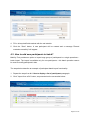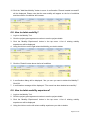
1
EUROPEAN COMMISSION
Directorate-General for Education and Culture
Lifelong Learning: policies and programme
Coordination of the "Lifelong learning" programme
Mobility Tool Guide for Beneficiaries
Version: 11 January 2013
Mobility Tool version 2.1.0#121217
Table of Contents
Acknowledgements ................................................................................................................................. 5
Document history ..................................................................................................................................... 6
1. General Introduction ............................................................................................................................ 8
1.1 Description .................................................................................................................................... 8
1.2 Mobility Tool users ........................................................................................................................ 8
2. How to login to Mobility Tool?.............................................................................................................. 8
2.1 How to change language of website user interface? .................................................................... 9
3. Project................................................................................................................................................ 10
3.1. How to view project’s details? .................................................................................................... 10
3.2. Changes to project details .......................................................................................................... 11
4. Participants ........................................................................................................................................ 14
4.1. How to display list of participants? ............................................................................................. 14
4.2. How to add new participant? ...................................................................................................... 15
4.3. How to add new participants in batch? ...................................................................................... 16
4.4. How to edit participant's details? ................................................................................................ 18
5. Partners ............................................................................................................................................. 20
5.1. How to display list of partners? .................................................................................................. 20
5.2. How to add new partner? ........................................................................................................... 22
5.3. How to edit partner’s details? ..................................................................................................... 24
5.4. How to remove partner?............................................................................................................. 24
5.5. How to add beneficiary organisation contact person? ............................................................... 25
5.6. How to add partner organisation contact person? ..................................................................... 27
5.7. How to remove beneficiary organisation contact person? ......................................................... 28
5.8. How to remove partner organisation contact person? ............................................................... 28
5.9. How to enable or disable beneficiary organisation contact person access to Mobility Tool? .... 29
6. Mobilities ............................................................................................................................................ 31
6.1. How to create new mobility experience? ................................................................................... 31
6.2. How to display mobility experience details? .............................................................................. 35
6.3. How to find specific mobility or mobility experience? ................................................................. 37
6.4. How to change mobility experience? ......................................................................................... 38
6.5. How to display mobility details? ................................................................................................. 39
6.6. How to change mobility? ............................................................................................................ 40
6.7. How to add new mobility to already existing mobility experience? ............................................ 41
6.8. How to delete mobility? .............................................................................................................. 44
6.9. How to delete mobility experience? ........................................................................................... 44
7. Import and export of data .................................................................................................................. 46
7.1. Data export ................................................................................................................................. 46
7.2. Data import ................................................................................................................................. 47
7.2.1. Data file template – file structure ........................................................................................ 48
Page 2 of 125
7.2.2. Examples of data import file ............................................................................................... 49
7.2.3. ID fields ............................................................................................................................... 52
7.2.3. Data import scenarios ......................................................................................................... 53
7.2.4. Error handling ..................................................................................................................... 57
7.2.5. The most important rules for successful data import .......................................................... 57
7.3. Remarks for text editing programs ............................................................................................. 58
7.3.1. UTF-8 .................................................................................................................................. 58
7.3.2. Saving CSV file format from Excel 2010 ............................................................................ 58
7.3.3. Long numerical values ........................................................................................................ 59
7.3.4. Auto-completion during writing ........................................................................................... 59
8. Participant reports ............................................................................................................................. 60
8.1. How to request participant report? ............................................................................................. 60
8.2. How to request many participant reports at once? .................................................................... 62
8.3. How to approve, reject or re-request participant reports? ......................................................... 64
8.4. How to check for status of participant report?............................................................................ 66
8.5. Participant forms submission deadline ...................................................................................... 67
8.6. How to print participant report form? .......................................................................................... 68
9. Budget ............................................................................................................................................... 71
9.1. How to manage mobility budgets? ............................................................................................. 71
9.2. How to manage project budget? ................................................................................................ 73
10. Beneficiary Report ........................................................................................................................... 77
10.1. How to create and submit beneficiary report? ......................................................................... 77
10.2. Beneficiary form submission deadline ..................................................................................... 79
10.3. Final Beneficiary Report discrepancies .................................................................................... 80
11. Support and troubleshooting ........................................................................................................... 81
11.1. National Agency Helpdesk contact .......................................................................................... 81
11.2. Troubleshooting of the most common issues .......................................................................... 81
11.2.1. Issues when submitting beneficiary or participant forms using Adobe Acrobat Reader –
"NotAllowedError" ......................................................................................................................... 81
11.2.2. CSV files exported by Mobility Tool are not opened correctly by Microsoft Excel ........... 82
Annex I – List of fields in Mobility Tool import template file ................................................................... 84
Annex II – List of codes for data import ................................................................................................. 91
1. Field Of Education ......................................................................................................................... 91
2. Level of Education ......................................................................................................................... 98
3. Economic Sector ......................................................................................................................... 102
4. Countries and Regions ................................................................................................................ 106
5. Languages ................................................................................................................................... 116
6. IVT Participant Type .................................................................................................................... 120
7. Type of Participant ...................................................................................................................... 121
8. Type of Organisation ................................................................................................................... 121
Page 3 of 125
9. Commercial Orientation .............................................................................................................. 123
10. Scope ........................................................................................................................................ 123
11. Legal Status .............................................................................................................................. 123
12. Size (staff) ................................................................................................................................. 123
13. Size (trainees) ........................................................................................................................... 123
14. Gender ...................................................................................................................................... 124
15. Certification Type ...................................................................................................................... 124
16. Boolean ..................................................................................................................................... 125
17. Special list of codes for question “is organisation able to recover VAT” ................................... 125
Page 4 of 125
Acknowledgements
For security and privacy reasons some names and email addresses used in application
screenshots presented in this document have been greyed out. All names and email
addresses are fictional. BE3 agency is used for information and demonstration purposes
only. All screenshots have been taken using a special, non-production version of the Mobility
Tool called Acceptance. Data presented in the screenshots is not a production data.
This document is valid only for Mobility Tool website version specified on the title page of the
document.
Page 5 of 125
Document history
Date
Change description
21 June 2011
First version of the document
10 October 2011
•
Added numbered chapters
•
Fixed: MTBHD-84 – page numbering
•
Fixed: MTBHD-82 – clarification on "Changes to project details" section
•
Added: MTBHD-80 – values for participant/beneficiary status report in
paragraph 7.2.
•
Fixed: MTBHD-79 – note text field cut
•
Changed page numbering style
•
All paragraphs reviewed and changed accordingly to changes in the
Mobility Tool application layout and functionality.
28 November 2011
•
Improved wording
•
Changed font size
•
Added screenshots
•
Changed document version accordingly to Mobility Tool version
(2011/11/28)
02 February 2012
•
Added more information about ECAS logging process
•
Added section "7.2. How to request many participant reports at once?"
•
Modified partner registration process
•
Added "Acknowledgements" section
•
MTBHD-542 – change in ECAS domain description details
•
MTBHD-539 – added information about beneficiary and participant form
expiration
•
MTBHD-537 – added extra information on budget updates
•
MTBHD-527
–
added
information
on
Adobe
Acrobat
Reader
troubleshooting of the "NotAllowedError" during form submission
30 March 2012
30 May 2012
•
MTBHD-477 – added information on form printing
•
MTBHD-598 - Change in section 3.2 - changes to project details
•
Change in font size throughout the document
•
Change in screenshot sizes – max. 14cm in width
•
MTBHD-865 - Change in ECAS screenshot due to ECAS GUI redesign
Page 6 of 125
Date
Change description
30 August 2012
•
Small changes in the text
•
GUI language selector description added
•
Participant batch import section added
•
Mobility experience advanced search description added
•
CSV in Excel troubleshooting added
•
Added Mobility Tool versioning
17 October 2012
•
Change of logo of the European Commission
11 January 2013
•
Added Annex I and II – List of import field and list of reference codes
used for Mobility Tool import function
•
Changes in Partner page sections
•
Changes in Mobility Experience page sections
•
Changes in Participant Reports page sections
•
Replaced the yellow Note sections
•
Added data import/export section
•
Small changes throughout the entire document
Page 7 of 125
1. General Introduction
1.1 Description
The Mobility Tool is a web platform tool for collaboration, management and reporting for
mobility projects under the Lifelong Learning Programme (LLP) of the European
Commission. It is developed by the European Commission to be mainly used by the
beneficiaries of mobility projects.
The users of the Mobility Tool will be able to provide all the information of the projects they
manage. They will be able to identify participants and mobilities, to complete and update
budget information, to generate participant reports and to generate their own reports to be
sent to their National Agency.
1.2 Mobility Tool users
The users of Mobility Tool are:
•
Beneficiary organisations – main users of the tool, responsible for entering mobility
project details, participants and budget information, creating reports.
•
National Agencies – generating, controlling and monitoring project information
•
DG EAC, system owner and central administrator of the tool
•
Participants of the LLP mobility projects – participants don't use Mobility Tool directly,
only the PDF reports generated by the tool
2. How to login to Mobility Tool?
Mobility Tool can be accessed using the following URL address:
https://webgate.ec.europa.eu/eac/mobility
In order to login to the Mobility Tool you need to have 1) an ECAS account and 2) be
registered in Mobility Tool. For 1) please read the ECAS User Manual document for more
information on registration and how to obtain a login name and password. For 2) if your email
address was provided in project information, you will gain access automatically. Otherwise,
please contact your National Agency for support.
The ECAS login page is shown below.
Page 8 of 125
The most important fields are:
-
"Is the selected domain correct?" – should be always set to External. If it is set otherwise,
please use "Change it" link and select "Neither an institution nor a European body".
-
"Username or e-mail address" – both can be used for login. Since usernames are
generated automatically by ECAS during the registration, we suggest using email
address as an easier way to remember.
-
"Password" – as defined during the registration process
2.1 How to change language of website user interface?
Mobility Tool can be translated to many languages. Languages available to you can be seen
on the upper right corner drop-down list, as shown on the screenshot below.
The languages are described in the following convention: BE3 – English (EN), where BE3 is
the National Agency and English (EN) is the language available for that agency.
Please note that only languages available to the agencies are available to beneficiary users.
For example, French agency will only have French language listed while Swiss Agency will
have German, French and Italian languages available. English language is available by
default to all agencies and users.
Page 9 of 125
If your language is missing from the list, please contact your National Agency.
3. Project
3.1. How to view project’s details?
1. Login to the Mobility Tool with your ECAS username (or email address) and password.
You will see a screen similar to the one presented below.
2. Click the project's grant agreement number to see the project details.
Page 10 of 125
3.2. Changes to project details
Note:
In Mobility Tool you can change partner, mobility, participant or budget information – see
further sections for details. All other project information, i.e. project title, National Agency
project ID, project activity periods cannot be changed in the tool.
To request changes to these project details, please contact the National Agency helpdesk.
National Agency's amendments to the projects are displayed in the "Updates and Reports"
section of the tool but the updated information will not change directly in the project. It is
beneficiary organisation's duty to look at the list of the changes displayed in the "Updates
and Reports" section and change the project data accordingly.
Any National Agency's amendments to projects are communicated by automated email sent
by the Mobility Tool to the beneficiary organisation contact persons.
To display National Agency changes to the projects, follow the steps below.
1. Login to the Mobility Tool.
2. Click the project grant agreement number to see the project details.
3. Click the "Updates and Reports" button in the menu, as presented below.
Page 11 of 125
4. A list of project updates will be displayed. This list always displays at least one position –
the original data import to the tool when the project was created by a National Agency.
5. Click the date and time in "Update time" column of the update details you would like to
display.
Page 12 of 125
6. Compare the project information shown in this window with the information stored in the
other sections of the Mobility Tool. Make appropriate changes in project details if
necessary. Check further sections of this document for details on how to add, change or
remove partners, contact persons or budgets.
7. Click "Back" to display a list of updates.
Please note, that "Approved Budget" details displayed in "Budget" section of the Mobility Tool
are updated automatically with the latest updates from project amendments.
Page 13 of 125
4. Participants
4.1. How to display list of participants?
1. Login to the Mobility Tool.
2. Click the project grant agreement number to see the project details.
3. Click the "Participants" button in the menu, as shown on the screen shot.
4. A list of all participants will appear. The list will display a title, first and last name, gender,
yes/no for special needs, yes/no for participant type (accompanying person or not) and
participant's email address. You may need to click the green loupe (
) next to the
participant's name to see more details.
Page 14 of 125
4.2. How to add new participant?
1. Repeat the steps listed in 4.1. How to display a list of participants paragraph.
2. Click the "Add New" button.
3. A new participant form will appear, as shown on the screen shot below.
Page 15 of 125
4. Fill in all required fields marked with the red asterisk.
5. Click the "Save" button. A new participant will be created and a message "Record
created successfully" will appear.
4.3. How to add new participants in batch?
Mobility Tool provides an option to import large group of participants in a single operations –
batch import. The import is available only for new participants – this batch operation cannot
be used to modify participants' data.
The steps below describe an example of participant batch import functionality.
1. Repeat the steps from 4.1. How to display a list of participants paragraph.
2. Click "Import from a file" button, as presented on the screenshot below.
Page 16 of 125
3. You will be presented with 3-step process description. The process involves downloading
a CSV template to fill in and importing the file into the system.
4. Click "Download a CSV template file" link. A dialog window will appear asking you to
either open or save a CSV template file. Please save the file in a convenient location.
5. Open the file in Microsoft Excel. If you see all values in a single cell, please refer to
10.2.2. CSV files exported by Mobility Tool are not opened correctly by Microsoft
Excel paragraph which covers troubleshooting of the CSV display issues in Excel.
6. Fill in the following fields: Title, First Name, Last Name, Date of Birth, Gender,
Telephone, Email, Address, Postal Code, City, Country, Region, Is Accompanying
Person, With Special Needs, Type of participant, IVT Participant Type
a. There are fields with specific formatting required. The table below shows all the
values and their required format. Please ask your National Agencies for a list of
accepted codes
b. Some fields are mandatory, some other are not. The table below describes all the
fields in details.
Field
Mandatory
Required format
Title
No
No special formatting required
First Name
Yes
No special formatting required
Last Name
Yes
No special formatting required
Date of Birth
Yes
Format of DD/MM/YYYY
Gender
Yes
Please refer to Appendix I for the list of codes.
Telephone
No
No special formatting required
It must be a valid email format, i.e. [email protected].
Email
Yes
The email field must be unique as this is the
participant identifier field.
Address
Yes
No special formatting required
Postal Code
Yes
No special formatting required
City
Yes
No special formatting required
Country
Yes
Please refer to Appendix I for the list of codes.
Region
Yes
Please refer to Appendix I for the list of codes.
Yes
Please refer to Appendix I for the list of codes.
With Special Needs
Yes
Please refer to Appendix I for the list of codes.
Type of participant
Yes
Please refer to Appendix I for the list of codes.
IVT Participant Type
No
Please refer to Appendix I for the list of codes.
Is Accompanying
Person
c. Please save your file in comma-separated values file format (CSV) in Excel.
Page 17 of 125
7. Once the file is filled in, you can import the data. Navigate to Participants, click "Import
from a file", click "Browse" and select your CSV file.
8. Click "Submit".
a. If you data contain some fields in incorrect format or some fields are missing you will
be informed about this fact on the next page. A valid reference data will be displayed
as well. At this stage you can either go back to fix the issue and submit the file again
or cancel the process.
b. If your data had correct format, a message will be displayed informing you how many
participants will be added and how many participants will be updated. Click "Yes" to
continue the process. You will be redirected to "Participants" page that will show the
result of the import.
c. If you already had participants in your project and participants from the import file
used the same email address, a similar message to the one below will be displayed:
Click "Yes" to continue and update the participant information.
4.4. How to edit participant's details?
1. Repeat the steps from 4.1. How to display a list of participants paragraph.
2. Click the green loupe icon (
).
3. Make the required changes and click the "Save" button.
Page 18 of 125
4. A confirmation "The record has been updated successfully" will be displayed.
Page 19 of 125
5. Partners
5.1. How to display list of partners?
1. Login to the Mobility Tool.
2. Click the project grant agreement number to see the project details.
3. Click the "Partners" button in the menu as shown on the screen shot below.
4. A list of partners will appear. Partners are: beneficiary organisation, host and
intermediary organisation or organisations. Please note the beneficiary organisation will
always be displayed at the top of the list (with value "Yes" in the Beneficiary column).
The list of partners allows quick filtering and searching partners from the list. Partners
can be filtered by partner ID (or part thereof), legal name (or part thereof), type of
Page 20 of 125
organisation – selection from the drop-down list, preferred contact person name (or part
thereof), preferred contact person mobile phone number (of part thereof) and country –
selection from the drop-down list.
The partner list page offers few other functionalities. You can find the actions oriented with
the partner list in the list top menu on the page. Below is an explanation of each button and
associated action.
Icon/button
Description
"Select all" - selects all or deselects all element in the list
"Add New" - adds new element to the list
"Delete" - removes selected element from the list
"Export PDF" - exports list to a PDF file. Please note only
elements that are visible on the list will be exported to PDF.
That means if the list is filtered, only the result of the
filtering will be seen in PDF file.
"Export Excel/CSV" - exports list to a CSV/Excel file. Please
note only elements that are visible on the list will be
exported to CSV file. That means if the list is filtered, only
the result of the filtering will be seen in CSV file.
"Print" - print the list. Please note only elements that are
visible on the list will be printed. That means if the list is
Page 21 of 125
filtered, only the result of the filtering will be seen on the
printout.
"Add/Remove Columns" - adds/removes displayed columns
of the list.
General search field – can be used for searching for any
value from the list. The list will dynamically adjust to results
of the search.
"Reset Filters" - clears the search results (similar to deleting
the content of the previously described search field).
5.2. How to add new partner?
1. Repeat the steps from 5.1. How to display a list of partners paragraph.
2. Click the green plus icon, the "Add New" button in the top menu of the partner list
(marked by red square in the below screenshot).
3. A partner details form will appear. Fill in all required fields marked with the red asterisk.
Page 22 of 125
4. Click "Save" to save the details of a new partner. Notice the new partner is added to the
end of the list of partners. Any new partner will always have "No" value in the
"Beneficiary" column in the list.
Please note the new partner organisation doesn't have any contact person specified. In order
to add a contact person to the new organisation in your project, please follow the 5.6 How to
add partner organisation contact person? paragraph.
Note:
Partner details can be changed at any time during project lifetime.
Page 23 of 125
5.3. How to edit partner’s details?
1. Repeat the steps from 5.1. How to display a list of partners paragraph.
2. Click the pencil icon next to the partner you want to edit, as shown on the screenshot.
3. Change the details and click the "Save" button. A confirmation message "The record has
been updated successfully" will be displayed.
Note:
The Beneficiary Organisation details should not be changed by Beneficiary Organisation,
only by the National Agency. If for any reason the Beneficiary Organisation details need to be
changed, please inform your National Agency. Once the data is changed by the National
Agency, please follow section 3.2 in order to reflect these changes in Mobility Tool.
5.4. How to remove partner?
2. Repeat the steps from 5.1. How to display a list of partners paragraph.
3. Mark the selection box next to the partner you want to remove. Please note that it is not
possible to remove your own beneficiary organisation from the list.
Page 24 of 125
4. Click the "Delete" icon (marked on the screenshot).
a. If the partner has not been used in any mobility, a confirmation will be displayed that
the partner has been deleted.
b. If the partner has been used in any mobility, a warning message will appear: "At least
one Partner has a role in at least one mobility. You must remove the partner from the
Mobility first." In this case, selected partner will not be removed until a corresponding
mobility experience is not deleted. Check section 6.8. How to delete a mobility
experience for more details.
5.5. How to add beneficiary organisation contact person?
1. Repeat the steps from "5.1. How to display a list of partners?" paragraph.
2. Click the organisation name.
3. A list of contacts for this partner will be displayed. In the example presented on the
screenshot, the organisation has 4 contact persons – one person authorised to sign
grants, three other persons with access to the project.
4. Click the "Add New" button.
Page 25 of 125
5. A contact person information form will be displayed.
6. Fill in all required fields marked with the red asterisk.
7. You may use "Same address as Partner Organisation" option to fill in the contact person
address using the beneficiary organisation address.
8. If you want this person to be a preferred contact person in this organisation, select
"Preferred contact" option. If you select this option, the contact person details will be
displayed on the Partners page.
9. Click the "Save" button. A confirmation that the new partner contact has been created will
be displayed: "Record created successfully".
Page 26 of 125
5.6. How to add partner organisation contact person?
1. Repeat the steps from 5.1. How to display a list of partners paragraph.
2. Click the name of the organisation you want to add a contact to.
3. A list of already existing contacts will appear.
4. Click "Add New" button as presented below.
5. Fill in all fields, especially those marked with a red asterisk. You may use "Same address
as Partner Organisation" option to fill in the contact person address using the beneficiary
organisation address. If you want this person to be a preferred contact in this partner
organisation, select "Preferred contact" option. Once selected, the contact will be
displayed on top of the list in bold (see the screen shot above). His/her details will be also
displayed on the list of all partner organisations.
6. Click the "Save" button. A confirmation "Record created successfully" will be displayed.
Notice the number of contact persons in the organisation has increased.
Page 27 of 125
5.7. How to remove beneficiary organisation contact person?
1. Repeat the steps from 5.1. How to display a list of partners paragraph.
2. Click the name the partner. A list of contacts for the beneficiary organisation will be
displayed.
3. Check the selection box next to the partner contact name you want to remove. Please
note that you cannot remove yourself from this list – the selection box will be greyed out.
4. Click the "Delete" button.
5. A confirmation message "The record has been deleted successfully" will be displayed.
Please note you cannot remove person authorised to sign from the list of beneficiary
contact persons. If the authorized person needs to be changed, please change the
person details, as described few paragraphs earlier.
5.8. How to remove partner organisation contact person?
1. Repeat the steps from 5.1. How to display a list of partners paragraph.
2. Click the partner name to display the list of contacts.
Page 28 of 125
3. A list of contact persons will appear.
4. Using the tick boxes on the right hand side select one or many contact persons you want
to remove for the partner. Please note you can select all partner contacts to be deleted.
Therefore partner organisation can have no contact persons listed.
5. Click the "Delete" button right above the list of contacts.
6. A confirmation message "The record has been deleted successfully" will be displayed.
5.9. How to enable or disable beneficiary organisation contact
person access to Mobility Tool?
1. Repeat the steps from 5.1. How to display a list of partners paragraph.
2. Click the name of the Beneficiary Organisation on the of the partners list.
3. You will see a list of beneficiary organisation contact persons with their status of access.
The status can have two values: "Yes" or "No”.
Page 29 of 125
4. To enable contact person access to Mobility Tool and access to the project, click the
yellow pencil to edit contact person details.
5. Select “Access to Project” to enable or deselect the option to disable Mobility Tool access
for that person.
In case the access is enabled a confirmation message "The user access to the Active
Project has been enabled" will be displayed. The person now has gained access to the
tool. Mobility Tool will send an automated email informing beneficiary contact person that
he/she has been granted access to the tool. The email will contain project number,
project title, link to Mobility Tool and contact details of the National Agency.
Page 30 of 125
6. Mobilities
6.1. How to create new mobility experience?
Definition:
A "Mobility Experience" is a set of one or more mobilities planned/realised by a single
participant. In most cases a “Mobility Experience” consists of a single mobility. However for a
“Mobility Experience” to consist of multiple mobilities, these mobilities must share the same
criteria (same economic sector, field of education and level of education).
Note:
Before a new mobility experience can be created, at least one participant and two partner
organisations (the first for sending and the second for receiving) must already be listed in the
Mobility Tool. Please check the "4.2. How to add a new participant?" and "5.2. How to add
a new partner?" chapters for more information.
1. Login to the Mobility Tool.
2. Click the project grant agreement number to see the project details.
3. Click the "Mobility Experiences" button in the menu.
4. A list of existing mobility experiences will be displayed.
Page 31 of 125
5. Click the "New Mobility Experience" button.
6. A new "Mobility Experience" form will appear.
7. Choose "Economic Sector", "Field of Education" and "Level of Education".
Page 32 of 125
8. Select participants from the participant list. You may use CTRL+click to select multiple
participants or type a letter to jump to desired participant name. When participant(s) are
selected, click the right arrow to add the selection to the list.
9. Select sending, receiving and if applicable, intermediary partners in the "Mobility
Partners" section.
10. In the "Mobility Details" section change sending and receiving country if they are selected
incorrectly. The values in sending and receiving country are deducted from selection of
sending and receiving partners.
Page 33 of 125
11. Choose departure and return date. "Duration in weeks" and "and days" fields will be
populated automatically once the departure and return dates are selected.
12. In the "Budget" section enter "Subsistence" and "Travel Costs" budget. The total budget
value will be calculated automatically.
13. If applicable, select the certifying partner and the certification type that the partner will
award to participants and click the green arrow to add the selection to the list. The
"Selected Certificates" list will display values in pairs in a format of "certifying partner" –
"certification type".
Page 34 of 125
Note:
It is possible that in the same mobility experience the same partner organisation can be both
a sending and a receiving partner. This situation is not possible in a single mobility, however.
14. Finally, select the languages that will be used during this Mobility Experience. Once
selected press the green arrow to add the languages to "Selected Languages" list.
Repeat the process until all languages used in this Mobility Experience are selected.
15. Click the "Save" button.
16. After saving a new Mobility Experience (or Experiences) for selected participant (or
participants) a confirmation message will be displayed. The Mobility Tool will create a
mobility experience for each selected participant. All the mobility experiences created in
this process will share the same values for economic sector, field of education, level of
education, mobility partners (sending, receiving and intermediary, if selected), sending
and receiving country, dates of mobility, budget, certifying partner and certification type
as well as languages.
17. Click the "Mobility Experiences List" button to return to the main Mobility Experience
page.
6.2. How to display mobility experience details?
1. Login to the Mobility Tool.
2. Click the project grant agreement number to see the project details.
3. Click the "Mobility Experiences" button in the top menu.
Page 35 of 125
4. A list of existing mobility experiences will be displayed. This list will display some basic
information about mobility experiences. This list will contain: last and first name of the
participant, starting date of first mobility, returning date from the last mobility, status of
participant report request and number of mobilities. If you wish to see more details,
please follow the steps below.
5. Click the green loupe icon (
) next to the mobility experience you're interested in.
Page 36 of 125
6. The "Mobility Experience Details" page will appear. Please note that this page also
includes a list of mobilities within the displayed mobility experience. Please check section
6.4. How to display mobility details for more information.
6.3. How to find specific mobility or mobility experience?
If you are looking for a specific mobility or mobility experience within a set of dozens or
hundreds of mobilities in the tool, you can use the Advanced Search option available on
Mobility Experiences page.
In order to use this function, navigate to Mobility Experience page and click the "Advanced
Search" button on the top of the mobility experiences table.
You will see a form similar to the one presented below.
Page 37 of 125
The advanced search option can help you to find a specific participant or participants,
accompanying persons, participants with special needs, those who travel from or to a
specific country and those who travel within spefic dates.
Use "Clear Filters" button to remove search criteria from the result table.
6.4. How to change mobility experience?
Only the following mobility experience information can be changed:
•
economic sector
•
field of education
•
level of education
In order to change the values listed above, follow these steps:
1. Follow the steps from 6.2. How to display mobility experience details
2. Click the green loupe (
) next to the Mobility Experience you want to change.
3. Change the values in the form. Please note that participant data cannot be modified in
this form. Please refer to 4.3. How to edit participant's details section for more
information on changing participant's data.
Page 38 of 125
4. Click the "Save" button.
If you wish to change more values than economic sector, field of education and level of
education, a new mobility experience must be created and the other one removed. Please
refer to other sections of this document for more information.
6.5. How to display mobility details?
1. Login to the Mobility Tool.
2. Click the project grant agreement number to see the project details.
3. Click the "Mobility Experiences" button in the top menu. A list of existing mobility
experiences will be displayed.
4. The list of mobility experiences will also contain some basic information about each
mobility. The page will include: sending country, receiving country, receiving partner, start
date and end date. If you wish to see more information, please follow the steps below.
5. Click the green loupe icon (
) on the right in the yellow "List of Mobilities for this
Mobility Experience" section, underneath the mobility experience details.
Page 39 of 125
6. A mobility details form will appear.
6.6. How to change mobility?
If you want to change mobility details, including:
•
sending country
•
receiving country
•
departure date
•
return date
•
sending partner
•
receiving partner
•
intermediary partner
•
subsistence and travel costs
•
certification and certifying partners
•
languages used
Follow the steps below.
1. Repeat the steps from 6.4 How to display mobility details paragraph.
2. Change the values and click the "Update Mobility" button to save.
Note:
If you want to change participant's name, you need to go to “How to edit a participant’s
details?” section for more information.
Page 40 of 125
6.7. How to add new mobility to already existing mobility
experience?
Note:
It is possible to add a maximum of 6 mobilities per single mobility experience (per person).
This limitation serves situations where participants had to, for various reasons, break their
mobilities, therefore their mobilities are no longer covered by only one period. This option
may also be used in cases where participant travels from one place to another and all his/her
mobilities must be recorded (different budgets, certificates, etc.) but they still fall within the
same mobility experience criteria.
If there are any doubts regarding how mobilities should be recorded, please consult your
National Agency.
1. Login to the Mobility Tool.
2. Click the project grant agreement number to see the project details.
3. Click the "Mobility Experiences" button in the top menu.
4. A list of existing mobility experiences will be displayed.
Page 41 of 125
5. Find the mobility experience you want to add a new mobility for on the list.
6. Click the "Add New Mobility" button underneath mobility experience details.
7. A new mobility form will appear.
8. Select "Sending Partner", "Receiving Partner", "Intermediary Partner" (if applicable),
change "Sending Country" and "Receiving Country" if they are different than the
countries of the partners, "Departure Date", "Return Date". "Duration in weeks" and "and
days" fields will be populated automatically.
Page 42 of 125
9. Add budget values for subsistence and travel costs. The "Total" budget value will be
calculated automatically.
10. If applicable, select "Certifying Partner" and the certification type that the partner will
award to participants in this mobility and click the green arrow to add selection to the list.
The "Selected Certificates" list will display values in pairs in a format of "certifying
partner" – "certification type".
11. Finally, select languages that will be used during this mobility. Once selected press the
green arrow to add the languages to "Selected Languages" list. Repeat the process until
all languages used in this mobility are selected.
Page 43 of 125
12. Click the "Add New Mobility" button to save. A confirmation "Record created successful"
will be displayed. Please note that the new mobility will appear on the list of mobilities
and the number of mobilities will increase.
6.8. How to delete mobility?
1. Login to the Mobility Tool.
2. Click the project grant agreement number to see the project details.
3. Click the "Mobility Experiences" button in the top menu. A list of existing mobility
experiences will be displayed.
4. Using the tick-box on the right select the Mobility you wish to delete.
5. Click the "Delete" button above the list of mobilities.
6. A confirmation dialog will be displayed: "Are you sure you want to delete this Mobility?".
Click OK.
7. A confirmation message will be displayed: "The record has been deleted successfully".
6.9. How to delete mobility experience?
1. Login to the Mobility Tool.
2. Click the project grant agreement number to see the project details.
3. Click the "Mobility Experiences" button in the top menu. A list of existing mobility
experiences will be displayed.
4. Using the tick-box on the left select mobility experience you wish to delete.
Page 44 of 125
5. Click the "Delete" button on top of the page.
6. A confirmation "The record has been deleted successfully!" will be displayed.
Page 45 of 125
7. Import and export of data
In this chapter you will find details regarding import of partner, participant and mobility data
as well as information regarding export of data from the Mobility Tool.
The main purpose of data import is to enable beneficiaries of big projects to quickly enter
large amount of data into the application in a single step. Other purpose of the import
functionality is synchronisation between an external, used by the beneficiary tool with the
Mobility Tool.
Data import/export feature are available from Mobility Experiences page, as presented on the
screenshot.
7.1. Data export
The data export part of the “Import – Export” page is highlighted on the screenshot below.
When exported, data from the Mobility Tool projects is saved in CSV file format. Semicolon
(;) is used as a default field separator. The file is exported in UTF-8 character encoding
standard. The exported file may be used for data import under the condition that all
mandatory fields are not empty. This is due to partner and mobility ID fields which may not
be provided while entering the data using graphical user interface. More information on this
topic can be found in the chapter describing the import process.
Page 46 of 125
Please notice that exporting data from the Mobility Tool may take some time and it may
result if files large in size. The biggest export file at the time of the writing the latest version of
this document has over 1.2MB and it took over 2 minutes to generate.
7.2. Data import
The Mobility Tool allows importing partner, participant and mobility data - that is all project
information, in one go. The import process uses CSV (Comma-Separated Values) file as a
data protocol. Data can be imported at any time of the project lifecycle. During the import
new data entries may be created as well as updated. It is not possible to delete any
information already existing in the tool during the data import process. All deletions should be
done manually by the Mobility Tool user using the graphical user interface (GUI).
The general rule for data import into the Mobility Tool is following:
-
If partner, mobility or participant cannot be identified in the system by partner and mobility
ID – a new set of data is created
-
If partner, mobility or participant can be identified as already existing in the system and
the imported data contains some changes to the partner, mobility or participant
information – the set of existing data is updated
-
If partner, mobility or participant can be identified as already existing in the system and
the imported data doesn’t contain changes to neither partner, mobility nor participant
information – no data is changed
It is important to mention that whilst it is not possible to delete data from the Mobility Tool
using the import functionality, it is possible to duplicate the existing information. More details
on this topic can be found in next paragraphs.
In order to import data into the Mobility Tool two conditions must be met – imported file must
have a proper structure and imported data must meet required conditions.
The data import section of the “Import – Export” page is highlighted on the screenshot below.
Page 47 of 125
Please notice that data import is resource heavy process and depending on size of the
imported file may take some time to finish.
Every import process always generates system response – in both successful and
unsuccessful cases. Examples of these messages are presented below. In case of success
the message might look as following.
The failed import process may be signalled by the following system message.
Important!
Please note that unless all data in the imported file is correct, nothing will be imported by the
Mobility Tool. This can be described as “All or None” approach to the import process.
7.2.1. Data file template – file structure
The best way to ensure the correct file structure of the imported file is to use a template from
the Mobility Tool website. The template can be obtained by going to Mobility Experience
page, clicking "Import – Export" button (marked on the screenshot in one of the previous
paragraphs) and clicking "Export Mobilities and the associated Partners information". This
function will download all project information – in case of a new project with no mobilities the template will contain only the field headers.
Page 48 of 125
The file is organised the way that all header fields are located in the first row of the file,
second row contains field requirements (described below) and data rows start from the third
row. One data row equals one mobility information – participant, mobility details, partner
details, budget, etc. Please note that even if you use only one sending or receiving partner,
you need to enter the partner organisation details (including organisation contact person
details) as many times as many mobilities your project contains paying attention that the
same partner ID is used throughout.
Note:
List of all fields with their description and specifics (whether the field is mandatory or requires
using dictionary codes) can be found in Annex I at the end of this document. The fields were
named in human-readable, as oppose to machine-readable format.
There are three types of fields in the template file – mandatory fields that need to contain
data (marked by a star * in the template file), code fields (marked as DICT) and optional open
text fields (that may be empty). All code fields are also mandatory fields. The specific of each
field is described in the second row of the template file.
Note:
The list of codes used in the code fields marked with DICT in the template file can be found
in the Annex II at the end of this document.
Please pay special attention to the list of codes as they will be used extensively during the
data import process – minimum 34 mandatory fields require use of dictionary codes,
additionally 11 is required is project has intermediary partners.
Mobility Tool import function respects use of national characters. Therefore it is important to
ensure the data file used for import is encoded in UTF-8 character format.
The CSV file template can be in one of the three accepted formats:
1. Field_1 ; Field_2 ; …; Field_n
2. “Field_1” ; “Field_2” ; … ; “Field_n”
3. “Field_1” ; Field_2 containing a double “” quote” ; … ; “Field_n”
7.2.2. Examples of data import file
The table below depicts the first 7 fields of the template import data file that contains
information about three mobilities. Please note the second row of the file containing
specification of each field - * being a mandatory field, DICT being a code field. The
Page 49 of 125
“Participant Title” field doesn’t have any requirements; therefore it can be an empty field. For
the purpose of the demonstration, other fields (columns) have been removed.
Project ID
*
2011-1BE3LEO0100001
2011-1BE3LEO0100001
2011-1BE3LEO0100001
Mobility
ID
*
Participant
Title
Participant
First Name
*
Participant
Last Name
*
Participant
Date of Birth
*
Participant
Gender
*, DICT
…
0001
Mr
FirstName
LastName
01/01/1980
M
…
0002
Mrs
Jane
Jones
01/01/1995
F
…
0003
Mr
FirstName
LastName
01/01/1980
M
…
…
It is very important that during the import of the data, the first two rows – field headers and
field specification must be preserved in the file. Deleting the first two rows from the template
will render the import invalid. It is also important not the change the order of the columns
(fields). Any change in the fields/columns order will render the import invalid as well.
In the following example 8 participants is going from the same sending organisation (code
BEN) will be sent to 8 different hosting partners (codes HOST01 to HOST08).
Project ID
Mobility
ID
...
Participant First
Name
...
Sending
Partner ID
...
Receiving
Partner ID
...
*
*
...
*
...
*
...
*
...
2011-1-BE3LEO01-00001
ID0001
...
FirstName1
...
BEN
...
HOST01
...
2011-1-BE3LEO01-00001
ID0002
...
FirstName2
...
BEN
...
HOST02
...
2011-1-BE3LEO01-00001
ID0003
...
FirstName3
...
BEN
...
HOST03
...
2011-1-BE3LEO01-00001
ID0004
...
FirstName4
...
BEN
...
HOST04
...
2011-1-BE3LEO01-00001
ID0005
...
FirstName5
...
BEN
...
HOST05
...
2011-1-BE3LEO01-00001
ID0006
...
FirstName6
...
BEN
...
HOST06
...
2011-1-BE3LEO01-00001
ID0007
...
FirstName7
...
BEN
...
HOST07
...
2011-1-BE3LEO01-00001
ID0008
...
FirstName8
...
BEN
...
HOST08
...
Page 50 of 125
Next example will create 3 different mobilities from the same sending partner to three
different hosting partners for the same participant. Please note that this import will result in
list of participants containing details of the same person 3 times. This is due to the fact that it
is the mobility that identifies the imported data, not participant.
Project ID
Mobility
ID
...
Participant
First Name
Participant
Last Name
...
Sending
Partner ID
...
Receiving
Partner ID
...
*
*
...
*
*
...
*
...
*
...
2011-1-BE3LEO0100001
2011-1-BE3LEO0100001
2011-1-BE3LEO0100001
ID0001
...
FirstName1
LastName1
...
BEN
...
HOST01
...
ID0002
...
FirstName1
LastName1
...
BEN
...
HOST02
...
ID0003
...
FirstName1
LastName1
...
BEN
...
HOST03
...
The following example highlights the importance of careful row-by-row data entry. During the
import process the Mobility Tool sees rows as consecutive data entries. Therefore if row 20
contains some modifications of partner data that has already been defined in row 6 of the
same imported data file, it will take the data from row 20 as the most current one and will
update the partner data as a result.
This can be illustrated by the next example of the import data file.
Project ID
...
Sending
Partner ID
Sending Partner
Legal Name
...
Sending Partner
Legal Address
Sending Partner
Postal Code
...
*
...
*
*
...
*
*
...
2011-1-BE3LEO01-00001
...
BEN
Beneficiary
Organisation
...
Rue Leonardo da
Vinci 1
BE-1000
...
...
...
...
...
...
...
...
...
2011-1-BE3LEO01-00001
...
BEN
Beneficiary
Organisation
...
Rue Leonardo da
Vinci 10
BE-1000
...
Please notice different address of the beneficiary organisation in the last row. Being the last
entry in the imported data file, “Sending Partner Legal Address” will contain value “Rue
Leonardo da Vinci 10”, not “Rue Leonardo da Vinci 1” as used in another entry.
The following example illustrates the similar behaviour.
Project ID
...
Sending
Partner ID
Sending Partner
Legal Name
...
Sending Partner
Legal Address
Sending Partner
Postal Code
...
*
...
*
*
...
*
*
...
2011-1-BE3LEO01-00001
...
BEN
Beneficiary
Organisation
...
Rue Leonardo da
Vinci 1
BE-1000
...
...
...
...
...
...
...
...
...
2011-1-BE3LEO01-00001
...
BEN
Beneficiary
Organisation
...
Rue Leonardo da
Vinci 10
BE-1000
...
Page 51 of 125
Project ID
...
Sending
Partner ID
Sending Partner
Legal Name
...
Sending Partner
Legal Address
Sending Partner
Postal Code
...
*
...
*
*
...
*
*
...
2011-1-BE3LEO01-00001
...
BEN
Beneficiary
Organisation
...
Rue Leonardo da
Vinci 1
BE-1000
...
Please notice the beneficiary organisation data will change twice during the import process.
Once – the “Sending Partner Legal Address” will be changed from “Rue Leonardo da Vinci 1”
to “Rue Leonardo da Vinci 10” and then, at the very last row, the address will be changed
back to its original value of “Rue Leonardo da Vinci 1”.
More scenarios will be discussed in following chapters.
7.2.3. ID fields
The data template file contains 12 ID fields. They play very important role in the data import
process. The table below presents all the ID fields with their characteristics.
Field name
Project ID
Mobility ID
Mandatory? Description
Yes
Grant agreement number also called project number, i.e.
2011-1-BE3-LEO01-00001. In a single import file this field
must always contain the same value.
Yes
Any unique identification of a particular mobility, i.e.
0001, MOB01, NL-GB-John
Certifying Partner ID 1
Equals to either sending, receiving or intermediary
partner ID
Certifying Partner ID 2
Equals to either sending, receiving or intermediary
partner ID
Certifying Partner ID 3
Equals to either sending, receiving or intermediary
partner ID
Sending Partner ID
Yes
Sending Partner National
ID
Sending / Receiving /
Intermediary Partner
Contact Email
Receiving Partner ID
Optional field for any partner national identification, i.e.
organisation registration number
Yes
Identification of a partner contact person. This field
cannot be updated via the import process.
Yes
Any unique identification of a receiving (host) partner,
i.e. HOST1
Receiving Partner National
ID
Intermediary Partner ID
Intermediary Partner
National ID
Any unique identification of a sending (beneficiary)
partner, i.e. BENEFICIARY, ORG1
Optional field for any partner national identification, i.e.
organisation registration number
Yes
Any unique identification of an intermediary partner – if
exists in the mobility context, i.e. INT1, TRAINING01
Optional field for any partner national identification, i.e.
organisation registration number
Page 52 of 125
Let’s analyse few scenarios that illustrate in details the logic behind the ID fields and how the
system interprets their use.
7.2.3. Data import scenarios
Scenario 1 – data import to an empty project – sending partner other than beneficiary
organisation
Let’s assume you just received the invitation from the Mobility Tool to work with your project.
The website doesn’t contain any information about participants of your project, also there are
no mobilities. You may or may not already have some partners in the project.
You go to the Mobility Tool website, open section Mobility Experiences, click “Import –
Export” button and download the exported data. The file is almost empty – contains only the
field names and their specification – it does not contain any project data.
You open the file in a program of your choice (please read remarks regarding software at the
end of this chapter) and fill in all required fields, taking into consideration the list of codes at
the end of this document and format of the fields (please pay special attention to the date
format) and ID codes described earlier. Minimum 79 out of 147 fields must be filled in. You
save the file in CSV format and import the file via the website.
The result is following:
1. Minimum two new partners are created with the partner ID’s and partner details specified
in the import file (sending and receiving partner) together with their contact persons.
2. Minimum one participant is added to the list of participants
3. Minimum one mobility is created
Important
1. The imported partner (sending, receiving or intermediary) contact person is automatically
marked as preferred partner contacts.
2. Values of education, certification and languages fields are ignored for accompanying
persons (they are participants having values for “Is Participant an Accompanying Person” set
to “Yes”), however they must be provided in the imported file.
The result of creating two new partners may not be necessarily the most desirable one as
you might want using your own beneficiary organisation as the sending partner. We’ll cover
this scenario next.
Scenario 2 - data import to an empty project – beneficiary organisation as the sending
partner
Page 53 of 125
Let’s assume you just received the invitation from the Mobility Tool to work with your project.
The website doesn’t contain any information about participants of your project, also there are
no mobilities. You may or may not already have some partners in the project, but you want to
make sure your beneficiary organisation is used to create mobilities during the import
process.
You go to the Mobility Tool website and click Partners to display list of partners in your
project. You click the pencil icon to edit your organisation and enter value for “Partner ID”
field, as presented in the screenshot below. For the purpose of a demonstration, value BEN
was entered in the Partner ID field.
Next, you open section Mobility Experiences, click “Import – Export” button and download the
exported data. The file is almost empty – contains only the field names and their specification
– it does not contain any project data.
You open the file in a program of your choice (please read remarks regarding software at the
end of this chapter) and fill in all required fields, taking into consideration the list of codes at
the end of this document and format of the fields (please pay special attention to the date
Page 54 of 125
format) and ID codes described earlier. In sending organisation part of the template file you
use data of your own organisation, making sure that “Sending Partner ID” contains value
BEN.
Minimum 79 out of 147 fields must be filled in. You save the file in CSV format and import the
file via the website.
The result is following:
1. Minimum one new partner is created with the partner ID and partner details specified in
the import file (sending and receiving partner).
2. Minimum one participant is added to the list of participants
3. Minimum one mobility is created
Notice that in this case, your beneficiary organisation was used as the sending organisation.
You may also notice that unless you entered your organisation and your organisation contact
person details exactly as they were on the website, the organisational or contact person data
is updated. Please refer to the next scenario for more details on how to update data using
the import process.
Scenario 3 – data import to project with mobilities – adding new and updating existing
information entered via graphical user interface
Let’s assume you already worked with your project using the graphical user interface (GUI)
of the Mobility Tool. You have added some partners, participants and created some
mobilities. You decide to work with the data outside of the tool using an external editing
software. You go to Mobility Experiences page, click “Import – Export” button and download
the exported data. You open the file in the text editor or a spreadsheet editor and notice that
neither the partners nor the mobilities have ID’s – the fields, despite being marked with the
star (*) as mandatory are empty.
You decide to update some information about the participants and add more mobilities. You
add mobility and partner ID’s in the respective columns. Finally, you import the data.
The result is following:
1. You login to the tool and notice that you have some double entries on the partner page –
some partner have partner ID values the others don’t. You see that the new partners you
added in the import file are correctly displayed on the page.
2. You notice that you have some duplication on the participant page, however you can find
the participants for whom you changed some data.
Page 55 of 125
3. You notice that you have some duplicated entries on the Mobility Experiences page.
Some mobilities have mobility ID’s some others don’t.
In this scenario you used the existing data entered via the website that didn’t have neither
partner nor mobility ID’s defined. The system assumed that new partner and new mobilities
are added since it couldn’t find partners and mobilities with the ID’s you defined in the file.
This is not the most desirable outcome of the data import. You need to manually delete the
mobilities without ID’s. Then you need manually delete the partners without ID’s and at the
end delete the duplicated participant entries – order is very important. You can select all
participants and click “Remove selected” – the system will only delete the participants without
existing mobilities.
How to prevent duplicated data entry from happening is described in the next scenario.
Scenario 4 – data import to project with mobilities – adding new and updating existing
information entered via graphical user interface and avoiding data duplication
Let’s assume you already worked with your project using the graphical user interface (GUI)
of the Mobility Tool. You have added some partners with their respective partner ID,
participants and created some mobilities with mobility ID’s. You decided to work with the data
outside of the tool using an external editing software. You go to Mobility Experiences page,
click “Import – Export” button and download the exported data. You open the file in the text
editor or a spreadsheet editor and notice that both the partners and the mobilities have ID’s.
You decided to update some information about the participants and add more mobilities. You
add mobility and partner ID’s in the respective columns – you reuse some of the codes as
you have same sending partner for all your mobilities. Finally, you import the data.
The result is following:
1. You login to the tool and notice that partner information remained unchanged as you
didn’t change any data in the import file.
2. You notice that some participant information have changed accordingly to changes done
in the import file.
3. You notice that the list of mobilities is longer than previously – there are new mobilities
that you defined in the import file.
Highlights from the described scenarios
1. To avoid data duplication always use partner and mobility ID’s. If you already have data
in the tool and you decide to start using the import functionality, make sure you edit all
your partners and all your mobilities and add unique ID’s.
Page 56 of 125
2. To update partner information use the same partner ID in the import file as the partner ID
you find in the partner details on the website.
3. Similarly, to update mobility information use the same mobility ID in the import file as the
mobility ID you find on the Mobility Experience page.
4. If you make a mistake and forgot about adding partner or mobility ID’s on the website,
you can delete all your data – all mobility experiences, partners and participants (in this
order!) and import the file again.
7.2.4. Error handling
Every failed import process generates a message on the website. Example error in
processing the file is presented on the following screenshot.
As it was already mentioned earlier, unless all data in the imported file is correct, nothing will
be stored in the Mobility Tool (“All or None” approach).
Every time an error is found in the analysed data, a log file is generated by the system. Log
file can be downloaded by clicking on the link in the error message on the website.
The error log file has almost exactly the same structure as the imported file – it contains field
headers and their specifics (whether the field is mandatory or a code must be used) with
additional field at the beginning of the file – Row Line. The other difference is that instead of
data it contains an error that is linked to a specific field in a specific row of the imported file.
Using the row number and error in the specified field is easy to locate the problematic entry
in the imported data file.
7.2.5. The most important rules for successful data import
Following is a non-exhaustive list of example requirement for successful data import.
−
File must be of the CSV format
−
Project agreement number must be the same as the active project on the website
−
Partner ID and Mobility ID must be provided
Page 57 of 125
−
Mobility ID must be unique in the imported file
−
All mandatory fields must be provided (except for the intermediary partner)
−
All fields must have correct format (use the Appendix I for reference)
−
All codes must be correct (use the Appendix II for reference)
−
Mobility return date must be later than departure date
−
Sending and receiving countries cannot be the same
−
Sending partner in one mobility cannot be receiving or intermediary partners in any other
imported mobility
−
Beneficiary organisation cannot play any other role than sending partner
−
There must be exactly one partner contact person per organisation (sending, receiving or
intermediary)
−
The certifying partners provided in the import file must be one of the sending, receiving or
intermediary partners
−
IVT mobilities can have a maximum of 39 weeks duration
−
PLM mobilities can have a maximum of 26 weeks duration
−
VETPRO mobilities can have a maximum of 6 weeks duration
−
Mobility budget cannot be smaller than 0 and larger than 99999; the budget values may
remain empty in the imported file
7.3. Remarks for text editing programs
There are many examples of text editing or spreadsheet editing software available on the
market. This paragraph will not extensively cover any particular example of software but will
provide few cases for Microsoft Excel 2010. We will focus on the most typical examples of
issues that might affect data import process into the Mobility Tool.
7.3.1. UTF-8
As mentioned already in this chapter, the Mobility Tool import process preserves national
characters in the import data file. The only requirement is that the data file must be in UTF-8
encoding standard. Otherwise, some national characters may be displayed incorrectly on the
website and consecutively in the beneficiary or participant reports.
Microsoft Excel 2010 does not save files in UTF-8 encoding by default.
7.3.2. Saving CSV file format from Excel 2010
Microsoft Excel 2010 is capable of opening and saving files in CSV format. However, whilst
opening the file is rather straightforward (see troubleshooting section if your Excel doesn’t
respect CSV field separators used by the Mobility Tool), saving files in CSV format may
Page 58 of 125
require bit more attention. Here are the steps to ensure that the data is saved in a proper
format.
1. When you finish file edit, select menu “File” and click “Save & Send”.
2. Click “Change File Type”, select “CSV (Comma delimited) (*.csv)” and click “Save As”
button underneath.
3. Select file name and make sure “Save as type” list have “CSV (Comma delimited) (*.csv)”
option selected. Click “Save” button to confirm.
4. Excel will display compatibility warning. Click “Yes” button to save.
7.3.3. Long numerical values
Some spreadsheet edition software may shorten your long numerical values, for example a
phone number, of 3212351234567 to a format of 3.12E+12. Pay special attention to the cell
data type because unless the type is changed to text (or similar that doesn’t require any
special formatting), the imported data will contain 3.12E+12 in the phone number field on the
website.
7.3.4. Auto-completion during writing
Some software offers auto completion during text editing which may create some problems.
Automatically corrected by Microsoft Excel values may not be accepted during the data
import. In Excel, the auto-completion can be disabled in menu File, then Options, Proofing,
“AutoCorrect Options…” button, “Math AutoCorrect” tab, deselect “Replace text as you type”.
Page 59 of 125
8. Participant reports
8.1. How to request participant report?
Note:
Participant reports are generated per Mobility Experience. Reports include questions for all
Mobilities within the Mobility Experience.
1. Follow the steps from 6.2. How to display mobility experience details paragraph.
2. Click the left hand side green loupe icon (
) next to Mobility Experience for which you
want to send a participant report.
3. Click the "Report Requests" tab on top of the page.
4. A list of participant report requests will appear.
Page 60 of 125
5. Click the "Request New Report" button.
6. Select report language. You can only use languages that were assigned to national
agency that approved the project. If required, type in a comment that will be sent along
with an email message to the participant.
Page 61 of 125
7. Click the "Request New Report" button to send the request. You will be redirected to the
list of participant report request. Please note the newly created report request is listed
with its current status (most likely REQUESTED).
8. Once the system generates a PDF file, the status will change to EMAIL NOTIFIED. That
means an email with a link to PDF file has been sent to the participant. Please check 7.4.
How to check the status of the participant report paragraph for more details on
participant report status.
9. Please note that as a beneficiary you can download participants report using the
"Download PDF" link on the Report Requests page. You can use this link in case participant
didn't receive or deleted the automated notification about report request. This link will always
provide a copy of an empty PDF file.
8.2. How to request many participant reports at once?
1. Follow the steps from 6.2. How to display mobility experience details paragraph.
2. Using the left hand side check boxes select all mobility experiences for which you want to
create participant report requests.
Page 62 of 125
3. Once selected, click on "Request report" on the top of the table.
4. A confirmation form will appear where a report language selection and additional
comments can be made. Please note that the list of mobility experiences for which the
reports have been requested is presented on top of the form.
5. Click "Request New Report". A confirmation message will be displayed: "2 Participant
Report Requests are created successfully". Please note the change of report status on
the list of mobility experiences.
Page 63 of 125
8.3. How to approve, reject or re-request participant reports?
1. Follow the steps from 6.2. How to display mobility experience details paragraph.
2. Click the "Report Requests" tab. A list of report requests will be displayed. A report that is
in status "Pending" is ready to be approved, rejected or re-requested.
a. The latest status can also be checked on the list of all mobility experiences page. It is
advised, however, to check each mobility experience individually in case multiple
reports were requested.
3. Click the report ID or the report status (PENDING).
4. Report data will appear as it was filled in by the participant.
Page 64 of 125
5. Read the report. There are three options you can take:
a. If you want to accept the report, click
the "Accept" link in the top of the
window. An automated email will be sent to the participant informing him/her that the
report has been accepted. Once accepted report can be reversed to a "Pending"
status. In order to do so, click the "Revert to Pending" link on top of the page
displaying the report data.
b. If you want to reject the report, click the "Reject" link. A dialog form will appear with
the option to provide an explanation on why the report was rejected. An automated
email will be sent to the participant with information that his/her report was rejected
stating the reason for rejection. The rejection email will also contain a link to a new
report PDF file that needs to be reviewed and submitted again. Once rejected, the
status of the report changes to "REJECTED". In this case a new report request will be
made.
Page 65 of 125
c. If you want to re-request, click the "Re-Request" link on top of the page. A dialog
form will appear to write a reason for the new request. The form is not mandatory to
be filled in. Click the "Submit" button to send a new request. The participant will
receive new email with a link to already filled PDF file. This action does not invalidate
or reject the previous participant submission. This action can be used to send
participant already filled-in report for his/her copy in case the report is missing.
8.4. How to check for status of participant report?
1. Login to the Mobility Tool.
2. Click the grant agreement number of the project you want to open. A page of project
details will be displayed.
3. Click the "Mobility Experiences" button in the top menu. You will see the list of existing
mobility experiences.
4. The current status of the participant report is displayed in the second column from the
right called "Report Status" is displayed.
a. Report request can also be checked for each individual mobility experience. In
order to verify the report request status, click on the green loupe next to the
mobility experience and then click on Reports Requests tab.
Page 66 of 125
Several values of the participant report status are possible. The complete list of participant
report status is as follows:
•
REQUESTED – beneficiary has requested a report on the website. The Mobility Tool is
processing the request and creates a participant form.
•
EMAIL NOTIFIED – email has been sent to participant with a link to report PDF file
•
SUBMITTED – participant has submitted his/her report data electronically via the PDF
form
•
PARSING – the Mobility Tool is reading data received from participant
•
PENDING – report is pending beneficiary decision whether to accept, reject or re-request
the report
•
ACCEPTED – report has been accepted by beneficiary
•
REJECTED – report has been rejected by beneficiary, a new report request was created
•
INCONSISTENT DATA – mobility, mobility experience or participant data has changed
since the report was requested. A new request will be necessary. Reports created before
the "inconsistent data" message will be invalidated.
•
INVALIDATED – a new report request has been made while other report request was in
"EMAIL NOTIFIED" state
•
ERROR – error in processing. Please contact your National Agency and let them know
about the problem.
8.5. Participant forms submission deadline
All reports have a maximum submission date – the latest date when the reports are accepted
by the system. The maximum submission date is calculated based on project activity dates in
the following method: the latest submission date = Project End Activity date + 60 days
In case a project doesn't have activity end date specified, the following formula is used to
determine the submission deadline: the latest submission date = National Agency contract
signature date + 2 years + 60 days
The details on the project activity dates can be found in the Project Details page in Mobility
Tool. The example start and end activity dates may look similar to the image below.
The reporting start and end date can be found in Updates and Reports section of the tool. In
order to find the details, please follow the steps:
Page 67 of 125
1) Login to the Mobility Tool
2) Click your project agreement number
3) Click "Updates and Reports" in the top menu bar
4) Click update time of the latest project update (the highest position on the list)
5) Report start date and Report end date values are displayed in "Submission Data" section
on top of the screen.
8.6. How to print participant report form?
Participant forms can be printed either by participant himself or the beneficiary organisation.
Participant:
1) Open the form
2) Scroll to the very end of the report to "Standard Submission Procedure" section
Page 68 of 125
3) Click "Print form" button. The same can be achieved by using File -> Print… in Adobe
Acrobat Reader Application.
Note:
You can only print reports that are in either PENDING, APPROVED or REJECTED status.
1) Login to the Mobility Tool
2) Click project agreement number
3) Click "Mobility Experiences" menu item on the top menu bar
4) Select participant you wish to print report for by clicking on the green loupe icon (
) on
the left hand side
5) Click "Reports Requests" tab on top of the mobility experience details section
6) Click PENDING, APPROVED, REJECTED status or the ID of the report
Page 69 of 125
7) Print the page using your Internet browser functionality.
Page 70 of 125
9. Budget
9.1. How to manage mobility budgets?
In the mobility budget section you are able to provide subsistence and travel cost for mobility
participants. Budget values can be entered during creation of mobility experience or
additional mobilities. However, if these values were not provided and need to be added later,
follow the steps below.
1. Login to the Mobility Tool.
2. Click the grant agreement number of the project you want to open. A page of project
details will be displayed.
3. Click the "Mobility Experiences" button in the top menu.
4. A list of existing mobility experiences along with corresponding mobilities will be
displayed.
5. Click the green loupe icon (
) at the right bottom side of the mobility for which you want
to change the budget.
Page 71 of 125
6. You will see the mobility details form displaying the following information:
a. "Mobility Partners" – sending, receiving and intermediary partners
b. "Mobility Details" – sending, receiving country, departure and return date, duration in
weeks and days
c. "Budget" – "Subsistence" and "Travel Costs" with automatically calculated "Total"
value
7. Provide subsistence and travel cost for the mobility. All budget entries are displayed in
Euros.
8. Click the "Update Mobility" button. A confirmation message "The record has been
updated successfully" will be displayed.
9. Click the "Mobility Experiences" button in the top menu to return to the list of mobility
experiences.
10. Repeat the process for each mobility, if necessary.
Page 72 of 125
9.2. How to manage project budget?
In the project budget section you are able to review project budget and compare it with
approved contractual budget values.
On the same page you're also able to enter amounts for "Mobility Organisation and
Management" and for "Pedagogical, Linguistic and Cultural Preparation". The budget values
are calculated based on values entered on this page as well as based on all mobilities
budget values.
In order to see the budget page or make changes to the budget values, please follow the
steps listed below.
1. Login to the Mobility Tool.
2. Click the project grant agreement number. A project details page will be displayed.
3. Click the "Budget" button in the menu.
4. A project budget page will be displayed. Values in the three columns represent:
-
Number of participants or number of mobilities for each budget category that have budget
greater than zero
-
Total project budget
-
Contractual approved budget.
Page 73 of 125
Items in the last column, "Approved Budget" reflect the amounts approved by the National
Agency as expressed in the Grant Agreement or in the last signed amendment. They cannot
be changed in the Mobility Tool by the beneficiary organisation. If there is any discrepancy
between these amounts and the contents of the project Grant Agreement or the last
Amendment, please contact your National Agency helpdesk.
The budget values are displayed in three distinctive groups:
a. Mobility Organisation and Management
b. Pedagogical Linguistic and Cultural Preparation
c. Mobility Budget, which is further split into:
i. Travel
ii. Subsistence
5. To enter or change the value in "Mobility Organisation and Management" please enter
the amount directly in the field.
a. Click the "Recalculate" button to see the "Total Budget" value recalculated.
Page 74 of 125
b. Click the "Save" button to save changes.
6. To enter or change the value of the next budget item, click the "Pedagogical Linguistic
and Cultural Preparation" link.
7. A list of participants and their budgets will be displayed.
a. To change these values, please click the participant's first or last name or the value
itself.
b. Change the "Total" value for the participant.
c. Click the "Save" button to save and return to previous page.
d. If necessary repeat this process for each participant.
e. Click the "Back" button to return to the main "Budget Summary" page.
8. Click the "Mobility Budget" link to see the summarized budget values for all mobility
experiences.
a. You can use the search field to quickly find a participant by their first or last name or
click the "Advanced Search" button for more detailed search.
b. To clear search results click the "Clear Filters" button.
9. If you click any participant name you will be redirected to the mobility details page for this
participant/mobility. Check the previous chapter for more details on using this form.
10. On the "Mobility Budget" page click "Back" to return to the project budget section.
11. If you click any of the "Travel" or "Subsistence" budget items you will see mobility budget
data based on the selected position. For example, clicking the "Accompanying Persons"
budget item under "Travel" will display values for accompanying persons only.
Please note that both travel and subsistence values will be displayed on the same page.
Page 75 of 125
If the project total budget or any budget headings exceed the values of the contracted and
approved budget, the budget headers will be displayed in red, as presented below.
Note:
The green loupe icons in Travel and Subsistence sections on Budget page next to
"Participants With Special Needs" and "Accompanying Persons" is only displayed when there
are mobilities for participants with special needs or accompanying persons. In this case
number of participants will also be shown as zero (0).
Page 76 of 125
10. Beneficiary Report
This section applies to final and intermediary beneficiary reporting.
Note:
Beneficiary report created in the Mobility Tool will be pre-filled with the information entered
during the project lifecycle. This information cannot be changed in the report and must be
verified and, if necessary, amended in the tool before creating the report.
10.1. How to create and submit beneficiary report?
1. Login to the Mobility Tool.
2. Click the project grant agreement number. A project details page will be displayed.
3. Click the "Updates and Reports" button in the top menu.
4. Information on number of Participant Mobility Experiences and on number of approved
Participant Reports will be displayed on top of the page for reference, so you can see at
any moment if all Participant Reports have already been submitted and approved or not.
Below, there is a table with as many lines as project updates. Beneficiary report can only
be prepared from the last update. The status of the report is shown.
Page 77 of 125
5. Click the "Prepare New Report" link.
a.
If there is no budget defined for mobilities a message "This project has Mobilities
with 0 (zero) budgets. A link to go to "Total Budget" will be displayed.
b.
If a project budget goes over the contractual budget amount a warning will be
displayed. Also a link to "Total Budget" will be provided to align the budget values with
the budget agreed in the contract.
If for any reason the contractual budget values are incorrect, please contact you National
Agency.
6. Choose the language of the report. You can only select among the languages approved
by your National Agency.
7. If more than one beneficiary organisation contact person has been created in the tool, the
person who will be displayed in the report needs to be selected.
Page 78 of 125
8. Click the "Yes" button. Confirmation "Request for a new report was sent" will be
displayed.
9. In a few minutes status of the report will change to "Requested".
10. Click the "Download PDF" link to download and save the report. To open the report
Adobe Acrobat Reader software is required. It is advisable to save the report on a
computer local hard drive.
11. Review the report and provide answers to all required questions in the form.
12. Scroll to the bottom of the report and click the "Validate" button. This action will check if
all required fields have been filled in.
13. Once completed, click the "Submit online" to send the report to your National Agency.
This action requires Internet connection.
14. If needed, print the report by clicking the "Print form" button on the bottom of the form.
10.2. Beneficiary form submission deadline
Beneficiary forms follow the same rules for submission deadlines as participant reports.
Please refer to 7.5 Participant forms submission deadline for more information.
Page 79 of 125
10.3. Final Beneficiary Report discrepancies
It may happen in your project that some mobilities don't have a travel and subsistence
budget defined or you forget to create mobilities for some participants or simply your budget
goes over the contracted amount. Neither of these problems can stop you from filling in and
submit your report to your National Agency.
The Mobility Tool will display these warnings during the process of final beneficiary report
creation and will allow you to fix it, if required. Otherwise, you can simply click "Yes" button in
answer to "Do you want to continue with the report generation?"
Below is an example of the above mentioned situation where there are participants without
mobilities, some mobilities without budget and the budget goes beyond the contracted
amount.
There is a section in beneficiary final report that shows similar summary. The report contains:
−
Table with number of expected and received participant reports
−
List of participants without mobilities
−
List of accompanying persons without mobilities
−
Mobility experiences with duration shorter than allowed
−
Mobilities with zero budget
Each of these sections has open text fields that allow you to provide more information on any
of the above issues.
Page 80 of 125
11. Support and troubleshooting
11.1. National Agency Helpdesk contact
All questions or issues with the Mobility Tool should be reported to your National Agency
helpdesk. The contact details are published on the Mobility Tool "Home" page, as shown on
the screen shot below.
11.2. Troubleshooting of the most common issues
11.2.1. Issues when submitting beneficiary or participant forms using
Adobe Acrobat Reader – "NotAllowedError"
During the form submission, it may happen that a following error is displayed in the form:
"NotAllowedError: Security settings prevent access to this property or method".
If this happens, please follow these steps:
1. Make sure the computer is connected to Internet
2. If the computer has a proxy connection (indirect access to Internet), make sure proxy
configuration is properly saved in system settings (for Windows, it's Internet Options in
Control Panel)
3. When the error appears, there will be an additional message bar on top of the Adobe
Acrobat Reader window with the following message: "Some features have been
disabled to avoid potential security risks. Only enable these features if you trust
this document"
4. Select "Options" button on the message bar (on the right) and choose option "Always
trust this document"
Page 81 of 125
5. A window will be shown asking to save the document and the form will re-open.
6. After re-opening submission should be successful and error-free.
7. If the problem persists, please contact National Agency Helpdesk.
11.2.2. CSV files exported by Mobility Tool are not opened correctly by
Microsoft Excel
Mobility Tool offers two options for mobility experience data export – Excel and CSV. It may
happen, that when you choose to download and open CSV your Excel might not recognize
the field separator and will display a whole length of each line in just one cell, as shown on
the screenshot below.
This may happen due to regional settings of your computer. The solution presented below
applies to Microsoft Windows 7, however previous versions of the Windows operating system
may have similar steps.
In order to fix the problem, please go to Control Panel, then Region and Language and clik
"Additional Settings" button on the bottom of the window.
Page 82 of 125
There you'll find "List separator" option which most likely will be set to comma (,).
Please change this option to semi-colon (;), save the settings, close Excel and export the
data again. The issue should be resolved.
Page 83 of 125
Annex I – List of fields in Mobility Tool import template file
#
Field Name
1 Project ID
Mandatory Characteristics.
Yes
Text with length less than 255 characters.
2 Mobility ID
No
Text with length less than 255 characters.
3 Participant Title
No
Text with length less than 255 characters.
4 Participant First Name
Yes
Text with length less than 255 characters.
5 Participant Last Name
Yes
Text with length less than 255 characters.
6 Participant Date of Birth
Yes
Acceptable date format are dd/mm/yyyy or
dd-mm-yyyy.
7 Participant Gender
8 Participant Telephone
Yes
No
Please refer to code list tables.
Text with length less than 255 characters.
9 Participant Email
Yes
Text with length less than 255 characters.
Email address format check.
10 Participant Address
Yes
Text with length less than 255 characters.
11 Participant Postal code
Yes
Text with length less than 255 characters.
12 Participant City
Yes
Text with length less than 255 characters.
13 Participant Country
14 Participant Region
15 Is Participant an Accompanying
Person
16 Participant With Special Needs
17 Type of participant
18 IVT Participant Type
19 Economic Sector
20 Field Of Education
21 Level of Education
22 Sending Country
23 Receiving Country
24 Departure Date
Yes
Yes
Yes
Please refer to code list tables.
Please refer to code list tables.
Please refer to code list tables.
Yes
Yes
Yes
Yes
Yes
Yes
Yes
Yes
Yes
Please refer to code list tables.
Please refer to code list tables.
Please refer to code list tables.
Please refer to code list tables.
Please refer to code list tables.
Please refer to code list tables.
Please refer to code list tables.
Please refer to code list tables.
Acceptable date format are dd/mm/yyyy or
dd-mm-yyyy.
25 Return Date
Yes
Acceptable date format are dd/mm/yyyy or
dd-mm-yyyy.
26 Subsistence
Yes
Numerical value more than zero.
Page 84 of 125
#
Mandatory
Yes
Yes
Yes
Yes
No
Characteristics.
Numerical value more than zero.
Please refer to code list tables.
Please refer to code list tables.
Please refer to code list tables.
Text with length less than 255 characters.
32 Certification Type 1
33 Certifying Partner ID 2
Yes
No
Please refer to code list tables.
Text with length less than 255 characters.
34 Certification Type 2
35 Certifying Partner ID 3
Yes
No
Please refer to code list tables.
Text with length less than 255 characters.
36 Certification Type 3
37 Sending Partner ID
Yes
No
Please refer to code list tables.
Text with length less than 255 characters.
38 Sending Partner Legal Name
Yes
Text with length less than 255 characters.
39 Sending Partner Latin Name
No
Text with length less than 255 characters.
40 Sending Partner Acronym
No
Text with length less than 255 characters.
41 Sending Partner National ID
No
Text with length less than 255 characters.
42 Sending Partner Type of
Organization
43 Sending Partner Commercial
Orientation
Yes
Please refer to code list tables.
Yes
Please refer to code list tables.
44 Sending Partner Scope
45 Sending Partner Legal Status
46 Sending Partner Economic
Sector
47 Sending Partner Size (Staff)
48 Sending Partner Size (Trainees)
49 Sending Partner VAT Number
Yes
Yes
Yes
Please refer to code list tables.
Please refer to code list tables.
Please refer to code list tables.
Yes
Yes
No
Please refer to code list tables.
Please refer to code list tables.
Text with length less than 255 characters.
50 Sending Partner Is Able to
Recover VAT
Yes
Please refer to code list tables.
51 Sending Partner LEO Certificate
Number
No
Text with length less than 255 characters.
52 Sending Partner Telephone
No
Text with length less than 255 characters.
53 Sending Partner Fax
No
Text with length less than 255 characters.
27
28
29
30
31
Field Name
Travel Cost
Language1
Language2
Language3
Certifying Partner ID 1
Page 85 of 125
#
Field Name
54 Sending Partner Email
Mandatory Characteristics.
Yes
Text with length less than 255 characters.
Email address format check.
55 Sending Partner Website
No
Text with length less than 255 characters.
56 Sending Partner Legal Address
Yes
Text with length less than 255 characters.
57 Sending Partner Postal Code
Yes
Text with length less than 255 characters.
58 Sending Partner City
Yes
Text with length less than 255 characters.
59 Sending Partner Country
60 Sending Partner Region
61 Sending Partner Contact Title
Yes
Yes
No
Please refer to code list tables.
Please refer to code list tables.
Text with length less than 255 characters.
62 Sending Partner Contact First
Name
Yes
Text with length less than 255 characters.
63 Sending Partner Contact Last
Name
Yes
Text with length less than 255 characters.
64 Sending Partner Contact
Department
No
Text with length less than 255 characters.
65 Sending Partner Contact
Position
No
Text with length less than 255 characters.
66 Sending Partner Contact Mobile
No
Text with length less than 255 characters.
67 Sending Partner Contact Email
Yes
Text with length less than 255 characters.
Email address format check.
68 Sending Partner Contact Legal
Address
Yes
Text with length less than 255 characters.
69 Sending Partner Contact Postal
Code
Yes
Text with length less than 255 characters.
70 Sending Partner Contact City
Yes
Text with length less than 255 characters.
71 Sending Partner Contact
Country
72 Sending Partner Contact Region
73 Sending Partner Contact Fax
Yes
Please refer to code list tables.
Yes
No
Please refer to code list tables.
Text with length less than 255 characters.
74 Receiving Partner ID
No
Text with length less than 255 characters.
75 Receiving Partner Legal Name
Yes
Text with length less than 255 characters.
Page 86 of 125
#
Field Name
76 Receiving Partner Latin Name
Mandatory Characteristics.
No
Text with length less than 255 characters.
77 Receiving Partner Acronym
No
Text with length less than 255 characters.
78 Receiving Partner National ID
No
Text with length less than 255 characters.
79 Receiving Partner Type of
Organization
Yes
Please refer to code list tables.
80 Receiving Partner Commercial
Orientation
Yes
Please refer to code list tables.
81 Receiving Partner Scope
82 Receiving Partner Legal Status
83 Receiving Partner Economic
Sector
84 Receiving Partner Size (Staff)
85 Receiving Partner Size
(Trainees)
86 Receiving Partner VAT Number
Yes
Yes
Yes
Please refer to code list tables.
Please refer to code list tables.
Please refer to code list tables.
Yes
Yes
Please refer to code list tables.
Please refer to code list tables.
No
Text with length less than 255 characters.
87 Receiving Partner Able to
Recover VAT
Yes
Please refer to code list tables.
88 Receiving Partner LEO
Certificate Number
No
Text with length less than 255 characters.
89 Receiving Partner Telephone
No
Text with length less than 255 characters.
90 Receiving Partner Fax
No
Text with length less than 255 characters.
91 Receiving Partner Email
Yes
Text with length less than 255 characters.
Email address format check.
92 Receiving Partner Website
No
Text with length less than 255 characters.
93 Receiving Partner Legal Address
Yes
Text with length less than 255 characters.
94 Receiving Partner Postal Code
Yes
Text with length less than 255 characters.
95 Receiving Partner City
Yes
Text with length less than 255 characters.
96 Receiving Partner Country
97 Receiving Partner Region
98 Receiving Partner Contact Title
Yes
Yes
No
Please refer to code list tables.
Please refer to code list tables.
Text with length less than 255 characters.
99 Receiving Partner Contact First
Name
Yes
Text with length less than 255 characters.
Page 87 of 125
#
Field Name
100 Receiving Partner Contact Last
Name
Mandatory Characteristics.
Yes
Text with length less than 255 characters.
101 Receiving Partner Contact
Department
No
Text with length less than 255 characters.
102 Receiving Partner Contact
Position
No
Text with length less than 255 characters.
103 Receiving Partner Contact
Mobile
No
Text with length less than 255 characters.
104 Receiving Partner Contact Email
Yes
Text with length less than 255 characters.
Email address format check.
105 Receiving Partner Contact Legal
Address
Yes
Text with length less than 255 characters.
106 Receiving Partner Contact
Postal Code
Yes
Text with length less than 255 characters.
107 Receiving Partner Contact City
Yes
Text with length less than 255 characters.
108 Receiving Partner Contact
Country
109 Receiving Partner Contact
Region
110 Receiving Partner Contact Fax
Yes
Please refer to code list tables.
Yes
Please refer to code list tables.
No
Text with length less than 255 characters.
111 Intermediary Partner ID
No
Text with length less than 255 characters.
112 Intermediary Partner Legal
Name
Yes
Text with length less than 255 characters.
113 Intermediary Partner Latin
Name
No
Text with length less than 255 characters.
114 Intermediary Partner Acronym
No
Text with length less than 255 characters.
115 Intermediary Partner National
ID
No
Text with length less than 255 characters.
116 Intermediary Partner Type of
Organization
Yes
Please refer to code list tables.
117 Intermediary Partner
Commercial Orientation
Yes
Please refer to code list tables.
118 Intermediary Partner Scope
119 Intermediary Partner Legal
Status
120 Intermediary Partner Economic
Sector
121 Intermediary Partner Size (Staff)
122 Intermediary Partner Size
(Trainees)
Yes
Yes
Please refer to code list tables.
Please refer to code list tables.
Yes
Please refer to code list tables.
Yes
Yes
Please refer to code list tables.
Please refer to code list tables.
Page 88 of 125
#
Field Name
123 Intermediary Partner VAT
Number
Mandatory Characteristics.
No
Text with length less than 255 characters.
124 Is Intermediary Partner Able to
Recover VAT
Yes
Please refer to code list tables.
125 Intermediary Partner LEO
Certificate Number
No
Text with length less than 255 characters.
126 Intermediary Partner Telephone
No
Text with length less than 255 characters.
127 Intermediary Partner Fax
No
Text with length less than 255 characters.
128 Intermediary Partner Email
Yes
Text with length less than 255 characters.
Email address format check.
129 Intermediary Partner Website
No
Text with length less than 255 characters.
130 Intermediary Partner Legal
Address
Yes
Text with length less than 255 characters.
131 Intermediary Partner Postal
Code
Yes
Text with length less than 255 characters.
132 Intermediary Partner City
Yes
Text with length less than 255 characters.
133 Intermediary Partner Country
134 Intermediary Partner Region
135 Intermediary Partner Contact
Title
Yes
Yes
No
Please refer to code list tables.
Please refer to code list tables.
Text with length less than 255 characters.
136 Intermediary Partner Contact
First Name
Yes
Text with length less than 255 characters.
137 Intermediary Partner Contact
Last Name
Yes
Text with length less than 255 characters.
138 Intermediary Partner Contact
Department
No
Text with length less than 255 characters.
139 Intermediary Partner Contact
Position
No
Text with length less than 255 characters.
140 Intermediary Partner Contact
Mobile
No
Text with length less than 255 characters.
141 Intermediary Partner Contact
Email
Yes
Text with length less than 255 characters.
Email address format check.
142 Intermediary Partner Contact
Legal Address
Yes
Text with length less than 255 characters.
143 Intermediary Partner Contact
Postal Code
Yes
Text with length less than 255 characters.
144 Intermediary Partner Contact
City
Yes
Text with length less than 255 characters.
Page 89 of 125
#
Field Name
145 Intermediary Partner Contact
Country
146 Intermediary Partner Contact
Region
147 Intermediary Partner Contact
Fax
Mandatory Characteristics.
Yes
Please refer to code list tables.
Yes
Please refer to code list tables.
No
Text with length less than 255 characters.
Page 90 of 125
Annex II – List of codes for data import
List of data reference, also called data dictionary or EAC Dictionary - codes used for data
import into Mobility Tool
1. Field Of Education
Code
Acronym/Description
0
General Programmes
01
Basic/broad, general programmes
010
Basic/broad, general programmes
0101
Basic programmes
0102
Broad, general programmes
0103
Arts and crafts
0104
Music
0105
History
0106
Religion / Ethics
0107
Civics
0108
Mother tongue
0109
Foreign language
010a
Mathematics
010b
Physics
010c
Chemistry
010d
Biology
010e
Geography
010f
Environmental education
010g
Health education
010h
Sports
010i
New technologies
010j
Economy and business
010k
Vocational subjects
010l
Other basic programmes
010m
General programmes with no special subject emphasis
08
Literacy and numeracy
080
Literacy and numeracy
0801
Basic remedial programmes for adults
0802
Literacy
0803
Numeracy
09
Personal skills
090
Personal skills
0901
Argumentation and presentation
0902
Assertiveness training
0903
Communication skills
0904
Co-operation
Page 91 of 125
Code
Acronym/Description
0905
Development of behavioural capacities
0906
Development of mental skills
0907
Jobseeking programmes
0908
Public speaking
0909
Self-esteem skills
090a
Social competence
090b
Time management
090c
Physical education, sport science
090d
Leisure studies
090e
Home economics, nutrition
090f
Nautical science, navigation
090g
Others in other areas of study
1
Education
14
Teacher training and education science
140
Teacher training and education science (broad programmes)
1401
Teacher training, general
1402
Practical pedagogical courses, general
141
Teaching and training
142
Education science
1421
Didactics
1422
Education science
1423
Educational assessment, testing and measurement
1424
Educational evaluation and research
1425
Pedagogical sciences
143
Training for pre-school teachers
1431
Early childhood teaching
1432
Pre-primary teacher training
144
Training for teachers at basic levels
1441
Class teacher training
1442
Home language teacher training
1443
Primary teaching
1444
Teacher training for children with special needs
145
Training for teachers with subject specialisation
1451
Secondary teaching
1452
Teacher Training theoretical subjects, e.g. English, Mathematics, History
1453
Teacher Training: Foreign Language Teaching
146
Training for teachers of vocational subjects
1461
Teacher training - Arts and crafts
1462
Teacher training - Commercial subjects
1463
Teacher training - Music
1464
Teacher training - Nursing
1465
Teacher training - Physical training
Page 92 of 125
Code
Acronym/Description
1466
Teacher training - Technical subjects
1467
Driving instructor training
1468
Training of instructors at companies
1469
Training of trainers
149
Teacher training and education science (others)
2
Humanities and Arts
21
Arts
210
Arts (broad programmes)
211
Fine arts
212
Music and performing arts
2121
Music and musicology
2122
Performing arts
213
Audio-visual techniques and media production
214
Design
215
Craft skills
219
Arts (others)
22
Humanities
220
Humanities (broad programmes)
221
Religion
222
Foreign languages
2221
Modern EC languages
2222
General and comparative literature
2223
Linguistics
2224
Translation, interpretation
2225
Classical philology
2226
Non-EC languages
2227
Less widely taught languages
2228
Regional and minority languages
2229
Others - Languages and philological sciences
223
Mother tongue
224
History, philosophy and related subjects
225
History and archaeology
226
Philosophy and ethics
229
Humanities (others)
3
Social sciences, Business and Law
31
Social and behavioural science
310
Social and behavioural science (broad programmes)
311
Psychology
312
Sociology and cultural studies
313
Political science and civics
314
Economics
317
Anthropology
Page 93 of 125
Code
Acronym/Description
318
Development studies
319
Social and behavioural science (others)
32
Journalism and information
321
Journalism and reporting
3211
Radio / TV Broadcasting
322
Library, information, archive
3221
Documentation, archiving
3222
Museum studies, conservation
329
Journalism and information (others)
34
Business and administration
340
Business and administration (broad programmes)
341
Wholesale and retail sales
342
Marketing and advertising
343
Finance, banking, insurance
344
Accounting and taxation
345
Management and administration
346
Secretarial and office work
347
Working life
349
Business and administration (others)
38
Law
380
Law
3801
Comparative law, law with languages
3802
International law
3803
Civil law
3804
Criminal law, criminology
3805
Constitutional / Public law
3806
Public administration
3807
European Community / EU law
3808
Others - Law
4
Science, Mathematics and Computing
42
Life science
421
Biology and biochemistry
4211
Microbiology, biotechnology
422
Environmental science
44
Physical science
440
Physical science (broad programmes)
441
Physics
4411
Nuclear and high energy physics
4412
Astronomy, astrophysics
442
Chemistry
4421
Biochemistry
443
Earth science
Page 94 of 125
Code
Acronym/Description
4431
Geography, geology
4432
Geography
4433
Environmental sciences, ecology
4434
Geology
4435
Soil and water sciences
4436
Geodesy, cartography, remote sensing
4437
Meteorology
4438
Oceanography
4439
Others - Geography, geology
4440
Other Natural Sciences
4441
Applied Sciences and Technologies
449
Physical science (others)
46
Mathematics and statistics
461
Mathematics
462
Statistics
4621
Actuarial science
469
Mathematics (others)
48
Computing
481
Computer science
4811
Artificial intelligence
4812
Computer programming
4813
Computer science
4814
Computer system analysis
4815
Computer system design
4816
Informatics
4817
Network administration
4818
Operating systems
4819
Programming languages (Visual Basic, C++ etc.)
482
Computer use
489
Computing (others)
5
Engineering, Manufacturing and Construction
52
Engineering and engineering trades
520
Engineering and engineering trades (broad programmes)
521
Mechanics and metal work
5211
Mechanical Engineering
522
Electricity and energy
5221
Air-conditioning trades programmes
5222
Climate engineering
5223
Electrical appliances repairing
5224
Electrical appliances repairing
5225
Electrical fitting
5226
Electrical power generation
Page 95 of 125
Code
Acronym/Description
5227
Electrical trades programmes
5228
Energy programmes, studies
5229
Gas distribution
522a
Heating trades programmes
522b
Nuclear, hydraulic and thermal energy
522c
Power production
522d
Power line installation and maintenance
522e
Refrigeration programmes
523
Electronics and automation
5231
Broadcasting electronics
5232
Communication systems
5233
Communications equipment installation
5234
Communications equipment maintenance
5235
Computer engineering
5236
Computer repairing
5237
Control engineering
5238
Data processing technology
5239
Digital technology
5240
Electronic engineering
5241
Electronic equipment servicing
5242
Network technology
5243
Robotics
5244
Telecommunication technology
5245
Television and radio repairing
524
Chemical and process
525
Motor vehicles, ships and aircraft
5251
Aeronautical Engineering
529
Engineering and engineering trades (others)
54
Manufacturing and processing
540
Manufacturing and processing (broad programmes)
541
Food processing
542
Textiles, clothes, footwear, leather
543
Materials (wood, paper, plastic, glass)
544
Mining and extraction
549
Manufacturing and processing (other)
58
Architecture and building
581
Architecture and town planning
5811
Architecture
5812
Interior design
5813
Urban planning
5814
Regional planning
5815
Landscape architecture
Page 96 of 125
Code
Acronym/Description
5816
Transport and traffic studies
582
Building and civil engineering
5821
Materials science
589
Architecture and building (others)
6
Agriculture and Veterinary
62
Agriculture, forestry and fishery
620
Agriculture, forestry and fishery (broad programmes)
6201
Agricultural economics
6202
Food science and technology
6203
Tropical / Subtropical agriculture
621
Crop and livestock production
622
Horticulture
623
Forestry
624
Fisheries
629
Agriculture, forestry and fishery (others)
64
Veterinary
641
Veterinary
6411
Animal husbandry
7
Health and Welfare
72
Health
720
Health (broad programmes)
721
Medicine
7211
Psychiatry and clinical psychology
7212
Public health
7213
Medical technology
7214
Medicine and Surgery
722
Medical services
723
Nursing and caring
724
Dental studies
725
Medical diagnostic and treatment technology
726
Therapy and rehabilitation
727
Pharmacy
729
Health (others)
76
Social services
761
Child care and youth services
762
Social work and counselling
769
Social services (others)
8
Services
81
Personal services
810
Personal services (broad programmes)
811
Hotel, restaurant and catering
812
Travel, tourism and leisure
Page 97 of 125
Code
Acronym/Description
813
Sports
814
Domestic services
815
Hair and beauty services
819
Personal services (others)
84
Transport services
840
Transport services
85
Environmental protection
850
Environmental protection (broad programmes)
851
Environmental protection technology
852
Natural environments and wildlife
853
Community sanitation services
859
Environmental protection (others)
86
Security services
860
Security services (broad programmes)
861
Protection of persons and property
862
Occupational health and safety
863
Military and defence
869
Security services (others)
9
Not known or unspecified
91
Interdisciplinary Studies
92
Multidisciplinary studies
99
Not known or unspecified
999
Not known or unspecified
2. Level of Education
Code
Acronym
Description
ISCED 0
Pre-primary education
Programmes at level 0, (pre-primary) defined as the initial
stage of organized instruction is designed primarily to introduce
very young children to a school-type environment, i.e. to
provide a bridge between the home and a school-based
atmosphere. Upon completion of these programmes, children
continue their education at level 1 (primary education).
ISCED 0-SCH
Pre-primary school
based
Pre-primary non school
based
Pre-primary education non school based
ISCED 0-NSCH
Pre-primary education non school based
Page 98 of 125
Code
Acronym
Description
ISCED 1
Primary education or
first stage of basic
education
Programmes at level 1 are normally designed on a unit or
project basis to give students a sound basic education in
reading, writing and mathematics along with an elementary
understanding of other subjects such as history, geography,
natural science, social science, art and music. In some cases
religious instruction is featured. The core at this level consists
of education provided for children, the customary or legal age
of entrance being not younger than five years or older than
seven years. This level covers in principle six years of full-time
schooling. Throughout this level the programmes are
organized in units or projects rather than by subjects. This is a
principal characteristic differentiating programmes at this level
in most countries from those at level 2.
ISCED 0-1
first stage of basic
education
Pre-primary, primary education or first stage of basic education
ISCED 2
Lower secondary or
second stage of basic
education
The contents of education at this stage are typically designed
to complete the provision of basic education which began at
ISCED level 1. In many, if not most countries, the educational
aim is to lay the foundation for lifelong learning and human
development on which countries may expand, systematically,
further educational opportunities. The programmes at this level
are usually on a more subject-oriented pattern using more
specialized teachers and more often several teachers
conducting classes in their field of specialization. The full
implementation of basic skills occurs at this level. The end of
this level often coincides with the end of compulsory education
where it exists.
ISCED 2GEN
general programmes
Education which is mainly designed to lead participants to a
deeper understanding of a subject or group of subjects,
especially, but not necessarily, with a view to preparing
participants for further (additional) education at the same or a
higher level. Successful completion of these programmes may
or may not provide the participants with a labour-market
relevant qualification at this level. These programmes are
typically school-based. Programmes with a general orientation
and not focusing on a particular specialization should be
classified in this category.
ISCED 2PV
pre-vocational
programmes
Education which is mainly designed to introduce participants to
the world of work and to prepare them for entry into vocational
or technical education programmes. Successful completion of
such programmes does not yet lead to a labour-market
relevant vocational or technical qualification. For a programme
to be considered as pre-vocational or pre-technical education,
at least 25 per cent of its content has to be vocational or
technical. This minimum is necessary to ensure that the
vocational subject or the technical subject is not only one
among many others.
ISCED 2VOC
vocational or technical
programmes
Education which is mainly designed to lead participants to
acquire the practical skills, know-how and understanding
necessary for employment in a particular occupation or trade
or class of occupations or trades. Successful completion of
such programmes lead to a labour-market relevant vocational
qualification recognized by the competent authorities in the
country in which it is obtained (e.g. Ministry of Education,
employers' associations, etc.).Programmes in this category
may be subdivided into two types: those which are primarily
theoretically-oriented; and those which are primarily practicallyoriented.
ISCED 2GPV
general and prevocational programmes
pre-vocational and
vocational programmes
general and pre-vocational programmes
ISCED 2VPV
pre-vocational and vocational programmes
Page 99 of 125
Code
Acronym
Description
ISCED 2A
Lower secondary
programmes to ISCED
3AB
Lower secondary programmes designed for direct access to
level 3, in a sequence which would ultimately lead to tertiary
education (i.e. entrance to ISCED 3A or 3B)
ISCED 2B
Lower secondary
programmes to ISCED
3C
Lower secondary
programmes to labour
Lower secondary programmes designed for direct access to
level 3C
Pre-primary, primary
and lower secondary
education
Primary and lower
secondary education
Upper secondary
education
Pre-primary, primary and lower secondary education
ISCED 3-UND
Graduates at ISCED3
Graduates at ISCED3, unduplicated
ISCED 3AB-UND
Graduates at ISCED
3A/B
Graduates at ISCED
3A/B/C
Graduates at ISCED 3A/B, unduplicated
ISCED 3GEN
general programmes
Upper secondary general programmes
ISCED 3PV
pre-vocational
programmes
Upper secondary pre-vocational programmes
ISCED 3VOC
vocational or technical
programmes
Upper secondary pre-vocational programmes
ISCED 3GPV
general and prevocational programmes
Upper secondary general and pre-vocational programmes
ISCED 3VPV
pre-vocational and
vocational programmes
Upper secondary pre-vocational and vocational programmes
ISCED 3VPV-SCH
Upper secondary pre-vocational and vocational programmes
school based
ISCED 3A-B
pre-vocational and
vocational programmes school based
pre-vocational and
vocational programmes work based
access to level 5
ISCED 3A
access to level 5A
ISCED 3B
access to level 5B
Upper secondary programmes designed to provide direct
access to level 5B
ISCED 3C
access to level 5A/B
ISCED 3C-S
access to level 5A/B
less than 3y
Upper secondary programmes not designed to lead directly to
levels 5A or 5B
Upper secondary programmes not designed to lead directly to
levels 5A or 5B - duration shorter than 3 years
ISCED 2C
ISCED 0-2
ISCED 1-2
ISCED 3
ISCED 3-UND-DUR
ISCED 3VPV-WRK
Lower secondary programmes designed for direct access to
the labour market
Primary and lower secondary education
This level of education typically begins at the end of full-time
compulsory education for those countries that have a system
of compulsory education. More specialization may be observed
at this level than at ISCED level 2 and often teachers need to
be more qualified or specialized than for ISCED level 2. The
entrance age to this level is typically 15 or 16 years. The
educational programmes included at this level typically require
the completion of some 9 years of full-time education (since
the beginning of level 1) for admission or a combination of
education and vocational or technical experience and with as
minimum entrance requirements the completion of level 2 or
demonstrable ability to handle programmes at this level.
Graduates at ISCED 3A/B and 3C (of similar duration to typical
ISCED 3A/B), unduplicated
Upper secondary pre-vocational and vocational programmes
work based
Upper secondary programmes designed to provide direct
access to level 5
Upper secondary programmes designed to provide direct
access to level 5A
Page 100 of 125
Code
Acronym
Description
ISCED 3C-L
access to level 5A/B
more than 3y
Pre-primary, primary
and secondary
education
Primary and secondary
education
Secondary education
Upper secondary programmes not designed to lead directly to
levels 5A or 5B - duration longer than 3 years
Pre-primary, primary and secondary education
ISCED 4
Post-secondary nontertiary education
ISCED 4 captures programmes that straddle the boundary
between upper secondary and post-secondary education from
an international point of view, even though they might clearly
be considered as upper-secondary or post-secondary
programmes in a national context. ISCED 4 programmes can,
considering their content, not be regarded as tertiary
programmes. They are often not significantly more advanced
than programmes at ISCED 3 but they serve to broaden the
knowledge of participants who have already completed a
programme at level 3.Typical examples are programmes
designed to prepare students for studies at level 5 who,
although having completed ISCED level 3, did not follow a
curriculum which would allow entry to level 5, i.e. pre-degree
foundation courses or short vocational programmes. Second
cycle programmes can be included as well.
ISCED 4-UND
unduplicated
Post-secondary unduplicated
ISCED 4GEN
general programmes
Post-secondary general programmes
ISCED 4PV
pre-vocational
programmes
vocational programmes
Post-secondary pre-vocational programmes
ISCED 0-3
ISCED 1-3
ISCED 2-3
ISCED 4VOC
Primary and secondary education
Secondary education
Post-secondary vocational programmes
ISCED 4GPV
general and prevocational programmes
Post-secondary general and pre-vocational programmes
ISCED 4VPV
pre-vocational and
vocational programmes
Post-secondary pre-vocational and vocational programmes
ISCED 4VPV-SCH
school based
ISCED 4VPV-WRK
work based
ISCED 4A-B
Post-secondary nontertiary to 5
Post-secondary pre-vocational and vocational programmes
school based
Post-secondary pre-vocational and vocational programmes
work based
Post-secondary non-tertiary designed to provide direct access
to level 5
ISCED 4A
Post-secondary nontertiary to 5A
Post-secondary non-tertiary programmes that prepare for entry
to level 5A
ISCED 4B
Post-secondary nontertiary to 5B
Post-secondary non-tertiary programmes hat prepare for entry
to level 5B
ISCED 4C
Post-secondary nontertiary not to 5
Post-secondary non-tertiary programmes not giving access to
level 5
ISCED 3-4
Upper secondary and
post-secondary nontertiary education
Upper secondary and
post-secondary vocational programmes
Upper secondary and post-secondary non-tertiary education
ISCED 3-4VOC
Upper secondary and post-secondary non-tertiary education vocational programmes
Page 101 of 125
Code
Acronym
Description
ISCED 5
First stage of tertiary
education (not leading
directly to an advanced
research qualification level 5)
ISCED 5A
Tertiary programmes
with academic
orientation
This level consists of tertiary programmes having an
educational content more advanced than those offered at
levels 3 and 4. Entry to these programmes normally requires
the successful completion of ISCED level 3A or 3B or a similar
qualification at ISCED level 4A.All degrees and qualifications
are cross-classified by type of programmes, position in national
degree or qualification structures (see below) and cumulative
duration at tertiary.
Programmes which are theoretically based/research
preparatory (history, philosophy, mathematics, etc.) or giving
access to professions with high skills requirements (e.g.
medicine, dentistry, architecture, etc.)
ISCED 5A-B
Tertiary education
Tertiary education
ISCED 5A-D1
Tertiary education all
first degrees
Tertiary programmes with academic orientation - all first
degrees
ISCED 5A-D1-UND
ISCED 5A first time
graduates, 1st degree
ISCED 5A first time graduates, 1st degree, unduplicated
ISCED 5A-D1-3TO5
ISCED 5A first time
graduates, 1st degree, 3
to 5 y
ISCED 5A first time
graduates, 1st degree,
more than 5 y
Tertiary programmes
with academic
orientation - 2nd degree
Tertiary programmes
with occupation
orientation
Tertiary programmes
with occupation
orientation - 1stQ
Tertiary programmes
with occupation
orientation - 2ndQ
Tertiary programmes
with academic
orientation
Second stage of tertiary
education leading to an
advanced research
qualification
Tertiary programmes with academic orientation - first degree 3
to 5 years
ISCED 5A-D1-GE5
ISCED 5A-D2
ISCED 5B
ISCED 5B-Q1
ISCED 5B-Q2
ISCED 5A-6
ISCED 6
ISCED 6-PHD
ISCED 5-6
ISCED 4-6
Tertiary programmes with academic orientation - first degree 5
years or more
Tertiary programmes with academic orientation - second
degree
Tertiary programmes with occupation orientation
Tertiary programmes with occupation orientation - first
qualification
Tertiary programmes with occupation orientation - second
qualification
Tertiary programmes with academic orientation - and
programmes leading to an advanced research qualification level 6
This level is reserved for tertiary programmes which lead to the
award of an advanced research qualification. The programmes
are therefore devoted to advanced study and original research
and are not based on course-work only.
PhD/Doctorate (ISCED
6)
Tertiary education
PhD/Doctorate (ISCED 6)
Post-secondary nontertiary and tertiary
education
Post-secondary non-tertiary and tertiary education
Tertiary education
3. Economic Sector
Code
Description
A
AGRICULTURE, FORESTRY AND FISHING
A1
Crop and animal production, hunting and related service activities
A2
Forestry and logging
Page 102 of 125
Code
Description
A3
Fishing and aquaculture
B
MINING AND QUARRYING
B5
Mining of coal and lignite
B6
Extraction of crude petroleum and natural gas
B7
Mining of metal ores
B8
Other mining and quarrying
B9
Mining support service activities
C
MANUFACTURING
C10
Manufacture of food products
C11
Manufacture of beverages
C12
Manufacture of tobacco products
C13
Manufacture of textiles
C14
Manufacture of wearing apparel
C15
Manufacture of leather and related products
C16
Manufacture of wood and of products of wood and cork, except furniture; manufacture of articles of
straw and plaiting materials
C17
Manufacture of paper and paper products
C18
Printing and reproduction of recorded media
C19
Manufacture of coke and refined petroleum products
C20
Manufacture of chemicals and chemical products
C21
Manufacture of basic pharmaceutical products and pharmaceutical preparations
C22
Manufacture of rubber and plastic products
C23
Manufacture of other non-metallic mineral products
C24
Manufacture of basic metals
C25
Manufacture of fabricated metal products, except machinery and equipment
C26
Manufacture of computer, electronic and optical products
C27
Manufacture of electrical equipment
C28
Manufacture of machinery and equipment n.e.c.
C29
Manufacture of motor vehicles, trailers and semi-trailers
C30
Manufacture of other transport equipment
C31
Manufacture of furniture
C32
Other manufacturing
C33
Repair and installation of machinery and equipment
D
ELECTRICITY, GAS, STEAM AND AIR CONDITIONING SUPPLY
D35
Electricity, gas, steam and air conditioning supply
E
WATER SUPPLY; SEWERAGE, WASTE MANAGEMENT AND REMEDIATION ACTIVITIES
E36
Water collection, treatment and supply
E37
Sewerage
E38
Waste collection, treatment and disposal activities; materials recovery
E39
Remediation activities and other waste management services
F
CONSTRUCTION
F41
Construction of buildings
Page 103 of 125
Code
Description
F42
Civil engineering
F43
Specialized construction activities
G
WHOLESALE AND RETAIL TRADE; REPAIR OF MOTOR VEHICLES AND MOTORCYCLES
G45
Wholesale and retail trade and repair of motor vehicles and motorcycles
G46
Wholesale trade, except of motor vehicles and motorcycles
G47
Retail trade, except of motor vehicles and motorcycles
H
TRANSPORTATION AND STORAGE
H49
Land transport and transport via pipelines
H50
Water transport
H51
Air transport
H52
Warehousing and support activities for transportation
H53
Postal and courier activities
I
ACCOMMODATION AND FOOD SERVICE ACTIVITIES
I55
Accommodation
I56
Food and beverage service activities
J
INFORMATION AND COMMUNICATION
J58
Publishing activities
J59
Motion picture, video and television programme production, sound recording and music publishing
activities
J60
Programming and broadcasting activities
J61
Telecommunications
J62
Information technology service activities
J63
Information service activities
K
FINANCIAL AND INSURANCE ACTIVITIES
K64
Financial intermediation, except insurance and pension funding
K65
Insurance, reinsurance and pension funding, except compulsory social security
K66
Other financial activities
L
REAL ESTATE ACTIVITIES
L68
Real estate activities
M
PROFESSIONAL, SCIENTIFIC AND TECHNICAL ACTIVITIES
M69
Legal and accounting activities
M70
Activities of head offices; management consultancy activities
M71
Architectural and engineering activities; technical testing and analysis
M72
Scientific research and development
M73
Advertising and market research
M74
Other professional, scientific and technical activities
M75
Veterinary activities
N
ADMINISTRATIVE AND SUPPORT SERVICE ACTIVITIES
N77
Rental and leasing activities
N78
Employment activities
N79
Travel agency, tour operator and other reservation service and related activities
N80
Security and investigation activities
Page 104 of 125
Code
Description
N81
Services to buildings and landscape activities
N82
Office administrative, office support and other business support activities
O
PUBLIC ADMINISTRATION AND DEFENCE; COMPULSORY SOCIAL SECURITY
O84
Public administration and defence; compulsory social security
P
EDUCATION
P85
Education
P85.1
Pre-primary education
P85.2
Primary education
P85.3
Secondary education
P85.31
General secondary education
P85.32
Technical and vocational secondary education
P85.4
Higher education
P85.41
Post-secondary non-tertiary education
P85.42
Tertiary education
P85.5
Other education
P85.51
Sports and recreation education
P85.52
Cultural education
P85.53
Driving school activities
P85.59
Other education n.e.c.
P85.6
Educational support activities
P85.60
Educational support activities
Q
HUMAN HEALTH AND SOCIAL WORK ACTIVITIES
Q86
Human health activities
Q87
Residential care activities
Q88
Social work activities without accommodation
R
ARTS, ENTERTAINMENT AND RECREATION
R90
Creative, arts and entertainment activities
R91
Libraries, archives, museums and other cultural activities
R92
Gambling and betting activities
R93
Sports activities and amusement and recreation activities
S
OTHER SERVICE ACTIVITIES
S94
Activities of membership organizations
S95
Repair of computers and personal and household goods
S96
Other personal service activities
T
T97
ACTIVITIES OF HOUSEHOLDS AS EMPLOYERS; UNDIFFERENTIATED GOODS- AND SERVICESPRODUCING ACTIVITIES OF HOUSEHOLDS FOR OWN USE
Activities of households as employers of domestic personnel
T98
Undifferentiated goods- and services-producing activities of private households for own use
U
ACTIVITIES OF EXTRATERRITORIAL ORGANIZATIONS AND BODIES
U99
Activities of extraterritorial organizations and bodies
Page 105 of 125
4. Countries and Regions
Code
Country
Region
AT
Description
AUSTRIA
AT11
Burgenland (A)
AT12
Niederösterreich
AT13
Wien
AT21
Kärnten
AT22
Steiermark
AT31
Oberösterreich
AT32
Salzburg
AT33
Tirol
AT34
Vorarlberg
ATZZ
Extra-Regio
BE
BELGIUM
BE10
Région de Bruxelles-Capitale / Brussels Hoofdstedelijk Gewest
BE21
Prov. Antwerpen
BE22
Prov. Limburg (B)
BE23
Prov. Oost-Vlaanderen
BE24
Prov. Vlaams-Brabant
BE25
Prov. West-Vlaanderen
BE31
Prov. Brabant Wallon
BE32
Prov. Hainaut
BE33
Prov. Liège
BE34
Prov. Luxembourg (B)
BE35
Prov. Namur
BEZZ
Extra-Regio
BG
BULGARIA
BG31
Severozapaden
BG32
Severen tsentralen
BG33
Severoiztochen
BG34
Yugoiztochen
BG41
Yugozapaden
BG42
Yuzhen tsentralen
BGZZ
Extra-Regio
CY
CYPRUS
CY00
Kypros / Kibris
CYZZ
Extra-Regio
CZ
CZECH REPUBLIC
CZ01
Praha
CZ02
Stredni Cechy
CZ03
Jihozapad
CZ04
Severozapad
Page 106 of 125
Code
Country
Region
Description
CZ05
Severovychod
CZ06
Jihovychod
CZ07
Stredni Morava
CZ08
Moravskoslezsko
CZZZ
Extra-Regio
DE
GERMANY
DE1
BADEN-WÜRTTEMBERG
DE11
Stuttgart
DE12
Karlsruhe
DE13
Freiburg
DE14
Tübingen
DE2
BAYERN
DE21
Oberbayern
DE22
Niederbayern
DE23
Oberpfalz
DE24
Oberfranken
DE25
Mittelfranken
DE26
Unterfranken
DE27
Schwaben
DE3
BERLIN
DE30
Berlin
DE4
BRANDENBURG
DE41
Brandenburg - Nordost
DE42
Brandenburg - Südwest
DE5
BREMEN
DE50
Bremen
DE6
HAMBURG
DE60
Hamburg
DE7
HESSEN
DE71
Darmstadt
DE72
Gießen
DE73
Kassel
DE8
MECKLENBURG-VORPOMMERN
DE80
Mecklenburg-Vorpommern
DE9
NIEDERSACHSEN
DE91
Braunschweig
DE92
Hannover
DE93
Lüneburg
DE94
Weser-Ems
DEA
NORDRHEIN-WESTFALEN
DEA1
Düsseldorf
Page 107 of 125
Code
Country
Region
Description
DEA2
Köln
DEA3
Münster
DEA4
Detmold
DEA5
Arnsberg
DEB
RHEINLAND-PFALZ
DEB1
Koblenz
DEB2
Trier
DEB3
Rheinhessen-Pfalz
DEC
SAARLAND
DEC0
Saarland
DED
SACHSEN
DED1
Chemnitz
DED2
Dresden
DED3
Leipzig
DEE
SACHSEN-ANHALT
DEE0
Sachsen-Anhalt
DEF
SCHLESWIG-HOLSTEIN
DEF0
Schleswig-Holstein
DEG
THÜRINGEN
DEG0
Thüringen
DEZ
EXTRA-REGIO
DEZZ
Extra-Regio
DK
DENMARK
DK01
Hovedstaden
DK02
Sjælland
DK03
Syddanmark
DK04
Midtjylland
DK05
Nordjylland
DKZZ
Extra-Regio
EE
ESTONIA
EE00
Eesti
EEZZ
Extra-Regio
ES
SPAIN
ES11
Galicia
ES12
Principado de Asturias
ES13
Cantabria
ES21
País Vasco
ES22
Comunidad Foral de Navarra
ES23
La Rioja
ES24
Aragón
ES30
Comunidad de Madrid
Page 108 of 125
Code
Country
Region
Description
ES41
Castilla y León
ES42
Castilla-La Mancha
ES43
Extremadura
ES51
Cataluña
ES52
Comunidad Valenciana
ES53
Illes Balears
ES61
Andalucía
ES62
Región de Murcia
ES63
Ciudad Autónoma de Ceuta
ES64
Ciudad Autónoma de Melilla
ES70
Canarias
ESZZ
Extra-Regio
FI
FINLAND
FI13
Itä-Suomi
FI18
Etelä-Suomi
FI19
Länsi-Suomi
FI1A
Pohjois-Suomi
FI20
Åland
FIZZ
Extra-Regio
FR
FRANCE
FR10
Île de France
FR21
Champagne-Ardenne
FR22
Picardie
FR23
Haute-Normandie
FR24
Centre
FR25
Basse-Normandie
FR26
Bourgogne
FR30
Nord - Pas-de-Calais
FR41
Lorraine
FR42
Alsace
FR43
Franche-Comté
FR51
Pays de la Loire
FR52
Bretagne
FR53
Poitou-Charentes
FR61
Aquitaine
FR62
Midi-Pyrénées
FR63
Limousin
FR71
Rhône-Alpes
FR72
Auvergne
FR81
Languedoc-Roussillon
FR82
Provence-Alpes-Côte d'Azur
Page 109 of 125
Code
Country
Region
Description
FR83
Corse
FR91
Guadeloupe
FR92
Martinique
FR93
Guyane
FR94
Réunion
FR94
Réunion
FRZZ
Extra-Regio
GR
GREECE
GR11
Anatoliki Makedonia, Thraki
GR12
Kentriki Makedonia
GR13
Dytiki Makedonia
GR14
Thessalia
GR21
Ipeiros
GR22
Ionia Nisia
GR23
Dytiki Ellada
GR24
Sterea Ellada
GR25
Peloponnisos
GR30
Attiki
GR41
Voreio Aigaio
GR42
Notio Aigaio
GR43
Kriti
GRZZ
Extra-Regio
HU
HUNGARY
HU10
Kozep-Magyarorszag
HU21
Kozep-Dunantul
HU22
Nyugat-Dunantul
HU23
Del-Dunantul
HU31
Eszak-Magyarorszag
HU32
Eszak-Alfold
HU33
Del-Alfold
HUZZ
Extra-Regio
IE
IRELAND
IE01
Border, Midland and Western
IE02
Southern and Eastern
IEZZ
Extra-Regio
IT
ITALY
ITC1
Piemonte
ITC2
Valle d'Aosta/Vallée d'Aoste
ITC3
Liguria
ITC4
Lombardia
ITD1
Provincia Autonoma Bolzano/Bozen
Page 110 of 125
Code
Country
Region
Description
ITD2
Provincia Autonoma Trento
ITD3
Veneto
ITD4
Friuli-Venezia Giulia
ITD5
Emilia-Romagna
ITE1
Toscana
ITE2
Umbria
ITE3
Marche
ITE4
Lazio
ITF1
Abruzzo
ITF2
Molise
ITF3
Campania
ITF4
Puglia
ITF5
Basilicata
ITF6
Calabria
ITG1
Sicilia
ITG2
Sardegna
ITZZ
Extra-Regio
LT
LITHUANIA
LT00
Lietuva
LTZZ
Extra-Regio
LU
LUXEMBOURG
LU00
Luxembourg (Grand-Duché)
LUZZ
Extra-Regio
LV
LATVIA
LV00
Latvija
LVZZ
Extra-Regio
MT
MALTA
MT00
Malta
MTZZ
Extra-Regio
NL
NETHERLANDS
NL11
Groningen
NL12
Friesland (NL)
NL13
Drenthe
NL21
Overijssel
NL22
Gelderland
NL23
Flevoland
NL31
Utrecht
NL32
Noord-Holland
NL33
Zuid-Holland
NL34
Zeeland
NL41
Noord-Brabant
Page 111 of 125
Code
Country
Region
Description
NL42
Limburg (NL)
NLZZ
Extra-Regio
PL
POLAND
PL11
Lodzkie
PL12
Mazowieckie
PL21
Malopolskie
PL22
Slaskie
PL31
Lubelskie
PL32
Podkarpackie
PL33
Swietokrzyskie
PL34
Podlaskie
PL41
Wielkopolskie
PL42
Zachodniopomorskie
PL43
Lubuskie
PL51
Dolnoslaskie
PL52
Opolskie
PL61
Kujawsko-Pomorskie
PL62
Warminsko-Mazurskie
PL63
Pomorskie
PLZZ
Extra-Regio
PT
PORTUGAL
PT11
Norte
PT15
Algarve
PT16
Centro (P)
PT17
Lisboa
PT18
Alentejo
PT20
Região Autónoma dos Açores
PT30
Região Autónoma da Madeira
PTZZ
Extra-Regio
RO
ROMANIA
RO11
Nord-Vest
RO12
Centru
RO21
Nord-Est
RO22
Sud-Est
RO31
Sud - Muntenia
RO32
Bucuresti - Ilfov
RO41
Sud-Vest Oltenia
RO42
Vest
SE
SWEDEN
SE11
Stockholm
SE12
Östra Mellansverige
Page 112 of 125
Code
Country
Region
Description
SE12
Östra Mellansverige
SE21
Småland med öarna
SE22
Sydsverige
SE23
Västsverige
SE31
Norra Mellansverige
SE32
Mellersta Norrland
SE33
Övre Norrland
SEZZ
Extra-Regio
SI
SLOVENIA
SI0
SLOVENIJA
SI01
Vzhodna Slovenija
SI02
Zahodna Slovenija
SIZ
EXTRA-REGIO
SIZZ
Extra-Regio
SK
SLOVAKIA
SK01
Bratislavsky kraj
SK02
Zapadne Slovensko
SK03
Stredne Slovensko
SK04
Vychodne Slovensko
SKZZ
Extra-Regio
GB
UNITED KINGDOM
UKC
NORTH EAST (ENGLAND)
UKC1
Tees Valley and Durham
UKC2
Northumberland and Tyne and Wear
UKD
NORTH WEST (ENGLAND)
UKD1
Cumbria
UKD2
Cheshire
UKD3
Greater Manchester
UKD4
Lancashire
UKD5
Merseyside
UKE
YORKSHIRE AND THE HUMBER
UKE1
East Yorkshire and Northern Lincolnshire
UKE2
North Yorkshire
UKE3
South Yorkshire
UKE4
West Yorkshire
UKF
EAST MIDLANDS (ENGLAND)
UKF1
Derbyshire and Nottinghamshire
UKF2
Leicestershire, Rutland and Northamptonshire
UKF3
Lincolnshire
UKG
WEST MIDLANDS (ENGLAND)
UKG1
Herefordshire, Worcestershire and Warwickshire
Page 113 of 125
Code
Country
Region
Description
UKG2
Shropshire and Staffordshire
UKG3
West Midlands
UKH
EAST OF ENGLAND
UKH1
East Anglia
UKH2
Bedfordshire and Hertfordshire
UKH3
Essex
UKI
LONDON
UKI1
Inner London
UKI2
Outer London
UKJ
SOUTH EAST (ENGLAND)
UKJ1
Berkshire, Buckinghamshire and Oxfordshire
UKJ2
Surrey, East and West Sussex
UKJ3
Hampshire and Isle of Wight
UKJ4
Kent
UKK
SOUTH WEST (ENGLAND)
UKK1
Gloucestershire, Wiltshire and Bristol/Bath area
UKK2
Dorset and Somerset
UKK3
Cornwall and Isles of Scilly
UKK4
Devon
UKL
WALES
UKL1
West Wales and The Valleys
UKL2
East Wales
UKM
SCOTLAND
UKM2
Eastern Scotland
UKM3
South Western Scotland
UKM5
North Eastern Scotland
UKM6
Highlands and Islands
UKN
NORTHERN IRELAND
UKN0
Northern Ireland
UKZ
EXTRA-REGIO
UKZZ
Extra-Regio
HR
CROATIA
HR01
Sjeverozapadna Hrvatska
HR02
Sredisnja i Istocna (Panonska) Hrvatska
HR03
Jadranska Hrvatska
TR
TURKEY
TR1
ISTANBUL
TR11
Istanbul
TR10
Istanbul
TR2
BATI MARMARA
TR21
Tekirdag
Page 114 of 125
Code
Country
Region
Description
TR22
Balikesir
TR3
EGE
TR31
Izmir
TR32
Aydin
TR33
Manisa
TR4
DOGU MARMARA
TR41
Bursa
TR42
Kocaeli
TR5
BATI ANADOLU
TR51
Ankara
TR52
Konya
TR6
AKDENIZ
TR61
Antalya
TR62
Adana
TR63
Hatay
TR7
ORTA ANADOLU
TR71
Kirikkale
TR72
Kayseri
TR8
BATI KARADENIZ
TR81
Zonguldak
TR82
Kastamonu
TR83
Samsun
TR9
DOGU KARADENIZ
TR90
Trabzon
TRA
KUZEYDOGU ANADOLU
TRA1
Erzurum
TRA2
Agri
TRB
ORTADOGU ANADOLU
TRB1
Malatya
TRB2
Van
TRC
GUNEYDOGU ANADOLU
TRC1
Gaziantep
TRC2
Sanliurfa
TRC3
Mardin
CH
SWITZERLAND
CH01
Région lémanique
CH02
Espace Mittelland
CH03
Nordwestschweiz
CH04
Zürich
CH05
Ostschweiz
CH06
Zentralschweiz
Page 115 of 125
Code
Country
Region
CH07
IS
Description
Ticino
ICELAND
IS00
LI
Ísland
LIECHTENSTEIN
LI00
NO
Liechtenstein
NORWAY
NO01
Oslo og Akershus
NO02
Hedmark og Oppland
NO03
Sør-Østlandet
NO04
Agder og Rogaland
NO05
Vestlandet
NO06
Trøndelag
NO07
Nord-Norge
5. Languages
Code
Description
EO
Esperanto
IA
Interlingua (International Auxiliary Language Association)
BG
Bulgarian
CS
Czech
DA
Danish
DE
German
EL
Greek
EN
English
ES
Spanish
ET
Estonian
FI
Finnish
FR
French
GA
Irish
HU
Hungarian
IT
Italian
LT
Lithuanian
LV
Latvian
MT
Maltese
NL
Dutch
PL
Polish
PT
Portuguese
RO
Romanian
SK
Slovak
SL
Slovenian
Page 116 of 125
Code
Description
SV
Swedish
AN
Aragonese
BR
Breton
BS
Bosnian
CA
Catalan
CO
Corsican
CY
Welsh
EU
Basque
FO
Faroese
GD
Gaelic (Scots)
GL
Gallegan
LI
Limburgan; Limburger; Limburgish
NB
Norwegian Bokmael
NN
Norwegian Nynorsk
SC
Sardinian
WA
Walloon
CU
Church Slavic
OC
Occitan (post 1500)
RM
Raeto-Romance
LA
Latin
HR
Croatian
IS
Icelandic
LB
Letzeburgesch
MK
Macedonian
MO
Moldavian
ME
Montenegrin
NO
Norwegian
RU
Russian
SH
Serbo-Croatian
SQ
Albanian
SR
Serbian
TR
Turkish
UK
Ukrainian
AA
Afar
AB
Abkhazian
AE
Avestan
AF
Afrikaans
AK
Akan
AM
Amharic
AR
Arabic
AS
Assamese
AV
Avaric
Page 117 of 125
Code
Description
AY
Aymara
AZ
Azerbaijani
BA
Bashkir
BE
Belarusian
BH
Bihari
BI
Bislama
BM
Bambara
BN
Bengali
BO
Tibetan
CE
Chechen
CH
Chamorro
CR
Cree
CV
Chuvash
DV
Divehi
DZ
Dzongkha
EE
Ewe
FA
Persian
FF
Fulah
FJ
Fijian
FY
Frisian
GN
Guarani
GU
Gujarati
GV
Manx
HE
Hebrew
HI
Hindi
HO
Hiri Motu
HT
Haitian; Haitian Creole
HY
Armenian
HZ
Herero
ID
Indonesian
IE
Interlingue
IG
Igbo
II
Sichuan Yi
IK
Inupiaq
IO
Ido
IU
Inuktitut
JA
Japanese
JV
Javanese
KA
Georgian
KG
Kongo
KI
Kikuyu
KJ
Kuanyama
Page 118 of 125
Code
Description
KK
Kazakh
KL
Kalaallisut
KM
Khmer
KN
Kannada
KO
Korean
KR
Kanuri
KS
Kashmiri
KU
Kurdish
KV
Komi
KW
Cornish
KY
Kirghiz
LG
Ganda
LN
Lingala
LO
Lao
LU
Luba-Katanga
MG
Malagasy
MH
Marshall
MI
Maori
ML
Malayalam
MN
Mongolian
MR
Marathi
MS
Malay
MY
Burmese
NA
Nauru
ND
Ndebele, North
NE
Nepali
NG
Ndonga
NR
Ndebele, South
NV
Navajo
NY
Chichewa
OJ
Ojibwa
OM
Oromo
OR
Oriya
OS
Ossetian
PA
Panjabi
PI
Pali
PS
Pushto
QU
Quechua
RN
Rundi
RW
Kinyarwanda
SA
Sanskrit
SD
Sindhi
Page 119 of 125
Code
Description
SE
Northern Sami
SG
Sango
SI
Sinhalese
SM
Samoan
SN
Shona
SO
Somali
SS
Swati
ST
Sotho, Southern
SU
Sundanese
SW
Swahili
TA
Tamil
TE
Telugu
TG
Tajik
TH
Thai
TK
Turkmen
TL
Tagalog
TN
Tswana
TS
Tsonga
TT
Tatar
TW
Twi
TY
Tahitian
UG
Uighur
UN
Un-identified
UR
Urdu
UZ
Uzbek
VE
Venda
VI
Vietnamese
VO
Volapok
WO
Wolof
XH
Xhosa
YI
Yiddish
ZA
Zhuang
ZH
Chinese
ZU
Zulu
6. IVT Participant Type
Code
Description
MobIVT-Appr
apprentices / trainees in alternate vocational training
MobIVT-Sch
Trainees in school based initial vocational training
Page 120 of 125
7. Type of Participant
Code
Description
LAB
People in the labour market
LAB-EMP
Employers
LAB-SAL
Employed
LAB-UNE
Unemployed
STD
Pupils, students, trainees and adult learners
STD-APP
Apprentices
STD-PUP
Pupils
STD-TRNee
Trainees
TCH
Teachers, trainers and other staff involved in any aspect of lifelong learning
TCH-LANG
Language teachers
LAB-FJS
First Job Seekers
OTH
Other
TCH-ADMIN
Administrative and other non-teaching staff
TCH-CNS
Counsellor or careers adviser
TCH-MNGR
Education managers
TCH-TCH
Teachers
TCH-TRNer
Trainers
8. Type of Organisation
Code
Description
ASC-PAR
Parents' associations
ASC-RES
Association of professors and researchers
ASC-TCH
Teachers associations
ASC-TRNee
Trainees associations
ASC-VET
VET providers associations
ASC-OTH
Other types of Association
CONS-GUID
Centre for vocational guidance and counselling
CONS-INF
Body providing guidance and information on Lifelong Learning
CONS-OTH
Other type of Counselling Service
EDU-COMP
Company training department
EDU-Gradu
Graduate / Doctoral school
EDU-SCHNur
Pre-primary school
EDU-SCHVoc
Vocational or technical secondary school
EDU-SpNeed
Establishment for learners / pupils with special needs
EDU-UNIV
University or higher education institution (tertiary level)
EDU-VET
Vocational training centre or organisation
ENT-CHCom
Chambers of commerce
ENT-CHCrft
Chamber of crafts
ENT-CHInd
Chambers of industry
Page 121 of 125
Code
Description
ENT-LARGE
Enterprise large (> 500 employees)
ENT-PROFS
Professional associations
ENT-SME
SME
ENT-TRD
Trade organisations
ENT-UNION
Social partners (trade unions, etc)
ENT-OTH
Other type of enterprise
NFP-ALLY
Organisation exclusively dedicated to youth
NFP-ASC
Non-profit associations
NFP-CS
Non-profit civil society organisation with a legal status
NFP-EURUMBR
European Umbrella Organisation (platform)
NFP-FAMV
Non-profit association of families of the victims
NFP-FLA
Non-profit federation/association of local authorities
NFP-MEMO
Civil society organisation linked to the European memory
NFP-NET
European network
NFP-NETINF
Informal European network
NFP-NETSTAT
European network having formal statutory member organisations
NFP-NETY
European network representing bodies working on behalf of young people
NFP-NGO
Non profit / Non governmental organisation
NFP-OTH
Other type of Not for Profit body
NFP-PLAT
Platform of pan-European organisations
NFP-PRTY
Organisation partly dedicated to youth
NFP-SURV
Non-profit association of survivors
NFP-TWNG
Non-profit twinning committee
NFP-THINK
European public policy research organisation (think tank)
NFP-UMBR
Umbrella Organisation (platform)
NFP-UMBRY
Umbrella organisation performing its activities on behalf of young people at European level
(platform)
NFP-VOL
Non-profit organisation active in the field of voluntary
NFP-WIDE
Organisation developing activities with a wide impact at European level
PUB-HSP
Hospital
PUB-LOC
Public authority (local)
PUB-MEM
Memorial
PUB-NAT
Public authority (national)
PUB-NYC
National Youth Council
PUB-REG
Public authority (regional)
PUB-OTH
Other type of public organisation
PUHO
Publishing House
PPGR
Part of publishing group
PUGR
Publishing Group
RES-NFP
Non-profit research institutions
RES-PRV
Private research centres
RES-PUB
Public research centres (not HE)
Page 122 of 125
Code
Description
RES-THTK
Think tank
RES-OTH
Other type of Research organisation
9. Commercial Orientation
Code
Description
P
For profit
NP
Not for Profit
10. Scope
Code
Description
L
local
R
regional
N
national
E
european
I
international
11. Legal Status
Code
Description
PR
private
PB
public
12. Size (staff)
Code
Description
S1
staff 1 to 20
S2
staff 21 to 50
S3
staff 51 to 250
S4
staff 251 to 500
S5
staff 501 to 2.000
S6
staff 2.001 to 5.000
S7
staff more than 5.000
13. Size (trainees)
Code
Description
R0
0
R1
1 to 20
R2
21 to 50
Page 123 of 125
R3
51 to 250
R4
251 to 500
R5
501 to 2.000
R6
2.001 to 5.000
R7
more than 5.000
14. Gender
Code
Description
F
Female
M
Male
15. Certification Type
Code
Acronym
Description
CERT
Certifications
Certifications associated to an educational period
Dip
Diploma
Diploma or degree
Dip-Double
Double degree
Double degree
Dip-Multiple
Multiple degree
Multiple degree
Dip-Joint
Joint Degree
Joint Degree
CoSpCe
Course specific
certificate
Europass
Curriculum Vitae
(CV)
Course specific certificate
Europass_CV
The Europass CV enables you to make your skills and qualifications
visible, and other Europass documents can be attached to the CV.
Europass_LangP
Europass
Language
Passport
The Europass Language Passport allows you to describe your language
skills, skills that are vital for learning and working in Europe.
Europass_Mob
Europass Mobility
Document
The Europass Mobility is a record of any organised period of time (called
Europass Mobility experience) that a person spends in another
European country for the purpose of learning or training.
Europass_CS
Europass
Certificate
Supplement
The Europass Certificate Supplement is delivered to people who hold a
vocational education and training certificate; it adds information to that
which is already included in the official certificate, making it more easily
understood, especially by employers or institutions outside the issuing
country. The information in the Europass Certificate Supplement is
provided by the relevant certifying authorities.
Europass_DS
Europass
Diploma
Supplement
The Europass Diploma Supplement is issued to graduates of higher
education institutions along with their degree or diploma. It helps to
ensure that higher education qualifications are more easily understood,
especially outside the country where they were awarded. The Europass
Diploma Supplement was developed jointly with Unesco and the Council
of Europe.
REC
Recognitions
Recognitions associated to an educational period
RecNac
National
recognition
Recognition by
home institution
Recognition at
national level in
National recognition
RecByHomInst
RecNatHom
Recognition by home institution
Recognition at national level in home country
Page 124 of 125
home country
NoRec
No Recognition
No Recognition
Oth
Other
Other
16. Boolean
Code
Description
Yes
Yes
No
No
17. Special list of codes for question “is organisation able to
recover VAT”
Code
Yes
No
N/A
Description
Yes
No
Not Applicable
Page 125 of 125