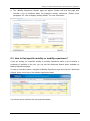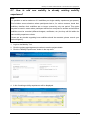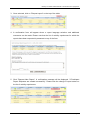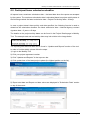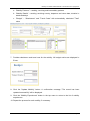
1
EUROPEAN COMMISSION Directorate-General for Education and Culture Lifelong Learning: policies and programme Coordination of the "Lifelong learning" programme Mobility Tool Guide for Beneficiaries of Leonardo da Vinci programme Version: 22 October 2013 Mobility Tool v. 3.2.0 Mobility Tool Guide for Beneficiaries of Leonardo da Vinci programme This page is intentionally left blank Page 2 Mobility Tool Guide for Beneficiaries of Leonardo da Vinci programme Table of Contents Acknowledgements ................................................................................................................................. 5 1. General Introduction ............................................................................................................................ 7 1.1 Description .................................................................................................................................... 7 1.2 Mobility Tool users ........................................................................................................................ 7 2. How to login to Mobility Tool?.............................................................................................................. 7 2.1 How to change language of website user interface? .................................................................... 8 3. Project.................................................................................................................................................. 9 3.1. How to view project’s details? ...................................................................................................... 9 3.2. Changes to project details .......................................................................................................... 10 4. Participants ........................................................................................................................................ 12 4.1. How to display list of participants? ............................................................................................. 12 4.2. How to add new participant? ...................................................................................................... 13 4.3. How to add new participants in batch? ...................................................................................... 14 4.4. How to edit participant's details? ................................................................................................ 17 5. Partners ............................................................................................................................................. 18 5.1. How to display list of partners? .................................................................................................. 18 5.2. How to add new partner? ........................................................................................................... 20 5.3. How to edit partner’s details? ..................................................................................................... 22 5.4. How to remove partner? ............................................................................................................. 22 5.5. How to add beneficiary organisation contact person? ............................................................... 23 5.6. How to add partner organisation contact person? ..................................................................... 25 5.7. How to remove beneficiary organisation contact person? ......................................................... 26 5.8. How to remove partner organisation contact person? ............................................................... 27 5.9. How to enable or disable beneficiary organisation contact person access to Mobility Tool? .... 27 6. Mobilities ............................................................................................................................................ 29 6.1. How to create new mobility experience? ................................................................................... 29 6.2. How to display mobility experience details? .............................................................................. 33 6.3. How to find specific mobility or mobility experience? ................................................................. 35 6.4. How to change mobility experience? ......................................................................................... 36 6.5. How to display mobility details? ................................................................................................. 37 6.6. How to change mobility? ............................................................................................................ 38 6.7. How to add new mobility to already existing mobility experience? ............................................ 39 6.8. How to delete mobility? .............................................................................................................. 41 6.9. How to delete mobility experience? ........................................................................................... 42 7. Import and export of data .................................................................................................................. 44 7.1. Data export ................................................................................................................................. 44 7.2. Data import ................................................................................................................................. 45 7.2.1. Data file template – file structure ........................................................................................ 46 7.2.2. Examples of data import file ............................................................................................... 47 Page 3 Mobility Tool Guide for Beneficiaries of Leonardo da Vinci programme 7.2.3. ID fields ............................................................................................................................... 50 7.2.3. Data import scenarios ......................................................................................................... 51 7.2.4. Error handling ..................................................................................................................... 55 7.2.5. The most important rules for successful data import .......................................................... 55 7.3. Remarks for text editing programs ............................................................................................. 56 7.3.1. UTF-8 .................................................................................................................................. 56 7.3.2. Saving CSV file format from Microsoft Excel 2010 ............................................................. 57 7.3.3. Long numerical values ........................................................................................................ 57 7.3.4. Auto-completion during writing ........................................................................................... 57 8. Participant reports ............................................................................................................................. 58 8.1. How to request participant report? ............................................................................................. 58 8.2. How to request many participant reports at once? .................................................................... 60 8.3. How to approve, reject or re-request participant reports? ......................................................... 62 8.4. How to check for status of participant report? ............................................................................ 63 8.5. Participant forms submission deadline ...................................................................................... 65 8.6. How to print participant report form? .......................................................................................... 66 9. Budget ............................................................................................................................................... 68 9.1. How to manage mobility budgets? ............................................................................................. 68 9.2. How to manage project budget? ................................................................................................ 70 10. Beneficiary Report ........................................................................................................................... 74 10.1. How to create and submit beneficiary report? ......................................................................... 74 10.2. Beneficiary form submission deadline ..................................................................................... 76 10.3. Final Beneficiary Report discrepancies .................................................................................... 77 11. Support and troubleshooting ........................................................................................................... 78 11.1. National Agency Helpdesk contact .......................................................................................... 78 11.2. Troubleshooting of the most common issues .......................................................................... 78 11.2.1. Issues when submitting beneficiary or participant forms using Adobe Acrobat Reader – "NotAllowedError" ......................................................................................................................... 78 11.2.2. CSV files exported by Mobility Tool are not opened correctly by Microsoft Excel ........... 79 11.2.3. Mobility Tool website is not displayed correctly in Microsoft Internet Explorer ................ 84 Page 4 Mobility Tool Guide for Beneficiaries of Leonardo da Vinci programme Acknowledgements For security and privacy reasons names and email addresses used in the application screenshots presented in this document have been greyed out. The Agency data is used for the information and demonstration purposes only. All screenshots have been taken using a non-production version of Mobility Tool running in the Acceptance (test) environment. The data presented in the screenshots is not a production data. This document is valid only for Mobility Tool website version specified on the title page of the document. Page 5 Mobility Tool Guide for Beneficiaries of Leonardo da Vinci programme This page is intentionally left blank Page 6 Mobility Tool Guide for Beneficiaries of Leonardo da Vinci programme 1. General Introduction 1.1 Description The Mobility Tool is a web platform tool for collaboration, management and reporting for mobility projects under the Lifelong Learning Programme (LLP) of the European Commission. It is developed by the European Commission to be mainly used by the beneficiaries of mobility projects. The users of the Mobility Tool will be able to provide all the information of the projects they manage. They will be able to identify participants and mobilities, to complete and update budget information, to generate participant reports and to generate their own reports to be sent to their National Agency. 1.2 Mobility Tool users The users of Mobility Tool are: Beneficiary organisations – main users of the tool, responsible for entering mobility project details, participants and budget information, creating reports. National Agencies – generating, controlling and monitoring project information European Commission DG EAC, system owner and central administrator of the tool Participants of the LLP mobility projects – participants don't use Mobility Tool directly, only the PDF reports generated by the tool 2. How to login to Mobility Tool? Mobility Tool can be accessed using the following address: URL: https://webgate.ec.europa.eu/eac/mobility In order to login to the Mobility Tool you need to have 1) an ECAS account and 2) be registered in Mobility Tool. For 1) please read the ECAS User Manual document for more information on registration and how to obtain a login name and password. For 2) if your email address was provided in project information, you will gain access automatically. Otherwise, please contact your National Agency for support. The ECAS login page is shown below. Page 7 Mobility Tool Guide for Beneficiaries of Leonardo da Vinci programme The most important fields are: - "Is the selected domain correct?" – should be always set to External. If it is set otherwise, please use "Change it" link and select "Neither an institution nor a European body". - "Username or e-mail address" – both can be used for login. Since usernames are generated automatically by ECAS during the registration, we suggest using email address as an easier way to remember. - "Password" – as defined during the registration process 2.1 How to change language of website user interface? Mobility Tool can be translated to many languages. Languages available to you can be seen on the upper right corner drop-down list, as shown on the screenshot below. The languages are described in the following convention: BE3 – English (EN), where BE3 is the National Agency and English (EN) is the language available for that agency. Please note that only languages available to the agencies are available to beneficiary users. For example, French agency will only have French language listed while Swiss Agency will have German, French and Italian languages available. English language is available by default to all agencies and users. Page 8 Mobility Tool Guide for Beneficiaries of Leonardo da Vinci programme If your language is missing from the list, please contact your National Agency. 3. Project 3.1. How to view project’s details? 1. Login to the Mobility Tool with your ECAS username (or email address) and password. You will see a screen similar to the one presented below. 2. Click the project's grant agreement number to see the project details. Page 9 Mobility Tool Guide for Beneficiaries of Leonardo da Vinci programme 3.2. Changes to project details Note: In Mobility Tool you can change partner, mobility, participant or budget information – see further sections for details. All other project information, i.e. project title, National Agency project ID, project activity periods cannot be changed in the tool. To request changes to these project details, please contact the National Agency helpdesk. National Agency's amendments to the projects are displayed in the "Updates and Reports" section of the tool but the updated information will not change directly in the project. It is beneficiary organisation's duty to look at the list of the changes displayed in the "Updates and Reports" section and change the project data accordingly. Any National Agency's amendments to projects are communicated by automated email sent by the Mobility Tool to the beneficiary organisation contact persons. To display National Agency changes to the projects, follow the steps below. 1. Login to the Mobility Tool. 2. Click the project grant agreement number to see the project details. 3. Click the "Updates and Reports" button in the menu, as presented below. Page 10 Mobility Tool Guide for Beneficiaries of Leonardo da Vinci programme 4. A list of project updates will be displayed. This list always displays at least one position – the original data import to the tool when the project was created by a National Agency. 5. Click the date and time in "Update time" column of the update details you would like to display. Page 11 Mobility Tool Guide for Beneficiaries of Leonardo da Vinci programme 6. Compare the project information shown in this window with the information stored in the other sections of the Mobility Tool. Make appropriate changes in project details if necessary. Check further sections of this document for details on how to add, change or remove partners, contact persons or budgets. 7. Click "Back" to display a list of updates. Please note, that "Approved Budget" details displayed in "Budget" section of the Mobility Tool are updated automatically with the latest updates from project amendments. 4. Participants 4.1. How to display list of participants? 1. Login to the Mobility Tool. 2. Click the project grant agreement number to see the project details. 3. Click the "Participants" button in the menu, as shown on the screen shot. Page 12 Mobility Tool Guide for Beneficiaries of Leonardo da Vinci programme 4. A list of all participants will appear. The list will display a title, first and last name, gender, yes/no for special needs, yes/no for participant type (accompanying person or not) and participant's email address. You may need to click the green loupe ( ) next to the participant's name to see more details. 4.2. How to add new participant? 1. Repeat the steps listed in the previous paragraph. 2. Click the "Add New" button. Page 13 Mobility Tool Guide for Beneficiaries of Leonardo da Vinci programme 3. A new participant form will appear, as shown on the screen shot below. 4. Fill in all required fields marked with the red asterisk. 5. Click the "Save" button. A new participant will be created and a message "Record created successfully" will appear. 4.3. How to add new participants in batch? Mobility Tool provides an option to import large group of participants in a single operations – batch import. The import is available only for new participants – this batch operation cannot be used to modify participants' data. The steps below describe an example of participant batch import functionality. 1. Repeat the steps from “4.1. How to display list of participants?” paragraph. 2. Click "Import from a file" button, as presented on the screenshot below. Page 14 Mobility Tool Guide for Beneficiaries of Leonardo da Vinci programme 3. You will be presented with 3-step process description. The process involves downloading a CSV template to fill in and importing the file into the system. 4. Click "Download a CSV template file" link. A dialog window will appear asking you to either open or save a CSV template file. Please save the file in a convenient location. 5. Open the file in a text or spread sheet editor of your choice (if you use Microsoft Excel and if you see all values in a single cell, please refer to “11.2.2. CSV files exported by Mobility Tool are not opened correctly by Microsoft Excel” paragraph which covers troubleshooting of the CSV display issues in Microsoft Excel). 6. Fill in the following fields: Title, First Name, Last Name, Date of Birth, Gender, Telephone, Email, Address, Postal Code, City, Country, Region, Is Accompanying Person, With Special Needs, Type of participant, IVT Participant Type a. There are fields with specific formatting required. The table below shows all the values and their required format. Please ask your National Agencies for a list of accepted codes b. Some fields are mandatory, some other are not. The table below describes all the fields in details. Field Mandatory Required format Title No No special formatting required First Name Yes No special formatting required Last Name Yes No special formatting required Date of Birth Yes Format of DD/MM/YYYY Gender Yes Telephone No Please refer to "Leonardo da Vinci Mobility Tool Data Dictionary" for the list of codes. No special formatting required Page 15 Mobility Tool Guide for Beneficiaries of Leonardo da Vinci programme Field Mandatory Required format It must be a valid email format, i.e. [email protected]. Email Yes The email field must be unique as this is the participant identifier field. Address Yes No special formatting required Postal Code Yes No special formatting required City Yes No special formatting required Country Yes Region Yes Is Accompanying Person Yes With Special Needs Yes Type of participant Yes IVT Participant Type No Please refer to "Leonardo da Vinci Mobility Tool Data Dictionary" for the list of codes. Please refer to "Leonardo da Vinci Mobility Tool Data Dictionary" for the list of codes. Please refer to "Leonardo da Vinci Mobility Tool Data Dictionary" for the list of codes. Please refer to "Leonardo da Vinci Mobility Tool Data Dictionary" for the list of codes. Please refer to "Leonardo da Vinci Mobility Tool Data Dictionary" for the list of codes. Please refer to "Leonardo da Vinci Mobility Tool Data Dictionary" for the list of codes. c. Save your file in comma-separated values file format (CSV). 7. Once the file is filled in, you can import the data. Navigate to Participants, click "Import from a file", click "Browse" and select your CSV file. 8. Click "Submit". a. If you data contain some fields in incorrect format or some fields are missing you will be informed about this fact on the next page. A valid reference data will be displayed as well. At this stage you can either go back to fix the issue and submit the file again or cancel the process. b. If your data had correct format, a message will be displayed informing you how many participants will be added and how many participants will be updated. Click "Yes" to continue the process. You will be redirected to "Participants" page that will show the result of the import. c. If you already had participants in your project and participants from the import file used the same email address, a similar message to the one below will be displayed: Page 16 Mobility Tool Guide for Beneficiaries of Leonardo da Vinci programme Click "Yes" to continue and update the participant information. 4.4. How to edit participant's details? 1. Repeat the steps from “4.1. How to display list of participants?” paragraph. 2. Click the green loupe icon ( ). 3. Make the required changes and click the "Save" button. 4. A confirmation "The record has been updated successfully" will be displayed. Page 17 Mobility Tool Guide for Beneficiaries of Leonardo da Vinci programme 5. Partners 5.1. How to display list of partners? 1. Login to the Mobility Tool. 2. Click the project grant agreement number to see the project details. 3. Click the "Partners" button in the menu as shown on the screen shot below. 4. A list of partners will appear. Partners are: beneficiary organisation, host and intermediary organisation or organisations. Please note the beneficiary organisation will always be displayed at the top of the list (with value "Yes" in the Beneficiary column). The list of partners allows quick filtering and searching partners from the list. Partners can be filtered by partner ID (or part thereof), legal name (or part thereof), type of organisation – selection from the drop-down list, preferred contact person name (or part Page 18 Mobility Tool Guide for Beneficiaries of Leonardo da Vinci programme thereof), preferred contact person mobile phone number (of part thereof) and country – selection from the drop-down list. The partner list page offers some other additional functionalities. You can find the actions oriented with the partner list in the list top menu on the page. Below is an explanation of each button and associated action. Icon/button Description "Select all" - selects all or deselects all element in the list "Add New" - adds new element to the list "Delete" - removes selected element from the list "Export PDF" - exports list to a PDF file. Please note only elements that are visible on the list will be exported to PDF. That means if the list is filtered, only the result of the filtering will be seen in PDF file. "Export Excel/CSV" - exports list to a CSV/Excel file. Please note only elements that are visible on the list will be exported to CSV file. That means if the list is filtered, only the result of the filtering will be seen in CSV file. Page 19 Mobility Tool Guide for Beneficiaries of Leonardo da Vinci programme Icon/button Description "Print" - print the list. Please note only elements that are visible on the list will be printed. That means if the list is filtered, only the result of the filtering will be seen on the printout. "Add/Remove Columns" - adds/removes displayed columns of the list. General search field – can be used for searching for any value from the list. The list will dynamically adjust to results of the search. "Reset Filters" - clears the search results (similar to deleting the content of the previously described search field). 5.2. How to add new partner? 1. Repeat the steps from “5.1. How to display list of partners?” paragraph. 2. Click the green plus icon, the "Add New" button in the top menu of the partner list (marked by red square in the below screenshot). 3. A partner details form will appear. Fill in all required fields marked with the red asterisk. Page 20 Mobility Tool Guide for Beneficiaries of Leonardo da Vinci programme 4. Click "Save" to save the details of a new partner. Notice the new partner is added to the end of the list of partners. Any new partner will always have "No" value in the "Beneficiary" column in the list. Please note the new partner organisation doesn't have any contact person specified. In order to add a contact person to the new organisation in your project, please follow the “5.6. How to add partner organisation contact person?” paragraph. Note: Partner details can be changed at any time during project lifetime. Page 21 Mobility Tool Guide for Beneficiaries of Leonardo da Vinci programme 5.3. How to edit partner’s details? 1. Repeat the steps from “5.1. How to display list of partners?” paragraph. 2. Click the pencil icon next to the partner you want to edit, as shown on the screenshot. 3. Change the details and click the "Save" button. A confirmation message "The record has been updated successfully" will be displayed. Note: The Beneficiary Organisation details should not be changed by Beneficiary Organisation, only by the National Agency. If for any reason the Beneficiary Organisation details need to be changed, please inform your National Agency. Once the data is changed by the National Agency, please follow paragraph “3.2. Changes to project details” in order to reflect these changes in Mobility Tool. 5.4. How to remove partner? 2. Repeat the steps from “5.1. How to display list of partners?” paragraph. 3. Mark the selection box next to the partner you want to remove. Please note that it is not possible to remove your own beneficiary organisation from the list. Page 22 Mobility Tool Guide for Beneficiaries of Leonardo da Vinci programme 4. Click the "Delete" icon (marked on the screenshot). a. If the partner has not been used in any mobility, a confirmation will be displayed that the partner has been deleted. b. If the partner has been used in any mobility, a warning message will appear: "At least one Partner has a role in at least one mobility. You must remove the partner from the Mobility first." In this case, selected partner will not be removed until a corresponding mobility experience is not deleted. Check chapter “6.9. How to delete mobility experience?” for more details. 5.5. How to add beneficiary organisation contact person? 1. Repeat the steps from “5.1. How to display list of partners?” paragraph. 2. Click the organisation name. 3. A list of contacts for this partner will be displayed. In the example presented on the screenshot, the organisation has 4 contact persons – one person authorised to sign grants, three other persons with access to the project. 4. Click the "Add New" button. Page 23 Mobility Tool Guide for Beneficiaries of Leonardo da Vinci programme 5. A contact person information form will be displayed. 6. Fill in all required fields marked with the red asterisk. 7. You may use "Same address as Partner Organisation" option to fill in the contact person address using the beneficiary organisation address. 8. If you want this person to be a preferred contact person in this organisation, select "Preferred contact" option. If you select this option, the contact person details will be displayed on the Partners page. Page 24 Mobility Tool Guide for Beneficiaries of Leonardo da Vinci programme 9. Click the "Save" button. A confirmation that the new partner contact has been created will be displayed: "Record created successfully". 5.6. How to add partner organisation contact person? 1. Repeat the steps from “5.1. How to display list of partners?” paragraph. 2. Click the name of the organisation you want to add a contact to. 3. A list of already existing contacts will appear. 4. Click "Add New" button as presented below. 5. Fill in all fields, especially those marked with a red asterisk. You may use “Same address as Partner Organisation” option to fill in the contact person address using the beneficiary organisation address. If you want this person to be a preferred contact in this partner organisation, select “Preferred contact” option. Once selected, the contact will be Page 25 Mobility Tool Guide for Beneficiaries of Leonardo da Vinci programme displayed on top of the list in bold (see the screen shot above). His/her details will be also displayed on the list of all partner organisations. 6. Click the “Save” button. A confirmation “Record created successfully” will be displayed. Notice the number of contact persons in the organisation has increased. 5.7. How to remove beneficiary organisation contact person? 1. Repeat the steps from “5.1. How to display list of partners?” paragraph. 2. Click the name the partner. A list of contacts for the beneficiary organisation will be displayed. 3. Check the selection box next to the partner contact name you want to remove. Please note that you cannot remove yourself from this list – the selection box will be greyed out. 4. Click the "Delete" button. 5. A confirmation message "The record has been deleted successfully" will be displayed. Page 26 Mobility Tool Guide for Beneficiaries of Leonardo da Vinci programme Please note you cannot remove person authorised to sign from the list of beneficiary contact persons. If the authorized person needs to be changed, please change the person details, as described few paragraphs earlier. 5.8. How to remove partner organisation contact person? 1. Repeat the steps from “5.1. How to display list of partners?” paragraph. 2. Click the partner name to display the list of contacts. 3. A list of contact persons will appear. 4. Using the tick boxes on the right hand side select one or many contact persons you want to remove for the partner. Please note you can select all partner contacts to be deleted. Therefore partner organisation can have no contact persons listed. 5. Click the "Delete" button right above the list of contacts. 6. A confirmation message "The record has been deleted successfully" will be displayed. 5.9. How to enable or disable beneficiary organisation contact person access to Mobility Tool? 1. Repeat the steps from “5.1. How to display list of partners?” paragraph. 2. Click the name of the Beneficiary Organisation on the of the partners list. Page 27 Mobility Tool Guide for Beneficiaries of Leonardo da Vinci programme 3. You will see a list of beneficiary organisation contact persons with their status of access. The status can have two values: "Yes" or "No”. 4. To enable contact person access to Mobility Tool and access to the project, click the yellow pencil to edit contact person details. 5. Select “Access to Project” to enable or deselect the option to disable Mobility Tool access for that person. In case the access is enabled a confirmation message "The user access to the Active Project has been enabled" will be displayed. The person now has gained access to the tool. Mobility Tool will send an automated email informing beneficiary contact person that he/she has been granted access to the tool. The email will contain project number, project title, link to Mobility Tool and contact details of the National Agency. Page 28 Mobility Tool Guide for Beneficiaries of Leonardo da Vinci programme 6. Mobilities 6.1. How to create new mobility experience? Definition: A "Mobility Experience" is a set of one or more mobilities planned/realised by a single participant. In most cases a “Mobility Experience” consists of a single mobility. However for a “Mobility Experience” to consist of multiple mobilities, these mobilities must share the same criteria (same economic sector, field of education and level of education). Note: Before a new mobility experience can be created, at least one participant and two partner organisations (the first for sending and the second for receiving) must already be listed in the Mobility Tool. Please check the “4.2. How to add new participant?” and “5.2. How to add new partner?” chapters for more information. 1. Login to the Mobility Tool. 2. Click the project grant agreement number to see the project details. 3. Click the "Mobility Experiences" button in the menu. 4. A list of existing mobility experiences will be displayed. Page 29 Mobility Tool Guide for Beneficiaries of Leonardo da Vinci programme 5. Click the "New Mobility Experience" button. 6. A new "Mobility Experience" form will appear. 7. Choose "Economic Sector", "Field of Education" and "Level of Education". Page 30 Mobility Tool Guide for Beneficiaries of Leonardo da Vinci programme 8. Select participants from the participant list. You may use CTRL+click to select multiple participants or type a letter to jump to desired participant name. When participant(s) are selected, click the right arrow to add the selection to the list. 9. Select sending, receiving and if applicable, intermediary partners in the "Mobility Partners" section. 10. In the "Mobility Details" section change sending and receiving country if they are selected incorrectly. The values in sending and receiving country are deducted from selection of sending and receiving partners. 11. Choose departure and return date. "Duration in weeks" and "and days" fields will be populated automatically once the departure and return dates are selected. Page 31 Mobility Tool Guide for Beneficiaries of Leonardo da Vinci programme 12. In the "Budget" section enter "Subsistence" and "Travel Costs" budget. The total budget value will be calculated automatically. 13. If applicable, select the certifying partner and the certification type that the partner will award to participants and click the green arrow to add the selection to the list. The "Selected Certificates" list will display values in pairs in a format of "certifying partner" – "certification type". In principle, maximum 3 certifications should be added for a single mobility experience. Note: Page 32 Mobility Tool Guide for Beneficiaries of Leonardo da Vinci programme It is possible that in the same mobility experience the same partner organisation can be both a sending and a receiving partner. This situation is not possible in a single mobility, however. 14. Finally, select the languages that will be used during this Mobility Experience. Once selected press the green arrow to add the languages to "Selected Languages" list. Repeat the process until all languages used in this Mobility Experience are selected. In principle, maximum 3 languages should be selected. 15. Click the "Save" button. 16. After saving a new Mobility Experience (or Experiences) for selected participant (or participants) a confirmation message will be displayed. The Mobility Tool will create a mobility experience for each selected participant. All the mobility experiences created in this process will share the same values for economic sector, field of education, level of education, mobility partners (sending, receiving and intermediary, if selected), sending and receiving country, dates of mobility, budget, certifying partner and certification type as well as languages. 17. Click the "Mobility Experiences List" button to return to the main Mobility Experience page. 6.2. How to display mobility experience details? 1. Login to the Mobility Tool. 2. Click the project grant agreement number to see the project details. 3. Click the "Mobility Experiences" button in the top menu. Page 33 Mobility Tool Guide for Beneficiaries of Leonardo da Vinci programme 4. A list of existing mobility experiences will be displayed. This list will display some basic information about mobility experiences. This list will contain: last and first name of the participant, starting date of first mobility, returning date from the last mobility, status of participant report request and number of mobilities. If you wish to see more details, please follow the steps below. 5. Click the green loupe icon ( Page 34 ) next to the mobility experience you're interested in. Mobility Tool Guide for Beneficiaries of Leonardo da Vinci programme 6. The "Mobility Experience Details" page will appear. Please note that this page also includes a list of mobilities within the displayed mobility experience. Please check paragraph “6.5. How to display mobility details?” for more information. 6.3. How to find specific mobility or mobility experience? If you are looking for a specific mobility or mobility experience within a set of dozens or hundreds of mobilities in the tool, you can use the Advanced Search option available on Mobility Experiences page. In order to use this function, navigate to Mobility Experience page and click the "Advanced Search" button on the top of the mobility experiences table. You will see a form similar to the one presented below. Page 35 Mobility Tool Guide for Beneficiaries of Leonardo da Vinci programme The advanced search option can help you to find a specific participant or participants, accompanying persons, participants with special needs, those who travel from or to a specific country and those who travel within spefic dates. Use "Clear Filters" button to remove search criteria from the result table. 6.4. How to change mobility experience? Only the following mobility experience information can be changed: economic sector field of education level of education In order to change the values listed above, follow these steps: 1. Follow the steps from paragraph “6.2. How to display mobility experience details?” 2. Click the green loupe ( ) next to the Mobility Experience you want to change. 3. Change the values in the form. Please note that participant data cannot be modified in this form. Please refer to “4.4. How to edit participant's details?” paragraph for more information on changing participant's data. Page 36 Mobility Tool Guide for Beneficiaries of Leonardo da Vinci programme 4. Click the "Save" button. If you wish to change more values than economic sector, field of education and level of education, a new mobility experience must be created and the other one removed. Please refer to other sections of this document for more information. 6.5. How to display mobility details? 1. Login to the Mobility Tool. 2. Click the project grant agreement number to see the project details. 3. Click the "Mobility Experiences" button in the top menu. A list of existing mobility experiences will be displayed. 4. The list of mobility experiences will also contain some basic information about each mobility. The page will include: sending country, receiving country, receiving partner, start date and end date. If you wish to see more information, please follow the steps below. 5. Click the green loupe icon ( ) on the right in the yellow "List of Mobilities for this Mobility Experience" section, underneath the mobility experience details. Page 37 Mobility Tool Guide for Beneficiaries of Leonardo da Vinci programme 6. A mobility details form will appear. 6.6. How to change mobility? If you want to change mobility details, including: sending country receiving country departure date return date sending partner receiving partner intermediary partner subsistence and travel costs certification and certifying partners languages used Follow the steps below. 1. Repeat the steps from “6.5. How to display mobility details?” paragraph. 2. Change the values and click the "Update Mobility" button to save. Note: If you want to change participant's name, you need to go to “4.4. How to edit participant's details?” paragraph for more information. Page 38 Mobility Tool Guide for Beneficiaries of Leonardo da Vinci programme 6.7. How to add new mobility to already existing mobility experience? Note: It is possible to add a maximum of 6 mobilities per single mobility experience (per person). This limitation serves situations where participants had to, for various reasons, break their mobilities, therefore their mobilities are no longer covered by only one period. This option may also be used in cases where participant travels from one place to another and all his/her mobilities must be recorded (different budgets, certificates, etc.) but they still fall within the same mobility experience criteria. If there are any doubts regarding how mobilities should be recorded, please consult your National Agency. 1. Login to the Mobility Tool. 2. Click the project grant agreement number to see the project details. 3. Click the "Mobility Experiences" button in the top menu. 4. A list of existing mobility experiences will be displayed. Page 39 Mobility Tool Guide for Beneficiaries of Leonardo da Vinci programme 5. Find the mobility experience you want to add a new mobility for on the list. 6. Click the "Add New Mobility" button underneath mobility experience details. 7. A new mobility form will appear. 8. Select "Sending Partner", "Receiving Partner", "Intermediary Partner" (if applicable), change "Sending Country" and "Receiving Country" if they are different than the countries of the partners, "Departure Date", "Return Date". "Duration in weeks" and "and days" fields will be populated automatically. 9. Add budget values for subsistence and travel costs. The "Total" budget value will be calculated automatically. 10. If applicable, select "Certifying Partner" and the certification type that the partner will award to participants in this mobility and click the green arrow to add selection to the list. The "Selected Certificates" list will display values in pairs in a format of "certifying Page 40 Mobility Tool Guide for Beneficiaries of Leonardo da Vinci programme partner" – "certification type". In principle, maximum 3 certifications should be added for a single mobility experience. 11. Finally, select languages that will be used during this mobility. Once selected press the green arrow to add the languages to "Selected Languages" list. Repeat the process until all languages used in this mobility are selected. In principle, maximum 3 languages should be added for a single mobility experience. 12. Click the "Add New Mobility" button to save. A confirmation "Record created successful" will be displayed. Please note that the new mobility will appear on the list of mobilities and the number of mobilities will increase. 6.8. How to delete mobility? 1. Login to the Mobility Tool. 2. Click the project grant agreement number to see the project details. Page 41 Mobility Tool Guide for Beneficiaries of Leonardo da Vinci programme 3. Click the "Mobility Experiences" button in the top menu. A list of existing mobility experiences will be displayed. 4. Using the tick-box on the right select the Mobility you wish to delete. 5. Click the "Delete" button above the list of mobilities. 6. A confirmation dialog will be displayed: "Are you sure you want to delete this Mobility?". Click OK. 7. A confirmation message will be displayed: "The record has been deleted successfully". 6.9. How to delete mobility experience? 1. Login to the Mobility Tool. 2. Click the project grant agreement number to see the project details. 3. Click the "Mobility Experiences" button in the top menu. A list of existing mobility experiences will be displayed. 4. Using the tick-box on the left select mobility experience you wish to delete. 5. Click the "Delete" button on top of the page. Page 42 Mobility Tool Guide for Beneficiaries of Leonardo da Vinci programme 6. A confirmation "The record has been deleted successfully!" will be displayed. Page 43 Mobility Tool Guide for Beneficiaries of Leonardo da Vinci programme 7. Import and export of data In this chapter you will find details regarding import of partner, participant and mobility data as well as information regarding export of data from the Mobility Tool. The main purpose of data import is to enable beneficiaries of big projects to quickly enter large amount of data into the application in a single step. Other purpose of the import functionality is synchronisation between an external, used by the beneficiary tool with the Mobility Tool. Data import/export feature are available from Mobility Experiences page, as presented on the screenshot. 7.1. Data export The data export part of the “Import – Export” page is highlighted on the screenshot below. When exported, data from the Mobility Tool projects is saved in CSV file format. Semicolon (;) is used as a default field separator. The file is exported in UTF-8 character encoding standard. The exported file may be used for data import under the condition that all mandatory fields are not empty. This is due to partner and mobility ID fields which may not be provided while entering the data using graphical user interface. More information on this topic can be found in the chapter describing the import process. Page 44 Mobility Tool Guide for Beneficiaries of Leonardo da Vinci programme Please notice that exporting data from the Mobility Tool may take some time and it may result if files large in size. The biggest export file at the time of the writing the latest version of this document has over 1.2MB and it took over 2 minutes to generate. 7.2. Data import The Mobility Tool allows importing partner, participant and mobility data - that is all project information, in one go. The import process uses CSV (Comma-Separated Values) file as a data protocol. Data can be imported at any time of the project lifecycle. During the import new data entries may be created as well as updated. It is not possible to delete any information already existing in the tool during the data import process. All deletions should be done manually by the Mobility Tool user using the graphical user interface (GUI). The general rule for data import into the Mobility Tool is following: - If partner, mobility or participant cannot be identified in the system by partner and mobility ID – a new set of data is created. In particular, the beneficiary ID should always be provided BEFORE the function of data import/export is used. - If partner, mobility or participant can be identified as already existing in the system and the imported data contains some changes to the partner, mobility or participant information – the set of existing data is updated - If partner, mobility or participant can be identified as already existing in the system and the imported data doesn’t contain changes to neither partner, mobility nor participant information – no data is changed It is important to mention that whilst it is not possible to delete data from the Mobility Tool using the import functionality, it is possible to duplicate the existing information. More details on this topic can be found in next paragraphs. In order to import data into the Mobility Tool two conditions must be met – imported file must have a proper structure and imported data must meet required conditions. The data import section of the “Import – Export” page is highlighted on the screenshot below. Page 45 Mobility Tool Guide for Beneficiaries of Leonardo da Vinci programme Please notice that data import is resource heavy process and depending on size of the imported file may take some time to finish. Every import process always generates system response – in both successful and unsuccessful cases. Examples of these messages are presented below. In case of success the message might look as following. The failed import process may be signalled by the following system message. Important! Please note that unless all data in the imported file is correct, nothing will be imported by the Mobility Tool. This can be described as “All or None” approach to the import process. 7.2.1. Data file template – file structure The best way to ensure the correct file structure of the imported file is to use a template from the Mobility Tool website. The template can be obtained by going to Mobility Experience page, clicking "Import – Export" button (marked on the screenshot in one of the previous paragraphs) and clicking "Export Mobilities and the associated Partners information". This function will download all project information – in case of a new project with no mobilities the template will contain only the field headers. Page 46 Mobility Tool Guide for Beneficiaries of Leonardo da Vinci programme The file is organised the way that all header fields are located in the first row of the file, second row contains field requirements (described below) and data rows start from the third row. One data row equals to one mobility information – participant, mobility details, partner details, budget, etc. Please note that even if you use only one sending or receiving partner, you need to enter the partner organisation details (including organisation contact person details) as many times as many mobilities your project contains paying attention that the same partner ID is used throughout. Note: List of all fields with their description and specifics (whether the field is mandatory or requires using dictionary codes) can be found in "Mobility Tool Leonardo da Vinci Data Dictionary" file. The fields were named in human-readable, as oppose to machine-readable format. There are three types of fields in the template file – mandatory fields that need to contain data (marked by a star * in the template file), code fields (marked as DICT) and optional open text fields (that may be empty). All code fields are also mandatory fields. The specific of each field is described in the second row of the template file. Note: The list of codes used in the code fields marked with DICT in the template file can be found in "Mobility Tool Leonardo da Vinci Data Dictionary" file. Please pay special attention to the list of codes as they will be used extensively during the data import process – minimum 34 mandatory fields require use of dictionary codes, additionally 11 is required is project has intermediary partners. Mobility Tool import function respects use of national characters. Therefore it is important to ensure the data file used for import is encoded in UTF-8 character format. The CSV file template can be in one of the three accepted formats: 1. Field_1 ; Field_2 ; …; Field_n 2. “Field_1” ; “Field_2” ; … ; “Field_n” 3. “Field_1” ; Field_2 containing a double “” quote” ; … ; “Field_n” 7.2.2. Examples of data import file The table below depicts the first 7 fields of the template import data file that contains information about three mobilities. Please note the second row of the file containing Page 47 Mobility Tool Guide for Beneficiaries of Leonardo da Vinci programme specification of each field - * being a mandatory field, DICT being a code field. The “Participant Title” field doesn’t have any requirements; therefore it can be an empty field. For the purpose of the demonstration, other fields (columns) have been removed. Project ID * 2011-1BE3LEO0100001 2011-1BE3LEO0100001 2011-1BE3LEO0100001 Participant First Name * Participant Last Name * Participant Date of Birth * Participant Gender *, DICT … Mr FirstName LastName 01/01/1980 M … 0002 Mrs Jane Jones 01/01/1995 F … 0003 Mr FirstName LastName 01/01/1980 M … Mobility ID * Participant Title 0001 … It is very important that during the import of the data, the first two rows – field headers and field specification must be preserved in the file. Deleting the first two rows from the template will render the import invalid. It is also important not the change the order of the columns (fields). Any change in the fields/columns order will render the import invalid as well. In the following example 8 participants is going from the same sending organisation (code BEN) will be sent to 8 different hosting partners (codes HOST01 to HOST08). Project ID Mobility ID ... Participant First Name ... Sending Partner ID ... Receiving Partner ID ... * * ... * ... * ... * ... 2011-1-BE3LEO01-00001 ID0001 ... FirstName1 ... BEN ... HOST01 ... 2011-1-BE3LEO01-00001 ID0002 ... FirstName2 ... BEN ... HOST02 ... 2011-1-BE3LEO01-00001 ID0003 ... FirstName3 ... BEN ... HOST03 ... 2011-1-BE3LEO01-00001 ID0004 ... FirstName4 ... BEN ... HOST04 ... 2011-1-BE3LEO01-00001 ID0005 ... FirstName5 ... BEN ... HOST05 ... 2011-1-BE3LEO01-00001 ID0006 ... FirstName6 ... BEN ... HOST06 ... 2011-1-BE3LEO01-00001 ID0007 ... FirstName7 ... BEN ... HOST07 ... 2011-1-BE3LEO01-00001 ID0008 ... FirstName8 ... BEN ... HOST08 ... Page 48 Mobility Tool Guide for Beneficiaries of Leonardo da Vinci programme Next example will create 3 different mobilities from the same sending partner to three different hosting partners for the same participant. Please note that this import will result in list of participants containing details of the same person 3 times. This is due to the fact that it is the mobility that identifies the imported data, not participant. Project ID Mobility ID ... Participant First Name Participant Last Name ... Sending Partner ID ... Receiving Partner ID ... * * ... * * ... * ... * ... 2011-1-BE3LEO0100001 2011-1-BE3LEO0100001 2011-1-BE3LEO0100001 ID0001 ... FirstName1 LastName1 ... BEN ... HOST01 ... ID0002 ... FirstName1 LastName1 ... BEN ... HOST02 ... ID0003 ... FirstName1 LastName1 ... BEN ... HOST03 ... The following example highlights the importance of careful row-by-row data entry. During the import process the Mobility Tool sees rows as consecutive data entries. Therefore if row 20 contains some modifications of partner data that has already been defined in row 6 of the same imported data file, it will take the data from row 20 as the most current one and will update the partner data as a result. This can be illustrated by the next example of the import data file. Project ID ... Sending Partner ID Sending Partner Legal Name ... Sending Partner Legal Address Sending Partner Postal Code ... * ... * * ... * * ... 2011-1-BE3LEO01-00001 ... BEN Beneficiary Organisation ... Rue Leonardo da Vinci 1 BE-1000 ... ... ... ... ... ... ... ... ... 2011-1-BE3LEO01-00001 ... BEN Beneficiary Organisation ... Rue Leonardo da Vinci 10 BE-1000 ... Please notice different address of the beneficiary organisation in the last row. Being the last entry in the imported data file, “Sending Partner Legal Address” will contain value “Rue Leonardo da Vinci 10”, not “Rue Leonardo da Vinci 1” as used in another entry. The following example illustrates the similar behaviour. Project ID ... Sending Partner ID Sending Partner Legal Name ... Sending Partner Legal Address Sending Partner Postal Code ... * ... * * ... * * ... 2011-1-BE3LEO01-00001 ... BEN Beneficiary Organisation ... Rue Leonardo da Vinci 1 BE-1000 ... ... ... ... ... ... ... ... ... 2011-1-BE3LEO01-00001 ... BEN Beneficiary Organisation ... Rue Leonardo da Vinci 10 BE-1000 ... Page 49 Mobility Tool Guide for Beneficiaries of Leonardo da Vinci programme Project ID ... Sending Partner ID Sending Partner Legal Name ... Sending Partner Legal Address Sending Partner Postal Code ... * ... * * ... * * ... 2011-1-BE3LEO01-00001 ... BEN Beneficiary Organisation ... Rue Leonardo da Vinci 1 BE-1000 ... Please notice the beneficiary organisation data will change twice during the import process. Once – the “Sending Partner Legal Address” will be changed from “Rue Leonardo da Vinci 1” to “Rue Leonardo da Vinci 10” and then, at the very last row, the address will be changed back to its original value of “Rue Leonardo da Vinci 1”. More scenarios will be discussed in following chapters. 7.2.3. ID fields The data template file contains 12 ID fields. They play very important role in the data import process. The table below presents all the ID fields with their characteristics. Field name Mandatory? Project ID Yes Mobility ID Yes Description Grant agreement number also called project number, i.e. 2011-1-BE3-LEO01-00001. In a single import file this field must always contain the same value. Any unique identification of a particular mobility, i.e. 0001, MOB01, NL-GB-John Certifying Partner ID 1 Equals to either sending, receiving or intermediary partner ID Certifying Partner ID 2 Equals to either sending, receiving or intermediary partner ID Certifying Partner ID 3 Equals to either sending, receiving or intermediary partner ID Sending Partner ID Yes Any unique identification of a sending (beneficiary) partner, i.e. BENEFICIARY, ORG1. The beneficiary ID should always be provided BEFORE the function of data import/export is used. Optional field for any partner national identification, i.e. organisation registration number Yes Identification of a partner contact person. This field cannot be updated via the import process. Yes Any unique identification of a receiving (host) partner, i.e. HOST1 Sending Partner National ID Sending / Receiving / Intermediary Partner Contact Email Receiving Partner ID Receiving Partner National ID Intermediary Partner ID Intermediary Partner National ID Page 50 Optional field for any partner national identification, i.e. organisation registration number Yes Any unique identification of an intermediary partner – if exists in the mobility context, i.e. INT1, TRAINING01 Optional field for any partner national identification, i.e. organisation registration number Mobility Tool Guide for Beneficiaries of Leonardo da Vinci programme Let’s analyse few scenarios that illustrate in details the logic behind the ID fields and how the system interprets their use. 7.2.3. Data import scenarios Scenario 1 – data import to an empty project – sending partner other than beneficiary organisation Let’s assume you just received the invitation from the Mobility Tool to work with your project. The website doesn’t contain any information about participants of your project, also there are no mobilities. You may or may not already have some partners in the project. You go to the Mobility Tool website, open section Mobility Experiences, click “Import – Export” button and download the exported data. The file is almost empty – contains only the field names and their specification – it does not contain any project data. You open the file in a program of your choice (please read remarks regarding software at the end of this chapter) and fill in all required fields, taking into consideration the list of codes at the end of this document and format of the fields (please pay special attention to the date format) and ID codes described earlier. Minimum 79 out of 147 fields must be filled in. You save the file in CSV format and import the file via the website. The result is following: 1. Minimum two new partners are created with the partner ID’s and partner details specified in the import file (sending and receiving partner) together with their contact persons. 2. Minimum one participant is added to the list of participants 3. Minimum one mobility is created Important 1. The imported partner (sending, receiving or intermediary) contact person is automatically marked as preferred partner contacts. 2. Values of education, certification and languages fields are ignored for accompanying persons (they are participants having values for “Is Participant an Accompanying Person” set to “Yes”), however they must be provided in the imported file. The result of creating two new partners may not be necessarily the most desirable one as you might want using your own beneficiary organisation as the sending partner. We’ll cover this scenario next. Page 51 Mobility Tool Guide for Beneficiaries of Leonardo da Vinci programme Scenario 2 - data import to an empty project – beneficiary organisation as the sending partner Let’s assume you just received the invitation from the Mobility Tool to work with your project. The website doesn’t contain any information about participants of your project, also there are no mobilities. You may or may not already have some partners in the project, but you want to make sure your beneficiary organisation is used to create mobilities during the import process. You go to the Mobility Tool website and click Partners to display list of partners in your project. You click the pencil icon to edit your organisation and enter value for “Partner ID” field, as presented in the screenshot below. For the purpose of a demonstration, value BEN was entered in the Partner ID field. Next, you open section Mobility Experiences, click “Import – Export” button and download the exported data. The file is almost empty – contains only the field names and their specification – it does not contain any project data. You open the file in a program of your choice (please read remarks regarding software at the end of this chapter) and fill in all required fields, taking into consideration the list of codes at Page 52 Mobility Tool Guide for Beneficiaries of Leonardo da Vinci programme the end of this document and format of the fields (please pay special attention to the date format) and ID codes described earlier. In sending organisation part of the template file you use data of your own organisation, making sure that “Sending Partner ID” contains value BEN. Minimum 79 out of 147 fields must be filled in. You save the file in CSV format and import the file via the website. The result is following: 1. Minimum one new partner is created with the partner ID and partner details specified in the import file (sending and receiving partner). 2. Minimum one participant is added to the list of participants 3. Minimum one mobility is created Notice that in this case, your beneficiary organisation was used as the sending organisation. You may also notice that unless you entered your organisation and your organisation contact person details exactly as they were on the website, the organisational or contact person data is updated. Please refer to the next scenario for more details on how to update data using the import process. Scenario 3 – data import to project with mobilities – adding new and updating existing information entered via graphical user interface Let’s assume you already worked with your project using the graphical user interface (GUI) of the Mobility Tool. You have added some partners, participants and created some mobilities. You decide to work with the data outside of the tool using an external editing software. You go to Mobility Experiences page, click “Import – Export” button and download the exported data. You open the file in the text editor or a spreadsheet editor and notice that neither the partners nor the mobilities have ID’s – the fields, despite being marked with the star (*) as mandatory are empty. You decide to update some information about the participants and add more mobilities. You add mobility and partner ID’s in the respective columns. Finally, you import the data. The result is following: 1. You login to the tool and notice that you have some double entries on the partner page – some partner have partner ID values the others don’t. You see that the new partners you added in the import file are correctly displayed on the page. Page 53 Mobility Tool Guide for Beneficiaries of Leonardo da Vinci programme 2. You notice that you have some duplication on the participant page, however you can find the participants for whom you changed some data. 3. You notice that you have some duplicated entries on the Mobility Experiences page. Some mobilities have mobility ID’s some others don’t. In this scenario you used the existing data entered via the website that didn’t have neither partner nor mobility ID’s defined. The system assumed that new partner and new mobilities are added since it couldn’t find partners and mobilities with the ID’s you defined in the file. This is not the most desirable outcome of the data import. You need to manually delete the mobilities without ID’s. Then you need manually delete the partners without ID’s and at the end delete the duplicated participant entries – order is very important. You can select all participants and click “Remove selected” – the system will only delete the participants without existing mobilities. How to prevent duplicated data entry from happening is described in the next scenario. Scenario 4 – data import to project with mobilities – adding new and updating existing information entered via graphical user interface and avoiding data duplication Let’s assume you already worked with your project using the graphical user interface (GUI) of the Mobility Tool. You have added some partners with their respective partner ID, participants and created some mobilities with mobility ID’s. You decided to work with the data outside of the tool using an external editing software. You go to Mobility Experiences page, click “Import – Export” button and download the exported data. You open the file in the text editor or a spreadsheet editor and notice that both the partners and the mobilities have ID’s. You decided to update some information about the participants and add more mobilities. You add mobility and partner ID’s in the respective columns – you reuse some of the codes as you have same sending partner for all your mobilities. Finally, you import the data. The result is following: 1. You login to the tool and notice that partner information remained unchanged as you didn’t change any data in the import file. 2. You notice that some participant information have changed accordingly to changes done in the import file. 3. You notice that the list of mobilities is longer than previously – there are new mobilities that you defined in the import file. Highlights from the described scenarios Page 54 Mobility Tool Guide for Beneficiaries of Leonardo da Vinci programme 1. To avoid data duplication always use partner and mobility ID’s. If you already have data in the tool and you decide to start using the import functionality, make sure you edit all your partners and all your mobilities and add unique ID’s. In particular, the beneficiary ID should always be provided BEFORE the function of data import/export is used. 2. To update partner information use the same partner ID in the import file as the partner ID you find in the partner details on the website. 3. Similarly, to update mobility information use the same mobility ID in the import file as the mobility ID you find on the Mobility Experience page. 4. If you make a mistake and forgot about adding partner or mobility ID’s on the website, you can delete all your data – all mobility experiences, partners and participants (in this order!) and import the file again. 7.2.4. Error handling Every failed import process generates a message on the website. Example error in processing the file is presented on the following screenshot. As it was already mentioned earlier, unless all data in the imported file is correct, nothing will be stored in the Mobility Tool (“All or None” approach). Every time an error is found in the analysed data, a log file is generated by the system. Log file can be downloaded by clicking on the link in the error message on the website. The error log file has almost exactly the same structure as the imported file – it contains field headers and their specifics (whether the field is mandatory or a code must be used) with additional field at the beginning of the file – Row Line. The other difference is that instead of data it contains an error that is linked to a specific field in a specific row of the imported file. Using the row number and error in the specified field is easy to locate the problematic entry in the imported data file. 7.2.5. The most important rules for successful data import Following is a non-exhaustive list of example requirement for successful data import. Page 55 Mobility Tool Guide for Beneficiaries of Leonardo da Vinci programme File must be of CSV format File must be encoded in UTF-8 Project agreement number must be the same as the active project on the website Partner ID and Mobility ID must be provided Mobility ID must be unique in the imported file All mandatory fields must be provided (except for the intermediary partner) All fields must have correct format (use the "Leonardo da Vinci Mobility Tool Data Dictionary" for reference) All codes must be correct (use the "Leonardo da Vinci Mobility Tool Data Dictionary" for reference) Mobility return date must be later than departure date Sending and receiving countries cannot be the same Sending partner in one mobility cannot be receiving or intermediary partners in any other imported mobility Beneficiary organisation cannot play any other role than sending partner There must be exactly one partner contact person per organisation (sending, receiving or intermediary) The certifying partners provided in the import file must be one of the sending, receiving or intermediary partners IVT mobilities can have a maximum of 39 weeks duration PLM mobilities can have a maximum of 26 weeks duration VETPRO mobilities can have a maximum of 6 weeks duration Mobility budget cannot be smaller than 0 and larger than 99999; the budget values may remain empty in the imported file 7.3. Remarks for text editing programs There are many examples of text or spreadsheet editing software available on the market. This paragraph will not extensively cover any particular examples of software but will provide few cases of using Microsoft Excel 2010. We will focus on the most typical examples of issues that might affect data import process into the Mobility Tool. 7.3.1. UTF-8 As mentioned already in this chapter, the Mobility Tool import preserves national characters during the process. The import files must have UTF-8 encoding. Otherwise, some national characters may be displayed incorrectly on the website and consecutively in the beneficiary or participant reports. Page 56 Mobility Tool Guide for Beneficiaries of Leonardo da Vinci programme Microsoft Excel 2010 does not save CSV files in UTF-8 character encoding. As a result, some national characters in a large number of European alphabets, such as Greek, Bulgarian, Polish and more, may be incorrectly preserved and as a results displayed on the website. Therefore it is suggested to test office suites available on the market to find the one that is fully compatible with UTF-8 and best suited to the user’s needs. Some examples of office suites that have been tested to be fully compatible with UTF-8 are: Libre Office, Apache Open Office for Microsoft Windows, Apple OS X and Linux or Apple iWorks on Apple OS X. 7.3.2. Saving CSV file format from Microsoft Excel 2010 Note: The process described below doesn’t produce correctly encoded characters for a large number of European languages. Please refer to the previous paragraph for more information. Microsoft Excel 2010 is capable of opening and saving files in CSV format. However, whilst opening the file is rather straightforward (see troubleshooting section “11.2.2. CSV files exported by Mobility Tool are not opened correctly by Microsoft Excel” if you experience problems), saving files in CSV format may require a bit more attention. Here are a few steps to ensure that the data is saved in a proper format. 1. When you finish file edit, select menu “File” and click “Save & Send”. 2. Click “Change File Type”, select “CSV (Comma delimited) (*.csv)” and click “Save As” button underneath. 3. Select file name and make sure “Save as type” list have “CSV (Comma delimited) (*.csv)” option selected. Click “Save” button to confirm. 4. Excel will display compatibility warning. Click “Yes” button to save. 7.3.3. Long numerical values Some spreadsheet software may shorten your long numerical values, for example a phone number, of 3212351234567 to a format of 3.12E+12. Pay special attention to the cell data type because unless the type is changed to text (or similar that doesn’t require any special formatting), the imported data will contain 3.12E+12 in the phone number field on the website. 7.3.4. Auto-completion during writing Some software offers auto completion during text editing which may create some problems. Automatically corrected by Microsoft Excel values may not be accepted during the data import. In Excel, the auto-completion can be disabled in menu File, then Options, Proofing, “AutoCorrect Options…” button, “Math AutoCorrect” tab, deselect “Replace text as you type”. Page 57 Mobility Tool Guide for Beneficiaries of Leonardo da Vinci programme 8. Participant reports 8.1. How to request participant report? Note: Participant reports are generated per Mobility Experience. Reports include questions for all Mobilities within the Mobility Experience. 1. Follow the steps from “6.2. How to display mobility experience details?” paragraph. 2. Click the left hand side green loupe icon ( ) next to Mobility Experience for which you want to send a participant report. 3. Click the "Report Requests" tab on top of the page. 4. A list of participant report requests will appear. Page 58 Mobility Tool Guide for Beneficiaries of Leonardo da Vinci programme 5. Click the "Request New Report" button. 6. Select report language. You can only use languages that were assigned to national agency that approved the project. If required, type in a comment that will be sent along with an email message to the participant. 7. Click the "Request New Report" button to send the request. You will be redirected to the list of participant report request. Please note the newly created report request is listed with its current status (most likely REQUESTED). Page 59 Mobility Tool Guide for Beneficiaries of Leonardo da Vinci programme 8. Once the system generates a PDF file, the status will change to EMAIL NOTIFIED. That means an email with a link to PDF file has been sent to the participant. Please check “8.4. How to check for status of participant report?” paragraph for more details on participant report status. 9. Please note that as a beneficiary you can download participants report using the "Download PDF" link on the Report Requests page. You can use this link in case participant didn't receive or deleted the automated notification about report request. This link will always provide a copy of an empty PDF file. 8.2. How to request many participant reports at once? 1. Follow the steps from “6.2. How to display mobility experience details?” paragraph. 2. Using the left hand side check boxes select all mobility experiences for which you want to create participant report requests. Page 60 Mobility Tool Guide for Beneficiaries of Leonardo da Vinci programme 3. Once selected, click on "Request report" on the top of the table. 4. A confirmation form will appear where a report language selection and additional comments can be made. Please note that the list of mobility experiences for which the reports have been requested is presented on top of the form. 5. Click "Request New Report". A confirmation message will be displayed: "2 Participant Report Requests are created successfully". Please note the change of report status on the list of mobility experiences. Page 61 Mobility Tool Guide for Beneficiaries of Leonardo da Vinci programme 8.3. How to approve, reject or re-request participant reports? 1. Follow the steps from “6.2. How to display mobility experience details?” paragraph. 2. Click the "Report Requests" tab. A list of report requests will be displayed. A report that is in status "Pending" is ready to be approved, rejected or re-requested. a. The latest status can also be checked on the list of all mobility experiences page. It is advised, however, to check each mobility experience individually in case multiple reports were requested. 3. Click the report ID or the report status (PENDING). 4. Report data will appear as the participant filled it in. Page 62 Mobility Tool Guide for Beneficiaries of Leonardo da Vinci programme 5. Read the report. There are three options you can take: a. If you want to accept the report, click the "Accept" link in the top of the window. Once accepted report can be reversed to a "Pending" status. In order to do so, click the "Revert to Pending" link on top of the page displaying the report data. b. If you want to reject the report, click the "Reject" link. A dialog form will appear with the option to provide an explanation on why the report was rejected. An automated email will be sent to the participant with information that his/her report was rejected stating the reason for rejection. The rejection email will also contain a link to a new report PDF file that needs to be reviewed and submitted again. Once rejected, the status of the report changes to "REJECTED". In this case a new report request will be made. c. If you want to re-request, click the "Re-Request" link on top of the page. A dialog form will appear to write a reason for the new request. The form is not mandatory to be filled in. Click the "Submit" button to send a new request. The participant will receive new email with a link to already filled PDF file. This action does not invalidate or reject the previous participant submission. This action can be used to send participant already filled-in report for his/her copy in case the report is missing. 8.4. How to check for status of participant report? 1. Login to the Mobility Tool. 2. Click the grant agreement number of the project you want to open. A page of project details will be displayed. 3. Click the "Mobility Experiences" button in the top menu. You will see the list of existing mobility experiences. 4. The current status of the participant report is displayed in the second column from the right called "Report Status" is displayed. Page 63 Mobility Tool Guide for Beneficiaries of Leonardo da Vinci programme a. Report request can also be checked for each individual mobility experience. In order to verify the report request status, click on the green loupe next to the mobility experience and then click on Reports Requests tab. Several values of the participant report status are possible. The complete list of participant report status is as follows: REQUESTED – beneficiary has requested a report on the website. The Mobility Tool is processing the request and creates a participant form. EMAIL NOTIFIED – email has been sent to participant with a link to report PDF file SUBMITTED – participant has submitted his/her report data electronically via the PDF form PARSING – the Mobility Tool is reading data received from participant PENDING – report is pending beneficiary decision whether to accept, reject or re-request the report ACCEPTED – report has been accepted by beneficiary REJECTED – report has been rejected by beneficiary, a new report request was created INVALIDATED – a new report request has been made while other report request was in "EMAIL NOTIFIED" state ERROR – error in processing. Please contact your National Agency and let them know about the problem. Page 64 Mobility Tool Guide for Beneficiaries of Leonardo da Vinci programme 8.5. Participant forms submission deadline All reports have a maximum submission date – the latest date when the reports are accepted by the system. The maximum submission date is calculated based on project activity dates in the following method: the latest submission date = Project End Activity date + 60 days In case a project doesn't have activity end date specified, the following formula is used to determine the submission deadline: the latest submission date = National Agency contract signature date + 2 years + 60 days The details on the project activity dates can be found in the Project Details page in Mobility Tool. The example start and end activity dates may look similar to the image below. The reporting start and end date can be found in “Updates and Reports” section of the tool. In order to find the details, please follow the steps: 1) Login to the Mobility Tool 2) Click your project agreement number 3) Click "Updates and Reports" in the top menu bar 4) Click update time of the latest project update (the highest position on the list) 5) Report start date and Report end date values are displayed in "Submission Data" section on top of the screen. Page 65 Mobility Tool Guide for Beneficiaries of Leonardo da Vinci programme 8.6. How to print participant report form? Participant forms can be printed either by participant himself or the beneficiary organisation. Participant: 1) Open the form 2) Scroll to the very end of the report to "Standard Submission Procedure" section 3) Click "Print form" button. The same can be achieved by using File -> Print… in Adobe Acrobat Reader Application. Note: You can only print reports that are in either PENDING, APPROVED or REJECTED status. 1) Login to the Mobility Tool 2) Click project agreement number 3) Click "Mobility Experiences" menu item on the top menu bar 4) Select participant you wish to print report for by clicking on the green loupe icon ( the left hand side 5) Click "Reports Requests" tab on top of the mobility experience details section Page 66 ) on Mobility Tool Guide for Beneficiaries of Leonardo da Vinci programme 6) Click PENDING, APPROVED, REJECTED status or the ID of the report 7) Print the page using your Internet browser functionality. Page 67 Mobility Tool Guide for Beneficiaries of Leonardo da Vinci programme 9. Budget 9.1. How to manage mobility budgets? In the mobility budget section you are able to provide subsistence and travel cost for mobility participants. Budget values can be entered during creation of mobility experience or additional mobilities. However, if these values were not provided and need to be added later, follow the steps below. 1. Login to the Mobility Tool. 2. Click the grant agreement number of the project you want to open. A page of project details will be displayed. 3. Click the "Mobility Experiences" button in the top menu. 4. A list of existing mobility experiences along with corresponding mobilities will be displayed. 5. Click the green loupe icon ( ) at the right bottom side of the mobility for which you want to change the budget. 6. You will see the mobility details form displaying the following information: Page 68 Mobility Tool Guide for Beneficiaries of Leonardo da Vinci programme a. "Mobility Partners" – sending, receiving and intermediary partners b. "Mobility Details" – sending, receiving country, departure and return date, duration in weeks and days c. "Budget" – "Subsistence" and "Travel Costs" with automatically calculated "Total" value 7. Provide subsistence and travel cost for the mobility. All budget entries are displayed in Euros. 8. Click the "Update Mobility" button. A confirmation message "The record has been updated successfully" will be displayed. 9. Click the "Mobility Experiences" button in the top menu to return to the list of mobility experiences. 10. Repeat the process for each mobility, if necessary. Page 69 Mobility Tool Guide for Beneficiaries of Leonardo da Vinci programme 9.2. How to manage project budget? In the project budget section you are able to review project budget and compare it with approved contractual budget values. On the same page you're also able to enter amounts for "Mobility Organisation and Management" and for "Pedagogical, Linguistic and Cultural Preparation". The budget values are calculated based on values entered on this page as well as based on all mobilities budget values. In order to see the budget page or make changes to the budget values, please follow the steps listed below. 1. Login to the Mobility Tool. 2. Click the project grant agreement number. A project details page will be displayed. 3. Click the "Budget" button in the menu. 4. A project budget page will be displayed. Values in the three columns represent: - Number of participants or number of mobilities for each budget category that have budget greater than zero - Total project budget - Contractual approved budget. Page 70 Mobility Tool Guide for Beneficiaries of Leonardo da Vinci programme Items in the last column, "Approved Budget" reflect the amounts approved by the National Agency as expressed in the Grant Agreement or in the last signed amendment. They cannot be changed in the Mobility Tool by the beneficiary organisation. If there is any discrepancy between these amounts and the contents of the project Grant Agreement or the last Amendment, please contact your National Agency helpdesk. The budget values are displayed in three distinctive groups: a. Mobility Organisation and Management b. Pedagogical Linguistic and Cultural Preparation c. Mobility Budget, which is further split into: i. Travel ii. Subsistence 5. To enter or change the value in "Mobility Organisation and Management" please enter the amount directly in the field. a. Click the "Recalculate" button to see the "Total Budget" value recalculated. b. Click the "Save" button to save changes. 6. To enter or change the value of the next budget item, click the "Pedagogical Linguistic and Cultural Preparation" link. Page 71 Mobility Tool Guide for Beneficiaries of Leonardo da Vinci programme 7. A list of participants and their budgets will be displayed. a. To change these values, please click the participant's first or last name or the value itself. b. Change the "Total" value for the participant. c. Click the "Save" button to save and return to previous page. d. If necessary repeat this process for each participant. e. Click the "Back" button to return to the main "Budget Summary" page. 8. Click the "Mobility Budget" link to see the summarized budget values for all mobility experiences. a. You can use the search field to quickly find a participant by their first or last name or click the "Advanced Search" button for more detailed search. b. To clear search results click the "Clear Filters" button. 9. If you click any participant name you will be redirected to the mobility details page for this participant/mobility. Check the previous chapter for more details on using this form. 10. On the "Mobility Budget" page click "Back" to return to the project budget section. 11. If you click any of the "Travel" or "Subsistence" budget items you will see mobility budget data based on the selected position. For example, clicking the "Accompanying Persons" budget item under "Travel" will display values for accompanying persons only. Please note that both travel and subsistence values will be displayed on the same page. If the project total budget or any budget headings exceed the values of the contracted and approved budget, the budget headers will be displayed in red, as presented below. Page 72 Mobility Tool Guide for Beneficiaries of Leonardo da Vinci programme Note: The green loupe icons in Travel and Subsistence sections on Budget page next to "Participants With Special Needs" and "Accompanying Persons" is only displayed when there are mobilities for participants with special needs or accompanying persons. In this case number of participants will also be shown as zero (0). Page 73 Mobility Tool Guide for Beneficiaries of Leonardo da Vinci programme 10. Beneficiary Report This section applies to final and intermediary beneficiary reporting. Note: Beneficiary report created in the Mobility Tool will be pre-filled with the information entered during the project lifecycle. This information cannot be changed in the report and must be verified and, if necessary, amended in the tool before creating the report. 10.1. How to create and submit beneficiary report? 1. Login to the Mobility Tool. 2. Click the project grant agreement number. A project details page will be displayed. 3. Click the "Updates and Reports" button in the top menu. 4. Information on number of Participant Mobility Experiences and on number of approved Participant Reports will be displayed on top of the page for reference, so you can see at any moment if all Participant Reports have already been submitted and approved or not. Below, there is a table with as many lines as project updates. Beneficiary report can only be prepared from the last update. The status of the report is shown. Page 74 Mobility Tool Guide for Beneficiaries of Leonardo da Vinci programme 5. Click the "Prepare New Report" link. a. If there is no budget defined for mobilities a message "This project has Mobilities with 0 (zero) budgets. A link to go to "Total Budget" will be displayed. b. If a project budget goes over the contractual budget amount a warning will be displayed. Also a link to "Total Budget" will be provided to align the budget values with the budget agreed in the contract. If for any reason the contractual budget values are incorrect, please contact you National Agency. 6. Choose the language of the report. You can only select among the languages approved by your National Agency. 7. If more than one beneficiary organisation contact person has been created in the tool, the person who will be displayed in the report needs to be selected. Page 75 Mobility Tool Guide for Beneficiaries of Leonardo da Vinci programme 8. Click the "Yes" button. Confirmation "Request for a new report was sent" will be displayed. 9. In a few minutes status of the report will change to "Requested". 10. Click the "Download PDF" link to download and save the report. To open the report Adobe Acrobat Reader software is required. It is advisable to save the report on a computer local hard drive. 11. Review the report and provide answers to all required questions in the form. 12. Scroll to the bottom of the report and click the "Validate" button. This action will check if all required fields have been filled in. 13. Once completed, click the "Submit online" to send the report to your National Agency. This action requires Internet connection. 14. If needed, print the report by clicking the "Print form" button on the bottom of the form. 10.2. Beneficiary form submission deadline Beneficiary forms follow the same rules for submission deadlines as participant reports. Please refer to “8.5. Participant forms submission deadline” for more information. Page 76 Mobility Tool Guide for Beneficiaries of Leonardo da Vinci programme 10.3. Final Beneficiary Report discrepancies It may happen in your project that some mobilities don't have a travel and subsistence budget defined or you forget to create mobilities for some participants or simply your budget goes over the contracted amount. Neither of these problems can stop you from filling in and submit your report to your National Agency. The Mobility Tool will display these warnings during the process of final beneficiary report creation and will allow you to fix it, if required. Otherwise, you can simply click "Yes" button in answer to "Do you want to continue with the report generation?" Below is an example of the above mentioned situation where there are participants without mobilities, some mobilities without budget and the budget goes beyond the contracted amount. There is a section in beneficiary final report that shows similar summary. The report contains: Table with number of expected and received participant reports List of participants without mobilities List of accompanying persons without mobilities Mobility experiences with duration shorter than allowed Mobilities with zero budget Each of these sections has open text fields that allow you to provide more information on any of the above issues. Page 77 Mobility Tool Guide for Beneficiaries of Leonardo da Vinci programme 11. Support and troubleshooting 11.1. National Agency Helpdesk contact All questions or issues with the Mobility Tool should be reported to your National Agency helpdesk. The contact details are published on the Mobility Tool "Home" page, as shown on the screen shot below. 11.2. Troubleshooting of the most common issues 11.2.1. Issues when submitting beneficiary or participant forms using Adobe Acrobat Reader – "NotAllowedError" During the form submission, it may happen that a following error is displayed in the form: "NotAllowedError: Security settings prevent access to this property or method". If this happens, please follow these steps: 1. Make sure the computer is connected to Internet 2. If the computer has a proxy connection (indirect access to Internet), make sure proxy configuration is properly saved in system settings (for Windows, it's Internet Options in Control Panel) 3. When the error appears, there will be an additional message bar on top of the Adobe Acrobat Reader window with the following message: "Some features have been disabled to avoid potential security risks. Only enable these features if you trust this document" 4. Select "Options" button on the message bar (on the right) and choose option "Always trust this document" 5. A window will be shown asking to save the document and the form will re-open. Page 78 Mobility Tool Guide for Beneficiaries of Leonardo da Vinci programme 6. After re-opening submission should be successful and error-free. 7. If the problem persists, please contact National Agency Helpdesk. 11.2.2. CSV files exported by Mobility Tool are not opened correctly by Microsoft Excel Mobility Tool offers two options for mobility experience data export – Excel and CSV. It may happen, that when you choose to download and open CSV Microsoft Excel might not recognize the field separator and will display a whole length of each line in just one cell, as shown on the screenshot below. Regional settings change technique This may happen due to regional settings of your computer. The solution presented below applies to Microsoft Windows 7, however previous versions of the Windows operating system may have similar steps. In order to fix the problem, please go to Control Panel, then Region and Language and click "Additional Settings" button on the bottom of the window. Page 79 Mobility Tool Guide for Beneficiaries of Leonardo da Vinci programme There you'll find "List separator" option that most likely will be set to comma (,). Please change this option to semi-colon (;), save the settings, close Excel and export the data again. The issue should be resolved. Use of Excel data import functionality The CSV data can be imported into Microsoft Excel without changing the regional settings. For this purpose text import function can be used in the application. Please note that the steps presented below may differ between different versions of Microsoft Excel and Office suits running on different operating systems (Microsoft Windows or Apple OS X). Page 80 Mobility Tool Guide for Beneficiaries of Leonardo da Vinci programme 1. Open Microsoft Excel with a blank spreadsheet. 2. Go to Data tab and click "From Text". Window "Import Text File" will appear. 3. Select the CSV file you wish to edit in Excel. The import process will continue with "Text Import Wizard". 4. Select "Delimited", as presented on the screenshot. Leave all other options as they are (start import at row 1, file origin: "65001 : Unicode (UTF-8)"). Click "Next" button. 5. Un-tick the default "Tab" and tick "Semicolon". You will notice that data preview will change accordingly. Click "Next" button. Page 81 Mobility Tool Guide for Beneficiaries of Leonardo da Vinci programme 6. In the next window, move the horizontal scrolling to the end of the right side of the data preview. 7. While holding Shift key on your keyboard, click on the last column of the data preview. You will notice the data preview table will turn black. Page 82 Mobility Tool Guide for Beneficiaries of Leonardo da Vinci programme 8. Select "Text" option in the column data format pane, as presented on the screenshot below. You will notice the headings of the columns in data preview will change from "General" to "Text". 9. Click "Finish". The wizard will ask you where the imported data should be placed. Click button "OK". Page 83 Mobility Tool Guide for Beneficiaries of Leonardo da Vinci programme 10. Your data from the CSV file exported from Mobility Tool will be presented in columns. 11.2.3. Mobility Tool website is not displayed correctly in Microsoft Internet Explorer It has been reported that the Compatibility View function of Microsoft Internet Explorer may cause some display issues on the Mobility Tool website. If you experience any issues displaying the websites on Microsoft Internet Explorer, please turn off the Compatibility View by going to Tools, and then click on Compatibility View to deselect it. Page 84 Mobility Tool Guide for Beneficiaries of Leonardo da Vinci programme More information on compatibility view can be found at the page below. http://windows.microsoft.com/is-is/internet-explorer/products/ie9/features/compatibility-view All other problems should be reported to the helpdesk of your National Agency. Page 85