1
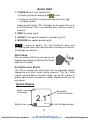
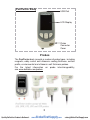
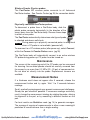
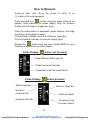
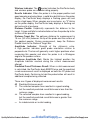
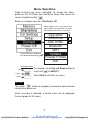
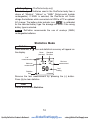
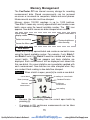
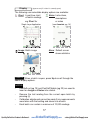
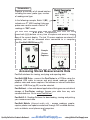
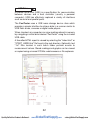
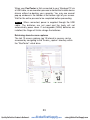
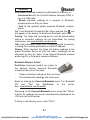
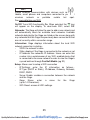
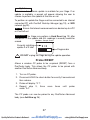
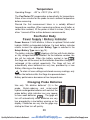
Quality DeFelsko Products Online at:
www.
GlobalTestSupply.com
[email protected]
Table of Contents
Introduction .........................................................
Kit Contents ........................................................
Quick Start ..........................................................
Probes .................................................................
Measurement Notes ............................................
How to Measure ..................................................
Menu Operation ..................................................
Verification of Accuracy .......................................
Zero .....................................................................
Calibration and Adjustment .................................
Adjustment Techniques .......................................
Cal Settings Menu ...............................................
1 Point Adjust .................................................
2 Point Adjust .................................................
Setup Menu .........................................................
Reset ..............................................................
Gage Info .......................................................
Statistics ..............................................................
Memory Management .........................................
Annotate .........................................................
Display ...........................................................
Summaries .....................................................
Screen Capture ..............................................
Accessing Stored Measurement Data ................
PosiSoft Desktop Manager (PDM) .................
PosiSoft.net ....................................................
PosiSoft 3.0 ....................................................
PosiSoft Mobile ..............................................
Quality DeFelsko Products Online at:
www.
GlobalTestSupply.com
1
1
2
3
4
5
7
8
8
9
9
10
10
10
12
12
13
14
15
16
17
18
18
18
19
19
20
20
[email protected]
Connect Menu .....................................................
Sync Now .......................................................
Auto Sync .......................................................
USB Drive ......................................................
Bluetooth ........................................................
Bluetooth Wireless Printer .............................
WiFi ................................................................
Powder Probes ..............................................
List .............................................................
Change Order ............................................
Add New ....................................................
Probe Off ...................................................
Connect .....................................................
Updates ..........................................................
Probe RESET .....................................................
Temperature ........................................................
PosiTector Body Power Supply/Battery Indicator...
Change Probe Batteries ......................................
Additional Accessories ........................................
Technical Data ....................................................
Returning For Service .........................................
Warranty ..............................................................
Quality DeFelsko Products Online at:
www.
GlobalTestSupply.com
21
21
21
22
24
24
25
26
26
26
26
26
26
27
27
28
28
28
29
31
32
32
[email protected]
Introduction
The PosiTector PC Powder Checker is a hand-held,
non-contact Coating Thickness Gage that uses an airborne high
frequency ultrasound to analyze coating powder applied to rigid
substrates to calculate and display a predicted cured thickness.
The Gage consists of an Advanced body and a Powder Checker
(PC) probe that communicate with each other via wireless
technology. They must stay within 10 meters (30 feet) of each
other while measuring. A rubber holster with belt loop allows the
PosiTector body to stay with the operator while measuring.
PosiTector PC Contents
- PosiTector body (Advanced)
- PosiTector probe (PC)
- PC Probe Connector Cover
- Probe zeroing fixture
- Replacement screen
- Protective lens shield
- Carabineer
- Wrist strap
- Protective rubber holster with belt clip
- 3 AAA alkaline batteries (gage body)
- 3 AA alkaline batteries (probe)
- Quick Guide instruction manual
- Instructional video
- Hard shell carrying case
- USB Cable
- PosiSoft.net account
- Two (2) year warranty on Body and Probe
1
Quality DeFelsko Products Online at:
www.
GlobalTestSupply.com
[email protected]
Quick Start
1. POWER-UP both units (probe first).
a) Power-up probe by pressing the
button.
b) Power-up PosiTector body by pressing the center
navigation button.
A beep and the letters “PC” will display on the upper left corner
of the PosiTector LCD. This indicates both units are ready to
measure.
2. ZERO the probe (pg 8)
3. ADJUST to the specific powder if necessary (pg 10)
4. MEASURE the applied powder (pg 5)
NOTE: To preserve battery life, the PosiTector body and
PC probe power down after approximately 5 minutes of no activity.
All settings are retained.
Wrist Strap
We recommend attaching and wearing the
supplied wrist straps for both the PosiTector
body and PC probe.
2
1
Protective Lens Shield
The LCD is covered with a thin plastic film for protection against
fingerprints and other marks during shipment. This film, while
usually removed before using the Gage, can be left in place to
protect against paint overspray or debris. Replacements can be
purchased.
Typical Display
Probe
Connected
PC
Predicted
Cured Thickness
2.1
Battery Icon
thou/mils
Unit of Measurement
2
Quality DeFelsko Products Online at:
www.
GlobalTestSupply.com
[email protected]
PosiTector Body
USB Port
LCD Display
Probe
Connector
Cover
Probes
The PosiTector body accepts a number of probe types including
magnetic, eddy current and ultrasonic coating thickness, surface
profile, environmental and ultrasonic wall thickness probes.
For the latest information on probe interchangeability,
see www.defelsko.com/probes
3
Quality DeFelsko Products Online at:
www.
GlobalTestSupply.com
[email protected]
Wireless Powder Checker probes:
The PosiTector PC wireless probe connects to all Advanced
PosiTector bodies. See Powder Probes (pg 26) for connection details.
Physically connected PosiTector probes:
To disconnect a probe from a PosiTector body, slide the
plastic probe connector horizontally (in the direction of the
arrow) away from the PosiTector body. Reverse these steps
to attach a new probe.
The PosiTector automatically determines what type of probe
is attached and does a self-check.
NOTE: During power-up a physically connected probe is recognized
when a PC probe is not available (powered-off). To reconnect to a PC wireless probe (after power-up), select Connect,
within the Connect > Powder Probes menu. (pg 26)
The PosiTector body will automatically connect to an active wireless
PC probe during power-up. PC probe must be turned on.
Maintenance
The screen at the measuring end of the PC probe can be unscrewed
for cleaning. Accumulated powder should be carefully removed from
the screen by no more than 0.2 MPa (20 - 30 psi) of compressed air.
Do not blow air directly into the probe. Replacement screens are
available.
Measurement Notes
If a thickness result does not appear after 5 seconds, release the
measurement button and try again. Wait 1 to 2 seconds between
readings.
Small, erratically swinging parts may present measurement challenges.
Steady the part whenever possible. If erroneous readings continually
result, change the measurement strategy by rotating the probe, altering
its alignment to the part, or by measuring a different location on the
part.
For best results use Statistics mode (pg 14) to generate averages.
The average of a series of measurements is often a more meaningful
prediction of cured thickness than a single reading.
4
Quality DeFelsko Products Online at:
www.
GlobalTestSupply.com
[email protected]
How to Measure
Power-up both units. Bring the probe to within 5 cm
(2 inches) of the coating powder.
Press and hold the
button. Bring the probe closer to the
powder. While watching the probe display, align the Distance
Paddle with the Distance Target Bar. (pg 5)
While the probe button is depressed, probe distance and angle
should be varied slightly keeping:
(a) the Distance Paddle close to the Distance Target Bar
(b) the Amplitude Indicator at maximum height (pg 5)
Release the
button when you hear a double BEEP or see a
thickness measurement on either display.
Probe Display: (
button not pressed)
Probe Batteries Status (pg 28)
Probe Connected Indicator
Predicted Cured Thickness Result
Probe Display: (
button pressed)
Results Indicator
Distance Target Bar
Maximum
Amplitude Dot
Distance Paddle
Amplitude Indicator
Predicted Cured
Thickness Result
5
Quality DeFelsko Products Online at:
www.
GlobalTestSupply.com
[email protected]
Wireless Indicator: The
symbol indicates the PosiTector body
and wireless probe are communicating properly.
Results Indicator: When the probe is in the proper position and
good samples are being taken, a solid blue dot blinks on the probe
display, the PosiTector body displays a flashing green dot and
emits a high beep. When samples are inconclusive, an "X" blinks
on the probe display, the PosiTector body displays a flashing red
dot and emits a low beep.
Distance Paddle: Graphically represents the distance to the
target. It rises and falls to indicate distance from the probe tip to the
surface of the powder.
Distance Target Bar: The optimum distance for measurement is
18 mm (3/4 inch) between the tip of the probe and the surface of
the applied powder. During measurement, keep the Distance
Paddle close to the Distance Target Bar.
Amplitude Indicator: Strength of the ultrasonic echo.
A high position indicates good probe orientation relative to
perpendicular. The bar will generally reach higher positions when
measuring thin powder and when the probe is at a 90-degree
angle to the powder surface.
Maximum Amplitude Dot: Marks the highest position the
Amplitude Indicator reached during the current measurement
attempt.
Predicted Cured Thickness Result: When a valid measurement
is calculated, the PosiTector body BEEPS twice and the predicted
cured measurement result is displayed on both the PC probe and
PosiTector body. Continuing to hold the probe button will result in
additional samples being collected.
There are 4 types of displayed measurement results:
43 Predicted thickness result.
0 The collected samples have resulted in a good reading,
but the resultant predicted cured thickness is less than the
minimum range.
++ The collected samples have resulted in a good reading,
but the resultant predicted cured thickness is greater than
the maximum range.
-- An indeterminate or invalid reading.
6
Quality DeFelsko Products Online at:
www.
GlobalTestSupply.com
[email protected]
Menu Operation
Gage functions are menu controlled. To access the Menu,
power-up the PC Probe and PosiTector body, then press the
center navigation button.
Below is a sample menu for a PosiTector PC:
Some buttons have a tick box to their
right to indicate current status. An empty
box indicates that feature is not active.
Sync Now
USB Drive
ü
Auto SYNC
Bluetooth
WiFi
Updates
Powder Probes
Exit
Current selection is displayed
with darkened background
Navigation Button
Up
To navigate, use the Up and Down buttons to
scroll and
to SELECT.
Center
Down
Select Exit to exit from any menu.
NOTES:
The center
button is purposely recessed to help eliminate
unintentional power-up.
When no probe is attached, a limited menu will be displayed.
Connect probe for full menu.
7
Quality DeFelsko Products Online at:
www.
GlobalTestSupply.com
[email protected]
Verification of Accuracy
Before first use on a new powder and periodically thereafter, the
user should perform an accuracy check. This ensures the gage
measures properly by comparing predicted thickness values with
actual cured thickness values.
1.
2.
3.
4.
5.
Zero the probe (pg 8).
Spray powder onto a flat, smooth metal sample.
Measure the uncured powder with the PosiTector PC.
Cure the powder.
Measure cured thickness with a magnetic or eddy current
coating thickness gage such as the PosiTector 6000.
6. Compare results.
A successful verification requires that the average of a series of
measurements by both instruments be within their combined
tolerances. If not, adjust the PosiTector PC using one of the
methods described on page 9.
For best accuracy, perform a Zero at the beginning of every shift
to compensate for temperature and humidity changes. It is also
required after a Reset (pg 12).
Zero
Place the measuring end of the PC probe into the
Powder Probe Fixture.
Select Zero from the Gage menu.
NOTE: The Zero process can take up to 30 seconds.
Factory Calibration Symbol
This symbol indicates the instrument is measuring with factory
calibration settings. It appears whenever a Reset (pg 12) is
performed or whenever a new calibration setting (pg 11) is created.
It disappears whenever a calibration adjustment is made (pg 10) or
when a user calibration is loaded from cal memory
(pg 11). A probe Zero (pg 8) does not change the status of the
symbol.
8
Quality DeFelsko Products Online at:
www.
GlobalTestSupply.com
[email protected]
Calibration and Adjustment
The PosiTector PC probe is factory calibrated and performs an
automatic self-check each time it calculates a measurement. For many
powder measurement applications no further adjustment is necessary.
Simply Zero at the beginning of each shift, then measure.
Sometimes gage measurement calculations can be influenced by the
composition of the coating powder. A calibration adjustment improves
accuracy in these circumstances.
Adjustment, or Calibration Adjustment, is the act of aligning the
gage's predictions to match those of a known cured sample.
Begin by performing a Verification of Accuracy (pg 8) to determine
if there is a need for an adjustment. If the average of several
thickness results is outside the combined tolerances of the two
measuring instruments (PosiTector PC and dry film thickness
instrument) then two adjustment techniques are available to
correct the variance (see Adjustment Techniques, pg 9).
User adjustments are stored in the current Cal setting. It may be
desirable to open a new Cal setting first (see Cal Memory, pg 11).
Adjustment Techniques
To ensure the gage is working properly, the user should
periodically perform an accuracy check by comparing predicted
thickness values with actual cured thickness values (pg 8).
If the average of a series of measurements by both instruments
(PosiTector PC and dry film thickness instrument) is not within
combined tolerances, the PosiTector PC can be adjusted using
one of two methods...
1. 1 Pt Adjust - The first and most common choice.
2. 2 Pt Adjust - If a 1 Pt Adjust does not improve accuracy.
See Cal Settings menu, pg 10 for more details.
9
Quality DeFelsko Products Online at:
www.
GlobalTestSupply.com
[email protected]
Cal Settings Menu
1 Pt Adjust
1. Spray approximately 75 microns (3 mils) of powder onto a flat,
smooth metal sample.
2. Select 1 Pt Adjust then select Measure.
3. Take at least 3 uncured powder measurements with the
PosiTector PC. Results will be stored in the gage.
4. Select OK.
5. Cure the powder.
NOTE: Gage may be powered off. It will retain the cal
measurements during a power cycle.
6. Measure cured thickness with a magnetic or eddy current
coating thickness gage. Record the results.
7. Select 1 Pt Adjust then select Adjust.
8. Adjust the displayed reading average lower (-) or higher (+)
to match the cured thickness value. Select OK.
2 Pt Adjust
1. Spray powder onto 2 flat, smooth metal samples. Place
approximately 40 microns (1.5 mils) on one and 75 microns
(3 mils) on the other.
2. Select 2 Pt Adjust then select Measure.
3. Take at least 3 uncured powder measurements on the thin
powder panel with the PosiTector PC. Results will be stored
in the gage. Select OK.
4. Take at least 3 uncured powder measurements on the thick
powder panel with the PosiTector PC. Results will be stored
in the gage. Select OK.
5. Cure the powder on both panels.
NOTE: Gage may be powered off. It will retain the cal
measurements during a power cycle.
6. Measure cured thickness on both panels with a magnetic or
eddy current coating thickness gage. Record the results.
7. Select 2 Pt Adjust then select Adjust.
8. Adjust the displayed 1st point reading average lower (-) or
higher (+) to match the cured thickness values. Select OK.
9. Adjust the displayed 2nd point reading average lower (-) or
higher (+) to match the cured thickness values. Select OK.
10
Quality DeFelsko Products Online at:
www.
GlobalTestSupply.com
[email protected]
Cal Memory
When measuring a specific part with a specific powder, it is often
convenient to be able to store any unique calibration adjustments
made for that application. Then, if you return to that part, the
corresponding Cal setting can be conveniently and quickly
restored.
A “cal setting” is any calibration adjustment. The PosiTector PC
always displays the current calibration setting (ex. Cal 3) in the
upper right corner of the display.
The setting called Cal 1 has unique features. It can be adjusted
but never deleted, and is always made active with factory settings
after a Reset (pg 12).
New
Creates a new calibration setting using the next available
number (Maximum of 10). By default, these new Cal settings
are initially created with the Gage’s factory settings. This is
indicated with the
icon which appears at the bottom of the
display. A warning message will prevent the creation of a new
Cal Memory if a batch is open and has readings. Delete the
batch first (pg 16).
Open
Loads an existing cal setting. Use the Up or Down buttons to
scroll until the desired setting appears, then press
. A
warning message will prevent the opening of a stored Cal
setting if a batch is open and has readings. Create a new batch
first or open a batch containing no readings (pg 15).
Delete
Removes a cal setting completely from the list. That Cal number
can be reused later with the New command. A setting cannot be
deleted if readings have been stored into a batch using that
calibration setting. Delete all readings in that batch first (pg 16).
Although Cal 1 cannot be deleted, the Delete function will
return it to factory settings.
View
View stored Calibration Settings.
11
Quality DeFelsko Products Online at:
www.
GlobalTestSupply.com
[email protected]
Cal Lock
ü
When selected, the
icon will appear and all calibration settings
are “locked” to prevent further user adjustments. Uncheck to make
further adjustments.
Cal Reset
Clears the calibration adjustments for the open Cal setting.
The factory calibration
icon will appear on the display.
Setup Menu
Reset
Reset (soft reset) restores factory settings and returns the Gage
to a known condition. The following occurs:
- All batches, stored measurements, images, and batch names
are erased.
- Menu settings are returned to the following:
Bluetooth = OFF
WiFi = OFF
Memory = OFF
Statistics = OFF
Cal Lock = OFF
Display = None
Perform a more thorough Hard Reset by powering down the
Gage, waiting several seconds, then simultaneously holding
both the center
and (+) buttons until the Reset symbol
appears. This returns the Gage to a known, “out-of-the-box”
condition.
It performs the same function as a menu Reset with the addition
of:
- All calibration adjustments and Cal Memory are cleared and
returned to the Gage’s factory calibration settings.
- Bluetooth Pairing info is cleared.
- Menu settings are returned to the following:
Units = microns
Flip Display = Normal
Auto Sync = OFF
White on Black = OFF
Language = English
Battery Type = Alkaline
Backlight = Normal
USB Drive= ON
NOTES: - A probe Zero (pg 8) must be performed after a Reset.
- Date, Time and stored WiFi settings are not affected by
either Reset.
12
Quality DeFelsko Products Online at:
www.
GlobalTestSupply.com
[email protected]
Gage Info
Displays the model number & serial number, probe type & serial
number, PosiSoft.net registration key, the amount of remaining
memory for storage of readings, date and time and software
packages.
For security purposes, the registration key is required to add the
Gage to your PosiSoft.net account.
Flip Display
This option causes the display to read upside down allowing for
alternate positioning techniques.
White on Black
Inverts the LCD display to white on a black background to provide
better readability in some surroundings.
Backlight
Selects display brightness (Sun, Normal or Night). All settings will
dim slightly after a period of no activity to conserve battery life.
Press the Down button to brighten the display.
Set Clock
All measurements are date and time stamped (24 hour format)
when stored into memory. It is therefore important to keep both
the date and time current using this menu option. Use the Up and
Down buttons to scroll, and the (-) and (+) buttons to adjust a
value. The Gage’s date and time can also be viewed in Gage Info
(pg 13).
Units
Converts the display from inch to metric or vice versa. Stored
measurements in memory are not converted.
Switching units will turn off Statistics view and closes Memory.
Language
Converts displayed and printed words to the selected language.
13
Quality DeFelsko Products Online at:
www.
GlobalTestSupply.com
[email protected]
(PosiTector body only)
Battery Type
Selects the type of batteries used in the PosiTector body from a
choice of “Alkaline”, “Lithium” or “NiMH” (Nickel-metal hydride
rechargeable). If NiMH is selected, the PosiTector will trickle
charge the batteries while connected via USB to a PC or optional
AC charger. The battery state indicator icon
is calibrated
for the selected battery type. No damage will occur if the wrong
battery type is selected.
NOTE: DeFelsko recommends the use of eneloop (NiMH)
rechargeable batteries.
Statistics Mode
ü
Statistics
When selected, a x icon and statistical summary will appear on
the display.
Standard
Mean
(average)
# of
measurements
n6
49.8 x
52
Maximum
measurement
↨
Statistics
Icon
Deviation
x
1.3 σ
48 ↨
50
Minimum
measurement
Last
reading
microns
Remove the last measurement by pressing the (-) button.
Press (+) to clear statistics.
Clear
Clears all on-screen Statistics.
14
Quality DeFelsko Products Online at:
www.
GlobalTestSupply.com
[email protected]
Memory Management
The PosiTector PC has internal memory storage for recording
measurement data. Stored measurements can be reviewed
on-screen or accessed via computers, tablets and smart phones.
Measurements are date and time-stamped.
Memory stores 100,000 readings in up to 1,000 batches.
“New Batch” closes any currently opened batch and creates a new
batch name using the lowest available number. The
icon
appears. New batch names are date stamped when created.
Scroll through
display modes
Create a new batch
Delete last reading
Restore brightness
after dimming
Access the Menu
New Batch
Closes any currently opened batch and creates a new batch name
using the lowest available number. For example, if only Batch 1
and Batch 3 exist, then Batch 2 would be created and made the
current batch. The
icon appears and basic statistics are
displayed. Each measurement will be displayed and stored into
this new batch. On screen statistics are immediately updated with
each measurement. New batches are date stamped when they
are created. Each reading is also data/time stamped.
Shortcut: When a batch is open, press (+) to create a new batch
current batch
# readings in current batch
Standard Deviation
Mean (average)
Minimum
measurement
Maximum
measurement
Last reading
NOTES:
•
Remove the last reading from the current open batch by
pressing (-).
•
If memory is ON, continuous measurements can be taken
and stored in memory.
15
Quality DeFelsko Products Online at:
www.
GlobalTestSupply.com
[email protected]
Open
Selects a previously created batch name to open and make
current. If it contains measurements, onscreen statistics will
immediately reflect values calculated from this batch.
Close
Stops the recording process, closes the current batch, and
removes batch information from the display.
Delete
Removes a batch completely from memory. The name is deleted
and all measurements are erased.
View
Scroll using the Up or Down buttons through information,
statistical summary, and a list of each reading in the currently
opened batch. Press
to exit.
Annotate
Create meaningful batch names and
enter notes directly on the Gage using a
familiar onscreen QWERTY
keyboard. Use the Gage’s navigation
and (-)(+) buttons to enter annotations.
Annotations can be synchronized with
PosiSoft.net and are included in all
PosiSoft reports (see Accessing
Stored Measurement Data, pg 18).
NOTE: Annotations can also be
created using PosiSoft.net (pg 19) or
PosiSoft Mobile (pg 20).
Print
Sends a statistical summary and individual measurements to the
optional Bluetooth wireless printer (see pg 24).
NOTE: To cancel printing, press and hold the (-) and (+) buttons
simultaneously.
16
Quality DeFelsko Products Online at:
www.
GlobalTestSupply.com
[email protected]
Display
(appears only if a batch is currently open)
The following user selectable display options are available:
Chart: A real-time chart
Notes: Instructions,
of batch readings
descriptions
x-y Chart for
or notes
Single Layer Application
(see Annotate, pg 16)
None: Default screen
shows statistics
Image: Batch image
Shortcut: When a batch is open, press Up to scroll through the
above display options.
NOTES:
•
•
•
•
PosiSoft.net (pg 19) and PosiSoft Mobile (pg 20) are used to
insert an Image and Notes into a batch.
Remove the last reading from the current open batch by
pressing (-).
Calibration adjustments cannot be made if any measurements
were taken with that setting and stored into a batch.
Each batch can contain a maximum of 10,000 readings.
17
Quality DeFelsko Products Online at:
www.
GlobalTestSupply.com
[email protected]
Summaries
Displays a summary of all stored batches
including the name, probe type, number
of readings and type.
In the following example, Batch 3 (B3)
indicates an “F” 6000 coating thickness
probe was used to record a total of “6”
readings in “PA2” mode.
Screen
Capture
Press both (-)(+) buttons at any time to capture and save an image
copy of the current display. The last 10 screen captures are stored in
memory and can be accessed when connected to a computer
(see PosiSoft USB Drive pg 22).
Sample
Screen
Captures
Accessing Stored Measurements Data
PosiSoft solutions for viewing, analyzing and reporting data:
PosiSoft USB Drive - connect the PosiTector to a PC/Mac using the
supplied USB cable to access and print stored readings, graphs,
photos, notes and screen captures. No software or internet connection
required. USB Drive (pg 22) must be selected.
PosiSoft.net - a free web-based application offering secure centralized
storage of PosiTector readings. Access your data from any web
connected device. Go to: www.PosiSoft.net
PosiSoft 3.0 - Desktop Software for downloading, viewing and printing
your measurement data.
PosiSoft Mobile (Advanced models only) - access readings, graphs,
capture photos and update annotations through WiFi enabled devices,
such as tablets, smart phones and computers.
18
Quality DeFelsko Products Online at:
www.
GlobalTestSupply.com
[email protected]
PosiSoft Desktop Manager (PDM):
A small Windows based application which allows automatic twoway communication (synchronization) between the Gage and
PosiSoft.net (internet connection required). When installed, PDM
runs as a start-up application and resides in the Windows
notification area (system tray) of a PC. PDM is available as a free
download within your PosiSoft.net account or at
www.defelsko.com/downloads
Register your Gage on PosiSoft.net to take full advantage of your
Gage’s capabilities. See www.PosiSoft.net
NOTE: PDM is not required for WiFi enabled gages (pg 25).
PosiSoft.net:
To enhance the operation of your Gage, all PosiTector users have
access to the features provided by PosiSoft.net. It is a web-based
application offering secure centralized management of readings.
After (1) a user account has been created, (2) a Gage has been
registered, and (3) the PosiSoft Desktop Manager is downloaded
and installed onto a Windows PC (not required for WiFi connected
gages), synchronization of measurement data can be performed
either manually or automatically whenever the PosiTector is
connected to a web enabled PC (USB cable or Bluetooth wireless
technology) or WiFi network. Gage measurements stored in
memory are uploaded; images and batch notes are synchronized.
Uploaded data can be manipulated using a standard internet web
browser from any location in the world - job site or head office.
Reports and graphs with annotations and corporate logo can be
generated. Data can be exported to XML or CSV (comma
delimited) text files.
Measurement data can be shared with authorized users via a
secure login from any computer and most web enabled devices
including smart phones.
NOTE: A PosiSoft.net account is not required to Update (pg 27)
your PosiTector. Simply download and install PosiSoft Desktop
Manager at www.defelsko.com/downloads
19
Quality DeFelsko Products Online at:
www.
GlobalTestSupply.com
[email protected]
PosiSoft 3.0:
Desktop Software that can be installed onto your Windows PC and
allows the user to download, view, print and analyze their
measurement data.
Reports and graphs with annotations and corporate logo can be
generated. Data can be exported to XML or CSV (comma
delimited) text files.
NOTE: PosiSoft Software is available for use with DeFelsko’s
complete line of electronic instruments and is available for download
at www.defelsko.com/posisoft
PosiSoft Mobile:
Is a Gage-based software application featured in all PosiTector
Advanced instruments (serial numbers 730,000+).
PosiSoft Mobile allows users to:
•
browse stored measurement data including
notes, images, statistics and charts
•
update batch names/notes using your
mobile device's keyboard
•
insert images directly into Gage batches
using your mobile device's camera or
image library
•
remotely view the live display of a working
PosiTector & more
PosiSoft Mobile can be
accessed from any WiFi
enabled device using a
standard web browser.
Ideal for use with devices such as Windows
Phone/Mobile, Blackberry (RIM), Android,
Apple iOS and more.
In addition to browser based access,
PosiSoft Mobile Managers are available for
Apple iOS and Android users.
See www.defelsko.com/wifi/wifi_mobile
20
Quality DeFelsko Products Online at:
www.
GlobalTestSupply.com
[email protected]
Connect Menu
Synchronizing (Sync) is the process whereby PosiTector stored
measurement data uploads to PosiSoft.net while images and
batch notes are downloaded to the Gage. This transfer occurs
when the Gage is connected via USB, Bluetooth or directly
through your WiFi router/hotspot via WiFi. It can be triggered either
manually (USB, Bluetooth or WiFi) or automatically (USB only).
Sync Now
When selected, the Gage immediately synchronizes stored
measurement data via USB, Bluetooth or WiFi to PosiSoft.net
(PosiSoft Desktop Manager (pg 19) and an internet connection are
required when using USB or Bluetooth.)
Multiple gages can be synchronized simultaneously when
connected using multiple connections (for example two gages
connected via USB and one gage connected via WiFi or
Bluetooth).
Auto SYNC
ü
Allows the Gage to automatically synchronize stored
measurements with PosiSoft.net when initially connected to the
internet via a PC running PosiSoft Desktop Manager (pg 19) or a
local WiFi network.
Additional measurements added to memory while connected are
synchronized only when the USB cable is disconnected, then
reconnected or when the Sync Now option is selected.
21
Quality DeFelsko Products Online at:
www.
GlobalTestSupply.com
[email protected]
USB Drive
ü
Universal Serial Bus (USB) is a specification for communication
between devices and a host controller (usually a personal
computer). USB has effectively replaced a variety of interfaces
such as serial and parallel ports.
The PosiTector uses a USB mass storage device class which
provides a simple interface to retrieve data in a manner similar to
USB flash drives, cameras or digital audio players.
When checked, any computer can view readings stored in memory
by navigating a virtual drive labeled “PosiTector” using the included
USB cable.
A formatted HTML report is viewed by selecting the "index.html" or
“START_HERE.html” file found in the root directory. Optionally, text
".txt" files located in each batch folder provide access to
measurement values. Stored readings and graphs can be viewed
or copied using universal PC/Mac web browsers or file explorers.
22
Quality DeFelsko Products Online at:
www.
GlobalTestSupply.com
[email protected]
When your PosiTector is first connected to your Windows PC via
a USB cable, an enumeration process is started that installs device
drivers without re-booting your computer. You may see several
pop-up windows in the taskbar at the bottom right of your screen.
Wait for the entire process to be completed before proceeding.
NOTE: When connected, power is supplied through the USB
cable. The batteries are not used and the body will not
automatically power down. If rechargeable (NiMH) batteries are
installed, the Gage will trickle charge the batteries.
Retrieving stored screen captures
The last 10 screen captures (pg 18) stored in memory can be
accessed by navigating to the “screen_capture” directory within
the “PosiTector” virtual drive.
23
Quality DeFelsko Products Online at:
www.
GlobalTestSupply.com
[email protected]
Bluetooth
PosiTector Advanced models have Bluetooth functionality to:
- Communicate with the PosiSoft Desktop Manager (PDM) in
lieu of a USB cable.
- Stream individual readings to a computer or Bluetooth
wireless printer as they are taken.
- Print to the optional battery powered Bluetooth wireless
printer.
On: Turns Bluetooth functionality On. When selected, the
icon
will appear on the display. To deactivate Bluetooth, select Off.
Pairing: The Gage and receiving device must be paired before
stored or streamed readings can be transmitted. For pairing
instructions, see www.defelsko.com/bluetooth
Info: Lists information about your current Bluetooth connection,
including the currently paired device and MAC address.
Stream: When checked, the Gage will stream readings to the
paired Bluetooth Device as they are taken. Readings can be
streamed as they are taken to the optional Bluetooth wireless
printer (pg 24) or third-party computer software.
Bluetooth Wireless Printer
PosiTector Advanced models can output to
the optional battery powered Bluetooth
wireless printer one of two ways:
•
Stream individual readings as they are taken.
•
Print stored batch readings and summaries.
Begin by entering the Connect>Bluetooth menu. Turn Bluetooth
ON
and
“Pair”
the
PosiTector
to
the
printer.
See: www.defelsko.com/bluetooth
Streaming: In the Connect>Bluetooth menu, select the “Stream”
tick box. All readings will now be simultaneously displayed on the
LCD and sent to the printer.
Printing: In the Memory menu, select “Print”.
24
Quality DeFelsko Products Online at:
www.
GlobalTestSupply.com
[email protected]
WiFi
Allows wireless communication with devices such as
tablets, smart phones and computers connected to your local
wireless
network
or
portable
mobile
hot
spot.
See www.defelsko.com/WiFi
On/Off: Turns WiFi functionality On. When selected, the
icon
will appear on the display. To deactivate WiFi, select Off.
Networks: The Gage will allow the user to add a new network and
will automatically check for available local networks. Available
networks detected by the Gage are listed on the screen along with
any networks that the Gage has previously been connected to that
are not currently within connection range.
Information: Gage displays information about the local WiFi
network connection including...
•
SSID: the network’s name
•
State: displays if the Gage is connected to the network or not
•
IP Address: the network’s IP Address. Users can enter this
number into a web-browser of any WiFi enabled device that
is connected to the same network in order to view the Gage’s
synced batches through PosiSoft Mobile (pg 20).
Setup: Allows user to setup a WiFi connection
•
IP Settings: enter the IP information as follows...
IP Type (DHCP or Static), IP Address, Gateway, Netmask,
DNS1, DNS2.
•
Server Enable: enables a connection between the network
and the Gage.
•
Gage
Name:
enter
a
name
for
the
Gage
(up to 14 Characters).
•
WiFi Reset: erases all WiFi settings.
25
Quality DeFelsko Products Online at:
www.
GlobalTestSupply.com
[email protected]
Powder Probes
Displays menu options that enable the PosiTector body to
communicate with wireless PosiTector PC probes.
List
Displays all previously connected PC probes.
Change Order
Select which PC probe the PosiTector body will connect to first
during power-up.
Add New
Allows PosiTector body to pair with a wireless PC probe for the
first time.
1. When selected, the PosiTector body will display, “Ensure
probe is turned on and in reset state before continuing!”
(see Probe RESET pg 27)
2. Select Next. The PosiTector body will search for available
PC probes.
3. Select the PC Probe to connect. PC Probes are displayed
by their serial numbers.
Probe Off
Disconnects PC probe from PosiTector body and causes the PC
probe to power off. If a physically connected probe is attached,
the PosiTector will automatically recognize it.
Connect
Allows PosiTector body to connect to or switch between
wireless PC probes and physically connected probes. PC
probe must be turned on.
26
Quality DeFelsko Products Online at:
www.
GlobalTestSupply.com
[email protected]
Updates
Determines if a software update is available for your Gage. If an
update is available, a prompt will appear allowing the user to
choose to perform the update at this time or not.
To perform an update the Gage must be connected to an internet
connected PC with PosiSoft Desktop Manager (pg 19), or WiFi
network (pg 25).
NOTE: Ensure that stored measurements are backed up to a PC
or PosiSoft.net.
WARNING: The Gage may perform a Hard Reset (pg 12) after
completion of the update and ALL readings in memory would be
Updates - Sample Screen
erased.
Currently installing
update 2 of 3 total
!
2/3
Progress bar
DO NOT unplug the Gage during the update operation.
Probe RESET
Allows a wireless PC probe to be un-paired (RESET) from a
PosiTector body. This allows the PC probe to be paired with
another PosiTector Advanced body.
1. Turn on PC probe.
2. Press and HOLD the check button for exactly 3 seconds and
then release.
3. Probe will display “0.1”.
4. Repeat step 2, three more times until probe
reads “0.4”.
The PC probe can now be paired to any PosiTector Advanced
body (see Add New pg 26). 27
Quality DeFelsko Products Online at:
www.
GlobalTestSupply.com
[email protected]
Temperature
Operating Range:
+32° to +120°F (0 to +50°C)
The PosiTector PC compensates automatically for temperature.
Allow a few minutes for the probe to reach ambient temperature
before measuring.
Discard the first measurement taken in a notably different
temperature condition. When measuring surfaces much hotter or
colder than ambient, lift the probe at least 6 inches (15cm) and
allow 1 second off the surface between measurements.
PosiTector Body
Power Supply / Battery Indicator
Power Source: 3 AAA alkaline, Lithium or optional Nickel-metal
hydride (NiMH) rechargeable batteries. For best battery indicator
results, ensure the appropriate Battery Type is selected in the
Setup>Battery Type menu (pg 14).
The battery indicator
displays a full bar with fresh alkaline
or fully charged batteries installed. As the batteries weaken, the
bar will be reduced. When the battery symbol is low
the Gage can still be used, but the batteries should be changed or
recharged at the earliest opportunity. The Gage will turn off
automatically when batteries are very low, preceded by a Low
Battery Warning on the display.
To retain all user settings and stored memory readings, only
replace the batteries after the Gage has powered-down.
!
Battery performance decreases at low temperatures.
Changing Probe Batteries
Use only “AA alkaline batteries” (3) in the
probe. Nickel-cadmium and nickel-metal
hydride rechargeable batteries will work but the
probe battery state indicator icon may appear
to have weak batteries
. The gage will
turn off automatically when batteries are very
low, preceded by a low battery warning on the
display. If batteries are very low the gage may
startup but then turn off quickly.
28
Quality DeFelsko Products Online at:
www.
GlobalTestSupply.com
[email protected]
Additional Accessories
Rechargeable Battery Pack - 4 AAA eneloop batteries
The PosiTector body can operate on rechargeable batteries and
DeFelsko recommends the use of eneloop (NiMH) rechargeables.
eneloop batteries combine the advantages of regular rechargeable
batteries and disposable (Alkaline) batteries. They discharge very
slowly and can be stored for long periods without having self
discharge concerns. Eneloop batteries come pre-charged and
ready to use immediately. See: www.eneloop.info
AC Power Cable Kit
An optional AC Power Cable Kit is available for continuous
operation or battery charging through the PosiTector’s built-in
USB port (as shown on pg 2). This kit supplies several alternate
power solutions for your battery-operated PosiTector. They allow
the gage to operate continuously without the need for batteries.
Use the cable alone to connect a PosiTector to your PC's built-in
USB port that acts as a continuous power source. Or connect the
cable to the included power adaptor which plugs into any AC wall
electrical outlet, 110 or 220V.
A selection of electrical plugs is included which are capable of
dealing with most country’s outlets.The USB cable provided can
also be used for Accessing Stored Measurement Data (pg 18).
USB Cable
A USB Cable is provided with every PosiTector. The USB cable
can also be used for Accessing Stored Measurement Data (pg
18) via the PosiTector USB Port or to a connect to a PC's built-in
USB port to act as a continuous power source. Replacement USB
cables are available.
Bluetooth Printer
This lightweight printer receives data from all PosiTector gages
via Bluetooth wireless technology. It is battery-operated and prints
readings and statistical summaries.
Protective Lens Shield
One lens shield is included with every PosiTector instrument.
Additional package of five (5) thin plastic lens shields are available
and ideal for protecting the PosiTector display from paint and
overspray.
29
Quality DeFelsko Products Online at:
www.
GlobalTestSupply.com
[email protected]
PosiTector Probes
PosiTector 6000 - Magentic & Eddy Current Coating Thickness probes
•
measure coatings on ferrous and non-ferrous metal substrates.
PosiTector 200 - Ultrasonic Coating Thickness probes
•
measure coatings on wood, concrete, plastics and more
PosiTector SPG - Surface Profile probes
•
measure and records peak to valley surface profile height
PosiTector RTR - Replica Tape Reader probes
•
measure and records peak to valley surface profile height
using replica tape (Testex™ Press-O-Film™ Replica Tape™)
PosiTector DPM - Dew Point Meter probes
•
measure and records climatic conditions
PosiTector UTG - Ultrasonic Wall Thickness probes
•
measures wall thickness of steel, plastic and more
30
Quality DeFelsko Products Online at:
www.
GlobalTestSupply.com
[email protected]
Technical Data
Measuring Range:
20-110 microns
0.8-4.3 mils
Body Size:
137 x 61 x 28 mm
5.4 x 2.4 x 1.1 in.
Accuracy:
+ 5 microns
+ 0.2 mil
Probe Size:
222 x Ø50 mm
8.75 x Ø2.0 in.
Resolution:
1 micron
0.05 mils
Body Weight: (without batteries)
140 g
4.9 oz
Measurement Time:
2-5 seconds
Probe Weight: (without batteries)
272 g
9.6 oz
Measurement Distance
to Powder:
18 mm
0.75 inch
Measurement Area:
2 mm
0.08 inch
Temperature Range:
+32° to +120°F
0 to +50°C
Conforms to:
ASTM D7378
This device complies with part 15 of the FCC Rules. Operation is subject to the following
two conditions: (1) This device may not cause harmful interference, and (2) this device
must accept any interference received, including interference that may cause undesired
operation.
31
Quality DeFelsko Products Online at:
www.
GlobalTestSupply.com
[email protected]
Returning for Service
Before returning the Gage for service…
1.Install new or newly recharged batteries in the proper alignment
as shown within battery compartment (pg 28).
2.Examine the probe screen for dirt or damage (pg 4).
3.Perform a Hard Reset (pg 12) and a Zero (pg 8).
If you must return the Gage for service, describe the problem fully
and include measurement results, if any. Be sure to also include
the probe, your company name, company contact, telephone
number and fax number or email address.
Website: www.defelsko.com/support
Limited Warranty, Sole Remedy
and Limited Liability
DeFelsko's sole warranty, remedy, and liability are the express
limited warranty, remedy, and limited liability that are set forth on
its website: www.defelsko.com/terms
www.defelsko.com
© DeFelsko Corporation USA 2014
All Rights Reserved
This manual is copyrighted with all rights reserved and may not be reproduced or transmitted, in whole or
part, by any means, without written permission from DeFelsko Corporation.
DeFelsko, PosiTector and PosiSoft are trademarks of DeFelsko Corporation registered in the U.S. and in
other countries. Other brand or product names are trademarks or registered trademarks of their respective
holders.
Every effort has been made to ensure that the information in this manual is accurate. DeFelsko is not
responsible for printing or clerical errors.
32
Quality DeFelsko Products Online at:
www.
GlobalTestSupply.com
[email protected]