1
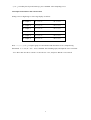
SC-2 COD Tester
User manual
Beijing ChinaInvent Instrument Tech. Co.,Ltd
http://www.ChinaInvent.com
th
Add: 8 Floor, NO.2 Xinxi Road, ShangDi, HaiDian District, Beijing China 100085
Tel: 010-82896091
Fax: 010-82896091-8099
Table of contents
Safety information...................................................................................................................................... 2
Specifications ............................................................................................................................................... 3
Operation.................................................................................................................................................... 4
Section 1 General information .................................................................................................................. 5
1.1 Instrument description............................................................................................................................ 5
1.2 Determination range............................................................................................................................... 5
1.3 Principle ................................................................................................................................................. 5
1.4 Unpacking the instrument ...................................................................................................................... 5
1.5 Instructions of keyboard..................................................................................................................... 6
Section 2 Set menu items ........................................................................................................................... 7
2.1 Menu ...................................................................................................................................................... 7
2.2 Set time .................................................................................................................................................. 7
2.3 Database................................................................................................................................................. 7
2.4 Set curve................................................................................................................................................. 7
Section 3 Operation.................................................................................................................................... 9
3.1 Reagent preparation ............................................................................................................................... 9
3.1.7 Standard stock solution ..................................................................................................................... 10
3.2 Digestion .............................................................................................................................................. 11
3.3 Zero calibration .................................................................................................................................... 12
3.4 Sample determination .......................................................................................................................... 13
3.5 Adjust the working curve ..................................................................................................................... 13
3.6 Quality assurance ................................................................................................................................. 13
Section 4 Maintenance ............................................................................................................................... 14
4.1 General Maintenance ........................................................................................................................... 14
4.2 Cleaning the colorimetric cell .............................................................................................................. 14
4.3 Replacement guide ............................................................................................................................... 14
Section 5 Troubleshooting ....................................................................................................................... 15
1
Safety information
Please read this entire manual before unpacking, setting up, or operating this equipment. Pay attention to
all danger and caution statements. Failure to do so could result in serious injury to the operator or damage
to the equipment.To ensure that the protection provided by this equipment is not impaired, do
not use or install this equipment in any manner other than that specified in this manual.
Use of Hazard Information
DANGER: Indicates a potentially or imminently hazardous situation which, if not be avoided, could
result in death or serious injury.
CAUTION: Indicates a potentially hazardous situation that may result in minor or moderate injury.
NOTE: Information that requires special emphasis.
2
Specifications
Specifications are subject to change without notice.
Wavelength accuracy
±3 nm
Wavelength
440nm 595nm
Wavelength selection
automatic
Transmittance accuracy
±2.0%T
Accuracy repeatability
±0.5%T
Disturbance resistance of chloride ion
≤1200mg/L
Digestion temperature
165℃±1.5℃
Drift
< 0.002A in 20mim
Light resource
LED
Filter
interference filter
Detector
silicon photodiode
display
wide screen LCD, 240*128
Reading model
%Transmittance, absorbance, concentration
Digestion temperature accuracy
±2℃
Output
USB and RS-232,configurable printer
Power supply
220VAC or 380VAC
Dimensions
380*280*120mm
Weight
4Kg
Luminosity range
0-2A
Temperature range
operation:
0-50℃
storage:
-40-60℃
humidity
below 85%
Environment
comply with IP67 standard
3
Operation
Danger
It may be dangerous to treat the chemical samples, standard substance and reagent. Please look over the
security information before dealing with any chemical substance.
4
Section 1 General information
1.1 Instrument description
The tester is a photometer that is controlled by a microprocessor with LED light source and filter. It is
suitable for laboratory or on-site color testing. The instrument has been pre-calibrated towards the
ordinary color testing. The features of tester are as follows:
• The result is displayed by concentration, absorbance or transmission
• The data storage and query is carried out in laboratory or on-sit
•Take power adapter as power supply
1.2 Determination range
For the undiluted water sample, the detection range of COD is 15~1000 mg/L, and the concentration of
chloride ion should lower than 1000 mg/L; while the COD value is beyond 1000 mg/L or the
concentration of chloride ion exceed 1000 mg/L, the sample must be diluted.
1.3 Principle
Add known amount of potassium dichromate solution in the sample. Taking silver sulfate as a catalyst,
the COD value is determined by spectrophotometry in strong sulfuric acid medium, after high
temperature digestion.
Principle: in the high range of COD values (100~1000mg/L), measure the absorbency of trivalent
chromium reduced at 600nm wavelength. According to the principle that the COD value is proportionate
to the increase value of trivalent chromium absorbency, convert the absorbency into COD value. While in
the low range of COD value (15~150mg / L), measured the total absorbency of hexavalent chromium not
reduced and trivalent chromium reduced at 440nm wavelength. In accordance with the direct ratio of the
decrease value of total absorbency with COD value, calculate the COD value.
1.4 Unpacking the instrument
Remove the COD tester from its shipping carton and inspect it for any visible damage. Contact
Chinainvent Customer Service at +86-10-82896091 if any items are missing or damaged.
1.4.1 Parts and accessories
• 1cm glass colorimetric cell(low range),2cm glass colorimetric cell(high range)
5
• Digestion tube
• AC adapter
• File pack— user manual, appendix, product conformity certificate, packing list
1.5 Instructions of keyboard
Key
Description
MENU
select a program, containing time set/ database/curve calibration
TEST
test the sample, including two items of high range and low range
ENTER
carry out the order selected
DEL
delete the data
BACK
to backtrack to higher menu
←
to move the cursor to the left
→
to move the cursor to the right
↑
move the cursor upwards; input number
↓
move the cursor downwards; input number
6
Section 2 Set menu items
2.1 Menu
Start up the instrument, and press “menu”. Such three items as “set time”, “database” and “curve
calibration” display in the menu interface. Press “↑” or “↓” to move the cursor to specific item, and press
“ENTER” to enter in.
2.2 Set time
Set date and time to get a correct date and time of data storage and query. Press “menu” , select “set
time”, press “→” or “←”to move cursor, and press “↑” or “↓” to revise date and time; press “ENTER” to
set date and time successfully.
2.3 Database
Inquire or delete the history data in database menu.
2.4 Set curve
Set curve in high-range or low-range with the same method. There are three methods to establish curves,
such as determination of standard sample, input of slope and intercept, and input of absorbance and
concentration.
2.4.1 Determination of standard sample
Press “→”, “←”, “↑”or“↓” to input a group of standard sample concentration following the prompts(the
tester could set six standard samples, press “ENTER” after completing input; according to the clew,
put in blank solution, test it, and then press “ENTER” after finishing test. Following the prompts, put the
sta. sample to test absorbance in turn, and press “ENTER” after the last sta. sample is determined; input
the curve serial NO. and press “SAVE”. Press “BACK” to test afresh.
Note:Curve serial NO. in low range, L1---L5; curve serial NO. in high range, H1---H5
2.4.2 Input of slope and intercept
There are five built-in curves in the instrument. Press “↑”or “↓”to select a curve, and press “ENTER” to
enter in the curve modification interface; press “→”or “←” to choose the item to be revised, and press
7
“↑”or “↓”to modify the slope and intercept; press “ENTER” after completing revise.
2.4.3 Input of absorbance and concentration
Setting curves in high-range or low-range display as follows:
Sta. sample 1
C1: ****.**
A1: *.****
Sta. sample 2
C2: ****.**
A2: *.****
Sta. sample 3
C3: ****.**
A3: *.****
Sta. sample 4
C4: ****.**
A4: *.****
Sta. sample 5
C5: ****.**
A5: *.****
Sta. sample 6
C6: ****.**
A6: *.****
Press “→”,“←”,“↑”or“↓” to input a group of concentration and absorbance of sta. sample having
determined(C1---C6;A1---A6). Press “ENTER” after finishing input, and input the curve serial NO.
(H1---H5 or L1---L5. Press “SAVE” to store the sta. curve, and press “BACK” to test afresh.
8
Section 3 Operation
3.1 Reagent preparation
3.1.1 Water
Should comply with relevant rules of Ι class water -GB/T6682
sulfuric
3.1.2 Sulfuric acid:ρ(H2SO4)=1.84g/mL.
3.1.3 Sulfuric acid solution:(1+9).
Slowly add 100mLof sulfuric acid(3.1.2)in 900mL water along breaker wall, stir to even,and cool it
down.
3.1.4 Catalyst—silver sulfate - Sulfuric acid solution:ρ(Ag2SO4)=10g/L.
Add 5.0g of silver sulfate to 500mL Sulfuric acid( 3.1.2, stand for 1-2 days, stir it to fully dissolve.
3.1.5 Masking agent ---- mercuric sulfate solution:ρ(HgSO4)=0.24g/mL.
Add 48.0g of mercuric sulfate to 200mL Sulfuric acid solution( 3.1.3), stir it to fully dissolve, it can be
stable for 6 months.
3.1.6 Oxidant
3.1.6.1 (High-range)potassium dichromate standard solution:C(1/6 K2Cr2O7)=0.500mol/L
Dry potassium dichromate to constant weight at 120℃±2℃,weight 24.5154g potassium dichromate and
add it into breaker,pour in 600mLwater,gradually add 100mL sulfuric acid(3.1.2), stirring meantime.
After it fully dissolve, transfer that solution to 1000mL volumetric flask, fill to the mark with water,
shake it even. It can be stable for 6 months.
3.1.6.2 (Low-range)potassium dichromate standard solution:C(1/6 K2Cr2O7)=0.120mol/L.
Dry potassium dichromate to constant weight at 120℃±2℃,weight 5.8837g potassium dichromate and
add it into breaker,pour in 600mLwater,gradually add 100mL sulfuric acid(3.1.2), stirring meantime,
9
After it fully dissolve, transfer that solution to 1000mL volumetric flask, fill to the mark with water, and
shake it even. It can be stable for 6 months.
3.1.7 Standard stock solution
3.1.7.1 (High-range)potassium acid phthalate (KAP) COD standard stock solution:COD 5000mg/L.
Dry KAP to constant weight at 105℃~110℃,weight 2.1274g KAP , add it into the breaker with 250mL
water, and stir it; after it fully dissolve, transfer that solution to 500mL volumetric flask, fill it to the mark
with water, and shake it even. It should be stored at 2℃~8℃; if adding 10mL sulfuric acid solution
(3.1.3)in the solution before fixing volume, it can be stable for 1 month in normal temperature.
3.1.7.2 (Low-range) potassium acid phthalate (KAP)COD standard stock solution:COD 625mg/L。
Pour 25.00mLCOD standard stock solution to 200mL volumetric flask, fill it to the mark with water, and
shake up. It is stable for 1 month at 2℃~8℃
3.1.8 KAP COD standard serial using solution
3.1.8.1 COD standard serial using solution in high range: 100 mg/L, 200 mg/L, 400 mg/L,600 mg/L,
800 mg/L, 1000 mg/L.
Add COD standard stock solution (3.1.7.1)of 10.00mL,20.00mL,30.00mL, 40.00mL, 50.00mL
into 250mL volumetric flask individually; fill it to the mark with water ,and shake up. It is stable for 1
month at 2℃~8℃.
3.1.8.2 COD standard serial using solution in low range: 25 mg/L, 50 mg/L,75 mg/L,100 mg/L,125
mg/L,150 mg/L.
Add COD standard stock solution (3.1.7.2)of10.00mL,20.00mL,30.00mL, 40.00mL 50.00mL and
60.00mL into 250mL volumetric flask individually, fill it to the mark with water ,and shake up. It is
stable for 1 month at 2℃~8℃.
Note: the concentration of KAP standard solution could be different with that in this manual as
required. The concentrations in this manual are for general reference only.
10
3.2 Digestion
3.2.1 Cleaning the digestion tube
The digestion tube of first use, should be cleaned as the following method:
Add the appropriate amount of mixture that consists of six portions of silver sulfate - sulfuric acid
solution (3.1.4) and one portion of
potassium dichromate (3.1.6.1) in the digestion tube, tighten the cap,
heat it at 60 ℃ ~ 80 ℃ water bath, and repeatedly wash the inside wall. After cooling it to room
temperature, unscrew the lid, pour out the mixture, rinse the cover and inside and outside wall of the
digestion tube with water.
3.2.2 The mixture of reagent with sample
Before digesting, add specific ratio of reagent and sample as the table below to the digestion tube, tighten
the lid and gently shake up and down several times to complete mix. Put the tube in digestion tank on the
left of the instrument for15min at 165 ℃.
Potassium
Colorimetric
Silver sulfateMercuric
bichromate
Range
cell
sulfuric acid
Sample
sulfate(3.1.5)
(3.1.4)
high range
1.00mL
2cm
(100-1000)mg/L
0.50mL
6.00mL
3.00mL
0.50mL
6.00mL
3.00mL
(3.1.6.1)
1.00mL
low range
1cm
(3.1.6.2)
(15-150)mg/L
3.2.3 Instruction of digester
3.2.3. 1
Specifications
Heating range: 20~200℃
Resolution ratio:
1℃
Accuracy: ±2℃
Digestion temperature: 165℃
Digestion time: 15min.
11
3.2.3.2
3.2.3.2.1
Digester interface and keyboard
Main interface after starting up :
Current tem.:
XXX
℃
Set tem.: XXX ℃
Diges. time: XXX min
*set parameter*
“Current tem.” is the actual temperature in the process of warming up;
“Set tem.”is the digestion temperature required;
“Diges. time” is the digestion time required
3.2.3.3.2 Press “mode”, the interface displays four items as follows:
*set parameter*, *constant tem.*, *start to diges. * and *cooling*. Press “ENTER” to enter in the mode
selected
(1)* set parameter *:press “ENTER” to enter in the items of “Set tem.”and “Diges. time”. Press “◄”
or “►” to adjust it and press “ENTER” to confirm the set.
(2)* constant tem.*:heat the instrument to the temperature set and keep it constant.
(3)* start to diges.*:begin to digest the sample
(4)*cooling*:after finishing digestion, take out digestion tube and make the digester cool down.
3.2.3.4 Usage of tester
Start up the tester, it enters in main interface automatically. Set the digestion temperature and time as
3.2.3.3.2; select the mode of “Current tem.”, put the tube in heating hole when the current temperature
rise to the set temperature, cover the lid; select the mode of *start to diges. *, and press “ENTER” to
begin to digest the sample. The tester will prompt the achievement of digestion with three-time buzzing,
when reach to digestion time, take out of digestion tube, and start to measure it when the solution cooling
off.
Note:please fix the lid on in the process of digestion, so that not to be injured because of the solution
boiling away and splashing, be careful not to be scalded when get out the tube.
3.3 Zero calibration
The instrument should be calibrated zero before conducting each or a series of experiments, to ensure the
zero reference on the measurement process. After starting up, put the blank solution (distilled water) in
colorimetric tank, press “ TEST” to select high or low range, and select a curve. Then the tester conduct
self-checking, and it will automatically measure the blank solution subsequently.
12
3.4 Sample determination
When digestion is over, get out the tube and cool it down to room temperature. Pour digestion
solution to a colorimeric cell, pour blank solution to another cell. After finishing zero calibration as
3.2, the screen displays “continue to test”, “quit testing”. when the cursor is shown on “continue to test”,
press “ENTER”. The notice—please put in the solution tested, and press ENTER—appears, then put the
cell with sample in colorimetric tank, finally press “ENTER” to determine it. The result contains
concentration,transmittance and absorbance, and the user could choose “continue to test”, “quit testing”
and “save data” at this time.
Note:Use 2cm colorimetric cell in high range, while 1 cm cell is used in low range
3.5 Adjust the working curve
Usually, each curve which is calibrated comprehensively under the ideal condition can meet the needs of
the majority of experiments. Deviation of the curve may result from the use of experimental reagent,
defective sample cell, procedure error, technical errors and other errors, there may be interfering
substances which is out of control of the operator and other reasons. The section of “set curve” ( see 3.4)
tell us how to create and store a new working curve.
Before adjust the calibration curve, please consider the following questions:
1. The experimental results will be improved because of the adjustment of the curve
2. Whether there is always interference substance in all samples to be tested.
3.6 Quality assurance
The specified reference material (neutral filter) which were used usually by the JJG178-2007 UV, visible
and near-infrared spectrophotometer can quickly validate the device performance. According to the
frequency proposed by laboratory quality assurance procedures, we can use these neutral filters to
measure the absorbance on the instrument anywhere and anytime.
13
Section 4 Maintenance
4.1 General Maintenance
Clean the shell by wet wipes. Eliminate any reagent spilled out quickly. If the reagent spills out onto
sample cell, please use the cotton sticks to clean it.
Keep both the colorimetric tank and colorimetric cell clean at any time. Use the lens wipe or soft
non-pilling cloth to wipe the cell surface.
4.2 Cleaning the colorimetric cell
Clean the colorimetric cell by detergent at first; then rinse with water several times; finally, washes it by
deionized water thoroughly. Some sample cells may need to be washed by acid detergent or special
cleaning procedures, please refer to procedure manual to obtain more information. Before detergent
cleaning, use organic solvents (such as chloroform, benzene, toluene, acetone, etc.), which could be also
used in the last washing.
4.3 Replacement guide
Turn off the instrument before exchange the batteries, avoiding electrostatic damage.
14
Section 5
Troubleshooting
Service department will be responsible for instrument maintenance. Do not open the instrument
without permission, otherwise the quality assurance will be canceled.
15