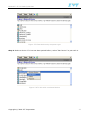
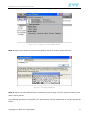
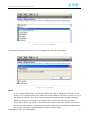
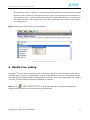
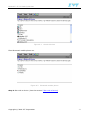
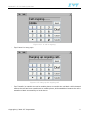
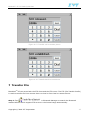
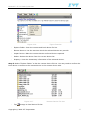
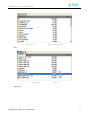
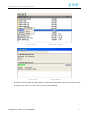
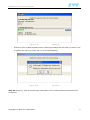
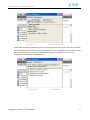
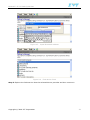
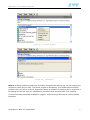
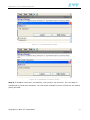
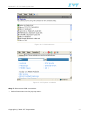
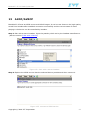
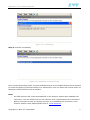
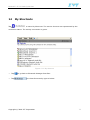
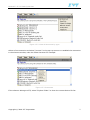
1
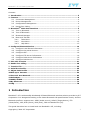
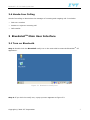
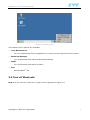
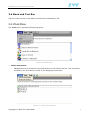
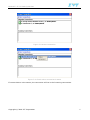
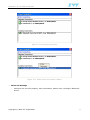
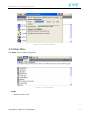
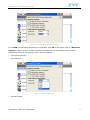
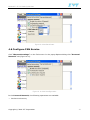
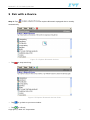
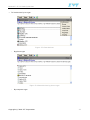
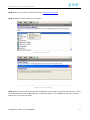
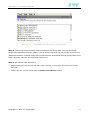
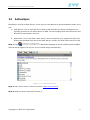
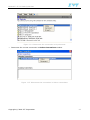
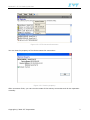
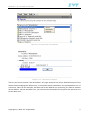
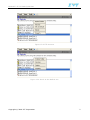
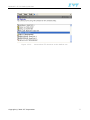
BlueSoleil™ CE 2.0 Classic
Quick Start
Version 1.3
IVT Corporation
5/F, Fazhan Plaza,
NO. 12, Xinxi Road,
Haidian District,
Beijing, 100085
P.R. China
Tel: +86 10 82898219
Fax: +86 10 62963059
www.ivtcorporation.com
Copyright © 2006 IVT Corporation. All rights reserved. These materials are confidential to and
maintained as a trade secret by IVT Corporation. Information in these materials is restricted to
IVT authorized recipients only.
BlueSoleil™ CE 2.0 Classic Quick Start
Revision History
Date/YY-MM-DD
Version
Description
Author/Maintainer
2007-11-30
1.0
Create
Lili
2008-7-31
1.1
Review
Lili
Add Hands-free calling;
2008-8-12
1.2
Change some screen snapshot;
Change Bullets and numbering;
Lili
Change some grammars.
2009-5-14
1.3
Copyright © 2006 IVT Corporation
Add OPP
Xingyang
2
BlueSoleil™ CE 2.0 Classic Quick Start
Contents
1 Introduction ....................................................................................................... 3
2 Features ............................................................................................................. 4
2.1
Connection Management .............................................................................. 4
2.2
Device Management .................................................................................... 4
2.3
Configuration Management ........................................................................... 4
2.4
Hands-free Calling....................................................................................... 5
3 BlueSoleilTM Main User Interface ........................................................................ 5
3.1
Turn on Bluetooth ....................................................................................... 5
3.2
Turn off Bluetooth ....................................................................................... 6
3.3
Bluetooth Manager ...................................................................................... 7
3.4
Menu and Tool Bar ...................................................................................... 9
3.4.1
Tools Menu ....................................................................................... 9
3.4.2
View Menu ..................................................................................... 12
3.4.3
Help Menu...................................................................................... 13
4 Configure Bluetooth Device .............................................................................. 14
4.1
Configure Local Device Information ............................................................. 14
4.2
Configure the paired devices....................................................................... 15
4.3
Configure SPP........................................................................................... 16
4.4
Configure FTP Server Information................................................................ 16
4.5
Configure DUN Server Information .............................................................. 18
4.6
Configure PAN Service ............................................................................... 20
5 Pair with a Device ............................................................................................ 21
6 Hands-free calling ............................................................................................ 28
7 Transfer File ..................................................................................................... 35
8 Serial Port Profile ............................................................................................. 46
9 Object Push Profile........................................................................................... 51
10 Dial-up to Internet ........................................................................................... 54
11 Personal Area Network..................................................................................... 63
12 ActiveSync........................................................................................................ 66
13 A2DP/AVRCP.................................................................................................... 69
14 My Shortcuts .................................................................................................... 72
15 FAQ .................................................................................................................. 78
1 Introduction
BlueSoleil™ CE is a Microsoft® Windows® CE based Bluetooth wireless solution provides by IVT
Corporation. It is designed according to the latest Bluetooth SIG specifications closely. And the
Bluetooth profiles it supports are: A2DP (Audio source), AVRCP (Target device), FTP
(Client/Sever), SPP, DUN (Client), PAN (User), FAX and Hands-free (HF).
This guide describes how to install and use BlueSoleilTM CE, including:
Copyright © 2006 IVT Corporation
3
BlueSoleil™ CE 2.0 Classic Quick Start
♦
How to start and exit BlueSoleilTM CE.
♦
How to navigate the main operation windows of BlueSoleilTM CE.
♦
How to use the Menu and Tool Bar.
♦
How to configure a Bluetooth device.
♦
How to use the Bluetooth profiles.
2 Features
2.1 Connection Management
Connection management includes the following operations:
♦
Create New Connection
♦
Rename Connection
♦
Remove Connection
♦
Connect
♦
Disconnect
2.2 Device Management
Device refers to a device that provides Bluetooth service(s), for example, Headset, Modem,
Notebook, PC, Pocket PC (or PDA) and Handset. Device management includes the following
operations:
♦
Search Devices
♦
Browse Services
♦
Search One Type Of Devices
♦
Stop Searching Devices
2.3 Configuration Management
Configuration management includes:
♦
Local Device Configuration
♦
Paired Devices Configuration
♦
Service Configuration
Copyright © 2006 IVT Corporation
4
BlueSoleil™ CE 2.0 Classic Quick Start
2.4 Hands-free Calling
Hands-free calling is identical as the manager of incoming and outgoing call. It includes:
♦
Dial out a number
♦
Answer or reject an incoming call
♦
Call transfer
3 BlueSoleilTM Main User Interface
3.1 Turn on Bluetooth
Step 1: Double click the BlueSoleil notify icon in the main shell to start the BlueSoleilTM CE
application.
Figure 3.1 BlueSoleilTM Notify Icon
Step 2: If you click the notify icon, a pop-up menu appears as Figure 3.2.
Copyright © 2006 IVT Corporation
5
BlueSoleil™ CE 2.0 Classic Quick Start
Figure 3.2 Notify Menu
The following menu options are available:
♦
Turn Bluetooth On
-
♦
Bluetooth Manager
-
♦
Turn on Bluetooth and starts up Bluetooth Manager.
Dialer
-
♦
Turn on the Bluetooth but the application is running on the foreground of the system.
Turn on Bluetooth and starts up Dialer.
Exit
-
Quit BlueSoleilTM CE.
3.2 Turn off Bluetooth
Step 1: If you click the notify icon, a pop-up menu appears as Figure 3.3.
Copyright © 2006 IVT Corporation
6
BlueSoleil™ CE 2.0 Classic Quick Start
Figure 3.3 Notify Menu
The following menu options are available:
♦
Turn Bluetooth Off
-
Turn off the Bluetooth but the application is still running on the background of the
system.
♦
Bluetooth Manager
-
♦
Dialer
-
♦
Starts up Bluetooth Manager
Starts up Dialer
Exit
-
Quit BlueSoleilTM CE.
3.3 Bluetooth Manager
Click “Bluetooth Manager” in Figure 3.3 to enter the main window of BlueSoleilTM CE. Here lists
all available Bluetooth services provided.
Copyright © 2006 IVT Corporation
7
BlueSoleil™ CE 2.0 Classic Quick Start
Figure 3.4 Bluetooth Manager Main Window
Figure 3.5 Bluetooth Manager Main Window
♦
Bluetooth Manager
-
This is the main window of BlueSoleilTM CE. It provides elementary information of
Bluetooth-equipped devices and the services it provides and direct you to communicate
with the remote devices via Bluetooth wireless technology.
♦
My shortcuts
-
If the connection has been established successfully before, a shortcut of the service will
create and you can
♦
Explore a Bluetooth Device
-
Search Bluetooth-equipped device within 10 meters nearby.
Copyright © 2006 IVT Corporation
8
BlueSoleil™ CE 2.0 Classic Quick Start
3.4 Menu and Tool Bar
There are three items on the Menu and Tool Bar of BlueSoleilTM CE.
3.4.1Tools Menu
The Tools menu includes the following items:
Figure 3.6Tools Menu
♦
Active Connection
-
Manage the active connection from local device to the remote devices. The connection
initiated by the local device will list in the Outgoing connections.
Figure 3.7 Active Connection
Copyright © 2006 IVT Corporation
9
BlueSoleil™ CE 2.0 Classic Quick Start
Figure 3.8 Active connection
Figure 3.9 Check active connection’s status
If remote device is the starter, the connection will list in the Incoming connections.
Copyright © 2006 IVT Corporation
10
BlueSoleil™ CE 2.0 Classic Quick Start
Figure 3.10 Incoming connection
Figure 3.11 Check active connection’s status
♦
Bluetooth Settings
-
Configure the services property. More information, please refer 4 Configure Bluetooth
device.
Copyright © 2006 IVT Corporation
11
BlueSoleil™ CE 2.0 Classic Quick Start
Figure 3.12 General setting
3.4.2View Menu
The View menu contains two items:
Figure 3.13 View Menu
♦
Icons
-
Switch to Icon view.
Copyright © 2006 IVT Corporation
12
BlueSoleil™ CE 2.0 Classic Quick Start
Figure 3.14 Icon view
3.4.3Help Menu
The Help menu contains two items:
Figure 3.15 Help Menu
♦
About
-
View software version.
Copyright © 2006 IVT Corporation
13
BlueSoleil™ CE 2.0 Classic Quick Start
Figure 3.16 About
4 Configure Bluetooth Device
4.1 Configure Local Device Information
Click “Bluetooth settings” on the Tools menu. In the popup Options dialog, click “General”
in Figure 4.1. The device name is fixed and can not be changed with others. Bluetooth Address
and Bluetooth chip manufacturer also available for information.
Figure 4.1
Local Device Configuration
In the Configure Local Device, the following operations are available, click OK in the
upper-right of “Bluetooth settings” window to save change:
Copyright © 2006 IVT Corporation
14
BlueSoleil™ CE 2.0 Classic Quick Start
♦
Set the Bluetooth device name.
♦
Set whether allow other devices to discover my device or not.
♦
Set whether allow other devices to connect my device or not.
4.2 Configure the paired devices
Click “Bluetooth settings” on the Tools menu. In the popup Options dialog click “Paired
Device” in Figure 4.2.
It lists all devices paired before. Pair means there is a link key has been changed between two
devices nearby. For security sake, only the paired devices have the privilege to exchange data.
After pair is done, the data sent by Bluetooth link channel will be encrypted and be received by
paired device to protect the attack form MIM. Remove a paired device by the Remove Device
button.
Figure 4.2
Copyright © 2006 IVT Corporation
Paired Devices Configuration
15
BlueSoleil™ CE 2.0 Classic Quick Start
4.3 Configure SPP
You can view the default COM port and select the available one.
The security level is also provided for your change.
Figure 4.3
SPP Configuration
-
Enable this service: enable security check when Bluesoleil is started..
-
Authorization Required: control the access rights of different service. A user-response
dialog box will remind user of the desired service provided locally being access by other
devices at the beginning of accessing action every time. Accept the request from remote
device or deny is both supported.
-
Authentication Required: check if the device initiates connect request is the trusted
device. If the initiator is first time hand up the accessing request, local device will start
the pairing request and ask user to input passkey to create a link key between these
devices. Save this link key to make these devices become trusted each other.
-
Encryption Required: To decide whether the data stream between the two connected
device should be encrypted or not. Switch to encrypted mode before accessing to the
service desired.
4.4 Configure FTP Server Information
Click “Bluetooth settings” on the Tools menu. In the popup Options dialog click “File
Transfer” tab (Figure 4.4).
Copyright © 2006 IVT Corporation
16
BlueSoleil™ CE 2.0 Classic Quick Start
Figure 4.4
FTP Service Shared Folder Configuration
In the File Transfer, the following operations are available, click OK in the upper-right of
“Bluetooth settings” window to save change:
♦
♦
Set service security. (Refer to 4.3 Configure SPP)
-
Enable this service (Started)
-
Authorization required
-
Authentication required
-
Encryption required
Set the local FTP Server shared folder.
-
Click the
button in Figure 4.3. In the popup Select Directory dialog, click Select
button to select a folder in Figure 4.4.
Copyright © 2006 IVT Corporation
17
BlueSoleil™ CE 2.0 Classic Quick Start
Figure 4.5
♦
FTP Service Shared Folder Configuration
Set the local FTP Server share permissions (Figure 4.5).
-
Read & Write: Remote client has both read and write permission of the shared folder
-
Read Only: Remote client only has read permission of the shared folder
Figure 4.6
FTP Service Shared Folder Permission Configuration
4.5 Configure DUN Server Information
Click “Bluetooth settings” on the Tools menu. In the popup Options dialog click “Dial-up
Networking” tab (Figure 4.7).
Copyright © 2006 IVT Corporation
18
BlueSoleil™ CE 2.0 Classic Quick Start
Figure 4.7 DUN Service Configuration
In the DUN, the following operations are available, click OK in the upper-right of “Bluetooth
settings” window to save changes. Please remember the current setting before change
parameters. Recover the setting if fail to dial-up network.
♦
Set service security.
♦
Set COM Port.
Figure 4.8 Set COM Port
♦
Set Baud Rate.
Copyright © 2006 IVT Corporation
19
BlueSoleil™ CE 2.0 Classic Quick Start
Figure 4.9 Set Baud Rate
4.6 Configure PAN Service
Click “Bluetooth settings” on the Tools menu. In the popup Options dialog click “Personal
Network” tab (Figure 4.10).
Figure 4.10 PAN Configuration
In the Personal Network, the following operations are available:
♦
Set Service Security
Copyright © 2006 IVT Corporation
20
BlueSoleil™ CE 2.0 Classic Quick Start
5 Pair with a Device
Step 1: Tap
to explore Bluetooth-equipped device nearby
automatically.
Figure 5.1 Explore Bluetooth devices
♦
Tap
to stop searching.
Figure 5.2 Explore Bluetooth devices finish
♦
Tap
to go back to previous window.
♦
Tap
to refresh.
Copyright © 2006 IVT Corporation
21
BlueSoleil™ CE 2.0 Classic Quick Start
♦
To list devices by its type.
Figure 5.3 Class devices
-
By phone type
Figure 5.4 Class devices by phone type
-
By computer type
Copyright © 2006 IVT Corporation
22
BlueSoleil™ CE 2.0 Classic Quick Start
Figure 5.5 Class devices by computer type
Step 2: Select a device. If it has not been paired before, select “Pair Device” to pair with it.
Figure 5.6 To Pair with a selected device
Copyright © 2006 IVT Corporation
23
BlueSoleil™ CE 2.0 Classic Quick Start
Figure 5.7 Pairing
-
To distinguish the pair/unpaired device by if it has the red pair symbol in device
representation icon.
If you have already known the Bluetooth address of your desired device, you can use the
speedup key ‘Find device’ in Tools menu. Bluetooth address is the ID of Bluetooth equipped
device.
Figure 5.8 Find device
Input the Bluetooth address of the device you have desire to find. The format should be
XX:XX:XX:XX:XX:XX. (X: Number or capital letter)
Copyright © 2006 IVT Corporation
24
BlueSoleil™ CE 2.0 Classic Quick Start
Figure 5.9 Find device
You can know Bluetooth address of your remote device by view its property and security level for
service of this device also can be set here.
Figure 5.10 Property of the remote device
Copyright © 2006 IVT Corporation
25
BlueSoleil™ CE 2.0 Classic Quick Start
Figure 5.11 Property of the remote device
Step 3: Input the characters used as the passkey which is used to create link key.
Figure 5.12 Input passkeys
Step 4: Input the same alphanumeric characters input in Step 3 to the request window in the
device which paired.
If the pairing operation is successful, the paired device will be marked with a red pair symbol as
below:
Copyright © 2006 IVT Corporation
26
BlueSoleil™ CE 2.0 Classic Quick Start
Figure 5.13 Pair successfully
If the pairing operation is failed, an error message box will pop up as below:
Figure 5.14 Pair fails
Note:
-
In the remote devices list, if the device which you want to establish connection is not
shown in the remote devices’ list, please check that whether the device is power on, or if
the distance between your device and remote device is less than 10 meters and the
Bluetooth program is running on the device, then refresh the devices’ list again.
-
If the device still is not shown in the device list, please check that whether the device
connect to other devices. If the connection with other device(s) exists, first disconnect
the current connection, and then search devices nearby again.
Copyright © 2006 IVT Corporation
27
BlueSoleil™ CE 2.0 Classic Quick Start
-
If the device’s name is “Unknown”, please check that whether the device connect to other
devices. If the connection with other device(s) exists, first disconnect the connections
with other device(s), and then search devices nearby again. Occasionally, you cannot get
the remote device’s name though you have done searching for the device many times,
you can ignore it.
Step 5: Explore the services of the paired device.
Figure 5.15 Explore the services
6 Hands-free calling
BlueSoleilTM CE can act as Hands-free unit. Hands-free calling is for the scenarios that dial an
outgoing call or answer an incoming call. The UI of this part has not been completely finished,
but work flow for calling operation has already carried out. Three-way calling does not support
currently, but this function has been scheduled in calendar.
Step 1: Tap
in Bluetooth Manager to search the Bluetooth
enabled mobile phones in the limited range automatically.
Copyright © 2006 IVT Corporation
28
BlueSoleil™ CE 2.0 Classic Quick Start
Figure 6.1
Search devices
Filter Bluetooth mobile phone out.
Figure 6.2
Bluetooth mobile phone
Step 2: Pair with a device. (See the section 5 Pair with a Device)
Copyright © 2006 IVT Corporation
29
BlueSoleil™ CE 2.0 Classic Quick Start
Figure 6.3
Pair
Step 3: Connect to the Hands-free service provided by mobile phone.
Figure 6.4
Copyright © 2006 IVT Corporation
Connect to Hands-free voice calling
30
BlueSoleil™ CE 2.0 Classic Quick Start
Figure 6.5
Connected
Step 4: Start up Dialer. There are two ways to start up Dialer. One is by select ‘Dialer’ in tools
menu or directly launch Dialer in the notify menu.
Step 5: Dial out a number.
Figure 6.6
♦
Dialer keypad
Keypad
-
dial out a number or answer the incoming call
Copyright © 2006 IVT Corporation
31
BlueSoleil™ CE 2.0 Classic Quick Start
-
clear all input
-
cancel the last input or reject the incoming call
-
transfer calling between local device and Bluetooth mobile phone
Figure 6.7
Dialing a number
Step 6: Answer or reject an incoming call.
Figure 6.8
-
Have an incoming call
Tap ‘Dial’ to answer it.
Copyright © 2006 IVT Corporation
32
BlueSoleil™ CE 2.0 Classic Quick Start
Figure 6.9
-
Answer this incoming call
Tap ‘Cancel’ to answer it.
Figure 6.10 Reject this incoming call
Step 7: An incoming or outgoing call is ongoing.
Copyright © 2006 IVT Corporation
33
BlueSoleil™ CE 2.0 Classic Quick Start
Figure 6.11 A call is ongoing
-
Tap ‘Cancel’ to hang up it.
Figure 6.12 Hang up the ongoing call
-
Tap ‘Transfer’ to transfer the call to mobile phone or transfer the call back. SCO released
means the call has been transferred to mobile phone; SCO established means the call is
transferred back successfully to local device.
Copyright © 2006 IVT Corporation
34
BlueSoleil™ CE 2.0 Classic Quick Start
Figure 6.13 Transfer call to mobile phone
Figure 6.14 Transfer back to local device
7 Transfer File
BlueSoleilTM CE can act as both the FTP client and the FTP server. The FTP (File Transfer Profile)
is used to transfer file from remote device to local or from local to remote device.
Step 1: Tap
in Bluetooth Manager to search the Bluetooth
enabled devices which support FTP service in the limited range automatically.
Copyright © 2006 IVT Corporation
35
BlueSoleil™ CE 2.0 Classic Quick Start
Figure 7.1 Preferred devices
Step 2: Pair with a device. (See the section 5 Pair with a Device)
Figure 6.15
Pair
After finish the pairing action, the function is listed in the pop-up menu.
Copyright © 2006 IVT Corporation
36
BlueSoleil™ CE 2.0 Classic Quick Start
Figure 6.16
Figure Function
-
Explore Folder: View the remote and local device file list.
-
Browse Service: List the services which the selected device can provide.
-
Unpair Device: Make the remote device and local device unpaired.
-
Delete: Delete the device from the current device list.
-
Property: View the elementary information of the selected device.
Step 3: Select “Explore Folder” to list the remote device file list. You may need to confirm the
local device to access to the remote device in the remote device side.
Figure 6.17
-
Tap
Remote Device File List
change to local device file list.
Copyright © 2006 IVT Corporation
37
BlueSoleil™ CE 2.0 Classic Quick Start
Figure 6.18
-
Exit.
Figure 6.19
-
local Device File List
Menu
Sort files.
Copyright © 2006 IVT Corporation
38
BlueSoleil™ CE 2.0 Classic Quick Start
Figure 6.20
Sorting
Step 4: Refresh the current file list from menu or tap shortly in the blank area.
Figure 6.21
Copyright © 2006 IVT Corporation
Refresh
39
BlueSoleil™ CE 2.0 Classic Quick Start
Figure 6.22
Refresh
Step 5: Download the selected file from the remote device to local device.
Figure 6.23
-
Download a file
You can download a folder.
Copyright © 2006 IVT Corporation
40
BlueSoleil™ CE 2.0 Classic Quick Start
Figure 6.24
Figure 6.25
-
Download a folder
Downloading
If there is a file or folder already exists, a warning message box will show up. Select “Yes”
to replace the old one, select “No” to cancel downloading.
Copyright © 2006 IVT Corporation
41
BlueSoleil™ CE 2.0 Classic Quick Start
Figure 6.26
Step 6: Tap
File exists
to display local file list.
Figure 6.27
Local file list
Step 7: Upload the selected file from the local device to remote device.
Copyright © 2006 IVT Corporation
42
BlueSoleil™ CE 2.0 Classic Quick Start
Figure 6.28
-
Upload a file
You can download a folder.
Figure 6.29
Copyright © 2006 IVT Corporation
Upload a folder
43
BlueSoleil™ CE 2.0 Classic Quick Start
Figure 6.30
-
Uploading
If there is a file or folder already exists, a warning message box will show up. Select “Yes”
to replace the old one, select “No” to cancel downloading.
Figure 6.31
File exists
Step 10: Property: View the elementary information of the selected device Disconnect FTP
connection
Copyright © 2006 IVT Corporation
44
BlueSoleil™ CE 2.0 Classic Quick Start
Figure 6.32
-
General information
Authorization setting. If selecting one of or all items in the service list. No need to confirm
the access action when access to the remote device. The remote device will acquiescently
deem the local device can safely establish the connection based on the service
respectively without any authorization.
Figure 6.33
Copyright © 2006 IVT Corporation
Authorization
45
BlueSoleil™ CE 2.0 Classic Quick Start
8 Serial Port Profile
BlueSoleil™ CE can act as both the SPP DevA/DevB. User may not use this kind connection
directly, and it’s just used by other application to send or received data via simulate COM port.
Step 1: Pair with a device. (See the section 5 Pair with a Device)
Step 2: Explore the serial port service that the selected device provides and then connect it.
Figure 8.1
View the services
Step 3: Select an available serial COM port and select “connect” to create the SPP connection.
Copyright © 2006 IVT Corporation
46
BlueSoleil™ CE 2.0 Classic Quick Start
Figure 8.2
Create SPP connection
Figure 8.3
Connecting
Step 4: The icon turn to green means the connect action is successfully done.
Copyright © 2006 IVT Corporation
47
BlueSoleil™ CE 2.0 Classic Quick Start
Figure 8.4
-
Connecting
You can view the status of the activity connection.
Figure 8.5
Copyright © 2006 IVT Corporation
Function
48
BlueSoleil™ CE 2.0 Classic Quick Start
Figure 8.6
Connection status
Step 5: More than one connection can co-currently exists.
Figure 8.7
Two activity connections
Step 6: View the active connections in Tools.
Copyright © 2006 IVT Corporation
49
BlueSoleil™ CE 2.0 Classic Quick Start
Figure 8.8
Figure 8.9
Tools
Active connection mangers
Step 7: Disconnect SPP connection.
♦
Select Disconnect on the pop-up menu after clicking current SPP connection for several
seconds.
♦
Disconnect the current connection in Active Connections window.
Copyright © 2006 IVT Corporation
50
BlueSoleil™ CE 2.0 Classic Quick Start
9 Object Push Profile
With the OPP profile of BlueSoleil™ CE, user can exchange business card or file with remote
device.
Step 1: Tap
in Bluetooth Manager to search the Bluetooth
devices which support OPP service in limited range automatically.
Figure 9.1
Preferred devices
Step 2: Pair with a device. (See the section 5 Pair with a Device).
If you only know the
Bluetooth address of the preferred device, you can select “Find device” and input the address, it
will focus the specific device.
Copyright © 2006 IVT Corporation
51
BlueSoleil™ CE 2.0 Classic Quick Start
Figure 9.2
Figure 9.3
Copyright © 2006 IVT Corporation
Find device
Input Bluetooth address
52
BlueSoleil™ CE 2.0 Classic Quick Start
Figure 9.4
Find device finish
Step 3: After a remote device has been successfully paired. User can pull, push or
exchange
business card or PIM Object with it. Simply press the device and choose the operation in pop up
window. Then BlueSoleil™ will connect the device and process the operation automatically.
Figure 9.5
Copyright © 2006 IVT Corporation
Process OPP operations
53
BlueSoleil™ CE 2.0 Classic Quick Start
Figure 9.6
Figure 9.7
10
Connect OPP service
Exchange business card complete
Dial-up to Internet
BlueSoleil™ CE acts as the DUN client (Data Terminal). The DUN Profile is used to cellular
phone/modem by a computer as a wireless modem for connecting to a dial-up internet access
server or using other dial-up services.
Cellular phone or modem by a computer to receive data calls.
Copyright © 2006 IVT Corporation
54
BlueSoleil™ CE 2.0 Classic Quick Start
Step 1: Tap
in Bluetooth Manager to search the Bluetooth wireless
technology enabled devices which support DUN service in limited range automatically.
Figure 9.1
Preferred devices
Step 2: Pair with a device. (See the section 5 Pair with a Device).
If you only know the
Bluetooth address of the preferred device, you can select “Find device” and input the address, it
will focus the specific device.
Figure 9.2
Copyright © 2006 IVT Corporation
Find device
55
BlueSoleil™ CE 2.0 Classic Quick Start
Figure 9.3
Input Bluetooth address
Figure 9.4
Find device finish
Step 3: Explore the DUN service that the selected device provides and then connect it.
Copyright © 2006 IVT Corporation
56
BlueSoleil™ CE 2.0 Classic Quick Start
Figure 9.5
Connect to DUN
Figure 9.6
Connecting
Step 4: A dialog window requesting a username and password will pop up. You can change the
connection name as you want. The phone number is decided by your mobile phone network
provider. Only one call at a time is supported. Before a cellphone or modem can be used with a
PC/Laptop for the first time, an initialization procedure must be performed. This typically
involves manually activating initialization support, and entering a PIN code on the PC/Laptop
keyboard.
Copyright © 2006 IVT Corporation
57
BlueSoleil™ CE 2.0 Classic Quick Start
Figure 9.7
Input phone number
Step 5: Connecting to Dial-up service.
Figure 9.8
Copyright © 2006 IVT Corporation
Opening communication port
58
BlueSoleil™ CE 2.0 Classic Quick Start
Figure 9.9
Dialing the phone number
Figure 9.10 Authenticate the device
Copyright © 2006 IVT Corporation
59
BlueSoleil™ CE 2.0 Classic Quick Start
Figure 9.11 Authentication finish
Figure 9.12 Establish connection finish
Step 6: If establish connection successfully, it will jump to “My shortcut”. The user data is
transported by serial port emulation. You can access available resource of Internet the mobile
phone provided.
Copyright © 2006 IVT Corporation
60
BlueSoleil™ CE 2.0 Classic Quick Start
Figure 9.13 DUN shortcut
Figure 9.14 Explore a website
Step 7: Disconnect DUN connection.
♦
Select Disconnect on the pop-up menu.
Copyright © 2006 IVT Corporation
61
BlueSoleil™ CE 2.0 Classic Quick Start
Figure 9.15 Disconnect the connection in My shortcuts
♦
Disconnect the current connection in Active Connections window.
Figure 9.16 Disconnect
Copyright © 2006 IVT Corporation
62
BlueSoleil™ CE 2.0 Classic Quick Start
11
Personal Area Network
There are three roles defined in PAN profile V1.0. They are (1) Network access points, (2) Group
Ad-hoc Networks, (3) PANU-PANU. BlueSoleil™ CE acts as the PAN User (PANU). According to its
roles, three Scenarios are discussed:
a. Network Access Points-PANU
A network access point is a unit that contains one or more Bluetooth radio devices and acts
as a bridge, proxy, or router between a Bluetooth network and some other network
technology.
b. Group Ad-hoc Networks-PANU
Group ad-hoc networking allows mobile hosts to cooperatively create ad-hoc wireless
networks without the use of additional networking hardware or infrastructure. A piconet
consists of one Bluetooth device operating as a piconet master communicating with between
1 and 7 active Bluetooth devices operating as slaves. A group ad-hoc network is a set of
computing devices which interact with each other to form a self-contained network, the
network being formed without the need for additional external networking hardware.
c. PANU-PANU
A point to point connection between two PANUs allows direct communication between these
two nodes only.
in Bluetooth Manager to search the Bluetooth
Step 1: Tap
enabled devices which support FTP service in the limited range automatically.
Figure 10.1 Preferred devices
Copyright © 2006 IVT Corporation
63
BlueSoleil™ CE 2.0 Classic Quick Start
Step 2: Pair with a device. (See the section 5 Pair with a Device)
Step 3: Select a device and then connect it.
Figure 10.2 Connect
Figure 10.3 Connecting
Step 4: If the connection is successfully established, it will jump to “My shortcuts” directly. There
lists all shortcut if have established the connection before or you added by selecting “Create
shortcuts” in the pop-up menu.
Copyright © 2006 IVT Corporation
64
BlueSoleil™ CE 2.0 Classic Quick Start
Figure 10.4
Disconnect the connection in My shortcuts
Step 5: The Group Ad-hoc Network and the PAN User exchange data using the Bluetooth
Network Encapsulation Protocol (BNEP). Group Ad-hoc Networks do not provide access to any
additional networks. Instead, Group Ad-hoc Networks are intended to allow a group of devices to
form temporary network and exchange information.
Step 6: Disconnect PAN connection.
♦
Select Disconnect on the pop-up menu after clicking current PAN connection for several
seconds.
♦
Disconnect the current connection in Active Connections window.
Copyright © 2006 IVT Corporation
65
BlueSoleil™ CE 2.0 Classic Quick Start
12
ActiveSync
BlueSoleil™ CE acts as IrMC Server. There are two roles defined in Synchronization profile, they
are:
a. IrMC Server: This is the IrMC server device that provides an object exchange server.
Typically, this device is a mobile phone or PDA. You can simplify seem it as the server who
provide the information resource.
b. IrMC Client: This is the IrMC client device, which contains a sync engine and pulls and
pushes the PIM data from and to the IrMC Server. Usually, the IrMC Client device is a PC.
in Bluetooth Manager to search the Bluetooth enabled
Step 1: Tap
devices which support FTP service in the limited range automatically.
Figure 11.1 Preferred devices
Step 2: Pair with a device. (See the section 5 Pair with a Device)
Step 3: Select a device and then connect it.
Copyright © 2006 IVT Corporation
66
BlueSoleil™ CE 2.0 Classic Quick Start
Figure 11.2 connect to A2DP service
Step 4: If the connection is successfully established, it will jump to “My shortcuts” directly. You
can synchronize phonebooks, calendars, messages, and notes in PC side.
Figure 11.3 My shortcuts
Step 5: Disconnect PAN connection.
♦
Select Disconnect on the pop-up menu after clicking current connection.
Copyright © 2006 IVT Corporation
67
BlueSoleil™ CE 2.0 Classic Quick Start
Figure 11.4 Disconnect the connection in My shortcuts
♦
Disconnect the current connection in Active Connections window.
Figure 11.5 Disconnect the connection in Active connections
Copyright © 2006 IVT Corporation
68
BlueSoleil™ CE 2.0 Classic Quick Start
13
A2DP/AVRCP
BlueSoleil™ CE acts as A2DP source and AVRCP target. It can let user listen to the high quality
sound from headset after establish connection successfully and the current state of music
playing in the device can be controlled by headset.
Step 1: Pair with a stereo headset. Input the passkey which set by the headset manufacturer.
(See the section 5 Pair with a Device)
Figure 12.1 Pair with a stereo headset
Step 2: Explore the A2DP service that the selected device provides and then connect it.
Figure 12.2 connect to A2DP service
Copyright © 2006 IVT Corporation
69
BlueSoleil™ CE 2.0 Classic Quick Start
Figure 12.3 connecting
Step 3: Connect successfully.
Figure 12.4 Establish connection finish
Once connected the Play, Pause, Previous and Next button in the Headset device can be pressed
to control the playing of an Audio Player or a Video Player. User can listen and control music via
Bluetooth remote devices such as headset.
Note:
-
An A2DP shortcut will create automatically in the Shortcut window after establish the
connection. You can double click its own shortcut icon (represented by the Connection
Name) and clicks connect on the pop-up menu to re-establish the connection in the
shortcut window. More details please refer to 14 My Shortcuts
Copyright © 2006 IVT Corporation
70
BlueSoleil™ CE 2.0 Classic Quick Start
Step 4: Disconnect A2DP connection.
♦
Select Disconnect on the pop-up menu after clicking current A2DP connection for several
seconds.
Figure 12.5 Disconnect
♦
Disconnect the current connection in Active Connections window.
Figure 12.6 Disconnect
Copyright © 2006 IVT Corporation
71
BlueSoleil™ CE 2.0 Classic Quick Start
14
Tap
My Shortcuts
to enter My Shortcuts. The service shortcut was represented by the
connection Name. The activity connection is green.
Figure 13.1 My shortcut
♦
Tap
♦
Tap
to go back to Bluetooth Manager Interface.
to class Shortcuts by type as below.
Copyright © 2006 IVT Corporation
72
BlueSoleil™ CE 2.0 Classic Quick Start
Figure 13.2 Class all shortcuts by type
Select a free connection and select “connect” on the pop-up menu to re-establish the connection
in the shortcut window, take the follow shortcuts for example:
Figure 13.3 Reconnect
If the shortcut belongs to FTP, select “Explore Folder” to show the remote device file list.
Copyright © 2006 IVT Corporation
73
BlueSoleil™ CE 2.0 Classic Quick Start
Figure 13.4 FTP shortcut Reconnect
You can view the property of the device owns this connection.
Figure 13.5 Device property
After reconnect finish, you can view the state of the activity connection and do the operation
normally.
Copyright © 2006 IVT Corporation
74
BlueSoleil™ CE 2.0 Classic Quick Start
Figure 13.6 Reconnect successfully
Figure 13.7 Connection’s status
There is one more function “Set as Default”. Any type shortcut has only a default shortcut. If the
shortcut has set being the default one, a red symbol will be marked on its representation icon. If
a shortcut, take FTP for example, has been set as the default one, and then you want to another
as the default. Just set the latter one, you can see the red symbol moving from the previous one
to the latter one.
Copyright © 2006 IVT Corporation
75
BlueSoleil™ CE 2.0 Classic Quick Start
Figure 13.8 FTP shortcut
Figure 13.9 Set it as the default one
Copyright © 2006 IVT Corporation
76
BlueSoleil™ CE 2.0 Classic Quick Start
Figure 13.10
Set another FTP shortcut as the default one
Copyright © 2006 IVT Corporation
77
BlueSoleil™ CE 2.0 Classic Quick Start
15
FAQ
N/A.
The Bluetooth word mark and logos are owned by the Bluetooth SIG, Inc. and any use of such
marks by IVT Corporation is under license. Other trademarks and trade names are those of
their respective owners.
Copyright © 2006 IVT Corporation
78