1
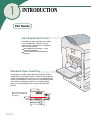
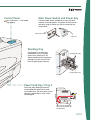
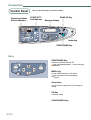
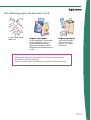
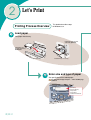
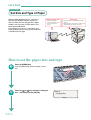
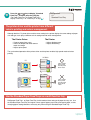
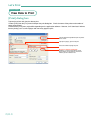
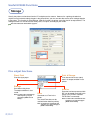
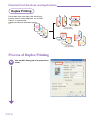
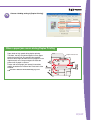
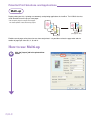
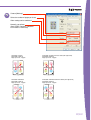
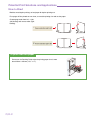
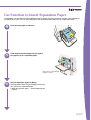
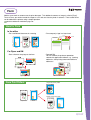
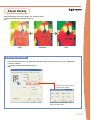
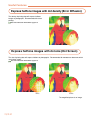
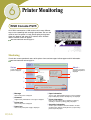
Contents
1. INTRODUCTION ....................................................... US/UK-4
Part Names ............................................................................................................................... US/UK-4
Control Panel ............................................................................................................................ US/UK-6
Paper Specifications ............................................................................................................... US/UK-8
Managing the Cartridge ........................................................................................................ US/UK-10
HC5000 Features to Recognize ............................................................................................ US/UK-11
2. Let's Print .................................................................. US/UK-14
Printing Process Overview ................................................................................................... US/UK-14
Set Size and Type of Paper ................................................................................................... US/UK-16
View Data to Print .................................................................................................................. US/UK-18
3. Useful HC5000 Functions ...................................... US/UK-20
Print Position Adjustment .....................................................................................................
Test Print ................................................................................................................................
Reprint (Temporary Data Retrieval) .....................................................................................
Storage ...................................................................................................................................
US/UK-20
US/UK-21
US/UK-22
US/UK-24
4. Potential Print Solutions and Applications .......... US/UK-26
Duplex Printing ......................................................................................................................
Multi-up ...................................................................................................................................
Pagination for Booklet Formats ...........................................................................................
Job Separation .......................................................................................................................
Form ........................................................................................................................................
US/UK-28
US/UK-30
US/UK-32
US/UK-35
US/UK-39
5. Useful Features....................................................... US/UK-42
Adjust Contrast ......................................................................................................................
Adjust Density ........................................................................................................................
Express halftone images with dot density (Error Diffusion) .............................................
Express halftone images with dot size (Dot Screen) .........................................................
US/UK-42
US/UK-43
US/UK-44
US/UK-44
6. Printer Monitoring ................................................. US/UK-46
RISO Console PS7R .............................................................................................................. US/UK-46
7. Trouble shooting.................................................... US/UK-48
Out put Does Not Look Clear And Sharp ............................................................................
Replace the Ink Cartridge .....................................................................................................
Head Maintenance .................................................................................................................
Accessories ............................................................................................................................
Scan Function ........................................................................................................................
Finisher Function ...................................................................................................................
US/UK-48
US/UK-49
US/UK-50
US/UK-51
US/UK-51
US/UK-51
US/UK-1
is one of the World’s
fastest and economical full colour
Printer.
HC5000 provides colour printing at an affordable price by using the FORCEJET™ ENGINE.
The core component FORCEJET™ ENGINE combines 4 individual Fixed-Array print heads (YMCK) and highspeed paper feeding capabilities. In addition the HC5000 is equipped with advanced output features such as
duplex.
US/UK-2
What is
?
RISO's trademark "ComColor™" is a synthesis of Communication
and Colour.
ComColor™ is a new type of printer that satisfies the need for "practical, fast and ondemand" printing for business, as well as for daily life.
The HC5000 will ensure you never have to worry about the high cost and slow printing
speed that usually is associated with colour printing.
Mechanism
Windows/Macintosh
To enable high-speed full-colour printing,
the HC5000 print controller (colour management system:
ComColor™ Standard) formats data transferred
from the PC into the most suitable format for the printer.
K
C
M
Y
Controls ink
output and
printing speed
FORCEJET™
Engine
Order print job
Paper size
Paper Type
Colour Information
Paper
Paper
Paper
Print Controller
(Colour management:
ComColor™
Standard)
The "FORCEJET™ ENGINE" is a
printing mechanism with a "High
Speed Line Ink Jet", and is the
heart of the HC5000.
The FORCEJET™ ENGINE was
developed to attain the targets of
"Full Colour, High Speed, High
Durability, and Low Running Cost".
Become more connected through
the world of ComColor™.
US/UK-3
1
INTRODUCTION
Part Names
Ink Compartment Cover
○ ○ ○ ○ ○ ○ ○ ○ ○ ○ ○ ○ ○ ○ ○ ○ ○ ○ ○ ○ ○ ○ ○
Four different colour cartridges are installed
in this compartment. Open this cover to
replace an ink cartridge when “Ink Replacement” indicator light up.
See "Replace the Ink Cartridge" — in this
booklet page US/UK-49.
See User's Manual for Printer Main Body
page 3-16.
Standard Paper Feed Tray
○ ○ ○ ○ ○ ○ ○ ○ ○ ○ ○ ○ ○ ○ ○ ○ ○ ○ ○ ○ ○
Heavy paper or custom sized paper (non-standard) needs be
loaded into this tray; Paper feed tray 1 and 2 will not accept nonstandard sized paper. When not is use, this tray should be kept
closed. If unused paper is left on this tray, it will absorb moisture
and could cause the paper jamming. It is recommended to
return any unused paper back to its original package after
printing.
Make sure that you load the
paper with the printable side
face upward.
US/UK-4
Control Panel
Main Power Switch and Power Key
○ ○ ○ ○ ○ ○ ○ ○ ○ ○ ○ ○ ○ ○ ○ ○
See "Control Panel" — in this booklet
page US/UK-6.
The Main Power Switch (located on the right side of the
machine) should be kept on. The power can be turned on
and off by using the Power Key, which is located on the
control panel.
Main Power Switch
Power Key
Stacking Tray
Printed paper is received and
stacked on this tray. The paper
guides of the stacking tray are
adjusted automatically according to
the paper size you select (Do not
force the paper guide manually).
Stacking guide (side)
○ ○ ○ ○ ○ ○ ○ ○ ○ ○
○ ○ ○ ○ ○
Stacking guide (end)
○ ○ ○ ○ ○ ○ ○ ○ ○ ○ ○ ○ ○
Paper Feed Tray 1/Tray 2
Due to the paper feeding mechanism,
avoid loading thick paper which could
cause paper jams. For more detail, please
refer to the specifications of the recommended paper.
Make sure that you load the
paper with the printable side
face downward.
US/UK-5
Introduction
WAKE-UP Key
○ ○ ○ ○ ○ ○ ○
Ready
Auto
○ ○ ○ ○ ○ ○
Message Display
○ ○ ○ ○ ○ ○ ○ ○ ○
FORCEJET™
Link Indicator
○ ○ ○ ○ ○ ○
○ ○ ○ ○ ○ ○
Remaining Volume
Notice Indicators
Use to set the printer and check status.
○ ○ ○ ○ ○ ○
Control Panel
Power Key
PRINT/PAUSE Key
Keys
PRINT/PAUSE Key
Switches Print Mode ON and OFF.
See "Printing Mode ON/OFF" — in this booklet page
US/UK-12.
MENU Key
Use for "MENU Setting" on the display.
See User's Manual for Printer Main Body
page 2-2.
Arrow Keys
Use to select the target menu or to change the
setting.
OK Key
Confirm a setting.
CANCEL/BACK Key
US/UK-6
Explanation of Error Symbols and Display
If an error occurs during printing, printing stops and an indicator will light up on the Operation Panel. An error
message may appear in the display depending on the type of error. Check the display message and error code and
follow the recommended procedures listed below.
INK CARTRIDGE
Ink is empty. The Ink cartridge indicated by
the light needs to be replaced.
CHECK SETTINGS
Check the location indicated by the light.
Some device inside has not correctly been
set, or the cover is not securely closed.
CALL SERVICE
Error requiring servicing. If this message
persists, write down the error number and
contact your local dealer (or service representative).
FORCEJET™ Link Symbol
The FORCEJET™ ENGINE
controls printing speed, size
and quality of the paper, and
the amount of ink used. The
symbol shows it is functioning
correctly.
See User's Manual for Printer
Main Body page 3-3.
JAM
Paper jam has occurred. Check the location
that the light indicates and remove the
jammed paper. A sticker inside the front
cover will explain how to remove the paper.
MAINTENANCE CALL
The cleaning tank is full or maintenance is
required. Contact your local dealer (or
service representative).
US/UK-7
Introduction
Paper Specifications
Usable Paper:
Paper that conforms to the following restrictions can be used for printing.
• Paper weight
For Standard Paper Feed Tray
46g/m2 – 157g/m2 (12-lb bond to 42-lb bond)
For Paper Feed Trays
52g/m2 – 104g/m2 (14-lb bond to 28-lb bond)
• Paper Sizes That Can Be Used in the Standard Feed Tray
Maximum size
Minimum size
Paper ejection
direction
90mm
(39/16")
297mm
(11")
Paper ejection
direction
148mm
(513/16")
Registering Paper Size :
297mm - 340mm
(11" - 133/8")
420mm (17")
Registering Paper Size :
420mm - 550mm (17" - 215/8")
• Paper Sizes That Can Be Used in Paper Feed Tray 1/Paper Feed Tray 2
Minimum size
Paper ejection
direction (*)
Maximum size
182mm (73/16")
Paper ejection
direction
257mm
(101/8")
* Both orientations are available.
US/UK-8
420mm (17")
297mm (11")
The following paper should not be used:
Curled, lipped, waved,
folded, wet
Regular inkjet paper
Regular envelopes
Certain inkjet paper is not suitable
for the oil-based ink, such as
specialized paper for photos or
papers that have glossy surface.
Image may not be printed correctly
if used.
You cannot use paper
that has flaps on the
surface. The surface
must be flat.
We provide paper that brings out the best in the machine,
for superior quality printing.
Please contact your local dealer (or service representative).
US/UK-9
Introduction
Managing the Cartridge
Do not store The ink for a long period.
Do not shake.
Do not expose the ink cartridge to direct sunlight or
extreme temperatures. Do not store the ink for a long
period of time after purchasing. Use as soon as
possible.
There is no need to shake the cartridge when you
replace it. Shaking creates bubbles inside the cartridge that could cause the print head to clog or affect
the colour quality of the print.
Air intake cap
Ink feed opening cap
Take extreme caution when replacing the
ink cartridge.
The oil based pigment ink should be handled carefully
to avoid stains. If spilled, immediately use soap to
wash off the ink and minimize the risk of a stain.
Do not remove the cap.
Although some ink will remain in the cartridge (50ml),
do not open the cap. Do not refill with new ink, and do
not flush ink down the drain.
Know when to change the cartridge/paper
If the remaining volume of paper in one of the feeding
trays or ink in one of the cartridges is low, the relevant
Remaining Volume Indicator will light up. For enhanced
productivity, prepare paper or ink cartridges for replacement when this occurs.
US/UK-10
Black ink is low.
HC5000 Features to Recognize
The HC5000 has some small but important differences when compared to other, ordinary printers. RISO
recomends that you learn the characteristics and usage of the HC5000.
Please use recommended oilbased ink and paper.
Personal inkjet printers often use water-based ink.
Inkjet paper designed for these printers are developed to maximize the print quality based on the
water-based ink used, and not for oil-based ink. The
HC5000 is a high-speed full colour printer designed
especially for RISO oil-based ink. The advantage of
oil-based ink is to have a clear image at a high
printing speed. To achieve the best results you should
use only recommended paper. When storing the
output in a plastic file, use PET made files to retain
quality.
Can the printer panel control a
printing task?
Usually, we use the printer driver and click the "OK"
button on the PC's screen to print. With the HC5000
the process is the same.
However, the HC5000's printing tasks can also be
managed through the control panel. For example, the
control panel is useful for big volume printing, for
changing the paper settings, or to start printing after
proof printing has finished.
See "Useful HC5000 Functions" — in this booklet page US/UK-20.
Cancel a print-job using [Menu 7
Job Clear]
When you need to stop and cancel printing, press the
PRINT/PAUSE Key to stop printing (Printing Mode Off), and execute [Menu 7 Job Clear]. If the printer
has not finished printing the job sent to the printer
driver, the CANCEL/BACK Key will not cancel the job.
Go to the Menu and select "Job Clear" and then
press the PRINT/PAUSE Key again to change to
Printing Mode to "ON". Make sure the Printing Mode
setting is changed to "ON", otherwise the printer will
not print, even if you start another print job from the
PC's printer driver.
Margins can be reduced
For its high-speed paper feeding mechanism, the
HC5000 has a default 5mm (3/16") margin on the top,
bottom, left, and right. You can change this margin to
1mm (0.04") by choosing [Maximum] from [Menu
4.10 Image Area].
However, some applications might not allow the
setting to be less than 5mm (3/16").
Different colour printers have
different colour tones
While the three primary colours (RGB: Red, Green,
Blue) are used for PC screens and displays, printers
define colours in the "three primary printing colours
(CMY: Cyan, Magenta, Yellow)". Usually, colours that
can be defined with CMY are more limited than those
defined by RGB, which makes it is impossible to
produce the same colour that you see on the screen.
Therefore, to transform RGB to CMY, printers need to
use a colour management technique. Every
manufacturer's printer has different transformation
techniques, and they all use their own original colour
chart.
With the basic concept of "low cost, fast, on-demand",
the HC5000 focuses on creating matched colour
schemes. The HC5000 uses the innovative
ComColor™ Standard for colour management.
ComColor™ Standard Features
• Adjusts colour tone by type of paper.
• Adjusts colour tone by Original image (Linebased or Photo-based).
• Adjusts colour within a specified colour range
to produce the best result for a printed image.
Using the above features of the HC5000, the paper
size and type in the tray should match the setting of
the printer driver. If the setting does not match, the
printer will not print correctly. The type of ink also has
a significant influence on the quality of the print.
HC5000's FORCEJET™ Link Symbol light
indicates the usage of appropriate ink and correct colour
management.
US/UK-11
Introduction
Be careful with curled paper
If the paper has more than a 2mm (0.08”) curl, correct the curl, or the paper will not pass through the printer.
Paper for the Standard Paper Feed Tray should be taken only from its original package. Any paper remaining after
the last print should be placed back in the original package.
Paper left out may curl due to humidity. If the curl is less than 2mm (0.08”) and still creates paper jams, flip the
paper over so that the curled part faces downwards.
Curl should
be less than
2mm (0.08").
Printing Mode ON/OFF
The [PRINT/PAUSE] Key on the control panel changes the Printing Mode to ON/OFF.
This Printing Mode ON/OFF is different from the ON-LINE/OFF-LINE of other printers.
HC5000
Regular printer
Network
FORCEJET™
Engine
Network
Switches between
Printing Mode
ON and OFF
Print Controller
Switches between
ON-LINE and OFF-LINE
Always ON-LINE
as long as
main power is on
The HC5000 Print Mode ON/OFF controls the
linkage between the FORCEJET™ ENGINE and
controller. In other words, the controller will continue
receiving data from the pc while it is off.
A regular printer's ON-LINE/OFF-LINE switches
between the Network and the Print Controller.
Therefore, data cannot be sent to the printer while
the machine is OFF-LINE.
Use the [PRINT/PAUSE] Key on the control panel to
switch Printing Mode ON or OFF.
Printing Mode ON
Print controller sends print job.
Lit green
Printing Mode OFF
Rejects order from the print controller, and accepts order
from the control panel. Use the control panel to change
settings and to adjust Print Position and Print Density.
Printing Mode ON
Not lit
Printing Mode OFF
US/UK-12
Duplex Printing = "Switch Back" & "Stackless" system
The HC5000 standard model can perform duplex printing,
from postcard size up to A3W size with paper weight of 46g/
m2~157g/m2 (12-lb bond to 42-lb bond). RISO uses a switch
back system: the system reverses the paper after the first
side has been printed. To take advantage of fast printing, an
Stackless system (the flipped printed paper is immediately
sent back to the inkjet heads, without being stacked, to print
the second side) is used. Fast and highly efficient duplex
printing becomes possible with these systems.
Switch Back
Single/Duplex
Distributor
Print head
Paper
After the first side is printed, the paper will be sent to the
Single/Duplex Distributor and then reversed by the Switch
Back Paper Guide.
The reversed paper will be inserted between the normal
printing papers from the tray and pass under the printer
heads again.
According to the printer driver output setting, the paper will
then be sent to the stacking tray in the correct order.
Paper
Paper
Paper: Front side
Paper: Back side
The HC5000 is a Post-Script printer
The standard OS functions – QuickDraw
(Mac), GDI (Windows) – and the page descripRegular Printer
tion language– PS (Postscript), PCL– are the
two major formatting factors for output of data
Windows / Machintosh
to printers.
(GDI)
(QuickDraw)
The HC5000 is a PS printer that uses PS page
description language.
The HC5000 uses it's printer controller to
Only prints
The printer
translate data created in a PC (PS data) into a
driver creates
a BMPimage
raster image that the printer can print. (The
®
®
print controller used is Adobe PostScript 3™)
HC5000 (PS Printer)
Normal printers create a raster image in the
Windows / Machintosh
PS
data
OS (i.e. QuickDraw or GDI), and the image is
then sent to the printer for printing. Since the
raster image of a non-PostScript format relies
The printer
controller (RIP)
on the attached output device, the data can
creates a preferred
print only with the printer that the data was
BMP image and
initiates printing.
created and formatted for.
However, with a PostScript printer like the
HC5000, the PC sends the Post Scripted data
to the printer controller, and the printer controller creates a raster image. As the data transfer speed is faster, the PC's resources can be used for the next DTP
job immediately, speeding the entire process independent of any output device activities. The PS data is an independent device that can print graphics and text in exactly the same way with any Post Script output device.
A
A
A
A
A
US/UK-13
2
Let's Print
Printing Process Overview
1
This booklet describes steps
for Windows use.
Load paper
Load paper into the tray.
Load paper with the print
side facing upwards.
Load paper with
the print side facing
downwards.
Standard Paper Feed Tray
Paper Feed Tray
2
Enter size and type of paper
Set specification of the loaded paper.
See "Set Size and Type of Paper" — in this booklet page
US/UK-16.
Menu 4
Configuration
US/UK-14
(Standard)
Paper Feed Tray
• Paper Size
• Paper Type
• Double Feed Check
3
Prepare the receiving tray.
Open the receiving tray, and then flip up the
paper guide.
5
Print
Depending on the situation, Test Print, Print
Position Adjustment, and Temporary Data
Retrieval functions are also available at this
point.
The Stack Guide will
automatically adjust to
paper size.
When you finish printing,
press the Stack Guide
Open Button to remove
the paper.
4
Stack Guide
Open Button
View print data on PC screen.
Choose [Print] from the [File] menu and if necessary,
change settings in the printer driver.
See "View data to print" — in this booklet page US/UK-18.
US/UK-15
Let's Print
Process stage:
Set Size and Type of Paper
Before sending data from the PC, specify the
size and type of paper that you wish to use.
You must enter the size and type of the paper
loaded in the tray of the HC5000 into the PC's
printer driver beforehand.
If the setting is not correct, a "No Paper" error
might mistakenly occur, or the printer could print
in a different size or Type.
Setting in printer driver
Printer tasks
• Paper size and type
• Layout information, colour
tone, etc. sent to the
printer
• Search the trays for matching size and type
of paper.
• Create an image of the print according to ink
output volume, layout, and colour tone.
How to set the paper size and type
1
2
US/UK-16
Press the [MENU] Key.
Press the [Menu] Key while the printer is not in
use.
Press the
or
key to display "Configuration", and then press the [OK] Key.
Menu 1 sition Adj
Print Po
Menu 4
Configuration
3
Press the
or
key to display "Standard
Feed Tray", and then press the [OK] Key.
(For Paper Feed Tray 1 or Paper Feed Tray 2,
display "Feed Tray 1" or "Feed Tray 2" in step 3 .)
Configuration
4.1
Standard Feed Tray
The printer driver and the printer have different
roles in printing and colour management.
Although both the PC printer driver and the menu setting in the printer display the same settings of paper
size and type, each plays a different role in setting matched colour management.
The Printer Driver:
The Printer:
• Chooses paper from a tray
• Orders ink output and colour tone to
match the image
• Adjusts print speed
• Adjusts feed pressure
• Adjusts feed timing
The synchronized operation of the printer driver and the printer enables high-speed matched colour
printing.
HC5000
PC
Standard
Feed Tray
A
Feed Tray 1
Feed Tray 2
Standard
Feed Tray
A
Feed Tray 1
Feed Tray 2
A
B
C
B
C
D
Paper settings
of the printer
and the printer
driver match.
Paper settings
of the printer
and the printer
driver do not
match.
Use the Standard Paper Feed Trays as a multi-function tray.
Refill paper Feed Tray 1 or Paper Feed Tray 2 with standard sizes and type of paper for easy use. Use
the Standard Paper Feed Tray for irregular size or type of paper, post cards, and special paper, so that
changing paper settings becomes necessary only when using the Standard Paper Feed Tray.
US/UK-17
Let's Print
Process stage:
View Data to Print
[Print] dialog box
Prepare the printer and view the data to print.
Choose [Print] from the [File] menu and open the print dialog box. Check the name of the printer and number of
pages to be printed.
Content of the [Print] menu might differ depending on the application software. However, it will show basic information on printing, such as which pages and how many pages to print.
Click the [Properties] button to open the printer
driver screen.
Specify the page(s) you wish to print
Select the number of pages to print.
Be sure to clear the check mark.
[Collate] is set in the printer driver screen.
Please make sure to clear the check mark
whether you use Collate or not.
US/UK-18
The Printer Driver Screen
If you click the [Properties] button in the [Print] dialog box, [Printing Preferences] appears.
This screen is called the [Printer Driver Screen].
The printer driver screen consists of seven tabs. Change settings according to your needs.
7
1
2
3
4 5 6
1 [Main setting] Tab
Sets Colour/Monochrome mode and Paper Type.
2 [Layout] Tab
Sets Output Zoom size and Pagination.
3 [Image Processing] Tab
Manages quality of the image.
4 [Options] Tab
Sets Job Separation, Print density, and Clustering.
5 [Forms] Tab
Sends a chosen Form to output data.
6 [About] Tab
Displays printer driver version information.
7 [Advanced] Tab
Displays driver screen of PostScript printer.
Click the [OK] button when you finish
with settings, and click the [OK] button
in the [Print] dialog box to start printing
with the settings you have chosen.
The printer driver is the printing control software. All programmable functions for data processing can be set using
this screen.
See User's Manual for Printer Driver page 2-2.
US/UK-19
3
Useful
HC5000
Functions
(RISO Extended Print Functions)
Print Position Adjustment
→
0 – 20.0mm (0" - 13/16")
Print positions can be changed during the printing process.
The position can be adjusted for binding or stapling. After
adjusting the print position, press the [Menu] key and choose
[Test Print] to check the result.
See User's Manual for Printer Main Body page 2-13.
→0 – 20.0mm
(0" - 13/16")
0 – 20.0mm
(0" - 13/16")
→
The position can change at the top,
bottom, left, and right, 0 – 20.0mm
(0” – 13/16”) from the current position,
by 0.5mm (3/16”) units.
→
0 – 20.0mm (0" - 13/16")
How to adjust the print position
1
Press the [Print/Pause] Key while printing.
2
Press the [Menu] Key.
3
Adjust the print position by using the arrow keys
and press the [Print/Pause] Key to start printing.
US/UK-20
de OFF
Printing Mo
Menu 1
Adj
Print Position
Test Print
Check the result after adjustment of print position and print tone.
See User's Manual for Printer Main Body page 2-15.
How to test print
1
Press the [Print/Pause] Key while printing
2
Press the [Menu] Key.
3
Show [Test Print] on the display and confirm
with the [OK] Key.
de OFF
Printing Mo
Menu 1
Adj
Print Position
Menu 2
Test Print
Menu 2
Test Print
4
Press the [OK] Key and check the test print.
Ready to Print ?
Cancel/OK
nt ?
Ready to Pri
Cancel/OK
US/UK-21
Useful HC5000 Functions
Reprint (Temporary Data Retrieval)
The last page that was sent to the printer can be
retrieved and reprinted. This function can be used
when there is a need to print more copies than was
originaly set up in the printer driver. To use this
function, set [Menu 5.8.6 Temp Data Retention] to
[ON] in [Menu 5 Administration].
Use the printer's
control panel to
enter the number
of pages to be
reprinted.
See User's Manual for Printer Main Body page 2-16.
How to reprint
1
Press the [Menu] Key when [Ready] is displayed.
Ready
Auto
Ready
Auto
2
When the display shows [Temp Data Retrieve],
confirm with the [OK] Key.
Menu3
Temp Data Retrieve
Menu3 Data Retrieve
Temp
US/UK-22
3
Enter the print quantity by using the arrow keys
and press [Print/Pause] key to start printing.
Print Quantity
0100
: Used to move the cursor
: Used to set the number of pages to be
printed
Quantity
0100
U
Temporary Data Retention
The printer function that saves the last page of data after completing printing is called [Temporary Data
Retention]. With this function, the last page's data remains in the printer until the next print job arrives.
For duplex printing, the data for the last two pages (the data on both sides of the last page) are retained.
It can be used in the following manner by switching between Temporary Data Retention ON (retain data)
and OFF (do not retain data).
Temporary Data Retention OFF
(do not retain data)
Temporary Data Retention ON
(retain data)
The factory setting for [Temporary Data Retention] is OFF (do not save data in the printer). For
example when printing exams, confidential
customer lists or other important documents,
keep it [OFF] to protect against unauthorised reprinting by a third party.
Choose [Administration] from the Menu setting
and change the setting to [Temporary Data
Retention] ON. Enter the required quantity and
the last page will be re-printed accordingly.
This function is useful when you need to print
more than your initial set-up in the printer driver.
US/UK-23
Useful HC5000 Functions
Storage
Usually, the printer receives data from the PC and prints out its content. However, for a printing situation that
requires many functional setting changes in the printer driver, you can save the data and its driver settings together
in the printer. This function is called Storage. With this function, the printer saves the data in its output format. The
Storage function can also be used to merely store, or to print, according to your needs.
See User's Manual for Printer Driver page 2-9.
Five output functions.
Direct Print
Print & Storage
Print directly to paper.
Print data and also save (store)
data in its output condition in the
printer.
Storage
Save data to the printer.
The output condition is also
saved.
Note: To retrieve the saved Storage
data and print, go to [Job
manager] in [RISO console
PS7R].
Archive
Form
Save data as a Form in the
printer.
The saved Form data can be
used with other data for printing.
Note: To retrieve the saved Form data
and print, go to [Job manager] in
[RISO console PS7R].
US/UK-24
Data that has been processed with
RIP can be stored (archived) in the
printer. (Only if RISO Controller
PS7R-9000 is connected).
Note: To retrieve the saved Archive data
and print, go to [Job manager] in
[RISO console PS7R].
Useful functions: [Storage]
Often-used data can be saved to the printer as storage data. The Storage function has the following two
features.
Feature 1: Saves output settings.
The saved data can be printed in the same output format eliminating the need to change settings each
time the job is reprinted. The nine folders allow you to save and manage data by separating type and
purpose.
Data
New product promotion
Proposal
Output condition
Paper size
Duplex printing
Paper Feed Tray
Paper type
Ejection mode
---- A4
---- Long edge binding
---- Auto tray selection
---- Standard 1
---- Collate
Save as
storage data
Feature 2: The function is independent of the OS.
When the PC sends data to save in the printer as storage data, this data becomes PS data. Any OS,
whether Windows or Mac, or any type of PC, can relay this data and print with the designated format,
such as duplex printing and pagination etc.
Transforming data to PS data prevents output errors that occur when you use different kinds of OS and
versions for printout. Since the print job does not need to resend data, it also shortens printing time.
Print PS data using FTP.
The HC5000 can print PS data using FTP.
The login name and password for a FTP connection is described below.
Login name: risops7r
Password: risops7r
US/UK-25
4
Potential Print Solutions and
Applications
Compared with monochrome or single colour printing, full colour printing creates a stronger impact and higher recognition with the viewer.
The HC5000 can enhance the value of every document.
1. Flyers
"Forms"
– as sales tools –
See this booklet page US/UK-39.
The variable printing functions with electric sorting and a wide range of paper sizes of the printer (postcard to
A3/Ledger) make creating sales tools such as flyers, direct mailers and shop displays much easier. Community-based sales advertisements can be printed cost effectively.
Brochure
Flyer
2. Office
– Presentation Documents –
"Duplex printing", "Multi-up", "Job separation"
See this booklet page US/UK-28, US/UK-30, US/UK-35.
Without worrying about cost, you can create attractive materials for presentations with full colour printing.
Business sales tools and internal/external company documents can be reprinted easily.
Business document
US/UK-26
Business document
Business document
3. Religious Newsletters – Administrative reports, direct mail –
4. Public Relations & Newspapers
– News Flash printing, Local News Information –
Useful Features
See “Useful Features” in this booklet page US/UK-42.
When you have news that needs to be published quickly, use high-speed printing. The clear and easy-to-read
colour paper printing is effective for newsletters, notices and news or news flashes.
Newspaper
Administrative Report
5. Publishing, Local Retailers – Manuals, Brochures –
6. Education – Training Session Documents, Text, Classroom Materials –
"Pagination", "Job separation"
See this booklet page US/UK-32, US/UK-35.
For product manuals, company manuals, training sessions and human resources documents, notices for
parents or classroom newspapers.
The HC5000 lets you print high speed and low running cost. Materials are printed in a clear and understandable fashion.
Brochure
Manual
Pagination
7. Information Systems
– Full-colour Designed Forms & Suggestions for POD (Print On Demand) –
Useful full colour printing for invoices, direct mail, letterhead and proposals that are stored in the system. You
can establish new business models and work flows.
US/UK-27
Potential Print Solutions and Applications
Duplex Printing
Print on both sides of the paper. With the Multi-up
function, material can be compacted. Use of “RISO
Paper IJ” is recommended.
See User's Manual for Printer Driver page 2-6.
Duplex printing
(Long edge binding)
Duplex printing
(Short edge binding)
Process of Duplex Printing
1
US/UK-28
Click the [Main Setting] tab in the printer driver
screen.
2
Choose a binding setting in [Duplex Printing].
When a paper jam occurs during Duplex Printing
Paper loads at high speed during duplex printing.
Therefore, not only the jammed paper, but any paper
within the transfer unit also needs to be removed.
Because there might be more than a few papers in the
duplex transfer unit, keep turning dial B inside the
printer until all paper is cleared.
Please refer to the paper jam removal instructions
graphic located on the inside of the Front cover of the
HC5000.
Duplex Transfer Unit
Dial B
See User's Manual for Printer Main Body page 3-10.
US/UK-29
Potential Print Solutions and Applications
Multi-up
Duplex printing and 2-in-1 printing are commonly used printing applications in the office. The HC5000 also has
useful functions that will help you save paper.
* You can print 2 pages on a single sheet of paper.
This feature provides a cost-effective way to print.
Multi-up
(Two pages in one)
Enables several pages to be placed on one sheet and printed. It is possible to select the page order and the
number of pages per sheet at 2, 4, 8, and 16.
How to use Multi-up
1
US/UK-30
Click the [Layout] tab in the printer driver
screen.
2
Choose [Multi-up].
Select the number of pages per sheet.
Order setting can be combined.
Normally, set to Auto.
(Only if RISO Controller Controller
PS7R-9000 is connected)
Orientation: Vertical
Pagenation: Multi-up
Pages per sheet: 4 pages
Orientation: Vertical & Reverse Order (from right to left)
Pagenation: Multi-up
Pages per sheet: 4 pages
Orientation: Horizontal
Pagenation: Multi-up
Pages per sheet: 4 pages
Orientation: Horizontal & Reverse Order (from right to left)
Pagenation: Multi-up
Pages per sheet: 4 pages
US/UK-31
Potential Print Solutions and Applications
Pagination for Booklet Formats
Pagination for booklet formats can be done with [Layout]
in the printer driver without using software applications.
Since it is a direct print, there is no fading in image quality
and the printing time is shortened.
See User's Manual for Printer Driver page 2-13.
Choose booklet
How to use Booklet
1
Click [Main setting] tab and from the [Duplex
Printing] menu choose [Short edge binding].
Choose Short edge binding
US/UK-32
2
Select [Booklet] on the [Layout] tab.
Output paper size
If you wish to make a
booklet with the original
manuscript's size, choose
double the original size.
Choose Booklet
Direction of pagination
Create Booklet with Data
Data
Duplex print / both sides
2-in-1 pagination
Booklet completed
with binding.
US/UK-33
Potential Print Solutions and Applications
How to Bind
• Booklets need duplex printing, so load paper for duplex printing use.
• Four pages will be printed on one sheet, so consider printing size and set the paper.
• Choose page order from left → right
(left binding) and reverse order (right
binding).
To print over-size paper
Do not use the Stacking Guide when the printing paper size is more
than 320mm x 432mm (125/8" x 17").
US/UK-34
Job Separation
Prepare large volume meeting material faster with the job separation function.
See User's Manual for Printer Driver page 2-23.
Types of Job Separation
Between Jobs
:Separation Paper
After finishing printing, place separation paper in every job.
Every division
• For Collate printing
Place separation paper by every collate
• For Non-collate printing
Place separation paper by page
US/UK-35
Potential Print Solutions and Applications
Choose the Type of Job Separation
1
Click the [Options] tab in the printer driver.
Choose the type of job separation.
2
When [Every division] is chosen, the [Ejection
mode] in the [Main setting] tab inserts separation paper.
Set separation paper.
Set and load the tray for the separation paper in
advance. The following is an example of setting the
separation paper in the Standard Paper Feed Tray.
1 Load the separation paper into the Standard Paper
Feeding Tray.
2 Press the [Menu] Key on the printer
3 Display [Menu 5 Administration] - [5.3 Separation
paper] and choose [Standard Feed Tray].
See User's Manual for Printer Main Body page 2-36.
Separetion
Paper
Standard
Paper Feed Tray
Paper Feed Tray 1
Paper Feed Tray 2
If you choose [OFF], the printer will stop for a few
Use paper in Paper Feed Tray 1 or Paper Feed Tray 2 for printing
seconds at every separation point. You can put a tag
or insert the prepared paper manually during the
pause.
The tray (Standard Paper Feed Tray) set as the separation paper tray cannot be used when the feeding
tray setting in the printer driver is [Auto tray selection]. When you use the tray for normal printing, change
setting to [OFF].
US/UK-36
Use Function to Insert Separation Paper
The following is an example of inserting different colors of paper, using the separation function. If the first page of
the booklet is the cover, you can print and prepare the cover beforehand and use it as a separation paper.
1
Print the cover paper in advance.
tion
mo
pro al
uct
rod opos n
p
New Pr omotio
t pr l
duc sa
pro opo
New Pr
2
Load the printed cover paper into the separation paper tray as a separation paper.
New pr
Propoduct prom
osal otion
Make sure the setting direction
of paper is correct
3
Set [5.3 Separation paper] in [Menu].
Set [Separation Paper Tray] according to which tray
you used for the separation paper.
See "Set separetion paper." — in this booklet page US/
UK-35.
US/UK-37
Potential Print Solutions and Applications
4
Choose the type of job separation
5
Print the contents page of the materials or
booklet.
The cover paper will be
automatically inserted as
a separation paper.
US/UK-38
New product promotion
Proposal
New product promotion
Proposal
New product promotion
Proposal
Form
Add the same mark or sentences to the print document. This additional sentence or image is called a [Form].
To use a Form, you need to create the image on a PC and save it to the printer in advance. These saved Forms
can be added to the printout using a simple operation.
See User's Manual for Printer Driver page 2-27.
Uses for Form
In the office
• For a confidential document in a meeting
• Print company's logo in a letter head
Form
Open seminar
New product release
Form
Output data
Final output
For Flyers and DM
• Save a frame or shop logo as the form
Form Print Pattern
• Postcard DM
You can combine shop data or promotion
content with application software, e.g. inserting
addresses, then printing content with different
addresses.
Single side overlay mode
New product release
New product release
Double side overlay mode
New product release
Output data
Form
Front side
Back side
US/UK-39
Potential Print Solutions and Applications
How to Choose Form
1
Click the [Form] tab in the printer driver
screen.
2
Choose whether you wish to have duplex
printing in [Form print pattern].
US/UK-40
3
Select the appropriate data [Form List] and
click [OK].
If [Double side overlay] is selected, choose the
Form data print face.
US/UK-41
5
Useful Features
The processing of half tone images can be adjusted by using the printer driver. This adjustment applies to the whole image and cannot apply only to parts. If you wish to adjust the
colour or the image quality of a photo with the document, this should be done with software
such as Photoshop before the photo is embedded in the document.
To adjust image quality, click
the [Image processing] tab in
the printer driver.
Adjust Contrast
When the colour image is not clear, you can adjust contrast.
[High] is used to enhance the contrast between light and dark areas, making the image sharper and clearer. [Low]
is to minimize the difference between light and dark areas: the image becomes grayish.
See User's Manual for Printer Driver page 2-17.
Low
US/UK-42
Standard
High
Adjust Density
Adjust the density of the entire image. See examples below.
See User's Manual for Printer Driver page 2-17.
Light
Standard
Dark
Adjust gamma level
Check [Details] and click the [Change details] button, adjust the gamma level of C(cyan), M(Magenta),
Y(Yellow), K(Black).
See User's Manual for Printer Driver page 2-17.
Set the gamma level of the colour
that needs to be adjusted
Smaller numbers for lighter colours, greater
numbers for darker colours.
US/UK-43
Useful Features
Express halftone images with dot density (Error Diffusion)
The density of printing dots will express halftone
images or photographs. Recommended for colour
printing.
See User's Manual for Printer Driver page 2-18.
Express halftone images with dot size (Dot Screen)
The size of printing dots will express halftone or photographs. Recommended for monotone or document which
use minimal colour.
See User's Manual for Printer Driver page 2-18.
70lines
100lines
The magnified picture is an image.
US/UK-44
To make character outlines smoother
In order to print characters with smoother edges,
check [Line smoothing] in the [Image processing]
tab.
See User's Manual for Printer Driver page 2-19.
Print characters in smoothed line.
Check [Line smoothing] in the [Image
processing] tab.
Special image setting features
Click the [Special setting] button in the [Image
processing] tab.
See User's Manual for Printer Driver page 2-20.
Rotate the image
Adjust the printing positions of both sides
Set the quality of print (dpi)
Set whether ComColor™ Standard should
perform colour matching or not.
US/UK-45
6
Printer Monitoring
RISO Console PS7R
An HC5000 connected to a LAN can be used in many different
ways to use networking and send high-speed data. You can also
check to see if the printer is ready, without going to the printer.
Open your browser and enter the IP address of the HC5000
and the console screen will appear.
See User's Manual for Console page 1-3.
Monitoring
Checks the current operational status of the printer. Icons and messages indicate paper and ink information.
See User's Manual for Console page 1-4.
Status
Current status of the
printer is displayed.
About ..
1
2
5
3
6
The status of the print
controller and printer is
displayed.
4
7
1 Message
Status of the printer is displayed.
2 Comment
Supplementary information for a message is displayed.
3 Printer icon
Status of the printer is displayed.
4 Power icon
Status of the printer power supply is displayed
US/UK-46
5 Paper information
The size, type, and orientation of paper set in the Standard
Paper Feeding Tray and other Feeding Trays are displayed.
6 Printer information
Paper size in the selected tray is displayed. If [Auto tray
selection] is selected in printing, [Auto] is displayed.
7 Controller information
The disk space available in the built-in hard disk, the data
reception status, and the current job name (if a job is being
processed) are displayed.
Job Manager
The current status of jobs processed by the printer is displayed.
See User's Manual for Console page 1-6.
Archive
A job stored in the printer for which data has been
processed with RIP can be checked or output. (Only if
RISO Controller Controller PS7R-9000 is connected).
Job status
The Job name, Status, Owner name,
Output volume, and Date/Time of the
currently processed job are displayed.
Storage
Registered jobs can be checked and output.
Forms
Registered jobs can be
checked and output.
Every screen can be
displayed by clicking
relevant buttons.
Other functions
Custom setting ..... The job history of the printer can be checked.
Administrator ........ Settings for the print controller in the printer.
Only users who login with passwords can access this menu to change settings.
Help ........................... Help support to use the RISO Console.
US/UK-47
7
Trouble shooting
Out put Does Not Look Clear And Sharp
Change the paper
Adjust the original data or adjust colour
Check that you are using the proper paper or printing
on the correct side of the paper.
The output quality can be improved by adjusting the
data resolution and colour.
See "Paper Specifications" — in this booklet page US/UK-8.
See User's Manual for Printer Main Body page 1-6.
See "Useful Features" — in this booklet page US/UK-42.
See User's Manual for Printer Main Body page 2-16.
Clean the Print head.
The printer head can clog. Use the head cleaning
function in the control panel.
See "Head Maintenance" — in this booklet page US/UK-50.
See User's Manual for Printer Main Body page 2-40.
When the Printer Stops...
1
Check the display on the control panel
Is there an error?
Confirm on display panel.
2
Check Printing Mode
Is the Printing Mode ON?
When the Printing Mode is ON, the indicator is lit,
and when the Printing Mode is OFF, the indicator is
not lit.
Press the [Print/Pause] Key to Printing Mode ON.
US/UK-48
Lit green
3
Is the printer waiting for a confirmation?
If the [Pause after a proof] check box is marked in
the [Main Setting] tab, the printer will wait for
confirmation to print after the proof printing finishes. Find the printout in the receiving tray,
confirm the print and Press the [Print / Pause] key
to restart printing.
de OFF
Printing Mo
Press the [Print/Pause] Key to restart printing
4
Contact service provider
See "Chapter3 Troubleshooting" in User's Manual
for Printer Main Body. If the printer still does not
work, contact your local dealer (or service representative).
Replace the Ink Cartridge
See User's Manual for Printer Main Body page 3-16.
1
Check the colour that lights up
2
Remove the cartridge* and replace with a new
cartridge
* Used Ink Cartridges are collated by a service representative.
After use is complete, attach the cap and put the cartridge into
the inner bag and packing material.
US/UK-49
Trouble shooting
Head Maintenance
See User's Manual for Printer Main Body page 2-40.
1
Display [Ready] and press the [Menu] Key
Ready
Auto
Ready
Auto
2
Display [Administration] and press the [OK] Key
Menu 5
Administration
Menu 5 nistration
Admi
3
Use the arrow keys to display [Head Maintenance]
and press the [OK] key
Administration
5.5
Head Maintenance
n
Administratio
5.5
enance
Head Maint
US/UK-50
4
Use the arrow keys to set a maintenance job
and press [OK] key.
Hyper-Cleaning
Rigorously clean each head individually
Normal-Cleaning
Clean all heads together
Head Maintenance
5.5.4
Hyper-Cleaning
enance
Head Maint
5.5.4
ning
Hyper-Clea
Accessories
Ink Cartridge
RISO HC Ink Cyan
RISO HC Ink Magenta
RISO HC Ink Yellow
RISO HC Ink Black
Scan Function
If you connect a specified scanner to the printer by using optional scanner connection kits, the printer can be used
as a colour copy machine. Use the touch panel to manage the Scan Function.
Finisher Function
If an HC Finisher is connected to the printer, finisher functions such as Stapler, Punching, and Booklet creation can
be used. Also if an HC Z Folder Unit is connected additionally, the Outer 3 fold, Inner 3 fold, and Z fold functions
can be used.
US/UK-51
About This NAVIGATION BOOK
Riso shall not be responsible for any damage or expense that might result from the use of this manual.
As we are constantly improving our products, the machine may differ in some respects from the illustrations used in this manual.
Riso shall not be liable for any direct, incidental, or consequential damages of any nature, or losses or expenses resulting from the use of this
product or included manuals.
Trademarks
Adobe®, Adobe Type Manage®, AdobePS®, ATM®, PostScript®, PostScript®3TM , PostScriptLogo, PageMaker® are trademarks or registered
trademarks of Adobe Systems Incorporated.
AppleTalk®, Macintosh® or MacOS® are registered trademarks of Apple Computer, Inc. in the U.S.A. and other countries.
Microsoft®, Windows® is a registered trademark of Microsoft Corporation in the U.S.A. and other countries.
Netscape® and Netscape Navigator® are registered trademarks of Netscape Communications Corporation registered in the U.S.A. and other
countries.
ColorTune® is a trademark of Agfa-Gevaert N.V. registered at US Patent and Trademark Office and may be registered in other regions of
jurisdiction.
ComColor™, and FORCEJET™ are trademarks of RISO KAGAKU CORPRATION.
is a registered trademark of RISO KAGAKU CORPORATION in Japan and other countries.
All other product names and company names written in this manual are trademarks or registered trademarks of their respective companies.
Copyright © 2005 RISO KAGAKU CORPORATION
US/UK-52


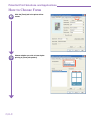


![1 Click the [OK] button.](http://vs1.manualzilla.com/store/data/005894494_1-d1f52ee6fd3b2146a5f252d3f1858c3b-150x150.png)