1
V3
SOUND
V3 DESKTOP
USER MANUAL 1.50
INDICE DEI CONTENUTI
Page
Safety precautions, technical specifications, copyright
2
Quick start
4-5
User interface and ports
6-7
Setup
8
Overview – SOUND – COMBI – REGIST modes
9
Selecting a registration
10
Factory registrations
11 - 13
Style arranger
14 - 15
MP3 and MIDI file players
16
Foot pedal, volume pedal, and transpose
17
QUICK GUIDE – Top 5 parameters of registrations
Sound change
18
Sound on/off
19
Sound volume and reverb
20
Playback volume – Track on/off – Track plan – Save
21
OVERVIEW – MORE MUSIC
Sound scenes: Sound change during play
22 - 23
LINK function: Switch sounds and style variations with one click
24 - 25
Selecting an instrumentation
26 - 27
SOUND mode
28
REFERENCE MANUAL
REGIST and COMBI modes in comparison
30
Categories – REGIST
31
Registration: Editing all parameters
32
Plug-in details
37
Plug-in: Soloist, high/low notes
42
Plug-in: Drums
46
SAVE
49
GLOBAL SETTINGS
Foot switch
50
Volume pedal
51
Tune & Contrast
52
Remote Control
53
MIDI setup
54
SCALA & TRANSPOSE
56
Troubleshooting
57
LINK examples
58
Manual bass and chord
61
Database overview
62
Sound categories
63
Rename - folder name
63
Software updates & SD card contents
64
Sound board installation
65
2
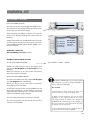
SAFETY PRECAUTIONS
SAFETY INSTRUCTIONS
COPYRIGHT
!
• Read the user manual before using the device
• Do not allow any liquid to come in contact
with the device
• Do not place anything on top of the device
• Do not handle the power supply with wet hands
• Turn off all connected devices before you
connect any new devices
Do not use or store the device where it is exposed to:
• dampness or wetness
• extreme temperature changes
(i.e. do not store in a vehicle in winter)
• strong vibrations or jolts
All the audio recordings V3SOUND uses on the sound
boards are protected by copyright. V3SOUND alone has
been given the right by all musicians involved to use this
material. Any duplication, editing or any other copy of
individual sounds by or given to a third party in any form
(audio sampling CD, data storage device with individual
sounds, download of any file, etc.) is strictly forbidden.
Copyright © 2012 V3SOUND - Austria
TECHNICAL SPECIFICATIONS
• Display: 320 x 240 pixels
HANDLING
• Use only the original cables and power supply
• Remove the cable only by pulling on the plug,
not on the cable
• Do not expose the power adapter to any mechanical
stress
• Audio player: MPEG Layer III 32-48.000kHz
Bit rate up to 320 kbit/s – all variable formats
MPEG Layer III audio decoding technology licensed
from Fraunhofer IIS and Thomson
• 12.800 memory slots for registrations
• 4GB memory support for MP3, MIDI and style files
CUSTOMER SERVICE
• 32 MIDI channels, 2 MIDI-out
Do not carry out any repairs at home, as this may result
in permanent damage to the electronics. Any guarantee
claims are no longer valid in this case.
• 4 audio out
• Dimensions: 27.3 cm (L) x 18 cm (W) x 6.8 cm (H)
• Sound memory via V3SOUND sound boards
ACCESSORIES
Manual and power
POWER REQUIREMENT • Polyphony depends by the total of sound boards
installed.
• Ports available for 3 foot pedals and
an expression pedal
9VDC / 1.3A
HUMIDITY
max. 80%, non-condensing
OPERATING TEMPERATURE
10 to 40 degrees Celsius
The CE certification is available at
www.v3sound.com.
V3SOUND
A-6114 Kolsass
Austria
CC
3
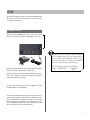
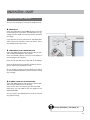
QUICK START
Thank you for choosing the V3 DESKTOP — the most modern technology inside an
electronic musical instrument.
BRIEF OVERVIEW OF ITS FUNCTIONS
SOUND BOARDS
CONTROLS & MUSIC
Three V3SOUND sound boards can be installed in
the V3 DESKTOP.
The V3 Desktop allows you to play up to 16
sounds simultaneously.
HQ260 - basic model
Example for live application
The standard sound board comes with solo
sounds and the perfect general MIDI (GM) sound
package. 260MB memory
Three sounds on MIDI channel 1, solo
One sound on MIDI channel 2, chord
Two sounds on MIDI channel 3, bass
Four sounds on MIDI channels 2 and 3, drums
Any MIDI instrument can be used.
Sound board expansions
Every sound board has its own processor, so
with each additional sound board, the number
of available sounds and the device’s available polyphony are expanded.
Intelligent instrumentation
For example: When three keys are pressed,
only the trumpet should sound on the highest
note, the saxophone on the middle note, and
the trombone on the lowest note.
T200 - TRADITION exclusive
German folk music played by the greatest Austrian, Slovenian and German virtuosos.
200MB memory
SW160 - SWISS exclusive
Swiss-style folk music.
160MB memory
CE 260 - CELTIC exclusive
Traditional sounds from Scotland and Ireland.
260MB memory
VGP 260 - VIENNA Grand Piano
Stereo concert grand piano with 7 dynamic layers.
260MB memory
4
16 sounds for live play and 16 sounds for the
playback of MIDI files or styles are all available at
the same time.
QUICK START
MULTIPLAYER
The V3 DESKTOP has 3 different players.
MEMORY
All data is stored on the
SD memory card.
MIDI PLAYER
Playback of MIDI files, format 0
MP3 AUDIO
Playback of MP3 audio tracks
STYLE ARRANGER
Playback of rhythm patterns
The SD memory card allows easy transfer of
MIDI and audio files from your computer to the
V3 DESKTOP.
By copying your data from the SD card to
your computer, you can create a complete
backup copy of your V3 DESKTOP data.
There are up to 10,000 memory slots available
on each SD card for MIDI files, MP3 files, styles,
sounds, combinations, and registrations.
Each style has 4 main variations. Up to 16 fill-ins
are pre-programmed for each style.
If you start the fill-in before the middle of the current bar, the fill-in begins immediately. If you start
the fill-in after the middle of the bar, the fill-in begins in the next bar.
Auto Fill-in (AF): If you activate the auto fill-in
function, a suitable fill-in will be selected automatically when you choose a main variation.
Breaks will always start in the next bar.
Intro and Ending 3 are available in both major
and minor versions.
STYLES
The V3 DESKTOP basic style package includes
more than 300 styles. When you expand the V3
with another sound board, you also get styles that
have been created with these sounds specifically.
REGISTRATIONS
All of your settings for one song are saved and retrieved by REGISTRATION.
5
AUDIO OUT 4
DC IN
AUDIO OUT 3
2
AUX L
AUX R
MIDI-OUT
EXPRESSION PEDAL (100k)
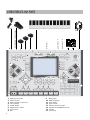
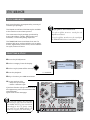
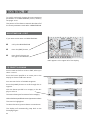
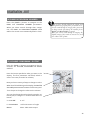
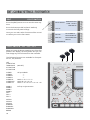
USER INTERFACE AND PORTS
PEDAL
FS1
COPY
FS2
FS3
LINK
SAVE
EDIT
LYRIC
SPLIT
MIDI-IN
CA1
HARM
1
THRU
OUT-A
OUT-B
1
CA2
MAIN L
MAIN R
VALUE
DESKTOP
FAVORITE
PAGE +
2ND
PAGE -
TRANS
3
MAIN
VOLUME
9 - 16
SCALA
PHONES
9
4
MP3
SOUND
10
MIDI
FILE
STYLE
1
11
Y
1
2
3
4
5
6
7
8
6
I
V3
12
COMBI
15
2
14
13
IV
REGIST
6
II
7
III
HO
IE1
AF
IE2
Memory card slots
Power on/off
Main volume / Data value
Sound mode
Combi mode
Registrations mode
Live scenes
Exit
F1
IE3
A
F2
B
LIMEX
V3SOUND
3
16
4
X
5
1
2
3
4
5
6
7
8
9
-
0
+
F3
C
9
10
11
12
13
14
15
16
D
BR
MP3 player
MIDI file player
Style mode
Style scenes
Volume of LIVE sounds
Volume of PLAYBACK sounds
Tempo
Start/stop
E
X
E
N
T
E
R
8
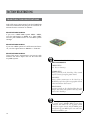
SETUP
This section tells you how to set up the V3 DESKTOP
for play. Read this information carefully before
turning on the device.
POWER SUPPLY
Make sure the POWER switch on the back of the
device is in the OFF position (LED light is not on).
If the device does not have a power adapter
or it is damaged and you need a replacement,
please contact your V3SOUND dealer. If you
plug the device into the wrong power adapter,
you can severely damage unit’s circuitry.
Plug the power adapter that came with the device
into the DC port on the back of the unit.
The technical specifications of the power
adapter: 9VDC/1.3A
Plug the other end of the power adapter into a power outlet. Make sure that the adapter is compatible with the power supply.
Connect the audio outputs to an amplifier, active
loudspeakers or headphones.
To avoid possible damage to the loud speakers or
other connected electronic devices, always turn on
the V3 DESKTOP first before turning on any active
loud speakers or amplifiers. You should also turn
off the V3 DESKTOP ast, after you have first turned
off the speakers, mixer and amplifier.
7
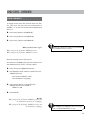
SETUP
TO TURN ON
Both card slots have the same capabilities. You
can insert your SD card in CA1 or CA2. You cannot use two SD cards at the same time, however.
Before you turn the device on or off, make sure
that all connected audio devices that amplify the
audio signal (mixer, amplifier, active loudspeakers) have their volumes turned down.
DC IN
Insert the SD memory card
into the CA1 slot.
PEDAL
FS1
FS2
COPY
FS3
EDIT
LYRIC
SPLIT
THRU
OUT-A
OUT-B
AUX L
AUX R
MAIN L
MAIN R
CA1
HARM
CA2
DESKTOP
FAVORITE
PAGE +
2ND
PAGE -
TRANS
MAIN
VOLUM
9 - 16
SCALA
MP3
SOUN
MIDI
FILE
STYLE
Turn the power on by pressing the
POWER ON/OFF switch on the
back of the device.
1
4
X
Y
REGIS
IV
II
2
III
3
HO
AF
IE1
Turn down the MAIN VOLUME control.
In the lower right of the display you will see
the current value of the OVERALL VOLUME.
DC IN
PEDAL
FS1
COPY
IE2
FS2
FS3
EDIT
LYRIC
SPLIT
F1
IE3
MIDI-IN
F2
A
THRU
B
OUT-A
CA1
HARM
C
OUT-B
D
AUX L
CA2
FAVORITE
BR
AUX R
MAIN L
PAGE +
2ND
PAGE -
TRANS
1
I
V3
0
+
PHONES
REGIST
IV
II
2
III
Y
3
1
DC IN
PEDAL
FS1
FS2
FS3
MIDI-IN
2
THRU
COPY
AF
F1
EDIT
SAVE
IE2
LYRIC
IE3
A
LINK
F2
HARM
SPLIT
B
F3
CA1
C
D
FAVORITE
3
5
CA2
BR
LIMEX
OUT-A
4
HO
IE1
then the button parallel to [CONTRAST]
on the display.
-
COMBI
4
then the button parallel to [UTILITY]
on the display;
6
9
SOUND
STYLE
5
8
After 2 seconds, the display switches back to
the standard display: TMP TRACK LIVE.
To adjust the display’s contrast, press:
the [EDIT] button;
4
MAIN
VOLUME
MIDI
FILE
X
3
7
MAIN R
9 - 16
MP3
LIMEX
F3
DESKTOP
SCALA
2
VALUE
LINK
SAVE
COMBI
I
V3
1
P
VALUE
LINK
SAVE
MIDI-IN
7
8
-
0
OUT-B
E
X
AUX L
AUX R
MAIN
6
E
N
9
T
DESKTOPE
R
+
PAGE +
2ND
PAGE -
TRANS
9 - 16
SCALA
MP3
Change the contrast using the [+/-]
buttons in the 10-button pad.
Press [SAVE] to keep your changes.
MIDI
FILE
STYLE
1
4
Y
8
X
I
V3
IV
II
2
III
3
HO
AF
F1
F2
1
2
4
5
7
8
F3
L
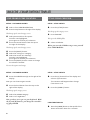
OVERVIEW OF MIDI CHANNEL – SOUND – COMBI – REGIST MODES
MIDI channel factory settings
[SOUND MODE]
1 sound
SOUND
COMBI
I
The SOUND mode is ideal for browsing the
individual sounds of a sound board.
REGIST
II
MIDI channel 1
III
SOUND
[COMBI MODE]
All 16 sounds available on any channel
COMBI
I
IV
REGIST
II
III
The COMBI mode is ideal as a tone generator for MIDI files programmed on your PC
and played on the V3 DESKTOP.
MIDI channels 1 - 16
(Factory setting MIDI channel 1)
SOUND
COMBI
I
[REGIST MODE]
All 16 sounds available on any channel
REGIST
II
III
The REGIST mode is the mode you use 99%
of the time.
MIDI channels 1-16
(Factory setting MIDI channel 1)
STYLE ARRANGER
Chord recognition
(Factory setting MIDI channel 2)
KEYBOARDS WITH 1 MIDI CHANNEL
The MIDI setup must be changed for keyboards with only one MIDI channel.
See page 55.
9
SELECTING A REGISTRATION – 3 OPTIONS
DC IN
SOUND
1. SELECT FROM DISPLAY
PEDAL
FS1
COPY
FS2
FS3
SAVE
EDIT
LYRIC
SPLIT
MIDI-IN
THRU
OUT-A
CA1
HARM
AUX L
CA2
DESKTOP
FAVORITE
Press the [REGIST] button.I
REGIST
AUX R
PAGE +
2ND
PAGE -
TRANS
MAIN
VOLUME
02 User free
09 Ballroom
10 Pop-Rock
MIDI
FILE
PEDAL
SOUND
i. e. 10 Pop-Rock
FS1
STYLE
Select a registration from the display.
COPY
FS3
MIDI-IN
OUT-A
DESKTOP
FAVORITE
HO
MIDI IE1
FILE
Press the [REGIST] button.
I
F1
IE3
A
1
IV
PAGE +
III
PAGE -
001 Beat8
003 Rock 69
F2
B
C
D
BR
HO
Digit 10 on the 10-button pad.
III
6
7
8
9
-
0
IE2
F1
IE3
F2
A
COPY
5
6
7
8
9
C
D
BR
-
0
+
EDIT
LYRIC
SPLIT
CA1
HARM
CA2
AUX L
AUX R
MAIN L
PAGE +
9 - 16
MP3
PHONES
2ND
TRANS
PAGE
SOUND
MIDI
FILE
COMBI
STYLE
1
4
Y
I
V3
IV
HO
REGIST
II
2
III
LIMEX
10-button pad
3
3. SELECT WITH +/- KEYS
AF
F1
IE1
IE2
Use the [+/-] keys in the 10-button
pad toIE3
moveAup
or down among registrations within a folder.
10
MAIN R
SHORTCUT
to select
a different registration in the
same folder, you do not need toMAIN
enter the folder
VOLUME
number again.
To select the registration 35 from the same folder,
press: [REGIST] [3] [5] [ENTER]
DESKTOP
If you want
FAVORITE
SCALA
OUT-B
VALUE
LINK
SAVE
OUT-A
F2
B
1
2
3
4
5
6
7
8
9
-
0
+
F3
C
D
BR
3
F3
B
E
X
E
N
T
E
R
E
X
E
N
T
E
R
SOUND
LIMEX
4
By pressing ENTER, the selection is carried out
and the registration is called up.
THRU
+
COMBI
2
Press [ENTER] on the 10-button pad.
MIDI-IN
MAIN
VOLUME
1
001 selects the registration 001 in folder 10
FS3
3
REGIST
II
III
AF
LIMEX
I
10 selects the folder number 10, Pop-Rock
IE1
FS2
2ND
TRANS
5
Digit 001 on the 10-button pad.
FS1
II
3
II
VALUE
4
2
PHO
REGIST
2
Y
MAIN R
1
IV
REGIST
IV
MAIN L
F3
V3
4
004 PopItaly
AF
IE2
STYLE
X
I
9 - 16
MP3
COMBI
AUX R
3
002 Gtr Rock
2. SELECT BY NUMBER
AUX L
CA2
2
SPLIT
SCALA
SOUND
OUT-B
a. e. 003 Rock 69
CA1
HARM
4
COMBI
THRU
V3
LINK
EDIT
X LYRIC Y
FS2
1
SAVE
X
PHO
II
DC IN
PEDAL
MAIN R
00 User free
08 Ballad
MP3
Select a REGIST folder from
III the display.
DC IN
MAIN L
9 - 16
SCALA
COMBI
01 User free
IV
OUT-B
VALUE
LINK
E
X
E
N
T
E
R
FACTORY REGISTRATIONS
FACTORY REGISTR ATIONS HQ260
FOLDERS FOR THE BUILT IN SOUND BOARD
08 Ballad
09 Ballroom
10 Pop-Rock
11 Swing & Jazz
12 DanceDisco
13 Latin
14 R & B
15 Country
23 German pop hits
24 German folk music hits
27 Italy Pop
28 Italy Folk
REGISTR ATION FOLDERS 08-29
The registrations in folders 08-29 (BALLAD, LATIN,
BALLROOM) are organized as follows:
4 sound settings are pre-programmed in each
registration. Use the SCENE buttons I, II, III,
and IV to select the sound mixtures suitable
to your piece.
The style arranger is activated and a suitable
style is set for the piece.
SYNC START and INTRO are pre-programmed for
all factory settings with a pre-set STYLE.
DC IN
PEDAL
FS1
COPY
FS2
FS3
EDIT
LYRIC
SPLIT
MIDI-IN
THRU
OUT-A
OUT-B
AUX L
CA1
HARM
CA2
DESKTOP
FAVORITE
29 Signation
AUX R
MAIN L
MAIN R
PAGE +
2ND
PAGE -
TRANS
MAIN
VOLUME
9 - 16
SCALA
PHONES
VALUE
LINK
SAVE
MP3
SOUND
MIDI
FILE
COMBI
STYLE
1
4
X
Y
I
V3
IV
REGIST
II
2
III
HO
IE1
AF
IE2
F1
IE3
A
F2
B
LIMEX
V3SOUND
3
1
2
4
5
6
3
7
8
9
-
0
+
F3
C
D
BR
E
X
E
N
T
E
R
SCENE I is always activated when selecting a factory
registration (the LED lights up).
MORE REGISTR ATIONS FOLDERS
FOLDERS - USER MEMORY SLOTS
00 USER
01 USER
02 USER
03 - 07 free for specific regional content
68 - 89 same content as 08-29 but
includes manual bass and chord
99 Special
dont use - special folder for the database
68-89 Manual bass & chord
Factory registrations of the most popular songs are
preset for manually playing bass and chord in folders 68-89. When you press START, the STYLE
plays only the percussion sounds.
11
FACTORY REGISTRATIONS
TR ADITION T200 REGISTR ATIONS
Select folk music registrations from the TRADITION
T200 sound board for live play on an accordion or
diatonic button accordion as follows:
REGISTRATIONS BANK 30
If you use a LIMEX MIDI system MPR3 / MPR4,
use the registrations in BANK 30 x T200 LIMEX.
Contact your LIMEX Center for the MIDI system
settings.
REGISTRATIONS BANK 31
If you use a MIDI system of a different manufacturer, use the registrations in BANK 31 x T200 ALL.
REGISTRATIONS BANK 32
These folk music registrations are pre-set with
German folk music styles and can be used with
any MIDI system.
GERMAN FOLK MUSIC ON
MIDI ACCORDION
TREBLE KEYS
Solo, duet, or harmony
CHORD KEYS
Variety of sounds on the chord keys. These sounds
may also consist of complete guitar chords.
BASS KEYS
Variety of bass instruments on the bass keys in
Oberkrainer style. One of the most popular sounds:
E-bass and baritone horn mixed.
PERCUSSION
Percussion sounds on the chord and bass keys; for
example, bass drum and cymbal on bass keys, snare
drum on the chord keys.
The difference among these registrations is
the guitar sound. LIMEX MIDI systems have
a function that allows the use of guitar sounds
recorded as complete chords. Ask your MIDI system
manufacturer if your MIDI system can make these
functions available to you.
12
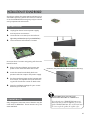
WERKSREGISTRATIONEN
SOUND BOARD SW160 SWISS
If you have purchased the optional sound board
SWISS 160, copy the sound folder SWISS 40 (this
can be found on the website V3SOUND) and place
this folder into the SOUND folder on the SD card.
SD-CARD more information page 62
SOUND BOARD TO260 T-ORGAN
If you have purchased the optional sound board
TO260, copy the sound folder 38 TO260 (these can
be found on the website V3SOUND) and place this
folder into the SOUND folder on the SD card.
SD-CARD more information page 62
Copy the registration folder in the folder TO260 38
registrations on the SD CARD.
13
STYLE ARRANGER
STYLE ARR ANGER
Each sound board is accompanied by a variety of
suitable style packages.
The HQ260 sound board had 300 styles available
at the time this manual was printed.
Style folders and sound boards
The styles in folders 01-29 use sounds from the
HQ260 sound board.
This international style package, produced by
D-O-O, Musalabra, Carillon, HRS Studios and
V3SOUND, is continually being expanded.
The styles in folders 30 and 31 use the sounds from
the TRADITION exclusive sound board.
The TRADITION T200 sound board has over 70
German folk music styles available, such as Oberkrainer, Egerlaender, brass music, various Zillertaler styles, and much more.
SELECTING A STYLE
DC IN
Press the [STYLE] button.
MP3
FS1
FS2
SAVE
EDIT
LYRIC
SPLIT
THRU
OUT-A
STYLE
AUX L
CA1
CA2
DESKTOP
FAVORITE
AUX R
MAIN L
PAGE +
2ND
PAGE -
TRANS
02 BALLROOOM
I
SOUND
IV
II
MIDI
FILE
III
i. e. 01Ballad
1
4
X
Y
PEDAL
To test another style
FS1
LINK
EDIT
LYRIC
SPLIT
SAVE
THRU
OUT-A
OUT-B
AUX L
i. e. 01 Ballad 8
CA1
HARM
CA2
DESKTOP
HO
IE1
FAVORITE
AF
9 - 16
IE2
REGIST
II
III
MIDI-IN
3
SCALA
If you have found a style you want to use in
this registration, press a second time to the
inverted button
Styles return to the main page.
IV
2
FS3
F1
IE3
COMBI
I
V3
FS2
COPY
PHO
MAIN
COM
VOLUME
NO PLAYER
03 ENTERTAIN
MP3
DC IN
MAIN R
9 - 16
Play a chord on your MIDI instrument.
> Stop the current style
> Select a different style.
OUT-B
VALUE
HARM
STYLE
F2
AUX R
1
2
D
3
PAGE +
2ND
PAGE
4 -
TRANS
5
F3
C
MAIN R
PHO
VALUE
01 Ballad 8
02ABallad B
16
LIMEX
MAIN L
BR
7
8
-
0
E
X
6
E
MAINN
9VOLUME
T
E
R
+
MP3
SOUND
MIDI
FILE
COMBI
STYLE
1
4
X
Y
I
V3
IV
REGIST
II
2
III
3
14
MIDI-IN
01 BALLAD
Start the playback.
If your style arranger does not follow
the chords you play, check the transmission MIDI channel of your instrument.
Accordingly to the V3's factory setting,
you must select the MIDI channel 2 to
let the V3 recognize your chord changes.
FS3
LINK
MIDISCALA
FILE
Select a category from the display.
Select a style (name will be inverse)
PEDAL
COPY
HO
IE1
AF
IE2
F1
IE3
A
F2
B
LIMEX
1
2
3
4
5
6
7
8
9
-
0
+
F3
C
D
BR
E
X
E
N
T
E
R
DC IN
PEDAL
FS1
COPY
FS2
EDIT
THRU
OUT-A
CA1
HARM
STYLE ARRANGER
MIDI-IN
AUX L
AUX R
CA2
DESKTOP
SPLIT
SCALA
OUT-B
MAIN L
MAIN R
FAVORITE
PAGE +
2ND
PAGE -
TRANS
MAIN
VOLUME
9 - 16
STYLE MP3
KEYS
SOUND
MIDI
When you haveFILE
selected a style, the keys on the
lower part of the V3 DESKTOP become active.
STYLE
1
SYNC STOP
Stops if no chord key is4
X
Y
pressed.
PHONES
VALUE
LINK
SAVE
LYRIC
FS3
COMBI
I
V3
SYNC START
AF
2
Starts
with the
next chord.
REGIST
F1 - F2 - F3
IV
Automatic fill-in with
change of variation.
II
a
3
HO
IE1
AF
IE2
F1
IE3
F2
A
1
2
3
4
5
6
7
8
9
-
0
+
E
X
E
N
T
E
R
F3
B
C
IE 1-2-3 INTRO / ENDING
LIMEX
Direct selection
of fill-ins
III
D
BR
MAIN A - B - C - D
If the style is already playing, these keys
are for the endings; otherwise they are
for Intro.
If one of the MAIN keys is pressed again, a suitable fill-in
for the MAIN variation will play.
VOLUME ADJUSTMENT & TEMPO
Use the arrow keys up/down right under the display to adjust the volume for the players and live
sounds and the tempo for the Styles and MIDI files.
DC IN
PEDAL
FS1
COPY
TMP
SAVE
EDIT
LYRIC
SPLIT
FS2
FS3
MIDI-IN
THRU
OUT-A
OUT-B
AUX L
AUX R
MAIN L
MAIN R
CA1
HARM
CA2
DESKTOP
FAVORITE
PAGE +
2ND
PAGE -
TRANS
MAIN
VOLUME
9 - 16
SCALA
tempo of the MIDI files or styles
MP3
SOUND
TRACK volume of the active player:
MIDI
FILE
MP3, MIDI file or style
LIVEvolume of all live sounds
TMP TRACK LIVE
120
100
100
STYLE
1
4
X
There are 3 ways to change volumes:
PHONES
VALUE
LINK
I
V3
IV
2
+
-
Y
3
HO
IE1
AF
IE2
F1
IE3
A
F2
B
REGIST
II
III
1
4
Change the value with the arrow keys;
Use the VALUE potentiometer;
Enter the volume using the 10-button pad.
COMBI
LIMEX
V3SOUND
2
3
5
6
7
8
9
-
0
+
F3
C
D
BR
E
X
E
N
T
E
R
15
COPY
LINK
SAVE
EDIT
LYRIC
CA1
HARM
CA2
PAGE +
DESKTOP
SPLIT
PAGE -
FAVORITE
9 - 16
SCALA
MP3 AND MIDI FILE PLAYER
T
MP3
MIDI
FILE
MP3-FILE PLAYER
STYLE
1
4
You can play mp3 audio files in registrationX mode.
Y
DC IN
stop the current file
select a different file.
3
The V3 DESKTOP cannot record MP3 files
itself. You must transfer MP3 files from your computer using an SD memory card.
III
1
4
MIDI
FILE
HO
IE1
PEDAL
FS1
COPY
AF
EDIT
If you have found a file you want to use, press a
LYRIC to SPLIT
second time the inverted file button to return
the main page.
SCALA
F1
F2
F3
7
V3 DESKTOP audio player:
MPEG Layer III 32-48.000kHz
I IE2
IE3
B
C
D
Bit rate
up to A320 kbit/s
– all variable
formatsBR
IV
II
MPEG Layer 3 audio decoding technology licensed
from
Fraunhofer
IIS
and
Thomson.
III
FS2
FS3
MIDI-IN
THRU
OUT-A
OUT-B
AUX L
AUX R
LINK
SAVE
IV
2
MP3
Press the [MP3] button
Select a folder
Select any mp3 file - the file is highlighted.
Press the play button
STYLE
To test another file
I
V3
CA1
HARM
CA2
PAGE +
DESKTOP
PAGE -
FAVORITE
T
9 - 16
To turn off the mp3 player, press the [MP3] button
and click the upper right button on the display, NO
MP3
PLAYER.
MIDI
FILE
MIDI FILE PLAYER
STYLE
X
You can play MIDI files in registration mode.
MP3
4
Y
MIDI
FILE
STYLE
stop the current file
select a different file.
If you have found a file you want to use, press a
second time the inverted file button to return to
the main page.
To turn off the mp3 player, press the [MP3] button
and click the upper right button on the display, NO
PLAYER.
16
3
Press the MIDI file button
Select a folder
Select a MIDI file
Press the play button
To test another file
1
HO
IE1
I
The V3V3
DESKTOP MIDI file player supports
MIDI files in Format 0.
2
IV
III
The standard MIDI file allows you to use recorded MIDI data in different devices and computer
programs. However, the label Standard MIDI File,
SMF, does not mean that any MIDI playback can
beAFused with the sound
board
installed. I
F1
F2 you have
F3
IV
If you are using MIDI files programmed for General
IE2
IE3
A
B
C
D
BR
III
MIDI sound format (GM), make sure the sound
board HQ260 is installed.
The TRADITION 200 sound board has special
German folk music sounds, but does not contain any
GM sounds.
Only MIDI files that were specially programmed
for these sounds will be correctly played back in
combination with the TRADITION 200 sound
board. If you were to play GM MIDI files, the
sound board would simply remain mute.
1
COMBI
4
7
II
-
FOOT PEDAL - FACTORY SETTING
FOOT PEDAL - FACTORY SETTING
Three foot pedals can be connected
to the V3 DESKTOP.
FS1 Switch between SCENE I and SCENE II
I > II > I > II > I > II > I...
FS2 Switch between SCENE III and SCENE IV.
III > IV > III > IV > III > IV...
with every tap of the pedal connected
to FS1.
FS3 START/STOP function for all players.
Be sure that the polarity of all foot pedals is in the
same direction.
VOLUME PEDAL
The volume pedal, PED, is not activated in the
factory setting. The volume pedal is used for live
sounds. You can choose whether the pedal is used
for only the sounds on the right hand or for more
than one channel.
The settings for the volume pedal can be
GLOBAL for all REGISTRATIONS, or individually set and saved for each REGISTRATION.
For more information, see page 51.
TR ANSPOSER
AUTO FILTER
When the volume pedal is activated on a MIDI
channel, all the data of the MIDI controller 11
(expression, bellows dynamic) are automatically
carried out on that MIDI channel.
WHY?
Only one control can be used to carry out the
musical volume changes of piano to forte — either
the bellows or the volume pedal.
If you were to use both controls at the same time,
it would be like driving a car with two gas pedals.
Press and hold down the [TRANS] key for 2 seconds - then release it. Now for the next 2 seconds,
you can change the numbers at the bottom of the
display by turning the knob on the VALUE pot.
The display will automatically jump back to the
homepage screen.
Now press the [TRANS] key to activate the transposition (LED lights up).
The TRANSPOSE value and its status ON/OFF (LED
lights up when it is activated) are saved separately
for each REGISTRATION.
For more information, see page 56.
17
REGISTRATION – SIMPLE CHANGES TO THE TOP 5 PARAMETERS
[1] HOMEPAGE – SOUND CHANGE
Using the REGISTRATION 08/033 Endless as an example, here is how you change a SOUND within a
REGISTRATION:
Press the [REGIST] button.
Using the 10-button pad, digit 08033.
Press [ENTER] on the 10-button pad.
LINK
CA1
HARM
CA2
PAGE +
DESKTOP
FAVORITE
9 - 16
PAGE -
08/033 Endless
002 Bright Pi
016 PAD 200
In the registration 08/033 Endless, you will see the
following sounds in the display:
Now press the button parallel to 002 BrightPi in
order to select a different sound.
The display shows you the SOUND categories.
Browse through the 32 categories using the [PAGE
+/-] buttons until you find the category you want
to select.
LINK
CA1
HARM
FAVORITE
Select a sound by pressing the button parallel to
that sound on the display.
PAGE -
9 - 16
Piano
Tuned Keys
Accordion
Bass
E-Piano
Organ
Guitar
Stringed
If you want a different piano sound, for example,
press the button parallel to piano in the display.
If the category contains more than 8 sounds, use
the [PAGE +/-] buttons to display and browse all of
the sounds within the category.
PAGE +
DESKTOP
Click on the button parallel to the category you
want to select.
The display now shows you the available sounds
in this category.
CA2
I
1
LINK
CA1
HARM
CA2
PAGE +
DESKTOP
FAVORITE
PAGE -
9 - 16
001 GrandPia
002 BrightPi
003 GrandElc
004 HonkyTon
005 GP solo
006 BrightPS
007 dont use
The sound name is highlighted. Press a key on
your keyboard and you can hear it.
To select it, just press the button a second time.
The display will automatically jump back to the
homepage screen.
18
If you want to select a different sound category,
press [EX]. Select the Part button on the display
again.
REGISTRATION – SIMPLE CHANGES TO THE TOP 5 PARAMETERS
[2] SOUND > ON/OFF
SCENE I-IV PART ON/OFF
From the displays home view press 1 time the
[PAGE+] button to access the SOUND ON/OFF parameters.
You are now on the second page of the EDIT menu.
The bottom of the display shows you what parameter can be changed on this page.
1
BLINKING
NOT BLINKING
= INACTIVE
= ACTIVE
(here showed in italic font)
You can turn the sounds ON or OFF for each of the
four SCENES. What is a SCENE?
EXAMPLE: REGIST 08/033 Endless
When you call up the REGISTRATION,
SCENE I is active and the display shows sounds
002 BrightPi and 016 Pad 200 not blinking.
When you play a key on your instrument, these
two sounds are heard.
Now press the SCENE III button.
The display shows sounds 010 Gt nylon and 101
Brightne not blinking.
When you play a key on your instrument, these
two sounds are heard.
To activate a sound in the currente SCENE, press
the [PAGE+] button, then click on the button parallel to the part/sound to activate. The part activated won't blink and will be heard on the next key
played.
You deactivate sounds using the same procedure.
IV
PAGE +
HARM
DESKTOP
FAVORITE
9 - 16
EDIT08/033
010 Gt nylon
101 Brightne
049 Strings
049 Strings
After pressing the [PAGE +] button, you will see
areas of the display blinking and other areas not
blinking.
A simple click on the parts buttons on the both sides
of the display allows you to turn the sound ON or
OFF (the LED signals which SCENE is currently activated).
I
V3
1
PAGE -
Endless
002 BrightPi
016 PAD 200
069 Oboe
100 free - R
V3
I
IV
The SOUND SCENES offer novel control
for live sounds.
Until now, you have been accustomed to changing
the current sound in order to play other sounds.
The V3 DESKTOP offers more.
You have 16 sounds and you choose which selection of the 16 available sounds is active in each
SCENE. A sound may be active in one, two, or in
all four SCENES.
With a simple click on the SCENE, you can
change more than one sound simultaneously
— and smoothly.
Smoothly means that even if you are still holding
down a key on your instrument when the SCENE
changes, the sound is not cut off. Only when the
next new key is pressed do the sounds of the new
SCENE play, resulting in a smooth transition of
sounds between SCENES.
You have time to play a note to its end while at the
same time calling up a sound change.
When you have learned this new method of
controlling sounds, you will see its advantages
— especially if you play a MIDI accordion.
Use the same steps to change any of the 16 parts
in any SCENE.
19
REGISTRATION – SIMPLE CHANGES TO THE TOP 5 PARAMETERS
[3] SOUND > VOLUME AND REVERB
From the Display's Home View Press 2 times the
[PAGE+] button to access the VOLUME and REVERB
parameters.
Reverb is the effect on MIDI sounds that
make them sound like they are being played
in a room or particular space. This portion of
the sound can be adjusted for each sound; bass
sounds usually have less reverb.
You can adjust the volume and the amount of
reverb for each SOUND.
Press the button parallel to what you want in the
display. The first parameter will blink, which is
Vxxx in this case (V stands for volume).
V100 R090
VOLUME REVERB
1
I
V3
IV
Now you have a variety of ways to change its value.
When the field is blinking in the display, the
MASTER VOLUME potentiometer becomes a
data-entry tool.
DC IN
PEDAL
FS1
COPY
FS2
FS3
EDIT
LYRIC
SPLIT
MIDI-IN
THRU
OUT-A
OUT-B
AUX L
AUX R
MAIN L
MAIN R
CA1
HARM
CA2
DESKTOP
FAVORITE
PAGE +
2ND
PAGE -
TRANS
MAIN
VOLUME
9 - 16
SCALA
Turn the pot to change the value on the volume.
MP3
SOUND
MIDI
FILE
COMBI
STYLE
1
4
20
Y
the 10-button pad, or using the +/- buttons
next to the “0” button.
X
I
V3
IV
REGIST
II
2
III
HO
IE1
AF
IE2
F1
IE3
A
F2
B
LIMEX
V3SOUND
3
You can also change the value directly using
PHONES
VALUE
LINK
SAVE
1
2
4
5
3
7
8
9
-
0
+
F3
C
D
BR
E
X
6
E
N
T
E
R
REGISTRATION – SIMPLE CHANGES TO THE TOP 5 PARAMETERS
[4] TR ACK ON / OFF / MUTE
From the Display's Home View Press 3 times the
[PAGE+] button to access the TRACK ON/OFF/
MUTE parameters.
OFF
ON
MUTE
DESKTOP
FAVORITE
9 - 16
02 VOLUME 000%
deactivates the track completely
plays the track
only in this SCENE (1, 2, 3, 4),
the track is muted
(see more on page 24)
04 VOLUME 000%
01 VOLUME 000%
03 VOLUME 000%
05 VOLUME 000%
TRACK VOLUME and TRACK ON are only
for MIDI files and styles. These settings do not
affect MP3 audio files.
The track ON/OFF setting is saved for each SCENE
(1, 2, 3, 4) in the REGISTRATION.
For more information, see below.
[5] FILE - TR ACK VOLUME
DESKTOP
FAVORITE
From the Display's Home View Press 4 times the
[PAGE+] button to access the TRACK VOLUME parameters.
9 - 16
02 TRACK ON
04 TRACK ON
01 TRACK ON
03 TRACK MUTE
05 TRACK ON
You can change the volume of each track in
percent (%).
TR ACK ASSIGNMENTS
Track 1 Bass Drum
Track 2 Snare
Track 3 HiHat
Track 4 Toms*
Track 5 Ride*
Track 6 Crash
Track 7 various percussion or other drums
Track 8 various percussion or other drums
Track 9 Bass
Track 10 various
Track 11 rhythm guitar
Track 12 various
Track 13 various
Track 14 various
Track 15 pad/surface sound
Track 16 Intro 1 – click
SAVE > SAVE REGISTR ATION
Press the [SAVE] button two times to save your
changes in the REGISTRATION.
To save in a different memory location, read more
on page 49. Changing the name of the file is only
possible on a PC in the 1.30 version.
The V3 DESKTOP only plays back MIDI files
and styles. The volume changes are only saved in
the REGISTRATION, not in the file!
21
OVERVIEW - MORE MUSIC
MORE MUSIC AT YOUR FINGERTIPS
You will be amazed at the way you can arrange
pieces of music with the V3 DESKTOP. Music lives
by dynamic and variation. On a piano, you change
the dynamic by keystroke velocity, and by air pressure for accordions and brass instruments. All of
today’s MIDI sound generators simulate dynamic,
but the capability of instrumentation was very limited – until now.
For the first time with the DESKTOP, you can:
also control which part (first, second or third)
the sounds should take
change the order of parts any number of times while you are playing the piece
When you play back the pieces of your concert
songlist, notice that music always has a similar instrumentation.
MUSICAL EXAMPLE OF INSTRUMENTATION
ON V3 DESKTOP
Part 1
You are playing the clarinet solo, and as soon as
you press a second key in addition to the first,
a trumpet as the second part – in this case as a
deeper voice – should be heard with the clarinet.
As long as you only press one key at a time, the
clarinet continues to play solo.
Part 2
In the middle of the piece, you want to change the
instrumentation. Now the trumpet should play
the solo part. If you only press one key, only the
trumpet is heard in solo, while the clarinet plays
the second voice. Again it plays above the trumpet
as higher voice in contrast to Part 1.
With the HIGH-LOW parameter you change this
setting and the clarinet will play the lower and the
trumpete the higher note.
Part 3
Now both instruments should play in unison.
When you press just one key, both voices are
heard.
22
1. Part
2. Part
3. Part
Clarinet = black
Trumpet = red
OVERVIEW - MORE MUSIC
REGISTR ATION / SOUND SCENES
A registration represents
a piece of music;
a scene is a section of the piece.
Example:
SCENE 1 = Intro
SCENE II = Verse
SCENE III = Refrain
SCENE IV = Solo
A REGISTRATION represents a piece of music. The
sound scenes within each REGISTRATION allow
you to change the instrumentation during different sections of the music.
Imagine that you are conducting 16 musicians
with your MIDI instrument. As the bandmaster,
you must accomplish these tasks for all 16 musicians before the piece begins:
Select an instrument = sound
Select 1st - 2nd - high - low
The sound scenes determine which of these musicians is currently active.
Are you wondering why a REGISTRATION can contain up to 16 sounds? The answer lies herein:
While you are playing, just press one of the
four SCENE buttons to play the instrumentatiOUT-A
OUT-B
AUX L
AUX R
MAIN L
MAIN R
PHONES
on
you want.
THRU
VALUE
From the musical example described previously, it
is clear that we need two musicians for the trumpet
and two musicians for clarinet.
Change the scenes using
pedal or a control
PAGEa
+ foot
2ND
device
on
your
MIDI
instrument.
DESKTOP
CA2
PAGE -
TRANS
MAIN
VOLUME
SOUND
COMBI
I
IV
REGIST
II
III
F1
F2
B
LIMEX
1
2
3
4
5
6
7
8
9
-
0
+
F3
C
D
BR
E
X
E
N
T
E
R
{
{
No. 1 plays first clarinet in Part 1 in the higher voice.
No. 2 plays second trumpet in Part 1 in the lower voice.
No. 3 plays first trumpet in Part 2, which is the lower
voice in this two-part harmony.
No. 4 plays second clarinet in Part 2 in the higher voice.
In Part 3, No. 1 and No. 3 play together.
Now if you consider that a MIDI instrument, such as a three-keyboard electric organ
or MIDI accordion, can play even more instruments, then the available 16 sounds are really
necessary in order to guarantee perfect harmony.
23
LINK FUNCTION
LINK FUNCTION
The LINK function can be activated once (GLOBAL)
or individually for each REGISTRATION.
COPY
When the LINK function is ON (LED is lighted), the
[1] button automatically switches on when the [I]
button is pressed.
LINK
SAVE
EDIT
LYRIC
SPLIT
CA1
HARM
FILE
STYLE
1
4
X
Y
V3
I
IV
REGIST
II
2
III
1
LIMEX
V3SOUND
3
2
3
E
X
This link allows you to change the following parameters with just one click on the V3 DESKTOP or
foot pedal.
STYLE VARIATION
When AF is ON (auto fill), a fill-in will play.
TRACK ON/OFF
Tracks of the style arranger
16 LIVE SOUNDS
Change all live sounds
The V3 DESKTOP has a special function that allows
you to switch between [I + II] with the foot pedal.
I > II > I > II > I > II
One press on the foot pedal lets you do all the
things that take a number of clicks on the devices
of other manufacturers.
The advantage of having four scenes within a
registration is that a song can be called up by its
number, yet already have a clear substructure of
scenes.
When you take more time to set up your program,
the performance is much less stressful and you
have more time for your audience and your
music.
24
You can also always manually press all the scene
buttons and play as you are accustomed to playing
with other devices.
LINK FUNCTION - ON/OFF
LINK FUNCTION ON/OFF
There are three ways to activate the LINK function.
MANUALLY
Press and hold down the [HARM] button to the left
of the display for 2 seconds. The LED lights up, signaling that the LINK function has been activated
manually.
If you want to save this activation in the REGISTRATION, follow the standard save procedure: Press
the [SAVE] button two times.
INDIVIDUALLY IN A REGISTRATION
Press the [EDIT] button, then press the button parallel to REGISTRATION on the display.
Press the [PAGE+] button until you scroll down to
the last page of the display.
COPY
LINK
SAVE
EDIT
LYRIC
SPLIT
CA1
HARM
FAVORITE
9 - 16
SCALA
MP3
MIDI
FILE
Here you will see LINK on the left side of the display.
Click the button directly parallel to LINK in the display to switch the parameter to ON.
Do not forget to save this setting before you move
to another REGISTRATION if you would like to keep
the changes.
GLOBALLY FOR ALL REGISTRATIONS
Press the [EDIT] button, then press the button parallel to FOOT SWITCH on the display.
Here on the left of the display you will see LINK.
Now when you set LINK to ON, this applies to all
REGISTRATIONS.
You must press the [SAVE] button once to activate
the global setting.
FOR AN EXAMPLE, SEE PAGE 58.
25
REGISTRATION – SELECTING AN INSTRUMENTATION
SIMPLE SELECTION
Although the LINK function described above may
still sound complicated, it is very simple to apply.
We have already prepared instrumentations for
the most popular instruments. You only need to
select the SOUND.
The instrumentations are called up simply selecting a registration.
EXAMPLE
Select a REGISTRATION.
Using the buttons on the two sides of the
display, choose a part for which a SOUND
must be selected.
The display shows you a list of
sound categories.
With a click on one of the category buttons, you
can continue selecting your sound if you want a
standard sound without pre-set instrumentations.
To select SOUNDS for which there are pre-loaded instrumentations available,
press the [SOUND] button one time
You get the categoriy view. PIANO, ORGAN..
SOUND
press the [SOUND] again to change to folder view
COMBI
DC IN
PEDAL
FS1
COPY
The display should show this screen.
IV
Now you see the sound folders on the SD card. III
FS3
EDIT
LYRIC
MIDI-IN
THRU
OUT-A
CA1
HARM
AUX L
CA2
REGIST
DESKTOP
SPLIT
II
OUT-B
AUX R
MAIN L
MAIN R
FAVORITE
PAGE +
2ND
PAGE -
TRANS
MAIN
VOLUME
9 - 16
SCALA
03 Voicing 123
05 Bank GMV
00 Bank GM
04 Left & Bass
MP3
SOUND
Select the folder 03 Voicing 123 with preset instrumentation by pressing the button parallel to it.
MIDI
FILE
COMBI
STYLE
1
4
26
All SOUNDS are pre-set for the THIRD
(MIDDLE) VOICE.
IV
REGIST
II
2
III
3
HO
IE1
MN
I
V3
Y
H2-L2 All SOUNDS
are pre-set for the SECOND VOICE.
H1-L1 All SOUNDS
are pre-set for the FIRST VOICE.
X
PHO
VALUE
LINK
SAVE
I
FS2
AF
IE2
F1
IE3
A
F2
B
LIMEX
1
2
3
4
5
6
7
8
9
-
0
+
F3
C
D
BR
E
X
E
N
T
E
R
REGISTRATION – SELECTING AN INSTRUMENTATION
DC IN
FIRST VOICE
PEDAL
FS1
COPY
H1 and L1 represent the following:
FS2
FS3
EDIT
LYRIC
SPLIT
THRU
OUT-A
OUT-B
AUX L
CA1
HARM
CA2
DESKTOP
FAVORITE
PAGE +
2ND
PAGE -
TRANS
MAIN
VOLUM
005MN SaxTen
SOUND
MIDI
FILE
COMBI
STYLE
1
4
I
V3
IV
REGIS
II
2
III
Y
3
HO
IE1
AF
IE2
F1
IE3
A
F2
B
LIMEX
1
2
4
5
6
7
8
9
C
D
BR
-
0
+
H2 and L2 represent the following:
001H2 SaxTen
001
the number of the sound
H
the high note will be played
(when more than one key is played)
2
2nd - the sound will play only as second note, it means that you need to press two keys at the same time to hear it.
SaxTen tenor saxophone
THIRD VOICE
MN represent the following:
005MN SaxTen
MN When more than 2 keys are played,
this sound will play all middle notes.
3
F3
SECOND VOICE
002L2SaxTen
002
the number of the sound
L
the low note will be played
(when more than one key is played)
2
2nd - the sound will play only as second note, it means that you need to press two keys at the same time to hear it.
SaxTen tenor saxophone
PH
003H2 SaxTen
004L2 SaxTe
MP3
002L1 SaxTen
002 the number of the sound
L
the low note will be played
(when more than one key is played)
1
1st – it will always be the first note played
SaxTen tenor saxophone
MAIN R
001H1 SaxTen
002L1 SaxTe
X
MAIN L
9 - 16
SCALA
001H1 SaxTen
001 the number of the sound
H the high note will be played
(when more than one key is played)
1 1st – it will always be the first note played
SaxTen tenor saxophone
AUX R
VALUE
LINK
SAVE
MIDI-IN
SUMMARY
You just pick a SOUND from the Voicing 123
folder, and everything is ready to go.
Select REGIST 13/048 ChaAmore for a simple
example of the above procedure.
If you only play one note, you only hear the
trumpet; when you play two notes, you hear the
trombone on the lower of the two notes played.
if you play more then two notes, all middle notes
will be played ba syxophones.
If you want to create and save sounds with instrumentations yourself, see page 48.
27
E
X
E
N
T
E
R
SOUND MODE
SOUND MODE
Press the [SOUND] button
SOUND
DC IN
Choose a sound category using the buttons
to the left and right of the display (piano,
accordion, guitar, etc.) I
REGIST
PEDAL
FS1
COPY
COMBI
FS2
FS3
EDIT
LYRIC
SPLIT
MIDI-IN
THRU
OUT-A
OUT-B
AUX L
AUX R
MAIN L
MAIN R
CA1
HARM
CA2
DESKTOP
FAVORITE
PAGE +
2ND
PAGE -
TRANS
MAIN
VOLUME
9 - 16
SCALA
MP3
IV
SOUND
II
Use the buttons to the IIIleft and right of the
display to select the specific sound you want.
MIDI
FILE
COMBI
STYLE
1
4
Y
Press the button a second time to select it.
The display will automatically jump back to the
homepage screen.
X
I
V3
IV
REGIST
II
2
III
HO
IE1
AF
IE2
F1
IE3
A
F2
B
LIMEX
V3SOUND
3
The SOUND is highlighted
You can already hear it pressing a key on your
MIDI instrument. You can continue highlighting
other sounds in order to preview them until you
find the sound you're looking for.
PHONES
VALUE
LINK
SAVE
1
2
4
5
3
7
8
9
-
0
+
F3
C
D
BR
E
X
6
E
N
T
E
R
The SOUND mode allows you to quickly familiarize
yourself with all the available sounds on the sound
board.
Use the [+/-] buttons on the 10-button pad to
switch quickly to the next sound in the same category.
To select a second category, press the [SOUND]
button again and use the [PAGE+/-] buttons to
scroll through the list.
SOUND FILE MANAGEMENT
Press the [SOUND] button once:
You see a list sorted by category.
Piano, Accordion, Guitar...
Press the [SOUND] button again:
You see a list sorted by banks.
00 Bank GM, 05 Bank GMV...
Press the [SOUND] button a third time:
You see the category list again.
Piano, Accordion, Guitar...
Using categories gets you quickly to the sounds
you want.
If you need a sound that does not belong to any
sound category, such as the cowbell, go to the paper (or PDF) list of sound banks provided with your
sound board. Search for the sound with its number from the sound board’s sound list.
Each sound board user manual lists the bank and
program number for every sound.
28
dont use
Sounds labeled “dont use” are placeholders for the
V3 DESKTOP operating system. The placeholders
ensure that at least one entry exists for each category, regardless of which sound board is installed.
If a “dont use” entry is selected, it will make no
sound. Nothing will be out of tune or changed; you
don’t need to concern yourself with them.
REGISTRATION
COMBINATION
MIDI-SETUP
PLUG-INS
REFERENCE MANUAL
REGISTRATION
REGISTR ATION
COMBINATION
COMBINATION
REGIST stands for REGISTRATION.
COMBI stands for COMBINATION.
All the sound settings for live play are saved in
REGISTRATIONS; they can be used to recall several
settings.
Sounds are put together, or combined, in a COMBINATION.
In the current software version 1.30, you will mostly be working with the REGISTRATIONS.
In contrast to COMBI mode, you can also do the
following in a REGISTRATION:
The COMBI mode comes into play when you:
MIDI files, MP3 files and styles can be played
Use different MIDI input devices and
back as well as linked to the REGISTRATION,
so they are ready from the start.
DESKTOP
All three foot pedals, FS1-FS3,
can be
individually set with various functions for
each REGISTRATION.
Use the TRACK function to set and save
volume levels for each area (MIDI file, MP3, style).
TMP TRACK LIVE
120
100
100
therefore need a second MIDI setting.
Want to adjust computer MIDI files directly with V3 DESKTOP sounds.
o carry out these functions, you need a setting
T
that can handle all 16 MIDI channels from the
MIDI IN port directly.
Select the COMBI file called 001extern16x from
the 98 ExternMID folder.
COMBI - 98 ExternMID - 001extern16x.
V3
Use the LIVE function to set and save the
volume of all sounds being played live.
Change and save the TEMPO of MIDI files
and styles.
COMBI memory slots are 99% similar to the registrations. Therefore, it is easy to change registrations into combinations and vice versa. Copy the
registration file on your PC and simply change the
file name ending from .rgi to .cmb.
Turn off individual MIDI file tracks as well as change their volume by percent.
MP3s, MIDI files and styles can only
be played back in REGISTRATION
mode!
30
CATEGORIES – REGIST
REGISTR ATION CATEGORIES
The registrations for the HQ260 sound board
are categorized using a simple system.
The category takes its name from the folder.
You can re-number any REGISTRATION folder and
change the order in which they will appear in your
display.
You can copy any REGISTRATION folder and give it
a new number and a new name.
You can copy individual REGISTRATIONS and put
them in your own folder to quickly create a program. This allows you easy and fast access to your
songs using the [+/-] buttons in the 10-button pad.
If you are using the V3 DESKTOP for more than
one band, you can create any number of folders to
save each type of program separately (weddings,
festivals, etc.).
CATEGORIES HQ260
00 User
01 User
02 User
03 - 07 free
08 Ballad
09 Ballroom
10 Pop-Rock
11 Swing & Jazz
12 DanceDisco
13 Latin
14 R & B
15 Country
23 German pop hits
24 German folk music hits
27 Italy Pop
28 Italy Folk
29 Signation
68-89 Manual bass, chord and drumcomputer
99 Special
(special folder for the database)
31
REGISTRATION – EDIT
To quickly and easily change the most important
parameters of a REGISTRATION (sound, volume),
see pages 18-21.
This portion of the reference manual describes all of
the sound parameters used within a REGISTRATION.
REGISTR ATION > EDIT
DC IN
If you want to edit more in a REGISTRATION:
PEDAL
FS1
COPY
FS2
FS3
SAVE
EDIT
LYRIC
SPLIT
MIDI-IN
CA1
HARM
OUT-B
AUX L
AUX R
MAIN L
PAGE +
2ND
PAGE -
TRANS
MP3
SOUND
COMBI
STYLE
1
4
X
Y
Press the first button on
the right of the DISPLAY
I
V3
IV
HO
III
IE1
AF
IE2
F1
IE3
A
F2
B
REGIST
II
2
3
Press the [EDIT] button
PHONES
MAIN
VOLUME
MIDI
FILE
MAIN R
EDIT
9 - 16
SCALA
Call up the REGISTRATION
OUT-A
CA2
DESKTOP
FAVORITE
THRU
VALUE
LINK
LIMEX
V3SOUND
1
2
4
5
6
3
7
8
9
-
0
+
F3
C
D
BR
E
X
E
N
T
E
R
EDIT appears in the upper left of the display.
[1] SELECT A SOUND
You are now on the first screen in EDIT, where you
select a sound.
Press the button parallel to an active part in the
display to choose a different sound.
You now see the list of SOUND categories.
PAGE +
HARM
DESKTOP
FAVORITE
9 - 16
PAGE -
018 Org Perc
Press the [PAGE+] button to scroll through the categories.
PAGE +
HARM
Click the button parallel to a category in the display to select it.
DESKTOP
FAVORITE
PAGE -
9 - 16
E-Piano
The screen shows you first 8 entries for this category.
Piano
Click on the button parallel to the sound you want to select it.
PAGE +
HARM
The sound is highlighted.
To select this sound, press its button a second time.
The display will automatically jump back to the
homepage again.
32
DESKTOP
FAVORITE
9 - 16
005 EPianoTi
006 EPianoFM
005 EPianoTh
006 EPianFM2
PAGE -
REGISTRATION – EDIT
[2] SOUND > ON/OFF
Press the [PAGE+] button.
You are now on the second page of the EDIT menu.
The bottom of the display shows you which parameters you can edit on this page.
After pressing the [PAGE +] button, you will see
areas of the display blinking and other areas not
blinking.
SZENE I-IV PART ON/OFF
1
IV
PAGE +
HARM
DESKTOP
FAVORITE
9 - 16
Simply click within the V3 DESKTOP sound scenes
to select which sound you want to hear in the activated SCENE (the LED signals which SCENE is currently activated).
BLINKING = INACTIVE
NOT BLINKING = ACTIVE (in italics)
I
V3
EDIT08/001
010 Gt nylon
101 Brightne
049 Strings
049 Strings
1
PAGE -
Endless
002 BrightPi
016 PAD 200
069 Oboe
100 free - R
V3
I
IV
EXAMPLE REGIST 08/001 Endless
To call up this REGISTRATION,
press REGIST – 08001 – ENTER.
SCENE I is active and you see in the display that
the sounds 002 BrightPi and 016 Pad 200 are not
blinking.
When you play a key on your input instrument,
these two sounds are heard.
Now press the SCENE III button.
You see in the display that the sounds 010 Gt nylon
and 101 Brightne are not blinking.
When you play a key on your input instrument,
these two sounds are heard.
To activate a sound in the current SCENE, click on
the button parallel to it in the display. The sound
stops blinking, signaling that it is now active and
will be heard when a key is played.
Use the same procedure to deactivate sounds.
The same procedure can be carried out for all 16
sounds in each SCENE.
SOUND SCENES offer novel control of LIVE
play. Until now, you had to change SOUNDS in
order to play other SOUNDS.
Our method
1. Switch between many sounds at the same time
with one click (or one tap on the foot pedal).
2. Retain smooth transitions. You can play and
hold keys on your input instrument (i.e. piano
and strings continue to vibrate), then change the
SCENE (all the sounds change in the display), yet
these new sounds are not heard until the next keys
are played on your instrument.
3. The instrumentation of the sounds can also be
changed, just like sounds in a SCENE.
33
REGISTRATION – EDIT
[3] MIDI CHANNEL
Press the [PAGE+/-] button to navigate to the MIDI
channel parameter.
V3 DESKTOP allows you to choose the following
MIDI channels:
R
L
B
D
right hand
left hand
bass
drums
(virtual MIDI-channel)
(virtual MIDI-channel)
(virtual MIDI-channel)
(virtual MIDI-channel)
OFF part off
HARM
1
2
16
DESKTOP
MIDI-channel 1
MIDI-channel 2
FAVORITE
PAGE +
2ND
PAGE -
TRANS
9 - 16
CH 2
CH 4
CH 6
CH 8
MIDI-channel 16
The virtual MIDI channels R/L/B/D are assigned in
MIDI setup. The default setting is R for CH 1, L for
CH 2, B for CH 3, and D for CH 10.
CH 1
CH 3
CH 5
CH 7
MIDI CHANNEL
I
1
You can use the absolute CHANNEL 1 ore the
virtual CH R to get a soun don CHANNEL 1.
But the virtual MIDI channels give you the advantage of quickly switching pre-set REGISTRATIONS
to all of your input instruments.
There are no limits to virtual MIDI channel distribution. However, the default settings for the
manufacturer’s registrations 08-29 are allocated
as follows:
If you want to select a specific MIDI channel,
you can only do so on the part designated for this
purpose. For example, you can only select MIDI
channel 4 on part 4. It´s not possible to call up
MIDI channel 4 on part 5.
The part distribution:
MIDI CHANNEL PART DEFAULT SETTINGS
Part 1 to 8
MIDI-channel R
Part 9
MIDI-channel L manual
drums
MIDI-channel B manual
drums
Part 10
Part 11
Part 13
MIDI-channel L - piano
MIDI-channel L - guitar
Part 12
Part 14
MIDI-channel B - e-bass
MIDI-channel B - con. bass
34
In the upper right of the display is
the upper left side of the display is
lower on the right side of the display is
lower on the left side is
and so on.
Part 1;
Part 2;
Part 3;
Part 4;
REGISTRATION – EDIT
[4] BANK & PROGR AM NUMBER
Press the [PAGE+/-] button to navigate to the
BANK and PROGRAM NUMBER parameters.
When you select sounds through their categories, the BANK and PROGRAM NUMBER saved
within the sound are automatically filled in here.
If you have already adjusted the volume and
other parameters perfectly, then you should not select the sound through its category when you want
to change sounds. Just change the numbers for its
BANK and PROGRAM here instead.
When you select a sound through its category, the
default settings of the sound are carried over, such
as a volume value of 100.
[5] VOLUME - PANORAMA - OUTPUT
Press the [PAGE+/-] button to navigate to the parameters for VOLUME, PANORAMA and AUDIO
OUTPUT.
THRU
OUT-A
OUT-B
AUX L
AUX R
MAIN L
MAIN R
PHONES
VALUE
CA2
Press the button parallel to what you want in the
display. The first parameter will blink, which is
Vxxx in this case (V stands for volume).
DESKTOP
PAGE +
2ND
PAGE -
TRANS
MAIN
VOLUME
SOUND
COMBI
Now you have a variety of ways to change its value.
I
IV
III
When the field is blinking in the display, the MASTER
VOLUME potentiometer becomes a data-entry tool.
F2
Turn the pot to change the value on the volume.
REGIST
II
LIMEX
V3SOUND
1
2
4
5
6
3
7
8
9
-
0
+
F3
C
D
BR
E
X
E
N
T
E
R
You can also change the value directly using the 10button pad, or using the +/- buttons next to the “0”
button.
V = VOLUME
0-127
P = PANORAMA
0=left 64=center 127=right
MA/AU
Main - AUX audio output
35
REGISTRATION – EDIT
[6] REVERB & CHORUS
R = REVERB
C = CHORUS
0 - 127
0 - 127
[7] ATTACK - DECAY - RELEASE
A = ATTACK
D = DECAY
R = RELEASE
64 is default setting
64 is default setting
64 is default setting
Attack determines whether the tone slowly builds
or is heard immediately at its highest level.
Release determines whether the tone oscillates at
the end. The strings of a dulcimer, for example, always fade out slowly unless they are stopped by
hand.
The RELEASE parameter is also very important for BASS played manually. You control how
long the bass string vibrates. The plug-in MONO
MODE is also critical here; see page 41. You can limit every sound to a certain section of keys on the input instrument — up to 16 split areas if necessary.
[8] LOW KEY - HIGH KEY
The lowest and highest key that is played.
0-127
Middle C is note 60. The trumpet player’s familiar
high C (top C or c3) is note 84.
[9] NOTE SHIFT & OCTAVE
NOT = half step
OCT = octave +/-
default setting = 0
All of the parameters discussed so far are
available in every REGISTRATION and
COMBINATION. The parameters to follow
below are available in select places.
36
PLUG-IN DETAILS
[10 - 17] PLUG-IN
EXPANSION
A plug-in is an expansion of parameters. In contrast to other fixed parameters such as VOLUME
or OCTAVE, the plug-in is flexible. This means that
a plug-in can take many different forms.
We chose this plug-in system because it is the best
way to insure continual development of our product.
This system sets the parameters needed and can
continually expand this list with software and updates.
With every new sound and every new style of music, new functions are needed to create extraordinary music.
V3 DESKTOP has 8 plug-in fields per sound.
16 sounds x 8 plug-ins = 128 plug-in fields.
Each field can contain any kind of plug-in you want.
V3SOUND offers groups of plug-ins.
SEND VALUE
SEND CONTROLLER
SEND CONTROLLER NRPN
SEND CONTROLLER RPN
SEND MSB LSB PRG
SEND BA-PR-VO X
SEND BA-PR-VO Y
SOUND PARAMETER
FINE TUNE
VIBRATO
VELOCITY +/ SOLIST PARAMETER
OCTAVE AUTO TRANSPOSE
VOICING
TIME WINDOW
DRUM PARAMETER
PARAMETER TABLE
PARAMETER
PART 1
PART 2~
PART16
SOUND
PIANO
E-BASS
-
SCENE I
ON
ON
OFF
SCENE II
OFF
ON
OFF
SCENE III
OFF
ON
OFF
SCENE IV
ON
ON
OFF
MIDI-CH
R
B
OFF
BANK
00
30
00
PROGRAM
001
002
001
VOLUME
100
100
100
PANORAMA
64
64
64
OUTPUT
MAIN
MAIN
MAIN
REVERB
40
00
40
CHORUS
00
00
00
ATTACK
64
64
64
DECAY
64
64
64
RELEASE
64
64
64
LOW KEY
50
1
1
HIGH KEY
127
49
127
NOTE SHIFT
0
0
0
OCTAVE
0
0
0
PLUG-IN 1
?
?
?
PLUG-IN 2
?
?
?
PLUG-IN 3
?
?
?
PLUG-IN 4
?
?
?
PLUG-IN 5
?
?
?
PLUG-IN 6
?
?
?
PLUG-IN 7
?
?
?
PLUG-IN 8
?
?
?
FOOT-SW
NOTE FIXED
37
PLUG-IN DETAILS
APPLYING A PLUG-IN
HARM
To apply a PLUG-IN to a part PLUG-IN field:
DESKTOP
FAVORITE
press the [EDIT] button
9 - 16
SEND VALUE
press the button in Display parallel
NO PLUG IN
SOUND PARAM
SOLIST PARAMETER
to REGISTRATION/COMBI/SOUND.
(This depents in witch mode you are).
press the [PAGE+] button to reach the
PLUGIN edit view
Press the button parallel to the sound in the
1
display and hold down the button for
2 SECONDS. This opens the PLUG-IN
folder, giving you fi ve PLUG-IN groups to
choose from.
V3
2
Select a PLUG-IN group.
Choose the PLUG-IN that you want.
CHANGE PLUG-IN SETTINGS
Briefly press the button next to the plug-in.
The first entry field will blink. Change the parameter to the value you want using DATA ENTRY.
HARM
DESKTOP
FAVORITE
9 - 16
SEND VALUE
NO PLUG IN
SOUND PARAM
SOLIST PARAMETER
Example: Setting the highest note:
Press and hold down the button next to the
display for 2 seconds.
Select the PLUG-IN group
SOLOIST PARAMETER
VOICING
In the display you will see LOW 1st G0
Press the parallel button briefly.
LOW is now blinking;
turn the DATA value to HIGH.
You have now applied the HIGH NOTE PLUG-IN to
this sound.
Press the SAVE button two times to save the
change.
38
HARM
DESKTOP
FAVORITE
9 - 16
LOW 1st G0
PLUG-IN DETAILS
PLUG-IN
SEND CONTROLLER
9 - 16
SEND MIDI-CONTROLLER
C00
V000
DESKTOP
FAVORITE
SEND C00 V000
sets the controller number
sets the value
MIDI CONTROLLER
SEND VALUE
SEND NRPN
SEND NRPN CONTROLLER
NRPN 00 00 00
An NRPN message is composed of three values.
CC 01
Modulation wheel
CC 05
Portamento time
CC 06
Data entry
CC 11
Expression
CC 64
Sustain Pedal
CC 71
Resonance
CC 74
Cutoff
CC 84
Portamento ON
NRPN messages are special parameters for sound
editing. You can find the list of which parameters
may be edited in your sound list details.
SEND VALUE
SEND RPN
SEND RPN CONTROLLER
RPN 00 00 00
RPN
An RPN message is composed of three values.
SEND VALUE
RPN 00 00 02
Pitch bend sensitivity
in half tones
02 stands for 2 half tones
SEND MSB LSB PRG
SEND MIDI CONTROLLER AND PROGRAM
MSB BANK 00
LSB BANK 00
PROGRAM NUMBER 00
V3SOUND sound boards do not need an LSB bank
parameter. This plug-in is only needed to control
products from other manufacturers.
39
PLUG-IN DESCRIPTION
SEND VALUE
To activate this PLUG-IN with FUNCTION
X, you must first assign one of the 3 FS pedals in the
GLOBAL MENU or in the REGISTRATION.
SEND BA-PR-VO X
This plug-in serves a very special purpose.
The BANK, PROGRAM, and VOLUME settings of this
PLUG-IN are exported when Controller X is activated.
Controller X can be activated with a foot pedal.
What’s special here is that the 3 messages are only
active as long as the foot pedal is pressed. As soon
as the foot pedal is released, the original values are
active again with the next press key. Those are the
values on the first two screens in the REGISTRATION
edit mode.
In other words, you can make a temporary sound
switch with this PLUG-IN.
PLUG-IN GROUP - SEND
Example: Grand Piano > < Brass Section
In this example, the sound of the Grand Piano in
BANK 00, PROGRAM NUMBER 01 has been selected.
Now, when the foot pedal is pressed, BANK 05,
PROGRAM 061 will be sent instead. And the next
pressed note will sound with this program.
Brass Section 061, which was created for SOLO-HIT,
is selected and the volume is also increased to 110,
since the SOLO should be somewhat louder.
As soon as you release the foot pedal, the original
setting is sent again, and the next pressed note will
sound with this program.
Use this function for brief sound changes. If you
want to change instrumentation, use the sound
SCENES instead.
REGISTRATION EXAMPLE
PARAMETER
PART 1
PART 2
PART16
SOUND
ORGAN
PIANO
-
SCENE I
ON
ON
OFF
SCENE II
OFF
ON
OFF
SCENE III
OFF
ON
OFF
SCENE IV
ON
ON
OFF
MIDI-CH
R
B
OFF
BANK
00
00
00
PROGRAM
017
001
001
VOLUME
100
100
100
PANORAMA
64
64
64
OUTPUT
MAIN
MAIN
MAIN
REVERB
40
00
40
CHORUS
00
00
00
ATTACK
64
64
64
DECAY
64
64
64
RELEASE
64
64
64
LOW KEY
50
1
1
HIGH KEY
127
49
127
NOTE SHIFT
0
0
0
OCTAVE
0
0
0
PLUG-IN 1
PLUG-IN 2
PLUG-IN 3
PLUG-IN 4
PLUG-IN 5
SEND VALUE
SEND BA-PR- VO Y
This is the same function as above and is another way
to change sounds using a foot pedal.
40
PLUG-IN 6
PLUG-IN 7
PLUG-IN 8
FOOT-SW
BA 05
PR 061
VO 110
PLUG-IN DETAILS
SOUND PAR AMETER
FINE TUNE
SEND MIDI-CONTROLLER.
Fine tune – cent
SOUND PAR AMETER
VIBR ATO
SEND MIDI-CONTROLLER.
A basic setting will be 55 - 75 - 64
Vibrato parameter RATE - DEPTH - DELAY
You can give each sound vibrato with this parameter. Rate is the speed; depth is how large the vibrato swells; and delay is the amount of time before
the vibrato starts.
SOUND PAR AMETER
VELOCITY
MANIPULATES the VELOCITY value
All incoming notes are manipulated.
PAR AMETER
This parameter is specially designed for MIDI
accordions and special basses for them. Baritone
horn and E-bass are recorded in 3 to 4 different
velocities (volumes). The MIDI accordion usually
plays at a value of 96. If you want to play the baritone horn or E-bass in pianissimo, set the VEL
+/- PLUG-IN value at -30.
MONO MODE ON
Monophonic - only one note is sounding.
41
TROMPETE Bb
Die Trompete in Bb klingt eine große Sekunde tiefer als notiert.
Prg. Nr. Name
48. Trompete Modell A dynamisch
PLUG-IN DETAILS
TROMPETE
Bb
50. Trompete Modell C dynamisch
49. Trompete Modell B dynamisch
Optionen
velocity switch weich/scharf
bei Wert 87/88
+ 36 stakkato
benötigte Polyphony Transpose Finale System
1
SOLIST
TRSekunde
ANSPOSE
Die
Trompete in BbOCT
klingt AUTO
eine große
tiefer als notiert.
51. Trompete Modell A
mezzoforte
-36 forte/scharfer
Klang
Prg. Nr.
Name
Optionen
Polyphony Transpose Finale System
These
the incoming
notes
52.PLUG-INS
Trompete manipulate
Modell B
Example:benötigte
Bb TRUMPET
+36
stakkato
so that
they remain
in the
natural range
of the
A Bb trumpet has a1range from (Bb)
F# togr.2
topaufwärts
C. Standard
plus 2#
48.
velocity
switch weich/scharf
53. Trompete
Trompete Modell
Modell A
C dynamisch
chosen instrument.
pieces
of
music
do
not
include
notes
beyond
this
range,
and
bei
Wert
87/88
1
49. Trompete Modell B dynamisch
it’s
always
recommended
to
stay
within
this
range.
+
36
stakkato
54. Trompete Modell D
50. AUTO
Trompete
Modell C dynamisch
OCTAVE
TRANSPOSE
1
55. Trompete Modell E
MIDI accordion players are used to varying their sounds
fer als notiert. 51. Trompete Modell A
mezzoforte
LO / LOW NOTE 000
by playing repeats an1 octave higher. The sound of the ac56. Trompete Modell F
+-36
36forte/scharfer
stakkato
Klang
HI / HIGH
NOTE
Modell
000
cordion becomes brighter and offers a beautiful contrast in
52. Trompete
B
en
benötigte
Polyphony
Transpose Finale System
+36 stakkato
1
the music.
(Bb) gr.2 aufwärts plus 2#
57. Trompete Modell
mit Dämpfer
Spitzdämpfer
1
y switch weich/scharf
53.
C
When a note is played that is outside of the set
But
in
practice,
when
a
MIDI
instrument
is played with
rt 87/88
1
range,
it
is
automatically
changed
by
an
octave
so
sampled
natural
instruments,
the
musician
is
used to inter54. Trompete Modell D
akkato
that it is played within that instrument’s range.
preting the piece just 1as she or he has always done it.
55. Trompete Modell E
That’s when the natural instruments are suddenly played
in a range in which they sound awful.
+ 36 stakkato
1
A trumpet at double top C does not sound like a trumpet.
Using the OCTAVE 1AUTO TRANSPOSE parameter, set
(Bb) gr.2Spitzdämpfer
aufwärts plus 2#
to LO 58 and HI 82, you will always remain in the appropriate range. You can play the piece on your MIDI insyou have been
usedSolo
to playing
it formit
years.
Die Modelle A ,B, C und D, E unterscheiden sich etwas im Klang.trument
Modell Fjust
istlike
vorgesehen
für eine
Trompete
stark
forte
56. Trompete Modell F
rte/scharfer Klang
akkato
1
57. Trompete mit Dämpfer
akkato
ämpfer
1
strahlendem Klang. Die Programme 48, 49, 50 wechseln ab velocity 88 von mezzoforte auf den scharfen forte Klang.
We recommend adjusting the range of 58-82 by one or two
1
values, ifdie
needed,
so the melody
doesn’t “jump”
too much.
Wenn Sie gezielt pro Note unabhängig von den dynamischen Zeichen
Klangvariation
weich/scharf
wechseln
wollen,
verwenden Sie das spezielle
SOLI-MUSIC
Vortragszeichen
+36.
1
Zusätzlich bieten die Programme 48 bis 56 stakkato Sampels. Diese bieten sich vor allem bei Sechzehntel
Noten
der gleichen
Charakteristisch
für Blasinstrumente
dass der für
nächste
StoßTrompete
nie
Die
Modelle
A ,B, C Tonhöhe
und D, E an.
unterscheiden
sich etwas
im Klang. ModellistFdabei,
ist vorgesehen
eine Solo
mit stark
hundertprozentig
gleich
klingt wie der
WechselnabSie
mit dem
Vortragszeichen
+36
jeden
zweiten
auf
strahlendem
Klang.
Die Programme
48,frühere.
49, 50 wechseln
velocity
88 von
mezzoforte auf
den
scharfen
forteTon
Klang.
stakkato.
Wenn Sie gezielt pro Note unabhängig von den dynamischen Zeichen die Klangvariation weich/scharf wechseln wollen,
verwenden Sie das spezielle SOLI-MUSIC Vortragszeichen +36.
Zusätzlich bieten die Programme 48 bis 56 stakkato Sampels. Diese bieten sich vor allem bei Sechzehntel
Noten
der [fis
gleichen
Tonhöhe für
an.eine
Charakteristisch
fürmit
Blasinstrumente
ist dabei, dass der nächste Stoß nie
Notation
- f3]
twas im Klang.
Modell
F ist
vorgesehen
Solo Trompete
stark
Spielbereich
Standard
range
hundertprozentig
gleich
klingt
wie
der
frühere.
Wechseln
Sie
mit
dem
Vortragszeichen
+36 jeden zweiten Ton auf
hseln ab velocity 88 von mezzoforte auf den scharfen forte Klang.
stakkato.
ynamischen Zeichen die Klangvariation weich/scharf wechseln wollen,
gszeichen +36.
Tone
Klang
[e bieten
- es3] sich vor allem bei Sechzehntel
Tone
ato Sampels.
Diese
Notation [fis
- f3] dass der nächste Stoß nie
für Blasinstrumente
ist dabei,
chseln Sie mit dem Vortragszeichen +36 jeden zweiten Ton auf
Variationen: forte und stakkato
Klang [e - es3]
Spielbereich
Trompete4Midi Note 16 - 51
Variationen: forte und stakkato
forte
42
Spielbereich
Trompete4Midi
MaximumNote
range
52 - 87
Trumpet
- notes 52-87
mezzoforte
Seite 32
Trompete4Midi Note 88 - 124
stakkato
PLUG-IN DETAILS
Bb
Bb KLARINETTE
CLARINET
Die Bb
Bb-Klarinette
klingt
eine second
große Sekunde
tiefer
als notiert.
The
clarinet plays
a major
lower than
its notation.
Notation [e - g3]
Spielbereich
Standard
range
Tone
Klang [d - f3]
MIDI note 50 - 84
Seite 21
Octave auto transpose is very important for E-bass
and contrabass.
The four-stringed E-bass and contrabass generally
only play as low as E.
Although Sepp Mattlschweiger can play as low as C
on the baritone horn, using C as the lowest note in
the baritone horn range is not always appropriate.
To have both options, you can set different baritone horn ranges in the SCENES or switch to the
instrument using the foot pedal X so that the low C
is heard only when you press the pedal.
There are many specialized bass programs available for TRADITION exclusive 200, with detailed descriptions of how best to apply them.
43
PLUG-IN DETAILS
SOLIST
VOICING
SOLIST
VOICING
The life of any kind of music is in its instrumentation.
As described previously, select the PLUG-IN
VOICING from the SOLOIST PARAMETER group.
Take Glenn Miller’s “In the Mood,” for example.
In the first part, only the saxophones play the famous phrase in unison, and then the accent is distributed across the entire orchestra.
LOW 1st G0 appears in the display.
In classical music, there is always an instrumentation. The notes are always spread over different
ranges and different instruments.
The first violins usually play the highest note, the
viola the second and cello takes the third; the contrabass plays the bass. Asking three cello players
to create a triad with three cellos only happens in
experimental pieces of music.
LOW 1st G0
In German folk music, the available instruments or
musicians tell you what kind of instrumentation
the piece can have.
If you only have one clarinet player, then only one
clarinet can be played. The dulcimer should not
be played in two voices.
A beautiful three-voice German folk movement
could translate to the following instrumentation:
The clarinet plays the highest voice and an accordion plays the second, complementary notes
below the clarinet, but not the highest ones. This
three-voice movement will sound open and natural. With the V3 DESKTOP, we can also set the stereo position, as in the original, so that one clarinet
is heard to the left and the two accordion voices
to the right.
Keyboarders and all other musicians who play MIDI
instruments are not used to playing this way, because until now, tone generators were not able to
produce stage quality instrumentations.
V3 DESKTOP makes any kind of instrumentation
possible.
There are three entries in this parameter described separately below.
Press the button parallel to the text in the display.
LOW will blink; set the following values by turning
the data entry controller.
LOW - LOW NOTE
The lowest note being pressed is what will be
played as the lowest note.
MID - MIDDLE NOTE
This sound is only played when more than two
notes are pressed at once. Only in that moment is
there a middle note. When more than three keys
are pressed, there is more than one middle note
and more than one will be heard.
HIGH - HIGH NOTE
The highest note being pressed is what will be
played as the highest note. If you press three
notes and let go of the highest note, then the next
lower note becomes the new highest note.
Press the button parallel to the text in the display.
1st will blink; set the following values by turning
the data entry controller.
1st - first note
This sound plays as soon as the first key is played.
2nd - begins with second note
This sound plays only when the second note is
pressed.
To the above description of instrumentations,
there’s one thing to remember:
If it sounds good, it’s possible.
44
PLUG-IN DETAILS
SOLIST
VOICING
Press the button parallel to the text in the display.
G0 will blink; set the following values by turning
the data entry controller.
SOLIST
TIME WINDOW
As described previously, select the PLUG-IN TIME
WINDOW from the SOLOIST PARAMETER group.
TIME WINDOW appears in the display.
G 0 - Grace note value 0
Use the grace note to set the half tone range for
what is not yet the second note.
Nothing can be changed in this parameter. Applying the PLUG-IN is all you need to do for its functions to work for you.
How to apply the grace note:
When you are using the PLUG-IN VOICING, you
naturally never press two keys at the same time.
This causes the notes to “jump” up and down.
Let’s use a clarinet and trumpet duet as an example:
When you set the clarinet sound to the PLUG-IN
HIGH NOTE and the trumpet to the LOW NOTE, you
will hear a nice duet when two notes are played.
Which begs the question:
What happens when I only press one key?
For this situation there is 1st and 2nd.
If you would like both sounds to play a note in unison, set both to 1st. This occurs often and will be
the desired setting.
The PLUG-IN TIME WINDOW smoothes out this
rough sound for you.
Just set the PLUG-IN and hear the results immediately.
Of course, you need to remember that the PLUGIN can’t work magic. You should always try to press
and release the keys as evenly as possible.
But when you want a solo for one of the two voices
(trumpet solo), set the clarinet to 2nd.
The clarinet will only play if you press two keys.
When you only press one key, you will only hear
the trumpet.
What happens when I play a grace note?
In this case, we have the problem that the trumpet
plays any time one key is pressed, but with grace
notes (think of the Radetzky March) two notes are
pressed at the same time, even though it’s only a
tenth of a second. Using the G 0 parameter – grace
note – you can set a range of 1 or 2 half tones in
which the 2nd note won’t be activated.
The result for a setting of G 2 is that the grace note
in the trumpet solo is played by the trumpet, just
as it should be.
This is where the final touches for solo instrumentation are added. At the same time, the 1st,
2nd and grace note parameters are crucial in applying instrumentation.
If you didn’t have these parameters, you wouldn’t be
able to play it.
In this tenth of a second the following happens:
The grace note briefly overlaps with the second
note. In this tenth of a second two notes are active.
In our system, there is always a higher and lower
note when two notes are played, meaning the grace
note would be played by the instrument set as the
high note.
This problem is solved with the G0 function.
45
PLUG-IN DETAILS
ARTIST Y=001
Special plug-in for new sounds coming in 2013.
DRUM PAR AMETER
NOTE FIXED
All notes will be routed to this number.
You can limit the notes with parameter LK & HK
(Low key - High key).
DRUM PAR AMETER
1 NOTE
The plug-in “1 Note” was specially developed for
LIVE percussion sounds played on the chord keys
of a MIDI accordion.
It allows you to play percussion sounds with MIDI
systems that do not have a drum channel.
The plug-in ignores all incoming notes as long as
one note is active.
The chord key on a MIDI accordion usually sends
3 notes together. But the drum application only
needs one note; other notes would lead to unpleasant phasing effects.
46
REGISTRATION – EDIT
[18] FOOT SWITCH
The settings for the following controllers can be
adjusted globally or individually for each REGISTRATION.
DESKTOP
PAG
FAVORITE
9 - 16
Foot switch
Foot pedal
LINK Function
FS1, FS2, FS3
PED
LINK
If you select the DEFAULT, the settings will be
GLOBAL.
FDI
DEFAULT
FDO DEFAULT
LINKSCEN DEF
FS1 DEFAULT
FS2 DEFAULT
FS3 DEFAULT
PED DEFAULT
FOOTSWITCH
GLOBAL settings can be defined under [FOOT
SWITCH] in the [EDIT] menu.
If you want to change the pedal settings for an
individual REGISTRATION, simply select that function.
Click the button parallel to the function you want
and turn the VALUE potentiometer to adjust it.
For detailed information on foot switch parameters and their functions, go to page 50.
47
EDIT COMBI - EDIT SOUND
COMBI PAR AMETER
All of the parameters described in the REGIST EDIT
menu can also be used in COMBI mode.
SOUND PAR AMETER
All of the parameters described in the EDIT REGIST
menu can also be used in a SOUND.
When you select a SOUND in a REGIST, all the parameters saved with the sound are automatically
copied to the REGIST.
USER SOUNDS – ONLY FOR PROS
Create a USER sound if you have a customized setting for a sound that you need more frequently.
All the parameters that you also need for a REGISTRATION can be pre-set and saved in the sound
file.
Your customized settings are then ready to go in
the registration when the sound is called up.
To do this, select a SOUND in SOUND mode.
Press the [EDIT] button.
In the right side of the display you will see SOUND.
Select SOUND to navigate to the SOUND EDIT
mode.
All the parameters that you now set will be saved
in the SOUND file, just like they would be in a REGISTRATION.
NOTE
Not all plug-ins are directly audible in SOUND
mode. Some become active after the sound is
called up from a REGISTRATION. For some parameters, the SOUND must also be saved and reopened before it becomes active.
48
SAVE
SAVE
Whether you are in the REGIST, COMBI or SOUND
mode, if you press 2 x the [SAVE] button, the current setting is stored on the current number on
your SD-CARD.
This process is to quickly secure updates.
We recommend that you raise this procedure
when you have invested so much time changes,
so it pays to save. It is not necessary to store after
each small change in volume, but possible.
SAVE TO X X X
To save the current REGIST, COMBI, or the SOUND
to another number:
DESKTOP
press the button [SAVE]
PAGE -
REG 08/001 Ballad 8
SAVE REGIST TO
press the button parallel to the current name
08/001 Ballad8 >>
SAVE
EXIT
DESKTOP
The display view folders on SD-CARD.
For example, if you save a REGISTRATION.
Select a folder with the USER name
by clicking the parallel key on the display.
REG 08/001 Ballad 8
03 User free
08 User free
10 Pop-Rock
00 User free
02 User free
09 Ballroom
11 SwingJazz
DESKTOP
Press the name on which the current
should be saved.
The display returns to the SAVE view and in the
second line shows now the selected file which will
be definitely stored when you press the [SAVE]
button again..
Press the [SAVE] button top left of the device
completes the save.
You also can use the key parallel to SAVE in display
to complete the save.
PAGE -
PAGE -
REG 08/001 Ballad 8
002 User
004 User
006 User
001 Start up
003 User
005 User
007 User
To rename a REGISTRATION read more on
page 63.
49
EDIT - GLOBALE SETTINGS - FOOT SWITCH
EDIT
FOOT SWITCH
Press the [EDIT] button once to view the menu options.
REGISTRATION
FOOT SWITCH
TUNE + SCALA
MIDI SETUP
Press the button parallel to [FOOT SWITCH]
to control the foot pedal settings.
UTILITY
Here you can select what function will be carried
out when you use the foot switch.
FDI OFF
FS1 SCENE I/II
FS2 SCENE III/IV
FDO OFF
FS3 XFUNKTION
LINKSZENE Off
PED Off
FOOT SWITCH - FS1 - FS2 - FS3
When you press the button parallel to any of the foot
pedals in the display, the entry blinks and you can
now change any of the functions for that controller.
The following functions are available for foot pedals FS1, FS2, and FS3:
OFF
START/STOP
TRANSPOSE
X FUNCTION
Y FUNCTION
(ON-OFF)
SCENE I
SCENE II
SCENE III
SCENE IV
SCENE I/II
SCENE III/IV
SCENE I-IV
call up SCENE I
-"-"-"switch I > II > I > II > I >
switch III > IV > III > IV
switch I > II > III > IV > I > II > III > IV
MAIN A
MAIN B
MAIN C
MAIN D
FILL 1
FILL 2
FILL 3
Call up a style variation
DC IN
PEDAL
FS1
COPY
FS2
FS3
LINK
SAVE
EDIT
LYRIC
SPLIT
MIDI-IN
THRU
CA1
HARM
FAVORITE
MIDI
FILE
STYLE
1
4
X
Y
50
MP3
INTRO 1
INTRO 2
INTRO 3
ENDING I
ENDING II
ENDING III
BREAK
9 - 16
SCALA
V3
2
3
HO
IE1
AF
IE2
F1
IE3
A
B
EDIT – GLOBAL SETTINGS – VOLUME PEDAL
VOLUME PEDAL
Potentiometer
100k
This parameter allows you to select which sounds
are affected by the volume control.
AUTO-FILTER
DC IN
If the volume pedal is activated on a sound, then
the incoming MIDI controller No. 11 (expression)
data is automatically filtered out on that MIDI
channel. It would not make sense to play piano
on the accordion while the foot pedal is on forte.
The volume pedal setting can also be used individually for each REGISTRATION.
This means that you can use the bellows dynamic
when the volume pedal for that sound in the REGISTRATION is turned OFF.
PEDAL
FS1
COPY
SAVE
FS2
LINK
EDIT
HARM
FS3
MIDI-IN
THRU
CA1
The MIDI controller 11 (expression) is for
dynamic volume changes from piano to forte.
MIDI accordions send this controller data when
the bellows pressure changes.
There are a number of ways the volume pedal
can be applied.
VOLUME PEDAL PAR AMETERS
OFF
R
R+L
R+L+B
R+L+B+D
L+B+D
volume pedal applies to all R sounds
-“R+L
-“R+L+B
-“R+L+B+D
-“L+B+D
The GLOBAL setting affects all default REGISTRATIONS.
If this setting is made directly in a REGISTRATION,
then this setting takes precedence over the GLOBAL setting.
Use GLOBAL for the settings you need most often; select the functions that deviate from those
in the REGISTRATION.
[L+B+D] means that you are using the volume
pedal on these sounds. LBD is controlled by the volume pedal, channel R is not controlled by footpedal
and therefore - you can use bellowdynmik - this
means
BLD is fixed with foot - R = bellow for solo
51
EDIT - GLOBAL SETTING
EDIT
TUNE
Press the [EDIT] button to view the menu options.
Press the button parallel to [TUNE] for the following selection:
TUNE 440Hz
Press the button parallel to TUNE 440Hz to select
the basic pitch for the V3 DESKTOP.
The standard setting is 440Hz.
Press [SAVE] to keep your changes and press [EX]
to exit the GLOBAL EDIT menu.
DISPLAY CONTR AST
To change the contrast of the display, press:
[EDIT]
[UTILITY]
[CONTRAST]
Change the value with the +/- buttons.
Press [SAVE] to keep your changes and press [EX]
to exit the GLOBAL EDIT menu.
52
REMOTE CONTROL
REMOTE CONTROL
Call up predefined V3 DESKTOP buttons with
simple MIDI messages.
MIDI-Controller number 20
START/STOP value 0
MAIN A
MAIN B
MAIN C
MAIN D
value 1
value 5
value 9
value 13
INTRO 1
INTRO 2
INTRO 3
value 17
value 18
value 19
ENDING 1
ENDING 2
ENDING 3
BREAK
value 21
value 22
value 23
value 25
MIDI-Controller number 21
LIVE SOUND SCENE
SCENE I
value
SCENE II
value
SCENE III
value
SCENE IV
value
1
2
3
4
STYLE SCENE
SCENE 1
SCENE 2
SCENE 3
SCENE 4
value 11
value 12
value 13
value 14
TRANSPOSE
ON/OFF
value 99
MIDI-Message
START/STOP - also possible to use
MIDI message FA - FC.
53
EDIT MIDI-SETUP
EDIT
MIDI SETUP
HARM
The V3 DESKTOP offers three MIDI setups. These are
automatically selected depending on which mode
you are in.
SOUND MODE
This setup is activated in the SOUND mode.
DESKTOP
FAVORITE
9 - 16
SOUND MODE
COMBI MODE
REGIST MODE 1
COMBI
This setup is activated in the COMBI mode.
R CH 01
LN001
HN 127 OCT 00
REGIST MODE 1
This setup is activated in the REGIST mode.
L CH 02
LN001
HN 127 OCT 00
B CH 03
LN001
HN 127 OCT 00
D CH 04
LN001
HN 127 OCT 00
[1] MIDI SETUP R - L - B - D
All the parameters can be selected by pressing the
button parallel to the item in the display.
To select an item that is in the same line but in the
second column, simply press the button parallel
to it again.
RLBD
are virtual MIDI channels that represent
the following MIDI channels.
RCH 01
LCH 02
BCH 03
DCH 10
LN 001 - HN127
LN 001 - HN127
LN 001 - HN127
LN 001 - HN127
Oct00
Oct00
Oct00
Oct00
LN-HN
Stands for the keyboard range on your instrument.
Oct - OCTAVE
Shifts the range by one octave.
> Press the [PAGE+/-] button.
54
These virtual MIDI channels gives the possibility to change quickly REGISTRATIONS
to other MIDI keyboard devices.
If you transfer REGISTRATIONS from a
5-octave keyboard to an electric organ with
two keyboards, you only need to change one
setting in the GLOBAL MENU, and all registrations assigned with R, L and B will function
without any other changes.
EDIT MIDI SETUP
[2] MIDI SETUP STYLE ARR ANGER
A CH02 LN001 HN127
MIDI channel for the style arranger’s chord recognition
ACH 1
LN001
HN 127
TCH off
LN001
HN 127
T CHOff LN000 HN000
Not activated in the software version.
Press the [PAGE+/-] button
[3] MIDI SETUP FILTER & MORE
SYSEX PB AT PA CC PRG CHANGE
Use this field to activate a MIDI filter for certain type
of data on the MIDI IN port.
GLOBAL PRG CH - OFF/1-16
Use the global program change to switch registrations with MIDI. The bank command selects the
REGIST folder; the program change selects the
REGISTRATION.
Setting the GLOBAL CHANNEL to CH16
produces the following: you can select the registration 10 in the folder 90 using the bank command
(CC0) MSB 90 followed by the program change
(PC) n.10 on MIDI channel 16.
NAME
Enter the name you want here.
> Press the SAVE button to save your settings.
MIDI setup for keyboards with only one MIDI
channel:
R CH 01
L CH 01
B CH off
D CH off
LN 055 - HN0127
LN 001 - HN154
LN 001 - HN127
LN 001 - HN127
A CH 01
LN 055 - HN0127
Oct00
Oct+03
Oct00
Oct00
55
SCALA & TRANSPOSE BUTTONS
[SCALA] BUTTON
For Oriental music, the [SCALA] button allows you
to change the tuning by pitch.
Press the [SCALA] button.
Press a key on MIDI channel R.
This note will be pitched 50 percent lower.
You also can use this micro-tuning on all 32 MIDI
channels or only on 16 live-play MIDI channels.
ALL
LIVE
all MIDI channels
only 16 live sounds change in pitch
[TR ANSPOSER] BUTTON
Press and hold down the [TRANSPOSE] button for
2 seconds. For the next 2 seconds you can see the
TRANSPOSE value at the bottom of the display and
change it by turning the knob of the VALUE pot.
The display then automatically switches back to
the homepage screen.
DESKTOP
PAGE +
2ND
PAGE -
TRANS
MAIN
VOLUME
The TRANSPOSE value “x” and its ON/OFF status
(LED lights up when activated) are saved separately in each REGISTRATION.
SOUND
To use the TRANPOSE function in a REGISTRATION:
COMBI
Everything is transposed when the pre-set TRANSPOSE function with the value “x” is called up using
the REGISTRATION (LED is lighted).
+00
I
IV
II
III
The value of the transposition is activated and set
after you have started to play. It can also be activated with a foot pedal. All areas are transposed:
LIVE, TRACK, MIDI file and STYLE. The MP3 player is
NOT transposed.
56
REGIST
1
LIMEX
V3SOUND
2
3
E
X
TROUBLESHOOTING / BUTTON OPTIONS
DEVICE WILL NOT START – BLINKING
Only use the original power adapter without a ferret.
BUTTONS - OPTIONS
In the software version 1.30, the following buttons
are not active:
2ND
SPLIT
LYRIC
FADE IN/OUT
HO - HOLD
57
LINK SCENE – OVERVIEW
STRESS-FREE PLAY
The following is a brief overview of how the operation of the V3 DESKTOP makes your performance
so easy it’s stress-free.
The concept is to trigger many different functions
with one switch.
Using SCENES I, II, III, and IV, you can switch the
sounds of your LIVE play, as previously described.
FILE
STYLE
1
4
X
Y
I
V3
REGIST
IV
II
2
III
1
SCENES 1, 2, 3, and 4 allow you to change the
STYLE variations as well as which track of the style
will be played back in each SCENE. These settings
are saved for each REGIST.
To accomplish our goal — pressing as few control
buttons as possible while playing — all we need to
do now is coordinate the LIVE and STYLE scenes.
1+I
2 + II
3 + III
Example
SCENE 1 = MAIN B
SCENE 2 = MAIN D
LIMEX
V3SOUND
3
2
3
Track 7 Tambourine off
Track 7 Tambourine on
4 + IV
LINK ON/OFF
When LINK is turned ON, then a switch from SCENE
I to SCENE II (Live parts) switch also the SCENE 1 to
SCENE 2 (Playpack parts).
The following four parameters can happen when
just press I to II.
LIVE Sounds variation is switched.
COPY
STYLE variation is switched.
When AF (auto fill) is ON, a fill-in plays.
LINK
SAVE
EDIT
LYRIC
SPLIT
CA1
HARM
FAVORITE
TRACK ON/OFF
SCALA
16 LIVE sounds
LIVE sounds turn on/off.
58
MP3
E
X
9 - 16
LINK SCENE – OVERVIEW
2
FS3
MIDI-IN
CA1
OUT-A
OUT-B
AUX L
AUX R
MAIN L
MAIN R
VORITE
PHONES
VALUE
CA2
PAGE +
2ND
To trigger more than one
function with one
but- TRANS
DESKTOP
PAGE ton, you must set and save this information in
SCENES 1, 2, 3, and 4. It sounds more complicated
than it is.
9 - 16
2
THRU
LINK EX AMPLE
MAIN
VOLUME
Press the [2] button and [MAIN B].
SOUND
Press the [3] button and [MAIN D].
COMBI
Press the [1] button and [MAIN A].
I
V3
IV
What you have done so far:
2
REGIST
II
Until now, you have been able to press the MAIN
B and MAIN D buttons directly.
III
When you press the [2] button, MAIN B is active.
When you press the [3] button, MAIN D is active.
AF
F1
F2
1
2
3
4
5
6
7
8
9
0
+
F3
Now the settings can be fine-tuned.
IE3
LIMEX
You A
want to B
use MAIN
C D, but
Dyou don’t
BR want to- use
the tambourine on track 7 until the repeat.
E
X
E
N
T
E
R
Press the [4] and [MAIN D] buttons.
the [PAGE+] button 4 times to view the track ON/MUTE screen.
You see that TRACK 7 is ON.
The tambourine is playing.
Press the [3] button to view the track
ON/MUTE screen for SCENE 3.
TRACK 7 is ON.
Select MUTE.
Result:
When you press the [3] button, MAIN D is active and
the tambourine on track 7 is not playing.
When you press the [4] button, MAIN D is active and
the tambourine is playing.
The TEMPO and TRACK volumes can only be
saved in a REGISTRATION one time.
59
LINK SCENE – EXAMPLE WITHOUT TEMPLATE
LIVE SOUND SCENE CREATION
STYLE SCENE CREATION
SETUP – LIVE SOUND SCENE I
SETUP – STYLE SCENE 1
Select a free USER REGISTRATION.
Press the top button on the right of the display.
This brings up the sound category screen.
Select piano and then first piano.
Sound is now highlighted,
press again to confirm your selection.
Press the second button from the top on
the right of the display.
This brings up the sound category screen.
Press the [STYLE] button.
This brings up the category screen.
Press “BALLAD.”
This opens the ballads folder.
Select 01 Ballad 8.
When you start the STYLE arranger now, you will
hear STYLE Ballad 8.
Press the [PAGE+] button.
Select the “String ens” category.
Select the sound “051 SYString.”
Sound is now highlighted,
press again to confirm your selection.
Press the [PAGE+] button 2 times to change the volume if needed.
You now hear piano and strings.
SETUP – LIVE SOUND SCENE II
SETUP – STYLE SCENE 2
Press the SCENE button [II] on the right of the display.
select a style variation.
This variation will happen when change from Scene I to II.
Now you can choose again sounds.
Press the third button from the top on the
right of the display.
Press the [2] button left of the display and
Press the [MAIN C] button.
This brings up the category screen.
Select the ORGAN category.
Select “017 OrgDrawP.”
Now you hear an organ on your keyboard. With
the [I] and [II] buttons, you change the sounds being played LIVE.
LINK FUNCTION ON
Press the [HARM] button on the top left of the 60
device and hold it down for 2 seconds.
MORE INFORMATION
MANUAL BASS - REGIST 68-89
When you press the [9-16] button, you switch to
the sounds 9-16 in the display.
Some of the sounds 9-16 are active when you call
up a REGISTRATION from folders 68-89.
Bass and chord sounds for MIDI accordion players
are preset.
With a simple click on PART buttons 15 and 16, you
can also activate manual drums.
Press the [9-16] button and then the [PAGE+] button.
This brings up the sounds display part on/off.
On the left side of the display, you see the sounds
that can be activated on the bass channel.
On the right side of the display, you see the sounds
that can be activated on the chord keys.
DRUM COMPUTER - REGIST 68-89
Press [START] and the Style Arranger will play just
the drum sounds.
61
OVERVIEW - DATABASE
DATA MANAGEMENT
SD CARD
The V3 also sets new standards in data management.
One SD memory card contains the entire data system.
A simple copy of your data on a PC ensures that you
have a backup of all your data.
Open the SOUND folder to find all the subfolders of
what is available to you, depending on which V3SOUND
sound boards are installed.
00 BANK GM
03 Voicing123
04 Left & Bass
05 Bank GMV
In this example you can see the contents of the sound folder for
HQ260 sound board.
Open the REGIST folder to find the subfolder for the
sound board you have installed.
08 Ballad
09 Ballroom
10 Pop-Rock
11 Swing
Open this REGIST subfolder to find the individual
registration files.
001 Endless
002 Knockin
003 DontKnow
004 Angels
005 SmokEyes
The name of the folder is also the name
of the category. You can simply copy a folder
and give it your own name. Remember: The
folder name must begin with two digits.
006 KillSoft
007 Strangers
008 BDolphine
009 Adeline u.v.m.
You can copy the data individually, in a group or all of
it at once; put it in a different folder.
We recommend using up to 12 letters if you change
names, and of course the file ending .rgi should not
be erased.
The advantage of this data management system
is that you can easily share REGISTRATIONS
with friends without needing a special PC Editor
or a USB connection.
New registrations are continually being created by
V3SOUND and are available free as a download
online under support at www.v3sound.com.
62
FILE RENAME - RENUMBER - CREATE FOLDER
RENAME
Each file on the SD card can be changed with a conventional computer that has an SD card port. You can
also create your own folders to structure your music
program.
Please observe the following rules:
FOLDER NAME
The folder name must begin with two numbers.
This number can only be used once.
For the following characters each letter can be used
(except Ä-Ö-Ü ß and special characters) and each
number.
REGISTRATION NAME
The name of a REGISTRATION must begin with three
numbers. This number can be used only once within
the folder. For the following letters each letter may
be used (except Ä-Ö-Ü ß and special characters) and
each number.
MIDI-FILES AND MP3 FILE NAME
We recommend to use a maximum of 99 files
in a folder.
Labeled 01 to 99. Only you have the opportunity to
easily determine the order of songs in the display
with the number at the beginning.
MORE INFORMATION
The respective endings .rgi .cmb. snd should not be
deleted.
The display shows only 12 letters. While longer names are possible, but will not be displayed.
TWO BANDS
Many musicians play in different bands.
The same two songs are often needed with different
sound settings. Copy the complete folder of the
REGISTRATIONS you have prepared for the first band
and rename it.
Thus, all ready-made settings as independent copies
ready, and you need to make the changes for your
second band only in this folder.
63
OVERVIEW – DATABASE
SOUND CATEGORIES – GROUPS
Press the [SOUND] button to view the sound categories.
There are 32 categories assigned by the manufacturer.
In REGISTRATIONS and STYLES, the folder name is
also the category name.
If you create your own REGIST folder 77 and call it
77 Carnival, you can copy your REGISTRATION to
that folder, thus creating your own category.
The sounds are organized differently since they
can be expanded. The sound expansions can be
added later, but need to appear in their respective
categories.
All of this is handled for you with a small database.
Every sound in a category is shown in the display,
regardless of which sound board is installed, and
even if you add a sound board later.
Up to 128 files per folder are recommend.
01. Piano
02. E-Piano
03. Tuned keys - Harpsichord
04. Organ
05. Accordion
06. Guitar
07. Bass
08. Strings – various string instruments
09. Strings solo
10. Strings ensemble
11. Choir
12. Trumpet
13. Brass solo
14. Brass ensemble und bass
15. Clarinet
16. Saxophone
17. Woodwinds – various woodwind instruments
18. Percussion instruments – xylophone, marimba
19. Synth lead
20. Synth pad
21. Synth bell
22. Synth bass
23. Synth effect
24. Ethnic
25. Percussion & drums
26. Sound effect
27. Instrument effect
28. Chord sounds – complete chords
29. Chord guitar – complete chords
30. Drum mode kit – only for MIDI channel D10
31. 32. User
SOUND FOLDER
All sound files are located in the sound folder on
the SD card. The assignment of sounds to categories has been preprogrammed by the manufacturer.
SOUND FOLDER ON SD-CARD
00. GM bank
03. Solo 3rd (solo sound, 1st, 2nd, 3rd voice)
04. Left & Bass (special sound for play on the left hand)
05. GMV bank (GM variations)
and much more
Page 65
INSTALLATION SOFTWARE
UPDATE V3 DESKTOP - SOFTWARE
Every new version of the operating software will
expand the available functions.
Go to out website www.v3sound.com
and access the Support page.
Save the file
V3 DESKTOP - Operating system X.XX” (.zip)
to your computer.
SD CARD
If your V3 DESKTOP already displays this version
when you turn it on, you can skip this procedure.
DC IN
PEDAL
FS1
COPY
FS2
FS3
SAVE
EDIT
SPLIT
THRU
OUT-A
OUT-B
AUX L
AUX R
MAIN L
MAIN R
CA1
HARM
CA2
DESKTOP
FAVORITE
PAGE +
2ND
PAGE -
TRANS
desktop.hex
MAIN
VOLUME
9 - 16
SCALA
PHONES
VALUE
LINK
LYRIC
MIDI-IN
This file may remain on your SD memory card
until the next update, or you may delete it immediately after completing the update.
Copy the contents of the .zip file –
the desktop.hex file – to an SD memory card.
MP3
SOUND
DC IN
MIDI
FILE
PEDAL
FS1
1
I
V3
IV
Put your SD memory card into the CA1 slot
4
on your V3 DESKTOP.
MIDI-IN
THRU
OUT-A
OUT-B
AUX L
AUX R
MAIN L
MAIN R
2
SCALA
IE1
AF
IE2
F1
IE3
A
F2
B
1
2
MP3
3
4
5
6
7
8
Press and hold down the ENTER button
at the same time you
BR
-
E
N
T
E
R
9
STYLE
0
+
X
Y
TRANS
MAIN
VOLUME
SOUND
COMBI
1
I
V3
IV
REGIST
II
2
III
3
HO
AF
F1
F2
LIMEX
1
2
4
5
6
3
7
8
9
F3
All the LEDs light up during updates starting in
software version 1.30.
IE1
Wait for the text coming on display.
2ND
PAGE -
9 - 16
4
Turn on your V3 DESKTOP.
D
PAGE +
E
X
MIDI
FILE
F3
C
DESKTOP
LIMEX
3
HO
HARM
CA2
FAVORITE
III
Y
EDIT
IE2
IE3
A
B
C
D
BR
-
0
+
Release the ENTER button
The update will take approximately
10 seconds.
Finished
SD CARD
SD CARD - COPY DATA
Copy all of the data with the label “SD Card Contents” to your SD card.
Copy the contents of the .zip file, not the .zip file
itself, to your SD card.
66
PHONES
VALUE
CA1
REGIST
SPLIT
LYRIC
II
X
FS3
LINK
SAVE
STYLE
FS2
COMBI
COPY
Registrations and the operating system are continually being updated and developed. We recommend you check our Internet site from time to time
for the latest updates.
E
X
E
N
T
E
R
INSTALLATION OF SOUND BOARD
Should you obtain the V3SOUND sound board as a
standalone product, please note that its installation in the V3 DESKTOP housing may only be carried
out by experienced technicians.
INSTALLATION
Unplug the device from its power supply
and any other connections.
Unscrew the six screws (3 on the left and
right sides, just below the top of your V3 DESKTOP).
The main board is fixed with 5 screws.
Unscrew these 5 screws and gently pull the main
board forward.
Plug in the sound board and screw it into
place on the underside with two screws.
Guide the main board slowly back into
position with the outputs and power supply.
Fix the main board again to the housing with
five screws, and replace the top of the housing and fix it with the screws on both sides.
Copy the software package for your sound
board to your SD card.
COMPATIBILITY
Only designated V3SOUND sound boards may be
used with V3 DESKTOP. These boards carry the
V3SOUND label.
Side view pictured here.
However, the procedure is done inside the housing.
INFORMATION FOR DEVICES
DELIVERED BEFORE OCTOBER 2011:
If you already own a TRADITION 200 sound
board and want to add the HQ260, you need to
update TRADITION 200. The sound board must
be sent to us for the update; the update is free.
67
STYLE ARRANGER CHORD SCAN TYPES
FINGERED
SHORT VERSION
C
Root position
C
First inversion
C
Second inversion
C
Cm
Root position
Cm
First inversion
Cm
Second inversion
Cm
Cdim
First inversion
Cdim
Cdim
Second inversion
Cdim7
use only Root position
Cb5
Cb5
Cb5
Caug
use only Root position
Csus4
Csus4 Second inversion
only second inversion possible
Csus2
use only Root position
C
1+5
use only Root position
68
STYLE ARRANGER CHORD SCAN TYPES
FINGERED
SHORT VERSION
C6
use only Root position
C6/9
use only Root position
Cadd9
use only Root position
Cmaj7
Cmaj7
Cmaj7
use only Root position
and short versions
Cmaj7/9
use all 4 inversions possible
and all 4 versions without note G
x
can be omitted
Cmaj7/9/#11
x
can be omitted
Cmaj7/b5
Cmaj7aug
69
STYLE ARRANGER CHORD SCAN TYPES
FINGERED
SHORT VERSION
Cm6
all 4 inversions possible
Cm7
Cm7
x
can be omitted
Cmadd9
Cm7/b5
Cm7/9
x
can be omitted
Cm7/9/11
x
x
can be omitted
can be omitted
Cmmaj7
Cmmaj7/9
Cmmaj7/b5
70
Cm7
x
can be omitted
Cm7
x
can be omitted
all 3 inversions possible
STYLE ARRANGER CHORD SCAN TYPES
FINGERED
SHORT VERSION
C7
C7
all 3 inversions possible
C7/9
C7sus4
C7add13
C7/b9
C7/#9
C7aug
C7/b5
C7/9/#11
C7/b13
71