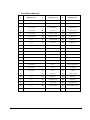
Download Function Key Programming
Transcript
ER-380M Operation and Program Manual All specificaitons are subject to change without notice Precaution Statements Follow these safety, servicing and ESD precautions to prevent damage and to protect against potential hazards such as electrical shock. 1-1 Safety Precautions 1. Be sure that all built-in protective devices are replaced. Restore any missing protective shields. 2. When reinstalling the chassis and its assemblies, be sure to restore all protective devices, including non-metallic control knobs and compartment covers. 3. Make sure there are no cabinet openings through which people - particularly children - might insert fingers and contact dangerous voltages. Such openings include excessively wide cabinet ventilation slots and improperly fitted covers and drawers. 4. 5. Design Alteration Warning: Never alter or add to the mechanical or electrical design of the SECR. Unauthorized alterations might create a safety hazard. Also, any design changes or additions will void the manufacturer’s warranty. Components, parts and wiring that appear to have overheated or that are otherwise damaged should be replaced with parts that meet the original specifications. Always determine the cause of damage or over-heating and correct any potential hazards. CAUTION Danger of explosion if battery is incorrectly replaced. Replace only with the same or equivalent type recommended by the manufacturer. Dispose of used batteries according to the manufacturer’s instructions. 6. Observe the original lead dress, especially near the following areas: - sharp edges, and especially the AC and high voltage supplies. Always inspect for pinched, out-of-place, or frayed wiring. Do not change the spacing between components and the printed circuit board. Check the AC power cord for damage. Make sure that leads and components do not touch thermally hot parts. 7. Product Safety Notice: Some electrical and mechanical parts have special safety-related characteristics, which might not be obvious from visual inspection. These safety features and the protection they give might be lost if the replacement component differs from the original - even if the replacement is rated for a higher voltage, wattage, etc. Components that are critical for safety are indicated in the circuit diagram by shading, ( ) or ( ). Use replacement components that have the same ratings, especially for flame resistance and dielectric strength specifications. A replacement part that does not have the same safety characteristics as the original might create shock, fire or other hazards. 1-2 Servicing Precautions WARNING: First read the-Safety Precautions-section of this manual. If some unforeseen circumstance creates a conflict between the servicing and safety precautions, always follow the safety precautions. WARNING: An electrolytic capacitor installed with the wrong polarity might explode. 1. Servicing precautions are printed on the cabinet. Follow them. 2. Always unplug the units AC power cord from the AC power source before attempting to: (a) Remove or reinstall any component or assembly (b) Disconnect an electrical plug or connector (c) Connect a test component in parallel with an electrolytic capacitor 3. 4. Some components are raised above the printed circuit board for safety. An insulation tube or tape is sometimes used. The internal wiring is sometimes clamped to prevent contact with thermally hot components. Reinstall all such elements to their original position. After servicing, always check that the screws, components and wiring have been correctly reinstalled. Make sure that the portion around the serviced part has not been damaged. 1-3 1. 2. 5. Check the insulation between the blades of the AC plug and accessible conductive parts (examples : metal panels and input terminals). 6. Insulation Checking Procedure: Disconnect the power cord from the AC source and turn the power switch ON. Connect an insulation resistance meter (500V) to the blades of AC plug. The insulation resistance between each blade of the AC plug and accessible conductive parts (see above) should be greater than 1 megohm. 7. Never defeat any of the B+ voltage interlocks. Do not apply AC power to the unit (or any of its assemblies) unless all solid -state heat sinks are correctly installed. 8. Always connect an instrument’s ground lead to the instrument chassis ground before connecting the positive lead; always remove the instrument’s ground lead last. Precautions for Electrostatically Sensitive Devices (ESDs) Some semiconductor (solid state) devices are easily damaged by static electricity. Such components are called Electrostatically Sensitive Devices (ESDs); examples include integrated circuits and some fieldeffect transistors. The following techniques will reduce the occurrence of component damage caused by static electricity. Immediately before handling any semiconductor components or assemblies, drain the electrostatic charge from your body by touching a known earth ground. Alternatively, wear a discharging wriststrap device. (Be sure to remove it prior to applying power - this is an electric shock precaution.) 3. After removing an ESD-equipped assembly, place it on a conductive surface such as aluminum foil to prevent accumulation of electrostatic charge. 4. Do not use freon-propelled chemicals. These can generate electrical charges that damage ESDs. 5. Use only a grounded-tip soldering iron when soldering or unsoldering ESDs. 6. Use only an anti-static solder removal device. Many solder removal devices are not rated as anti-static; these can accumulate sufficient electrical charge to damage ESDs. 7. Do not remove a replacement ESD from its protective package until you are ready to install it. Most replacement ESDs are packaged with leads that are electrically shorted together by conductive foam, aluminum foil or other conductive materials. 8. Immediately before removing the protective material from the leads of a replacement ESD, touch the protective material to the chassis or circuit assembly into which the device will be installed. 9. Minimize body motions when handling unpackaged replacement ESDs. Motions such as brushing clothes together, or lifting a foot from a carpeted floor can generate enough static electricity to damage an ESD. Contents Getting Started 1 About the ER-380.....................................................................................................................................1 Unpacking ..................................................................................................................................................2 Installing the Paper...................................................................................................................................2 Basic Features and Functions.................................................................................................................7 Standard Hardware....................................................................................................................7 Optional Hardware ....................................................................................................................7 Software Features......................................................................................................................7 Display........................................................................................................................................8 Control Lock.............................................................................................................................11 Keyboards................................................................................................................................12 Operating Instructions 13 Function Key Descriptions....................................................................................................................13 Clerk Sign-On/Sign-Off...........................................................................................................................18 Direct Sign-On .........................................................................................................................18 Coded Sign-On ........................................................................................................................18 Receipt On and Off..................................................................................................................................19 Training Mode.........................................................................................................................................20 Item Registrations ...................................................................................................................................21 Open Keyboard PLU Entry ....................................................................................................22 Preset Price Keyboard PLU....................................................................................................22 Keyboard PLU Repeat Entry .................................................................................................23 Keyboard PLU Multiplication ...............................................................................................24 Keyboard PLU Multiplication with Decimal Point .............................................................25 Split Pricing (Keyboard PLU) ................................................................................................26 Single Item Keyboard PLU.....................................................................................................27 Open Code Entry PLU ............................................................................................................28 Preset Price Code Entry PLU .................................................................................................28 Code Entry PLU Multiplication.............................................................................................29 Code Entry PLU Multiplication with Decimal Point...........................................................30 Split Pricing Code Entry PLU.................................................................................................30 Modifier Key............................................................................................................................31 Price Level Key........................................................................................................................32 Promotion .................................................................................................................................33 Waste ........................................................................................................................................34 Price Change Item....................................................................................................................35 Percent Key Operations .........................................................................................................................36 Preset Percent Discount on an Item.....................................................................................36 Enter a Percent Discount on an Item....................................................................................37 Percent on Sale Total..............................................................................................................37 Coupon on Sale (Vendor Coupon).......................................................................................38 Coupon on Item (Store Coupon)...........................................................................................39 Return Merchandise Registrations.......................................................................................................40 Voids and Corrections............................................................................................................................41 Error Correction (Void Last Item) ..........................................................................................41 ER380 Contents • i Void Previous Item..................................................................................................................41 Cancel........................................................................................................................................43 Void Position Operations.......................................................................................................43 No Sale Operations .................................................................................................................................44 Open Drawer............................................................................................................................44 Non Add Number....................................................................................................................44 Received On Account Operations........................................................................................................45 Paid Out Operations................................................................................................................................46 Subtotalling a Sale...................................................................................................................................47 Totalling and Tendering.........................................................................................................................48 Totalling a Cash Sale ..............................................................................................................48 Totalling a CHEQUE Sale .......................................................................................................48 Tendering a Cash Sale ............................................................................................................49 Tendering a CHEQUE Sale.....................................................................................................49 Totalling a Charge Sale...........................................................................................................50 Tendering a Charge Sale ........................................................................................................51 CHEQUE Cashing....................................................................................................................52 Split Tender..............................................................................................................................53 Post Tender..............................................................................................................................54 Currency Conversion..............................................................................................................55 Not Found Key Operation .....................................................................................................56 Table Management and Clerk Interrupt Operations ..........................................................................57 Overview...................................................................................................................................57 Soft Check................................................................................................................................58 Hard Check...............................................................................................................................61 X Mode 63 Introduction .............................................................................................................................................63 X Reports..................................................................................................................................................64 Running a Report – General Instructions............................................................................64 Report Table.............................................................................................................................65 Cash Declaration .....................................................................................................................................67 Service Mode Programming 68 Overview...................................................................................................................................................68 Ram Clear & Memory Allocation..........................................................................................................69 Clear Totals ..............................................................................................................................................71 Clear Grand Totals ...................................................................................................................................71 Clear PLU File...........................................................................................................................................72 Eprom Information...................................................................................................................................72 Memory Allocation.................................................................................................................................72 Load Default Keyboard ..........................................................................................................................72 Initial Clear................................................................................................................................................73 PC Online Mode ......................................................................................................................................73 Function Key Assignment Programming ............................................................................................74 Function Key Codes ...............................................................................................................75 RS232C Port Options ..............................................................................................................................76 Program Mode Programming 79 Default Programming ..............................................................................................................................79 Descriptor Programming Methods .......................................................................................................79 Program Overlay Method.......................................................................................................80 Descriptor Code.......................................................................................................................81 Tax Programming.....................................................................................................................................82 Straight Percentage Tax Rate Programming ........................................................................82 ii • Contents ER380 PLU Programming....................................................................................................................................84 Program 100 - PLU Status Programming ..............................................................................85 Program 150 - PLU Group Assignment ................................................................................88 Program 200 - PLU Price/HALO Programming....................................................................89 Program 250 - PLU Stock Amount Programming................................................................91 PLU Stock Programming By ADD / DEDUCT / OVERWRITE KEY................................92 Program 280 - PLU Minimum Stock Amount Programming ..............................................93 Program 300 - PLU Descriptor Programming.......................................................................94 Program 350 - PLU Link Programming..................................................................................95 Program 400 – PLU Delete Programming .............................................................................96 Program 450 - PLU MIX & MATCH Programming ............................................................97 Program 999 – ALL PLU Programming.................................................................................98 System Option Programming...............................................................................................................100 System Option Table ............................................................................................................101 Print Option Programming....................................................................................................................106 Print Option Table .................................................................................................................107 Function Key Programming.................................................................................................................112 Program 70 - Function Key Options...................................................................................113 Program 80 - Function Key Descriptor...............................................................................114 Program 90 - Function Key HALO......................................................................................115 ADD CHECK - Function Key Programs ............................................................................116 CANCEL - Function Key Programs ....................................................................................117 CASH - Function Key Programs .........................................................................................118 CHARGE1-8 - Function Key Programs ..............................................................................119 CHEQUE - Function Key Programs ....................................................................................121 CHEQUE CASHING - Function Key Programs .................................................................123 CHEQUE ENDORSEMENT - Function Key Programs ....................................................124 CHECK # - Function Key Programs ...................................................................................125 CURRENCY CONVERSION - Function Key Programs ...................................................126 ANALYSIS - Function Key Programs ................................................................................127 ERROR CORRECT - Function Key Programs ...................................................................128 F/S TEND - Function Key Programs ..................................................................................129 GUEST - Function Key Programs .......................................................................................130 PRICE LEVEL1-2 - Function Key Programs .......................................................................130 #/N0 SALE - Function Key Programs ................................................................................131 RETURN - Function Key Programs ....................................................................................133 LEVEL MODIFIER 1-5 - Function Key Programs .............................................................134 PAYMENT - Function Key Programs ................................................................................135 PBAL - Function Key Programs ..........................................................................................135 PROMOTION- Function Key Programs ............................................................................136 PRICE CHANGE - Function Key Programs .......................................................................137 PRICE INQUIRE - Function Key Programs .......................................................................138 STOCK INQUIRE - Function Key Programs .....................................................................139 PAID OUT1-3 - Function Key Programs ...........................................................................140 PRINT CHECK - Function Key Programs ..........................................................................141 RECD ON ACCT1-3 - Function Key Programs .................................................................142 SERVICE - Function Key Programs ....................................................................................143 SUBTOTAL - Function Key Programs ..............................................................................144 TAX EXEMPT - Function Key Programs ..........................................................................145 TIP - Function Key Programs ..............................................................................................146 VALIDATE - Function Key Programs ...............................................................................147 VOID - Function Key Programs ..........................................................................................148 WASTE - Function Key Programs .....................................................................................149 %1- %5 - Function Key Programs ......................................................................................150 Clerk Programming ................................................................................................................................152 Program 800 - Secret Code Programming...........................................................................153 Program 801 - Clerk Status Programming..........................................................................154 Program 810 - Descriptor Programming..............................................................................155 ER380 Contents • iii Mix & Match Programming..................................................................................................................156 Program 600 - Trip Level Programming ..............................................................................157 Program 601 - Price Programming........................................................................................157 Program 610 - Mix & Match Descriptor Programming.....................................................158 Group Programming ..............................................................................................................................159 Miscellaneous Programming ...............................................................................................................161 Macro Key Sequence Programming...................................................................................161 Logo Descriptor Programming ............................................................................................162 NLU Code Number Programming........................................................................................169 Cash-In-Drawer Limit Programming....................................................................................170 Cheque Change Limit Programming ...................................................................................171 Date and Time Programming................................................................................................172 Machine Number Programming...........................................................................................173 Training Mode Password.....................................................................................................174 EURO Rounding Programming............................................................................................175 MACRO Schedule Programming ........................................................................................176 Program Scans .......................................................................................................................................177 iv • Contents ER380 Getting Started About the ER-380 • The ER-380 features a 44-position keyboard with traditional raised keys. This keyboard will accommodate up to 12 NLU keys and works best in retail stores, or shops where it is not necessary to place a large number of preset item keys on the keyboard. ER-380 is an excellent low cost solution for a wide range of retail environments. ER-380, with its superb thermal printing system, always provides the fastest in transaction speeds. ER380 Getting Started • 1 Unpacking 1. Unpack and unwrap the cash register. 2. Located in the packing are the following items: • 1 Rolls of paper and paper spindle, • 2 sets of control keys, • Operation and Program Manual, 3. Remove the cardboard protectors from the cash drawer. 4. Plug the register into a grounded outlet (three prong), insert a control key and turn the key to the REG control lock position. Installing the Paper 1. Remove the printer cover. 2 • Getting Started ER380 2. Push the blue cap lever and then lift up to open the paper cover. ER380 Getting Started • 3 3. Ensure that the paper is being fed from the bottom of the roll. 4. Put the the leading edge of the paper over the printer 5. Close the paper cover slowly until it locks firmly 4 • Getting Started ER380 6. Passing the leading edge of the paper through the cutter slot. Tear off the excess paper. Replace the printer cover. ER380 Getting Started • 5 ? If you wish to use the printer to print a sales journal or electronic journal, insert the paper into the paper take-up spool. Wind the paper two or three turns around the spool shaft and install the spool in the mount. 6 • Getting Started ER380 Basic Features and Functions Standard Hardware • Display => LCD: Adjustable 2 line, 16 character liquid crystal display and ten position rear displays with a rear pop up display standard. • 44 position keyboard. • 1 station Thermal 32-column printer with drop-and-print mechanism. • Sturdy Metal Cash Drawer with removable 4 Bill 8 Coin drawer insert. • 7-position control lock. • Standard cus tomer pole display. • Communications ports: RS232C. Optional Hardware • Kitchen printer. / Bill Printer / Journal Printer • Bar code scanner. • PC Link Software Features ER380 • Up to 2 price levels for each PLU. • Up to 5 PLU modifier keys. • 5,000 (expandable) Price Look Ups (PLUs) for open or preset item registration. For direct registrations, up to 12 PLUs are on the keyboard. • 18 character programmable descriptors for PLUs and functions. • Up to 99 PLU Group totals. • Up to 99 clerks with separate report totals. Getting Started • 7 Display The ER-380M comes with a liquid crystal screen, allowing you to view up to 2 lines of information with up to 16 characters per line. The display is backlit to provide excellent visibility, regardless of lighting conditions. When the control lock is in the OFF position, the register can not be opeated. When the control lock in the REG, VOID, X, Z, PGM or SM positions the appropriate message, there are displayed with the message “CLOSED”. You must sign on a clerk to remove the “CLOSED” message and begin operation. REG REG MODE CLOSED VOID VOID MODE CLOSED Operator Display Example t Press 10.00 – PLU1 to register of the PLU1 PLU1 1 10.00 t Press 50.00 – PLU1 to tender a sale CASH CHANGE 50.00 40.00 Displayed Error Conditions ** WARNING ** SEQUENCE ERROR 8 • Getting Started ER380 Error Messages ER380 E0 SEQUENCE ERROR E1 PLU NO DATA E2 CLERK ERROR E3 AMOUNT COUNT OVER E4 EFT ERROR E5 COMMUNICATION ERROR E6 TIME AND DATE E7 LIMIT OVER E8 INACTIVE E9 XMODE ONLY E10 NONADD E11 ADDCHECK ERROR E12 CONDIMENT ERROR E13 REQ. EAT IN E14 REQ. STOCK E15 REQ.DRAWER E16 REQ.GUEST E17 SCALE E18 CLERK NOT MATCH E19 COMPULSORY TARE E20 REQ.DECLARATION E21 OFF LINE E22 REQ.ENDORSEMENT E23 CONSOL OVER E24 REQ.SUBTOTAL E25 PROMO ERROR E26 CHECK OPEN E27 REQ. PASSWORD E28 NO VOID PLU E29 232C SETUP ERROR E30 REQ.PRESET VALUE E31 REQ. OPEN VALUE Getting Started • 9 10 • Getting Started E32 REQ. AMOUNT E33 REQ. PAYMENT E34 INVALID FUNCTION E35 REQ. TABLE E36 REQ. PBAL E37 REQ.CHECK # E38 ONLY ONE TABLE E39 REQ. VALID PER RECEIPT PRINTER PAPER END PCO PRINTER COVER OPEN PFP SYSTEM ERROR (If this problem occurs, call the service engineer.) E43 MEMORY ALLOCATION ERROR E44 ELECTRONIC JOURNAL FULL E45 CLOSE OPEN CHECKS TO FINALIZE TRAIN MODE ER380 Control Lock The control lock has 7 positions, accessed with 5 keys. Each ECR is shipped with two full sets of keys. OFF VOID Use to void (correct) items outside of a sale. VOID REG X Z P OFF The register is inoperable. REG Use for normal registrations. X Use to read register reports. Z Use to read register reports and reset totals to zero. P Use to program the register. S The S position is a hidden position reserved for dealer access. Before performing any operations in Register Mode a clerk must be signed on. See “Clerk Sign-On/Sign-Off” for a description of clerk operations. Control Keys The ER-380 includes two sets of keys that may be used to access the following control lock positions. Key Positions Accessible REG OFF, REG VOID VOID, OFF, REG, X Z VOID, OFF, REG, X, Z P VOID, OFF, REG, X, Z, P C ALL POSITIONS Note: Keys may be removed from the control lock in the OFF or REG positions. ER380 Getting Started • 11 Keyboards The ER-380 keyboard is shown below with the default legends and key assignments. This configuration has 12 keyboard NLU locations. Programmable key locations are shown with a bold border. PAPER FEED CLEAR X/TIME 7 8 9 4 8 12 PAID OUT RECD ACC CANCEL RETURN CLERK SALE ITEM NO. 4 5 6 3 7 11 CURRN CONV CHARG E SUB TOTAL CHEQU E %1 #/NO SALE PRICE INQUIRE 1 2 3 2 6 10 PRICE LEVEL1 PRICE LEVEL2 PLU 0 00 . 1 5 9 12 • Getting Started CASH/TEND ER380 Operating Instructions Function Key Descriptions Keys are listed in alphabetical order. Some of the keys described below are not included on the default keyboard. See “Function Key Assignment Programming to add or change programmable keys. Keyboard Legend Description #/NO SALE Use as a non-add key to print up to an 8-digit numeric entry on the receipt and journal. This entry will not add to any sales totals. The #/NO SALE key is also used to open the cash drawer without making a sale. X/TIME Use to multiply a quantity of items or calculate split pricing on PLU entries. 00, 0-9, Decimal Use to make numeric entries in REG, X, Z, VOID, or P positions. The decimal key is used for decimal or scale multiplication, when setting or entering fractional percentage discounts, or when programming fractional tax rates. Do not use the decimal key when making amount entries into PLUs. ADD CHECK Use to combine individual trays (in a cafeteria situation) that will be paid together. Each tray subtotal can advance the consecutive number, depending on programming. CANCEL Cancels a transaction without updating PLU, or function key totals. The Cancel function may only be used prior to tendering. Once tendering begins, the Cancel function may no longer be used. The CANCEL key corrects the appropriate totals and counters and the Financial report records total of transactions cancelled. CASH Calculates the sale total including tax, finalises the sale, and opens the cash drawer. Change computation is allowed by entering an amount before pressing the CASH key. The cash drawer will open only if the amount tendered is equal to or greater than the total amount of the sale. Post tendering is also available should a second change calculation be necessary. Re-enter the tendered amount and press the CASH key to show the new change computation. Press the CASH key a second time to issue a buffered receipt (up to 200 lines) when the receipt on/off function is OFF. ER380 Operating Instructions • 13 CHEQUE Use to finalise cheque sales. Calculates the sale total including tax, finalises the sale, and opens the cash drawer. Change computation is allowed by entering an amount before pressing the CHEQUE key. The cash drawer will open only if the amount tendered is equal to or greater than the total amount of the sale. Change issued will be subtracted from the appropriate in-drawer total. CHEQUE CASHING Use to exchange a cheque for cash. Cash-in-drawer and Cheque-indrawer totals are adjusted. CHEQUE ENDORSEMENT Use to print a cheque endorsement message on an optional slip printer with a programmable endorsement message. CHARGE(1-8) Use to finalise charge sales. Calculates the sale total including tax, finalises the sale, and opens the cash drawer. Change computation is allowed by entering an amount before pressing the CHARGE key. The cash drawer will open only if the amount tendered is equal to or greater than the total amount of the sale. Change issued will be subtracted from the appropriate in-drawer total. CHECK # The CHECK # key is used to begin a new, or access an existing balance (hard check) or itemized bill (soft check.) Check track numbers that are entered manually may be set at a fixed length of one to nine digits. Check track numbers assigned automatically will begin with #1. Existing checks are accessed by entering the check track number and pressing the CHECK # key. CLEAR Use to clear entries made into the 10 key numeric pad or X/TIME key before they are printed. Also used to clear error conditions. CLERK The register will not operate in register mode unless a clerk has been signed on. Clerk sign-on is accomplished by direct or secret code sign on. All entries made on the register will report to one of the 15 clerk totals. When a clerk is signed on, all entries following will add to that clerk’s total until another clerk is signed on. However, a clerk cannot be changed in the middle of a transaction. To sign a clerk off, thereby displaying the “CLOSED” message on the display, enter 0 (zero), then press the CLERK key. This disables the register until another clerk is signed on. The current clerk must first be signed off before another clerk can sign on. CONV (1 & 4) The currency conversion function, allowed after subtotal, converts and displays the new subtotal at a preprogrammed exchange rate. Tendering is allowed after using the currency conversion function. Change is calculated and issued in home currency. The amount of foreign currency tendered is stored in a separate total on the Financial report, but not added to the drawer total. ANALYSIS 1/2/3 Sale analise 1,2,3 keys (Eat-in, Take-out and Drive-thru), are subtotal functions. In areas that have different tax rules for eat-in and take out sales, each key can be programmed to automatically charge or exempt taxes. Sales may not be split between each key. ERROR CORR Use to correct the last entry. The ERROR CORR key corrects the appropriate totals and counters. F/S SHIFT When pressed before a PLU entry, the F/S SHIFT key reverses the preprogrammed food stamp status of the PLU. For example, an item not 14 • Operating Instructions ER380 preprogrammed food stamp status of the PLU. For example, an item not food stamp eligible can be made food stamp eligible. F/S SUB Displays the amount of the sale that is food stamp eligible. F/S TEND Use to tender food stamps for eligible sales. GUEST # Use to enter the count of guests served as part of a guest check. MACRO (1-10) Macro keys may be programmed to record, then later perform, up to 50 keystrokes. For example, a macro key could be set to tender (preset tender) a common currency, such as £ 5 into the cash key. RETURN ITEM Used to return or refund merchandise. Returning an item will also return any tax, which may have been applied. MODIFIER 1-5 The Modifier key alters the next PLU registered, either by changing the Code number of the PLU so that a different item is registered, or by adding the modifier descriptor. P/BAL Use to enter the amount of an outstanding b alance. PAID OUT Use to record money taken from the register to pay invoices, etc. The paid out amount subtracts from the cash-in-drawer total. Paid outs are allowed outside of a sale only. % Keys 1- 5 Up to five % keys may be placed on the keyboard. Each % key is set with a specific function, such as item discount or surcharge, or sale discount or surcharge. The percent rate may be entered or preprogrammed, or the percent keys can be programmed with a negative, open or preset price, thus acting as coupon keys. A percentage key may also be set up to accept charge tip entries. PLU The PLU key is used to register price look ups by number entry. PLUs can be programmed open or preset, and positive or negative. PAYMENT Use to Charge Posting Feature. This key can be enforced prior to cashing off a check sale. PRINT CHECK Use to print a guest check. The check can be printed on an optional (RS-232C) printer, or can be printed on the receipt printer. The PRINT CHECK key can be set to automatically service the check. PROMOTION The PROMOTION key allows you to account for promotional items . Pressing this key will remove an item's cost from the sale, but will include the sale of the item in the item's sales counter. RECD ACCT The RECD ACCT (received on account) key is used to record media loaned to the cash drawer, or payments received outside of a sale. The cash drawer will open. The amount received adds to the cash-in-drawer total. SERVICE Use to temporarily finalise Previous Balance or Table Tracking transactions. SUBTOTAL Displays subtotal of sale including tax. Must be pressed prior to a sale discount or sale surcharge. TABLE # Tracks the current balance for a guest check or table. TAX EXEMPT Press the TAX EXEMPT key to exempt tax 1, tax 2, tax 3, and/or tax 4 from the entire sale. TAX (1-4) SHIFT When pressed before a PLU entry, the tax shift keys reverse the tax status of the PLU, i.e., a PLU with non-tax status would become taxable ER380 Operating Instructions • 15 or a PLU with tax status would become non-taxable. 16 • Operating Instructions ER380 TIP The TIP key allows a gratuity to be added to a guest check before payment. The tip amount is deducted from the Cash-in-Drawer amount for the Clerk/Cashier closing the guest check. The TIP key may be programmed as either a percentage or amount. If programmed as a percentage, tax programming defines whether the percentage is calculated on the net amount or the amount after taxes. VOID Use to correct an item entered earlier within a sale. The VOID key corrects the appropriate totals and counters. To correct the last item, use the ERROR CORR key. For void operations outside of a sale (Transaction Void), use the VOID position on the control lock. The Financial report records totals for each type of void separately. VALID Press the VALID key to print a one-line validation on a separate form or piece of paper. Any item registration, discount or payment may be validated. If validation is required after a particular function, the message "SP" will appear on the front display. WASTE The WASTE key allows control of inventory by accounting for items, which must be removed from stock due to spoilage, breakage or mistakes. Press the WASTE key before entering wasted items, then press the WASTE key again to finalise. The WASTE key may be under manager control, requiring the control lock to be in the X position. The WASTE operation is not allowed within a sale. ER380 Operating Instructions • 17 Clerk Sign-On/Sign-Off See "System Option Programming”, to review your clerk options: • System option #2 allows you to select direct or code entry sign on and/or staydown or pop-up operation. Depending on how your machine has been programmed, sign-on will take place only at the beginning of a shift (stay-down), or may have to be repeated for each transaction (pop-up). If your machine has been programmed for stay-down clerks, the clerk currently signed on must be signed off before another clerk may be signed on. Direct Sign-On There are two ways to sign on a clerk. One is to enter the clerk number and press the clerk key and the other is to enter direct clerk no. key. CLERK Clerk # (1-10) CLERK 1 ~ CLERK 10 There are two ways to sign the clerk off. One is to enter 0 (Zero) and press the clerk key and the other is to enter 0 (zero) and press direct clerk no. key. 0 CLERK 0 CLERK 1 ~ CLERK 10 Coded Sign-On To sign on a clerk, press the clerk key, enter the clerk code, then press the clerk key again. CLERK CLERK Clerk Code (up to 6 digits) To sign the clerk off, enter 0 (Zero) and press the clerk key. 0 CLERK 18 • Operating Instructions ER380 Receipt On and Off 1. Turn the control lock to the X position. 2. To turn the receipt off, enter 9 9, press the SBTL key. Enter 1, press CASH. 9 9 SBTL 1 CASH 3. To turn the receipt on, enter 9 9, press the SBTL key. Enter 0, press CASH. 9 ER380 9 SBTL 0 CASH Operating Instructions • 19 Training Mode A training mode is available so that you can operate the cash register without updating totals and counters. Note the following conditions: • The receipt and journal print the message "TRAINING MODE BEGIN" when training mode is activated. • The receipt and journal print the message "TRAINING MODE END" when training mode is exited. • The message "TRAINING MODE" prints on each receipt printed while training mode is active. • The journal does not print during training mode. To Enter Training Mode There are two ways to enter the train mode. One is by training password and the other is by training clerk. First, you must program a training password 1. Turn the control lock to the X position. 2. To begin the program, enter 199, press the SBTL key. 1 9 9 SBTL 3. Input Training Password # and press X/TIME key. PASSWORD # X/TIME To Exit Training Mode Note :- It is not possible to exit training mode with either open clerks or check balances 1. Turn the control lock to the X position. 2. To begin the program, enter 199, press the SBTL key. 1 9 9 SBTL 3. Input Training Password (Zero is the default code) and press X/TIME key. 0 20 • Operating Instructions X/TIME ER380 Item Registrations All registrations on ER-380 are made into open or preset PLUs. ER380 • In place of traditional PLU keys, some PLUs are located directly on the keyboard. • When more items or categories are needed than the number of PLUs available on the keyboard, registrations through PLUs can be made by entering the PLU code number and pressing the PLU key on the keyboard. • This system simplifies reporting by listing all items (regardless of how they are entered) on the PLU report, while reporting for groups of items or categories is available from the Group report. Operating Instructions • 21 Open Keyboard PLU Entry 1. Enter an amount on the ten keypad. Do not use the decimal key. For example, for £2.99, enter: 2 9 THANK -YOU CALL AGAIN DATE 01/15/2003 WED 8:33 TIME 9 2. Press a PLU key. For example, press PLU 1: 1 PLU1 T1 £2.99 TAX1 £0.18 TOTAL £3.17 CASH £3.17 CLERK 1 00001 No.000011 Preset Price Keyboard PLU A preset PLU registers the price that was previously programmed for the PLU. See "PLU Programming" in the "Program Mode Programming" chapter to program preset prices. THANK -YOU 1. Press a preset PLU key. For example, press PLU 5: 5 CALL AGAIN DATE 01/15/2003 WED 8:33 TIME PLU5 £1.29 TOTAL £1.29 CASH £1.29 CLERK 1 00001 22 • Operating Instructions No.000011 ER380 Keyboard PLU Repeat Entry Open or preset price PLUs can be repeated as many times as necessary by pressing the same PLU again. The number of times the item is repeated is shown on the display. 1. Enter an amount on the ten keypad. Do not use the decimal key. For example, for £ 2.99, enter: 2 9 THANK-YOU CALL AGAIN DATE 01/15/2003 WED 8:33 TIME 9 2. Press a PLU key. For example, press PLU 1: PLU1 T1 £2.99 PLU1 T1 £2.99 TAX1 £0.36 1 3. To register a second item exactly as the first, press the PLU key a second time. For example, press PLU 1: TOTAL £6.34 CASH £6.34 CLERK 1 00001 No.000011 1 ER380 Operating Instructions • 23 Keyboard PLU Multiplication When several of the same items are to be sold of the same PLU, you can use multiplication. You can enter a quantity (1 to 999.999) using the X/TIME key. You can multiply open or preset PLUs. 1. Enter the quantity of items being purchased, press the X/TIME key. For example, enter 4 on the numeric key pad and press the X/TIME key: 4 2. Enter an amount on the ten keypad. Do not use the decimal key. For example, for £1.99, enter: 9 DATE 01/15/2003 WED 08:33 4X X/TIME 1 THANK -YOU CALL AGAIN 9 3. Press a PLU key. For example, press PLU 1: TIME @1.99 PLU1 T1 £7.96 TAX1 £0.48 TOTAL £8.44 CASH £8.44 CLERK 00001 No.000011 1 24 • Operating Instructions ER380 Keyboard PLU Multiplication with Decimal Point If you are selling items by weight, or decimal quantities such as half-pints, you can multiply a fraction of a unit. 1. Enter the amount with the decimal point, press the X/TIME key. For example, for 3.75 kilos of produce, enter: 3 . 7 5 THANK-YOU CALL AGAIN DATE 01/15/2003 WED 08:33 X/TIME 3.75X 2. Enter an amount on the ten keypad. Do not use the decimal key. For example, if the price is £.99 per kilo, enter: 9 TIME 9 3. Press a PLU key. For example, press PLU 1: @0.99 PLU1 T1 £3.71 TAX1 £0.22 TOTAL £3.93 CASH £3.93 CLERK 1 00001 No.000011 1 ER380 Operating Instructions • 25 Split Pricing (Keyboard PLU) When items are priced in groups, i.e. 3 for £1.00, you can enter the quantity purchased and let the register calculate the correct price. THANK -YOU 1. Enter the quantity purchased, press the X/TIME key. For example, enter: 2 DATE 01/15/2003 WED 08:33 X/TIME 2. Enter the quantity of the group price, press the X/TIME key. For example, if the items are priced 3 for £1.00, enter: 3 X/TIME 0 2@3FOR TIME @1.00 PLU1 T1 £0.67 TAX1 £0.04 TOTAL £0.71 3. Enter an amount on the ten keypad. For example, if the items are priced 3 for £1.00, enter: 1 CALL AGAIN CASH £0.71 CLERK 1 00001 No.000011 0 4. Press a PLU key. For example, press PLU 1: 1 26 • Operating Instructions ER380 Single Item Keyboard PLU Single item PLUs automatically total as a cash sale immediately after registration. Use single item PLUs for speedy one-item sales. For example if you are selling admission tickets, and all ticket sales are one item sales, you can use an open or preset PLU. After each registration, the drawer will immediately open, and a separate transaction receipt is printed. See "PLU Programming" in the "Program Mode Programming" chapter to program a single item PLU. 1. Press a single item preset PLU key. (or enter a price and press a single item open PLU key.) For example, press PLU 6: 6 THANK-YOU CALL AGAIN DATE 01/15/2003 WED 08:33 TIME PLU6 £1.29 TOTAL £1.29 CASH £1.29 CLERK 1 00001 ER380 No.000011 Operating Instructions • 27 Open Code Entry PLU If the PRESET status of a PLU is set to N (no), the PLU will operate as an open PLU. See "PLU Programming" in the "Program Mode Programming" chapter to program PLU descriptors and options. THANK -YOU 1. Enter the PLU number; press the PLU key. For example, enter: 2 DATE 01/15/2003 WED 08:33 PLU 2. Enter an amount on the ten keypad. Do not use the decimal key. For example, for £2.99, enter: 2 9 CALL AGAIN 9 3. Press the PLU key again. TIME PLU2 T1 £2.99 TAX1 £0.18 TOTAL £3.17 CASH £3.17 CLERK 1 00001 No.000011 PLU Preset Price Code Entry PLU THANK -YOU 1. Enter the PLU number; press the PLU key. For example, enter: 1 PLU CALL AGAIN DATE 01/15/2003 WED 08:33 TIME PLU1 £1.29 TOTAL £1.29 CASH £1.29 CLERK 1 00001 28 • Operating Instructions No.000011 ER380 Code Entry PLU Multiplication When several of the same items are to be entered into the same PLU, you can use multiplication. You can enter a quantity (1 to 999.999) using the X/TIME key. You can multiply open or preset PLUs. 1. Enter the quantity of items being purchased, press the X/TIME key. For example, enter 4 on the numeric key pad and press the X/TIME key: 4 X/TIME 2. Enter the PLU number; press the PLU key. For example, enter: 1 PLU THANK-YOU CALL AGAIN DATE 01/15/2003 WED 08:33 4X TIME @1.99 PLU1 T1 £7.96 TAX1 £0.48 TOTAL £8.44 CASH £8.44 CLERK 1 00001 ER380 No.000011 Operating Instructions • 29 Code Entry PLU Multiplication with Decimal Point If you are selling items by weight, or if you are selling yard goods, you can multiply a fraction of a unit. 1. Enter the quantity with the decimal point, press the X/TIME key. For example, for 3.75 Kilos of produce, enter: 3 . 7 5 THANK -YOU CALL AGAIN DATE 01/15/2003 WED 08:33 X/TIME 3.75X 2. Enter the PLU number; press the PLU key. For example, enter: 3 TIME PLU @2.99 PLU3 T1 £11.21 TAX1 £0.67 TOTAL £11.88 CASH £11.88 CLERK 1 00001 No.000011 Split Pricing Code Entry PLU When items are priced in groups, i.e. 3 for £1.00, you can enter the quantity purchased and let the register calculate the correct price. THANK -YOU 1. Enter the quantity purchased, press the X/TIME key. For example, enter: 2 X/TIME 2. Enter the quantity of the group price, press the X/TIME key. For example, if the items are priced 3 for £1.00, enter: 3 X/TIME 3. Enter the PLU number; press the PLU key. For example, enter: 3 30 • Operating Instructions CALL AGAIN DATE 01/15/2003 WED 08:33 2@3FOR TIME @2.99 PLU3 T1 £1.99 TAX1 £0.12 TOTAL £2.11 CASH £2.11 CLERK 1 00001 No.000011 PLU ER380 Modifier Key Pressing a modifier key alters the next PLU registered, either by changing the code number of the PLU so that a different item is registered, or by just adding the modifier descriptor and registering the same PLU. See "Modifier 1-5" in the "Program Mode Programming" chapter in order to determine how the modifier key will affect the PLU entry. Modifiers can be: • STAY DOWN so that registrations will be modified by the same modifier until another modifier is selected, • POP UP after each item to register, for example large, medium or small soft drink, • POP UP after each transaction to register, for example, toppings of various pizza sizes. See "System Options" in the "Program Mode Programming" chapter to select stay down/popup status . Pop-Up Modifier Key Affecting PLU Code THANK-YOU 1. Press a preset PLU key. For example, press PLU 1 with a price of £1.00. 1 2. Press the MOD 1 key. The message "MOD1" displays. CALL AGAIN DATE 01/15/2003 WED 08:33 TIME PLU1 £1.00 MOD1 #1001 £1.25 MOD 1 3. Press the same PLU key. In this example the modifier 1 will add the digit 1 to the fourth PLU # position, resulting in the registration of PLU #1001. PLU2 £1.50 TOTAL £3.75 CASH £3.75 CLERK 1 00001 No.000011 1 4. Press another PLU key. In this example press PLU 2 with a price of £1.50. ER380 Operating Instructions • 31 Price Level Key If you choose to use the price level feature, you must allocate memory for each level. See "Memory Allocation" in the "Service Mode Programming" chapter. Note that the default program selects one price level. You must also place price level keys on the keyboard. See "Function Key Assignment" in the "Program Mode Programming" chapter. If you use this feature, the same PLU can be given up to 2 different preset prices. Price Level keys shift the price that is being registered. Levels can be: • STAY DOWN so that registrations will stay in the selected level until another is selected, • POP UP after each item to register, for example large, medium or small soft drink, • POP UP after each transaction to register, for example, toppings of various pizza sizes. See "System Options" in the "Program Mode Programming" chapter to set how the price level keys operate. Pop-Up Price Level Keys 1. Press a preset PLU key. For example, press PLU 1 programmed with a price of £1.00 for price level 1. 1 2. Press the LEVEL 2 key. The message "LEVEL 2" displays. LEVEL 2 3. Press the same PLU key. In this example the PLU 1 key is programmed with a price of £2.00 for price level 2. THANK -YOU CALL AGAIN DATE 01/15/2003 WED 08:33 TIME PLU1 £1.00 PLU1 £2.00 PLU2 £1.50 TOTAL £4.50 CASH £4.50 CLERK 1 00001 No.000011 1 4. Press another PLU key. In this example press PLU 2 programmed to register PLU #2 with price level 1. Note that the level 1 price is registered. 32 • Operating Instructions ER380 Promotion The PROMOTION key allows you to account for Promotional items. Pressing this key will remove an item's cost from the sale, and the Promotion item will not be added to the PLU sales total, but it is added to the item sales counter. If stock (inventory) reporting is used, the item will be subtracted from inventory. 1. Register an item. For example, press PLU 1 programmed with a price of £1.00 for price level 1. 1 2. Press the PROMOTION key. The message "PROMOTION" displays. PROMO 3. Enter the item to be Promoted. You can not enter an item that has not been already registered in this transaction. THANK-YOU CALL AGAIN DATE 01/15/2003 WED 08:33 TIME PLU1 £1.00 ***PROMOTION*** PLU1 TOTAL £0.00 CASH £0.00 CLERK 1 00001 No.000011 1 ER380 Operating Instructions • 33 Waste The WASTE key allows control of inventory by accounting for items that must be removed from stock due to spoilage, breakage or mistakes. Press the WASTE key before entering wasted items, and then press the WASTE key again to finalise. The WASTE key may be under manager control, requiring the control lock to be in the X position. The WASTE key is not allowed within a sale. 1. Press the WASTE key. The message "WASTE" displays at the top of the screen. THANK -YOU CALL AGAIN DATE 01/15/2003 WED 08:33 TIME WASTE ***WASTE*** 2. Enter the item or items that are wasted. PLU1 £1.25 3. Press the WASTE key again to total the wasted items: PLU2 £1.50 ***WASTE*** WASTE TOTAL £2.75 CLERK 1 00001 34 • Operating Instructions No.000011 ER380 Price Change Item The PRICE CHANGE key allows you to change PLU price when you sale the item. Before you use this key, the price change item option of the PLU should be programmed first. 1. Press the Price Change key. PRICE CHANGE 2. Enter the PLU No. 3. Enter the Price. 4. Press the Price Change key again to to sale the item. PRICE CHANGE ER380 Operating Instructions • 35 Percent Key Operations A total of five % functions are available to be allocated to the keyboard. Each function is individually programmable to add or subtract, from an individual item or from a sale total, amounts (coupons) or percentages. You can also program the percentage key taxable or non-taxable, so that sales taxes are calculated on the net, or the gross amount of the item or sale. You can also program preset prices or percentages. The operation examples in this section show the percentage key in a variety of configurations. See "Function Key Programming" in the "Program Mode Programming" chapter to assign a specific function to each percentage key. Preset Percent Discount on an Item In this example the %1 function is preset with a rate of 10 %. THANK -YOU 1. Register the item. CALL AGAIN 2. Press the %1 key: %1 3. The discount is automatically subtracted. DATE 01/15/2003 WED 08:33 TIME PLU2 £10.00 % 1 10.000% - AMOUNT 1.00 - TOTAL £9.00 CASH £9.00 CLERK 1 00001 36 • Operating Instructions No.000011 ER380 Enter a Percent Discount on an Item You can also operate the percentage functions by entering the percentage of the discount or surcharge. If necessary, you can enter a fractional percentage up to 3 digits beyond the decimal (i.e. 99.999%). THANK-YOU 1. Register the discounted item. CALL AGAIN 2. Enter the percentage. If you are entering a fraction of a percent, you mus t use the decimal key. For example, for one third off enter: DATE 01/15/2003 WED 08:33 TIME PLU2 £10.00 3 3 . 3 3 3 3. Press the %1 key: % 1 33.333% - AMOUNT 3.33 - TOTAL £6.67 %1 4. The discount is automatically subtracted. CASH £6.67 CLERK 1 00001 No.000011 Percent on Sale Total The percent can be an open or preset amount. In this example an open percentage surcharge of 15% is applied. THANK-YOU 1. Register the items you wish to sell. CALL AGAIN 2. Press the SBTL key: DATE 01/15/2003 WED 08:33 SBTL 3. Enter the percentage, press the appropriate discount key. For example, for 15% enter: TIME PLU2 £10.00 % 1 15.000% AMOUNT £1.50 1 5 %1 4. The surcharge is automatically added. TOTAL £11.50 CASH £11.50 CLERK 1 00001 ER380 No.000011 Operating Instructions • 37 Coupon on Sale (Vendor Coupon) When programmed as "amount", "sale", "open" and "negative", a % key will perform a coupon against a sale (or vendor coupon.) Also, depending upon programming: • You may be allowed to enter only one coupon in a sale, after the SBTL key is pressed, • You may be allowed to enter multiple coupons, but you must press the SBTL key before each coupon, • You may be allowed to enter multiple coupons, without first pressing SBTL. In this example, a coupon may be entered only once, and you must first press SBTL. THANK -YOU 1. Register the items you wish to sell. CALL AGAIN 2. Press the SBTL key: DATE 01/15/2003 WED 08:33 SBTL 3. Enter the amount of the coupon, press the appropriate % key. For example: PLU2 10.00 %1 2.00 %1 TOTAL £8.00 4. The coupon is subtracted. CASH £8.00 2 0 0 CLERK 1 00001 38 • Operating Instructions TIME - No.000011 ER380 Coupon on Item (Store Coupon) When programmed as "amount", "item", "open" and "negative", a % key will perform a coupon against an item (or store coupon.) In this case, you must press the PLU (or enter the PLU number) of the PLU you wish the coupon to be subtracted from. THANK-YOU 1. Register the items you wish to sell. 2. Enter the amount of the coupon, press the appropriate % key. For example: 2 0 0 %1 3. Press the PLU key you wish to subtract the coupon from (or enter the PLU number of the PLU you wish to subtract the coupon from and press PLU.) CALL AGAIN DATE 01/15/2003 WED 08:33 TIME PLU1 £10.00 PLU1 C 2.00 - TOTAL £8.00 CASH £8.00 1 CLERK 1 00001 No.000011 4. The coupon is automatically subtracted. ER380 Operating Instructions • 39 Return Merchandise Registrations If you wish to return or refund an item, press RETURN, then re-enter any item. You can return merchandise as part of a sale, or you can return merchandise as a separate transaction and return cash to the customer. THANK -YOU 1. Press RETURN: CALL AGAIN RETURN DATE 01/15/2003 WED 08:33 2. Enter the price of the item you wish to return, then press the PLU key where it was registered originally. 2 9 9 2 3. Total the sale with CASH , CHEQUE, or a CHARGE function. RETURN ************************* PLU2 T1 2.99 - TAX1 AMT 0.18 - TOTAL 3.17 - CASH 3.17 - CLERK 1 00001 40 • Operating Instructions TIME No.000011 ER380 Voids and Corrections Error Correction (Void Last Item) This function corrects the last item entered. THANK-YOU 1. Register the item you wish to sell. CALL AGAIN 2. Press the ERROR CORR key: DATE 01/15/2003 WED 08:33 ERROR CORR TIME PLU1 T1 29 £2 PLU2 £1.29 ERR CORR ---------------------PLU2 1.29 - TAX1 AMT £0.14 TOTAL £2.43 CASH £2.43 CLERK 1 00001 No.000011 Void Previous Item This function allows you to correct an item registered previously in a transaction. THANK-YOU 1. Register an item. Then register a second item. 2. To correct the first item, press VOID: CALL AGAIN DATE 01/15/2003 WED 08:33 PLU2 £1.29 VOID 3. Enter the price of the first item, then press the PLU key where it was registered originally. PLU1 T1 £2.29 VOID -------------------------PLU2 1.29 1 TIME 2 9 2 - TAX1 AMT £0.14 TOTAL £2.43 CASH ER380 Operating Instructions • 41 £2.43 CLERK 1 00001 42 • Operating Instructions No.000011 ER380 Cancel The CANCEL key allows you to stop any transaction. Anything registered within the transaction before the CANCEL key is pressed is automatically corrected. The CANCEL key can be inactivated through programming, see "Function Key Programming" in the "Program Mode Programming" chapter, or the key can be programmed to require manager control. THANK-YOU 1. Register the items you wish to sell. CALL AGAIN 2. Press the CANCEL key DATE 01/15/2003 WED 08:33 TIME CANCEL PLU1 T1 £2.29 PLU2 0.50 - CANCEL ************************* CLERK 1 00001 No.000011 Void Position Operations You can use the VOID control lock position to correct any complete transaction. To correct any transaction: THANK-YOU 1. Turn the control lock to the VOID position. 2. Enter the transaction you wish to correct exactly as it was entered originally in the REG control lock position. You can enter discounts, voids, returns, tax exemptions or any other function. 3. All totals and counters are corrected as if the original transaction did not take place. CALL AGAIN DATE 01/15/2003 WED 08:33 VOID MODE ********************** PLU1 T1 2.29 - PLU2 1.00 - TAX1 AMT 0.14 - TOTAL 3.43 - CASH 3.43 - CLERK 1 00001 ER380 TIME No.000011 Operating Instructions • 43 No Sale Operations Open Drawer The #/NO SALE key will open the cash drawer when you have not already started a transaction. The no sale func tion can be disabled or placed under manager control through programming, see "Function Key Programming" in the "Program Mode Programming" chapter. THANK -YOU 1. Press #/NS: CALL AGAIN #/NS DATE 01/15/2003 WED 08:33 2. The drawer will open and the receipt will print as in the example on the right. TIME NO SALE ----------------------CLERK 1 00001 No.000011 Non Add Number You can also use the #/NO SALE key to print any number (up to 9 digits) on the printer paper. You can enter the number any time during a transaction. For example, if you wish to record a checking account number, enter the number and press the #/NO SALE key before totalling the sale with the cheque key. THANK -YOU 1. Register the items you wish to sell. 2. Enter the number you wish to record, for example enter: 1 2 3 3. Press #/NS: #/NS 4. Press CHEQUE CHEQUE 4 CALL AGAIN DATE 01/15/2003 WED 08:33 PLU1 T1 £2.99 NON-ADD# 1234 TAX1 AMT £0.18 TOTAL £3.17 CHEQUE £3.17 CLERK 1 00001 44 • Operating Instructions TIME No.000011 ER380 Received On Account Operations You can use one of the received on account functions (RA1-RA3) to accept cash or checks into the cash drawer when you are not actually selling merchandise. For example, use received on account to accept payments for previously sold merchandise, or record loans to the cash drawer. THANK-YOU 1. Press one of the received on account keys (RA1 -RA3) RA1 DATE 01/15/2003 WED 08:33 2. Enter the amount of cash received, press CASH. 1 0 0 0 CASH 3. Enter the cheque amount received, press CHEQUE 1 0 0 0 CHEQUE 4. Enter the charge amount received, press CHARGE1 1 CALL AGAIN 0 0 0 TIME RA1 CASH £10.00 CHEQUE £10.00 CHARGE1 £10.00 RA1 £30.00 CLERK 1 00001 No.000011 CHARGE 1 5. You can continue to itemise receipts, or you can finalise by pressing or selecting the same received on account key. RA1 ER380 Operating Instructions • 45 Paid Out Operations You can use the paid out function(PO1-PO3) to track cash or checks paid out or to record loans from the cash drawer. THANK-YOU 1. Press one of the paid out keys(PO1PO3) DATE 01/15/2003 WED 08:33 PO1 2. Enter the amount of cash paid out, press CASH. 1 0 0 0 CASH 3. Enter the cheque amount paid out, press CHEQUE. 1 0 0 0 CHEQUE 4. Enter the charge amount received, press CHARGE1 1 CALL AGAIN 0 0 0 TIME PO1 CASH 10.00 - CHEQUE 10.00 - CHARGE1 10.00 - PO1 30.00 CLERK 1 00001 No.000011 CHARGE 1 5. You can continue to itemize paid outs, or you can finalise by pressing or selecting the same paid out key. PO1 46 • Operating Instructions ER380 Subtotalling a Sale 1. Register the items you wish to sell. 2. Press SBTL. The subtotal will display with the message "Sub" indicated on the rear display. SBTL The subtotal can be printed if the system option is set. See "Print Option Programming" in the "Program Mode Programming" chapter. ER380 Operating Instructions • 47 Totalling and Tendering There are ten tender functions available to categorise sales. CASH and CHEQUE are individual keys on the keyboard Totalling a Cash Sale THANK -YOU 1. Register the items you wish to sell. CALL AGAIN 2. To total a cash sale, press CASH: CASH 3. The display will indicate the total amount of the cash sale. DATE 01/15/2003 WED 08:33 TIME PLU2 £7.96 TOTAL £7.96 CASH £7.96 CLERK 1 00001 No.000011 Totalling a CHEQUE Sale THANK -YOU 1. Register the items you wish to sell. CALL AGAIN 2. To total a cash sale, press CHEQUE: CHEQUE 3. The display will indicate the total amount of the cash sale. DATE 01/15/2003 WED 08:33 TIME PLU2 £7.96 TOTAL £7.96 CHEQUE £7.96 CLERK 1 00001 48 • Operating Instructions No.000011 ER380 Tendering a Cash Sale THANK-YOU 1. Register the items you wish to sell. 2. Enter the amount tendered by the customer. For example, for £20.00 enter: 2 0 0 0 3. Press CASH: CALL AGAIN DATE 01/15/2003 WED 08:33 TIME PLU1 T1 £2.99 PLU1 T1 £2.99 4X CASH 4. The display will indicate the total amount of the cash tendered and the change due, if any. £1.99 PLU2 £7.96 TAX1 £0.36 TOTAL £14.30 CASH £20.00 CHANGE £5.70 CLERK 1 00001 No.000011 Tendering a CHEQUE Sale THANK-YOU 1. Register the items you wish to sell. 2. Enter the amount tendered by the customer. For example, for £20.00 enter: 2 0 0 0 3. Press CHEQUE: CHEQUE 4. The display will indicate the total amount of the check tendered and the change due, if any. CALL AGAIN DATE 01/15/2003 WED 08:33 TIME PLU1 T1 £2.99 PLU1 T1 £2.99 4X £1.99 PLU2 £7.96 TAX1 £0.36 TOTAL £14.30 CHEQUE £20.00 CHANGE £5.70 CLERK 1 00001 ER380 No.000011 Operating Instructions • 49 Totalling a Charge Sale Use the charge keys to track charge or credit card sales. See "Function Key Programming" in the "Program Mode Programming" chapter to change the descriptors for the charge tender functions. For example, you can use CHARGE 1 to track Visa card sales. The descriptor "VISA" will display on the function look up menu and print on the printer. You can also set tendering options for the charge keys, i.e. whether to allow over tendering or to enforce tendering. THANK -YOU 1. Register the items you wish to sell. 2. Press one of the charge keys if it is located on the keyboard: CHARGE 1 CALL AGAIN DATE 01/15/2003 WED 08:33 TIME PLU1 T1 £2.99 PLU1 T1 £2.99 4X £1.99 PLU2 £7.96 TAX1 £0.36 TOTAL £14.30 CHARGE1 £14.30 CLERK 1 00001 50 • Operating Instructions No.000011 ER380 Tendering a Charge Sale Tendering a charge sale may or may not be allowed. See "Function Key Programming" in the "Program Mode Programming" chapter to set tendering options for the charge keys, i.e. whether to allow over tendering or to enforce tendering. THANK-YOU 1. Register the items you wish to sell. 2. Enter the amount of the charge and press one of the charge keys if it is loc ated on the keyboard: 2 0 0 0 CHARGE 1 CALL AGAIN DATE 01/15/2003 WED 08:33 TIME PLU1 T1 £2.99 PLU1 T1 £2.99 4X £1.99 PLU2 £7.96 TAX1 £0.36 TOTAL £14.30 CHARGE1 £20.00 CHANGE £5.70 CLERK 1 00001 ER380 No.000011 Operating Instructions • 51 CHEQUE Cashing Cheque cashing means exchanging cash for a cheque. If you wish to cash cheques, you must place a CHQCASH key on the keyboard. See "Function Key Assignment" in the "Program Mode Programming" chapter. 1. Enter the amount of the cheque tendered by the customer. For example, for £20.00 enter: 2 0 0 THANK -YOU CALL AGAIN DATE 01/15/2003 WED 08:33 0 ***CHKCASH*** 2. Press CHQCASH: CHQ CASH 3. The display will indicate the amount of the cheque and the cash change. 52 • Operating Instructions TIME CHEQUE £20.00 CASH 20.00 CLERK 1 00001 No.000011 ER380 Split Tender Split tendering is paying for one transaction by more than one payment method. For example, a £20.00 sale could be split so £10.00 is paid in cash, and the remaining £10.00 is paid by a cheque. If necessary, you can make several different payments. THANK-YOU 1. Register the items you wish to sell. 2. Enter the amount of cash tendered by the customer. For example, enter £10.00 and press CASH: 1 0 0 0 CASH 3. The display will indicate the £10.00 cash tender and the £10.00 total still due. 4. Enter the amount of cheque tendered by the customer. For example, enter £10.00 and press CHEQUE: 1 0 0 0 CHEQUE CALL AGAIN DATE 01/15/2003 WED 08:33 TIME PLU2 00 £20 TOTAL £20.00 CASH £10.00 TOTAL £10.00 CHEQUE £10.00 CLERK 1 00001 No.000011 5. When the total tendered equals or exceeds the total due, the receipt will print and the transaction is complete. ER380 Operating Instructions • 53 Post Tender Post tendering means computing change after the sale has been totalled and the drawer is open. This feature is useful when a customer changes the amount of the tender. Normally, this function is not allowed. If you wish to allow post tendering, you must set the appropriate system option. THANK -YOU 1. Register the items you wish to sell. CALL AGAIN 2. Press CASH: DATE 01/15/2003 WED 08:33 TIME CASH 3. The display will indicate the total of the cash sale. 4. Enter the amount of the new tender, Press CASH: 2 0 0 0 CASH PLU1 T1 £2.00 TAX1 £0.12 CASH £2.12 CLERK 1 00001 No.000011 5. The display will indicate the change due. 54 • Operating Instructions ER380 Currency Conversion If you normally accept currency from neighbouring nations, you can program to convert the subtotal of a sale to the equivalent cost in the foreign currency. You can set up four separate conversion functions for different foreign currencies. To do this, you need to program the conversion factor. For example, if the pound (home currency) is worth approximately 63 euros (foreign currency), the conversion factor could be 0.632511. See "Function Key Programming" in the "Program Mode Programming" chapter to set a conversion factor. THANK-YOU 1. Register the items you wish to sell. 2. Press the CONV1 key if it is located on the keyboard: CALL A GAIN DATE 01/15/2003 WED 08:33 TIME CONV1 PLU1 T1 £2.00 TAX1 £0.12 3. Enter the amount of the foreign currency tender, Press CASH: 1 0 0 0 CASH 4. The display will indicate the amount of foreign currency tendered and display £5.17 change due. The change due is computed in home currency! ER380 TOTAL £2.12 CONV 1 €2.90 CHANGE RATE @1.3720 HOME AMT. £10.00 CHANGE £5.17 CLERK 1 00001 No.000011 Operating Instructions • 55 Not Found Key Operation The 380M has the ability to create a PLU within a sale. If during a sale a PLU is sold that does not exist an error tone will sound, follow the sequence below to create and sell the PLU. 1. If there is a PLU error tone during the item registration, Press NOT FOUND key. NOT FOUND 2. Enter a price of the PLU up to eight digits, (or "0" for no price)and press X/TIME key. Then the PLU code and price of the PLU will be automatically programmed and sold. X/TIME Descriptor - Refer to “Program 80 – Function Key Descriptor” 56 • Operating Instructions ER380 Table Management and Clerk Interrupt Operations Overview The ER-380 can employ a manual previous balance, hard check, or soft check system. (You must select hard or soft check posting in memory allocation programming - the default selection is soft.) There are two methods in ER-380 to manage check track. One is table management system and the other is clerk interrupt system. If you want to use clerk interrupt system. First, Program as below. To Enter Clerk Interrupt System (To Exit Table Management system ) 1.Program Clerk Secret Code 2.Set system option #2 to a value of 1. See “System Option Programming” 3.Set system option #26 to a value of 1. See “System Option Programming”. To Exit Clerk Interrupt System(To Enter Table Management system) Set system option #26 to a value of 0. See “System Option Programming” . ER380 Operating Instructions • 57 Soft Check Opening a Soft Check 1. Enter the number of the guest check, press the CHECK # key: 1 2 3 CHECK# or, press the CHECK # key to automatically assign a check: CHECK# 2. If required, enter the table number and press the TABLE key: 3 TABLE 3. If required, enter the number of guests and press the GUEST key: 2 GUEST 4. Register the items you wish to sell. Receipt Example: THANK -YOU CALL AGAIN DATE 01/15/2003 WED 08:33 TIME CHECK # #123 PBAL £0.00 TABLE #3 GUEST #2 CHICKEN £7.00 STEAK £10.00 SERVICE £17.00 BFWD £17.00 CLERK 1 00001 No.000011 5. To total the posting, press SERVICE: SERVICE Note: If a table number entry is required for all guest checks, and checks are assigned by register, the check will be assigned by the register when the table # is entered. 58 • Operating Instructions ER380 Adding to a Soft Check 1. Enter the number of the guest check, press the CHECK # key: 1 2 3 CHECK# or, if you entered a table number, enter the table number and press the TABLE key: 3 Receipt Example: THANK-YOU CALL AGAIN DATE 01/15/2003 WED 08:33 TIME CHECK # #123 PBAL £17.00 TABLE #3 TABLE 2. Register the next items you wish to sell. 3. To total the posting, press SERVICE: GARLIC BREAD £2.00 SERVICE £2.00 BFWD £19.00 SERVICE CLERK 1 00001 No.000012 Printing a Soft Check 1. Enter the number of the guest check, press the CHECK # key: Sample of soft check printed on the receipt: THANK-YOU 1 2 3 CHECK# or, if you entered a table number, enter the table number and press the TABLE key: 3 TABLE 2. Press PRINT CHECK to print the complete check. If programmed to do so, the PRINT CHECK key will automatically service the check: PRINT CHECK CALL AGAIN DATE 01/15/2003 WED 08:33 TIME CHECK # #123 PBAL £19.00 TABLE #3 CHICKEN £7.00 STEAK £10.00 GARLIC BREAD £2.00 SERVICE £0.00 BFWD £19.00 CHK # : 1 CLERK 1 00001 ER380 No.000012 Operating Instructions • 59 Paying a Soft Check 1. Enter the number of the guest check, press the CHECK # key: 1 2 3 CHECK# THANK -YOU CALL AGAIN DATE 01/15/2003 WED 08:33 or, if you entered a table number, enter the table number and press the TABLE key: 3 Sample of soft check printed on the receipt: TIME CHECK # #123 PBAL £19.00 TABLE #3 TABLE 2. If necessary, add additional items. If you wish to add a tip, press SBTL, then enter the tip amount and press the TIP key: TIP £3.00 CHECKS PAID £22.00 CASH £25.00 SBTL CHANGE £3.00 CHK # 3 0 0 TIP : 2 3. Pay the balance as you would normally tender a transaction, with CASH, CHEQUE, or one of the CHARGE functions. If the tender is greater than the balance due, change is displayed. 2 60 • Operating Instructions 5 0 0 CLERK 1 00001 No.000013 CASH ER380 Hard Check Opening a Hard Check 1. Enter the number of the guest check, press the CHECK # key: 1 2 3 CHECK# or, press the CHECK # key to automatically assign a check: CHECK# 2. If required, enter the table number and press the TABLE key: 3 TABLE 3. If required, enter the number of guests and press the GUEST key: 2 GUEST 4. Register the items you wish to sell. Receipt Example: THANK-YOU CALL AGAIN DATE 01/15/2003 WED 08:33 TIME CHECK # #123 PBAL £0.00 TABLE #3 GUEST #2 CHICKEN £7.00 STEAK £10.00 SERVICE £17.00 BFWD £17.00 CLERK 1 00001 No.000011 5. Place a slip in an optional slip printer, the check will print automatically when you press SERVICE: SERVICE ER380 Operating Instructions • 61 Adding to a Hard Check 1. Enter the number of the guest check, press the CHECK # key: 1 2 3 CHECK# or, if you entered a table number, enter the table number and press the TABLE key: 3 TABLE 2. Register the next items you wish to sell. 3. To total the posting, press SERVICE: SERVICE Receipt Example: THANK -YOU CALL AGAIN DATE 01/15/2003 WED 08:33 CHECK # #123 PBAL £17.00 TABLE #3 GARLIC BREAD £2.00 SERVICE £2.00 BFWD 19.00 CLERK 1 00001 62 • Operating Instructions TIME No.000012 ER380 X Mode Introduction All Management Functions take place with the control lock in the X position. This way only those with the correct key will have access to these functions. Some register operations may be programmed to require the control lock in the X position in order to operate. All reports require a key that will access the X or Z position. ER380 X Mode • 63 X Reports System reports are divided into two basic categories: • X reports, which read totals without resetting • Z reports, which read totals and reset them to zero Most reports are available in both categories. Some reports, such as the Cash-in-Drawer report and the From-To PLU report are available only as X reports. Some reports also provide identical but separate period to date reports. These reports maintain a separate set of totals, which may be allowed to accumulate over a period of days, weeks, months, or even years. X2 reports read period to date totals without resetting, and Z2 reports read period to date totals and reset them to zero. Period to date totals are updated each time a Z1 report is completed. A complete list of available reports is presented in a chart on the following page. An example is given for each of these reports in the pages that follow. Those reports which may be optionally abbreviated through register programming are represented twice. They are first shown with the option off, giving all totals, and again with the option turned on, showing the abbreviated version of the same report. Registers programmed with pop-up clerks must be signed on in the REG control lock position prior to taking reports. Running a Report – General Instructions 1. Refer to the “Report Table”. 2. Select a report type and the report mode. 3. Turn the control lock to the position indicated. 4. Enter the key sequence for the report you have selected. 64 • X Mode ER380 Report Table Report Type Financial Time All PLU All Clerk Group All STOCK VOID Daily Sales Report Number 1 2 3 4 5 6 7 8 Individual Clerk Report 9 MIX AND MATCH 10 Open Table ER380 11 Control Lock Position Key Sequence X 1 – SBTL Z Z 1 – SBTL X2 X 201 – SBTL Z2 Z 201 – SBTL X X 2 – SBTL Z Z 2 – SBTL X2 X 202 – SBTL Z2 Z 202 – SBTL X X 3 – SBTL Z Z 3 – SBTL X2 X 203 – SBTL Z2 Z 203 – SBTL X X 4 – SBTL Z Z 4 – SBTL X2 X 204 – SBTL Z2 Z 204 – SBTL X X 5 – SBTL Z Z 5 – SBTL X2 X 205 – SBTL Z2 Z 205 – SBTL X X 6 – SBTL Z Z 6 – SBTL X X 7 – SBTL Z Z 7 – SBTL X2 X 207 – SBTL Z2 Z 207 – SBTL X2 X 208 – SBTL Z2 Z 208 – SBTL X X 9 – SBTL - # -CLERK - # -CLERK X2 X 209 – SBTL - # -CLERK - # - CLERK X X 10 – SBTL Z Z 10 – SBTL X2 X 210 – SBTL Z2 Z 210 – SBTL X X 11 – SBTL Z Z 11 – SBTL Report Mode X X Mode • 65 Report Type TRAIN FINANCIAL From/To PLU Report Number 12 13 From/To PLU Control Lock Position Key Sequence X 12 – SBTL Z Z 12 – SBTL X2 X 212 – SBTL Z2 Z 212 – SBTL X X 13-SBTL XXXX – PLU – XXXX – PLU X2 X 213-SBTL XXXX – PLU – XXXX – PLU 14-SBTL XXXX –PLU – XXXX – PLU Report Mode X From/To STOCK 14 X X Minimum Stock 15 X X 16 – SBTL DRAWER TOTAL 111 X X 111-SBTL PRINT ALL EJ 300 X X 300 -SBTL PRINT EJ CASH 301 X X 301 -SBTL PRINT EJ CHECK 302 X X 302 -SBTL PRINT EJ MISC/T 303 X X 303 -SBTL PRINT EJ % 304 X X 304 -SBTL PRINT EJ RA/PO 305 X X 305 -SBTL PRINT EJ RETURN PRI NT EJ EC/VOID PRINT EJ NO SALE PRINT EJ CANCEL PRINT EJ TRAIN 306 X X 306 -SBTL 307 X X 307 -SBTL 308 X X 308 -SBTL 309 X X 309 –SBTL 311 X X 311 - SBTL PRINT VOID MODE PRINT EJ BY CLERK RESET EJ 312 X X 312 - SBTL 401 – 15 X X 401-415(depends on Max Clerk)-SBTL 399 Z Z 399- SBTL 66 • X Mode ER380 Cash Declaration If compulsory cash declaration is required, you must declare the count of the cash drawer prior to taking X or Z financial and clerk reports. You can enter the cash drawer total in one step, or to facilitate the countin g of the cash drawer, you can enter each type of bill/coin and cheques separately and let the register act as an adding machine. You can also use the X/TIME key to multiply the denomination of currency times your count. Either way you choose to enter cash, the register will compare your declaration with the expected cash and cheque in drawer totals and print the over or short amounts on the report. For example: 1. Turn the control lock to the X or Z position (depending upon the type of report you are taking.) THANK -YOU CALL A GAIN 2. Press the CASH key. 9 0 DATE 08:33 SBTL 8 7 0 0 TIME CASH £98.76 6 CASH 0 CASH £20.00 CASH £118.76 4. Enter the total of cheques. 2 WED *** CASH DECLARATION ** 3. Enter the total of cash. 9 01/15/2003 CHEQUE CLERK 1 00001 No.000011 5. Press the CASH key to total the declaration. CASH ER380 X Mode • 67 Service Mode Programming Overview The following procedures are done from the Service Mode menu: • Clear all totals • Clear grand total • Clear PLU file • EPROM Information • Memory Allocation • Assignment of functions to keyboard locations • RS232C Port 68 • Service Mode Programming ER380 Ram Clear & Memory Allocation 1. Turn the key to the S mode and power on the register whilst holding down the CHEQUE key. Then press the top left, bottom left, top right and bottom right keys to start the memory allocation procedure. If you want to allocate memory by default value, Press CASH key only, Alternatively: Refer to the chart below . Enter the index number and press the X/TIME key. X X/TIME X MEMORY ITEM 1 2 3 4 5 6 7 8 9 PLU CLERK GROUP CHECK# SOFT CHECK LINE CHECK TYPE : Hard(1), Soft(0) PRICE LEVEL MIX AND MATCH ELECTRONIC JOURNAL Note:- ***The number of clerks must be equal to or less than the number of check# details entered in file 4. 2. Enter the Number to allocate for the Memory Item and Press CASH key. See the example data table below N CASH MEMORY ITEM PLU CLERK GROUP CHECK # SOFT CHECK LINE CHECK TYPE PRICE LEVEL MIX AND MATCH ELECTRONIC JOURNAL N 300 (Max.5000) 10 (Max. 99) 20 (Max. 99) 15 (Max. 500) 30 (Max. 100) 0(Soft Check), 1(Hard Check) 1 (Max. 2) 10 (Max. 99) 3000(Max. 15000) Default Memory Allocation 3. If you want to finish memory allocation, Enter CASH key with no numeric key input. And if you want to allocate another memory area, Repeat the file number entry sequence. ER380 Service Mode Programming • 69 CASH 70 • Service Mode Programming ER380 Clear Totals 1.Turn the control lock to the S position. 2.To Reset Totals, enter 20, press the SBTL key. 2 0 SBTL 3. Press the X/TIME key to confirm. X/TIME 4. Press CASH key to finalise CASH Clear Grand Totals 1.Turn the control lock to the S position. 2. To Reset Grand Totals, enter 30, press the SBTL key. 3 0 SBTL 3. Press the /TIME key to confirm. X/TIME 4. Press CASH key to finalise CASH ER380 Service Mode Programming • 71 Clear PLU File 1.Turn the control lock to the S position. 2.To Reset PLU file, enter 40, press the SBTL key. 4 0 SBTL 3. Press the /TIME key to confirm. X/TIME 4. Press the CASH key to finalise CASH Eprom Information 1.Turn the control lock to the S position. 2.To Scan Eprom Information, enter 50, press the SBTL key. 5 0 SBTL Memory Allocation 1.Turn the control lock to the S position. 2.To Scan Eprom Information, enter 60, press the SBTL key. 6 0 SBTL Load Default Keyboard 1.Turn the control lock to the S position. 2.Turn the power switch to the OFF position . 3.Press and hold the SUBTOTAL key. While continuing to hold the SUBTOTAL key, turn the power switch to the ON position. 72 • Service Mode Programming ER380 Initial Clear 1.Turn the control lock to the P position. 2.Turn the power switch to the OFF position . 3.Press and hold the CASH key. While continuing to hold the CASH key, turn the power switch to the ON position. PC Online Mode In ER-380, There are no special commands to enter PC Online Mode. When you want to enter PC Online mode, All you have to do is to set 232 Communication Option in Programming. When PC sends commands to the ECR, the ECR will be automatically in Online Mode if connected. ER380 Service Mode Programming • 73 Function Key Assignment Programming Function keys may be relocated, inactivated or changed with this program. For example, you may wish to place functions, such as PREVIOUS BALANCE and SERVICE that are not placed on the default keyboard. Or perhaps, you may wish to remove a function, such as CANCEL, for security reasons. Please note the following limitations: • If you assign a duplicate of a function code, the duplicate will function exactly as the original - you will not get separate totals and counters on reports for the duplicated key. • You can reassign keys only in locations that are programmable. See "Keyboards", where the key locations that may be programmed are identified. To Assign a Function Key to a Location: 1. Turn the control lock to the S position. 2. Enter 70, press the SBTL key. 7 0 SBTL 3. Refer to Function Key Codes to find the code for the key you wish to assign, press the location you wish to program. Repeat this step to assign another key. Key Location Key Code 4. Press the CASH key to finalise key assignment program. CASH 74 • Service Mode Programming ER380 Function Key Codes Code Function Code Function Code Function Code Function 1 NLU 1 43 CHARGE 7 73 MACRO 9 103 VOID ITEM 12 NLU 12 44 CHARGE 8 74 MACRO 10 104 WASTE 15 Numeric 1 45 CHEQUE CASHING 75 MDSE RETURN 105 VALIDATION 16 Numeric 2 46 ENDORSE 76 MODIFIER 1 106 PAYMENT 17 Numeric 3 47 CHEQUE TEND 77 MODIFIER 2 107 RCPT ON/OFF 18 Numeric 4 48 CHECK # 78 MODIFIER 3 108 INACTIVE 19 Numeric 5 49 CLEAR (ESC) 79 MODIFIER 4 109 NON ADD 20 Numeric 6 50 CLERK # 80 MODIFIER 5 110 PRICE CHANGE 21 Numeric 7 51 CURR. CONV. 1 81 P/BAL 111 CLERK 1 22 Numeric 8 52 CURR. .CONV. 2 82 PAID OUT 1 112 CLERK 2 23 Numeric 9 53 CURR. CONV. 3 83 PAID OUT 2 113 CLERK 3 24 Numeric 0 54 CURR. CONV. 4 84 PAID OUT 3 114 CLERK 4 25 Numeric 00 55 ANALISE 2 85 PAPER FEED 115 CLERK 5 26 DECIMAL 56 ANALISE 1 86 PRINT CHECK 116 CLERK 6 27 #/NS 57 ERR CORRECT 87 PROMOTION 117 CLERK 7 28 %1 58 F/S SHIFT 88 REC ON ACCT 1 118 CLERK 8 29 %2 59 F/S SUB 89 REC ON ACCT 2 119 CLERK 9 30 %3 60 F/S TEND 90 REC ON ACCT 3 120 CLERK 10 31 %4 61 GUEST 91 SUBTOTAL 121 PRICE INQ 32 %5 62 PLU 92 SCALE 122 ADD STOCK 33 QTY/TIME 63 PRICE LEVEL 1 93 SERVICE 123 DEDUCT STOCK 34 ADD CHECK 64 PRICE LEVEL 2 94 TABLE # 124 35 CANCEL 65 MACRO 1 95 TARE 125 OVERWRITE STOCK NOT FOUND 36 CASH 66 MACRO 2 96 ANALISE 3 126 STOCK INQUIRE 37 CHARGE 1 67 MACRO 3 97 TAX EXEMPT 127 CHARGE # 38 CHARGE 2 68 MACRO 4 98 TAX SHIFT 1 128 MACRO # 39 CHARGE 3 69 MACRO 5 99 TAX SHIFT 2 40 CHARGE 4 70 MACRO 6 100 TAX SHIFT 3 41 CHARGE 5 71 MACRO 7 101 TAX SHIFT 4 42 CHARGE 6 72 MACRO 8 102 TIP ER380 Service Mode Programming • 75 RS232C Port Options Turn the control lock to the S position To program PORT1 enter 80 and press SBTL key. Repeat for another Index 8 0 SBTL N1 XTIME N2 CASH CASH N1 OPTION N2 VALUE 1 Baud Rate 0 9600 BPS 1 1200 BPS 2 2400 BPS 3 4800 BPS 4 19200 BPS 0 NONE 1 ODD 2 EVEN 0 8 BITS 1 7 BITS 0 1 BIT 1 2 BIT 0 NONE 1 PC 2 Not Used 3 RJ PRINTER 4 RECEIPT PRINTER 6 SCANNER 7 COIN 8 EFT 9 POLE 2 3 4 5 Parity Data Bits Stop Bits Device Function 6 Initial Feeding Line KP 0 - 20 7 End Feeding Line KP 0 - 20 8 Initial Feeding Line Slip 0 - 20 9 Print Line On Guest Check 0 - 50 Scale Type (Non UK) 76 • Service Mode Programming 0 NCI ER380 ER380 N1 OPTION 10 Scale Type (Non UK) N2 VALUE 0 NCI 1 CAS Service Mode Programming • 77 Printer Type 11 12 13 Pole Display EFT TYPE – (Non Uk) 14 EFT CONFIG BYTE (Non Uk) 15 EFT CURRENCY (Non Uk) 16 EFT PASSWORD (Non Uk) 78 • Service Mode Programming 0 NONE 1 SAMSUNG SRP-100 2 SRP-250 3 SRP-300 4 SRP-350 5 CITIZEN3550 6 CITIZEN810 7 CITIZEN230 8 EPSON TMT88-2 9 EPSON U200 10 EPSON U295 11 EPSON U300 12 EPSON U325 13 EPSON U375 14 STAR SP-200 15 STAR SP-298 16 STAR SP-300 17 STAR TSP-200 0 EPSON 1 ICD 0 EFT GLED 1 EFT INGE 2 EFT ZVT700 0 - 127 0 NONE 1 DM 2 EURO 0- 99999999 ER380 Program Mode Programming Default Programming • All keyboard PLUs are non-taxable and open, without entry limits by default status programming of "00000000". • All system options are set to 0 in default programming, unless otherwise noted. Change only the options, which will deviate, from default programming. There is no need to re-enter an option status of 0, since 0 is its original setting. • All programming (unless otherwise stated) is done with the control lock in the P position. Each section details a specific area of register programming. Descriptor Programming Methods Descriptors are programmable for PLUs, function keys, groups, clerks and the logo/messages. There is a method available to program descriptors the Descriptor Code Method. ER380 Program Mode Programming • 79 Program Overlay Method ER380 Alpha Keyboard Overlay 7 8 9 M Q U X SPACE C F I 4 5 6 L P T W Z B E H 1 2 3 K O S V Y A D G 0 00 . J N R 80 • Program Mode Programming ER380 Descriptor Code Descriptor Code Chart CHAR Ç ü é â ä à å ç ê ë CODE 001 002 003 004 005 006 007 008 009 010 CHAR è ï î ì Ä Å É æ ? ô 020 CODE 011 012 013 014 015 016 017 018 019 CHAR ö ò û ù ÿ Ö Ü ¢ £ ¥ CODE 022 023 024 0250 026 027 028 029 030 CHAR 021 € SPACE ! " # $ % & ' ( CODE 031 032 033 034 035 036 037 038 039 040 CHAR ) * + , - . / 0 1 2 CODE 041 042 043 044 045 046 047 048 049 050 CHAR CODE 3 051 4 052 5 053 6 054 7 055 8 056 9 057 : 058 ; 059 < 060 CHAR CODE = 061 > 062 ? 063 @ 064 A 065 B 066 C 067 D 068 E 069 F 070 CHAR CODE G 071 H 072 I 073 J 074 K 075 L 076 M 077 N 078 O 079 P 080 CHAR Q R S T U V W X Y Z CODE 081 082 083 084 085 086 087 088 089 090 a b c d CHAR ER380 CODE 091 092 093 094 095 096 097 098 099 100 CHAR CODE e 101 f 102 g 103 h 104 I 105 j 106 k 107 l 108 m 109 n 110 CHAR CODE o 111 p 112 q 113 r 114 s 115 t 116 u 117 v 118 w 119 x 120 CHAR CODE y 121 z 122 BACK SPACE 123 Double 999 Program Mode Programming • 81 Tax Programming The ER-380 has the capability to support four separate taxes. Taxes can be calculated as either a straight percentage rate of between .001% and 99.999%, or a 60 break point tax table. Each tax may be either an add-on tax (added to the cost of a taxable item), or a value added tax (VAT) that is included in the price of the item. Tax rate 4 may be set to function as the Canadian Goods & Services Tax (GST). Definitions for tax rates 1, 2, 3 & 4 are made as part of tax programming. • If you are entering a tax rate (add-on or VAT), see "Straight Percentage Tax Rate Programming" to enter the percentage rate. • If you are entering a Canadian Goods and Services Tax (GST), use tax rate 4 for the GST tax, and use tax rates 1, 2 and/or 3 for any other provincial tax or taxes. See "Straight Percentage Tax Rate Programming" to enter the GST status and percentage rate. Important Note: After you have entered your tax program(s), test for accuracy by entering several transactions of different amounts. Carefully check to make sure the tax charged by the cash register matches the tax on the printed tax chart for your area. As a merchant, you are responsible for accurate tax collection. If the cash register is not calculating tax accurately, contact your dealer for assistance. Descriptor - Refer to “Program 80 – Function Key Descriptor” Straight Percentage Tax Rate Programming When tax requirements may be met using a straight percentage rate, use the following method to program a tax as a straight percentage. Programming Straight Percentage Tax Rates and Status 1. Turn the control lock to the P position. 2. If the tax is a percentage rate, with a decimal (0.000-99.999), it is not necessary to enter preceding zeros. For example, for 6%, enter 06.000 or 6.000. 3. For the type of tax: If the tax is a percentage added to the sale (normal add on tax), enter: 0 If the tax is a percentage value added tax (VAT; calculated as part of the sale), enter: 2 82 • Program Mode Programming ER380 4. Enter 0 here for all taxes, unless you are programming tax 4 as a Canadian GST. If tax 4 is a Canadian GST, enter the sum of the options below: OPTION VALUE GST (tax 4) is taxable by rate 1? Yes = 1 No = 0 GST (tax 4) is taxable by rate 2? Yes = 2 No = 0 GST (tax 4) is taxable by rate 3? Yes = 4 No = 0 = SUM 5. Press the Tax Shift key for the tax you are programming. 6. Press the CASH key to end programming. Tax Rate Programming Flowchart TAX SHIFT (1/2/3/4) . Tax Rate You must enter decimal ER380 Tax type CASH GST tax Info Program Mode Programming • 83 PLU Programming All PLUs, whether they are registered by pressing a PLU key on the keyboard, or by entering the PLU number and pressing the PLU key, have the same programming options. These options are set through separate programs: • Program 100 – PLU Status Programming determines whether the PLU is open, preset or inactive. Also selected here are tax, food stamp, scale, negative, single item, hash, gallonage, compulsory number entry, compulsory validation, compulsory condiment and print options. • Program 150 – PLU Group Assignment allows you to select up to two groups where each PLUs sale will accumulate. • Program 200 - PLU Price/HALO Programming determines the PLU price if the PLU is preset, or the high amount lock out (HALO) if the PLU is open. • Program 250 - PLU Stock Amount Programming and ADD STOCK function key. • Program 300 - PLU Descriptor Programming allows you to set a unique, up to 18 character, descriptor for each PLU. • Program 350 - PLU Link Programming allow you to link a PLU to another PLU, so that registration of the first PLU will automatically trigger registration of the linked PLU. • Program 400 - PLU Delete Programming allows you to delete the PLU. • Program 450 - PLU Mix & Match Programming. Allows you to set promotion offers. • Program 999 – Lead Thru PLU programming 84 • Program Mode Programming ER380 Program 100 - PLU Status Programming 1. Turn the control lock to the P position. 2. To begin the program, enter 1 0 0, press the SBTL key. 1 0 0 SBTL 3. Select the PLU or PLUs you wish to program in one of the following ways: • Press a PLU key on the keyboard, or PLU • Press the first PLU keys that are to receive the same status and Press the last PLU keys, or PLU • PLU Enter up to 15 digit number of the PLU and press the PLU key, or Enter the PLU#, up to 15 digits • PLU Enter the number of the first PLU in a range of PLUs that are to receive the same setting; press the PLU key. Enter the last number in the range; press the PLU key. Enter the PLU#, up to 15 digits Enter the PLU#, up to 15 digits PLU PLU 4. Refer to the "PLU Status Chart" to determine the values for N1 through N9. (If an address offers more than one option, add the values for each option and enter the sum. For example, if you wish the PLU to be taxable by rates 1 and 3, add the values for your choices, 1 + 4, and enter the sum "5" for address N5.) Enter the values you have selected, press the X/TIME key. (You do not need to enter preceeding zeros. For example, if you are only selecting a value for N8, i.e. print price on guest check number 1, just enter 10.) N1 N2 N3 N4 N5 N6 N7 N8 N9 X/TIME 5. To program additional PLUs, repeat from step 3, or press the CASH key to finalise the program. CASH ER380 Program Mode Programming • 85 PLU Status Chart Address N1 N2 N3 N4 N5 N6 N7 Program Option Value PLU is preset? Yes = 0 No = 1 PLU is override preset ? Yes = 0 No = 2 PLU is taxable by rate 1? Yes = 4 No = 0 PLU is taxable by rate 2? Yes = 1 No = 0 PLU is taxable by rate 3? Yes = 2 No = 0 PLU is taxable by rate 4? Yes = 4 No = 0 PLU is food stamp eligible? Yes = 1 No = 0 PLU is negative item? Yes = 2 No = 0 PLU is hash? Yes = 4 No = 0 PLU is single item? Yes = 1 No = 0 Compulsory non-add number? Yes = 2 No = 0 PLU is gallonage? Yes = 4 No = 0 PLU is inventory? Yes = 1 No = 0 PLU is inactive? Yes = 2 No = 0 PLU is a condiment? Yes = 2 No = 0 Compulsory condiment entry? Yes = 4 No = 0 Print PLU on receipt? Yes = 0 No = 1 = Sum Not Used N8 N9 Print PLU on check? Yes = 0 No = 4 Print item’s price on receipt? Yes = 0 No = 1 Print item’s price on check? Yes = 0 No = 2 PLU is disabled PROMO function? Yes = 4 No = 0 Allow Discounts Yes = 0 No = 1 PLU is preset override in MGR control? Yes = 2 No = 0 PLU is price change Item Yes = 4 No = 0 86 • Program Mode Programming ER380 Program 150 - PLU Group Assignment Each PLU may report to any three levels of groups. Group totals appear on reports, so that you can track sales of different types of items. A group can also be used to designate items that are to print on an optional kitchen printer. Note: The PLU will report to group "0", if not programmed to report to groups 1-20. 1. Turn the control lock to the P position. 2. To begin the program, enter 1 5 0, press the SBTL key. 1 5 0 SBTL 3. Select the PLU or PLUs you wish to program in one of the following ways: • Press a PLU key on the keyboard, or PLU • Press the first PLU keys that are to receive the same status and Press the last PLU keys, or PLU • PLU Enter up to 15 digit number of the PLU and press the PLU key, or Enter the PLU#, up to 15 digits • PLU Enter the number of the first PLU in a range of PLUs that are to receive the same setting; press the PLU key. Enter the last number in the range; press the PLU key. Enter the PLU#, up to 15 digits PLU Enter the PLU#, up to 15 digits PLU 4. Enter up to three 2-digit numbers representing the groups where you wish to add the PLUs sales, i.e. enter 1 0 for group 10 or enter 0 4 for group four. Press the X/TIME key. X/TIME st 3 Group nd 2 Group rd 1 Group 5. To program additional PLUs, repeat from step 3, or press the CASH key to finalise the program. CASH ER380 Program Mode Programming • 87 Program 200 - PLU Price/HALO Programming If a PLU is open, set the HALO (high amount lock out) here. If a PLU is preset set the preset price here. If a PLU is set with gallonage status, enter the price per gallon here. (Enter price per gallon in tenths of a penny, i.e. 1299 for £1.29 9/10 per gallon.) 1. Turn the control lock to the P position. 2. To begin the program, enter 2 0 0, press the SBTL key. 2 0 0 SBTL 3. Select the PLU or PLUs you wish to program in one of the following ways: • Press a PLU key on the keyboard, or PLU • Press the first PLU keys that are to receive the same status and press the last PLU keys, or PLU • PLU Enter up to 15 digit number of the PLU and press the PLU key, or Enter the PLU#, up to 15 digits • PLU Enter the number of the first PLU in a range of PLUs that are to receive the same setting; press the PLU key. Enter the last number in the range; press the PLU key. Enter the PLU#, up to 15 digits PLU Enter the PLU#, up to 15 digits PLU 4. If the PLU is open, enter a HALO of up to 7 digits. If the PLU is preset, enter a preset price. X/TIME Price/HALO If the PLU Price Level is 2, Repeat this again. X/TIME Price/HALO 5. To program additional PLUs, repeat from step 3, or press the CASH key to finalise the program. CASH 88 • Program Mode Programming ER380 Program 250 - PLU Stock Amount Programming With this program, you can you can add stock to the PLU sales counters for PLUs you have designated as stock keeping PLUs. 1. Turn the control lock to the P position. 2. To begin the program, enter 2 5 0, press the SBTL key. 2 5 0 SBTL 3. Select the PLU or PLUs you wish to program in one of the following ways: • Press a PLU key on the keyboard, or PLU • Press the first PLU keys that are to receive the same status and Press the last PLU keys, or PLU • PLU Enter up to 15 digit number of the PLU and press the PLU key, or Enter the PLU#, up to 15 digits • PLU Enter the number of the first PLU in a range of PLUs that are to receive the same setting; press the PLU key. Enter the last number in the range; press the PLU key. Enter the PLU#, up to 15 digits PLU Enter the PLU#, up to 15 digits PLU 4. Enter the stock amount you wish to add (up to six digits), press the X/TIME key. X/TIME Stock Amount 5. To program additional PLUs, repeat from step 3, or press the CASH key to finalize the program. CASH ER380 Program Mode Programming • 89 PLU Stock Programming By ADD / DEDUCT / OVERWRITE KEY There are three keys to program stock. ADD, DEDUCT,OVERWRITE. 1.Turn the control lock to the P position. 2.To begin the program, Press ADD STOCK, DEDUCT STOCK, OVERWRITE STOCK, Keys on the Keyboard Location. 3. Select the PLU or PLUs you wish to program in one of the following ways: • Press a PLU key on the keyboard, or PLU • Press the first PLU keys that are to receive the same status and Press the last PLU keys, or PLU • PLU Enter up to 15 digit number of the PLU and press the PLU key, or Enter the PLU#, up to 15 digits • PLU Enter the number of the first PLU in a range of PLUs that are to receive the same setting; press the PLU key. Enter the last number in the range; press the PLU key. Enter the PLU#, up to 15 digits PLU Enter the PLU#, up to 15 digits PLU 4. Press ADD STOCK, DEDUCT STOCK, REPLACE STOCK key. 5.Enter the stock amount you wish to add (up to six digits), press the X/TIME key. X/TIME Stock Amount 6.To program additional PLUs, repeat from step 3, or press the CASH key to finalise the program. CASH 90 • Program Mode Programming ER380 Program 280 - PLU Minimum Stock Amount Programming Turn the control lock to the P position. 1. To begin the program, enter 2 8 0, press the SBTL key. 2 8 0 SBTL 2. Select the PLU or PLUs you wish to program in one of the following ways: • Press a PLU key on the keyboard, or PLU • Press the first PLU keys that are to receive the same status and press the last PLU keys, or PLU • PLU Enter up to 15 digit number of the PLU and press the PLU key, or Enter the PLU#, up to 15 digits • PLU Enter the number of the first PLU in a range of PLUs that are to receive the same setting; press the PLU key. Enter the last number in the range; press the PLU key. Enter the PLU#, up to 15 digits PLU Enter the PLU#, up to 15 digits PLU 3. Enter the stock amount you wish to add (up to 4 digits), press the X/TIME key. X/TIME Stock Amount 4. To program additional PLUs, repeat from step 3, or press the CASH key to finalise the program. . ER380 CASH Program Mode Programming • 91 Program 300 - PLU Descriptor Programming Program descriptors by entering three digit alpha character codes. 1. Turn the control lock to the P position 2. To begin the program, enter 3 0 0, press the SBTL key. 3 0 0 SBTL 3. Select the PLU you wish to program in one of the following ways: • Press a PLU key on the keyboard, or PLU • Enter up to 15 digit number of the PLU and press the PLU key, or Enter the PLU#, up to 15 digits PLU 4. If you are programming using alpha overlay; Type up to 18 descriptor keys X/TIME or, Enter up to 18 three-character codes X/TIME 5. To program additional PLUs, repeat from step 3, or press the CASH key to finalise the program. CASH 92 • Program Mode Programming ER380 Program 350 - PLU Link Programming PLU link programming allows you to link a PLU to another PLU, so that registration of the first PLU will automatically trigger registration of the linked PLU. For example, you may wish to link a bottle deposit with the sale of beverages, or you may wish to register a group of items normally sold together. 1. Turn the control lock to the P position. 2. To begin the program, enter 3 5 0, press the SBTL key. 3 5 0 SBTL 3. Select the PLU you wish to program in one of the following ways: • Press a PLU key on the keyboard, or PLU • Enter up to 15 digit number of the PLU and press the PLU key, or Enter the PLU#, up to 15 digits PLU 4. Enter the number of the PLU you wish the PLU linked to; press the PLU key. Or press the PLU key on the keyboard you wish the PLU linked to. Enter the PLU#, up to 15 digits PLU OR PLU If you want to unlink, 0 PLU 5. To program additional PLUs, repeat from step 3, or press the CASH key to finalise the program. CASH ER380 Program Mode Programming • 93 Program 400 – PLU Delete Programming NOTE: To delete a PLU, all totals for the PLU must be cleared from Z reports(including Stock and PLU reports.) 1. Turn the control lock to the P position. 2. To begin the program, enter 4 0 0, press the SBTL key. 4 3. 0 0 SBTL Select the PLU or PLUs you wish to program in one of the following ways: • Press a PLU key on the keyboard, or PLU • Press the first PLU key to be deleted, then press the last PLU key to be deleted, or PLU • PLU Enter up to 15 digit number of the PLU and press the PLU key, or Enter the PLU#, up to 15 digits • PLU Enter the number of the first PLU in a range to be deleted and press the PLU key, then enter the last number in the range, and press the PLU key. Enter the PLU#, up to 15 digits PLU Enter the PLU#, up to 15 digits PLU 4. Press X/TIME key. X/TIME 5. To program additional PLUs, repeat from step 3, or press the CASH key to finalise the program. CASH 94 • Program Mode Programming ER380 Program 450 - PLU MIX & MATCH Programming 1. Turn the control lock to the P position. 2. To begin the program, enter 4 5 0, press the SBTL key. 4 5 0 SBTL 3. Select the PLU you wish to be linked to the mix & match table: • Press a PLU key on the keyboard, or PLU • Press the first PLU to be linked, then the PLU key, and the last PLU in the range, or PLU • PLU Enter up to 15 digit number of the PLU and press the PLU key, or Enter the PLU#, up to 15 digits • PLU Enter the number of the first PLU in the range, and press the PLU key, then enter the last PLU number in the range and press the PLU key. Enter the PLU#, up to 15 digits PLU Enter the PLU#, up to 15 digits PLU 4. Enter the number of the Mix & Match Table then press the X/TIME key. X/TIME 5. To program additional PLUs, repeat from step 3, or press the CASH key to finalise the program. CASH ER380 Program Mode Programming • 95 Program 999 – ALL PLU Programming 1. Turn the control lock to the P position. 2. To begin the program, enter 999, press the SBTL key. 9 3. 9 9 SBTL Enter the PLU you wish to program all. • Press a PLU key on the keyboard, or PLU Enter up to 15 digit number of the PLU and press the PLU key, or Enter the PLU#, up to 15 digits PLU 4. Enter the PLU STATUS and press the X/TIME key. N1 N2 N3 N4 N5 N6 N7 N8 N9 X/TIME 5. Enter the PLU GROUP LINKED and press the X/TIME key. X/TIME st 3 Group nd 2 Group rd 1 Group 6. Enter the PLU PRICE/HALO and press the X/TIME key. X/TIME Price/HALO If the PLU Price Level is 2, Repeat this again. X/TIME Price/HALO 96 • Program Mode Programming ER380 8. Enter the PLU DESCRIPTOR and press the X/TIME key. Type up to 18 descriptor keys X/TIME or, Enter up to 18 three-character codes X/TIME 9. Enter the PLU MIX AND MATCH LINK TABLE and press the X/TIME key. X/TIME 10. Press the CASH key to finalise the program. CASH ER380 Program Mode Programming • 97 System Option Programming Refer to the “System Option Table” to review the system options. Read each option carefully to determine if you wish to make any changes. NOTE: Because after clearing memory all option settings are automatically set to 0, and because your most likely option selections require a status setting of 0, you do not need to program this section unless you wish to change the default status. Programming a System Option: 1. Turn the control lock to the P position. 2. Enter 3 0, press the SBTL key. 3. Enter a system option address, press the X/TIME key. 4. Enter the number representing the status you have selected, or if there is more than one decision to be made in an address, add the values representing your choices for each decision and enter the sum. Press the SBTL key. 5. Repeat from step 3 for each system option that you wish to change. 6. Press the CASH key to end system option programming. System Option Flowchart Repeat for each System Option 3 0 SBTL X/TIME Option # 98 • Program Mode Programming SBTL CASH Status ER380 System Option Table Address 1 2 3 SYSTEM OPTION VALUE Beeper is active? Yes = 0 No = 1 % will not affect net sale s? Yes = 2 No = 0 Clerk sign on method is: direct entry = 0 code entry = 1 Clerks are: pop-up stay down 4 5 = = SUM 1 = 0 Enforce closed drawer for register operating? Yes = 0 No = 1 Open drawer alarm is active? Yes = 2 No = 0 The number of seconds before the open drawer warning tone sounds 1-99 (default is 30 seconds). 6 7 8 9 Allow the post-tender function? Yes = 0 No = 1 Drawer is opened on post tender? Yes = 0 No = 2 Allow multiple receipts? Yes = 0 No = 4 Cash declaration is compulsory before report may be taken? Yes = 1 No = 0 Allow negative balance sales in the X control lock position only? Yes = 2 No = 0 Allow zero balance sales in the X control lock position only? Yes = 1 No = 0 Consecutive number is reset after a financial report? Yes = 2 No = 0 Grand total is reset after a Z Financial report? Yes = 1 No = 0 Cash drawer will open when reports are run? Yes = 0 No = 2 Open drawer during training mode? Yes = 0 No = 4 10 Decimal place : (0,1,2,3) default=2 11 Date format is: DDMMYY = 0(default) MMDDYY = 1 YYMMDD ER380 0-3 = 2 Program Mode Programming • 99 12 13 14 Percentage and Tax calculations will: 16 17 18 0(default) always round up = 1 always round down = 2 Split price round up at 0.005 = 0(default) calculations will: always round up = 1 always round down = 2 Analysis procedure compulsory before tendering is allowed? Hash is 15 round up at 0.005 = Yes = 1 No = 0 non-add = 0 Normal = 2 Reset the Financial report Z counter after a Z1 Financial report? Yes = 1 No = 0 Reset the Time report Z counter after a Z1 Time report? Yes = 2 No = 0 Reset the PLU report Z counter after a Z1 PLU report? Yes = 4 No = 0 Reset the Clerk report Z counter after a Z1 Clerk report? Yes = 1 No = 0 Reset the Group report Z counter after a Z1 Group report? Yes = 2 No = 0 Reset the Daily sale report Z counter after a Z2 Daily sale report? Yes = 1 No = 0 Paper sensor is enabled? Yes = 0 No = 2 Split pricing is deactivated? Yes = 4 No = 0 Multiple preset PLU by entering the quantity? Yes = 1 No = 0 Not Used 19 The number of numeric digits: 0 is no limit 100 • Program Mode Programming 0-14 ER380 20 Allow direct multiply by more than one digit? Tender amount is: 21 22 24 25 26 validation amount tendered amount of sale Yes = 0 No = 1 = = 2 0 Display add price of linked item? Yes = 1 No = 0 Allow sale when stock reaches “0”? Yes = 0 No = 2 Allow Euro Rounding Yes = 4 No = 0 Not used Allow Z stock report? Yes =2 No = 0 Electronic Journal enable ? Yes = 1 No = 0 Prompt operator when Electronic Journal is full Yes = 0 No = 2 Stop operation when Electronic Journal is full Yes = 4 No = 0 Send only negative entries to Electronic Journal Yes = 1 No = 0 Send reset report to Electronic Journal Yes = 2 No = 0 Disable Cash Declaration? Yes = 4 No = 0 Table Management Clerk Interrupt = 0 = 1 Overlay Descriptor not alpha code entry? Yes = 0 No = 2 Do not totalise in void mode? 27 28 29 ER380 Disable level keys: Price level is: Modifier is: Yes = 4 No = 0 Level1 = 1 Level2 = 2 Pop-up after item = 0 Pop-up after sale = 1 Stay-down 2 = Pop-up after item = 0 Pop-up after sale = 1 Stay-down 2 = Program Mode Programming • 101 30 Base Currency Euro Home Print Euro Amount Total 1 0 Yes = 2 No = 0 Print Euro Input Amount Yes = 4 No = 0 31 Print Euro Change Yes = 1 No = 0 Don’t Print in Void Mode Yes = 2 No = 0 Don’t Print Guest Check at Finalization Yes = 4 No = 0 102 • Program Mode Programming ER380 Print Option Programming Refer to the “Print Option Table” to review the print options. Read each option carefully to determine if you wish to make any changes. NOTE: After clearing memory all option settings are automatically set to 0, and because your most likely option selections require a status setting of 0, you do not need to program this section unless you wish to change the default status. Programming a Print Option: 1. Turn the control lock to the P position. 2. Enter 4 0, press the SBTL key. 3. Enter a print option address, press the X/TIME key. 4. Enter the number representing the status you have selected, or if there is more than one decision to be made in an address, add the values representing your choices for each decision and enter the sum. Press the SBTL key. 5. Repeat from step 3 for each print option that you wish to change. 6. Press the CASH key to end print option programming. Print Option Flowchart Repeat for each Print Option 4 0 SBTL X/TIME Option # SBTL Status System option is Overlay descriptor method and Index is 8,14,15,16,17 ER380 CASH X/TIME Program Mode Programming • 103 Print Option Table Address 1 2 3 4 5 6 7 PRINT OPTION VALUE Print media total on clerk report? Yes = 1 No = 0 Print tax symbol? Yes = 0 No = 2 Void/Return totals will print on the Financial report? Yes = 0 No = 1 Audaction total will print on the Financial report? Yes = 2 No = 0 Skip media totals with zero activity on the Financial report? Yes = 0 No = 1 Skip media totals with zero activity on the Clerk report? Yes = 0 No = 2 Print Clerk report at the end of the Financial report? Yes = 4 No = 0 Print PLU sale item number? Yes = 1 No = 0 Print PLU with zero totals on report? Yes = 2 No = 0 Subtotal is printed when the SBTL key is pressed? Yes = 4 No = 0 Print percentage of sales on the PLU report? Yes = 1 No = 0 Print consecutive number counter on receipt? Yes = 0 No = 2 Print date on receipt? Yes = 0 No = 1 Print time on receipt? Yes = 0 No = 2 Print machine number on receipt? Yes = 0 No = 4 Print clerk name on receipt? Yes = 0 No = 1 Print Z counter on reports? Yes = 0 No = 2 Home Currency symbol (see note1 below) 9 Print receipt when sign on/off? Yes = 1 No = 0 Print Grand total on the X Financial report? Yes = 0 No = 2 Print Grand total on the Z Financial report? Yes = 0 No = 4 Print Gross total on the X Financial report? Yes = 0 No = 1 Print Gross total on the Z Financial report? Yes = 0 No = 2 104 • Program Mode Programming SUM ? defaul t 8 10 = ER380 Address 11 PRINT OPTION VALUE Print the subtotal without tax on the receipt? Yes = 1 No = 0 Tax amount to print on receipt is: 12 13 combine itemize = 0 Print the tax amount on receipt? Yes = 0 No = 1 Print taxable totals? Yes = 2 No = 0 Print the tax rate? Yes = 4 No = 0 Print a breakdown of the VAT eligible sale? Yes = 1 No = 0 Print training mode message on the receipt during training mode operations? Yes = 0 No = 2 Currency Symbol: (see note2 below) = Euro CONV. #2 = . 16 CONV. #3 = . 17 CONV. #4 = . 15 19 20 Print the KP order number on receipt. Yes = 0 No = 1 Print the item’s price on the kitchen printer requisition? Yes = 2 No = 0 Print registrations in void mode on the kitchen printer requisition? Yes = 0 No = 1 Print registrations in training mode on the kitchen printer requisition? Yes = 2 No = 0 Combine like items on the kitchen printer? Yes = 0 No = 1 Consolidation of like items on check track? Yes = 0 No = 2 Chooses volume unit when the PLU is gallonage. gallons litres 21 22 SUM 2 CONV. #1 14 ER380 = = = = 0 4 Print p reamble message on receipt? Yes = 0 No = 1 Print p ostamble message on receipt? Yes = 0 No = 2 Print p reamble message on the guest check? Yes = 4 No = 0 Print p ostamble message on the guest check? Yes = 1 No = 0 Do not print pre/postamble message on the journal receipt? Yes = 0 No = 2 Program Mode Programming • 105 23 24 25 Print average items per customer on the Financial report? Yes = 0 No = 1 Print average sales per customer on the Financial report? Yes = 0 No = 2 Issue a second receipt for the same transaction? Yes = 1 No = 0 Priority print by group on the kitchen printer? Yes = 2 No = 0 Print the PLU number and descriptor on the receipt? Yes = 4 No = 0 Not Print when polling reports? Yes = 1 No = 0 Print PLU# on PLU report? Yes = 2 No = 0 Grand total is: net sale = gross sale 26 27 28 29 30 Print journal font = 0 4 small = 0 normal = 1 Print journal reverse? Yes = 2 No = 0 Receipt mode use? Yes = 0 No = 4 Send order to the kitchen printer when the SBTL key is pressed? Yes = 1 No = 0 Print date on hard check? Yes = 2 No = 0 Pre Print graphic logo on receipt? Yes = 1 No = 0 Post Print graphic logo on receipt? Yes = 2 No = 0 Pre Print graphic logo on the guest check? Yes = 1 No = 0 Post Print graphic logo on the guest check? Yes = 2 No = 0 Print pre- logo Default User = = 0 1 Not Used 31 Number of Pre-feeding lines on receipt. 0-5 32 Number of Post-feeding lines on receipt. 0-5 106 • Program Mode Programming ER380 33 Reserved Suppress bitmap in PGM and X/Z Mode Yes = 0 No = 2 Suppress printing of last report date Yes = 4 No = 0 34 Print Group Details on receipt Yes = 1 No = 0 Two line print on KP Yes = 2 No = 0 NOTE 1: Print Option# 8 - Users outside of the USA can designate a different currency symbol. To select a different symbol enter three digit alpha character code s. NOTE 2: Print Option# 14,15,16,17 - If you are using the currency conversion feature, you can select the appropriate symbol for each foreign currency you are accepting. To select a different symbol enter three digit alpha character codes. ER380 Program Mode Programming • 107 Function Key Programming Three programs are used to program function keys; • Program 70 - is used to set each keys individual options • Program 80 - is used to program a 18 character alpha numeric descriptor • Program 90 - is used to set a high amount limit (HALO) In this chapter you will find: • General instructions for programs 70, 80 and 90. • Specific programming instructions for each function key. 108 • Program Mode Programming ER380 Program 70 - Function Key Options Use Program 70 to set options for function keys. Because of the differences inherent in function keys, individual options will be different. See the specific instructions for each key in this chapter to find the options for each key. 1. Turn the control lock to the P position. 2. To begin the program, enter 7 0, press the SBTL key. 7 0 SBTL 3. Enter the values for the option digit or digits. Depending on the function key you are programming, you may enter up to six digits N1 through N6. Determine the values for N1 through N6 by referring to the specific function key information that follows. (You do not need to enter preceding zeros. 4. For example, if the function key offers six digits, N1 through N6 and you are only selecting a value for N6, just enter the value for N6.) Press the function key you wish to program. N1 N2 N3 N4 N5 N6 FUNCTION KEY 5. To program additional function keys, repeat from step 3, or press the CASH key to finalise the program. CASH ER380 Program Mode Programming • 109 Program 80 - Function Key Descriptor Program descriptors by entering three digit alpha character codes. 1. Turn the control lock to the P position. 2. To begin the program, enter 8 0, press the SBTL key. 8 0 SBTL 3. If you are programming alpha Overy Type up to 18 descriptor keys X/TIME FUNCTION KEY or, Enter up to 18 three-character codes FUNCTION KEY 4. To program additional function keys, repeat from step 3, or press the CASH key to finalise the program. CASH 110 • Program Mode Programming ER380 Program 90 - Function Key HALO Use Program 90 to program a high amount lock out (HALO) for a function key. Only specific keys require this program. For example, you can set a HALO for the CASH, CHEQUE or CHARGE keys. Refer to the specific function key programming information in this chapter to determine when the HALO option is available. 1. Turn the control lock to the P position. 2. To begin the program, enter 9 0, press the SBTL key. 9 0 SBTL 3. Enter a HALO of up to eight digits, (or "0" for no HALO). Enter 1-8 digit HALO 4. Press the function key on the keyboard you wish to program. FUNCTION KEY 5. To program additional function keys, repeat from step 2, or press the CASH key to finalise the program. CASH ER380 Program Mode Programming • 111 ADD CHECK - Function Key Programs Options - Program 70 Repeat for another function key 7 0 Address N1 N2 N3 SBTL N1 N2 N3 ADD CEHCK CASH OPTION VALUE Key is inactive? Yes = 1 No = 0 Compulsory before tendering? Yes = 2 No = 0 Advance the consecutive # when this function is used? Yes = 0 No = 4 Delete the pre/postamble when this function is used? Yes = 0 No = 1 Exempt tax 1? Yes = 2 No = 0 Exempt tax 2? Yes = 4 No = 0 Exempt tax 3? Yes = 1 No = 0 Exempt tax 4? Yes = 2 No = 0 Validation is compulsory? Yes = 4 No = 0 = SUM Descriptor - Refer to “Program 80 – Function Key Descriptor” 112 • Program Mode Programming ER380 CANCEL - Function Key Programs Options - Program 70 Repeat for another function key 7 0 Address N1 SBTL N1 CANCEL CASH OPTION VALUE Key is inactive? Yes = 1 No = 0 Key in active in X control lock position only? Yes = 2 No = 0 Validation is compulsory ? Yes = 4 No = 0 = SUM Descriptor - Refer to “Program 80 – Function Key Descriptor” HALO - Refer to “Program 90 – Function Key HALO ” ER380 Program Mode Programming • 113 CASH - Function Key Programs Options - Program 70 Repeat for another function key 7 0 Address N1 N2 N3 N4 N5 SBTL N1 N2 N3 N4 N5 CASH OPTION VALUE Amount tender is compulsory? Yes = 1 No = 0 Allow over tendering and under tendering in X control lock position only? Yes = 2 No = 0 Disable under tendering? Yes = 4 No = 0 Open cash drawer? Yes = 0 No = 1 Exempt tax 1? Yes = 2 No = 0 Exempt tax 2? Yes = 4 No = 0 Exempt tax 3? Yes = 1 No = 0 Exempt tax 4? Yes = 2 No = 0 Validation is compulsory? Yes = 4 No = 0 CASH = SUM Change Deduct From OWN TOTAL 0 Cheque 1 Charge 1 ~ Charge 8 = 2~9 Tender Total to OWN TOTAL 0 Cheque 1 Charge 1 ~ Charge 8 = 2~9 Descriptor - Refer to “Program 80 – Function Key Descriptor” HALO - Refer to “Program 90 – Function Key HALO” 114 • Program Mode Programming ER380 CHARGE1-8 - Function Key Programs Repeat for another function key 7 0 Address N1 N2 N3 N4 N5 SBTL N1 N2 N3 N4 N5 N6 N7 OPTION VALUE Amount tender is compulsory? Yes = 1 No = 0 Allow over tendering and under tendering in X control lock position only? Yes = 2 No = 0 Disable under tendering? Yes = 4 No = 0 Open cash drawer? Yes = 0 No = 1 Allow over tendering? Yes = 2 No = 0 Non-add # entry compulsory? Yes = 4 No = 0 Exempt tax 1? Yes = 1 No = 0 Exempt tax 2? Yes = 2 No = 0 Exempt tax 3? Yes = 4 No = 0 Exempt tax 4? Yes = 1 No = 0 Validation compulsory? Yes = 2 No = 0 Send to EFT? (not Uk) Yes = 4 No = 0 EFT PORT (not UK) CHQUE CASH = SUM 0-1 Continued……… ER380 Program Mode Programming • 115 N6 N7 Change Deduct From OWN TOTAL 0 Cash 1 Cheque 2 If Charge1, From Charge 2,3,4,5,6,7,8 3~9 if Charge2, From Charge 1,3,4,5,6,7,8 3~9 if Charge3, From Charge 1,2,4,5,6,7,8 3~9 if Charge4, From Charge 1,2,3,5,6,7,8 3~9 if Charge5, From Charge 1,2,3,4,6,7,8 3~9 if Charge6, From Charge1,2, 3,4,5,7,8 3~9 if Charge7, From Charge 1,2,3,4,5,6,8 3~9 if Charge8, From Charge 1,2,3,4,5,6,7 3~9 Tender Totaled To OWN TOTAL 0 Cash 1 Cheque 2 If Charge1, From Charge 2,3,4,5,6,7,8 3~9 if Charge2, From Charge 1,3,4,5,6,7,8 3~9 if Charge3, From Charge 1,2,4,5,6,7,8 3~9 if Charge4, From Charge 1,2,3,5,6,7,8 3~9 if Charge5, From Charge 1,2,3,4,6,7,8 3~9 if Charge6, From Charge1,2, 3,4,5,7,8 3~9 if Charge7, From Charge 1,2,3,4,5,6,8 3~9 if Charge8, From Charge 1,2,3,4,5,6,7 3~9 Descriptor - Refer to “Program 80 – Function Key Descriptor” HALO - Refer to “Program 90 – Function Key HALO” 116 • Program Mode Programming ER380 CHEQUE - Function Key Programs Options - Program 70 Repeat for another function key 7 0 Address N1 N2 N3 N4 N5 N6 SBTL N1 N2 N3 N4 N5 N6 CHQUE OPTION VALUE Amount tender is compulsory? Yes = 1 No = 0 Allow over tendering and under tendering in X control lock position only? Yes = 2 No = 0 Disable under tendering? Yes = 4 No = 0 Open cash drawer? Yes = 0 No = 1 Exempt tax 1? Yes = 2 No = 0 Exempt tax 2? Yes = 4 No = 0 Exempt tax 3? Yes = 1 No = 0 Exempt tax 4? Yes = 2 No = 0 Cheque endorsement compulsory? Yes = 1 No = 0 Validation is compulsory ? Yes = 2 No = 0 CASH = SUM Change Deduct From OWN TOTAL 0 Cash 1 Charge 1 ~ Charge 8 = 2~9 Tender Total to OWN TOTAL 0 Cash 1 Charge 1 ~ Charge 8 = 2~9 Descriptor - Refer to “Program 80 – Function Key Descriptor” ER380 Program Mode Programming • 117 HALO - Refer to “Program 90 – Function Key HALO” 118 • Program Mode Programming ER380 CHEQUE CASHING - Function Key Programs Options - Program 70 Repeat for another function key 7 0 Address N1 SBTL N1 CHEQUE CASH CASH OPTION VALUE Key is inactive? Yes = 1 No = 0 Key in active in X control lock position only? Yes = 2 No = 0 Validation is compulsory ? Yes = 4 No = 0 = SUM Descriptor - Refer to “Program 80 – Function Key Descriptor” HALO - Refer to “Program 90 – Function Key HALO” ER380 Program Mode Programming • 119 CHEQUE ENDORSEMENT - Function Key Programs Options - Program 70 Repeat for another function key 7 0 Address N1 N2 SBTL N1 N2 CHEQUE ENDORSE CASH OPTION VALUE Key is inactive? Yes = 1 No = 0 Print the amount of the cheque and endorsement message? Yes = 2 No = 0 Print date? Yes = 0 No = 4 Print time? Yes = 0 No = 1 Print clerk? Yes = 0 No = 2 Print consecutive number? Yes = 0 No = 4 = SUM Descriptor - Refer to “Program 80 – Function Key Descriptor” 120 • Program Mode Programming ER380 CHECK # - Function Key Programs Options - Program 70 Repeat for another function key 7 0 Address N1 N2 N3 N4 SBTL N1 N2 N3 N4 CHECK# CASH OPTION VALUE Key is inactive? Yes = 1 No = 0 Before registering, begin a tracking number? Yes = 2 No = 0 Opening clerk has exclusive access? Yes = 4 No = 0 Check track # and balance will print on receipt? Yes = 0 No = 1 Check track # and balance will print on remote? Yes = 0 No = 2 Allow only one check per table? Yes = 4 No = 0 Check# is automatically assigned by register? Yes = 1 No = 0 PBAL key is used Drive thru recall key? Yes = 2 No = 0 Length of Check(0-9) = SUM 0-9 Descriptor - Refer to “Program 80 – Function Key Descriptor” ER380 Program Mode Programming • 121 CURRENCY CONVERSION - Function Key Programs Currency Conversion Rate - Program 90 1. Turn the control lock to the P position. 2. To begin the program, enter 9 0, press the SBTL key. 9 0 SBTL 3. Enter the exchange rate of up to 7 digits (do not enter the decimal point), then enter a number from 0 to 7 to indicate the decimal position. See "Currency Exchange Rate Programming Example s" below. Exchange Rate Decimal Position 4. Press the function key on the keyboard you wish to program. FUNCTION KEY 5. To program additional function keys, repeat from step 2, or press the CASH key to finalise the program. CASH Currency Exchange Rate Programming Examples Note: Foreign currency exchange rates may be stated as “foreign currency in euros ”. Use the rate stated in “Sterling in foreign currency” when you are programming this section. The £1.00 is worth 63 Euros (foreign currency). 1 3 7 2 Exchange Rate 122 • Program Mode Programming 0 4 Decimal Position ER380 ANALYSIS - Function Key Programs Options - Program 70 Repeat for another function key 7 0 SBTL N1 N2 DRIVE THRU CASH Repeat for another function key 7 0 SBTL N1 N2 EAT IN CASH Repeat for another function key 7 0 Address N1 N2 SBTL N1 N2 TAKE OUT CASH OPTION VALUE Exempt tax 1? Yes = 1 No = 0 Exempt tax 2? Yes = 2 No = 0 Exempt tax 3? Yes = 4 No = 0 Exempt tax 4? Yes = 1 No = 0 Validation is compulsory ? Yes = 2 No = 0 = SUM Descriptor - Refer to “Program 80 – Function Key Descriptor” ER380 Program Mode Programming • 123 ERROR CORRECT - Function Key Programs Options - Program 70 Repeat for another function key 7 0 Address N1 SBTL N1 ERROR CORRECT CASH OPTION VALUE Key is inactive? Yes = 1 No = 0 Key in active in X control lock position only? Yes = 2 No = 0 Validation is compulsory? Yes = 4 No = 0 = SUM = SUM Descriptor - Refer to “Program 80 – Function Key Descriptor” HALO - Refer to “Program 90 – Function Key HALO” F/S SUB - Function Key Programs Options - Program 70 Repeat for another function key 7 0 Address N1 SBTL N1 F/S SUBTOTAL CASH OPTION VALUE Key is inactive? Yes = 1 No = 0 Descriptor - Refer to “Program 80 – Function Key Descriptor” 124 • Program Mode Programming ER380 F/S TEND - Function Key Programs Options - Program 7 0 Repeat for another function key 7 0 Address N1 N2 N3 SBTL N1 N2 N3 F/S TEND CASH OPTION VALUE Exempt tax 1? Yes = 1 No = 0 Exempt tax 2? Yes = 2 No = 0 Exempt tax 3? Yes = 4 No = 0 Exempt tax 4? Yes = 1 No = 0 The tender is allowed in any amount? Yes = 2 No = 0 Food stamp change Cash = is issued in Food stamps = SUM 4 = 0 Open cash drawer? Yes = 0 No = 1 Validation is compulsory ? Yes = 2 No = 0 Descriptor - Refer to “Program 80 – Function Key Descriptor” HALO - Refer to “Program 90 – Function Key HALO” ER380 Program Mode Programming • 125 GUEST - Function Key Programs Options - Program 70 Repeat for another function key 7 0 SBTL Address N1 N1 GUEST CASH OPTION VALUE Guest # compulsory when you use guest check operation? Yes = 1 No = 0 Before registering, enter a guest number? Yes = 2 No = 0 Print Guest # at the kitchen printer and Bill? Yes = 4 No = 0 = SUM = SUM Descriptor - Refer to “Program 80 – Function Key Descriptor” PRICE LEVEL1-2 - Function Key Programs Options - Program 70 Repeat for another function key 7 0 Address N1 SBTL N1 LEVEL CASH OPTION VALUE Print level description at the KP? Yes = 0 No = 1 Key is active in X control lock Yes = 2 No = 0 Print descriptor on guest check Yes = 0 No = 4 N2 Print descriptor on receipt Yes = 0 No = 1 Descriptor - Refer to “Program 80 – Function Key Descriptor” 126 • Program Mode Programming ER380 #/N0 SALE - Function Key Programs Options - Program 70 Repeat for another function key 7 0 Address N1 N2 N3 N4 ER380 SBTL N1 N2 N3 N4 #/NS CASH OPTION VALUE No Sale is inactive? Yes = 1 No = 0 No Sale active in X control lock position only? Yes = 2 No = 0 No Sale inactive after non-add # entry? Yes = 4 No = 0 Enforce non-add # entry at start of sale? Yes = 1 No = 0 Print when a NO SALE is performed? Yes = 0 No = 2 Non-add # entries are prohibited? Yes = 4 No = 0 Compulsory non-add entry must match number of digits set in the MAX DIGIT flag below? Yes = 1 No = 0 Print non-add on guest check? Yes = 2 No = 0 Enter maximum number of digits for non-add number entry. Zero(0) means no limit. = SUM 0-8 Program Mode Programming • 127 Descriptor - Programs 80 & 81 Since two distinct functions, # entry and no sale, reside on the same key, different programs are used to program each descriptor. To program the no sale descriptor: Repeat for another function key 8 0 SBTL Enter up to 18 descriptor codes FUNCTION KEY CASH To program the # descriptor: Repeat for another function key 8 1 SBTL 128 • Program Mode Programming Enter up to 18 descriptor codes FUNCTION KEY CASH ER380 RETURN - Function Key Programs Options - Program 70 Repeat for another function key 7 0 Address N1 N2 SBTL N1 RETURN CASH OPTION VALUE Key is inactive? Yes = 1 No = 0 Key in active in X control lock position only? Yes = 2 No = 0 Validation is compulsory ? Yes = 4 No = 0 Add to Net Grand total on Financial/Clerk Report Yes = 0 = SUM No = 1 Descriptor - Refer to “Program 80 – Function Key Descriptor” HALO - Refer to “Program 90 – Function Key HALO” ER380 Program Mode Programming • 129 LEVEL MODIFIER 1-5 - Function Key Programs Options - Program 70 Repeat for another function key 7 0 Address N1 N2 SBTL N1 N2 N3 MOD OPTION VALUE Key in active in X control lock position only? Yes = 1 No = 0 Affect to modify the PLU? Yes = 2 No = 0 Print modifier descriptor on the guest check? Yes = 0 No = 1 Print modifier descriptor on the receipt? Yes = 0 No = 2 Print modifier descriptor on the KP? N3 CASH Value of affected digit(0-9) = SUM Yes = 0 No = 4 0-9 * Affect Digit(1-14) of PLU# Repeat for another function key 9 0 SBTL 1-14 MOD CASH Descriptor - Refer to “Program 80 – Function Key Descriptor” 130 • Program Mode Programming ER380 
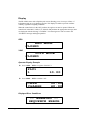
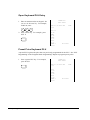
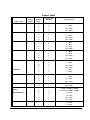
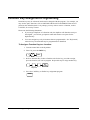
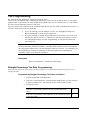
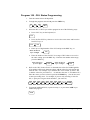
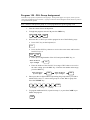
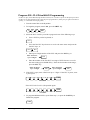
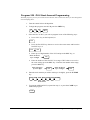
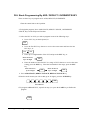
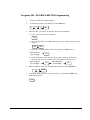
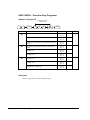
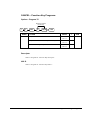
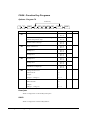
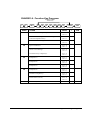
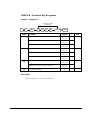
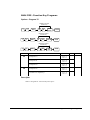
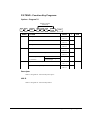
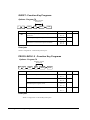
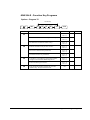
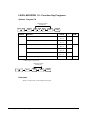
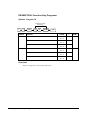
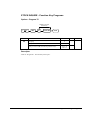
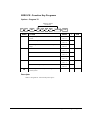
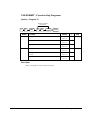
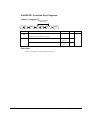
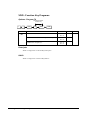
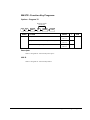
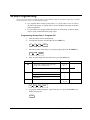
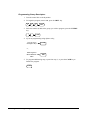
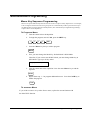
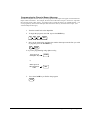
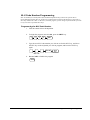
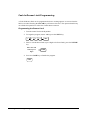
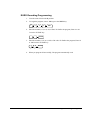
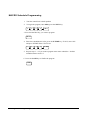
PAYMENT - Function Key Programs Options - Program 70 Repeat for another function key 7 0 Address N1 SBTL N1 PAYMENT CASH OPTION VALUE Require to close check? Yes = 1 No = 0 = SUM = SUM Descriptor - Refer to “Program 80 – Function Key Descriptor” PBAL - Function Key Programs Options - Program 70 Repeat for another function key 7 0 Address N1 SBTL N1 PREVIOUS BALANCE CASH OPTION VALUE Previous balance may be entered at any time? Yes = 1 No = 0 Previous balance required at the start of the sale? Yes = 2 No = 0 Descriptor - Refer to “Program 80 – Function Key Descriptor” ER380 Program Mode Programming • 131 PROMOTION- Function Key Programs Options - Program 70 Repeat for another function key 7 0 Address N1 N2 SBTL N1 N2 PROMO CASH OPTION VALUE Key is inactive? Yes = 1 No = 0 Key in active in X control lock position only? Yes = 2 No = 0 Taxable by Tax 1 Yes = 4 No = 0 Taxable by Tax 2 Yes = 1 No = 0 Taxable by Tax 3 Yes = 2 No = 0 Taxable by Tax 4 Yes = 4 No = 0 = SUM Descriptor - Refer to “Program 80 – Function Key Descriptor” 132 • Program Mode Programming ER380 PRICE CHANGE - Function Key Programs Options - Program 70 Repeat for another function key 7 0 Address N1 SBTL N1 PRICE CHG CASH OPTION VALUE Key is inactive? Yes = 1 No = 0 Key in active in X control lock position only? Yes = 2 No = 0 = SUM Descriptor - Refer to “Program 80 – Function Key Descriptor” ER380 Program Mode Programming • 133 PRICE INQUIRE - Function Key Programs Options - Program 70 Repeat for another function key 7 0 Address N1 SBTL N1 PRICE INQ CASH OPTION VALUE Pop up 0 Stay Down 1 Key in active in X control lock position only? = SUM Yes = 2 No = 0 Descriptor - Refer to “Program 80 – Function Key Descriptor” 134 • Program Mode Programming ER380 STOCK INQUIRE - Function Key Programs Options - Program 70 Repeat for another function key 7 0 Address N1 SBTL N1 STOCK INQ CASH OPTION VALUE Pop up 0 Stay Down 1 Key in active in X control lock position only? = SUM Yes = 2 No = 0 Descriptor - Refer to “Program 80 – Function Key Descriptor” ER380 Program Mode Programming • 135 PAID OUT1-3 - Function Key Programs Options - Program 70 Repeat for another function key 7 0 Address N1 SBTL N1 P/O CASH OPTION VALUE Key is inactive? Yes = 1 No = 0 Key in active in X control lock position only? Yes = 2 No = 0 Validation is compulsory? Yes = 4 No = 0 = SUM Descriptor - Refer to “Program 80 – Function Key Descriptor” 136 • Program Mode Programming ER380 PRINT CHECK - Function Key Programs Options - Program 70 Repeat for another function key 7 0 SBTL Address N1 N2 PRINT CHECK CASH OPTION VALUE N1 Print Check Port (0 – 1 ) N2 This key is to automatically check? Yes = 0 No = 1 Print Check On Receipt Yes = 0 = SUM 0-1 No = 2 Skip Print Check consecutive count of bill prints Yes=4 No=0 Descriptor - Refer to “Program 80 – Function Key Descriptor” ER380 Program Mode Programming • 137 RECD ON ACCT1-3 - Function Key Programs Options - Program 70 Repeat for another function key 7 0 Address N1 SBTL N1 R/A CASH OPTION VALUE Key is inactive? Yes = 1 No = 0 Key in active in X control lock position only? Yes = 2 No = 0 Validation is compulsory? Yes = 4 No = 0 = SUM Descriptor - Refer to “Program 80 – Function Key Descriptor” HALO - Refer to “Program 90 – Function Key HALO” 138 • Program Mode Programming ER380 SERVICE - Function Key Programs Options - Program 70 Repeat for another function key 7 0 Address N1 N2 N3 N4 SBTL N1 N2 N3 N4 SERVICE CASH OPTION VALUE Compulsory non-add number before this key is used? Yes = 1 No = 0 Print on receipt? Yes = 0 No = 2 Allow negative balance in X control lock position only? Yes = 4 No = 0 Calculate tax 1? Yes = 0 No = 1 Calculate tax 2? Yes = 0 No = 2 Calculate tax 3? Yes = 0 No = 4 Calculate tax 4? Yes = 0 No = 1 Validation is compulsory ? Yes = 2 No = 0 Enter the port number if you are using a hard check system. = SUM 0-1 Descriptor - Refer to “Program 80 – Function Key Descriptor” ER380 Program Mode Programming • 139 SUBTOTAL - Function Key Programs Options - Program 70 Repeat for another function key 7 0 Address N1 SBTL N1 SUBTOTAL CASH OPTION VALUE Key is inactive? Yes = 1 No = 0 = SUM = SUM Descriptor - Refer to “Program 80 – Function Key Descriptor” TABLE - Function Key Programs Options - Program 70 Repeat for another function key 7 0 Address N1 SBTL N1 TABLE # CASH OPTION VALUE Table number entry compulsory before opening a new check? Yes = 1 No = 0 Table number entry compulsory for all sales? Yes = 2 No = 0 Print table# at the remote printer and guest check? Yes = 4 No = 0 Descriptor - Refer to “Program 80 – Function Key Descriptor” 140 • Program Mode Programming ER380 TAX EXEMPT - Function Key Programs Options - Program 70 Repeat for another function key 7 0 Address N1 N2 SBTL N1 N2 TAX EXEMP CASH OPTION VALUE Exempt tax 1? Yes = 1 No = 0 Exempt tax 2? Yes = 2 No = 0 Exempt tax 3? Yes = 4 No = 0 Exempt tax 4? Yes = 1 No = 0 Compulsory non-add number before this key is used? Yes = 2 No = 0 Validation is compulsory ? Yes = 4 No = 0 = SUM Descriptor - Refer to “Program 80 – Function Key Descriptor” ER380 Program Mode Programming • 141 TIP - Function Key Programs Options - Program 70 Repeat for another function key 7 0 Address N1 N2 N3 N4 SBTL N1 N2 N3 N4 TIP OPTION Type of tip is: CASH VALUE Percentage = 1 Amount = 0 Key is inactive? Yes = 1 No = 0 Key in active in X control lock position only? Yes = 2 No = 0 Add tax rate 1? Yes = 4 No = 0 Add tax rate 2? Yes = 1 No = 0 Add tax rate 3? Yes = 2 No = 0 Add tax rate 4? Yes = 4 No = 0 Add the tip total to the NET and GROSS sales total? Yes = 1 No = 0 = SUM Descriptor - Refer to “Program 80 – Function Key Descriptor” 142 • Program Mode Programming ER380 VALIDATE - Function Key Programs Options - Program 70 Repeat for another function key 7 0 Address N1 SBTL N1 N2 VALID CASH OPTION Enter output communication port.(0-1) VALUE = SUM 0-1 Enter Zero if validation is no used. N2 Key is inactive? Yes = 1 No = 0 Allow multiple validation? Yes = 2 No = 0 Descriptor - Refer to “Program 80 – Function Key Descriptor” ER380 Program Mode Programming • 143 VOID - Function Key Programs Options - Program 70 Repeat for another function key 7 0 Address N1 SBTL N1 VOID CASH OPTION VALUE Key is inactive? Yes = 1 No = 0 Key in active in X control lock position only? Yes = 2 No = 0 Validation is compuls ory? Yes = 4 No = 0 = SUM Descriptor - Refer to “Program 80 – Function Key Descriptor” HALO - Refer to “Program 90 – Function Key HALO” 144 • Program Mode Programming ER380 WASTE - Function Key Programs Options - Program 70 Repeat for another function key 7 0 Address N1 SBTL N1 WASTE CASH OPTION VALUE Key is inactive? Yes = 1 No = 0 Key in active in X control lock position only? Yes = 2 No = 0 Validation is compulsory ? Yes = 4 No = 0 = SUM Descriptor - Refer to “Program 80 – Function Key Descriptor” HALO - Refer to “Program 90 – Function Key HALO” ER380 Program Mode Programming • 145 %1- %5 - Function Key Programs Options - Program 70 Repeat for another function key 7 0 SBTL Address OPTION N1 Apply an: N1 N2 N3 N4 N5 Amount = Yes = 2 No = 0 % key is active in X control lock position only? Yes = 4 No = 0 Open % key is: = N5 N6 = 1 Sale = 2 Item = 0 Yes = 4 No = 0 % key is: Positive = 1 (Not allowed positive item amount) Negative = 0 % amount taxable tax 1? Yes = 2 No = 0 % amount taxable tax 2? Yes = 1 No = 0 % amount taxable tax 3? Yes = 2 No = 0 % amount taxable tax 4? Yes = 4 No = 0 Reduce (or increase) the food stamp subtotal by % entry? Yes = 1 No = 0 Allow only one time subtotal entry? Yes = 2 No = 0 Allow multiple amount coupons without pressing subtotal? Yes = 4 No = 0 Allow % key preset override active in X control lock position only? Yes = 1 No = 0 Validation is compulsory? Yes = 2 No = 0 146 • Program Mode Programming SUM 0 Allow % key override preset? N4 = 0 Key is inactive? % key is: CASH 1 = Preset N3 % VALUE Percentage N2 N6 ER380 Descriptor - Refer to “Program 80 – Function Key Descriptor” HALO - Program 90 Repeat for another function key 9 0 SBTL Enter 5 digit rate or amount (see note below) % CASH Note: If key is amount , enter 5 digit HALO, or 0 for no HALO. If key is percentage enter the percentage in a five-digit format, without the decimal (XX.XXX). For example: for 10%, enter 10000; for 5.55%, enter 05550; for 99.999%, enter 99999. ER380 Program Mode Programming • 147 Clerk Programming Clerks have the following programming options. These options are set through separate programs: • Program 800 - Secret Code programming determines the code that is used for clerk sign on if a code entry sign on method is selected in system option #2 (See "System Option Programming") • Program 801 – Training Clerk Programming. This allows the setting of a training clerk or alternative drawers. • Program 810 - Clerk Descriptor Programming allows you to set a unique, up to 18 character, descriptor for each clerk 148 • Program Mode Programming ER380 Program 800 - Secret Code Programming 1. Turn the control lock to the P position. 2. To begin the program, enter 8 0 0, press the SBTL key. 8 0 0 SBTL 3. Enter the number (1-15) of the clerk you wish to program; press the X/TIME key. X/TIME 4. Enter a secret code (up to 6 digits); press the SBTL key. Enter the secret code, up to 6 digits SBTL 5. Repeat from step 3 for each clerk you wish to program. Press the CASH key to finalise the program. CASH ER380 Program Mode Programming • 149 Program 801 - Clerk Status Programming 1. Turn the control lock to the P position. 2. To begin the program, enter 8 0 1, press the SBTL key. 8 0 1 SBTL 3. Enter the number (1-15) of the clerk you wish to program; press the X/TIME key. X/TIME 4. Enter an option digit from the table below, press the SBTL key. 5. Enter an option digit from the table below, press the SBTL key. Address OPTION N1 Drawer assignment default drawer, 1: no drawer) N2 Training Clerk VALUE (0: = SUM 0-1 Yes=1 No=0 N1 N2 SBTL 5. Repeat from step 3 for each clerk you wish to program. Press the CASH key to finalise the program. CASH 150 • Program Mode Programming ER380 Program 810 - Descriptor Programming Program descriptors by entering three digit alpha character codes. 1. Turn the control lock to the P position. 2. To begin the program, enter 8 1 0, press the SBTL key. 8 1 0 SBTL 3. Enter the number (1-15) of the clerk you wish to program; press the X/TIME key. X/TIME 4. If you are programming using alpha overlay; Type up to 18 descriptor keys X/TIME or, Enter up to 18 three-character codes SBTL 5. Press the CASH key to finalise the program. CASH ER380 Program Mode Programming • 151 Mix & Match Programming Mix & Match Tables have the following programming options. These options are set through separate programs: • Program 600 - Trip Level Programming • Program 601 - Price Programming • Program 610 - Mix & Match Descriptor Programming allows you to set a unique, up to 18 character, descriptor for Mix & Match Table. 152 • Program Mode Programming ER380 Program 600 - Trip Level Programming 1. Turn the control lock to the P position. 2. To begin the program, enter 6 0 0, press the SBTL key. 6 0 0 SBTL 3. Enter the number of the M&M table you wish to program; press the X/TIME key. X/TIME 4. Enter a level of up to 5 digits. (The Maximum Level you can enter is 50000) ; press the SBTL key. Enter the level up to 5 digits SBTL 5. Repeat from step 3 for each table you wish to program. Press the CASH key to finalise the program. CASH Program 601 - Price Programming 1. Turn the control lock to the P position. 2. To begin the program, enter 6 0 1, press the SBTL key. 6 0 1 SBTL 3. Enter the number of the M&M table you wish to program; press the X/TIME key. X/TIME 4. Enter a price (up to 7 digits); press the SBTL key. SBTL Price/HALO 5. Repeat from step 3 for each table you wish to program. Press the CASH key to finalise the program. ER380 Program Mode Programming • 153 Program 610 - Mix & Match Descriptor Programming Program descriptors by entering three digit alpha character codes. 1. Turn the control lock to the P position. 2. To begin the program, enter 6 1 0, press the SBTL key. 6 1 0 SBTL 3. Enter the number of the M&M table you wish to program; press the X/TIME key. X/TIME 4. If you are programming using alpha overlay; Type up to 18 descriptor keys X/TIME or, Enter up to 18 three-character codes SBTL 5. Press the CASH key to finalise the program. CASH 154 • Program Mode Programming ER380 Group Programming Group totals are available to accumulate totals of individual PLUs that are assigned to each group. Each PLU can be assigned to one, two or three different groups. • Use program 900 to assign a group status, i.e. a group can be set to not add to the total of all groups, or a group can be used to designate like items for kitchen printer assignment. • Use program 910 to assign a unique descriptor for each group, so that the group may be easily understood on the group report. Programming Group Status - Program 900 1. Turn the control lock to the P position. 2. To begin the program, enter 9 0 0, press the SBTL key. 9 0 0 SBTL 3. Enter the number of the group you wish to program; press the X/TIME key. X/TIME 4. Enter an option digit from the table below, press the SBTL key. Address N1 N2 OPTION VALUE Group total is added to the total of all group on the Group report? Yes = 0 No = 1 Send to kitchen printer? Yes = 2 No = 0 No Choice 0 KP PORT# : R(print a kitchen requisition) 1 KP PORT# : 1 2 Print RED on KP? N3 N1 N2 N3 = SUM Yes = 1 No = 0 SBTL 5. To program additional groups, repeat from step 3, or press the CASH key to finalise the program. CASH ER380 Program Mode Programming • 155 Programming Group Descriptors 1. Turn the control lock to the P position. 2. To begin the program, enter 9 1 0, press the SBTL key. 9 1 0 SBTL 3. Enter the number (1-20) of the group you wish to program; press the X/TIME key. X/TIME 4. If you are programming using alpha overlay; Type up to 18 descriptor keys X/TIME or, Enter up to 18 three-character codes SBTL 5. To program additional groups, repeat from step 3, or press the CASH key to finalise the program. CASH 156 • Program Mode Programming ER380 Miscellaneous Programming Macro Key Sequence Programming Macros are special function keys that are used to execute a sequence of key depressions. For example, a macro might be used to execute a string of reports or to automatically tender a preset amount. Up to ten different macros may be placed on the keyboard. (See "Function Key Assignment Programming” to place macros on the keyboard.) To Program a Macro 1. Turn the control lock to the P position. 2. To begin the program, enter 1 5 0 0, press the SBTL key. 1 5 0 0 SBTL 3. Press the Macro key that you wish to program. MACRO 4. First, you must change the Mode Key. Default Mode is PGM Mode. Therefore, If you want to start in REG Mode, you must change Mode key to REG Mode. Type up to 50 key stokes Type up to 50 key strokes 5. Turn the control lock to the P position. P ress the same Macro key to end the sequence MACRO 6. Repeat from step 3 - 5 to program additional macros. Press the CASH key to finalise the program. CASH To remove a Macro If you wish to remove a key stroke from a macro, replace the current function with the INACTIVE function. ER380 Program Mode Programming • 157 Logo Descriptor Programming Programming the Receipt/Check Endorsement Message A preamble message of up to six lines can be printed at the top of each receipt; a postamble message of up to six lines can be printed at the bottom of each receipt: an endorsement message of up to ten lines can be printed when a check is endorsed on an optional slip printer. Each line can consist of up to 32 characters. 1. Turn the control lock to the P position. 2. To begin the program, enter 7 0 0, press the SBTL key. 7 0 0 SBTL 3. Refer to the chart below and enter the number that represents the line you wish to program; press the X/TIME key. X X/TIME X 1 2 3 4 5 6 7 8 9 10 11 Message Line st 1 line of Preamble 2nd line of Preamble 3rd line of Preamble 4th line of Preamble 5th line of Preamble 6th line of Preamble 1st line of Postamble 2nd line of Postamble 3rd line of Postamble 4th line of Postamble 5th line of Postamble X Message Line 12 13 14 15 16 17 18 19 20 21 22 6th line of Postamble 1st line of Endorsement 2nd line of Endorsement 3rd line of Endorsement 4th line of Endorsement 5th line of Endorsement 6th line of Endorsement 7th line of Endorsement 8th line of Endorsement 9th line of Endorsement 10th line of Endorsement 4. If you are programming using alpha overlay; Type up to 18 descriptor keys X/TIME or, Enter up to 18 three-character codes SBTL 5. Press the CASH key to finalise the program. CASH 158 • Program Mode Programming ER380 Programming the Financial Report Message The Financial Report selection allows you to reprogram the descriptors that appear with the Financial Report totals and counters. For example, the first total on the financial report "+PLU TTL" represents the total of all positive PLU entries. You might wish to re-label this total to say "FOOD SALES". You can reprogram any of the Financial Report totals listed here with any 18-character descriptor. (See “Financial Report Message”). 1. Turn the control lock to the P position. 2. To begin the program, enter 7 0 1, press the SBTL key. 7 0 1 SBTL 3. Refer to the chart below and enter the number that represents the line you wish to program; press the X/TIME key. X X/TIME 4. If you are programming using alpha overlay; Type up to 32 descriptor keys X/TIME or, Enter up to 32 three-character codes SBTL 5. Press the CASH key to finalise the program. CASH ER380 Program Mode Programming • 159 Financial Report Message 160 • Program Mode Programming ER380 X 1 2 3 4 5 6 7 8 9 10 11 12 13 14 15 16 17 18 19 20 21 22 23 24 25 26 27 28 29 30 31 ER380 Message Line X +PLU TTL -PLU TTL ADJST TTL NONTAX TAX1 SALES TAX2 SALES TAX3 SALES TAX4 SALES TAX1 TAX2 TAX3 TAX4 NET TAX 1 NET TAX 2 NET TAX 3 NET TAX 4 XMPT1 SALES XMPT2 SALES XMPT3 SALES XMPT4 SALES ANALYSIS 2 ANALYSIS 3 ANALYSIS 1 %1 %2 %3 %4 %5 NET SALE CREDIT TAX1 CREDIT TAX2 32 33 34 35 36 37 38 39 40 41 42 43 44 45 46 47 48 49 50 51 52 53 54 55 56 57 58 59 60 61 62 Message Line X Message Line CREDIT TAX3 CREDIT TAX4 FD/S CREDIT RETURN ERROR CORR PREVIOUS VD VOID MODE CANCEL GROSS SALES CASH SALES CHECK SALES R/A 1 R/A 2 R/A 3 P/O 1 P/O 2 P/O 3 HASH TTL AUDACTION NOSALE CASH-IN-D CHECK-IN-D FD/S-IN-D CHG1-IN-D CHG2-IN-D CHG3-IN-D CHG4-IN-D CHG5-IN-D CHG6-IN-D CHG7-IN-D CHG8-IN-D 6 3 6 4 6 5 6 6 7 6 8 6 9 7 0 7 1 7 2 7 3 7 4 7 5 7 6 7 7 8 7 9 8 0 8 81 2 8 38 4 8 85 6 8 78 8 99 0 9 1 9 2 CHG1 SALES CHG2 SALES CHG3 SALES CHG4 SALES CHG5 SALES CHG6 SALES CHG7 SALES CHG8 SALES FOREIGN 1 FOREIGN 2 FOREIGN 3 FOREIGN 4 DRWR TTL PROMO WASTE TIP TRAIN TTL BAL FORWARD GUESTS P/BAL CHECKS PAID SERVICE MIX&MATCH PLU LEVEL1 TTL PLU LEVEL2 TTL MOD 1 TTL MOD 2 TTL MOD 3 TTL MOD 4 TTL MOD 5 TTL Program Mode Programming • 161 Programming the Clerk Report Message The Clerk Report selection allows you to reprogram the descriptors that appear with the Clerk Report totals and counters. For example, the first total on the clerk report "NET SALES" might be re-labeled to say "GROSS SALES". You can reprogram any of the Financial Report totals listed here with any 18character descriptor. (See “Clerk Report Message”). 1. Turn the control lock to the P position. 2. To begin the program, enter 7 1 0, press the SBTL key. 7 1 0 SBTL 3. Refer to the chart below and enter the number that represents the line you wish to program; press the X/TIME key. X X/TIME 4. If you are programming using alpha overlay; Type up to 18 descriptor keys X/TIME or, Enter up to 18 three-character codes 5. SBTL Press the CASH key to finalise the program. CASH 162 • Program Mode Programming ER380 Clerk Report Message ER380 X Message Line X Message Line X Message Line 1 NET SALE 25 CREDIT TAX3 49 CHG4 SALES 2 NONTAX 26 CREDIT TAX4 50 CHG5 SALES 3 TAX1 SALES 27 FD/S CREDIT 51 CHG6 SALES 4 TAX2 SALES 28 RETURN 52 CHG7 SALES 5 TAX3 SALES 29 ERROR CORR 53 CHG8 SALES 6 TAX4 SALES 30 PREVIOUS VD 54 FOREIGN 1 7 TAX1 31 VOID MODE 55 FOREIGN 2 8 TAX2 32 CANCEL 56 FOREIGN 3 9 TAX3 33 GROSS SALES 57 FOREIGN 4 10 TAX4 34 CASH SALES 58 DRWR TTL 11 XMPT1 SALES 35 SALES 59 PROMOTION 12 XMPT2 SALES 36 R/A 1 60 WASTE 13 XMPT3 SALES 37 R/A 2 61 TIP 14 XMPT4 SALES 38 R/A 3 62 TRAIN TTL 15 ANALYSIS 2 39 P/O 1 63 BAL FORWARD 16 ANALYSIS 3 40 P/O 2 64 GUESTS 17 ANALYSIS 1 41 P/O 3 65 P/BAL 18 %1 42 HASH TTL 66 CHECKS PAID 19 %2 43 CASH-IN-D 67 SERVICE 20 %3 44 CHEQUE-IN-D 68 NOSALE 21 %4 45 FD/S-IN-D 69 MIX&MATCH 22 %5 46 CHG1 SALES 70 PLU LEVEL 1 TTL 23 CREDIT TAX1 47 CHG2 SALES 71 PLU LEVEL 2 TTL Program Mode Programming • 163 Programming the Macro Name Up to ten function locations may be designated as Macro keys. You may wish to program a name for a macro. For example if a macro executes a series of commands to produce daily reports, you can program the descriptor “DAILY”, so the macro can easily be identified. Macro names can also be helpful when looking at keyboard layout information with the PC communication utility. 1. Turn the control lock to the P position. 2. To begin the program, enter 7 1 1, press the SBTL key. 7 1 1 SBTL 3. Refer to the chart below and enter the number that represents the line you wish to program; press the X/TIME key. X X/TIME 4. If you are programming using alpha overlay; Type up to 18 descriptor keys X/TIME or, Enter up to 18 three-character codes 5. SBTL Press the CASH key to finalise the program. 164 • Program Mode Programming ER380 NLU Code Number Programming NLU are fixed keys on the keyboard (like traditional department keys) that access specific PLUs. On the default keyboard, there are 12 NLU keys and the PLU# assigned to the NLU key is the same, i.e. NLU key number one is PLU #1. However, with this program, you can assign any PLU number you wish to any one of the 12 possible NLU keys. Programming the NLU Code Number 1. Turn the control lock to the P position. 2. To begin the program, enter 1 0 0 0, press the SBTL key. 1 0 0 0 SBTL 3. Type the new PLU code number you wish to use for this NLU key, and Press the NLU key on the keyboard you wish to program, and Press the NLU key again. NLU KEY Same Key NLU Code 4. Press CASH to finalise the program CASH ER380 Program Mode Programming • 165 Cash-In-Drawer Limit Programming. A Cash-In-Drawer limit can be programmed so that a warning appears on screen when the limit is exceeded. Pressing the CLEAR key will remove the error. The operator should carry out a Paid Out operation to reduce the Cash-in-drawer amount. Programming the Drawer Limit 1. Turn the control lock to the P position. 2. To begin the program, enter 1 1 0 0, press the SBTL key. 1 1 0 0 SBTL 3. Enter a cash-in-drawer limit (up to 8 digits or 0 for no limit); press the X/TIME key. Enter the cash limit, up to 8 digits X/TIME 4. Press the CASH key to finalise the program. CASH 166 • Program Mode Programming ER380 Cheque Change Limit Programming Use this program to set the maximum amount of cash that can be returned when a cheque is tendered for an amount greater than the amount of the sale. For example, if the cheque change limit is £10.00 the maximum amount that can be tendered into the cheque key on a £5.00 sale is £15.00. Programming the Cheque Change Limit 1. Turn the control lock to the P position. 2. To begin the program, enter 1 2 0 0, press the SBTL key. 1 2 0 0 SBTL 3. Enter a cash-in-drawer limit (up to 8 digits or 0 for no limit); press the X/TIME key. Enter the cash limit, up to 8 digits X/TIME 4. Press the CASH key to finalise the program. CASH ER380 Program Mode Programming • 167 Date and Time Programming Use this program to set the clock and calendar on your ER380. The date changes automatically. After initial setting, time changing will probably be required only for beginning and ending daylight savings time. Programming the Date and Time 1. Turn the control lock to the P position. 2. To begin the program, enter 1 3 0 0, press the SBTL key. 1 3 0 0 SBTL 3. Enter time in military standard time (based on 24 hours), must be four digits (i.e. 1300 hours = 1:00 PM); press the X/TIME key. H H M M X/TIME 4. Enter the date in MM(month) DD(day) and YY(year) format. Press the X/TIME key: M M D D Y Y X/TIME 5. Press the CASH key to finalise the program. CASH 168 • Program Mode Programming ER380 Machine Number Programming The machine number is printed on the register receipt. Program a machine number so that any receipt can be identified with the store or register where the transaction took place. Programming the Machine Number 1. Turn the control lock to the P position. 2. To begin the program, enter 1 6 0 0, press the SBTL key. 1 6 0 0 SBTL 3. Enter a machine number (up to 5 digits); press the X/TIME key. X/TIME 4. Press the CASH key to finalise the program. CASH ER380 Program Mode Programming • 169 Training Mode Password If you wish to use training mode, you must program a password that you will use to enter training mode. The password may be up to 4 digits long, however, if you choose to use a password less that for digits, you must enter preceeding zeros to complete a 4 digit entry. For example, if you program the password to be "77", you must type "0077" when entering training Programming the Check Change Limit 1. Turn the control lock to the P position. 2. To begin the program, enter 18 0 0, press the SBTL key. 1 8 0 0 SBTL 3. Enter a 4-digit password and press the X/TIME key. Enter the Password up to 4 digits X/TIME 4. Press the CASH key to finalise the program. CASH 170 • Program Mode Programming ER380 EURO Rounding Programming 1. Turn the control lock to the P position. 2. To begin the program, enter 1 9 0 0, press the SBTL key. 1 9 0 0 SBTL 2. Enter the number (1-9) or (1-99) of End. To finalize the program, Enter 9 or 99. Press the X/TIME key. X/TIME 3. Enter the number (1-10) or (1-100) of the value.To finalize the program, Enter 10 or 100.Press the X/TIME key. X/TIME 4. When you program all successfully, The program automatically ends. ER380 Program Mode Programming • 171 MACRO Schedule Programming 1. Turn the control lock to the P position. 2. To begin the program, enter 2000, press the SBTL key. 2 0 0 0 SBTL 3. Press the MACRO key you want to program. MACRO 4. Enter the scheduled time value, press the X/TIME key. If 10:35, enter 1035 and press X/TIME.Enter 0 for No use. 1 0 3 5 X/TIME 5. Repeat steps 3 – 4 if you want to program more macro schedules. Default scheduled macro count is 5. 6. Press the CASH key to finalise the program CASH 172 • Program Mode Programming ER380 Program Scans Since much time and energy has been invested in the planning and programming of your ER-380 , it is advisable to print a hard copy of the final program for future reference. This copy should be kept in a safe place. 1. Turn the control lock to the P position. 2. To print a program scan, enter 1 5, press the SBTL key. 1 5 SBTL 3. In this step, there are three different ways to scan program information. One is PLU, the other is Macro, The third is Others. PLU PROGRAM SCAN To read one PLU program information, enter the number (1-1000) of the PLU and press the same number and PLU key. Enter the PLU#, up to 15 digits PLU Enter the PLU#, up to 15 digits PLU Press a PLU key on the keyboard and press same key again. PLU 1 PLU 1 To read multiple PLU program information, enter the first number and press PLU key. Press the last number and press PLU key. Enter the first PLU#, up to 15 digits PLU Enter the last PLU#, up to 15 digits PLU Press a PLU key on the keyboard . PLU 1 PLU 10 MACRO PROGRAM SCAN To read MACRO information, press the MACRO key to be scanned, MACRO# MACRO# Refer to the chart below and enter a digit to represent the segment of the program you wish to print; press the X/TIME key. To program additional scan, repeat this operation. ER380 Program Mode Programming • 173 OTHERS PROGRAM SCAN X X/TIME X Program 0 1 2 3 4 5 6 7 8 9 10 Group Tax System option Print option Function keys Clerk Preamble message Postamble message Endorsement message Financial Report message Clerk Report message X 11 12 13 14 15 16 17 18 19 20 Program M acro Name Drawer Limit Cheque Change Limit Time & Date Tare Weight Machine Number Mix & Match Scheduled Macro Euro Rounding All Function Keyboard Scan 4. Press the CASH key to finalise the program. CASH 174 • Program Mode Programming ER380 ER380 Program Mode Programming • 175