1
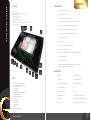
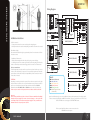
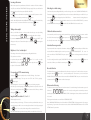
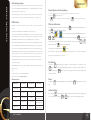
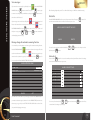
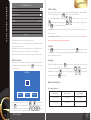
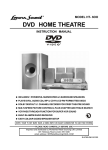
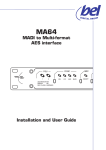
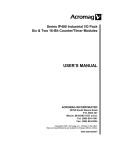
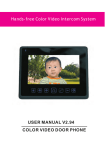
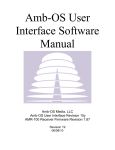
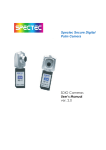
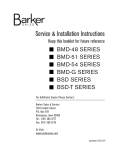
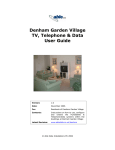
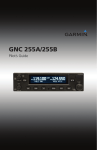
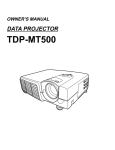
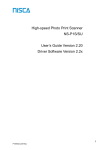
MAX V2
Thank you for choosing
GRD products
User's Manual
MAX V2
Package
MAX V2
Characteristics:
• up to 4 monitors in one system
Monitor – 1pc.
Wall mounting bracket with screws – 1pc.
Power cord – 1pc.
Door panel cords – 2pcs.
Camera cord - 1pc.
Sub monitor cord – 1pcs.
Telephone cord - 1pc. (only for MAX TEL V2)
User's manual – 1pc.
14
• 2 door panels connection
• 2 cameras connection (without audio)
• Incoming calls redirection between monitors in the system
13
• Brightness, contrast and color tuning of the display
12
11
• Video cupture to the SD-card (capacity up to 32 Gb)
• Photo cupture to the SD-card (capacity up to 32 Gb)
• Calendar and alarm clock
• Multimedia menu
• Music and image playback from SD-card
• Automatic answer function
• Door lock control through the panel or directly from the monitor
• „Don't disturb” function
1
2
• 9 mp-3 call melodies
3
10
8
4
Keys
1. „Answer/View camera” button
2. „Intercom/Call redirection” button
3. „Open door” button
4. „Pre” button
5. „Next” button
6. „Multimedia menu/Settings” button
7. „Off/End call” button
8. Adress intercom buttons
9. Speaker
Благодарим за выбор10. SD card slot
LED indicator
продукции GARDI 11.
12. Microphone
13. Display
14. Power on/off switch
1
User’s manual
5
6
9
7
• Incoming call redirection to the phone with possibility to open
lock remotely (Only for MAX TEL V2 model)
Specification:
Display
7" LCD display
Resolution
800х480 (480 TV-lines)
Power (built-in power supply)
100-240V AC (50-60 Hz)
Power Consumption
12 W
Door Panels system
4-wires
Video signal system
Analog, PAL and NTSC system
Dimensions
260mm(W)> х 195mm(H) х 34mm(D)
Memory
SD-cards and internal photo memory
2
MAX V2
Wiring Diagram
Installation instructions
TEL-B
12V
VD
GND
Camera 1
Telephone
line
VD
GND
Camera 2
DATA
AD-1
VD-1
GND
MAX V2 (ROOM 3)
Add. Mon.
DATA
AD-1
VD-1
GND
Add. Mon.
Door panel 2
MAX V2 (ROOM 2)
Add. Mon.
B
G
A
V
D/O
D/O
C) Installation of the monitor
1. Fix the wall mounting bracket in the best place by using screws and plugs.
2. Carefully place the indoor monitor against the bracket and gently push down the
monitor so that the pins on the bracket engage in the slots on the rear of the monitor.
Attention!
Don't connect powerful devices (such as locks and CCD cameras with infrared backlight)
directly to the power supply of door camera. It can cause damage to the monitor with
Благодарим за выбор
no warranty provide. You should use external power supply for such powerful devices.
продукции GARDIMaximum current for door panel power is 500mA.
CCTV1
GND
CCTV2
GND
MAX V2 (ROOM 1)
B) Installation height
Recommended installation height is approximately 140cm for monitor unit and 150cm
for outdoor camera.
ATTENTION!
Depending on monitor position in the system (If more then one monitor is used), right
intercom address should be set for every monitor. Main monitor (all cameras and door
panels are conected to the main monitor) intrcom address should be set ROOM1.
Additional monitors ROOM2, ROOM3 and ROOM4 intercom adresses should be used.
If there is only one monitor in the system, then intrcom address should be set ROOM1.
DATA
AD0
VD0
GND
Lock 1
A) Cable connection
1. Connect the monitor to the camera according to the wiring diagram.
2. Carefully insert the wires to the terminal, taking care that the 2 bare wires do not touch.
Cable recommendations:
If cable length between monitor and door panel not more than 30m then you can use
4-wire or 6-wire cable with 0,75 sq.mm. area of one wire. If this length exceeds 30m then
you should use coaxial cable for video (for example RG69), all other connections 4-wire or
6-wire cable can be used.
Input 2
TEL-A
Input 1
Door panel 1
PWR1
GND
AD1
VD1
KEY1
PWR2
GND
AD2
VD2
KEY2
Add. Mon. Cameras
B
G
A
V
D/O
D/O
DATA
AD-1
VD-1
GND
12V
Lock 2
Labels:
GND - Ground (black wire)
AD - Audio (blue wire)
VD - Video (yellow wire)
PWR - Power (red wire)
DATA - Data (green wire)
KEY - Unlock signal +12 active
(brown wire)
MAX V2 (ROOM 4)
Input 2 is multifunctional, you can connect additional camera to this input instead of second door panel.
Camera connects to the VD -Video and GND - Ground wires. That case you should choose CCTV3 for the
PORT 2 SETTINGS on the second page of SYSTEMSETTINGS menu.
Two door panels with locks and two cameras connection to the
GRD MAX V2 monitors system
3
User’s manual
4
Multimedia manager
Shortly press
button in standby mode to enter Multimedia Manager. Use
Menu/Set
Next/+
button to move through the menu. Shortly press
Same way you can enter any sub menu. Press
Menu/Set
Pre/-
or
Press and hold
button to enter current menu.
button for two seconds to enter SYSTEM SETTINGS:
Menu/Set
button to exit current menu or
1/2
Off/Save
multimedia manager.
MAX V2
System settings
SYSTEM SETTINGS
CHIME TIME
10 S
CHIME VOLUME
50%
CHIME TYPE SETTINGS
DON'T DISTURB
CAN BE MONITORED
MULTIMEDIA MENU ICONS NAME
AUTO CAPTURE QUANTITY
1
COPY FILES ON SD CARD
DVR SETTINGS
ANSWER MODE
AUTO ANSWER
DEVICE ADDRESS
Press
Pre/-
or
button to move up and down through the settings. Press
Next/+
current setting and
or
Pre/-
View the photos from the door panels
and cameras
View the records from the door panels
and cameras
to confirm your choise.
Press
ROOM1
Menu/Set
button to change current setting. Then press
button one more time
Menu/Set
Next/+
button to exit system settings any time you want.
Off/Save
System settings consists of two pages. To go to the second page of the system settings, move the frame
downwords by
button.
Next/+
2/2
SYSTEM SETTINGS
PORT 2 STATE
View DVR records
button to activate
DOOR2
PHONE NUMBER SETTINGS
SYSTEM TIME SETTINGS
View media contains on microSD
MULTIMEDIA folder.
ALARM CLOCK SETTINGS
FORMAT
SOFTWARE VERSION
BACKGROUND IMAGE SETTING
Voice playing
RESTORE DEFAULT
LANGUAGE
ENGLISH
Voice recording
To come back to the first page of the system settings, move the frame upwords by
5
User's manual
Pre/-
button.
6
Incoming calls answer
MAX V2
When a visitor prsses door panel buttton, all the indoor monitors will chime simultaneously. The screen will show “PLEASE TAKE UP”, left upper angle of the screen will show the
Unlocking door while viewing
sign which door panel have been pressed (DOOR1 or DOOR2).
Some time, when you are talking with DOOR1, you will see the sign on the screen “SOMEONE IS VISITING DOOR 2”.
Press
That means another person is pressing DOOR2, but you have no chance to talk with the person at DOOR2. So you
Monitor
Answer
button to talk with the visitor (talk time is 60 seconds). If you want to unlock
the door for the visitor during conversation, press
Unlock
button.
have to press
Off/Save
button to hang up the phone of DOOR1. Press
DOOR1 UNLOCKED or DOOR 2 UNLOCKED will be shown on the screen. The unlock delay
and hold
time is 3 seconds. To end current call before 60 seconds, press
unlock the door for this visitor, press
Off/Save
When you talk with the visitor or when you make broadcast, you can adjust talking
or
buton, to make volume lower or higher.
Pre/-
Next/+
If you want to mute the microphone, then shortly press
Monitor
Answer
button, and “MUTE” sign
will appear on the screen. To turn the microphone on, shortly press
Monitor
Answer
button. DOOR2 UNLOCKED will be shown on the screen.
Unlock
Talking volume adjust
volume by shortly pressing
button for 2 seconds to talk with the visitor, the screen will show “PLEASE TALK”. If you want to
Unlock
button.
button to view who is visiting, then press
button again in
the same way.
Call transfer between monitors
You can transfer your call to any monitor in the system while you are talking to the visitor. If you want to transfer
the call for all monitors, then press
the call only for one monitor. Press
Transfer
Broadcast
1
button or pres one of
Room
2
Room
3
Room
4
Room
buttons to transfer
button to answer the call on the target montor.
Monitor
Answer
Internal calls among monitors
If you want to make intercom request for all monitors, shortly press
Brightness / color / contrast adjust
This settings can be made only during viewing or talking with the visitor.
other room will show “PLEASE TAKE UP”. Anyone can press
The operations are as below:
other.
In any above mode press and hold
BRIGHTNESS first. Short press
Pre/-
or
or
Next/+
button for 2 seconds to adjust
button to adjust, then press
Pre/-
Next/+
to adjust COLOR and then CONTRAST.
Transfer
Broadcast
button in standby mode. All the indoor
monitors will chime simulteniously, the screen in your room will show “INTERCOM REQUEST”. The screen in
Monitor
Answer
button
Monitor
Answer
button on the target monitor to talk to each
If a call is coming from the door panel, “PLEASE TAKE UP” will be shown on the screen. Press
answer the call. When you will finish conversation, press
button.
Monitor
Answer
button to
Off/Save
Broadcast function
Door panels and CCTV cameras viewing
Shortly press
Monitor
Answer
button in standby mode to view DOOR1 image. Press button
again to view DOOR2 image. Then you can view CCTV1 and CCTV 2 by pressing
Monitor
Answer
button again.
ment, press and hold
Transfer
Broadcast
button for 2 seconds in standby mode. The monitor in your room will show
“BROADCAST REQUEST”. The monitors in other rooms will show “BROADCASTING”. Now you can make broadcast
announcement. Press
button to end broadcast request.
Off/Save
The switching time is 1.8 seconds. Press
Off/Save
button to end viewing at any time.
Note: when you are viewing images, if a call is coming from the door panel, the visitor call
will be prior to viwing function. Press
talking, press
This function allows you to broadcast information for all monitors in your house. To make broadcast announce-
button.
Monitor
Answer
button to answer the call. When you finished
Off/Save
Other monitors listening
This function is active only if you have not less than 2 monitors. To activate listening of another monitor, press and
hold any of
1
Room
2
Room
3
Room
4
Room
buttons for 2 seconds, according to the room number you want to
listen. Display of your monitor will show “LISTENING TO OTHER”. Listeining time is 8 hours, but the screen will be off
Image format convertation 16 : 9 or 4 : 3
in 5 seconds.
Default image format is 16:9.
The being monitored monitor screen will show ”LISTENED BY OTHER”.
Sometimes, when you view images, CCTV cameras or when you talk with the visitor, you
Note: CAN BE MONITORED function should be enabled in SYSTEM SETTINGS of the target monitor. If you want to
can see the images are flat. You can convert image format from 16:9 to 4:3 by pressing and
deny listening of your monitor from another monitors, disable CAN BE MONITORED function in the SYSTEM
hold
SETTINGS menu of your monitor.
button for 2 seconds, then the image will be converted to 4:3 format.
User's manual
Monitor
Answer
Press and hold this button again then the image will be converted back to 16:9 from 4:3.
7
8
Auto leaving message
MAX V2
This function let your visitors to leave a video message for you while nobody is at home. You should
activate AUTO ANSWER for ANSWER MODE function in the SYSTEM SETTINGS of your monitor
before leaving home to activate this function.
When the visitor presses call button on the door panel and the chime time ends, visitor can hear a
voice from the door panel and have 20 seconds after „beep” signal to leave a message for you.
Manual photo and video capturing
You can make manual photo or video capturing during talking or viewing door panels or cameras.
Shortly press
Press
Menu/Set
button to make a photo.
button for 2 seconds to start video recording. Shortly press
Menu/Set
DVR function
DVR function lets you record video from any panel or camera in your system by predefined
schedule.
If someone visit your house while you was absent then
button will be blinking with green color.
Menu/Set
button to enter Multimedia Manager.
Menu/Set
You can also enable MOTION DETECTION SENSITIVITY. In that case video recording starts only when
You will see that
motion detected and 10 minutes after that. Motion detects only during schedule time interval.
MOTION DETECTION SENSITIVITY can be set as LOW, NORMAL, HIGH, or can be disabled.
BEGIN TIME and END TIME defines schedule time interval. Recording starts at BEGIN TIME and ends
at the END TIME, if MOTION DETECTION SENSITIVITY is disabled. You will see the image from the
Pre/-
or
and
icons are in red frame when you enter Multimedia Manager. Press
button to choose from photo or video message view. Then press
Next/+
Menu/Set
the year and month you want to view. You can choose the video or photo by pressing
buttons and then press
Menu/Set
button to choose
Pre/-
or
Next/+
button to view the target file.
camera or door panel and sign „DVR IS WORKING” on the monitor screen when DVR starts working.
Same way you can view DVR records in
FRAME RATE and RESOLUTION defines quality of recorded image. Different values of quality can be
Note: all file names consits of the date and time it was created, for example: 2011-01-01 11:30:20, means that file
availble depends on the micro SD card capacity. Minimal micro SD card capacity to start DVR
function is 2Gb. Maximum frame rate and resolution availble from 8Gb micro SD card capacity.
As RECORD SOURCE you should choose video channel for the recording (only one video channel for
Fast forward
SCREENSAVER TIME it is a time of display work in DVR mode. After that time display will be off, but
You can press
button during video playing to accelerate playing in two times (2x). Press
Next/+
button one more time to accelerate playing up to 4x, and so on: 8х, 16х, 32х. If you will reach 32х
Next/+
Notes:
speed playing and press
1) DVR starts working in 10 seconds after BEGIN TIME.
without acceleration.
2) DVR records only video, sound doesn't records.
Record resolution
less than 2 GB
Record frame rate
Shortly press
Record length
DVR is not active
320*240 pixels
2 Gb
Next/+
button one more time, system will back to the normal playing mode
Pause
DVR characteristics
microSD volume
1 fps
play.
button during playing to stop record play. Press
Pre/-
Volume settings
More than 24 hours
4 Gb
320*240 pixels
1, 2, 5 fps
More than 24 hour with
1 fps record frame rate
8 Gb
320*240 pixels
1, 2, 5, 10 fps
More than 96 hour with
1 fps record frame rate
1, 2, 5, 10 fps
More than 192 hour with
1 fps record frame rate
320*240 or 640*480
pixels
User's manual
button again to start record
Pre/-
Press and hold
button during 2 seconds while playing to activate volume control in upper right
Pre/-
16 GB and more
menu.
was created on 1st of January 2011, 11:30 o'clock.
recording can be applied).
DVR still working.
9
button again to end video recording.
Photo and video view
Press
Enable DVR in SYSTEM SETTINGS --> DVR SETTINGS to activate that function.
Menu/Set
corner of the display. Shortly press
or
Pre/-
button to decrease or increase playing volume.
Next/+
10
Voice messages
MAX V2
If you want to leave a message for your family, choose
MANAGER and press
Menu/Set
menu in MULTIMEDIA
button to enter it. Then press
Menu/Set
to start voice recording. When you will finish recording, press
button again
button one more
Menu/Set
time and record will be saved.
menu will be flashing in red
frame, which means that new message wasn't listened. Choose
find your message using
Pre/-
Delete files
Enter MULTIMEDIA MANAGER and choose any file you want to delete. Then press
If your message was recorded succesfully, then
MULTIMEDIA MANAGER and press
After all settings being made press ACT to confirm all the changes or CANCEL to exit without saving.
seconds to activate delete menu. You will see such menu on your screen:
menu in
ARE YOU SURE TO DELETE THE FILE?
button to enter it. Choose year, month and
Menu/Set
or
keys. Press
Next/+
Menu/Set
button for 2
Menu/Set
to enter current menu
and start playing curent message.
CANCEL
Message change for automatic answering function
You can install your own begining or end message for automatic answering function.
Enter MULTIMEDIA MANAGER
menu and record two voice messages. Then exit
record menu and enter voice listening menu
Choose the action you want to make with that file by
Next/+
button for
by short press of
button.
Alarm clock
Pre/-
button for 2 seconds in standby mode and you willl enter alarm clock settings
menu. You will see next window on your screen:
CONFIG ATTENTION TONE
TONE TYPE
USER TONE
PLAY TYPE
BEGINING TONE
ATTENTION TONE VOLUME
buttons and confirm your choise
Next/+
Menu/Set
Press and hold
2 secons and you will enter CONFIG ATTENTION TONE menu.
or
Pre/-
. Find voice message that you
want to install as „invitation” or „good bye” tone and choose it. Press
DELETE
05
ALARM CLOCK SETTINGS
ALARM CLOCK1
ALARM CLOCK2
ALARM CLOCK3
ALARM CLOCK4
ALARM CLOCK5
ALARM CLOCK6
ALARM CLOCK CHIME TYPE
CANCEL
05
ACT
Set TONE TYPE as USER TONE to use your message. Set PLAY TYPE as BEGINING TONE if
you want to use that message as „invitation” or set it as ENDING TONE if you want to use
that message as „good bye” tone. ATTENTION TONE VOLUME defines volume of the
Choose any of six alarm clocks by
or
Pre/-
current alarm clock settings on your display:
button and enter it using
Next/+
button. You will see
Menu/Set
door panel while playing your message.
11
User's manual
12
MAX V2
SET ALARM CLOCK 1
STATE
CYCLE TYPE
WEEK
WEEK SELECT
Address setting
Before starting to work with the monitor, you should correctly set DEVICE ADDRESS. To set DEVICE ADDRESS,
enter system settings by press and hold
buton for two seconds in standby mode.
Menu/Set
TIME
08:15
DATE
**** -** -**
Then go to the DEVICE ADDRESS setting, using
Menu/Set
press
Pre/-
button to activate address setting and use
or
Next/+
or
Pre/-
Menu/Set
button. After that,
shortly
press
button to choose correct address. Then
Next/+
button to confirm address setting.
Set ROOM 1 if you have only one monitor in the system or if it is a monitor which all the door panels and
cameras connected.
RETURN
Set ROOM 2, ROOM 3 or ROOM 4 if there is no door panels or cameras connected to this monitor. Two monitors
in one system can't have the same address at the same time!
STATE menu allows you enable or disable current alarm clock.
CYCLE TYPE menu allows you to choose SINGLE alarm clock, WEEK repeat, MONTH
repeat or YEAR repeat alarm clock.
WEEK SELECT allows you to choose day of the week when alarm clock will be activated.
Calendar
Press
button in standby mode to enter calendar & clock screen. Press
button again to turn off
WEEK SELECT menu is active only when CYCLE TYPE is set to the WEEK type.
the calendar screen. Calendar screen works all the time after entering until it will be turned off or incoming call
TIME anв DATE menu allows you to set exact time when alarm clock will be activated.
will be received from the door panel.
Off/Save
НАСТРОЙКИ
Address intercom
If you have more than two monitors connected into one system then address intercom
menu will be activated automaticly. When you will push
Transfer
Broadcast
button, you will see next
Off/Save
Language
Enter SYSTEM SETTINGS menu by pressing
button for two seconds in standby mode. Then go to the
Menu/Set
second page of SYSTEM SETTINGS and choose LANGUAGE menu using
menu on your screen:
LANGUAGE menu: shortly press
INTERCOM
Menu/Set
your choise by short press of
Pre/-
button. Choose the language using
or
Next/+
or
Pre/-
button. Activate
button. Confirm
Next/+
button again.
Menu/Set
Memory characteristics
ALL
Photo capturing function
ROOM 1
ROOM2
ROOM3
You can choose any ROOM you want to call by
press
Transfer
Broadcast
or
buttons and then
Image quantity
Memory type
Photo resolution
Internal memory
320*240 pixels
near 60 images
microSD card
640*480 pixels
depends on microSD card volume
to call to the current ROOM. Or you can choose ALL to call all the monitors
in your system. Also you can shortly press any of
1
Room
2
Room
3
Room
4
Room
buttons
in standby mode to call to the target room directly.
13
User's manual
14
MAX V2
Video capturing function
SD card volume
Video resolution
Frame rate
1 Gb
320*240 pixels
2 fps
2 Gb
320*240 pixels
5 fps
4 Gb
320*240 pixels
10 fps
CHIME TYPE SETTINGS you can set any of 9 mp-3 melodies for every door panel (DOOR1 CHIME TYPE or
640*480 pixels
10 fps
DOOR2 CHIME TYPE) and also INTERCOM CHIME TYPE
8 Gb or more
System settings options
CHIME TIME can be seted as (in seconds): 05S/10S/15S/20S/25S/30S/35S/40S/45S/50S/55S/60S.
CHIME VOLUME can be changed as: 10%/20%/30%/40%/50%/60%/70%/60%/90%/100%
DON'T DISTURB turn this function on
CAN BE MONITORED
Timings
MULTIMEDIA MENU ICONS NAME
Another monitor listening time
8 hours
Door panels view time
2 minutes
if you want to disable call melody from the door panel.
if monitor mode is disabled, or
if monitor mode is enabled.
makes icon names invisible,
- icons names are visible.
AUTO CAPTURE QUANTITY automaticly captures 1,2 or 3 images when incoming call from the door panel
was detected.
COPY FILES TO SD CARD lets you copy all files from the monitor memory to micro SD card. Choose COPY
to start copying files or CANCEL to exit without copying.
DVR SETTINGS this function described on the 9th page of the manual.
Video cameras view time
8 hours
Max. answer waiting time
1 minute
DEVICE ADDRESS can be set as ROOM1-ROOM4, see details on the 14th page of the manual.
Photo view
display off after 10
minutes with no
actions
PORT2 STATE can be set as: DOOR2/CCTV1/CCTV2, depends on the device, connected to the port2 input.
Calendar and clock view
Manual off
SYSTEM TIME SETTINGS let you set system time and date.
ANSWER MODE can be set as MANUAL ANSWER, AUTO ANSWER or CALL TRANSFER to the telephone.
PHONE NUMBER SETTINGS defines telephone number for the CALL TRANSFER function.
ALARM CLOCK SETTINGS this function described on the 12th page of the manual.
Max. length of the voice message
10 minutes
Max. length of the manual video record
10 minutes
Image change time interval during slide show
5 seconds
Alarm clock melody length
10 seconds
Alarm clock repeat time
1 minute
Standby mode with no actions
1 minute
Min. answer waiting time
5 seconds
DVR turn on time from standby mode
10 seconds
DVR turn on time from calendar mode
10 seconds
FORMAT let you delete all the files from the internal memory of the monitor: FORMAT FLASH or delete all
the files from micro SD card: FORMAT SD CARD. Then choose ACT to start format or CANCEL to exit
15
User's manual
without format.
SOFTWARE VERSION show you software version of the monitor program
BACKGROUND IMAGE SETTINGS set the image for menu background
RESTORE DEFAULT restores all factory settings of the monitor
LANGUAGE let you choose the language of the menues.
16
MAX V2
Transfer visitor calls to the telephone (only MAX TEL V2)
Go to the first page of SYSTEM SETTINGS and set ANSWER MODE to be CALL TRANSFER.
Then enter PHONE NUMBER SETTINGS and enter phone number which you want to transfer
calls. If you want to add a pause during phone number dial then use P, which means 1 second pause during dialing.
When somebody presses door panel and there is no answer during CHIME TIME, the call will
be transfered to the telephone. “TRANSFERING TO TELE” will be shown on the monitor’s
display while transferring. When you pick up this call, you will hear the chimes from the door
panel. Now you can press ## on your phone to talk with the visitor. Talking time is 60 seconds.
Press ** on your phone to hang up the phone call.
Press 00 on your phone to unlock the door remotely.
Note that monitor uses tone mode to dial phone numbers.
“Don’t disturb” function
If you want to disable chime sound on the monitor, press and hold
button for 2 sec.
in standby mode. LED indicator will become flashing by green color with 3 second interval it means “Don’t disturb” mode is active.
If you want to disable “Don’t disturb” mode, press and hold
button for 2 sec., LED
indicator will become green color - it means “Don’t disturb” mode is disabled.
Also you can use SYSTEM SETTINGS menu to turn DON’T DISTURB on or off.
Next/+
Next/+
Safety Instructions
1. Do not install near other electronic equipment such as computers, TV, video recorder as
this may cause radiated interference to the unit.
2. Do not disassemble the unit.
3. Do not spray water on the indoor unit. Do not keep the outdoor unit where it will be
exposed to extreme moisture.
4. Do not overload mains wall outlets or extension cords.
5. Do not drop or shock the unit, dropping can result in failure to operate. Circuit boards can
crack and may not survive the impact.
6. Remove the power cord from the wall socket when unit is not used for long periods
7. Do not place any naked flames (e.g. lighted candles) on the apparatus.
8. Do not place objects filled with water (e.g. vases) on the apparatus.
9. Do not cover the ventilation holes with clothing, paper, curtains etc.
10. Keep minimum distance 5cm around the apparatus for sufficient ventilation.
11. This apparatus is designed for middle climates. Do not use in high humidity, dusty or
dirty areas. The electronics may be contaminated.
12. To disconnect or isolate the unit, switch off at the socket or remove plug from wall socket.
Please ensure the plug and socket is easily accessible.
13. Do not store in hot or cold areas. Extreme hot or cold temperatures can shorten the life of
electronic devices and can distort/melt certain plastics or may cause malfunction.
14. Do not use harsh chemicals, cleaning solvents or strong detergents. To clean, wipe with a
damp cloth from time to time.
Warranty
Warranty period is 18 months from purchaseing.
Warranty void if unit was damaged by the fault of the custumer.
Warranty void if the sticker on the backside of the unit was broken.
Life time of the unit depends on it's maintainance and carefull using.
17
User's manual
Index
Package..................................................................................................................................................................................................1
Keys..........................................................................................................................................................................................................1
Characteristics................................................................................................................................................................................2
Specification...................................................................................................................................................................................2
Installation instructions..............................................................................................................................................................3
Wiring diagram..............................................................................................................................................................................4
Multimedia manager...................................................................................................................................................................5
System settings..........................................................................................................................................................................6
Incoming calls answer.................................................................................................................................................................7
Talking volume adjust.................................................................................................................................................................7
Brightnes/Contrast/Cololr adjust............................................................................................................................................7
Door panels and CCTV cameras viewing.............................................................................................................................7
Image format convertation from 16:9 to 4:3......................................................................................................................7
Unlocking door while viewing..............................................................................................................................................8
Call transfer between monitors............................................................................................................................................8
Internal calls among monitors.....................................................................................................................................................8
Broadcast function.......................................................................................................................................................................8
Other monitors listening..................................................................................................................................................................8
Auto leaving message.................................................................................................................................................................9
DVR function...................................................................................................................................................................................9
Manual photo and video capturing.....................................................................................................................................10
Photo and video view................................................................................................................................................................10
Fast forward..................................................................................................................................................................................10
Pause...............................................................................................................................................................................................10
Volume settings...........................................................................................................................................................................10
Voice messages...........................................................................................................................................................................11
Message change for automatic answering function.....................................................................................................11
Delete files.....................................................................................................................................................................................12
Alarm clock...................................................................................................................................................................................12
Address intercom........................................................................................................................................................................13
Address setting............................................................................................................................................................................14
Calendar.........................................................................................................................................................................................14
Language.......................................................................................................................................................................................14
Memory characteristics............................................................................................................................................................14
Timings...........................................................................................................................................................................................15
System settings options...........................................................................................................................................................16
Transfer visitor calls to the telephone.................................................................................................................................17
Don't disturb function..............................................................................................................................................................17
Safety instructions......................................................................................................................................................................17
Warranty.........................................................................................................................................................................................17
18