1
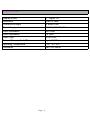
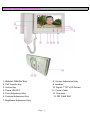
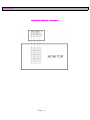
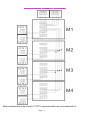
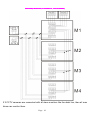
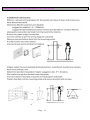
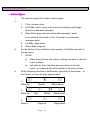
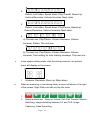
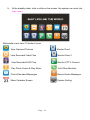
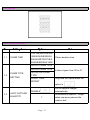
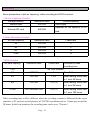
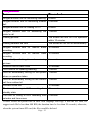
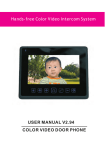
Handset Color Video Intercom System
M1607BCR
________________________________________________________________
USER MANUAL V2.96
CONTENTS
COVER
P1
CONTENT
P2
P3
INDOOR MONITOR
FEATURES
P3
BASICF EATURES
P3
EXTRA FUNTIONS
P3
SUPPORT SOLUTIONS
P3
SPECIFICATION
P4
DESCRIPTION OF MONITOR(FRONT)
P5
DESCRIPTION OF MONTOR(REAR)
P6
P7
INSTALLATION GUIDE
CAUTION
P7
DIAGRAM
P8~P10
SINGLE MONITOR AND DOORBELL INSTALLATION
P11
CABLE SPECIFICATION
P12
P13
OPERATION GUIDE
P14
KEY OPERATIONS
P14~P16
TOUCH SCREEN OPETATION
P17
THE TERMINAL
P17 ~P21
MENU SETTING OPERATION
P22 ~P23
PARAMETERS
HOW TO LEAVE MESSAGES FROM DOORBELL(S)
HOW TO CHANGE ATTENTION TONE FOR LEAVING MESSAGE
Page 2
P24
P24~P25
INDOOR MONITOR
FEATURES
�
7 '' TFT LCD
�
Touch Screen
�
Hand set
�
Surface-mounted
�
Built-in power supply
BASIC FUNCTIONS
�
Capture over 64 images with internal flash
�
Support room-to-room internal communication
�
Support door call transfer to the other indoor monitors
�
Support broadcasting to the other indoor monitors
�
Support capturing pictures from doorbell automatically
EXTRA FUNTIONS
�
Support SD card(optional)
�
Support DVR function with SD card
�
Support saving images, video& audio with SD card
�
Support recording videos &audio from doorbells with SD card
�
Support answer machine function
�
Support Multimedia and photo frame
�
Support changing background pictures
SUPPORT SOLUTIONS
�
Solution 1: 2 doorbells + 4 monitors + 2 CCTV cameras
�
Solution 2: 1 doorbell + 4monitors + 3 CCTV cameras
Note: each salve monitor can add two extra CCTV independently
Page 3
SPECIFICATION
Display screen
7 '' Digital TFT
Resolution
>480TV lines
Connection/Length
4 wires/100m
Power Supply
AC110-240V/50-60Hz
Audio Impedance
300 Ohm
Video Impedance
75 Ohm
Video Type
NTSC/PAL
External Memory Card SD
up to 32 GB
Operating Temperature
-10℃ to + 60℃
Dimension
285*140*46mm
Page 4
DESCRIPTION OF MONITOR(FRONT)
1. Answer /Monitor Key
8. Volume Adjustment Key
2. Call Transfer Key
9. Handset
3. Unlock Key
10. Digital 7''TFT LCD Screen
4. Power ON/OFF
11. Power Cable
5. Color Adjustment Key
12. Terminals
13. SD Card Slot
6. Contrast Adjustment Key
7. Brightness Adjustment Key
Page 5
DESCRIPTION OF MONTOR(REAR)
Page 6
INSTALLATION GUIDE
CAUTION
Page 7
DIAGRAM
DIAGRAM 1(1 MONITORS, 1 DOORBELL)
Page 8
DIAGRAM2 (2 MONITORS, 2 DOORBELLS, 2~8 CCTV CAMERA)
Each machine can only monitor 2 CCTV cameras which are connected with it.
Page 9
DIAGRAM3(2 MONITORS, 2 DOORBELLS, 2 CCTV CAMERA)
If 2 CCTV cameras are connected with all slave monitors like the dash line, then all mac
hines can monitor them.
Page 10
SINGLE MONITOR AND DOORBELL INSTALLATION
Page 11
CABLE SPECIFICATION
Page 12
OPERATION GUIDE
Key Operation
a)
Three buttons in total
b)
Answer Key
i.
At standby or monitor state, press this button to enter the monitor state or
switch to monitor channels
ii.
In Multimedia and system setting interface ,
is for selecting or
adjusting (Go up or Decrease)
Intercom/ Transfer Key
c)
i.
At standby or answering state, press this key to enter the call transfer state
ii.
In Multimedia Manager and System Setting, this button is for the selection
and adjustment(Move down or Increase)
d)
i.
ii.
iii.
iv.
v.
Unlock Key
When answering or monitoring the doorbell ,press it to unlock the door
At standby state , long press
to enter System Setting
When the system display boot screen, long press can enter the Advanced
Setting
If there is upgrade file in the inserted SD, long press can enter the upgrade
option interface
In the Multimedia and System Setting state, long press can back to the last
menu. Keep pressing it ,the system back to the past menu gradually
Page 13
Touch Screen Operation
a) Action Types
i.
The system support five kinds of action types
ii.
1.
Click: choose, enter
2.
Left Slide: return, show main menu(at standby model),page
down(in multimedia manager)
3.
Right Slide: page down(in multimedia manager), show
menu(slide at the bottom of the 1/3 screen in multimedia
manager state)
iii.
4.
Up Slide: page down
5.
Down Slide: page up
On the bottom of any interface in the system ,Left Slide can back to
the last menu
1.
NOTE:
a)
When play pictures and videos ,clicking can back to the last
menu similarly
b)
Left slide at other interface also can return to the last
menu ,not required slip at the bottom of the touch screen
iv.
At the following interface in Multimedia, right slide at the bottom
the screen, a menu will play appropriately
1.
Move up
Delete
Move down
2.
Move up
Play
Delete
Move down
3.
Return
Page up
Page 14
Page down
of
4.
Return; Last video; Speed down; Play/ PausE; Speed up;
Volume Decrease; Volume Increase; Next video
5.
Return; Last video; Speed down; Play/Pause; Speed up;
Volume Decrease; Volume Increase; Next video
6.
a).The last one; Play/Pause; Volume Decrease; Volume
Increase; Delete; The next one
b).The last one; Play/Pause; Volume Decrease; Volume
Increase; Tone setting for auto leaving message; The next one
v.
In the system setting state, click the setting contents, an optional
menu will display on the screen
Increase; Decrease; Move up; Move down
When at answering or monitoring state, a menu will show on the right
of the screen, Right Slide can hide or play the menu
1.
vi.
1.
2.
Above buttons are:Hang up; Unlock; Call /Call Transfer; Monitor
Switching; Image switching between 4:3 and 16:9; Image
Capturing; Video Recording
Page 15
b)
At the standby state ,click or slide on the screen ,the system can enter into
main menu
Multimedia menu have 12 kinds of icons
View Captured Pictures
Monitor Door1
View Recorded Video Files
Monitor Door 2
View Recorded DVR Files
Monitor CCTV Camera
Play Photo Frame & Play Music
Call Other Monitors
Check Recorded Messages
Record Audio Messages
Show Calendar Screen
System Setting
Page 16
The Terminal
Menu Setting Operation
No.
Setting items
Options
Note
10S/15S/20S/25S/30S
1.1
CHIME TIME
/35S/40S/45S/50S/55
S/60S/65S/70S/75S/8
Chime duration time
0S/85S/90S/95S/100S
DOOR1 CHIME TYPE
DOOR2 CHIME TYPE
1.2
CHIME TYPE
SETTING
INTERCOM CHIME
8 chime types: from 00 to 07
TYPE
RINGE TONE
Ring tone will repeat when the
REPEAT
option is
Do not capture images
1.3
AUTO CAPTURE
QUANTITY
DISABLE
automatically
Automatically capture 1 image
1
when someone presses the
outdoor bell.
Page 17
Automatically capture 2 images
2
when someone presses the
outdoor bell.
Automatically capture 3 images
3
when someone presses the
outdoor bell.
1.4
COPY FILE TO SD
CARD
CANCEL
COPY
DVR ENABLE
BEGIN TIME
1.5
DVR SETTING
END TIME
The time when DVR starts
working.
The time when DVR ends
working.
FRAME RATE
RESOLUTION
RECORD LOCATION
The DVR will start working at the
BEGIN TIME.
1.51
DVR ENALBE
1.52
BEGIN TIME
HOUR:MINUTER
1.53
END TIME
HOUR:MINUTER
.
1.54
FRAME RATE
1/2/5/10 FRAME/S
Related with SD card capacity,
1.55
RESOLUTION
320*240
640*480
DOOR1
1.56
Related with SD card capacity
Record from Door1 camera.
RECORD
Record from Door2 camera.
LOCATION
DOOR2(optional)
(Only valid when Doorbell 2
connected and Port2 state set as
Page 18
Door2.)
CCTV1(optional)
CCTV2(optional)
SCREEN
1.57
SAVER
TIME
NEVER/05/10/15/20/2
5/30/35/40/45/50/55/6
0 MIN
Record from CCTV1 (CCTV1
must be connected )
Record from CCTV2 (CCTV2
must be connected)
The screen will be off when the
set screen saver time arrives.
The system will ask visitor to
1.6
AUTO
leave message if no one
LEAVING
answers after the chime time.
MESSAGE
The system will turn off if no one
answers after chime time.
1.7
1.8
DEVICE
The option will be red if two
ROOM1/2/3/4
ADDRESS
PORT2 STATE
monitors set the same address
DOOR2
CCTV3
DATE:
1.9
SYSTEM
TIME
SETTING
YEAR-MONTH-DAY
TIME:
HOUR:MINUTER:SEC
OND
ALARM CLOCK 1
ALARM CLOCK 2
ALARM CLOCK 3
2.0
ALARM
CLOCK
SETTING
ALARM CLOCK 4
ALARM CLOCK 5
ALARM CLOCK6
ALARM
CLOCK
CHIME TYPE
2.01
CLOCK1 SETTING
STATE
Page 19
1. Each alarm clock can be set
separately.
2. Since set time, it will alarm
every 50 seconds till you turn the
alarm clock off by press
8 types: from 00 to 07
CYCLE TYPE
4 types available
WEEK SELECT
Only valid at Week Type.
TIME
DATE
2.01
1
STATE
The alarm will trigger at the set
time.
SINGLE
Alarm on the chosen days every
WEEK
2.01
2
CYCLE TYPE
Alarm once at the set time.
week.
MONTH
Alarm on the chosen day every
month.
Alarm on the chosen day every
YEAR
year.
SUNDAY
MONDAY
2.01
3
WEEK SELECT
TUESDAY
You can set each day's state as
WEDNESDAY
enable/disable to create an
THURSDAY
alarm group you like.
FRIDAY
SATURDAY
2.01
4
TIME
HOUR:MINUTER
1.At Single Type, YEAR,MONTH
and DAY are all valid
2.01
5
2.At Week Type, all options are
DATE
YEAR-MONTH-DAY
invalid
3.At Month Type, only DAY is
valid
4.At Year Type, only MONTH and
Page 20
DAY are valid
2.1
2.2
2.3
SYSTEM FORMAT
PROGRAM
FORMAT FLASH
FORMAT SD CARD
2.96
VERSION
BACKGROUND
PICTURE1/;
IMAGE SETTING
COLOR1/2/3/4/5/6/7
Entering the touch screen
2.4
2.5
2.6
CALIBRATE
interface, click the "X "on the
THE
upper corner first, then click the
lower right corner "X ",
calibration will be completed.
TOUCH SCREEN
RESTORE
DEFAULT
LANGUAGE
CANCEL
RESTORE
ENGLISH/RUSSIAN/P
ERSIAN/GERMAN
Page 21
The system will restore default
by this operation.
Parameters
Some parameters of picture capturing, video recording and DVR functions.
1.Picture Capturing Function
Storage location
Resolution ratio
Internal flash
320*240
External SD card
640*480
Pictures quantity
Over 60pcs
Depends on the capacity of SD
card
2.Video Recording Function
SD card capacity
Resolution ratio
Frame rate
1G
320*240
2
2G
320*240
5
4G
320*240
10
>=8G
640*480
10
3.DVR Function
SD card capacity
Resolution ratio
Frame rate
Continuous video
recording time
<2G
No DVR function
2G
320*240
1
4G
320*240
1,2,5
Over 24 hours
When setting frame rate
to 1,over 48 hours
8G
320*240
1,2,5,10
When setting frame rate
to 1,over 96 hours
>=16G
320*240or640*480
1,2,5,10
When setting frame rate
to 1,over 192 hours
Video recording time will be different when the recording content is different,(In the worst
situation, a 2G card can record pictures of 320*240 resolution ratio at 1 frame per second for
28 hours, In the best situation, the recording time can be over 72 hours.)
Page 22
Time parameter
Items
Time and note
Longest duration time for monitoring listening
8 hours
Longest duration time for monitoring outdoor
2 minutes
bell
Longest duration time for viewing CCTV
8 hours
Longest duration time for answering the
1 minute
visitor's call
Viewing pictures
The screen will turn off if no operation
within 10 minutes.
Viewing calendar and time
The screen will not turn off automatically.
Longest duration time for manual audio
10 minutes
recording
Longest duration time for manual video
10 minutes
recording
Automatically refreshing time when viewing
5 seconds
pictures
Duration time for alarm clock
10 seconds
Time interval for repeating alarming
1 minute
Time for automatically turning off the system 1 minute
when no operations taken
Time for automatically turning off the visitor's 1 minute
call from outdoor bell
Shortest chime time
10 seconds
The time for turning to DVR recording from 10 seconds
standby state
The time for turning to DVR recording from 2 minutes
calendar and time screen
If users record the system tone in their own language and copy it into the SD card, we
suggest each file be less than 400 KB( the duration time be less than 20 seconds), otherwise,
when the system format SD card, the files would be deleted.
Page 23
HOW TO LEAVE MESSAGES FROM DOORBELL(S)?
This model also allows your visitors to leave message for you when no one is at home.
1. Go to SYSTEM SETTINGS to make the AUTO LEAVING MESSAGE to be ENABLE
Mode. Operations as below:
Go into
option to be
menu. Slip to the AUTO LEAVING MESSAGE line , please change the
.
2. When a visitor presses doorbell, no one to answer, after chime Time, a voice from
doorbell will say “Hello, no one is at home at the moment, please leave a message after the
tone”. Now the visitor has 30 seconds to leave message from your outdoor bell. A word
RECORDING will show on the monitor. 20 seconds later, another voice from doorbell will
say, “The recording is over, thank you”, the words RECORDING IS OVER will show on the
monitor.
HOW TO CHANGE ATTENTION TONE FOR LEAVING MESSAGE?
Hosts can change the attention messages with their own languages, and two ways can
achieve it:
Method One:
Go to
in MULTIMEDIA MANAGER, and record one audio messages in your own
language. Then back to MULTIMEDIA MANAGER, click
to enter the folder, click
the audio file you recorded, and right slide at the bottom of the screen, a menu will show
under the screen as follow pic:
Click
to enter into CONFIG ATTENTION TONE. Then change the TONE TYPE to
be USER TONE, and up slip to turn the PLAY TYPE option to BEGINNINGTONE, then
slip again to ATTENTION TONE VOLUME line, and change the volume. Finally press the
Page 24
ACT to confirm the setting. Now the beginning attention tone will be the one your recorded.
Same operation to set the end tone.
Method Two:
Setting the ATTENTION TONE with computer. Record 2 audio file in mp3 format in your
own language, and rename their names to be Beginningtone.mp3(tell the visitors that the
host is not in, please leave messages) and Endingtone.mp3 (thanks for the visitors leaving
messages). Insert the SD card into the computer, create a new folder in the SD card and
rename its name as “Attention Tone”, copy the two recorded files BeginningTone.mp3 and
EndingTone.mp3 into the folder. Then insert the SD card back to the monitor, restart the
monitor and the attention tone would be what you have recorded now.
Note: If users record the system tone in their own language and copy it into the SD card, we
suggest each file be less than 400 KB( the duration time be less than 20 seconds), otherwise,
when the system format SD card, the files would be deleted.
Page 25