1
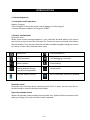
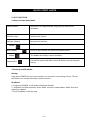
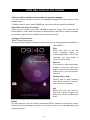
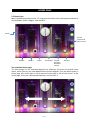
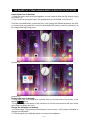
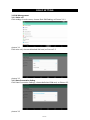
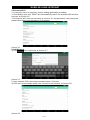
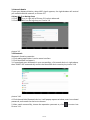
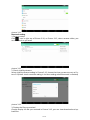
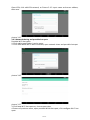
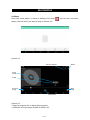
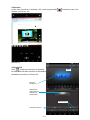
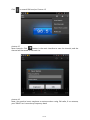
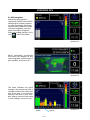
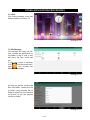
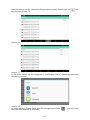
MT-733GQ
ENG User Manual
TAB
ENG 1
INDEX
Introduction
Quick Start Guide
Open and close of the screen
Home Page
The shortcut icons management in desktop application
Application procedures
Basic settings
Messagge
Wireless and Internet
Brightness setting
Storage
Backup and reset
Multimedia
Communication function
Internet
GPS function
Other application
Installation procedure
Technical details
3
4
5
6
7
8
10
11
12
18
18
21
22
25
26
27
28
30
31
This manual is used to help you the right to use the product, this product does not
represent the software and hardware configuration of any description.
The picture in this manual is only for reference, If individual picture does not
match with the product in kind. Please refer to the products.
ENG 2
INTRODUCTION
1. Acknowledgement
1.1 Operation and Preparation
Battery Charging.
If this navigator is first used, please use AV adapter to fully charge it.
1. Apply the power adapter to charge for TABLET.
1.2 Status and Reminder
Reminder icons.
When some remind message appears in your reminder window, please click column
and slip the screen to open the reminder list. Choose the menu you need, and confirm
the information. Then you can close the reminder window through clicking the column
to slide up. Please refer to below status icons:
New email
Airplane Mode on
USB Connected
USB debugging connected
Return button
Downloading
Setting button & Display
recently-used application
Home button
Current electric volume
Wi-Fi connected, internet is available
Reminder board
Reminder icons will work while receiving emails, Wi-Fi is open, you can open the reminder board to view the detailed information.
Open the reminder board
When the reminder column shows new reminder icon, please hold the column and slip
down your finger, then the reminder board is opened.
ENG 3
QUICK START GUIDE
2. KEYS FUNCTION
2.1 Keys Function Description
Power button
Short press to sleep/wake up, long press to startup and
shutdown.
Volume +(up)
Increase the volume
Volume - (down)
Decrease the volume
HOME
Back button
MENU
Impostazioni
Click it in any interface will return to main interface.
Click it in any interface will return to previous menu
This button will display in menu interface.
Can set the system and other menus & display recently browsed
history
2.2 Startup and Shutdown
Startup:
Long press POWER key for three seconds, you can enter into startup picture. The system enters into screen lock status, please unlock it.
Shutdown:
1. Long press POWER, it will popup shutdown window.
2. Shutdown window contains mute mode, airplane mode,reboot mode and shutdown four options.
3. Click Shutdown is the last step.
ENG 4
OPEN AND CLOSE OF THE SCREEN
2.3 Screen will be closed on its own when no operation happens
1. Screen will be closed on its own if no operation happens for some time to save
battery power
2. When screen is open, press POWER key, the screen will be closed immediately.
Open the screen when it is closed
If the screen is closed, short press POWER to open the screen. The screen will be
locked open it, it will show the picture as below picture, left slide to unlock and enter
into camera, right slide the unlock icon to unlock the screen
2.4 Usage of Touch Screen
TABLET operating methods
There are below methods to view the main screen, menu and application procedure in
your TABLET.
Click
When you want to use the
screen keyboard typing or
choose application in the main
interface, you only need to
touch it by your finger.
Press on
If you want to open some item(
textbox or the link in the webpage), or shortcut and main procedure move, you can press on
this item.
Quickly slide or slide
Quickly slide or slide indicates
make quick vertical or horizontally movement by finger.
Pull
Before you pull, you need to
hold the it with strength until
you pull it into the position you
want.
Rotate
For most pictures, you only need to rotate the TABLET sidewise to change the screen
direction from horizontally to vertical. For instance, when you are typing words, and
watching movies.
ENG 5
HOME PAGE
2.5 Home Page
Main interface as below picture 2.2, long press the blank and it will popup windows to
set wallpaper, folder, widgets, and shortcut.
Search
Set the
system and
other menus
Volume-
Return
Home
Screenshot Display
Recently
Browsed
History
Volume+
The extended home page
The home page can be extended beyond the wideness of screen to provide more
space, which you can put new-added shortcuts and widgets. Click the blank space in
home page then slide right or left to extend to the right or left of the screen. In the
home page, there are two extended pictures, as Picture 2.3.
ENG 6
THE SHORTCUT ICONS MANAGEMENT IN DESKTOP APPLICATION
Create folder icon in desktop.
1. Drag the icons need to be put together on one icon(can also overlay several icons)
as Picture 2.4.
2. Then click the overlayed icons, the applications can be folded, as Picture 2.5.
Click the unnamed folder in the black box, it will popup the hidden keyboard, the folder name can be renamed (this is similar with Apple IOS system), the icons position can
be changed through long press.
picture 2.4
picture 2.5
Remove the icons in desktop
1. Long press the icons need to be remove, then on the left side of the screen, it will
appear
icons.
2. Drag the icon to the above of the remove icon, till the icon become red, then move
your finger to delete the icon.
Change the wallpaper of desktop
1. In home page, long press any blank space in main screen, it will popup a window to
change the wallpaper.
2. Click the gallery or wallpaper gallery to select the wallpaper.
ENG 7
VISIT APPLICATION PROCEDURES
Click
in right top of Picture 2.2, enter into main interface as Picture 2.6, choose
the application procedure you want to visit.
picture 2.6
2.7 USB Connection
Before transmitting documents, you have to conduct storage configuration for your
TABLET:
1. Connect the TABLET and computer by USB cable, the reminder column will show the
remind information.
2. Open the reminder board; please view the TABLET status and reminder to learn how
to open the board.
3. It will as below Picture 2.7, then click “USB storage”.
4. Now the USB is connected successfully.
picture 2.7
ENG 8
Copy the document into memory card
1. Connect the TABLET to computer with USB cable.
2. As TABLET storage configuration, it is connected with computer successfully.
3. Open the “My computer” in your computer, check the items in “removable disc”.
4. Copy the documents you need into “removable disc”.
5. After copying finishes, click “shutdown the USB storage configuration” to uninstall.
Notice: When the TABLET is connected with USB cable, and you open the USB storage
configuration, you can’t view the memory card through the TABLET. Only after you
detach the USB cable, you can view the memory card in the TABLET.
2.8 Operation Technique
Enter widgets interface
In the application interface, click widgets on the above of screen, or slide the screen,
it will switch into widgets interface. Long press any widget to create its shortcut, then
you can enter into the application through the shortcut icon.
Create application shortcut icons in the desktop
In the application interface or widgets interface, long press any icon to switch into
desktop automatically, drag and hold the icon, you can move to any position in the
desktop.
Remind: If the target position has no space, the widget won’t be add in the main
screen.
ENG 9
BASIC SETTING
3.1 SIM Management
3.1-1 Voice call
Click settings in main menu, choose Dual SIM Setting, as Picture 3.1.1
picture 3.1
Click voice call, choose defaulted SIM card, as Picture 3.2
picture 3.2
3.1-2 Date Connection Setting
Click Date Connection Settings, choose defaulted SIM card, as Picture 3.3
picture 3.3
ENG 10
MESSAGE
3.1-3 Messaggi
Click SMS Setting, choose the defaulted SIM card when sends message, as Picture 3.4
picture 3.4
ENG 11
WIRELESS AND INTERNET
3.2 Connect Wi-Fi
1. In the main menu or interface, choose setting application procedure.
2. Click WLAN, open wifi, TABLET will automatically search the available Wifi wireless
internet. As Picture 3.6
3. Choose the Wi-Fi internet you want to connect, if it has password, it will popup the
password window, enter password, click connect.
picture 3.6
2. Add Network
1) Click
icon in right top, as Picture 3.7
picture 3.7
2. Input network SSID, the wireless network name, click save.
3) Click user name already saved, click connect to use network, as Picture 3.8
picture 3.8
ENG 12
3. Network Notice
If you open Network Notice, when WIFI signal appears, the right bottom will remind
you available WLAN network, as Picture 3.6
4. Keep WI-FI on during sleep
1. Click
icon in right top of Picture 3.8, select advanced.
2. Click Keep WI-FI on during sleep, as Picture 3.9
picture 3.9
3.3 Bluetooth
Bluetooth function operation
1. Click setting application in main menu interface
2. Click bluetooth and open it.
3. If somebody open bluetooth in your surroudings, click search device in right above,
then TABLET will automatically search the bluetooth device nearby. As picture 3.10
picture 3.10
4. Click the available Bluetooth device, it will popup request window, enter into related
password, and match the device to connect.
5. After match successfully, choose the operation you want to, click
to enter into
Picture 3.11.
ENG 13
picture 3.11
Bluetooth setting
1. Rename tablet
Click
icon in right top of Picture 3.10, as Picture 3.12, select rename tablet, you
can rename it as you want
picture 3.12
2. Check visibility timeout
Select visibility timeout setting in Picture 3.12, choose the time you want to set, as Picture 3.13(Note: check overtime setting is the time setting when Bluetooth is checked)
picture 3.13
3. Display the file you received
Choose display the file you received in Picture 3.12, you can view download and upload files.
ENG 14
Open VPN, click add VPN network, as Picture 3.15. Input name and server address,
then save.
picture 3.15
3.4-3 Network sharing and portable hot spots
Portable WI-FI hot spots
1. Click setting application in main menu.
2. Click more when wifi is well connected, open network share and portable hot spot
picture 3.16
picture 3.17
3. Click keep Wi-Fi hot spots on, choose open time.
4. Return to previous menu, open portable WLAN hot spots, click configure WI-FI hot
spots
ENG 15
picture 3.19
5. Set passwords you want to, password should be more than 8 numbers.
3.5 Mobile Networks
1. Click Settings and come into “More” of the WIRELESS&NETWORKS.
picture 3.20
2. Access Point Name( APN)
Choose the SIM 1 or SIM 2 network settings, as Picture 3.21
picture 3.21
ENG 16
Choose access points name (APN)
Choose connect type, as Picture 3.22
picture 3.22
3. Network Operator
Click preferred network type, system will search available GSM and WCDMA network,
as Picture 3.23
picture 3.23
3.5.1 Preferenza di una rete
Click network operators, you can search available networks or choose automatically as
Picture the picture below.
ENG 17
IMPOSTAZIONE LUMINOSITÁ
(1) Brightness setting
Sliding back and forth to adjust the birghtness
(2) Wallpaper
(3) Never Sleep
Click never, tablet will never sleep.
(4) Font Size
(5) Daydream
select the clock/colors/photo frame/photo table
STORAGE
3.6 Memoria
Open setting function, click memory, click preferred install location, you can choose
install new application to choose preferred install location.
System storage: it is the space TABLET leave for system file, as Picture 3.27. it can’t be
viewed.
picture 3.27
ENG 18
Internal storage: it is internal storage is TABLET local NAND storage, as Picture 3.28, if
you need to check the storage content, you can check it in main menu.
picture 3.28
SD card: You can check storage space, SD card available space, unmount SD card and
erase SD card, as Picture 3.29
picture 3.29
Safe remove SD card.
1. Click setting application.
2. Click memory.
3. Click uninstall SD card.
4. Now you can remove SD card safely.
Note: Removing SD card safely can protect SD card and increase its lifetime
ENG 19
3.7. Location service
Click setting, select location, go into location mode setting as Picture 3.30
picture 3.30
1. High accuracy
You can use GPS,WIFI ,and mobile networks to determine location.
2. Battery saving
You can use WIFI ,and mobile networks to determine location.
3. Device only
You can use GPS to determine location.
4. AGPS enable option
Click APGS enable option, enter into Picture 3.31, then can select the networks of
AGPS.
picture 3.31
1. Registered network
Click registered network,you can use the registered network date for AGPS.
2. All Networks
Click registered network,you can use all networks date for AGPS.
3. Do not use AGPS
Click registered network,you can stop AGPS function
ENG 20
BACKUP AND RESET
3.8 Backup AND Reset
Connect WIFI and login your google account, choose backup my data, system will backup your data into google server.
If you need to recovery factory reset, please click reset, as Picture 3.35, if you need to
formulate NAND, please click reset tablet.
picture 3.35
ENG 21
MULTIMEDIA
4.1 Music
Enter into music player: in menu or desktop click music
player, click the music you want to play, as Picture 4.1.
icon to enter into music
picture 4.1
See the playlist
Menu
Song
name
Artist
Previous
Song
Next
Song
Play/Pause
picture 4.2
- Drag the progress bar to adjust play progress.
- Operation of music player button as Picture 4.2
ENG 22
4.2 Camera
In the main interface or desktop, click camera application
camera, as Picture 4.3
procedure enter into
picture 4.3
4.3 Radio FM
Click
in the main interface or desktop
to enter into FM radio interface. Radio button
operation instruction as Picture 4.4
Save
Current
frequency
Slide left or
right come to
previous or
next chanel
Next channel
Previous channel
ENG 23
picture 4.4
Click
to search FM band, as Picture 4.5
picture 4.5
Save channels: Click
button in the main interface to save the channel, and the
channel will be saved in channels list.
picture 4.6
Note: You need to insert earphone as antenna when using FM radio, If no antenna,
your TABLET can’t search any frequency band
ENG 24
COMMUNICATION FUNCTION
Contact settings
Display phone
numbers
The area of dial
phone numbers
Call
history
All Contacts
Dial phone
numbers
Protect your hearing
To avoid possible damage to your hearing,
limit the amount of time listening at high
volumes
ENG 25
INTERNET
5.1 Browser
In case of Wi-Fi or mobile internet is connected well (Please refer to Chapter 3.1 for
wireless and internet setting), click
IE browser in the main menu or desktop to
enter the IE interface, as Picture 5.1
Address column
Save bookmark
Bookmarks/History/
Saved page
Menu
ENG 26
RISOLUZIONE
FUNZIONE
PROBLEMI
GPS
6.1 GPS Navigation
Map of the third parties is
required for TABLET internal GPS
satellite signal receiver positioning, after installation the device
can accurately implement traffic
real-time navigation, meet the
needs of outdoor navigation.
Enter into setting interface, click
icon
,enter into below
picture 6.1
When positioning successfully
the screen will display the latitude, longitude, and the time of
your location. As Picture t 6.2
picture 6.2
The value indicates the signal
strength, the positioning time is
relavant to time zone in your setting, if the time is not inconsistent with real time in your location, please check the time zone
in your setting is correct or not.
Value
Signal
ENG 27
picture 6.3
OTHERRISOLUZIONE
APPLICATION
PROBLEMI
PROCEDURES
7.1 Clock
Click Clock procedure, enter into
below interface as Picture 7.1
immagine 7.1
7.2 File Manager
File manager will copy, cut, delete, rename the documents or
the folder in the TF card, it also
will share the files, install apk
etc.
In the main menu or desktop,
click
the document manager
icon to enter into
documents manager.
immagine 7.1
immagine 7.3
A) Copy, cut, delete, rename the
files and folder: choose the file
or folder, long pressthe file or
folder to enter into the interface
as Picture 7.3 you can operate
the file or folder.
ENG 28
Paste the copy or cut file: choose the file you want to paste, choose right top
to enter into Picture 7.4.
icon
picture 7.4
picture 7.5
C) Share file: choose any file, long press it, it will popup “share”, choose the share way
you want in the list.
picture 7.6
D) Install apk file. Choose Quick View file manager application
the third part software as reminder
ENG 29
, you can install
INSTALLATION OF PROCEDURES
8. Install the third party application procedure
8.1 Installation
Install the third party application procedure
1. Click “File Explorer” application procedure; choose the application procedure you
need to install.
2. Hold the application procedure you need to install.
3. It popup install, click install apk.
4. Finish the installation as guide, it will operate
Note: The third party procedure searched from internet to use on the system are all
suffixed with .apk.
8.2 Uninstall
Uninstall application procedure
1. Click Setting icon in main interface.
2. Click Apps, list all the application procedures installed in the system.
3. Click the APK you want to uninstall, click disable
4. Click confirm to finish uninstallation.
9. Troubles Shooting
1. The first startup of TABLET is slow
After the TABLET system upgraded, the first startup need to install the pre-installed
application softwares, the lead time is around 2-3 minutes, the startup afterwards will
be much quicker.
2. TABLET can’t connect Wi-Fi
- Make sure the wireless router of internet service can work in normal.
- Ensure the TABLET and wireless router in certain distance, and no wall or other barrier between them.
- Ensure the user name and password both correct
3. TABLET feels hot
When many application procedures are used in meanwhile, or the brightness of screen
open to the lightest or under charging, TABLET may feel fever. It is normal.
4. Email can’t be set or Registration of application procedure
- Ensure your internet is well connected.
- Make sure your email setting way is correct.
- Keep your system time and local time consistent.
5. The system is abnormal and can’t work.
When you install some third party application procedure, it may cause abnormal work,
you can press Reset key(next to power port) to reset the system
6. The webpage can’t be opened
- Please keep the distance between from route to TABLET in effective range.
- Please restart WIFI and try again.
7. TABLET works terribly slow sometimes
It is normal phenomenon. Please turn off some application you don’t need in advanced task management, or uninstall some third party application to release more
system resource.
ENG 30
TECHNICAL SPECIFICATION
Size: 105x185x10,5mm
Weight: 282g
Display: 7”
Resolution: 1024x600
Processor: Spreadtrum SC5735 Quad-Core 1.2 GHz
Internal Memory: 8 GB up to 32GB with MicroSD/MicroSDHC
RAM: 1GB
Battery and capacity: built-in lithium rechargeable 2800 mAh 3,7V
Power cord included: INPUT: 100-240V~50/60Hz
OUTPUT: DC 5.0V 2A
USB: mini USB 2.0
Dual Camera: Front 0.3 Megapixel, Rear 2.0 Megapixel
Connections: Bluetooth 4.0, 3G, Wi-Fi 802.11 b/g/n
Gps: built-in
Microphone: built-in
Operating System: Android 4.4 KitKat
Video format: AVI, MPG, MKV, RM, RMVB, MP4, MOV, VOB, DAT, FLV, TS, 3GP, WEBM,
VP8, etc...
Audio format: MP1, MP2, MP3, WMA, WAV, OGG, OGA, APE,
FLAC, AAC, M4A, 3GPP, etc…
Images: JPG, JPEG, BMB, GIF, PNG, JFIF etc;
Applications: MarketWall, Gamepix, Kobo, 1000 Italy.
ENG 31
MADE IN CHINA
Produced by Futura Grafica S.p.A.
Via Domenico Fontana, 12 - 00182 Roma - Italia
We the manufacturers, Futura Grafica S.p.A., hereby declare that the product Miia TAB MT733GQ meets the requirements of the R&TTE Directive (EC) CE 1995/5. The complete Declaration of Conformity is available from the company: Futura Grafica S.p.A., Via Domenico Fontana,
12 - 00185 Rome
Return the product to the retailer at the time of purchasing another equivalent product; trade one
item to one item.
Information on the SAR certification (Specific Absorption Rate).
The device is compliant with European Union (EU) standards that limit human exposure to radio
frequencies (RF) issued by telecommunication devices and radios. These standards prevent the sale
of mobile devices that exceed a level of maximum exposure (also called SAR) equal to 2.0 W/kg.
During the test, the highest SAR level recorded for this model was equal to 0.129 W/kg. During
normal use, the actual SAR level may be much lower, since the device was designed to emit only
the radio frequency energy needed to transmit the signal to the closest base station. Through the
automatic issuance of energy at lower levels where possible, the device reduces the overall exposure
to radio frequency energy for users.
IINFORMATION FOR USERS
Pursuant to Legislative Decree no. 49 of 14 March 2014 “Attuazione della Direttiva 2012/19/UE sui
rifiuti di apparecchiature elettriche ed elettroniche (RAEE)”
The symbol of the crossed out wheeled bin on the equipment indicates that the product must
be collected separately from other waste at the end of its useful life. Therefore, the user must
turn in the equipment, complete with all its essential components, at the end of its useful lifetime to
an appropriate centre for separate collection of electrical and electronic waste. The user may also take
to the retailer at the time new equipment of an equivalent type is purchased, trading one item for one
item, or one item for zero items for devices measuring less than 25 cm on the longest side. Suitable
separate collection for ensuring that the equipment is recycled, handled and disposed of compatibly with
environmental obligations prevents possible negative effects on the environment and human health. It
also favours the recycling of the materials that the device is made of. Improper disposal of the product by
the user implies the application of administrative penalties as per D. Lgs n. Legislative Decree no. 49 of 14
March 2014.
The product works with batteries covered by European directive 2006/66/CE, which may not be
disposed of with normal household waste.
Inquire about local regulations relating to the separate collection of batteries: proper disposal
prevents negative consequences for the environment and health.
The battery is built-in, to be disposed of at the end of the useful life of the product.
The battery can not be removed by the user.
The recovery centers can disassembly the product and remove of the battery.
ENG 32