1
Trust Wireless Design & Work Tablet 200
UK
TRUST WIRELESS DESIGN &
WORK TABLET 200
User manual
Version 2.0
Trust Wireless Design & Work Tablet 200
Thank you
Thank you very much for purchasing this product from the Trust range. We wish you hours of fun
with it. Please read this manual carefully before using the product.
Registration
Register your purchase now at the Trust Internet site, www.trust.com, entitling you to receive
optimal warranty and service support. You will be automatically informed of developments to your
and of other Trust products. You will also have the chance to win some spectacular prizes.
Copyright statement
No part of this instruction manual may be reproduced or transmitted, in any form or by any means,
electronic or mechanical, including photocopying, recording, or information storage and retrieval
systems, for any purpose other than the purchaser's own personal use, without prior written
permission from the manufacturer.
Disclaimer statement
The manufacturer specifically disclaims all warranties, either express or implied, including, but not
limited to, implied warranties for the marketability and suitability for a particular purpose, with
respect to the software, the accompanying product manual(s) and written material, and all other
accompanying hardware. The manufacturer reserves the right to revise or make improvements to
its product at any time and without obligation to notify any person of such revisions or
improvements.
In no event shall the manufacturer be liable for any consequential or incidental damages, including
any loss of business profits or any other commercial damages, arising out of the use of its
products.
All company or product names are trademarks or registered trademarks of their respective
owners.
01 UK 12052 WDWTABLET200
Trust Wireless Design & Work Tablet 200
Contents
1.
2.
Introduction ..................................................................................................................................... 2
1.1
Conventions in the manual ..................................................................................................... 2
1.2
Contents of the package.......................................................................................................... 2
1.3
Minimum system requirements .............................................................................................. 2
Safety................................................................................................................................................ 3
2.1
General ...................................................................................................................................... 3
2.2
Batteries .................................................................................................................................... 3
3.
‘Trust Design & Work Tablet 200’ functions................................................................................. 3
4.
Installation ....................................................................................................................................... 4
4.1
5.
6.
Inserting batteries .................................................................................................................... 4
4.1.1
Pen ...................................................................................................................................... 4
4.1.2
Mouse ................................................................................................................................. 4
4.2
‘Trust Design & Work Tablet 200’ driver program installation ............................................ 5
4.3
Art Dabbler 2.1 installation ...................................................................................................... 6
4.4
PenSoft installation.................................................................................................................. 8
4.5
CADIX 98 installation ............................................................................................................. 11
Use of the Tablet ........................................................................................................................... 15
5.1
Adjusting sensitivity .............................................................................................................. 15
5.2
Mouse settings ....................................................................................................................... 17
5.3
Adjusting the work surface ................................................................................................... 17
Using the software ........................................................................................................................ 18
6.1
Art Dabbler 2.1 ........................................................................................................................ 18
6.2
PenSoft .................................................................................................................................... 21
6.3
CADIX98 .................................................................................................................................. 21
7.
Troubleshooting............................................................................................................................ 21
8.
Specifications ................................................................................................................................ 22
9.
Trust Customer Care Centres ...................................................................................................... 23
1
UK
Trust Wireless Design & Work Tablet 200
1. Introduction
This instruction manual is intended for users of the Trust Wireless Design & Work Tablet 200 (Design &
Work Tablet 200). Some computer experience is necessary when installing this product. When in doubt,
consult one of the Trust Customer Care Centres. The last page of the electronic manual, as well as the back
of the printed quick installation manual, contain more information about these Customer Care Centres.
1.1
Conventions in the manual
The following conventions have been used in this manual to indicate instructions:
<key>
Here you should press a key. The name of the key is given between brackets.
‘System’
This is a specific term used in a program. These are the terms used by, for example,
Microsoft Windows 98.
[DIR]
Key in the text shown in square brackets [….].
{Term}
The text between the accolades {….} is the English term, e.g.{File} which appears in the
associated figure.
Additional information is shown as follows:
NOTE:
If you connect the ‘Trust Design & Work Tablet 200’ to a USB HUB, the USB HUB must have its
own power source.
The examples assume that the letter “D” has been assigned to your CD-ROM drive. If your system uses a
different drive letter for your CD-ROM drive, such as "E", you should replace the drive letter "D" in the text
with "E".
1.2
Contents of the package
Before reading the user manual, check the contents of the package. It must contain:
• Trust Design & Work Tablet 200
• Wireless 3-button pen
• Wireless mouse
• CD-ROM with driver program, applications and manuals
• CD-ROM with ART DABBLER 2.1
• Quick installation manual
• Type AAA batteries (2)
Should anything be missing or be damaged, please contact one of the Trust Customer Care Centres. You will
find more information about this at the back of this manual.
1.3
Minimum system requirements
• Pentium 133 MHz CPU
• USB port
• Windows 98
• 32 MB RAM
• 50 MB hard disk space available
• 4X CD-ROM player
2
Trust Wireless Design & Work Tablet 200
2. Safety
2.1
General
1.
Do not use this device in a damp environment.
2.
Do not try to repair this device yourself.
3.
Under the following circumstances, have the device repaired by qualified personnel:
UK
a) The cable or plug is damaged or worn;
b) Fluid has entered the device;
c) The device has been dropped and/or the housing is damaged;
4.
2.2
Position the device so that the cables cannot be damaged.
Batteries
1.
The batteries are not rechargeable. Do not try to recharge these batteries. This may result in an
explosion.
2.
Do not throw the batteries in an open fire. The batteries may explode.
3.
Never drill a hole in the batteries.
4.
Keep the batteries out of the reach of small children.
When the batteries are empty, ask your local authority where you can dispose of them.
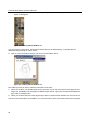
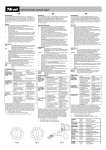
3. ‘Trust Design & Work Tablet 200’ functions
Figure 1: ‘Trust Design & Work Tablet 200’ functions
Description
Function
A
LED
Goes on when the ‘Trust Design & Work Tablet
200’ has been properly installed.
B
Function Keys
F1 through 12
These have the same function as function keys F1
through F12 on the keyboard. The driver program
does have to be installed.
C
Pen Holder
Place to put the pen while not in use.
D
Work area
You can make a drawing here.
3
Trust Wireless Design & Work Tablet 200
Description
Function
E
Pen point
Equivalent to left mouse button.
F
Pen Switch
Equivalent to middle mouse button.
G
Pen Switch
Equivalent to right mouse button.
H
Left mouse button
I
Middle mouse
button
J
Right mouse button
Table 1: Trust Design & Work Tablet 200 functions
4. Installation
4.1
Inserting batteries
4.1.1
Pen
Insert the batteries in the ‘Trust Design & Work Tablet 200’ pen as follows.
Figure 2a: inserting batteries
1.
Twist the top of the pen to the left until it comes apart.
2.
Insert the battery in the compartment as shown in Figure 2. You can also read on the inside of the
battery compartment how the batteries must be inserted.
3.
Next, twist the top of the pen on again.
4.1.2
Mouse
Figure 2b: inserting battery
1. Remove the battery lid on the bottom of the mouse.
2. Insert the battery into the compartment as shown in Figure 2b. You can also read on the inside of the
battery compartment how the battery must be inserted.
3. Replace the battery lid on the bottom of the mouse.
Note:
Inserting the batteries incorrectly may cause damage.
Note:
Only replace the battery with an equivalent type (alkaline type AAA batteries or rechargeable
NiMH).
4
Trust Wireless Design & Work Tablet 200
4.2
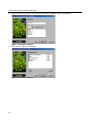
‘Trust Design & Work Tablet 200’ driver program installation
1. Insert the CD-ROM in your CD-ROM player and the installation program will start up automatically. If this
does not happen, start up ‘Setup.exe’ on the CD. Figure 3 will appear.
UK
Figure 3: Driver program installation
2. Click on ‘Trust Design & Work Tablet 200’ to install the driver program. Figure 4 will appear.
Figure 4: driver program installation
3. Click on ‘Next’ to start the installation. After installation, Figure 5 will appear.
Figure 5: driver program installation
4. Connect the ‘Trust Wireless Design & Work Tablet 200’ to a free USB port.
The driver program installation is completed. Go on to chapter 4.3 for installation of Art Dabbler 2.1.
5
Trust Wireless Design & Work Tablet 200
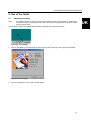
4.3
Art Dabbler 2.1 installation
Art Dabbler 2.1 is a drawing program which you can use with your ‘Trust Design & Work Tablet 200’. Follow
the instructions below for installation of Art Dabbler 2.1.
The Art Dabbler 2.1 program is included on a separate CD-ROM. To install it, follow the directions below.
1. Insert the Art Dabbler CD-ROM in your CD-ROM player.
2. If the CD does not start up automatically, proceed as follows.
3. Click on ‘Run’ in the Start menu.
4. Type in [D:\English\Setup.exe] for the English installation, [D:\German\Setup.exe] for the German
installation or [D:\French\Setup.exe] for the French installation and click on ‘OK’. Figure 6 will appear.
Figure 6: Art Dabbler 2.1 installation
5. Click on ‘Next’. Figure 7 will appear.
Figure 7: Art Dabbler 2.1 installation
6. Select ‘Typical’ and click on ‘Next’. Figure 8 will appear.
6
Trust Wireless Design & Work Tablet 200
UK
Figure 8: Art Dabbler 2.1 installation
7. Click on ‘Next’. Figure 9 will appear
Figure 9: Art Dabbler 2.1 installation
7
Trust Wireless Design & Work Tablet 200
8. Click on ‘Next’. Art Dabbler 2.1 is being installed now. After installation, Figure 10 will appear.
Figure 10: Art Dabbler 2.1 installation
9. Click on ‘Finish’ to complete installation of Art Dabbler 2.1.
Installation of Art Dabbler is completed. For installation of other programs you must remove Art Dabbler 2.1
CD-ROM and insert the Trust CD-ROM in your CD-ROM player. Repeat step 1 from chapter 4.2. Figure 3 will
appear.
See chapter 4.4 for installation of PenSoft.
4.4
PenSoft installation
PenSoft is a program which recognises handwriting. Follow the instructions below for installation of PenSoft.
1.
Go to the installation screen and click on ‘Install PenSoft’, see Figure 3. Figure 11 will appear.
Figure 11: PenSoft installation
2.
8
Select the language in which PenSoft will be installed.
Trust Wireless Design & Work Tablet 200
3.
Click on ‘GO’ to continue the installation. Figure 12 will appear.
UK
Figure 12: PenSoft installation
4.
Click on ‘Next’. Figure 13 will appear.
Figure 13: PenSoft installation
9
Trust Wireless Design & Work Tablet 200
5.
Click on ‘Accept’ to accept the licence and continue the installation. Figure 14 will appear.
Figure 14: PenSoft installation
6.
Click on ‘Next’. Figure 15 will appear.
Figure 15: PenSoft installation
10
Trust Wireless Design & Work Tablet 200
7.
Click on ‘Next’. Figure 16 will appear.
UK
Figure 16: PenSoft installation
8.
Click on ‘Install’. PenSoft is now being installed. After installation, Figure 17 will appear.
Figure 17: PenSoft installation
9.
Click on ‘Finish’ to complete installation of PenSoft and restart the computer.
Installation of PenSoft is completed. See chapter 4.5 for installation of CADIX 98.
4.5
CADIX 98 installation
CADIX 98 is a screen protection program which recognises handwriting. For installation of CADIX 98, follow
the directions below.
11
Trust Wireless Design & Work Tablet 200
1. Go to the installation screen (Figure 3) and click on ‘Install CADIX 98’. See Figure 3. Figure 18 will
appear.
Figure 18: CADIX 98 installation
2. Click on ‘Next’. Figure 19 will appear.
Figure 19: CADIX 98 installation
12
Trust Wireless Design & Work Tablet 200
3. Select ‘Graphics Tablet’ and click on ‘Next’. Figure 20 will appear.
UK
Figure 20: CADIX 98 installation
4. Click on ‘Next’. Figure 21 will appear.
Figure 21: CADIX 98 installation
13
Trust Wireless Design & Work Tablet 200
5. Click on ‘Yes’. CADIX 98 is now being installed. After installation, Figure 22 will appear.
Figure 22: CADIX 98 installation
6.
Click on ‘OK’. Figure 23 will appear.
Figure 23: CADIX 98 installation
7. Click on “Yes’ to complete installation of CADIX 98 and restart the computer.
You have completed installation of CADIX 98. See chapter 6 for using the software.
14
Trust Wireless Design & Work Tablet 200
5. Use of the Tablet
5.1
Adjusting sensitivity
Note:
The function of the pen and /or mouse may be affected by the mouse (serial or PS/2) being
connected to the PC; therefore take the pen and the mouse off the tablet if the serial or PS/2
mouse is being used.
The sensitivity of the pen supplied with the tablet is adjusted in the following manner:
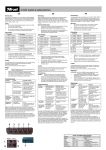
Figure 23: Pen settings
1. Click on the tablet A icon at the bottom right on the tool bar. See Figure 24. Figure 25 will appear.
Figure 25: Pen settings
2. Click on the ‘Buttons’ menu. Figure 26 will appear.
15
UK
Trust Wireless Design & Work Tablet 200
B
Function button 1
settings
C
Function button 2
settings
D
Factory settings
E
Pen pressure
adjustment
Figure 26: Pen settings
3. Different functions can be assigned to the buttons (B & C) on the pen. To do this, click on the arrow to the
right intended for this.
4. If you want to cancel the settings, press ‘Default’ (D) to activate the factory settings.
5. The pen pressure can be adjusted by moving the slide (E) up or down.
6. Click on ‘Test’ to test the pen pressure. Figure 27 will appear. You can test the pen pressure here.
Figure 27: Testing pen pressure
7. Press on the cross on the top right ‘X’ to turn the screen off.
8. Press on ‘OK’ (Figure 26) to save the settings.
16
Trust Wireless Design & Work Tablet 200
5.2
Mouse settings
1. Click on ‘Mouse’ menu (See Figure 25). Figure 28 will appear
A
Mouse cursor speed
B
Settings for left and right-hand users
C
Middle mouse button function
UK
Figure 28: Mouse settings
2. Adjust the mouse functions here such as speed, left or right-hand use and the functions of the middle
button.
3. After selecting the settings, click ‘OK’ to save the settings.
5.3
Adjusting the work surface
For adjusting the work surface you may select centimetres (cm) or inches (inch). Click on the specified format
in Figure 25 to do so.
1. Click on the ‘Control’ menu (See Figure 25). Figure 29 will appear.
Figure 29: Setting the work surface
2. Change the specified work surface and push ‘OK’ to save the settings
17
Trust Wireless Design & Work Tablet 200
6. Using the software
6.1
Art Dabbler 2.1
Art Dabbler 2.1 is a drawing program with a large number of options.
Follow the instructions below for adjustment and use of Art Dabbler 2.1.
Note:
The enclosed CD-ROM contains the manual.
1. Open the Art Dabbler program. Figure 30 will appear.
Figure 30: working with Art Dabbler 2.1
2. Go to Edit and select Add Page (see Figure 31). Now you have created a new page you can work on.
Figure 31: working with Art Dabbler 2.1
3. Go to the tool drawer by pulling the handle. Figure 32 will appear.
18
Trust Wireless Design & Work Tablet 200
UK
Figure 32: working with Art Dabbler
4. Click on the tools and the size of the tools (the red triangle) you want to use. After selecting, close the
drawer.
5. From the current colour palette at the front of colour drawer C (see Figure 30), select a colour you want
to use or open the colour drawer and reselect a palette. See Figure 33. Close the drawer when you have
finished.
Figure 33: working with Art Dabbler 2.1
19
Trust Wireless Design & Work Tablet 200
Now, you can go to the structure drawer C (see Figure 30) to select the paper you want to draw on.
Figure 34 will appear.
Figure 34: working with Art Dabbler 2.1
You now have the correct tools, structure and colours and you can start drawing. To get help with the
different drawing techniques, select ‘Tutors’.
6. Click on ‘Tutors’ and select the topic you want more information about.
Figure 35: working with Art Dabbler 2.1
Now make your own art work or follow the instructions of the tutor.
7. When you are done, you probably want to save your work. Go to ‘File’ and click on ‘Save page as’ (see
Figure 30). Art Dabbler can save pages as different types of files. Type in the file name and indicate the
type of file, for example TIFF.
8. When you are done with the current page and you want to continue with a different one, return to item 2.
This was a short description of Art Dabbler. For more information, see the enclosed manual of this Program.
20
Trust Wireless Design & Work Tablet 200
6.2
PenSoft
For using the PenSoft program we refer you to the help function in the program or the manual on CD.
6.3
CADIX98
For using the CADIX98 program we refer you to the help function in the program or the manual on CD.
7. Troubleshooting
Problem
Cause
Possible solution
Windows does not find new
equipment after the tablet is
connected.
The computer’s USB port does
not function.
Delete the USB port from
equipment management and reinstall it.
Computer jams when operating
via USB.
USB port shares an IRQ with
another device.
Remove cards from the
computer or arrange the IRQs
differently
‘Trust Design & Work Tablet
200’ is marked with an
exclamation mark ‘!’ in
‘Equipment management’.
Tablet connected to a USB HUB Connect the tablet to a USB
without power.
HUB with power or to a USB port
of the computer.
Pen does not respond.
Battery is empty.
Replace the battery. See chapter
4.1.1.
Battery inserted incorrectly.
Re-insert the battery. See
chapter 4.1.1.
Tablet mouse does not respond. Battery is empty.
Replace the battery. See chapter
4.1.2.
Battery inserted incorrectly.
Re-insert the battery. See
chapter 4.1.2.
Pen responds too slowly /
quickly.
Sensitivity of the pen adjusted
incorrectly.
Adjust the pen. See chapter 5.1.
Tablet mouse responds too
slowly / quickly.
Sensitivity of the mouse adjusted Adjust the tablet mouse. See
incorrectly.
chapter 5.2.
Standard mouse (serial / PS/2)
does not function any longer.
Standard Mouse interferes with
pen and tablet mouse causing
both devices to stop functioning.
Remove the pen and tablet
mouse from the tablet when the
mouse is in use.
Small work surface.
Work surface set too small .
Adjust the work surface. See
chapter 5.3
Sudden mouse / pen failure.
Low battery voltage.
Replace the battery. See
chapters 4.1.1 and 4.1.2
No connection to the computer.
Bad cable connection.
Re-connect the cable. See item
4 of chapter 4.2.
Table 2: troubleshooting
Check the FAQ's on the Internet (www.trust.com). You can also register your product via www.trust.com,
entitling you to receive optimal warranty and service support. You will be automatically informed of
developments to your and of other Trust products. You will also have the chance to win some spectacular
prizes.
If you still have any problems after trying these solutions, please contact one of the Trust Customer Care
Centres. You can find more information on the last page of this electronic manual, as well as at the back of
the quick installation manual. Please have the following information available:
21
UK
Trust Wireless Design & Work Tablet 200
• The article number of the device. This is: 12052;
• Hardware data;
• Operating system + version;
• A good description of what exactly does not function;
• A good description of when exactly the problem occurs.
8. Specifications
Work area
6" x 4.5"
Resolution
3048 lpi
Connection
USB
Pen battery
Type AAA
Mouse battery
Type AAA
Table 3: specifications
22
Trust Wireless Design & Work Tablet 200
9. Trust Customer Care Centres
Inhabitants of Great Britain and Ireland should contact:
GB Office
Internet
www.trust.com
From:
E-mail
[email protected]
9:30 – 17:00
Fax
+44-(0)1376-514633
Tel.
+44-(0)1376-500000
Inhabitants of Italy should contact:
Italian Office
From:
Internet
www.trust.com
[email protected]
9:00 – 13:00 E-mail
Fax
051-6635843
/ 14:00 –
Tel.
051-6635947
18:00
UK
Inhabitants of France and North Africa should contact:
French Office
From:
Internet
www.trust.com
[email protected]
9:00 – 17:00 E-mail
Fax
+33-(0)1-48174918
Tel.
+33-(0)803-083080
Inhabitants of Germany should contact:
German Office
From:
Internet
www.trust.com
[email protected]
9:00 – 17:00 E-mail
Fax
02821-58873
Tel.
0800-00TRUST (=0800-0087878)
Inhabitants of Spain should contact:
Spanish Office
From:
Internet
www.trust.com
[email protected]
9:00 – 17:00 E-mail
Fax
+31-78-6543299
Tel.
+34-902 160937
Inhabitants of the Netherlands should contact:
Dutch Office
From:
Internet
www.trust.com
[email protected]
9:00 – 17:00 E-mail
Fax
078-6543299
Tel.
0800-BELTRUST (=0800-23587878)
Inhabitants of all other European countries should contact:
European Head Office
From:
Internet
www.trust.com
[email protected]
9.00 – 17.00 E-mail
Fax
+31-78-6543299
Tel.
+31-78-6549999
23