1
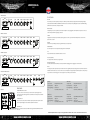
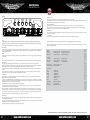
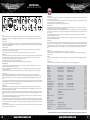
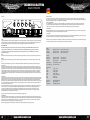
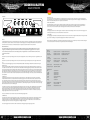
www.ashdownmusic.com
1
USER MANUAL
WELCOME
Thank you
Thank you for purchasing your Ashdown Engineering Amplifier and welcome to the family!
We really think you’ve made the right choice and know that this amplifier will give you years of great
tone and service. It is a machine though and needs to be looked after, please read through this user
manual which will help you get the most out of your new Amp and keep it running as long as some
of our happiest and very famous customers.
REGISTER ONLINE
Please register this product online so we can make sure we give you years of customer support
through our friendly in-house service centre.
Here is where you need to visit to register your product:
http://www.ashdownmusic.com/register
www.ashdownmusic.com
2
www.ashdownmusic.com
www.ashdownmusic.com
3
USER MANUAL
AAA
AFTER 8 Front Panel
hIGh
INPUT
LoW
INPUT
BASS
46
3
CLIP
APPTEk
MIDDLE
46
7
7
3
TREBLE
46
7
3
AUX MIX
46
7
3
VoLUME
46
7
3
2
8
2
8
2
8
2
8
2
8
2
1
9
1
9
1
9
1
9
1
9
1
0
10
0
10
0
10
0
10
0
FRONT PANEL
LINE IN
APPTEK
This enables you to further expand your amp for use with the provided cable and your Agile Partners Amp Kit App. The App
features the Ashdown ABM 900 and ABM 810 cab which can be used with your amp utilizing the features of the ABM including
SUB Harmonics, Valve Drive, Compression and EQ.
46
10
3
7
0
10
8
9
AFTER 8
Headphones
A headphone jack socket is provided to allow stereo headphones to be plugged into the amplifier for silent practice. This cuts
out the main speaker when a jack plug is inserted.
PERFECT 10 Front Panel
hIGh
INPUT
LoW
INPUT
46
APPTEk
46
7
3
CLIP
BASS
DRIVE
3
MIDDLE
46
3
7
TREBLE
46
3
7
AUX MIX
46
3
7
VoLUME
46
3
7
46
7
2
8
2
8
2
8
2
8
2
8
2
8
2
1
9
1
9
1
9
1
9
1
9
1
9
1
0
10
0
10
0
10
0
10
0
10
0
LINE IN
A single balanced line input is provided for play along practice. Used in conjunction with the Headphones socket for silent
practice. Also see, MIX.
LINE IN
10
3
7
0
10
8
AUX MIX
Set the level of your Backing Track by using the ‘MIX’ Rotary control provided.
9
PERFECT 10
DI
MASTER level
Use the output level control to adjust the playing volume of the amplifier.
E.Q.
This passive EQ has bass, middle and treble tone controls.
VINTAGE 12 Front Panel
hIGh
INPUT
LoW
INPUT
BASS
DRIVE
MIDDLE
TREBLE
AUX MIX
VoLUME
LINE IN
DI (were applicable)
DI Output provides a balanced post signal output.
Drive in/out
46
CLIP
APPTEk
46
7
3
2
1
0
3
8
2
9
1
10
46
3
7
0
8
2
9
1
10
46
0
46
3
7
8
2
9
1
10
3
7
0
8
2
9
1
10
46
3
7
0
8
2
9
1
10
46
3
7
0
8
2
9
1
10
7
8
9
0
Drive (were applicable)
This adds tube emulated overdrive as a tube amp would when adding gain. From slight grit to full on overdrive.
10
VINTAGE 12
DI
Input
Two input jack socket are provided for your instrument. There is a high impedance input designed to have sufficient headroom
available to allow active basses to be used. There is also a low impedance input perfectly match the impedance of the pick-ups
on a passive bass. Use the input gain control to adjust for the sensitivity of your instrument.
FIVE 15 & FIVE 15 BB Front Panel
INPUT
hIGh
LoW
INPUT
BASS
DRIVE
MIDDLE
TREBLE
AUX MIX
VoLUME
FX LooP
LINE IN
DI
Drive in/out
APPTEk
46
46
3
7
0
10
2
1
8
2
9
1
3
7
0
10
8
2
9
1
46
3
7
0
10
8
2
9
1
46
3
7
0
10
8
2
9
1
46
46
3
7
0
10
8
2
9
1
3
7
0
10
8
2
9
1
3
7
0
10
8
9
SEND
RETURN
FIVE 15
Back Panel
Rear panel
Fused mains inlet socket
This is for connection of the unit to your countries mains power supply. Please
ensure that the type and rating of mains fuse marked on the rear panel is used when
this is replaced.
Power switch
The power to the unit is turned on with the rear panel power switch. A power led on
the front panel will light to indicate that the amplifier is switched on.
FIVE 15 BB
after 8
Output Power
Input Impedance
Input Signal Range
E.Q.
20watts rms into 8 ohms
1 Meg ohm
100Mv to 10v
Passive Bass, Middle, Treble.
VINTAGE 12
Output Power
Input Impedance
Input Signal Range
E.Q.
20watts rms into 8 ohms
1 Meg ohm
100Mv to 10v
Passive Bass, Middle, Treble.
Perfect 10
Output Power
Input Impedance
Input Signal Range
E.Q.
40watts rms into 8 ohms
1 Meg ohm
100Mv to 10v
Passive Bass, Middle, Treble.
FIVE 15 & BB
Output Power
Input Impedance
Input Signal Range
E.Q.
100(220BB)watts rms 8 ohms
1 Meg ohm
100Mv to 10v
Passive Bass, Middle, Treble.
Specifications
46
CLIP
SPEAKER OUT
There is a speaker out fitted to the After 8, Vintage 12 and Five 15 BB with an 8Ohm
min load.
Ashdown Amplifiers reserve the right to change specifications without notice. E & O E. All contents © Ashdown 2014.
4
www.ashdownmusic.com
www.ashdownmusic.com
5
USER MANUAL
MAG ROOTMASTER
Direct inject ( d.I. )
A balanced d.I. Is provided on the front panel xlr socket. This provides a post E.Q. Post effects signal.
The output signal from this xlr socket is set to a level and impedance suitable for connecting directly into a balanced microphone input of a mixing
desk for either direct injection into the pa system or for recording.
Front Panel
Effects send/return
A serial effects loop is provided at a level of 0db. The effects send and return sockets for this are on the front panel below the d.I. Socket.
The effects send socket can also be used as a line out socket if required. The signal path through the preamp is only broken when a jack plug is
inserted into the effects return socket. The effects send is situated after the E.Q.
Tuner/line out
This output socket provides a line level signal that can be used either for a permanent connection to a tuner or a line output for connection to other
power amplifiers and speakers.
VU
Output level
The output control adjusts the overall level of the amplifier. Adjust this for your preferred overall stage playing volume.
Input control
The input control sets the signal level through the preamp in conjunction with the input level vu meter. This is adjusted to give a reading of 0vu on the
meter for average playing dynamics with occasional peaks into the red region. Please note that the setting of this may have to be re-adjusted after
modification of the E.Q. controls.
Shape
With this button in a fixed E.Q. is superimposed on the pre-amp to give a bass and treble boost to the sound. This gives +8db at 50hz and This gives
+10db at 10khz.
E.Q.
This button switches the equalisation section in or out i.e. the Bass, Middle and Treble controls and the two rotary controls placed between these.
Equalisation
This consists of bass, middle and treble controls with two more rotary controls placed in-between. This can be used in a number of ways:
Firstly as a very simple bass, middle and treble tone control section as found on older traditional amplifiers. This is done by leaving the 340hz and
1.6Khz controls set in their centre positions and using only the bass, middle and treble controls to alter the overall tone.
Secondly, if more control is required then the 340hz and 1.6Khz controls can also be used to tailor the E.Q. In the regions between the main tone
controls.
This provides a very versatile equalisation section, it is simple to understand and operate, yet provides a wide degree of variation. It retains the
simplicity of a three control tone section but provides the flexibility of a graphic equaliser.
Compression
Adding a small amount of compression gives a fat bottom end to the sound and allows a greater volume of amplification to be used without the
playing peaks distorting the amplifiers output stage.
You will also find that this will add definition to your playing bringing out notes within a run more clearly as it evens out the dynamics of your playing. A
large amount of compression can be used as an effect but it will tend to reduce the dynamics in your playing to such an extent that the volume of the
note will be the same no matter how hard or soft you hit the string.
Compression also adds sustain to notes making them longer before they die away.
The compression level control adjusts the degree of compression applied to the bass signal. For this to function correctly the input level must be
correctly set as described in the input control section above.
When the input level is correctly set there will be hardly any difference in volume between compression in and compression out. This is because
the MAG automatically compensates for the reduction in level that would be apparent when compression is added by increasing the overall gain to
restore the volume to its pre compression level, because of this you may notice an increase in background noise with high compression settings.
Everything possible has been done to make these reliable, minimum service, high quality, long lasting powerful bass amplifiers.
We know you will appreciate the effort that has been put into the design and manufacture of this unit and you will be rewarded in your choice of bass
amplifier by long life and reliability.
Inputs
High Input
Low Input
Effects Return
Impedance - 3.9M ohms
Impedance - 10k ohms
Impedance - 22k ohms
Input range 150mv to 20v p - p
Input range 300mv to 40v p - p
Input level 0dbu nominal
Outputs
Tuner Output
Effects Send
D.I.Output
Impedance - 10k ohms
Impedance - 22k ohms
600 ohms balanced
Level 0dbu nominal
Level 0dbu nominal
Level -20dbu nominal
Speaker Outputs
Frequency Response
Minimum Impedance - 4 ohms
-3db at 22hz and 25khz
Equalisation
Bass
Lo Mid
Middle
Hi Mid
Treble
Deep
Bright
+/- 15db @ 100hz
+/- 15db @ 340hz
+/- 15db @ 660hz
+/- 15db @ 1.6Khz
+/- 15db @ 7khz shelving
+ 8db @ 50hz
+ 10db @ 10khz
Signal to Noise
Distortion
Output Power
Better than 80db (E.Q. Flat)
Less than 0.5% Thd
220watts RMS into 4 ohms.
Specifications
Input
A single input jack socket is Provided for your instrument. This is a high impedance input designed to perfectly match the
impedance of the pick-ups on a passive bass. It also has sufficient headroom available to allow active basses to be used. Use
the input gain control to adjust for the sensitivity of your instrument.
Compression is switched in/out with the push button adjacent to the compression level control.
Sub harmonics
This section produces sub harmonics an octave below the notes being played. The level of these sub harmonics relative to the straight bass sound
can be adjusted using the level control.
This is very effective in thickening the sound and you will find in use that only a small degree of this lower octave is required to really fill out the sound
and provide a character that is not possible by any other means.
The degree of sub harmonics is also dependant on the setting of the bass control.
Ashdown Amplifiers reserve the right to change specifications without notice. E & O E. All contents © Ashdown 2014.
6
www.ashdownmusic.com
www.ashdownmusic.com
7
USER MANUAL
MAG ROOTMOASTER
Front Panel
Direct inject ( d.I. )
A balanced d.I. Is provided on the front panel xlr socket. This provides a post E.Q. Post effects signal.
The output signal from this xlr socket is set to a level and impedance suitable for connecting directly into a balanced microphone input of a mixing
desk for either direct injection into the pa system or for recording.
Effects send/return
A serial effects loop is provided at a level of 0db. The effects send and return sockets for this are on the front panel below the d.I. Socket.
The effects send socket can also be used as a line out socket if required. The signal path through the preamp is only broken when a jack plug is
inserted into the effects return socket. The effects send is situated after the E.Q.
VU
Tuner/line out
This output socket provides a line level signal that can be used either for a permanent connection to a tuner or a line output for connection to other
power amplifiers and speakers.
Output level
The output control adjusts the overall level of the amplifier. Adjust this for your preferred overall stage playing volume.
Input control
The input control sets the signal level through the preamp in conjunction with the input level vu meter. This is adjusted to give a reading of 0vu on the
meter for average playing dynamics with occasional peaks into the red region. Please note that the setting of this may have to be re-adjusted after
modification of the E.Q. controls.
Shape
With this button in a fixed E.Q. is superimposed on the pre-amp to give a bass and treble boost to the sound. This gives +8db at 50hz and This gives
+10db at 10khz.
E.Q.
This button switches the equalisation section in or out i.e. the Bass, Middle and Treble controls and the two rotary controls placed between these.
Equalisation
This consists of bass, middle and treble controls with two more rotary controls placed in-between. This can be used in a number of ways:
Firstly as a very simple bass, middle and treble tone control section as found on older traditional amplifiers. This is done by leaving the 340hz and
1.6Khz controls set in their centre positions and using only the bass, middle and treble controls to alter the overall tone.
Secondly, if more control is required then the 340hz and 1.6Khz controls can also be used to tailor the E.Q. In the regions between the main tone
controls.
This provides a very versatile equalisation section, it is simple to understand and operate, yet provides a wide degree of variation. It retains the
simplicity of a three control tone section but provides the flexibility of a graphic equaliser.
Compression
Adding a small amount of compression gives a fat bottom end to the sound and allows a greater volume of amplification to be used without the
playing peaks distorting the amplifiers output stage.
You will also find that this will add definition to your playing bringing out notes within a run more clearly as it evens out the dynamics of your playing. A
large amount of compression can be used as an effect but it will tend to reduce the dynamics in your playing to such an extent that the volume of the
note will be the same no matter how hard or soft you hit the string.
Compression also adds sustain to notes making them longer before they die away.
The compression level control adjusts the degree of compression applied to the bass signal. For this to function correctly the input level must be
correctly set as described in the input control section above.
When the input level is correctly set there will be hardly any difference in volume between compression in and compression out. This is because
the MAG automatically compensates for the reduction in level that would be apparent when compression is added by increasing the overall gain to
restore the volume to its pre compression level, because of this you may notice an increase in background noise with high compression settings.
Everything possible has been done to make these reliable, minimum service, high quality, long lasting powerful bass amplifiers.
We know you will appreciate the effort that has been put into the design and manufacture of this unit and you will be rewarded in your choice of bass
amplifier by long life and reliability.
Inputs
High Input
Low Input
Effects Return
Impedance - 3.9M ohms
Impedance - 10k ohms
Impedance - 22k ohms
Input range 150mv to 20v p - p
Input range 300mv to 40v p - p
Input level 0dbu nominal
Outputs
Tuner Output
Effects Send
D.I.Output
Impedance - 10k ohms
Impedance - 22k ohms
600 ohms balanced
Level 0dbu nominal
Level 0dbu nominal
Level -20dbu nominal
Speaker Outputs
Frequency Response
Minimum Impedance - 4 ohms
-3db at 22hz and 25khz
Equalisation
Bass
Lo Mid
Middle
Hi Mid
Treble
Deep
Bright
+/- 15db @ 100hz
+/- 15db @ 340hz
+/- 15db @ 660hz
+/- 15db @ 1.6Khz
+/- 15db @ 7khz shelving
+ 8db @ 50hz
+ 10db @ 10khz
Signal to Noise
Distortion
Output Power
Better than 80db (E.Q. Flat)
Less than 0.5% Thd
220watts RMS into 4 ohms.
Specifications
Input
A single input jack socket is Provided for your instrument. This is a high impedance input designed to perfectly match the
impedance of the pick-ups on a passive bass. It also has sufficient headroom available to allow active basses to be used. Use
the input gain control to adjust for the sensitivity of your instrument.
Compression is switched in/out with the push button adjacent to the compression level control.
Sub harmonics
This section produces sub harmonics an octave below the notes being played. The level of these sub harmonics relative to the straight bass sound
can be adjusted using the level control.
This is very effective in thickening the sound and you will find in use that only a small degree of this lower octave is required to really fill out the sound
and provide a character that is not possible by any other means.
The degree of sub harmonics is also dependant on the setting of the bass control.
Ashdown Amplifiers reserve the right to change specifications without notice. E & O E. All contents © Ashdown 2014.
8
www.ashdownmusic.com
www.ashdownmusic.com
9
USER MANUAL
ABM 400 - 500 - 900 - 1000
SUB HARMONICS
This section produces Sub Harmonics an octave below the notes being played. The level of these Sub Harmonics relative to the straight bass sound
can be adjusted using the LEVEL control.
This is very effective in thickening the sound and you will find in use that only a small degree of this lower octave is required to really fill out the sound
and provide a character that is not possible by any other means.
The degree of Sub Harmonics is also dependant on the setting of the BASS control.
Front Panel
INPUT
There is a single instrument input provided linked to a PASSIVE/ACTIVE selector switch. The Passive input (switch out) is high sensitivity and also
high impedance to suit the output from PASSIVE basses. The Active input (switch in) is low sensitivity and lower impedance to suit the output from
ACTIVE basses.
INPUT CONTROL
The INPUT control sets the signal level through the preamp in conjunction with the INPUT LEVEL VU Meter. This is adjusted to give a reading of 0VU
on the meter for average playing dynamics with occasional peaks into the red region. Please note that the setting of this may have to be re-adjusted
after modification of the EQ controls.
PUSH FLAT / SHAPE
With this button in its OUT position a fixed E.Q. is superimposed on the preamp to give a bright but punchy character to the sound. Pushing this
button IN returns the preamp to a Flat frequency response.
This function may also be controlled from a footswitch. For the footswitch to operate this button must be in its OUT position.
VALVE DRIVE
This routes the signal either through a clean Solid State amplification section (control on zero) or through a Dual Triode Tube amplification/overdrive
section in order to add either tonal character i.e. warmth with the control set at 9 o’clock, a slight edge in the sound at 12 0’clock through to an
increasing degree of Tube distortion/overdrive as the control is advanced to maximum.
A Mix of these two amplification sections can be achieved with this control.
N.B. The degree of tube distortion provided by this control will also depend on the setting of the INPUT control.
VALVE DRIVE IN/OUT
This push button switches the valve drive section IN or OUT. This function may also be controlled from the Ashdown 4 way footswitch. For the
footswitch to operate this button must be in its OUT position.
E.Q. IN / OUT - This push button switches the Equalisation section IN or OUT i.e. the Bass, Middle and Treble controls plus the two sets of sliders
placed between each of these.
This function may also be controlled from the Ashdown 4 way footswitch. For the footswitch to operate this button must be in its OUT position.
EQUALISATION
This consists of BASS, MIDDLE and TREBLE controls with two sliders placed between each control. This can be used in a number of ways:
Firstly as a very simple Bass, Middle and Treble tone control section as found on older traditional amplifiers. This is done by leaving the two sets of
sliders interposed between these controls set in their centre positions and using only the BASS, MIDDLE and TREBLE controls to alter the overall
tone.
Secondly, if more control is required then the sliders can also be used to tailor the E.Q. in the regions between the main tone controls. This provides a
very versatile Equalisation section, it is simple to understand and operate, yet provides a wide degree of variation. It retains the simplicity of a threecontrol tone section but provides the flexibility of a graphic equaliser.
COMPRESSION
Adding a small amount of compression gives a fat bottom end to the sound and allows a greater volume of amplification to be used without the
playing peaks distorting the amplifiers output stage. You will also find that this will add definition to your playing bringing out notes within a run more
clearly as it evens out the dynamics of your playing.
A large amount of compression can be used as an effect but it will tend to reduce the dynamics in your playing to such an extent that the volume of
the note will be the same no matter how hard or soft you hit the string. Compression also adds sustain to notes making them longer before they die
away.
The Compression Level control adjusts the degree of compression applied to the bass signal. For this to function correctly the Input Level must be
correctly set as described in the INPUT CONTROL section (left).
When the Input Level is correctly set there will be hardly any difference in volume between Compression IN and Compression OUT. This is because
the amplifier automatically compensates for the reduction in level that would be apparent when Compression is added by increasing the overall gain
to restore the volume to its pre compression level, because of this you may notice an increase in background noise with high compression settings.
COMPRESSION IN/OUT
This push button switches the Compression IN or OUT. This function may also be controlled from the Ashdown 4 way footswitch. For the footswitch
to operate this button must be in its OUT position.
DIRECT INJECT (D.I.)
A balanced D.I. is provided on a latching XLR socket. This has a push button placed below it that allows the user to choose either a Pre E.Q. signal
(button pushed IN) or a Post E.Q. Post Sub and effects signal (button OUT).
The output signal from this XLR socket is set to a level and impedance suitable for connecting directly into the Microphone input of a mixing desk for
either Direct Injection into the PA system or for recording. This must ONLY be used into a Balanced Microphone input, it is not intended for any other
type of connection.
This has a floating ground that is referenced to the mixing console it is plugged into and should not need ground lifting. It is also unaffected by
Phantom Powering on the Microphone input.
Make sure your XLR plug does not have the shell of the plug internally connected to signal ground or this will connect the system to chassis ground of
the ABM and may cause problems with hum.
PUSH TO MUTE
When pushed IN this button mutes the output from the preamp to the power amp, mutes the output from the D.I. socket and mutes the output from
the LINE Out socket as well. This leaves the output from the TUNER socket still available to allow muted tuning. An LED is provided next to this switch
to indicate when the amplifier is muted. This function operates only from the front panel MUTE push switch. i.e. pressing this button mutes all sound
from the amplifier and allows a tuner connected to the TUNER socket to operate for silent tuning. Release the button and you are back in action
again.
TUNER OUT
This output socket provides a line level signal that can be used for a permanent connection to a tuner.
The signal from this socket remains when all other outputs from the amplifier are Muted allowing all sound from the amplifier to be silenced while
tuning is in progress.
LINE OUT
This output socket provides a line level/post Output Level control signal for connection to an external power amplifier driving additional speaker
cabinets.
OUTPUT LEVEL
The OUTPUT control adjusts the overall level of the amplifier. Adjust this for your preferred overall stage playing volume.
INPUTS
High Input
Low Input Line Input Effects Return
Impedance 3.9M Ohms
Impedance 10K Ohms
Impedance 22K Ohms
Impedance 22K Ohms
Input range 150mV to 20V p-p
Input range 300mV to 40V p-p
Input level 0dBu nominal
Input level 0dBu nominal
OUTPUTS
Tuner Output Line Output Effects Send
D.I. Output
Impedance 1K Ohms
Impedance 10K Ohms
Impedance 22K Ohms
600 Ohms balanced
Level 0dBu nominal
Level 0dBu nominal
Level 0dBu nominal
Level -20dBu nominal
(rackmount preamp only) Low Pass (RPM-1 only) Impedance 1K Ohms
High Pass (RPM-1 only) Impedance 1K Ohms
Full Range (RPM-1 only)
Impedance 1K Ohms
EQUALISATION
Shape (Push Flat) Bass
Middle
Treble
Slider1 +/-15dB @ 110Hz
Slider 2 Slider 3 Slider 4+/-15dB @ 2.6kHz
Frequency Response Level switched 0/+4dBU
Level switched 0/+4dBU
Level switched 0/+4dBU
+8dB @ 50Hz & 4kHz, -8dB @ 400Hz, filter slope - 6dB/octave
+/-15dB @ 45Hz
+/-15dB @ 660Hz
+/-15dB @ 7kHz shelving
+/-15dB @ 340Hz
+/-15dB @ 1.3kHz
-3dB at 17Hz and 30KHz
Rackmount Preamp Crossover
Variable between 35 and 160Hz
Speaker Outputs
Minimum impedance 4 Ohms
Output Power
1000watts RMS into 4 ohms. / 2000watts RMS into 4 ohms.
Specifications
VU
Ashdown Amplifiers reserve the right to change specifications without notice. E & O E. All contents © Ashdown 2014.
10
www.ashdownmusic.com
www.ashdownmusic.com
11
USER MANUAL
NOTES
Ashdown Amplifiers reserve the right to change specifications without notice. E & O E. All contents © Ashdown 2013.
12
www.ashdownmusic.com
www.ashdownmusic.com
13
Bedienungsanleitung
AAA
AFTER 8 Front Panel
hIGh
INPUT
LoW
INPUT
BASS
46
CLIP
APPTEk
MIDDLE
46
3
7
0
10
2
1
8
2
9
1
TREBLE
46
3
7
0
10
8
2
9
1
AUX MIX
46
3
7
0
10
8
2
9
1
VoLUME
46
3
7
0
10
8
2
9
1
VORDERSEITE:
LINE IN
46
3
7
0
10
8
2
9
1
3
7
0
10
APPTEK
Dies erlaubt es Ihnen, ihren Verstärker mit dem beiliegenden Kabel und Ihrer “Agile Partners Amp Kit” App zu
erweitern. Die App unterstützt den Ashdown ABM 900 und ABM 810, welche zusammen mit dem Verstärker
verwendet werden können. Features sind Untertöne, Ventilantrieb, Komprimierung und Equalizer.
8
9
AFTER 8
EINGANG
Eine Eingangsbuchse für Ihr Instrument ist vorhanden. Dies ist eine Buchse mit hoher Impedanz, entworfen,
um der Impedanz eines passiven Basses perfekt angepasst zu sein. Es steht auch genügend Kopffreiheit
zur Verfügung, damit aktiv Bässe verwenden zu können. Verwenden Sie die Eingangspegelregler um die
Empfindlichkeit des Instruments anpassen.
PERFECT 10 Front Panel
hIGh
INPUT
LoW
INPUT
CLIP
APPTEk
BASS
DRIVE
46
3
46
7
3
MIDDLE
46
3
7
TREBLE
46
3
7
AUX MIX
46
3
7
VoLUME
46
3
7
LINE IN
7
2
8
2
8
2
8
2
8
2
8
2
8
2
8
1
9
1
9
1
9
1
9
1
9
1
9
1
9
0
10
0
10
0
10
0
10
0
10
0
Kopfhörer:
Eine Kopfhörer-Klinkenbuchsen ist vorhanden, um Stereo-Kopfhörer in den Verstärker zu stecken, damit
ein lautloses Üben möglich wird. Sobald die Kopfhörer angeschlossen sind, wird die Verbindung zum
Hauptlautsprecher getrennt.
46
3
7
10
0
10
PERFECT 10
DI
LINE IN:
Ein einzelner Eingang ist für das Mitspielen zum Playback beim Üben (play along) vorhanden. In Verbindung mit
der Kopfhörer-Buchse für lautloses Üben. Siehe auch MIX.
VINTAGE 12 Front Panel
hIGh
INPUT
LoW
INPUT
BASS
DRIVE
MIDDLE
TREBLE
AUX MIX
VoLUME
MIX LEVEL:
Stellen Sie den Pegel für ihr Playback ein, indem Sie den “MIX” Drehregler zur Einstellung verwenden.
LINE IN
Drive in/out
46
3
CLIP
APPTEk
46
7
3
46
3
7
46
3
7
46
3
7
46
3
7
46
7
2
8
2
8
2
8
2
8
2
8
2
8
2
1
9
1
9
1
9
1
9
1
9
1
9
1
0
10
0
10
0
10
0
10
0
10
0
10
3
7
0
10
MASTER LEVEL:
Verwenden Sie den Ausgangspegel um die Wiedergabelautstärke der Verstärkers einzustellen.
8
9
VINTAGE 12
E.Q.:
Dieser passive EQ hat Bass, Middle und Treble Einstellungen.
DI
VERSTÄRKUNG (GAIN):
Diese Einstellung fügt einen Schnellgang hinzu wie es ein Rohrverstärker tun würde. Vom leichten Körnchen bis
auf Hochtouren.
FIVE 15 & FIVE 15 BB Front Panel
INPUT
hIGh
LoW
INPUT
BASS
DRIVE
MIDDLE
TREBLE
AUX MIX
VoLUME
FX LooP
LINE IN
DI
Drive in/out
CLIP
APPTEk
46
46
7
0
10
2
1
8
2
9
1
3
7
0
10
8
2
9
1
46
3
7
0
10
8
2
9
1
46
3
7
0
10
8
2
9
1
46
46
3
7
0
10
8
2
9
1
3
7
0
10
8
2
9
1
3
7
0
10
8
9
SEND
RETURN
FIVE 15
RÜCKSEITE
Back Panel
NETZEINGANGSBUCHSE
Dies dient zur Verbindung des Gerätes mit Ihrer länderspezifischen Steckdose. Bitte
stellen Sie sicher, dass die Art und Bewertung der Netzsicherung, die auf der Rückseite
vermerkt wird, verwendet wird, wenn diese ersetzt wird.
EIN-/AUS-SCHALTER:
Das Gerät wird mit dem sich auf der Rückseite befindenden Schalter eingeschaltet. Eine
LED Lampe leuchtet, wenn der Verstärker eingeschaltet ist.
FIVE 15 BB
14
after 8
Output Power
Input Impedance
Input Signal Range
E.Q.
20watts rms into 8 ohms
1 Meg ohm
100Mv to 10v
Passive Bass, Middle, Treble.
VINTAGE 12
Output Power
Input Impedance
Input Signal Range
E.Q.
20watts rms into 8 ohms
1 Meg ohm
100Mv to 10v
Passive Bass, Middle, Treble.
Perfect 10
Output Power
Input Impedance
Input Signal Range
E.Q.
40watts rms into 8 ohms
1 Meg ohm
100Mv to 10v
Passive Bass, Middle, Treble.
FIVE 15 & BB
Output Power
Input Impedance
Input Signal Range
E.Q.
100(220BB)watts rms 8 ohms
1 Meg ohm
100Mv to 10v
Passive Bass, Middle, Treble.
LAUTSPRECHER AUSGANG:
Es gibt einen Lautsprecher Ausgang, angepasst an After 8, Vintage 12 und Five 15 BB mit
einer 8 Ohm Mindestlast.
www.ashdownmusic.com
www.ashdownmusic.com
Specifications
46
3
15
BEDIENUNGSANLEITUNG
MAG ROOTMASTER
Front Panel
direct inject (d.I.)
Eine D.I. wird auf der Vorderseite als XLR Buchse zur Verfügung gestellt. Dies erstellt einen nach EQ. Nacheffekte erzeugen. Das Ausgangssignal
dieser XLR Buchse ist auf ein Impedanz Level eingestellt, nwelches geeignet für die Verbindung mit einem Mikrofoneingang von einem Mischpult ist.
Entweder für das direkte Einstöpseln in ein P.A.-System oder für Aufnahmen.
Effects Send / Return
Ein serieller Effektweg ist auf einen Pegel von 0 dB gestellt. Die Effects Send / Return Buchsen hierfür sind an der Vorderseite unterhalb des D.I..
Falls erforderlich kann die Effects Send Buchse auch als Ausgangsbuchse verwendet werden. Der Signalweg durch den Vorverstärker wird nur
unterbrochen, wenn in Stecker in die Effect Return Buchse gesteckt wird. Die Effect Send Buchse ist nach dem EQ platziert.
Tuner/line out
Diese Ausgangsbuchse liefert einen Linien-Pegel, der entweder für eine dauerhafte Verbindung zu einem Tuner oder einem Linien-Ausgang für die
Verbindung mit anderen Lautsprechern und Verstärkern benutzt werden kann.
VU
Output level
Der Ausgangsregler bestimmt die Gesamtlautstärke des Verstärkers. Passen Sie diese an Ihre bevorzugte Bühnenlautstärke an. Alles mögliche wurde
getan, um sie zu zuverlässigen, hoch qualitativen, langlebigen, kraftvollen Bass Verstärkern zu machen.
Input Regelung
Die Input Einstellung leitet das Signal durch den Vorverstärker in Verbindung mit dem INPUT LEVEL VU Meter. Dies wird
eingestellt, um eine Ablesung von 0 VU am Zähler für durchschnittliche Spieldynamik, mit gelegentlichen roten Spitzen,
zu erreichen. Bitte beachten Sie das Diese Einstellungen müssen möglicherweise nach dem modifizieren den EQ erneut
vorgenommen werden.
Deep
Mit diesem Knopf bei einem festen EQ liegt auf dem Vorverstärker ein überlagerter Bass Boost um den Klang zu verbessern. Das gibt 8 dB bei 50 Hz.
Bright
Mit diesem Knopf bei einem festen EQ liegt auf dem Vorverstärker eine Höhenanhebung um den Klang zu verbessern. Das gibt +10 dB bei 10 kHz.
E.Q.
Diese Taste schaltet die Klangregelung ein oder aus. Zum Beispiel die Bass, Middle und Treble-Regler und die dazwischen platzierten Drehregler.
Equalisation
Dies besteht aus Bass, Middle und Treble Einstellungen, die mit zwei Schiebern zwischen den einzelnen Einstellungen platziert sind. Dies kann auf
verschiedene sein benutzt werden: erstens als eine sehr einfache Bass, Middle und Treble Klangregelungen wie auf alten, traditionellen Verstärkern
gefunden. Dies wird erreicht indem Sie die 340 Hz und 1.6 kHz zwischengeschalteten Schieber in ihre mittlere Position bringen und die Bass, Middle
und Treble Regler für die Verbesserung des gesamten Tons verwenden. Zweitens, wenn mehr Steuerung erforderlich ist, können die 340 Hz und 1.6
kHz Schieber zum E.Q. perfektionieren verwendet werden. Dies ist ein sehr vielseitiger Ausgleich Abschnitt. Einfach zu verstehen und zu bedienen,
aber trotzdem mit einem hohen Maß an Variation. Es behält die Einfachheit eines drei-Kontrollregler Tonabschnittts, bietet aber die Flexibilität eines
Grafik-Equalizers.
KOMPRESSION
Zugabe einer geringen Menge der Kompression ergibt ein fettes unteres Ende zum Ton und ermöglicht ein größeres Volumen an Verstärkung welches
verwendet werden kann, ohne dass die Höhen den Verstärkerausgang verzerren. Sie werden auch herausfinden, dass dies Definition zu Ihrem Spielen
hinzufügt, indem es einige Noten hervorhebt und das Spielen dynamischer klingen lässt. Eine große Menge Kompression kann als Effekt benutzt
werden, jedoch neigt es dazu, Ihre Musik weniger dynamisch klingen zu lassen. Dies in sofern, dass eine Note immer gleich klingen wird, egal wie stark
Sie eine Saite zupfen. Kompression verstärkt auch die Noten, sodass die länger klingen bevor sie verschwinden. Der Kompressiosregler definiert der
Grad der Kompression für das Bass Signal.
Wir wissen alle, dass Sie die Mühe, die in der Entwicklung und Herstellung eines Geräts steckt, zu schätzen wissen. Als Preis für Ihre Entscheidung für
eins unserer Geräte belohnen wir Sie mit dessen langer Lebensdauer und hoher Zuverlässigkeit.
Inputs
High Input
Low Input
Effects Return
Impedance - 3.9M ohms
Impedance - 10k ohms
Impedance - 22k ohms
Outputs
Tuner Output
Effects Send
D.I.Output
Impedance - 10k ohmsLevel 0dbu nominal
Impedance - 22k ohmsLevel 0dbu nominal
600 ohms balancedLevel -20dbu nominal
Speaker Outputs
Frequency Response
Minimum Impedance - 4 ohms
-3db at 22hz and 25khz
Equalisation
Bass
Lo Mid
Middle
Hi Mid
Treble
Deep
Bright
+/- 15db @ 100hz
+/- 15db @ 340hz
+/- 15db @ 660hz
+/- 15db @ 1.6Khz
+/- 15db @ 7khz shelving
+ 8db @ 50hz
+ 10db @ 10khz
Input range 150mv to 20v p - p
Input range 300mv to 40v p - p
Input level 0dbu nominal
Signal to Noise
Better than 80db (E.Q. Flat)
DistortionLess than 0.5% Thd
Output Power
220watts RMS into 4 ohms.
Damit dies korrekt funktioniert, muss der Eingangspegel richtig eingestellt sein (wie oben beschrieben). Wenn der Eingangspegel richtig eingestellt
ist, wird es kaum einen Unterschied zwischen der Lautstärke, während die Kompression an ist und während sie ausgeschaltet ist, geben. Dies
liegt daran, dass das MAG automatisch die Verminderung des Levels komprimiert, welche existieren würde, wenn die Kompression durch die
Gesamtverstärkung um das Volumen auf seine Vorkomprimierungsstufe gestellt wird. Aus diesem Grund können Sie vielleicht feststellen, dass
Hintergrundgeräusch bei hoher Kompressions lauter werden.
Specifications
Inputs
Es gibt zwei Möglichkeiten für den Instrument Eingang. Dieser ist mit aktiv und passiv markiert. Der passive Eingang hat eine höhere Empfindlichkeit
und Impedanz um sich passiven Bass Instrumenten anzupassen. Der aktive Eingang hat eine viel niedrigere Empfindlichkeit und Impedanz um sich
aktiven Bass Instrumenten anzupassen, zum Beispiel diese, die einen eingebauten, batteriebetriebenen Vorverstärker haben.
Kompression wird mit dem Knopf neben der Kompressionslevel-Einstellung an/ausgeschaltet.
SUB HARMONICS
Dieser Abschnitt produziert Oberschwingungen, die eine Oktave unter den gespielten Noten liegen. Die Höhe dieser Oberschwingungen, bezogen
auf den Bass Sound, können mit dem Pegelregler eingestellt werden. Dies ist sehr effektiv in der Verdickung der Töne und Sie werden beim Verwenden
feststellen, dass nur ein kleiner Grad der tieferen Okatve nötig ist, um den Sound so voll klingen zu lassen, wie es mit keiner anderen Einstellung
möglich ist. Der Grad der Oberschwingungen ist auch abhängig vom Bassregler.
Die Oberschwingungen werden mit dem Knopf links unterhalb der Oberschwingungen Pegelsteuerung an/ausgeschaltet.
16
www.ashdownmusic.com
www.ashdownmusic.com
17
BEDIENUNGSANLEITUNG
MAG ROOTMASTER
Front Panel
direct inject (d.I.)
Eine D.I. wird auf der Vorderseite als XLR Buchse zur Verfügung gestellt. Dies erstellt einen nach EQ. Nacheffekte erzeugen. Das Ausgangssignal
dieser XLR Buchse ist auf ein Impedanz Level eingestellt, nwelches geeignet für die Verbindung mit einem Mikrofoneingang von einem Mischpult ist.
Entweder für das direkte Einstöpseln in ein P.A.-System oder für Aufnahmen.
Effects Send / Return
Ein serieller Effektweg ist auf einen Pegel von 0 dB gestellt. Die Effects Send / Return Buchsen hierfür sind an der Vorderseite unterhalb des D.I..
Falls erforderlich kann die Effects Send Buchse auch als Ausgangsbuchse verwendet werden. Der Signalweg durch den Vorverstärker wird nur
unterbrochen, wenn in Stecker in die Effect Return Buchse gesteckt wird. Die Effect Send Buchse ist nach dem EQ platziert.
VU
Tuner/line out
Diese Ausgangsbuchse liefert einen Linien-Pegel, der entweder für eine dauerhafte Verbindung zu einem Tuner oder einem Linien-Ausgang für die
Verbindung mit anderen Lautsprechern und Verstärkern benutzt werden kann.
Output level
Der Ausgangsregler bestimmt die Gesamtlautstärke des Verstärkers. Passen Sie diese an Ihre bevorzugte Bühnenlautstärke an. Alles mögliche wurde
getan, um sie zu zuverlässigen, hoch qualitativen, langlebigen, kraftvollen Bass Verstärkern zu machen.
Input Regelung
Die Input Einstellung leitet das Signal durch den Vorverstärker in Verbindung mit dem INPUT LEVEL VU Meter. Dies wird
eingestellt, um eine Ablesung von 0 VU am Zähler für durchschnittliche Spieldynamik, mit gelegentlichen roten Spitzen,
zu erreichen. Bitte beachten Sie das Diese Einstellungen müssen möglicherweise nach dem modifizieren den EQ erneut
vorgenommen werden.
Deep
Mit diesem Knopf bei einem festen EQ liegt auf dem Vorverstärker ein überlagerter Bass Boost um den Klang zu verbessern. Das gibt 8 dB bei 50 Hz.
Bright
Mit diesem Knopf bei einem festen EQ liegt auf dem Vorverstärker eine Höhenanhebung um den Klang zu verbessern. Das gibt +10 dB bei 10 kHz.
E.Q.
Diese Taste schaltet die Klangregelung ein oder aus. Zum Beispiel die Bass, Middle und Treble-Regler und die dazwischen platzierten Drehregler.
Equalisation
Dies besteht aus Bass, Middle und Treble Einstellungen, die mit zwei Schiebern zwischen den einzelnen Einstellungen platziert sind. Dies kann auf
verschiedene sein benutzt werden: erstens als eine sehr einfache Bass, Middle und Treble Klangregelungen wie auf alten, traditionellen Verstärkern
gefunden. Dies wird erreicht indem Sie die 340 Hz und 1.6 kHz zwischengeschalteten Schieber in ihre mittlere Position bringen und die Bass, Middle
und Treble Regler für die Verbesserung des gesamten Tons verwenden. Zweitens, wenn mehr Steuerung erforderlich ist, können die 340 Hz und 1.6
kHz Schieber zum E.Q. perfektionieren verwendet werden. Dies ist ein sehr vielseitiger Ausgleich Abschnitt. Einfach zu verstehen und zu bedienen,
aber trotzdem mit einem hohen Maß an Variation. Es behält die Einfachheit eines drei-Kontrollregler Tonabschnittts, bietet aber die Flexibilität eines
Grafik-Equalizers.
KOMPRESSION
Zugabe einer geringen Menge der Kompression ergibt ein fettes unteres Ende zum Ton und ermöglicht ein größeres Volumen an Verstärkung
welches verwendet werden kann, ohne dass die Höhen den Verstärkerausgang verzerren. Sie werden auch herausfinden, dass dies Definition zu
Ihrem Spielen hinzufügt, indem es einige Noten hervorhebt und das Spielen dynamischer klingen lässt. Eine große Menge Kompression kann als
Effekt benutzt werden, jedoch neigt es dazu, Ihre Musik weniger dynamisch klingen zu lassen. Dies in sofern, dass eine Note immer gleich klingen wird,
egal wie stark Sie eine Saite zupfen. Kompression verstärkt auch die Noten, sodass die länger klingen bevor sie verschwinden. Der Kompressiosregler
definiert der Grad der Kompression für das Bass Signal.
Damit dies korrekt funktioniert, muss der Eingangspegel richtig eingestellt sein (wie oben beschrieben). Wenn der Eingangspegel richtig eingestellt
ist, wird es kaum einen Unterschied zwischen der Lautstärke, während die Kompression an ist und während sie ausgeschaltet ist, geben. Dies
liegt daran, dass das MAG automatisch die Verminderung des Levels komprimiert, welche existieren würde, wenn die Kompression durch die
Gesamtverstärkung um das Volumen auf seine Vorkomprimierungsstufe gestellt wird. Aus diesem Grund können Sie vielleicht feststellen, dass
Hintergrundgeräusch bei hoher Kompressions lauter werden.
Wir wissen alle, dass Sie die Mühe, die in der Entwicklung und Herstellung eines Geräts steckt, zu schätzen wissen. Als Preis für Ihre Entscheidung für
eins unserer Geräte belohnen wir Sie mit dessen langer Lebensdauer und hoher Zuverlässigkeit.
Inputs
High Input
Low Input
Effects Return
Impedance - 3.9M ohms
Impedance - 10k ohms
Impedance - 22k ohms
Input range 150mv to 20v p - p
Input range 300mv to 40v p - p
Input level 0dbu nominal
Outputs
Tuner Output
Effects Send
D.I.Output
Impedance - 10k ohms
Impedance - 22k ohms
600 ohms balanced
Level 0dbu nominal
Level 0dbu nominal
Level -20dbu nominal
Speaker Outputs
Frequency Response
Minimum Impedance - 4 ohms
-3db at 22hz and 25khz
Equalisation
Bass
Lo Mid
Middle
Hi Mid
Treble
Deep
Bright
+/- 15db @ 100hz
+/- 15db @ 340hz
+/- 15db @ 660hz
+/- 15db @ 1.6Khz
+/- 15db @ 7khz shelving
+ 8db @ 50hz
+ 10db @ 10khz
Signal to Noise
Distortion
Output Power
Better than 80db (E.Q. Flat)
Less than 0.5% Thd
220watts RMS into 4 ohms.
Specifications
Inputs
Es gibt zwei Möglichkeiten für den Instrument Eingang. Dieser ist mit aktiv und passiv markiert. Der passive Eingang hat eine höhere Empfindlichkeit
und Impedanz um sich passiven Bass Instrumenten anzupassen. Der aktive Eingang hat eine viel niedrigere Empfindlichkeit und Impedanz um sich
aktiven Bass Instrumenten anzupassen, zum Beispiel diese, die einen eingebauten, batteriebetriebenen Vorverstärker haben.
Kompression wird mit dem Knopf neben der Kompressionslevel-Einstellung an/ausgeschaltet.
SUB HARMONICS
Dieser Abschnitt produziert Oberschwingungen, die eine Oktave unter den gespielten Noten liegen. Die Höhe dieser Oberschwingungen, bezogen
auf den Bass Sound, können mit dem Pegelregler eingestellt werden. Dies ist sehr effektiv in der Verdickung der Töne und Sie werden beim
Verwenden feststellen, dass nur ein kleiner Grad der tieferen Okatve nötig ist, um den Sound so voll klingen zu lassen, wie es mit keiner anderen
Einstellung möglich ist. Der Grad der Oberschwingungen ist auch abhängig vom Bassregler.
Die Oberschwingungen werden mit dem Knopf links unterhalb der Oberschwingungen Pegelsteuerung an/ausgeschaltet.
18
www.ashdownmusic.com
www.ashdownmusic.com
19
BEDIENUNGSANLEITUNG
ABM
Front Panel
SUB HARMONICS
Dieser Abschnitt produziert Oberschwingungen, die eine Oktave unter den gespielten Noten liegen. Die Höhe dieser Oberschwingungen, bezogen
auf den Bass Sound, können mit dem Pegelregler eingestellt werden. Dies ist sehr effektiv in der Verdickung der Töne und Sie werden beim
Verwenden feststellen, dass nur ein kleiner Grad der tieferen Okatve nötig ist, um den Sound so voll klingen zu lassen, wie es mit keiner anderen
Einstellung möglich ist. Der Grad der Oberschwingungen ist auch abhängig vom Bassregler.
Die Oberschwingungen werden mit dem Knopf links unterhalb der Oberschwingungen Pegelsteuerung an/ausgeschaltet.
INPUT
Dieser Abschnitt produziert Oberschwingungen, die eine Oktave unter den gespielten Noten liegen. Die Höhe dieser Oberschwingungen, bezogen
auf den Bass Sound, können mit dem Pegelregler eingestellt werden. Dies ist sehr effektiv in der Verdickung der Töne und Sie werden beim
Verwenden feststellen, dass nur ein kleiner Grad der tieferen Okatve nötig ist, um den Sound so voll klingen zu lassen, wie es mit keiner anderen
Einstellung möglich ist. Der Grad der Oberschwingungen ist auch abhängig vom Bassregler.
INPUT CONTROL
Die Input Einstellung leitet das Signal durch den Vorverstärker in Verbindung mit dem INPUT LEVEL VU Meter. Dies wird eingestellt, um eine Ablesung
von 0 VU am Zähler für durchschnittliche Spieldynamik, mit gelegentlichen roten Spitzen, zu erreichen. Bitte beachten Sie, dass die Einstellungen
eventuell nochmal vorgenommen werden müssen.
PUSH FLAT / SHAPE
Wenn dieser Knopf nicht eingedrückt ist wird ein fester EQ über den Verstärker gelegt um dem Sound einen hellen, aber druckvollen Charakter zu
geben. Wenn der Knopf eingerückt ist kehrt der Verstärker zum flachen Frequenzgang zurück. Diese Funktion kann auch mit dem Fußpedal gesteuert
werden. Um dies zu können, darf der Knopf nicht eingedrückt sein.
VALVE DRIVE (Stellantrieb)
Durch diese Einstellung wird das Signal entweder durch einen sauberen, soliden Verstärkerabschnitt (Einstellung auf Null) oder durch einen DualTriodenröhre/Overdrive Abschnitt geleitet, entweder um Klangcharakter, d.h. Wärme, mit der Einstellung auf 9 Uhr hinzuzufügen, um eine leichte
Kante mit der Einstellung auf 12 Uhr hinzuzufügen oder bis hin zu einem erhöhten Level der Röhrenverzerrung/Overdrive, indem die Einstellung
bis zum Anschlag gedreht wird. Ein Mix aus diesen beiden Verstärkerabschnitten kann mit dieser Einstellung erreicht werden. Der Grad der
Röhrenverzerrung hängt von derEingangseinstellung ab.
VALVE DRIVE IN/OUT
Diese Taste schaltet den Schnelltrieb an oder aus. Diese Funktion kann mit dem Ashdown 4 Way Fußpedal gestreut werden. Dafür darf der Schalter
nicht eingedrückt sein.
E.Q. IN / OUT
Diese Taste schaltet den Ausgleichsabschnitt ein oder aus (zum Beispiel die Bass, Middle und Treble Einstellungen und die Schalter die dazwischen
platziert sind). Diese Funktion kann mit dem
EQUALISATION
Dies besteht aus Bass, Middle und Treble Einstellungen, die mit zwei Schiebern zwischen den einzelnen Einstellungen platziert sind. Dies kann auf
verschiedene sein benutzt werden: erstens als eine sehr einfache Bass, Middle und Treble Klangregelungen wie auf alten, traditionellen Verstärkern
gefunden. Dies wird erreicht indem Sie die zwischengeschalteten Schieber in ihre mittlere Position bringen und die Bass, Middle und Treble Regler
für die Verbesserung des gesamten Tons verwenden. Zweitens, wenn mehr Steuerung erforderlich ist, können die Schieber zum E.Q. perfektionieren
verwendet werden. Dies ist ein sehr vielseitiger Ausgleich Abschnitt. Einfach zu verstehen und zu bedienen, aber trotzdem mit einem hohen Maß an
Variation. Es behält die Einfachheit eines drei-Kontrollregler Tonabschnittts, bietet aber die Flexibilität eines Grafik-Equalizers.
KOMPRESSION
Zugabe einer geringen Menge der Kompression ergibt ein fettes unteres Ende zum Ton und ermöglicht ein größeres Volumen an Verstärkung
welches verwendet werden kann, ohne dass die Höhen den Verstärkerausgang verzerren. Sie werden auch herausfinden, dass dies Definition zu
Ihrem Spielen hinzufügt, indem es einige Noten hervorhebt und das Spielen dynamischer klingen lässt. Eine große Menge Kompression kann als
Effekt benutzt werden, jedoch neigt es dazu, Ihre Musik weniger dynamisch klingen zu lassen. Dies in sofern, dass eine Note immer gleich klingen wird,
egal wie stark Sie eine Saite zupfen. Kompression verstärkt auch die Noten, sodass die länger klingen bevor sie verschwinden. Der Kompressiosregler
definiert der Grad der Kompression für das Bass Signal. Damit dies korrekt funktioniert, muss der Eingangspegel richtig eingestellt sein (wie oben
beschrieben). Wenn der Eingangspegel richtig eingestellt ist, wird es kaum einen Unterschied zwischen der Lautstärke, während die Kompression
an ist und während sie ausgeschaltet ist, geben. Dies liegt daran, dass das MAG automatisch die Verminderung des Levels komprimiert, welche
existieren würde, wenn die Kompression durch die Gesamtverstärkung um das Volumen auf seine Vorkomprimierungsstufe gestellt wird. Aus diesem
Grund können Sie vielleicht feststellen, dass Hintergrundgeräusch bei hoher Kompressions lauter werden.
direct inject (d.I.)
Eine D.I. wird auf der Vorderseite als XLR Buchse zur Verfügung gestellt. Diese hat einen Knopf unterhalb, welcher es dem Benutzer erlaubt sich
entweder ein Pre EQ Signal (eingedrückter Knopf) oder ein Post EQ Signal (nicht eingedrückter Knopf) auszusuchen. Das Ausgangssignal dieser
Buchse ist auf der Ebene und Impedanz dazu geeignet, es direkt an einen Mikrofoneingang eines Mischpults anzuschließen. Das entweder für die
direkte Verbindung mit dem PA-System oder für die Aufnahme. Dies darf AUSSCHLIESSLICH mit einem symmetrischen Mikrofoneingang verbunden
werden, da es nicht für eine andere Art von Verbindung geeignet ist. Da dies eine schwebende Masse hat, welche auf die Mischeinstellungen
abgestimmt sind, sollte kein Ground Lifting nötig sein. Phantomspeisung am Mikrofoneingang wird es ebenfalls nicht geben. Stellen Sie sicher,
dass Ihr XLR-Stecker (die Schale des Steckers) nicht mit der internen Signalmasse verbunden ist. Ansonsten könnte dieses System mit der Erdung
verbunden werden und ein Summen wird auftreten.
STUMMSCHALTUNG
Wenn dieser Knopf eingedrückt wurde, schaltet das Ausgangssignal vom Vorverstärker auf die Endstufe und der Ausgang der DI Buchse und der der
Ausgangsbuchse wird stummgeschaltet. Das lässt den Ausgang der Tuner-Buchse übrig und ermöglich gedämpfte Abstimmung. Ein LED Licht zieht
an, ob der Verstärker stummgeschaltet ist. Das Drücken den Knopfes schaltet alle Töne aus dem Verstärker stumm und ermöglicht es, den Tuner mit
der Tuner-Buchse für lautloses Stimmen zu benutzen. Wenn Sie den Knopf loslassen sind Sie wieder in Aktion.
TUNER OUT
Diese Ausgangsbuchse erstellt ein Pegelsignal, welches für eine dauerhafte Verbindung mit dem Tuner verwendet werden kann. Das Signal der
Buchse bleibt, auch wenn alle anderen Ausgänge der Verstärkers stumm geschaltet wurden, damit das Tuning mit stummem Verstärker geschehen
kann.
LINE OUT
Diese Ausgangsbuchse liefert einen Pegel/einPost Output Level Steuersignal für den Anschluss an einen Leistungsverstärker mit zusätzlichen
Lautsprecherboxen.
OUTPUT LEVEL
Der Ausgangsregler bestimmt die Gesamtlautstärke des Verstärkers. Passen Sie diese an Ihre bevorzugte Bühnenlautstärke an. Es gibt zwei
Möglichkeiten für den vorhandenen Instrument Eingang. Dieser ist mit aktiv und passiv markiert. Der passive Eingang hat eine höhere Empfindlichkeit
und Impedanz um sich passiven Bass Instrumenten anzupassen. Der aktive Eingang hat eine viel niedrigere Empfindlichkeit und Impedanz um sich
aktiven Bass Instrumenten anzupassen
INPUTS
High Input
Low Input Line Input Effects Return
Impedance 3.9M Ohms
Impedance 10K Ohms
Impedance 22K Ohms
Impedance 22K Ohms
Input range 150mV to 20V p-p
Input range 300mV to 40V p-p
Input level 0dBu nominal
Input level 0dBu nominal
OUTPUTS
Tuner Output Line Output Effects Send
D.I. Output
Impedance 1K Ohms
Impedance 10K Ohms
Impedance 22K Ohms
600 Ohms balanced
Level 0dBu nominal
Level 0dBu nominal
Level 0dBu nominal
Level -20dBu nominal
(rackmount preamp only) Low Pass (RPM-1 only) Impedance 1K Ohms
High Pass (RPM-1 only) Impedance 1K Ohms
Full Range (RPM-1 only)
Impedance 1K Ohms
EQUALISATION
Shape (Push Flat) Bass
Middle
Treble
Slider1 +/-15dB @ 110Hz
Slider 2 Slider 3 Slider 4+/-15dB @ 2.6kHz
Frequency Response KOMPRESSION IN/OUT
Dieser Knopf schaltet die Kompression an oder aus. Diese Funktion kann mit dem Ashdown 4 Way Fußpedal gestreut werden. Dafür darf der Schalter
nicht eingedrückt sein.
20
www.ashdownmusic.com
Level switched 0/+4dBU
Level switched 0/+4dBU
Level switched 0/+4dBU
+8dB @ 50Hz & 4kHz, -8dB @ 400Hz, filter slope - 6dB/octave
+/-15dB @ 45Hz
+/-15dB @ 660Hz
+/-15dB @ 7kHz shelving
+/-15dB @ 340Hz
+/-15dB @ 1.3kHz
-3dB at 17Hz and 30KHz
Rackmount Preamp Crossover
Variable between 35 and 160Hz
Speaker Outputs
Minimum impedance 4 Ohms
Output Power
1000watts RMS into 4 ohms. / 2000watts RMS into 4 ohms.
www.ashdownmusic.com
Specifications
VU
21
BEDIENUNGSANLEITUNG
NOTES
22
www.ashdownmusic.com
www.ashdownmusic.com
23
MANUEL D’EMPLOI
AAA
AFTER 8 Front Panel
hIGh
INPUT
FACE AVANT
LoW
INPUT
BASS
46
3
CLIP
APPTEk
MIDDLE
46
7
46
7
3
TREBLE
46
7
3
AUX MIX
46
7
3
VoLUME
46
7
3
2
8
2
8
2
8
2
8
2
8
2
1
9
1
9
1
9
1
9
1
9
1
0
10
0
10
0
10
0
10
0
PRISE CASQUE
Un casque stéréophonique peut être relie a cette entrée pour une utilisation silencieuse, le raccordement du casque désactive
le haut parleur.
LINE IN
10
3
7
0
10
8
9
LINE IN
Une entrée ligne est prévue et peut être écoutée sur le casque pour une utilisation silencieuse (voir MIX)
AFTER 8
NIVEAU SORTIE
Set the level of your Backing Track by using the ‘MIX’ Rotery control provided.
PERFECT 10 Front Panel
hIGh
INPUT
MASTER level
Le potentiomètre Master Level permet d ajuster le niveau du volume de sortie de votre ampli Ashdown
LoW
INPUT
CLIP
APPTEk
46
7
2
1
0
BASS
DRIVE
46
3
3
8
2
9
1
10
0
MIDDLE
46
3
7
8
2
9
1
10
0
TREBLE
46
3
7
8
2
9
1
10
0
AUX MIX
46
3
7
8
2
9
1
10
0
VoLUME
46
3
7
8
2
9
1
10
0
LINE IN
E.Q.
Ce EQ passif offre des réglages des basses/mediums/ aigus.
46
3
7
8
2
9
1
10
7
8
9
0
GAIN
Lorsque vous augmentez le gain, vous obtenez une saturation issue d’une émulation de préampli à lampes.
10
PERFECT 10
DI
Input
Cette seule et unique prise jack à haute impédance est parfaitement adaptée aux micros des basses passives. Cependant sa
plage de sensibilité est telle que l’on peut également y brancher des basses actives. Utilisez le potentiomètre de “INPUT GAIN”
pour régler la sensibilité de l’ampli adaptée à votre instrument.
VINTAGE 12 Front Panel
hIGh
INPUT
LoW
INPUT
BASS
DRIVE
MIDDLE
TREBLE
AUX MIX
VoLUME
LINE IN
Drive in/out
46
CLIP
APPTEk
46
3
7
0
10
2
1
8
2
9
1
46
3
7
0
10
8
2
9
1
46
3
7
0
10
8
2
9
1
46
3
7
0
10
8
2
9
1
46
3
7
0
10
8
2
9
1
46
3
7
0
10
8
2
9
1
3
7
0
10
FACE ARRIERE
8
Entrée secteur
Cette prise sert a raccorder le câble d alimentation fourni avec l appareil veiller à bien vérifier le voltage avant le raccordement.
Avant de remplacer le fusible secteur inséré dans le porte fusible débranchez d abord la prise du secteur et remplacer par un
fusible de même type et même valeur.
9
VINTAGE 12
DI
Interrupteur secteur
Cet interrupteur permet la mise sous tension et l’arrêt de l’appareil. Une Led est allumée sur le panneau avant lorsque l’appareil
est sous tension.
FIVE 15 & FIVE 15 BB Front Panel
INPUT
hIGh
LoW
INPUT
BASS
DRIVE
MIDDLE
TREBLE
AUX MIX
VoLUME
FX LooP
LINE IN
DI
Drive in/out
APPTEk
46
46
3
7
0
10
2
1
8
2
9
1
3
7
0
10
8
2
9
1
46
3
7
0
10
8
2
9
1
46
3
7
0
10
8
2
9
1
46
46
3
7
0
10
8
2
9
1
3
7
0
10
8
2
9
1
3
7
0
10
8
9
SEND
RETURN
FIVE 15
Rear panel
Back Panel
Fused mains inlet socket
This is for connection of the unit to your countries mains power supply. Please
ensure that the type and rating of mains fuse marked on the rear panel is used when
this is replaced.
Power switch
The power to the unit is turned on with the rear panel power switch. A power led on
the front panel will light to indicate that the amplifier is switched on.
20watts rms into 8 ohms
1 Meg ohm
100Mv to 10v
Passive Bass, Middle, Treble.
VINTAGE 12
Output Power
Input Impedance
Input Signal Range
E.Q.
20watts rms into 8 ohms
1 Meg ohm
100Mv to 10v
Passive Bass, Middle, Treble.
Perfect ten combo
Puissance maximale 40watts rms into 8 ohms
Impédance d’entrée 1 Meg ohm
Impédance signal
100Mv to 10v
E.Q.
Passive Bass, Middle, Treble.
FIVE 15 & BB
Output Power
Input Impedance
Input Signal Range
E.Q.
100(220BB)watts rms 8 ohms
1 Meg ohm
100Mv to 10v
Passive Bass, Middle, Treble.
after eight
Puissance maximale
Impédance d’entrée
Impédance signal
E.Q.
FIVE 15 BB
SPEAKER OUT
There is a speaker out fitted to the After 8, Vintage 12 and Five 15 BB with an 8Ohm
min load.
Ashdown amplificateurs se reserve le droit de modifier toute specification sans preavis prealable.. E & O E © Ashdown 2014.
24
www.ashdownmusic.com
caractéristiques
46
CLIP
Ashdown amplificateurs se reserve le droit de modifier toute specification sans preavis prealable.. E & O E © Ashdown 2014.
www.ashdownmusic.com
25
MANUEL D’EMPLOI
MAG ROOTMASTER
à l’aide de ce potentiomètre.
Le signal saturé est appliqué ajouté au signal original pour vous assurer de ne jamais perdre la rondeur de votre son. La saturation est placée après la
compression permettant ainsi d’obtenir un son saturé avec du sustain en modifiant les paramètres de la compression.
Sub harmonics
Cette section est constituée d’un interrupteur IN / OUT et d’un contrôle de niveau. Lorsque l’interrupteur est en position IN, des Sub Harmoniques
à l’octave inférieure aux notes jouées sont produites. Le niveau de ces Sub Harmoniques par rapport au son de basse direct peut être ajusté en
utilisant le contrôle de niveau. Ceci est très efficace pour épaissir le son et vous constaterez à l’usage qu’il suffit d’un dosage minime de cette octave
inférieure pour vraiment remplir le son en lui donnant un caractère qu’il n’est pas possible d’obtenir par d’autres moyens. Cette fonction s’active/
désactive à l’aide du bouton situé à gauche du potentiomètre de contrôle Sub Harmonics.
VU
Direct inject ( d.I. )
Une sortie D.I. symétrique est disponible sur la face avant avec une prise XLR en métal à verrouillage. Le signal sortant de cette prise XLR est Post
E.Q. / Post Sub et Effets et calibré à un niveau et impédance convenables pour se connecter à l’entrée microphone d’une table de mixage, ou pour
l’injection directe dans un système de sonorisation ou pour enregistrer.
Inputs
Vous avez deux entrées aux choix suivant le type d’instrument que vous utilisez, une notées passive et l ‘autre active. L’entrée passive offre une
haute sensibilité et une haute impédance pour adapter les basses passives. L’entrée active dispose d’une sensibilité et d‘une impédance nettement
plus basse afin de correspondre au signal provenant d’une basse active.
Input control
Le réglage input control permet de définir le niveau du signal d’entrée dans le préampli en coordination avec le vu- mètre; Il doit être réglé de façon à
ce que la valeur moyenne soit 0vu et en obtenant des pics occasionnels en zone rouge. Notez que ces paramètres pourront être réajustes après que
vous ayez appliqué des modifications des valeurs d’égalisation
Deep
En position enfoncé, ce bouton enclenche un circuit de pré-égalisation fixe qui amplifie les graves de +8dB à 50Hz; ce qui donne au son une certaine
profondeur.
Bright
En position enfoncé, ce bouton enclenche un circuit de pré-égalisation fixe qui amplifie les aigus de +10dB à 10kHz; ce qui donne au son une certaine
clarté.
E.Q.
Ce bouton active ou désactive la section Egalisation, c’est-à-dire les réglages Graves/Mediums/Aigus et les deux petits potentiomètres rotatifs.
EQUALISEUR
La section d’égalisation comprend les réglages « BASS/ MIDDLE/ TREBLE» (Graves/ Mediums/ Aigus)et les deux potentiomètres rotatifs « 340 Hz »
(Bas medium) et « 1,6 kHz » (Haut medium) placés entre ceux-ci.
Vous pouvez utiliser cet égaliseur de deux manières différentes :
1- Comme un simple réglage des tonalités graves, médiums et aigües, que l’on trouve traditionnellement sur nombre d’amplificateurs classiques.
Vous laisserez alors les deux petits potentiomètres « 340 Hz » (Bas medium) et « 1,6 kHz » (Haut medium) en position centrale et n’utiliserez que les
boutons Graves/Mediums/Aigus pour régler la tonalité générale.
2 - Comme un égaliseur polyvalent, simple à comprendre et à régler. En plus des réglages Graves/Mediums/Aigus, vous utiliserez les deux petits
potentiomètres « 340 Hz » et « 1,6 kHz » qui vous permettront de façonner le son à votre guise, en travaillant sur le Bas et le Haut medium. Cette
section se caractérise donc par la simplicité d’un réglage de tonalité à trois boutons avec la flexibilité d’un égaliseur graphique.
Compression
L’ajout d’une faible quantité de compression vous permet de donner un son beaucoup plus profond et de jouer à un volume plus élevé sans
attaquer les cordes plus fort ce qui permet d’éviter les pics de distorsion de l’étage de sortie de l’amplificateur.
Vous trouverez également que le son sera plus défini en mettant en valeur la dynamique de votre jeu et en offrant également une meilleur définition.
Une valeur de compression élevée peut être utilisée comme un effet mais elle aura tendance à réduire la dynamique de votre jeu de manière à ce
que le volume des notes reste le même, que les cordes soient jouées plus ou moins durement.
La compression permet également d’ajouter du sustain aux notes jouées en maintenant leur volume les rendant ainsi plus longues.
Le potentiomètre ajuste le niveau de compression appliquée.
Pour que cela fonctionne correctement le niveau d’entre doit être correctement réglé comme décrit précédemment. Lorsque le niveau d’entrée
est correctement règle il n’y aura quasiment aucune différence de volume que la compression soit activée ou non. C’est grâce au Mag qui compense
automatiquement la réduction du niveau en augmentant le gain global pour le restaurer à son niveau de pré compression. A cause de vous
remarquerez peut être une augmentation du bruit de fond avec des valeurs élevées. La compression s’active/désactive en utilisant le poussoir
adjacent au contrôle de niveau de compression.
Effects send/return
Une boucle d’insertion d’effets est disponible à un niveau de 0dB . Au besoin, la sortie EFFECTS SEND peut aussi être utilisée comme une sortie ligne.
Le chemin du signal à travers le préampli est rompu seulement lorsqu’un jack est inséré dans la prise EFFECTS RETURN. La prise EFFECTS SEND est
située après l’EQ.
Tuner/line out
Cette sortie présente un signal de niveau ligne qui peut être utilisée autant pour une connexion permanente à un accordeur que comme une sortie
ligne pour asservir d’autres amplificateurs de puissance.
Output level
Le contrôle OUTPUT ajuste le niveau général de l’amplificateur. Ajustez le pour obtenir votre volume de jeu général préféré sur scène.
Tout a été mis en œuvre afin de vous fournir un ampli basses puissant de haute qualité alliant technologie et simplicité d’utilisation.
Nous savons que vous apprécierez l’effort qui fait pour la conception et la fabrication de ce produit et vous serez récompensé de votre choix par la
fiabilité et la longue durée de vie de votre ampli.
Inputs
High Input
Low Input
Effects Return
Impedance - 3.9M ohms
Impedance - 10k ohms
Impedance - 22k ohms
Input range 150mv to 20v p - p
Input range 300mv to 40v p - p
Input level 0dbu nominal
Outputs
Tuner Output
Effects Send
D.I.Output
Impedance - 10k ohms
Impedance - 22k ohms
600 ohms balanced
Level 0dbu nominal
Level 0dbu nominal
Level -20dbu nominal
Speaker Outputs
Frequency Response
Minimum Impedance - 4 ohms
-3db at 22hz and 25khz
Equalisation
Bass
Lo Mid
Middle
Hi Mid
Treble
Deep
Bright
+/- 15db @ 100hz
+/- 15db @ 340hz
+/- 15db @ 660hz
+/- 15db @ 1.6Khz
+/- 15db @ 7khz shelving
+ 8db @ 50hz
+ 10db @ 10khz
Signal to Noise
Distortion
Output Power
Better than 80db (E.Q. Flat)
Less than 0.5% Thd
330watts RMS into 4 ohms. / 575watts RMS into 4 ohms.
Overdrive
C’est une émulation de préampli à lampes qui offre un taux de saturation variable allant d’une saturation chaude et légère et allant jusqu’au son très
agressif d’un effet de distorsion. La «quantité» de saturation est également dépendante de la valeur du gain d’entrée. Plus ce gain sera élevé plus le
contrôle offert par le potentiomètre sera efficace.
La saturation peut être activée/désactivée à l’aide du bouton adjacent au potentiomètre de contrôle Overdrive. La quantité de saturation est ajustée
26
caractéristiques
FACE AVANT
Ashdown amplificateurs se reserve le droit de modifier toute specification sans preavis prealable.. E & O E © Ashdown 2014.
Ashdown amplificateurs se reserve le droit de modifier toute specification sans preavis prealable.. E & O E © Ashdown 2014.
www.ashdownmusic.com
www.ashdownmusic.com
27
MANUEL D’EMPLOI
MAG ROOTMASTER
Direct inject ( d.I. )
Une sortie D.I. symétrique est disponible sur la face avant avec une prise XLR en métal à verrouillage. Le signal sortant de cette prise XLR est Post
E.Q. / Post Sub et Effets et calibré à un niveau et impédance convenables pour se connecter à l’entrée microphone d’une table de mixage, ou pour
l’injection directe dans un système de sonorisation ou pour enregistrer.
Effects send/return
Une boucle d’insertion d’effets est disponible à un niveau de 0dB . Au besoin, la sortie EFFECTS SEND peut aussi être utilisée comme une sortie ligne.
Le chemin du signal à travers le préampli est rompu seulement lorsqu’un jack est inséré dans la prise EFFECTS RETURN. La prise EFFECTS SEND est
située après l’EQ.
VU
Tuner/line out
Cette sortie présente un signal de niveau ligne qui peut être utilisée autant pour une connexion permanente à un accordeur que comme une sortie
ligne pour asservir d’autres amplificateurs de puissance.
Output level
Le contrôle OUTPUT ajuste le niveau général de l’amplificateur. Ajustez le pour obtenir votre volume de jeu général préféré sur scène.
Inputs
Vous avez deux entrées aux choix suivant le type d’instrument que vous utilisez, une notées passive et l ‘autre active. L’entrée passive offre une
haute sensibilité et une haute impédance pour adapter les basses passives. L’entrée active dispose d’une sensibilité et d‘une impédance nettement
plus basse afin de correspondre au signal provenant d’une basse active.
Input control
Le réglage input control permet de définir le niveau du signal d’entrée dans le préampli en coordination avec le vu- mètre; Il doit être réglé de façon à
ce que la valeur moyenne soit 0vu et en obtenant des pics occasionnels en zone rouge. Notez que ces paramètres pourront être réajustes après que
vous ayez appliqué des modifications des valeurs d’égalisation.
Deep
En position enfoncé, ce bouton enclenche un circuit de pré-égalisation fixe qui amplifie les graves de +8dB à 50Hz; ce qui donne au son une certaine
profondeur.
Bright
En position enfoncé, ce bouton enclenche un circuit de pré-égalisation fixe qui amplifie les aigus de +10dB à 10kHz; ce qui donne au son une certaine
clarté.
E.Q.
Ce bouton active ou désactive la section Egalisation, c’est-à-dire les réglages Graves/Mediums/Aigus et les deux petits potentiomètres rotatifs.
EQUALISEUR
La section d’égalisation comprend les réglages « BASS/ MIDDLE/ TREBLE» (Graves/ Mediums/ Aigus)et les deux potentiomètres rotatifs « 340 Hz »
(Bas medium) et « 1,6 kHz » (Haut medium) placés entre ceux-ci.
Vous pouvez utiliser cet égaliseur de deux manières différentes :
1- Comme un simple réglage des tonalités graves, médiums et aigües, que l’on trouve traditionnellement sur nombre d’amplificateurs classiques.
Vous laisserez alors les deux petits potentiomètres « 340 Hz » (Bas medium) et « 1,6 kHz » (Haut medium) en position centrale et n’utiliserez que les
boutons Graves/Mediums/Aigus pour régler la tonalité générale.
2 - Comme un égaliseur polyvalent, simple à comprendre et à régler. En plus des réglages Graves/Mediums/Aigus, vous utiliserez les deux petits
potentiomètres « 340 Hz » et « 1,6 kHz » qui vous permettront de façonner le son à votre guise, en travaillant sur le Bas et le Haut medium. Cette
section se caractérise donc par la simplicité d’un réglage de tonalité à trois boutons avec la flexibilité d’un égaliseur graphique.
Compression
L’ajout d’une faible quantité de compression vous permet de donner un son beaucoup plus profond et de jouer à un volume plus élevé sans
attaquer les cordes plus fort ce qui permet d’éviter les pics de distorsion de l’étage de sortie de l’amplificateur.
Vous trouverez également que le son sera plus défini en mettant en valeur la dynamique de votre jeu et en offrant également une meilleur définition.
Une valeur de compression élevée peut être utilisée comme un effet mais elle aura tendance à réduire la dynamique de votre jeu de manière à ce
que le volume des notes reste le même, que les cordes soient jouées plus ou moins durement.
La compression permet également d’ajouter du sustain aux notes jouées en maintenant leur volume les rendant ainsi plus longues.
Le potentiomètre ajuste le niveau de compression appliquée.
Pour que cela fonctionne correctement le niveau d’entre doit être correctement réglé comme décrit précédemment. Lorsque le niveau d’entrée
est correctement règle il n’y aura quasiment aucune différence de volume que la compression soit activée ou non. C’est grâce au Mag qui compense
automatiquement la réduction du niveau en augmentant le gain global pour le restaurer à son niveau de pré compression. A cause de vous
remarquerez peut être une augmentation du bruit de fond avec des valeurs élevées. La compression s’active/désactive en utilisant le poussoir
adjacent au contrôle de niveau de compression.
Tout a été mis en œuvre afin de vous fournir un ampli basses puissant de haute qualité alliant technologie et simplicité d’utilisation.
Nous savons que vous apprécierez l’effort qui fait pour la conception et la fabrication de ce produit et vous serez récompensé de votre choix par la
fiabilité et la longue durée de vie de votre ampli.
Inputs
High Input
Low Input
Effects Return
Impedance - 3.9M ohms
Impedance - 10k ohms
Impedance - 22k ohms
Input range 150mv to 20v p - p
Input range 300mv to 40v p - p
Input level 0dbu nominal
Outputs
Tuner Output
Effects Send
D.I.Output
Impedance - 10k ohms
Impedance - 22k ohms
600 ohms balanced
Level 0dbu nominal
Level 0dbu nominal
Level -20dbu nominal
Speaker Outputs
Frequency Response
Minimum Impedance - 4 ohms
-3db at 22hz and 25khz
Equalisation
Bass
Lo Mid
Middle
Hi Mid
Treble
Deep
Bright
+/- 15db @ 100hz
+/- 15db @ 340hz
+/- 15db @ 660hz
+/- 15db @ 1.6Khz
+/- 15db @ 7khz shelving
+ 8db @ 50hz
+ 10db @ 10khz
Signal to Noise
Distortion
Output Power
Better than 80db (E.Q. Flat)
Less than 0.5% Thd
220watts RMS into 4 ohms.
caractéristiques
FACE AVANT
Sub harmonics
Cette section est constituée d’un interrupteur IN / OUT et d’un contrôle de niveau. Lorsque l’interrupteur est en position IN, des Sub Harmoniques
à l’octave inférieure aux notes jouées sont produites. Le niveau de ces Sub Harmoniques par rapport au son de basse direct peut être ajusté en
utilisant le contrôle de niveau. Ceci est très efficace pour épaissir le son et vous constaterez à l’usage qu’il suffit d’un dosage minime de cette octave
inférieure pour vraiment remplir le son en lui donnant un caractère qu’il n’est pas possible d’obtenir par d’autres moyens. Cette fonction s’active/
désactive à l’aide du bouton situé à gauche du potentiomètre de contrôle Sub Harmonics.
28
Ashdown amplificateurs se reserve le droit de modifier toute specification sans preavis prealable.. E & O E © Ashdown 2014.
Ashdown amplificateurs se reserve le droit de modifier toute specification sans preavis prealable.. E & O E © Ashdown 2014.
www.ashdownmusic.com
www.ashdownmusic.com
29
MANUEL D’EMPLOI
ABM
SUB HARMONICS
Cette section est constituée d’un interrupteur IN / OUT et d’un contrôle de niveau. Lorsque l’interrupteur est en position IN, des Sub Harmoniques
à l’octave inférieure aux notes jouées sont produites. Le niveau de ces Sub Harmoniques par rapport au son de basse direct peut être ajusté en
utilisant le contrôle de niveau. Ceci est très efficace pour épaissir le son et vous constaterez à l’usage qu’il suffit d’un dosage minime de cette octave
inférieure pour vraiment remplir le son en lui donnant un caractère qu’il n’est pas possible d’obtenir par d’autres moyens. Cette fonction s’active/
désactive à l’aide du bouton situé à gauche du potentiomètre de contrôle Sub Harmonics.
VU
DIRECT INJECT (D.I.)
Une sortie D.I. symétrique est disponible sur la face avant avec une prise XLR en métal à verrouillage. Le signal sortant de cette prise XLR est Post
E.Q. / Post Sub et Effets et calibré à un niveau et impédance convenables pour se connecter à l’entrée microphone d’une table de mixage, ou pour
l’injection directe dans un système de sonorisation ou pour enregistrer. Elle doit SEULEMENT être utilisée pour aller dans une entrée microphone
symétrique. Elle n’est pas prévue pour tout autre type de connexion. Elle a une terre flottante calibrée pour la console de mixage dans laquelle elle va
se connecter et ne nécessite pas de mise à la terre. Elle n’est non plus pas affectée par l’alimentation fantôme de l’entrée microphone. Assurez-vous
que votre fiche XLR n’a pas une connexion interne à la terre car cela relierait le système à la terre du châssis de l’amplificateur et pourrait causer des
problèmes de ronflements.
INPUT
Vous disposez d’une entrée et d’un interrupteur vous permettant de choisir le type d’impédance de l’instrument utilisé. Passive et Active. Le mode
Passif (interrupteur relâché) offre une haute sensibilité et une haute impédance pour s’adapter aux basses passives. Le mode actif (interrupteur
enfoncé) offre une sensibilité et une impédance nettement plus basse afin de correspondre au signal provenant d’une basse active.
INPUT CONTROL
Le réglage input control permet de définir le niveau du signal d’entrée dans le préampli en coordination avec le vu- mètre; Il doit être réglé de façon à
ce que la valeur moyenne soit 0vu et en obtenant des pics occasionnels en zone rouge. Notez que ces paramètres pourront être réajustes après que
vous ayez appliqué des modifications des valeurs d’égalisation.
PUSH FLAT / SHAPE
En position relâché, ce bouton enclenche un circuit de pré-égalisation fixe qui donne au son une certaine clarté et un caractère punchy. Appuyer sur
ce bouton pour obtenir une égalisation plate. Cette fonction peut également être contrôlée par une pédale, pour que la pédale soit opérationnelle le
bouton doit être en position off.
VALVE DRIVE
Cette fonction permet d’acheminer le signal soit vers une section d’amplificateur à transistors (son clair), soit vers une section d’amplification à
lampes double triode afin d’y ajouter du caractère; de la chaleur avec un réglages à 9h ; un léger grain sur 12h ; et jusqu’à la saturation des lampes
lorsque le réglage est amené au maximum.
Un mélange des deux sections d’amplification peut être réalisé avec ce réglage.
N.B : la quantité de saturation est également dépendante du réglage du gain d’entrée.
VALVE DRIVE IN/OUT
Ce bouton active/désactive la fonction Valve Drive. Cette fonction peut également être accessible à partir du pédalier FS4 en option (pour que le
pédalier fonctionne, cette fonction doit être désactivée).
E.Q. IN / OUT
Ce bouton active ou désactive la section Egalisation. Cette fonction peut également être accessible à partir du pédalier FS4 en option (pour que le
pédalier fonctionne, cette fonction doit être désactivée).
EQUALISATION
La section d’égalisation comprend les réglages Graves/Mediums/Aigus et les deux jeux de potentiomètres linéaires placés entre ceux-ci.
Vous pouvez utiliser cet égaliseur de deux manières différentes :
1- Comme un simple réglage des tonalités graves, médiums et aigües, que l’on trouve traditionnellement sur nombre d’amplificateurs classiques.
Vous laisserez alors les deux jeux de potentiomètres linéaires placés entre ceux-ci en position centrale et n’utiliserez que les boutons Graves/
Mediums/Aigus pour régler la tonalité générale.
2 - Comme un égaliseur polyvalent, simple à comprendre et à régler. En plus des réglages Graves/ Mediums/Aigus, vous utiliserez les deux jeux de
potentiomètres linéaires placés entre ceux-ci qui vous permettront de façonner le son à votre guise, en travaillant sur le Bas et le Haut medium.
Cette section se caractérise donc par la simplicité d’un réglage de tonalité à trois boutons avec la flexibilité d’un égaliseur graphique.
COMPRESSION
L’ajout d’une faible quantité de compression vous permet de donner un son beaucoup plus profond et de jouer à un volume plus élevé sans
attaquer les cordes plus fort ce qui permet d’éviter les pics de distorsion de l’étage de sortie de l’amplificateur.
Vous trouverez également que le son sera plus défini en mettant en valeur la dynamique de votre jeu et en offrant également une meilleur définition.
Une valeur de compression élevée peut être utilisée comme un effet mais elle aura tendance à réduire la dynamique de votre jeu de manière à ce
que le volume des notes reste le même, que les cordes soient jouées plus ou moins durement.
La compression permet également d’ajouter du sustain aux notes jouées en maintenant leur volume les rendant ainsi plus longues.
Le potentiomètre ajuste le niveau de compression appliquée.
Pour que cela fonctionne correctement le niveau d’entre doit être correctement réglé comme décrit précédemment. Lorsque le niveau
d’entrée est correctement règle il n’y aura quasiment aucune différence de volume que la compression soit activée ou non. L’ampli compense
automatiquement la réduction du niveau en augmentant le gain global pour le restaurer à son niveau de pré compression. A cause de ceci vous
remarquerez peut être une augmentation du bruit de fond avec des valeurs élevées. La compression s’active/désactive en utilisant le poussoir
adjacent au contrôle de niveau de compression.
30
PUSH TO MUTE
En pressant sur ce bouton on mute (Mode muet) : la sortie du pré-ampli à l’ampli de puissance, la sortie DI et la sortie ligne tout en laissant en
fonction la sortie accordeur.
Une Led placée à cote du bouton poussoir s’allume lorsque l’amplificateur est mis en mode mute.
Cette fonction ne peut se faire qu’à partir du bouton poussoir mute situe sur le panneau avant. En pressant ce bouton poussoir tous les sons de
l’amplificateur sont coupes ce qui permet le réglage silencieux de votre basse via la prise accordeur. Relâchez ce bouton et vous voila à nouveau en
action.
TUNER OUT
Cette sortie présente un signal de niveau ligne qui peut être utilisée autant pour une connexion permanente à un accordeur que comme une sortie
ligne pour asservir d’autres amplificateurs de puissance. Elle fonctionne même si l’ampli est mis en mode mute.
LINE OUT
Ce connecteur de sortie délivre un signal de niveau ligne pour le raccordement à un amplificateur de puissance externe pilotant des hauts parleurs
additionnels.
OUTPUT LEVEL
La commande du niveau de sortie vous permet d’ajuster le niveau global de votre amplificateur.
INPUTS
High Input
Low Input Line Input Effects Return
Impedance 3.9M Ohms
Impedance 10K Ohms
Impedance 22K Ohms
Impedance 22K Ohms
Input range 150mV to 20V p-p
Input range 300mV to 40V p-p
Input level 0dBu nominal
Input level 0dBu nominal
OUTPUTS
Tuner Output Line Output Effects Send
D.I. Output
Impedance 1K Ohms
Impedance 10K Ohms
Impedance 22K Ohms
600 Ohms balanced
Level 0dBu nominal
Level 0dBu nominal
Level 0dBu nominal
Level -20dBu nominal
(rackmount preamp only) Low Pass (RPM-1 only) Impedance 1K Ohms
High Pass (RPM-1 only) Impedance 1K Ohms
Full Range (RPM-1 only)
Impedance 1K Ohms
EQUALISATION
Shape (Push Flat) Bass
Middle
Treble
Slider1 +/-15dB @ 110Hz
Slider 2 Slider 3 Slider 4+/-15dB @ 2.6kHz
Frequency Response Level switched 0/+4dBU
Level switched 0/+4dBU
Level switched 0/+4dBU
+8dB @ 50Hz & 4kHz, -8dB @ 400Hz, filter slope - 6dB/octave
+/-15dB @ 45Hz
+/-15dB @ 660Hz
+/-15dB @ 7kHz shelving
+/-15dB @ 340Hz
+/-15dB @ 1.3kHz
-3dB at 17Hz and 30KHz
Rackmount Preamp Crossover
Variable between 35 and 160Hz
Speaker Outputs
Minimum impedance 4 Ohms
Output Power
1000watts RMS into 4 ohms. / 2000watts RMS into 4 ohms.
caractéristiques
FACE AVANT
Ashdown amplificateurs se reserve le droit de modifier toute specification sans preavis prealable.. E & O E © Ashdown 2014.
Ashdown amplificateurs se reserve le droit de modifier toute specification sans preavis prealable.. E & O E © Ashdown 2014.
www.ashdownmusic.com
www.ashdownmusic.com
31
MANUEL D’EMPLOI
NOTES
32
www.ashdownmusic.com
www.ashdownmusic.com
33
www.ashdownmusic.com
Ashdown Design & Marketing Ltd
Stevens Farm (The Stables), Mashbury Road, Chignal St James, Chelmsford, Essex CM1 4TX