1
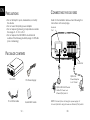
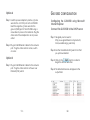
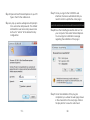
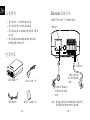
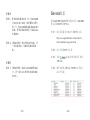
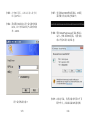
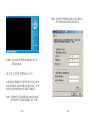
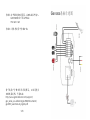
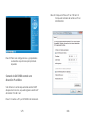
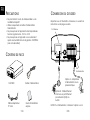
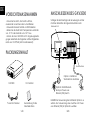
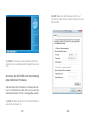
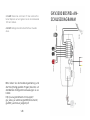
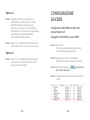
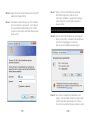
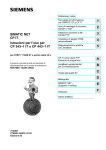
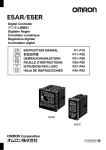
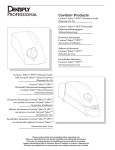
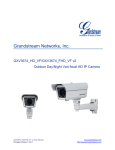
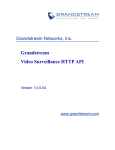
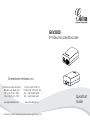
GXV3500
IP Video Encoder/Decoder
Grandstream Networks, Inc.
1297 Beacon Street, 2nd Floor
Brookline, MA 02446, USA
Tel : +1 (617) 566 – 9300
Fax: +1 (617) 247 – 1987
深圳市南山高新科技园中区
科发路2号1栋(朗峰大厦)5楼
电话: +86 755-2601-4600
传真: +86 755-2601-4601
www.grandstream.com
www.grandstream.cn
For Warranty and RMA information, please visit www.grandstream.com
QuickStart
Guide
Content
English......................................................1
简体中文................................................11
Español...................................................21
Français..................................................31
Deutsch...................................................41
Italiano....................................................51
EN PRECAUTIONS
CONNECTING THE GXV3500
• Do not attempt to open, disassemble, or modify
the device
• Do not use a third party power adapter
• Do not expose this device to temperatures outside
o
o
the range of -10 C to +55 C
• Do not expose the GXV3500 to environments
outside of the following humidity range: 10-90% RH
(non-condensing)
Refer to the illustration below when following the
instructions on the next page.
Network
Port
PACKAGE CONTENTS
-
+ Power Port
V
12
GXV3500
Option A:
Power Adapter
12V Power Supply
to AC Outlet
Option B: RJ45 Ethernet
cable to Power over
Ethernet(PoE) switch
TV out RCA cable
Quick Start Guide
~1~
NOTE: Choose Option A if using the power supply. Or
V
12
choose Option B if using a Power over Ethernet (PoE) switch.
~2~
Option A
GXV3500 CONFIGURATION
Step 1: Insert the power adapter’s positive (+) bare
Configuring the GXV3500 using Microsoft
Internet Explorer
wire into the +12V DC port on the GXV3500.
Insert the negative (-) bare wire into the
ground (GND) port of the GXV3500 using a
screwdriver to press on the terminals. Plug the
other end of the adapter into an AC power
outlet.
Step 2: Plug an RJ45 Ethernet cable into the network
port. Plug the other end into a hub, switch
or router.
Option B
Connect the GXV3500 to the DHCP server
Step 1: Navigate your browser to:
http://www.grandstream.com/products/
tools/surveillance/gs_search.zip
Step 2: Run the Grandstream GS_Search tool that
you just downloaded.
Step 3: Click on the
Step 1: Plug an RJ45 Ethernet cable into the network
port. Plug the other end into a Power over
Ethernet (PoE) switch.
~3~
button in order to
begin the device detection.
Step 4: The detected devices will appear in the
output field.
~4~
Step 5: Open Microsoft Internet Explorer on your PC.
Type in the IP in the address bar.
Step 7: Once you log into the GXV3500’s web
interface, the device will indicate that you
need to install or update the video plug in.
Step 6: A pop-up window will appear with prompts
for a user name and password. The default
administrator user name and password are
both set to “admin” at the default factory
configuration.
Step 8: Save the VideoPlugine.exe file and run it on
your computer. Then restart Internet Explorer.
You should get a confirmation message
regarding the installation of the plug in.
Step 9: Once the installation of the plug in is
completed, you will see the web page shown
in the screenshot on the next page. Click on
the play button to view the video feed.
~5~
~6~
Step 2: Set the IP address of your PC to 192.168.1.X.
Set the subnet mask of your PC to
255.255.255.0.
Step 10: Click through the menu of the left hand side
of the web GUI for more advanced
configuration parameters.
Connect the GXV3500 using Static IP
If the camera does not get a response from the DHCP
server after 3 minutes, it can be accessed by the
default IP 192.168.1.168
Step 1: Connect your PC and the GXV3500 to the
same network.
~7~
~8~
Step 3: Open Microsoft Internet Explorer on your PC.
Type 192.168.1.168 in the address bar.
GXV3500 SAMPLE
CONNECTION DIAGRAM
Step 4: Please refer to Steps 6-10 above.
Please download the user manual and FAQ for
more detailed configuration instructions:
http://www.grandstream.com/support/
gxv_series_sur-veillance/gxv3500/documents/
gxv3500_usermanual_english.pdf
~9~
~10~
GXV3500 连接方法
注意事项
• 请不要打开、拆卸或修改该设备
• 请不要使用第三方的电源适配器
请参照下图以及下一页的操作说明。
网络接口
• 请不要在超出-10至55摄氏度的环境下使用
此设备
• 请不要将GXV3500暴露在超出相对湿度
10-90%范围外的环境下
包装内容
-
+
电源接口
V
12
GXV3500一个
方案A: 使用12V
DC 电源适配器
12V DC 电源一个
供电
V
12
方案B: 使用RJ45以
太网接口通过PoE
供电
音频视频线
快速入门指南一本
~11~
注意: 选择A方案使用电源适配器给设备供电
或选择B方案使用PoE给设备供电。
~12~
Gxv3500配置
方案A
步骤 1: 将电源适配器的正极(+)与GXV3500
+12V DC 端口相连;使用螺丝刀将负
极(-)与GXV3500的接地端GND端口
相连;将电源适配器的另一端插入AC
电源插口;
连接 GXV3500到 DHCP服务器环境下, GXV3500
默认通过DHCP获取IP地址。
步骤1: 通过浏览器访问地址下载IP搜索工具
http://www.grandstream.com/products/
步骤 2: 将RJ45网线一端与网络接口相连,另
一端与集线器、交换机或路由器相
连。
tools/surveillance/gs_search.zip
步骤2:运行下载的IP搜索工具;
步骤3:点击
备IP地址;
方案B
步骤 1: 将RJ45网线一端连入GXV3500网络接
口,另一端与以太网供电交换机相连
(PoE)。
~13~
按键,搜索该网段下的设
步骤4:搜索到的设备IP地址及HTTP端口将显示
在以下界面;
~14~
步骤5: 打开IE浏览器,在地址栏输入搜索到
的设备IP地址;
步骤6: 界面将会跳出输入用户名及密码的验
证框,出厂时默认的用户名和密码均
为:admin
用户名密码提示窗口
~15~
步骤7: 登录到GXV3500网络界面后, IE浏览
器将提示您安装或更新插件;
步骤8: 保存VideoPlugine.exe并且在电脑上
运行。重新启动IE浏览器,您将会看
到以下窗口提示安装信息;
步骤9: 安装完毕后,您将会看到网页如下页
图中所示,点击播放按钮观看视频;
~16~
步骤2: 将您的PC的IP地址设置为192.168.1.X
将子网掩码设置为255.255.255.0;
步骤10: 点击网络用户界面左侧的菜单进行更
多的高级配置。
通过默认的静态IP地址访问
如果将GXV3500置于非DHCP环境下或三分钟
后GXV3500未从DHCP服务器得到响应,它将
使用默认的静态IP地址192.168.1.168访问。
步骤1: 将您的PC与GXV3500通过双绞线相连,
或将您的PC与GXV3500接入同一网段;
~17~
~18~
步骤3: 打开微软的IE浏览器,在IE地址栏中输入
GXV3500的出厂默认IP地址:
Gxv3500连接示意图
192.168.1.168
步骤4:请参考前页中步骤6-10。
请下载用户手册和常见问题解答,以取得更详
细的配置说明。下载地址:
http://www.grandstream.com/support/
gxv_series_sur-veillance/gxv3500/documents/
gxv3500_usermanual_english.pdf
~19~
~20~
ES
Precauciones
Conexión del GXV3500
• No intente abrir, desarmar o modificar la unidad
• No use un adaptador de corriente de otra marca
• No exponga esta unidad a temperaturas fuera de
este rango: -10 C to +55 C
• No exponga esta unidad a condiciones húmedas
fuera del rango de 10 - 90% RH (no condensadas)
Observe la ilustración de abajo cuando siga las
instrucciones en la página siguiente.
Puerto de Red
Contenido
-
2V
1
Adaptador
de corriente de 12V
GXV3500
~21~
Guía de Instalación
Rápida
Puerto de
corriente
Opción A: Adaptador
de corriente hacia toma
de corriente
Opción B: Cable de
Red RJ45 hacia switch
PoE
Cable de salida a TV
tipo RCA
+
Nota: Utilice solo una opción A o B
~22~
V
12
Si el usuario elije opción A:
Paso 1: Conecte el terminal positivo (+) del cable
pelado al conector de +12V en el terminal.
Conecte el terminal negativo (-) del cable
pelado al conector GND (-) del terminal. Use
un desarmador plano pequeño para presionar
las solapas encima. Conecte el otro extremo
en la toma de corriente.
Paso 2: Conecte el cable de red RJ45 en el puerto de
red. Conecte el otro extremo en el hub/switch
/router.
Si el usuario elije opción B:
Paso 1: Conecte el cable de red RJ45 en el puerto
de red. Conecte el otro extremo en el switch
PoE.
~23~
Configuración del GXV3500
Configure el GXV3500 usando el Explorador Internet de Microsoft ®
Conecte el GXV3500 al servidor DHCP
Paso 1: Navegue su explorador hacia:
http://www.grandstream.com/products/
tools/surveillance/gs_search.zip
Paso 2: Ejecute la herramienta GS_Search de
Grandstream que acaba de bajar.
Paso 3: Haga click en el botón de
iniciar la detección de equipos.
para
Paso 4: Los equipos detectados aparecerán en la
pantalla.
~24~
Paso 5: Abra Microsoft Internet Explorer en su PC.
Ingrese la dirección IP en la barra de
direcciones.
Paso 6: Una ventana aparecerá en donde deberá
ingresar el nombre de usuario y la contraseña.
De fabrica el nombre de usuario de administrador y la contraseña son ambos admin.
Paso 7: Luego de ingresar a la página web, su
explorador le indicará que se necesita instalar
o actualizar el plug in de video para poder
visualizar la imagen. Haga click en el texto
para descargar el archivo.
Paso 8: Grabe el archivo VideoPlugine.exe en su
PC y luego ejecútelo, luego de esto reinicie
Internet Explorer, luego recibirá un mensaje
de confirmación sobre la instalación del
plug in de video.
Paso 9: Una vez que la instalación del plug in este
completada, podrá ver la página web
mostrada en la siguiente página. Haga click
en el botón de play para poder ver el video.
~25~
~26~
Paso 2: Coloque la IP de su PC en 192.168.1.X.
Coloque la máscara de red de su PC en
255.255.255.0.
Paso 10: Para mas configuraciones y propiedades
avanzadas vaya al menú principal de la
izquierda.
Conecte la GXV3500 usando una
dirección IP estática
Si la cámara no recibe respuesta del servidor DHCP
después de 3 minutos, se puede ingresar usando la IP
de fabrica 192.168.1.168
Paso 1: Conecte su PC y el GXV3500 a la misma red.
~27~
~28~
Paso 3: Abra Microsoft Internet Explorer ® en su PC.
Coloque 192.168.1.168 en la barra de
direcciones.
GXV3500 Diagrama de
Conexion
Paso 4: Por favor referirse a los pasos 6-10 arriba.
Por favor baje el manual de usuario y FAQ para
más instrucciones de configuración:
http://www.grandstream.com/support/
gxv_series_sur-veillance/gxv3500/documents/
gxv3500_usermanual_english.pdf
~29~
~30~
FR
PRECAUTIONS
CONNEXION DU GXV3500
• Ne pas tenter d’ouvrir, de désassembler ou de
modifier le dispositif
• Utiliser uniquement un boîtier d’alimentation
Grandstream
• Ne pas exposer cet appareil à des temperatures
hors de la gamme de -10 C to +55 C
• Ne pas exposer vet appareil a un environment
ayant une humidité hors de la gamme 10-90% RH
(sans condensation)
Reportez-vous à l’illustration ci-dessous en suivant les
instructions sur la page suivante.
Port Réseau
CONTENU DU PACK
-
V
12
GXV3500
Boitier d’alimentation
Câble adaptateur
TV VGA
Guide d’installation
express
~31~
+
Port
d’alimentation
Option A : Adaptateur
d’alimentation à une
prise électrique
V
12
Option B : Câble Ethernet
RJ45 vers un port Ethernet
pré-alimenté (PoE) du
Switch
NOTE: Pour l’alimentation, choisissez l’option A ou B.
~32~
Si l’utilisateur choisi l’option A
Etape 1: Branchez le petit connecteur rond du boîtier
d’alimentation. Branchez l’autre extremité à
une prise murale.
Etape 2: Branchez un cable Ethernet RJ45 au port
réseau. Branchez l’autre extremité à un hub/
switch/routeur.
Si l’utilisateur choisi l’option B
Etape 1: Branchez un cable Ethernet RJ45 au port
réseau. BRanchez l’autre extremité à un port
Ethernet pré-alimenté.
La Configuration du GXV3500
Configurez le GXV3500 en utilisant le
navigateur Microsoft Internet Explorer ®
Configurer le GXV3500 à un serveur DHCP
Etape 1: Accédez à votre navigateur:
http://www.grandstream.com/products/
tools/surveillance/gs_search.zip
Etape 2: Exécutez l’outil de Grandstream GS_Search
que vous venez de télécharger.
Etape 3: Cliquez sur
pour commencer la
détection des appareils
Etape 4: Les appareils détectés s’afficheront dans le
champ de sortie.
~33~
~34~
Etape 5: Ouvrez Microsoft Internet Explorer sur votre
PC. Saisissez l’adresse IP dans la barre
d’adresse.
Etape 6: Une fenêtre pop-up apparaîtra avec invite
à entrer un nome d’utilisateur et un mot de
passé. Le nom d’utilisateur et le mot de passé
administrateur par défaut sont définies sur
“admin” à la configuration d’origine par
défaut.
Etape 7: Une fois connecté sur l’interface Web du
GXV3500, l’appareil indiquera que vous
devez installer ou mettre à jour le plugin
video. Cliquer sur le texte pour le télécharger.
Etape 8: Enregistrez le fichier VideoPlugine.exe et
pouis exécutez-le sur votre ordinateur. Après
le redémarrage d’Internet Explorer, vous
devez obtenir un message de confirmation
concernant l’installation.
Etape 9: Une fois l’installation du plugin est terminée,
vous allez obtenir la page Web illustrée sur la
page suivante. CLiquez sur le bouton de l
lecture pour afficher le flux vidéo.
~35~
~36~
Etape 2: Fixez l’adresse IP de votre PC à 192.168.1.X
et le masque sous réseau à 255.255.255.0.
Etape 10: Utiliseur le menu sur le côté gauche de
l’interface web pour des paramètres de
configuration plus avancés.
Connecter le GXV3500 en utilisant une
adresse IP statique
Si la caméra ne recoit pas de réponse du serveur
DHCP au bout de 3 minutes, vous pousez y acceder
pal l’adresse IP par défaut 192.168.1.168
Etape 1: Connectez votre PC et le GXV3500 au
meme réseau.
~37~
~38~
Etape 3: Ouvrez le navigateur Microsoft Internet
Explorer et tapez 192.168.1.168 dans la
barre d’adresse.
Exemple de Diagramme de
connexion du GXV3500
Etape 4: Référez-vous SVP aux étapes 6-10 ci-dessus.
Pour les instructions de configuration détaillées,
veuillez télécharger le manuel d’utilisation et
‘laide:
http://www.grandstream.com/support/
gxv_series_sur-veillance/gxv3500/documents/
gxv3500_usermanual_english.pdf
~39~
~40~
DE
VORSICHTSMASSNAHMEN
• Versuchen Sie nicht, das Gerät zu öffnen,
auseinander zu nehmen oder zu modifizieren.
• Verwenden Sie kein Netzteil von Drittanbietern.
• Setzen Sie das Gerät nicht Temperaturen unterhalb
von -10 °C oder oberhalb von +55 °C aus.
• Setzen Sie den GXV3500 nicht Umgebungsbedingungen außerhalb des folgenden Luftfeuchtigkeitsbereichs aus: 10-90 % RH (nicht kondensierend)
ANSCHLIESSEN DES GXV3500
Schlagen Sie beim befolgen der Anweisungen auf der
nächsten Seite bitte die folgende Illustration nach.
Netzwerk-Port
PACKUNGSINHALT
-
+
Netzanschluss
V
12
GXV3500
Option A: Netzteil zur
Wechselstrom-steckdose
V
12 V-Netzteil
Option B: RJ45-Ethernetkabel yum Power-overEthernet-(PoE)-Switch
TV-auf-Cinch-Kabel
Kurzanleitung für die
Inbetriebnahme
~41~
12
HINWEIS: Bei Verwendung des Netzteils ist Option A zu
wählen. Bei Verwendung eines Switches mit Powerover-Ethernet (PoE) ist Option B zu wählen.
~42~
Option A
GXV3500-KONFIGURATION
1. Schritt: Blanken Draht des Netzteil-Plus (+) in den
Anschluss +12V DC (Gleichstrom) am GXV3500 einstecken. Blanken Draht des Netzteil-Minus (-) in den
Masse-Anschluss (GND) des GXV3500 einstecken um
mit einem Schraubendreher auf die Anschlussklemmen drücken. Das andere Ende des Netzteils in eine
Wechselstromsteckdose einstöpseln.
Konfiguration des GXV3500 unter Verwendung des Microsoft Internet Explorer®
Den GXV3500 mit dem DHCP-Server
verbinden
2. Schritt: Ein RJ45-Ethernetkabel in die Netzwerschnittstelle einstöpseln. Das andere Ende in einen Hub,
Switch oder Router einstöpseln.
1. Schritt: Mit dem Webbrowser die folgende Datei
herunterladen:
http://www.grandstream.com/products/tools/
surveillance/gs_search.zip
Option B
2. Schritt: Das Grandstream GS_Search-Tool aufrufen,
dass Sie gerade herunter geladen haben.
1. Schritt: Ein RJ45-Ethernetkabel in die Netzwerschnittstelle einstöpseln. Das andere Ende in einen Powerover-Ethernet-(PoE)-Switch einstöpseln.
~43~
3. Schritt: Auf die Schaltfläche
(Suchen)klicken, um mit dem Auffinden des Geräts zu beginnen.
4. Schritt: Die aufgefunden Geräte werden im Ausgabefeld angezeigt.
~44~
5. Schritt: Rufen Sie auf Ihrem PC den Microsoft Internet Explorer auf und geben Sie in der Adresszeile die
IP-Adresse ein.
6. Schritt: Es wird ein Pop-up-Fenster angezeigt, das
nach einer Benutzerkennung (User Name) und einem
Kennwort (Password) fragt. Sowohl die Standardadministratorenbenutzerkennung als auch das Kennwort
stehen in der Standardwerkskonfiguration auf “admin”.
~45~
7. Schritt: Sobald Sie sich an der Webschnittstelle des
GXV3500 angemeldet haben, zeigt dass Gerät an,
dass Sie das Video-Plugin installieren oder aktualisieren
müssen. Klicken Sie auf den Text, um das Video-Plugin
herunterzuladen. Bitte aktualisieren Sie die Seite nach
erfolgtem Herunterladen und Installation.
8. Schritt: Speichern Sie die Datei VideoPlugine.exe
und führen Sie sie mittels klicken auf “Run” auf Ihrem
Computer aus. Anschließend müssen Sie den Internet Explorer neu starten. Sie sollten eine Bestätigungsmeldung bzgl. der Installation des Plugins erhalten.
9. Schritt: Sobald die Installation des Plugins abgeschlossen ist, wird Ihnen die im Screenshot auf der
nächsten Seite abgebildete Webseite angezeigt.
Klicken Sie auf die Taste “Play”, um sich den VideoFeed anzusehen.
~46~
2. Schritt: Stellen Sie die IP-Adresse Ihres PCs auf
192.168.1.X. Stellen Sie das Subnet Mask Ihres PCs auf
255.255.255.0.
10. Schritt: Im Menü links in der Web-Benutzerschnittstelle finden Sie weitergehende Konfigurationsparameter.
Anschluss des GXV3500 unter Verwendung
einer statischen IP-Adresse
Falls die Kamera nicht innerhalb von 3 Minuten eine Antwort vom DHCP-Server erhält, kann auf sie unter der
Standard-IP-Adresse 192.168.1.168 zugegriffen werden.
1. Schritt: Schließen Sie Ihren PC und den GXV3500 an
das gleiche Netzwerk an.
~47~
~48~
3. Schritt: Rufen Sie auf Ihrem PC den Microsoft Internet Explorer auf und geben Sie in der Adresszeile
192.168.1.168 ein.
GXV3500 BEISPIEL-ANSCHLUSSDIAGRAMM
4. Schritt: Befolgen Sie bitte die Schritte 6-10 weiter
oben.
Bitte laden Sie die Bedienungsanleitung und
die FAQ (Häufig gestellte Fragen) herunter, um
detailliertere Konfigurationsanweisungen zu erhalten:
http://www.grandstream.com/support/
gxv_series_sur-veillance/gxv3500/documents/
gxv3500_usermanual_english.pdf
~49~
~50~
IT
PRECAUZIONI
CONNETTERE IL GXV3500
• Non tentare di aprire, smontare o modificare il
dispositivo
• Non utilizzare un adattatore di alimentazione non
originale
• Non esporre il dispositivo a temperature inferiori a
-10 C o superiori a +55 C
• Non installare il GXV3500 in ambienti con livelli
umidità che non rientrano nella seguente gamma:
10-90% RH (senza condensa)
Nel seguire le istruzioni che si trovano alla pagina successiva, far riferimento alla seguente illustrazione.
porta di rete
CONTENUTO DELLA
CONFEZIONE
-
+ porta di alimentazione
V
12
GXV3500
Opzione A:
Adattatore nella
Alimentatore 12V
presa CA
Opzione B: Cavo Ethernet
nello switch Power over
V
12
Ethernet(PoE)
Cavo RCA uscita TV
Guida QuickStart
~51~
N.B.: Se si usa l’alimentatore, scegliere l’opzione A. Se
si usa uno switch Power over Ethernet (PoE), scegliere
l’opzione B.
~52~
Opzione A
Passo 1: Inserire il conduttore nudo positivo (+)
dell’adattatore nella porta CC +12V del
GXV3500. Inserire il conduttore nudo
negativo (-) nella porta a terra (GND) del
GXV3500 con un cacciavite per far pressione
sui terminali. Inserire l’altra estremità
dell’adattatore nella presa CA.
Passo 2: Inserire un cavo Ethernet RJ45 nella porta di
rete. Inserire l’altro in un hub, switch o router.
Opzione B
Passo 1: Inserire un cavo Ethernet RJ45 nella porta di
rete. Inserire l’altra estremità in uno switch
Power over Ethernet (PoE).
CONFIGURAZIONE
GXV3500
Configurare il GXV3500 con Microsoft
Internet Explorer ®
Collegare il GXV3500 al server DHCP
Passo 1: Spostarsi su:
http://www.grandstream.com/products/
tools/surveillance/gs_search.zip
Passo 2: Eseguire lo strumento Grandstream
GS_Search che è stato appena scaricato.
Passo 3: Fare clic sul pulsante
rilevamento dispositivi.
per iniziare il
Passo 4: I dispositivi rilevati compaiono nel campo di
output.
~53~
~54~
Passo 5: Aprire Microsoft Internet Explorer e inserire l’IP
nella barra degli indirizzi.
Passo 6: Compare una finestra pop-up che richiede
il nome utente e la password. La configurazione predefinita dalla fabbrica è “admin”
sia per il nome utente amministratore sia per
la password.
Passo 7: Dopo l’accesso all’interfaccia web del
GXV3500, il dispositivo indica che è
necessario installare o aggiornare il plug-in
video. Fare clic sul testo per scaricare il
plug-in video.
Passo 8: Salvare il file VideoPlugine.exe ed eseguirlo.
Dopo averlo fatto, riavviare Internet Explorer.
Arriverà un messaggio a conferma
dell’avvenuta installazione del plug-in.
Passo 9: Una volta completata l’installazione del
plug-in, sarà possibile vedere la pagina web
nella schermata della pagina successiva.
Fare clic sul pulsante Play per vedere il video.
~55~
~56~
Passo 2: Impostare l’indirizzo IP del proprio computer
su 192.168.1.X. Impostare la Subnet Mask
predefinita del proprio computer su
255.255.255.0.
Passo 10: Fare clic sul menu che si trova a sinistra
dell’interfaccia web per parametri di
configurazione più avanzati.
Collegare il GXV3500 utilizzando un IP
statico
Se la videocamera non riceve risposta dal server
DHCP dopo 3 minuti, vi si può accedere attraverso l’IP
predefinito 192.168.1.168
Passo 1: Collegare il PC e il GXV3500 alla stessa rete.
~57~
~58~
Passo 3: Aprire Microsoft Internet Explorer e digitare
192.168.1.168 nella barra degli indirizzi.
SCHEMA DI COLLEGAMENTO
DEL GXV3500
Passo 4: Far riferimento ai passi 6-10 descritti sopra.
Scaricare il manuale dell’utente e le FAQ se si
desidera avere istruzioni di configurazione più
dettagliate:
http://www.grandstream.com/support/
gxv_series_sur-veillance/gxv3500/documents/
gxv3500_usermanual_english.pdf
~59~
~60~