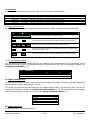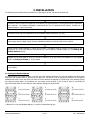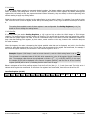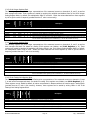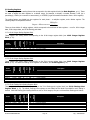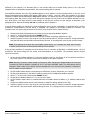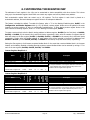
1
Installation Considerations
Installation and maintenance of the i-Spy device should only be performed by qualified, competent
personnel who have appropriate training and experience with high electrical circuit installations. The i-Spy
device must be installed in accordance with all Local and National Electrical Safety Codes.
WARNING
Failure to observe the following may result in severe injury or death:
•
With their primary circuit energized, current transformers (CTs) may generate high voltage when their secondary
windings are open. Follow standard safety precautions while performing any installation or service work (i.e.
remove line fuses, short CT secondaries, etc).
•
This device is not intended for protection applications.
•
Do not HIPOT and/or dielectric test any of the digital outputs.
•
Do not exceed rated input signals as it may permanently damage the meter.
•
The power supply input should be connected via a rated 12-30 VAC/VDC power supply and properly isolated from
the line voltage.
•
Isolation is provided by the current transformers.
Limitation of Liability
Elkor Technologies Inc. (“Elkor”) reserves the right to make changes to its products and/or their specifications without
notice. Elkor strongly recommends obtaining the latest version of the device specifications to assure the most current
information is available to the customer. Specifications and manual are available at http://www.elkor.net
Elkor assumes no liability for applications assistance, customer’s system design, or infringement of patents or copyrights
of third parties by/or arising from the use of Elkor’s devices.
ELKOR TECHNOLOGIES INC. SHALL NOT BE LIABLE FOR CONSEQUENTIAL DAMAGES SUSTAINED IN CONNECTION
WITH ELKOR PRODUCTS, EXCEPT TO THE EXTENT PROHIBITED BY APPLICABLE LAW. FURTHERMORE, ELKOR NEITHER
ALLOWS NOR AUTHORIZES ANY OTHER PERSON TO ASSUME FOR IT ANY SUCH OBLIGATION OR LIABILITY.
Although the information contained in this document is believed to be accurate, Elkor assumes no responsibility for any
errors which may exist in this publication.
ELKOR TECHNOLOGIES INC.
- Page 1 -
i-Spy – USER MANUAL
TABLE OF CONTENTS
1.
Introduction .............................................................................................................................................. 3
1.1. Electrical Wiring ................................................................................................................................................3
1.2. Documentation .................................................................................................................................................3
1.3. Disclosure.........................................................................................................................................................3
1.4. Warranty ..........................................................................................................................................................3
1.5. Product Description ...........................................................................................................................................3
1.6. Features ...........................................................................................................................................................3
2. Specifications ............................................................................................................................................ 4
2.1. Environmental ..................................................................................................................................................4
2.2. Power Supply Requirements ..............................................................................................................................4
2.3. Current Input Requirements (model-dependant) .................................................................................................4
2.4. Indicators .........................................................................................................................................................5
2.5. Digital Communication ......................................................................................................................................5
2.6. Update Frequency.............................................................................................................................................5
2.7. Accuracy Specification .......................................................................................................................................6
3. Installation................................................................................................................................................ 7
3.1. Setting the Modbus Address ..............................................................................................................................7
4. Communication ......................................................................................................................................... 8
4.1. Modbus Protocol ...............................................................................................................................................8
4.2. Modbus Functions .............................................................................................................................................8
5. Register Map ........................................................................................................................................... 11
5.1. Register Addressing Conventions .....................................................................................................................11
5.2. Data Types .....................................................................................................................................................11
5.3. Read-only and Read/Write Registers ................................................................................................................11
5.4. Data Registers ................................................................................................................................................11
5.5. Scaling Registers.............................................................................................................................................14
5.6. Configuration and Status Registers...................................................................................................................15
5.7. System Registers ............................................................................................................................................18
6. Customizing the Register Map ................................................................................................................ 20
7. Firmware Updates and the Bootloader ................................................................................................... 22
8. Appendix A, Modbus Protocol Details ..................................................................................................... 23
8.1. Modbus Frames ..............................................................................................................................................23
8.2. Cyclic Redundancy Checksum ..........................................................................................................................23
8.3. Read Holding Registers ...................................................................................................................................24
8.4. Read Input Registers.......................................................................................................................................24
8.5. Write Single Register.......................................................................................................................................24
8.6. Write Multiple Registers...................................................................................................................................24
8.7. Mask Write Register ........................................................................................................................................25
8.8. Read/Write Multiple Registers ..........................................................................................................................25
8.9. Diagnostics .....................................................................................................................................................26
8.10. Get Comm Event Counter ..............................................................................................................................28
8.11. Report Slave ID.............................................................................................................................................28
ELKOR TECHNOLOGIES INC.
- Page 2 -
i-Spy – USER MANUAL
1. INTRODUCTION
1.1. Electrical Wiring
Because of possible electrical shock or fire hazards, connection of this equipment should only be made by
qualified personnel in compliance with the applicable electrical codes and standards.
1.2. Documentation
This document was written and released in April 2014 (rev. 3).
1.3. Disclosure
This publication contains information proprietary to Elkor Technologies Inc. No part of this publication may be reproduced,
in any form, without prior written consent from Elkor Technologies Inc.
1.4. Warranty
The i-Spy Advanced Current Monitor is warranted against defective material and workmanship. During the warranty
period Elkor will repair or replace, at its option, all defective equipment that is returned freight prepaid. There will be no
charge for repair provided there is no evidence that the equipment has been mishandled or abused. If the equipment is
found to be in proper working order, a service fee will be billed to the customer. Warranty claims must be made via the
original purchaser.
Standard Warranty duration is one (1) year from date of sale. Extended warranties are available to OEMs.
1.5. Product Description
The i-Spy Advanced Current Monitor is a microprocessor-based precision current monitor that performs true RMS current
measurements in one three-phase circuit or in three independent AC loads. This device is backwards-compatible with
existing ETA3.RTU transducers.
The unit may be ordered for use with standard 5A current transformers as well as a variety of current sensors including
split and solid core CTs and precision sensors with mA and mV outputs that may be applied to the secondary wires of
existing 5A CTs.
The i-Spy measures true RMS current in each of the three inputs and provides output data (via Modbus RTU) that is
proportional to the RMS current in each input, the averaged current and the total current. Configurable scaling factors can
be applied to the output values for ease of use and compatibility. A proprietary noise filtering technique is employed to
expand the dynamic range of the transducer and to improve the accuracy and stability of readings at low currents.
1.6. Features
The following bullet points summarize the features of the i-Spy.
•
•
•
•
•
True RMS, 0.1% accuracy.
Supports a wide variety of solid core and split core CTs.
Modbus/RS-485 communication (up to 63 devices per line).
Customizable scaling, filtering, Modbus map, and serial settings.
Compact size, easy wiring, DIN mounting.
ELKOR TECHNOLOGIES INC.
- Page 3 -
i-Spy – USER MANUAL
2. SPECIFICATIONS
2.1. Environmental
This device is intended for installation in a protected environment.
Operating Temperature:
–40°C to +70°C
Storage Temperature:
–65°C to +85°C
Humidity:
10 to 90% non-condensing
2.2. Power Supply Requirements
12–30V VDC/VAC, 50mA (max)
2.3. Current Input Requirements (model-dependant)
Input Wire Gauge:
AWG 12-24, of proper isolation rating as per electrical code.
AWG 16-22 recommended.
The i-Spy accepts a wide range of input current transformers (CTs) depending on its model.
2.3.1. Milliamp Model
Current Transformers:
Measurement Input Range:
Absolute Maximum Input Signal:
Elkor MCT/MSCT current sensors (Solid/Split Core)
0-220mA RMS
1.00A peak-to-peak
2.3.2. 333 Millivolt Model
Current Transformers:
Measurement Input Range:
Absolute Maximum Input Signal:
333mV output
0-350mV
2V peak-to-peak
2.3.3. 5A Model
Current Transformers:
Measurement Input Range:
Absolute Maximum Input Signal
ELKOR TECHNOLOGIES INC.
Standard CTs, 0-5A, 20% continued overload, burden 0.05Ω MAX.
0-6A
10A peak-to-peak
- Page 4 -
i-Spy – USER MANUAL
2.4. Indicators
A number of indicator LEDs are present on the i-Spy. They are described in the table below.
Label
STATUS
TX/RX
A
B
C
Location
Bottom-left
Bottom-left
Bottom-right
Bottom-right
Bottom-right
Color
Green/Red
Green/Red
Green/Red
Green/Red
Green/Red
Description
Indicates the status of the device. See the Status Indicator Codes, below.
Indicates RS-485 communication. Green indicates reception, red indicates transmission.
Channel A current indicator. See Current Indicator Defaults, below.
Channel B current indicator. See Current Indicator Defaults, below.
Channel C current indicator. See Current Indicator Defaults, below.
2.4.1. Status Indicator Codes
The status indicator uses a variety of patterns to indicate the device’s status, as described by the following table.
Code
Description
Solid green indicates that the device is operating normally.
Two periodic green blinks indicates that the meter has started in bootloader mode.
Alternating green and red indicates that the Modbus address is set to 0.
Two periodic red blinks indicates that corrupt firmware has been on the device, halting
the device in bootloader mode.
Flashing red indicates a product malfunction that prevents it from reading correctly.
2.4.2. Current Indicator Defaults
The i-Spy features three current indicator LEDs for easy installation and visual identification of the approximate current
levels that the device is reading. Their default settings are described below. These can be customized via Modbus; see
Configuring Current LEDs (p. 17).
Color
Default level
Off
Green
Red
Below 5%
5% to 90%
Greater than 90%
Milliamp version
Below 10mA
10mA to 180mA
Greater than 180mA
Indicated Current
Millivolt version
Below 16.65mV
16.65mV to 299.7mV
Greater than 299.7mV
5A version
Below 250mA
250mA to 4.5A
Greater than 4.5A
2.5. Digital Communication
The i-Spy has one RS-485 port which communicates using the Modbus RTU protocol. The device is hardware addressable
via the on-board DIP switch. Valid addresses are 1-63.
The RS-485 port comes factory-programmed with the indicated settings below. The baud rate, parity, and stop bit
settings can be changed via Modbus; see Configuring Serial Parameters (p. 18). The Modbus address can be changed
using the onboard switch at the top-right of the unit; see Setting the Modbus Address (p. 7).
Parameter
Modbus address
Baud rate
Parity
Data bits
Stop bits
Default Setting
1
9600
None
8
1
2.6. Update Frequency
All outputs and data are updated every 500ms.
ELKOR TECHNOLOGIES INC.
- Page 5 -
i-Spy – USER MANUAL
2.7. Accuracy Specification
Note: Metering grade CTs are recommended for high accuracy applications.
Error:
Validity:
Resolution:
Sampling Rate:
±0.1% of reading @ 25°C
Valid between 1% to 110% of nominal input
Up to 20 bits
2 kHz
ELKOR TECHNOLOGIES INC.
- Page 6 -
i-Spy – USER MANUAL
3. INSTALLATION
The following chart summarizes the procedure to install and set up the i-Spy device for basic use.
Connect up to three current transformers to the current input terminals (bottom green) on the device.
Connect the two or three-wire RS-485 line to the device’s top green terminal. The third ground wire is optional for
short distances. The Modbus specification recommends the use of shielded RS-485 cabling. Twisted pair is
recommended for noisy environments.
Connect the other end of the Modbus line to your Modbus master device (PLC, PC, etc.).
Connect a 12-30 VAC/VDC power supply to the device’s black power terminal. If isolation is required between the
power supply and the output signals, a small, dedicated transformer should be used for this purpose.
Set the device’s Modbus address by setting the DIP switch. The address must be unique for every device on the
RS-485 line. If it is the only device on the Modbus line, it can be left at the default setting (1). See Setting the
Modbus Address (below).
Program the full scale value of your CTs (for 5A or millivolt CTs) or turn count (for milliamp CTs) into register
0x500. See Setting CT Ratios (p. 15) for details.
Read the data registers 0x001 to 0x003 to determine the current measured on the line. See Data Registers (p.
10) for details.
3.1. Setting the Modbus Address
A Modbus address is a number between 1 and 247 (the i-Spy supports addresses of 1-63) that identifies the device when
more than one Modbus device is present on the same line. The device is set by flipping the switches on the device’s
hardware DIP switch on the top of the unit. Each of the six switches corresponds to a binary digit in the address; flipping
the right-most switch adds 1 to the address, the next switch to the left adds 2, then 4, then 8, then 16, and finally the
right-most switch adds 32 to the address. Some example settings are shown below.
1
(0+0+0+0+0+1)
4
(0+0+0+4+0+0)
32
(32+0+0+0+0+0)
2
(0+0+0+0+2+0)
5
(0+0+0+4+0+1)
63
(32+16+8+4+2+1)
3
(0+0+0+0+2+1)
6
(0+0+0+4+2+0)
0*
(0+0+0+0+0+0)
* Address 0 is not a valid Modbus address; it is used for troubleshooting only.
ELKOR TECHNOLOGIES INC.
- Page 7 -
i-Spy – USER MANUAL
4. COMMUNICATION
4.1. Modbus Protocol
The i-Spy communicates using Modbus RTU, a digital communication protocol over an RS-485 port. This protocol is
supported by various PC software applications, PLCs, data logging devices, and other Modbus “master” devices, can be
used to communicate with the i-Spy. The i-Spy is defined as a Modbus “slave” device, meaning that it responds to queries
sent by the Modbus “master” device.
A Modbus slave device, such as the i-Spy, defines blocks of “registers” that contain information, each with a particular
address. Each register contains a 16-byte field of data which can be read by the master device. The registers defined by
the i-Spy are described in section 5. Register Map (p. 11).
For details on the Modbus protocol, see Appendix A, Modbus Protocol Details (p. 23), or see the official
Modbus Application Specification available for free from http://www.modbus.org/specs.php.
4.1.1. 32-bit Registers
Modbus registers are defined as each containing 16 bits of information. In this document, some registers are described as
being 32-bits wide, rather than 16. In these cases, two registers are concatenated together one after another in order to
obtain the 32-bit value. Most modern Modbus software and hardware devices understand the notion of 32-bit registers,
and will do this processing, provided the data is configured as a 32-bit register.
Example: Register 0x102 is a 32-bit register. Suppose a read of register 0x102 returns 0x0003, and a read
of register 0x103 returns 0x0D40. Concatenate these two registers together to get a hexadecimal value of
0x00030D40, or a decimal value of 200,000.
By default, the higher-order 16-bit word of a 32-bit register is the register with the lower address, and the lower-order
word is at the higher address. Most Modbus software and devices will interpret 32-bit registers this way. Alternatively, the
i-Spy can be configured to reverse the byte ordering, so that the higher-order word is at the higher address, and the
lower-order word is at the lower address. See Setting 32-bit Endianness (p. 17) for details on how to configure this
setting.
4.2. Modbus Functions
The i-Spy supports a number of different Modbus functions that are used to query the device for information or issue a
command. Some Modbus software and devices require the user specify specific Modbus commands. Others are more
sophisticated, and will automatically use the appropriate commands in different situations, without requiring detailed
knowledge of the Modbus protocol.
ELKOR TECHNOLOGIES INC.
- Page 8 -
i-Spy – USER MANUAL
4.2.1. Supported Functions
Each Modbus function is identified by a function code (given in the table below both in decimal and hexadecimal notation).
The i-Spy supports the following Modbus functions:
Function Name
Read Holding Registers
Read Input Registers
Write Register
Diagnostics
Function Code
03 (0x03)
04 (0x04)
06 (0x06)
08 (0x08)
Get Event Counter
Write Multiple Registers
Report Slave ID
Write Mask Register
Read/Write Registers
Read Device ID
11 (0x0B)
16 (0x10)
17 (0x11)
22 (0x16)
23 (0x17)
43 (0x2B)/14 (0x0E)
Description
Reads the data contained in one or more registers (identical to function 04).
Reads the data contained in one or more registers (identical to function 03).
Writes data to a single register.
Return Query Data
00 (0x00)
The Diagnostics function is a series of subfunctions that assist in diagnosing
Clear Counters
10 (0x0A)
communication problems.
Bus Message Count
11 (0x0B)
Bus Comm Error Count
12 (0x0C)
See Diagnostic Functions (below) for details
Bus Exception Count
13 (0x0D)
on each one.
Slave Message Count
14 (0x0E)
Reads a count of successful messages since power-on, excluding function 11 messages.
Writes data to one or more registers.
Returns various information used to identify this device. See Slave ID (below).
Modifies data in a single register based on an OR mask and an AND mask.
Writes data to one or more registers, and then reads data from one or more registers.
Reads various text strings giving device parameters. See
Device
ID (below).
4.2.2. Diagnostic Functions
The i-Spy implements various diagnostic functions to assist in verifying and diagnosing communication problems. The
Diagnostic function is divided into a number of sub-functions each identified by a sub-function code. The following table
summarizes the diagnostic sub-functions implemented by this device.
Description
Return Query Data
Sub-Function
00 (0x00)
Clear Counters
10 (0x0A)
Bus Message Count
11 (0x0B)
Bus Comm Error Count
12 (0x0C)
Bus Exception Count
Slave Message Count
13 (0x0D)
14 (0x0E)
Description
Sends dummy data to the device, which is then returned as-is. Used for verifying successful
communication with the device.
Clears all counters associated with the communication system, including the Bus Message
Counter, the Bus Comm Error Counter, the Bus Exception Counter, the Slave Message Counter,
and the Event Counter (also used in function 11).
Returns the number of messages that the device has detected since power-up. These messages
were not necessarily valid or addressed to this device.
Returns the number of CRC errors detected by the device since power-up. The messages
containing these CRC errors were not necessarily addressed to this device.
Returns the number of exception responses returned by this device since power-up.
Returns the number of messages that were addressed to this device that were received since
power-up.
4.2.3. Slave ID
The i-Spy implements function 17, Report Slave ID, which returns three separate pieces of information. It returns an ID
code identifying this particular device, a status code indicating if the device is running or not, and a null-terminated text
string identifying this particular device. The i-Spy returns the following information:
Field
ID Code
Status
Text String
Data
120 (0x78)
0xFF (ON) when running normally, 0x00 (OFF) when in bootloader mode.
An ASCII text string containing the name of the product, its input configuration (mA, mV, or 5A), and its hardware and software version.
The string is null-terminated, meaning a 0 is transmitted after the last character.
For example, “Elkor Technologies i-Spy-10-mA Hardware 1.00 Firmware 1.00”.
While in bootloader mode, the string returned contains the bootloader version, for example, “Elkor Technologies Bootloader 1.00”.
ELKOR TECHNOLOGIES INC.
- Page 9 -
i-Spy – USER MANUAL
4.2.4. Device ID
The i-Spy implements the Read Device ID function, which provides access to various strings that identify various device
properties. This is sub-function 14 (0x0E) of function 43 (0x2B), Encapsulated Interface Transport. The i-Spy implements
this function at the highest Conformity Level of 0x83 (basic, regular, and extended identification, stream or individual
access).
Each string, called an “object”, is accessed with a number, called the object ID. The i-Spy defines the following objects,
which can be read using this function.
Object
VendorName
ProductCode
MajorMinorRevision
VendorUrl
ProductName
ModelName
UserApplicationName
HardwareRevision
BootloaderRevision
SerialNumber
Device ID
ELKOR TECHNOLOGIES INC.
Object ID
0 (0x00)
1 (0x01)
2 (0x02)
3 (0x03)
4 (0x04)
5 (0x05)
6 (0x06)
128 (0x80)
129 (0x81)
130 (0x82)
131 (0x83)
Category
Standard (Basic)
Standard (Basic)
Standard (Basic)
Standard (Regular)
Standard (Regular)
Standard (Regular)
Standard (Regular)
Extended
Extended
Extended
Extended
Value
“Elkor Technologies”
“i-Spy”
The firmware version of the device, such as “1.00”
“http://www.elkor.net”
“i-Spy”
“i-Spy-10-mA”, “i-Spy-10-mV”, or “i-Spy-10-5A”
“Elkor Firmware”
The hardware version on the device, such as “1.00”
The bootloader version on the device, such as “1.00”
The serial number of the device, such as “12345”
120
- Page 10 -
i-Spy – USER MANUAL
5. REGISTER MAP
This section lists the registers that are defined by the i-Spy. The i-Spy is register-compatible with the older ETA3.RTU
device — that is to say, all of the registers defined in the ETA3.RTU are also defined in the i-Spy — allowing easy
migration from those devices to i-Spy devices.
5.1. Register Addressing Conventions
There are several different conventions for specifying the address of a particular register. Different conventions are used
in different software programs, PLCs, and other devices. Two common conventions are described below.
•
Offsets: Addresses are presented as hexadecimal numbers (shown with the “0x” prefix) with the first address
starting at address 0. This is how addresses are transmitted digitally over the serial cable.
•
PLC-style addresses: Addresses are presented as 5-digit decimal numbers, starting with a “3” or a “4” indicating
whether they are considered “input registers” or “holding registers” (respectively). The first input register is
defined as 30001, and the first holding register is defined as 40001. For ease of integration, the i-Spy treats both
Holding Registers and Input Registers as the same, therefore, either 30000-based addresses or 40000-based
addresses will work with the i-Spy, and are interchangeable. Many PLCs and some other devices describe Modbus
addresses in this manner.
The address of each register is presented in both styles in this manual. The required convention that is used depends on
the Modbus master software or device. When using the PLC-style notation, either the “3” prefix or the “4” prefix can be
used, as they access the same data. Function 03 (Read Holding Registers) and Function 04 (Read Input Registers) are
interchangeable with this device.
5.2. Data Types
Registers can contain data in one of four different data types. Data types are given in the register tables with a single
letter code in the “Type” column to indicate the type. The types are as follows.
Type
Unsigned
Integer
Signed
Integer
Floating-Point
Code
U
Boolean
B
S
F
Description
Positive whole numbers (no sign). Can range from 0 to 65,535 for 16-bit registers, and 0 to 4,294,967,295 for 32-bit
registers.
Positive or negative whole numbers. Represented in 2’s complement format. Can range from -32,768 to +32,767 for 16-bit
registers and -2,147,483,648 to +2,147,483,647 for 32-bit registers.
Positive or negative decimal numbers. Represented in IEEE 754 format. Can represent values from negative infinity to
positive infinity, at varying levels of resolution as the number gets larger.
True or false. False is represented by the value 0, while true is represented by the value 1.
5.3. Read-only and Read/Write Registers
Some registers are read-only registers, meaning that their values can be read (such with Modbus function code 3) but not
written to (such as with Modbus function code 6). Other registers can be both read and written. This is indicated in the
register tables with an “R” for read-only registers and an “RW” for read/write registers in the “R/W” column.
5.4. Data Registers
Data registers contain the actual current measurements from the three input channels on the device. There are three
separate blocks of data registers: 16-bit integer register, 32-bit integer registers, and 32-bit floating-point registers. This
allows the information to be read in whichever format the Modbus master software or device that is being used can
support.
16-bit integer registers are the simplest to understand, as they require only one register read per data point. All Modbus
master devices should support 16-bit integer registers. More sophisticated Modbus master devices that can read 32-bit
data fields (see 32-bit Registers, p. 8) can get data at a higher resolution by reading the 32-bit integer registers.
Modbus master devices or software that can interpret IEEE 754 floating-point data can read the 32-bit floating point
registers, which have the advantage of displaying decimal numbers without requiring that they be multiplied by a scaling
factor to obtain the correct units.
ELKOR TECHNOLOGIES INC.
- Page 11 -
i-Spy – USER MANUAL
5.4.1. Scaling
In order to allow integer registers to represent decimal numbers, the integer registers are scaled according to a scaling
factor. By default, this scaling factor is 100 for 16-bit registers, and 1000 for 32-bit registers. By default, floating-point
registers are not scaled; as they can represent decimal numbers inherently, they are already in correct engineering units
without needing to apply any scaling factors.
Divide the value read from the register by this scaling factor to get a value in Amps. For example, if you read the value
“450” from the 16-bit Current A register, divide 450 by the scaling factor of 100, to get a value of 4.50 Amps on channel
A.
The scaling factor applied to each of these registers is user-configurable. See Scaling Registers (p. 14), for
details on how to change the scaling factors.
5.4.2. Overflow
If a scaling factor (see section Scaling Registers, p. 14) is set too high on either the 16-bit integer or 32-bit integer
registers, it is possible that the resulting number will overflow. This means that the output value may exceed the number
of bits that the output register can hold, or that an intermediate value in the device’s internal calculations became too
large. Note that floating-point registers, by their nature, cannot overflow in this way, however their resolution drops as
the value increases.
When this happens, the value is clamped at the highest possible value that can be displayed, and a bit in the Overflow
register for each data register block is set. The bit that is set corresponds to the register that overflowed, for example, if
the Current B register overflows, the second bit in the Overflow register is set to 1.
Example: Suppose 2,000 Amps is read on current channel A, and the 16-bit scaling factor is set to
100
.
1
This will result in a calculated value of 200,000, which exceeds the in the 16-bit register Current A maximum
size.. The maximum value that can be represented in 16-bits is (216 – 1), or 65,535 (0xFFFF). In this case,
the number 65,535 will be displayed in the Current A register (0x0001), and the first bit of the Overflow
register (0x0006) will be set to 1, indicating that the value is out of range.
Below is a diagram of the 16-bit overflow register. Only the first 5 bits (bits 0, 1, 2, 3, and 4) are used. The bit(s) set to 1
indicate which register has overflowed. If more than one registers have overflowed, more than one bit will be set.
Overflow Register (16-bit)
Not
Not
Not
Not
Not
used used used used used
15
14
13
12
11
ELKOR TECHNOLOGIES INC.
Not
used
10
Not
used
9
Not
used
8
Not
used
7
- Page 12 -
Not
used
6
Not
used
5
Total
Avg.
C
B
A
4
3
2
1
0
i-Spy – USER MANUAL
5.4.3. 16-bit Integer Register Block
Size
Type
R/W
Device ID
Current A
Current B
Current C
Average
Total
Overflow
Address
Name
Offset
The following registers are 16-bit integer representations of the measured currents on channels A, B, and C, as well as
their averages and totals. These registers are scaled by applying the multiplier and dividers found in the 16-bit Integer
Scaling Register Block; by default, the multiplication factor is set to100. Divide the values obtained from these registers
by 100 to get the value in Amperes (provided that the CT ratio is set correctly).
0x00
0x01
0x02
0x03
0x04
0x05
0x06
40001
40002
40003
40004
40005
40006
40007
16
16
16
16
16
16
16
U
U
U
U
U
U
U
R
R
R
R
R
R
R
Description
Always returns 10, indicating an i-Spy-10 device
Instantaneous current in channel A (Amps)
Instantaneous current in channel B (Amps)
Instantaneous current in channel C (Amps)
Average of current readings in channels A, B, and C (Amps)
Total of current readings in channels A, B, and C (Amps)
Set to a non-zero value when any of the above registers is out of range. The position of the bits that
are set indicate which register(s) have overflowed (i.e., the first bit indicates Current A).
5.4.4. 32-bit Integer Register Block
Size
Type
R/W
Device ID
Current A
Current B
Current C
Average
Total
Overflow
Address
Name
Offset
The following registers are 32-bit integer representations of the measured currents on channels A, B, and C, as well as
their averages and totals. For details on reading 32-bit registers over Modbus, see 32-bit Registers (p. 8). These
registers are scaled by applying the multiplier and dividers found in the 32-bit Integer Scaling Register Block; by default,
the multiplication factor is set to 1000. Divide the values obtained from these registers by 1000 to get the value in
Amperes (provided that the CT ratio is set correctly).
0x100
0x102
0x104
0x106
0x108
0x10A
0x10C
40257
40259
40261
40263
40265
40267
40269
16
32
32
32
32
32
16
U
U
U
U
U
U
U
R
R
R
R
R
R
R
Description
Always returns 10, indicating an i-Spy-10 device
Instantaneous current in channel A (Amps)
Instantaneous current in channel B (Amps)
Instantaneous current in channel C (Amps)
Average of current readings in channels A, B, and C (Amps)
Total of current readings in channels A, B, and C (Amps)
Set to a non-zero value when any of the above registers is “off the scale.” The position of the bits
that are set indicate which register(s) have overflowed (i.e., the first bit indicates Current A).
5.4.5. 32-bit Floating-Point Register Block
Name
Offset
Address
Size
Type
R/W
The following registers are 32-bit IEEE 754 floating-point representations of the measured currents on channels A, B, and
C, as well as their averages and totals. For details on reading 32-bit registers over Modbus, see 32-bit Registers (p. 8).
These registers are not scaled by default; all values are presented in Amperes without the need to apply a scaling factor
(provided that the CT ratio is set correctly). However, these registers can be scaled by writing values in the 32-bit
Floating-Point Scaling Register Block.
Device ID
Current A
Current B
Current C
Average
Total
0x200
0x202
0x204
0x206
0x208
0x20A
40513
40515
40517
40519
40521
40523
32
32
32
32
32
32
F
F
F
F
F
F
R
R
R
R
R
R
ELKOR TECHNOLOGIES INC.
Description
Always returns 10.0, indicating an i-Spy-10 device
Instantaneous current in channel A (Amps)
Instantaneous current in channel B (Amps)
Instantaneous current in channel C (Amps)
Average of current readings in channels A, B, and C (Amps)
Total of current readings in channels A, B, and C (Amps)
- Page 13 -
i-Spy – USER MANUAL
5.5. Scaling Registers
The following registers are scaling factors that correspond to the data register blocks (see Data Registers, p. 11). These
are used to adjust the data registers to a desired range, for example, to display a number between 0-100 (as a
percentage), 0-5000 (as is common in some meters), or 0-65535 (to get the maximum resolution from a 16-bit register).
The scaling factors are divided into two registers for each phase – a multiplier register, and a divider register. The
resulting output is computed as follows:
Output = Measurement ×
Multiplier
Divider
There are three blocks of scaling registers, which correspond to three blocks of data registers — one for 16-bit integer
data, 32-bit integer data, and 32-bit floating-point data.
5.5.1. 16-bit Integer Scaling Register Block
Name
Offset
Address
Size
Type
R/W
Default
These registers are scaling factors corresponding to the 16-bit integer register block (see 16-bit Integer Register
Block, p. 13).
Multiplier A
Multiplier B
Multiplier C
Divider A
Divider B
Divider C
0x1000
0x1001
0x1002
0x1003
0x1004
0x1005
44097
44098
44099
44100
44101
44102
16
16
16
16
16
16
U
U
U
U
U
U
RW
RW
RW
RW
RW
RW
100
100
100
1
1
1
Description
Current
Current
Current
Current
Current
Current
A multiplier
B multiplier
C multiplier
A divider
B divider
C divider
5.5.2. 32-bit Integer Scaling Register Block
Address
Size
Type
R/W
Multiplier A
Multiplier B
Multiplier C
Divider A
Divider B
Divider C
0x1100
0x1102
0x1104
0x1106
0x1108
0x110A
44353
44354
44355
44356
44357
44358
32
32
32
32
32
32
U
U
U
U
U
U
RW
RW
RW
RW
RW
RW
Default
Name
Offset
These registers are scaling factors corresponding to the 32-bit integer register block (see 32-bit Integer Register
Block, p. 13). For details on reading 32-bit registers over Modbus, see 32-bit Registers (p. 8).
1000
1000
1000
1
1
1
Description
Current
Current
Current
Current
Current
Current
A multiplier
B multiplier
C multiplier
A divider
B divider
C divider
5.5.3. 32-bit Floating-Point Scaling Register Block
Name
Offset
Address
Size
Type
R/W
Default
These registers are scaling factors corresponding to the 32-bit floating-point register block (see 32-bit Floating-Point
Register Block, p. 13). By default, floating-point registers are not scaled, but this block is provided for use if scaling is
desired. Note that floating-point scaling factors are set as 32-bit integers; they are not themselves floating-point values.
Multiplier A
Multiplier B
Multiplier C
Divider A
Divider B
Divider C
0x1200
0x1202
0x1204
0x1206
0x1208
0x120A
44609
44610
44611
44612
44613
44614
32
32
32
32
32
32
U
U
U
U
U
U
RW
RW
RW
RW
RW
RW
1
1
1
1
1
1
ELKOR TECHNOLOGIES INC.
Description
Current
Current
Current
Current
Current
Current
A multiplier
B multiplier
C multiplier
A divider
B divider
C divider
- Page 14 -
i-Spy – USER MANUAL
5.6. Configuration and Status Registers
These registers are used to configure the device, view a variety of status information, and trigger a reboot.
5.6.1. Setting CT Ratios
Current transformer (CT) ratios allow the device to scale the data to report the actual real-world current values on the
input of the current transformers.
Typically, the same type of CT is used on all three current channels. In this case, write the CT ratio primary (in the case
of 5A or millivolt output CTs) or the number of turns (in the case of milliamp output CTs) into the Primary CT Ratio (All)
register, at address 0x500 (41281). Setting the secondary CT ratio, register 0x501 is not generally necessary, as it will
default to the correct value (5 for 5A CTs, 333 for 333 millivolt CT, and 1 for milliamp CTs).
Example 1: If a 100A:5A CT is being used (that is, a CT that outputs 5A when the input current is 100A),
write the value “100” to register 0x500. Leave register 0x501 at its default value of “5”.
Example 2: If an Elkor MCTA is being used, which has a turns ratio of 2500, write the value “2500” to
register 0x500. Leave register 0x501 at its default value of “1”.
The turn counts of various Elkor Milliamp CTs are listed in the table below. Contact Elkor for further details if the CT ratio
is unknown. A correct setting of the CT ratio is critical to obtaining accurate measurements.
Current Transformer
MCTA
MCTB
MSCT1
MSCT2
MSCT3
MSCT5
MS160
MS360
Number of Turns
2500
4000
7500
7500
7500
11000
3000
2000
(i) Setting CT Ratios Per-Channel
It is permissible to use different CTs in each channel, provided they are of the same output type (mA, 5A or 333mV). In
this case, it is necessary to enter the CT ratio primary (in the case of 5A or millivolt output CTs) or the number of turns
(in the case of milliamp output CTs) into three separate registers, one for each channel. Write the value for channel A to
register 0x502 (41283), channel B to register 0x504 (41285), and channel C to register 0x506 (41287). Setting the
secondary CT ratios (registers 0x503, 0x505, and 0x507) is not generally necessary, as they will default to the correct
values (5 for 5A CTs, 333 for 333 millivolt CT, and 1 for milliamp CTs).
Example: Suppose two 50A:5A CTs are connected to channels A and B, and one 250A:5A CT is connected
to channel C. Write the value “50” to registers 0x502 and 0x504, and the value “250” to register 0x506.
Leave registers 0x503, 0x505, and 0x507 at their default values of “5”.
Note: While it is possible to use CTs with different full scale ratings or turns ratios together on the same unit,
it is not possible to mix 5A CTs, millivolt CTs, or milliamp CTs together on the same unit.
(ii) Greater Accuracy
Many milliamp CTs are factory-tested to determine the precise effective turns ratio. In this case, the number of turns is
indicated on the CT model. By using these values, CT manufacturing variations are accounted for, resulting in greater
accuracy. For each channel, enter the precise number of turns for the CT connected to that input channel. Write the value
for channel A to register 0x502 (41283), channel B to register 0x504 (41285), and channel C to register 0x506 (41287).
Example: Suppose there are three MSCT1 CTs connected to the device. The CTs have the number of turns
indicated on each of them. The CT connected to channel A lists 7492, the CT connected to channel B lists
ELKOR TECHNOLOGIES INC.
- Page 15 -
i-Spy – USER MANUAL
7490, and the CT connected to channel C lists 7493. Write the value “7492” to register 0x502, the value
“7490” to register 0x504, and the value “7493” to register 0x506. Leave registers 0x503, 0x505, and 0x507
at their default values of “1”.
Name
Offset
Address
Size
Type
R/W
Default
Note: 5A and millivolt CTs are not generally factory-tested in this way.
Primary CT Ratio (All)
Secondary CT Ratio (All)
0x500
0x501
41281
41282
16
16
U
U
RW
RW
*
*
Primary CT Ratio A
Secondary CT Ratio A
Primary CT Ratio B
Secondary CT Ratio B
Primary CT Ratio C
Secondary CT Ratio C
Debug 16-bit
Debug 32-bit
Debug Floating-Point
Uptime
Masking Enabled
Masking Override
Noise Filtering Enabled
32-bit Little-Endian
0x502
0x503
0x504
0x505
0x506
0x507
0x508
0x509
0x50B
0x50D
0x50F
0x510
0x511
0x512
41283
41284
41285
41286
41287
41288
41289
41290
41292
41294
41296
41297
41298
41299
16
16
16
16
16
16
16
32
32
32
16
16
16
16
U
U
U
U
U
U
U
U
F
U
B
B
B
B
RW
RW
RW
RW
RW
RW
R
R
R
R
RW
RW
RW
RW
*
*
*
*
*
*
12345
1234567
1234.567
false
false
true
false
Light Red Threshold
0x513
41300
16
U
RW
80
Light Off Threshold
0x514
41301
16
U
RW
5
Serial Number
Hardware Version
Firmware Version
Bootloader Version
Model Number
Input Type
0x515
0x517
0x518
0x519
0x51A
0x51B
41302
41304
41305
41306
41307
41308
32
16
16
16
16
16
U
U
U
U
U
U
R
R
R
R
R
R
-
Reserved
0x51C
41309
16
-
R
0
…
0x52F
0x530
Scratch Pad 32
0x54F
41328
41329
41360
Writing to these registers globally sets the CT ratios for all of the phases
simultaneously. If the CT ratios are not identical in all three channels,
these values are set to “0”.
CT ratios of the device, for each phase. See Setting CT Ratios (p. 15) for
details.
These registers always output their default values. Useful for debugging
communication with the device.
Seconds since the device was last powered on or reset.
Indicates if Modbus Masking is enabled or not.
Indicates if masks can override existing registers.
Indicates if the low current noise filtering feature is enabled.
Indicates if 32-bit registers are transmitted with the least significant word
first. By default, 32-bit registers are transmitted with the most significant
word first. See Setting 32-bit Endianness (p. 17).
Percentage of the device’s maximum input above which the current LEDs
are red. See Configuring Current LEDs (p. 17).
Percentage of the device’s maximum input below which the current LEDs
turn off. See Configuring Current LEDs (p. 17).
Factory-programmed serial number of the unit.
Version numbers of different hardware and software components of this
device. Divide by 100 to get the version number; for example, a value of
“100” indicates version 1.00.
The model number of the device.
“1” indicates milliamp CTs, “2” indicates 333 mV CTs, and “3” indicates 5A
CTs. “0” indicates a custom configuration.
Reserved for future use. These registers output “0” when read. To ensure
compatibility with future versions, these registers should not be written to.
16
16
-
R
RW
0
0
16
-
RW
0
…
Reserved
Scratch Pad 1
Description
32 registers are available for user storage. Values written here are stored in
non-volatile memory. For example, they can be used to store store room
numbers, customer IDs, etc. They can be used as 32 16-bit registers, or 16
32-bit registers.
* Default values depend on the input type of the device. Milliamp units default to “1”, 333 mV units default to “333”, and 5A units default to “5”.
Because the primary and secondary values are equal for all models, the ratios all reduce to 1:1 regardless of the input type, by default.
5.6.2. Uptime
The uptime register reports the number of seconds that the device has been running. This counter is reset when the
device is powered off, reset, or the bootloader is started.
5.6.3. Masking
Modbus Masking is a feature used to change the Modbus map of the device. It can be enabled or disabled by writing a
“1” or “0”, respectively, to the Modbus Enabled register, 0x50F (41296). Custom Modbus blocks may be configured to
exist in the same register address space as the native i-Spy registers; this functionality can be enabled by writing a “1” to
the Masking Override register, 0x510 (41297). Otherwise, the i-Spy native registers will always override custom register
blocks. See Customizing the Register Map (p. 20) for details on this feature.
ELKOR TECHNOLOGIES INC.
- Page 16 -
i-Spy – USER MANUAL
5.6.4. Low Current Noise Filtering
When reading very low current values (such as below 1% of the unit’s full scale), noise may become noticeable. Due to
the design of the analog-to-digital converters in the device, there are slight oscillations at low input values, which may
appear as reading instability. A proprietary noise filtering algorithm is employed by default to filter out noise when
reading low current values, improving accuracy and increasing the dynamic range of the device. However, this will result
in slower response times for low fluctuating signals. The settling time for slowly changing signals is approximately 5
seconds, however the settling time is much lower (ie., under 500 ms) for signals that change magnitude quickly.
Filtering may be disabled by writing a “0” to register 0x511 (41298).
5.6.5. Setting 32-bit Endianness
By default, the higher-order 16-bit word of a 32-bit register is the register with the lower Modbus address, and the lowerorder word is at the higher address. Most Modbus software and devices will interpret 32-bit registers this way. Writing a
“1” to the 32-bit Little Endian register at address 0x512 (41299) configures the i-Spy to reverse the 16-bit word ordering,
so that the higher-order word is at the higher address, and the lower-order word is at the lower address.
Example: Register 0x102 is a 32-bit register. Suppose this register contains the decimal value of 200,000,
or 0x00030D40 in hexadecimal. By default, a read of register 0x102 returns 0x0003, and a read of register
0x103 returns 0x0D40. If a “1” is written to register 0x51F (41312), a read of register 0x102 instead returns
0x0D40, and a read of register 0x103 returns 0x0003.
5.6.6. Configuring Current LEDs
The i-Spy contains an LED for each of the three current channels on the device. By default, these LEDs are off when
there is low current on the corresponding input channel (less than 5% of the unit’s maximum), green when there is a
nominal current (between 5% and 80% of the unit’s maximum), and red when there is high current (more than 80%) of
the corresponding input channel.
Note: These values relate to the maximum input current as defined in section 2 for each corresponding iSpy input configuration.
These percentages can be changed via Modbus. To change the threshold at which the LED shows red, write to the Light
Red Threshold register at address 0x513 (41300). To change the threshold at which the LED is off, write to the Light Off
Threshold register at address 0x514 (41301). Valid values are between 0 and 100. The red threshold should be a higher
value than the off threshold for proper results. This settings applies to all channels.
The diagram below illustrates the states of the current LEDs.
Low Current
0%
Nominal Current
←
High Current
100%
→
Off Threshold
Red Threshold
5.6.7. Scratch Pad Registers
There are 32 scratch pad registers available, starting from address 0x530 (41329) and ending at address 0x54F (41360).
Any values can be written to these registers. Values written to these registers will be stored in non-volatile memory so
that they their values are retained after the device has been powered off or rebooted. These can be used for room
numbers, customer IDs, or any other purpose as desired. These registers are not used for any measurement purposes.
Note: Consideration should be given to the fact that these registers are written to flash memory, which has
limited write cycle endurance. Writes should be limited to fewer than 10,000 operations.
ELKOR TECHNOLOGIES INC.
- Page 17 -
i-Spy – USER MANUAL
5.7. System Registers
Offset
Address
Size
Type
R/W
Default
These registers are used to configure the serial communication parameters, to reset the device, or to enter the device’s
bootloader mode for firmware updates.
Modbus Address
0x600
41537
16
U
R
1
Serial Baud Rate
Serial Parity Mode
Serial Stop Bits
Serial Response Delay
Serial Commit
Reserved
Reserved
Device Mode
0x601
0x602
0x603
0x604
0x605
0x606
0x607
0x608
41538
41539
41540
41541
41542
41543
41544
41545
16
16
16
16
16
16
16
16
U
U
U
U
U
U
RW
RW
RW
RW
RW
R
R
R
9600
0
1
0
0
0
0
1
Reset to Firmware
0x609
41546
16
U
W
0
Reset to Bootloader
0x60A
41547
16
U
W
0
Name
Description
Outputs the device’s Modbus address, as set on the unit’s hardware switch
on the top of the unit. By default, the address is “1”.
Sets the device’s serial parameters. These settings are not applied until a
“1” is written to the Serial Commit register, and are not permanent until a
valid Modbus query message is received using the new settings. See
Configuring Serial Parameters (p. 18).
Reserved for future use. These registers output “0” when read. To ensure
compatibility with future versions, these registers should not be written to.
“1” indicates the device firmware is running normally, “2” indicates the
device is in bootloader mode.
Write the value 0xAA55 (43605) to reboot the unit. This register always
reads as “0”.
Write the value 0xB001 (45057) to reboot the unit. When reset in this
way, the device will enter bootloader mode. This register always reads as
“0”.
5.7.1. Configuring Serial Parameters
By default, the i-Spy ships pre-configured with the most commonly used serial settings for Modbus products — 9600 baud,
no parity, 8 data bits, 1 stop bit. Generally, there is no need to change this. In addition, it supports a variety of other
baud rates, parity modes, and stop bit modes.
Supported serial settings are listed in the table below.
Parameter
Baud rate
Parity
Stop bits
Default Setting
9600
No Parity (0)
1
Supported Values
9600, 19200, 28800, 38400, 48000, 57600
No Parity (0), Odd Parity (1), Event Parity (2)
1, 2
Settings are changed by writing to the corresponding Modbus registers. To change the baud rate, write the new value to
the Serial Baud Rate register 0x601 (41568). For instance, to change the baud rate to 57600, write “57600” to register
0x601. To change the parity mode, write a “0” for no parity, “1” for odd parity, or “2” for even parity into the Serial Parity
Mode register 0x602 (41539). To change the number stop bits, enter “1” for 1 stop bit or “2” for 2 stop bits into the
Serial Stop Bits register 0x603 (41540).
In cases where legacy Modbus master devices cannot process responses fast enough, it may be necessary to enable a
response delay within the i-Spy. If such problems exist, the delay may be introduced by using the Serial Response Delay
register 0x604 (41541). The i-Spy will wait at least as long as specified by this register (in milliseconds) before
responding. Generally, small values between 0 to 100 milliseconds are sufficient. The default value is “0”, meaning that
the i-Spy will respond as soon as its data is ready to reply to the query.
Changes are not applied until a “1” is written to the Serial Commit register. This is to ensure that all serial settings are
applied at once, in case that more than one serial parameter was changed at the same time.
In order to guard against accidental changes to the device’s serial settings and to protect against incorrect or unknown
values, there is a 3-minute period in which the Modbus master device must successfully communicate with the device
before the new settings become permanent. This is to ensure that the Modbus master software or device is capable of
correctly communicating at the new settings. Reading or writing any register, or using any other Modbus function, is
ELKOR TECHNOLOGIES INC.
- Page 18 -
i-Spy – USER MANUAL
sufficient for this purpose. If a successful query is not received within the 3-minute waiting period, or the i-Spy was
rebooted before a successfully communication, the previous settings will be restored.
As an additional failsafe, when the i-Spy’s Modbus address is set to address 0 via the hardware switch on the unit, it will
always communicate using default serial settings (9600 baud, no parity, 1 stop bit). While set to address 0, the device
responds to Modbus queries addressed to any Modbus address. The device can then be reconfigured to the appropriate
serial settings. Note that once the i-Spy’s serial settings are changed, you will need to set the Modbus address to a nonzero value before it will begin using the new settings, so that you can confirm the new settings as described in the
paragraph above. New serial settings can not be confirmed while in address 0.
A step-by-step procedure for changing the serial configuration from a known configuration is described below. Use this
procedure if communications with the device is establised, but changes to the Modbus settings are required. This
procedure does not require physical access to the device (it can be done from a remote location).
1.
2.
3.
4.
Change the desired serial parameters by writing to the corresponding Modbus registers.
Write a “1” to the Serial Commit register 0x605 (41542)
Change your Modbus master device’s serial settings to match the settings applied to the i-Spy.
Read any register from the i-Spy using the new serial settings within 3 minutes to make the change permanent.
Note that the device should remain powered during this time, or its settings will revert to their previous values.
Note: If the settings do not work with your Modbus master device, or if a mistake was made, wait 3 minutes
or power cycle the device, and the previous settings will be restored.
A step-by-step procedure for changing the serial settings from an unknown configuration is described below. Use this
procedure if the device settings are not known, and communication is not possible. This procedure requires physical
access to the device.
1. Set the device’s Modbus address to 0 using the hardware switch on the device. All of the switches should be in
the “down” position. This sets the device’s serial settings to their factory defaults.
Note: Normally, the device should already be powered on when changing the Modbus address. If the device
is powered on while its address is already set to 0, it will enter bootloader mode. The serial settings can be
changed in either mode, but the device must be rebooted with a non-zero once the procedure is complete in
order to read the current registers.
2.
3.
4.
5.
6.
Set the Modbus master device’s serial settings to 9600 baud, no parity, 8 data bits, and 1 stop bit.
Set the serial parameters to the desired values by writing to the corresponding Modbus registers.
Write a “1” to the Serial Commit register 0x605 (41542)
Set the device’s Modbus address to 1 (or any non-zero value).
Set the Modbus master device to communicate with the Modbus device at address 1 (or whatever address was
used)
7. Change the Modbus master device’s serial settings to match the settings applied to the i-Spy.
8. Read any register from the i-Spy using the new serial settings within 3 minutes to make the change permanent.
Note that the i-Spy should remain powered during this time, or its settings will revert to their previous values.
ELKOR TECHNOLOGIES INC.
- Page 19 -
i-Spy – USER MANUAL
6. CUSTOMIZING THE REGISTER MAP
The addresses of each register in the i-Spy can be customized to obtain compatibility with other devices. This is done
using up to 4 customizable register blocks which can contain any register and can be placed at any address.
Each customizable register block can contain up to 126 registers. The first register in each block is placed at a
customizable address, and each subsequent register follows it at subsequent addresses.
This feature is disabled by default. To enable this feature, write a “1” to the Masking Enabled register, 0x50F, in the
Configuration and Status Registers block (p. 15); By default, custom register blocks can not be placed in the same
locations as existing registers, as doing so complicates troubleshooting. To allow placing custom register blocks in the
same locations as existing registers, write a “1” to the Masking Override register, 0x510.
To create a custom block, write the block’s starting address to Address register, 0x1500 (for the first block, or 0x1600,
0x1700, or 0x1800, for the second, third, and fourth blocks, respectively). Next, write the number of registers that the
block will contain to the Size register, 0x1501 (or 0x1601, 0x1701, or 0x1801 for the second, third, and fourth blocks,
respectively). Finally, write the Modbus address of each register that will be included in the block at addresses from
0x1502 to 0x157F (or from 0x1602, 0x1702, or 0x1802 for the second, third, and fourth blocks, respectively).
Setting the Size register to 0 will remove a custom Modbus block. In the event that a custom Modbus block is in the same
location as the Masking Enabled or Masking Override registers, custom Modbus blocks can be removed by writing a “0” to
each of the size registers, 0x1501, 0x1601, 0x1701, and 0x1801.
R/W
Default
Address
Size
Register 1
Register 2
Type
1
1
1
1
Size
Block
Block
Block
Block
0x1500
0x1501
0x1502
0x1503
45377
45378
45379
45380
16
16
16
16
U
U
U
U
RW
RW
RW
RW
0
0
0
0
45504
16
U
RW
0
…
Custom
Custom
Custom
Custom
Address
Name
Offset
Custom Register Map Block 1
Custom Block 1 Register 126
0x157F
Description
Modbus address at which the 1st custom Modbus block will be placed.
Number of registers in the 1st custom Modbus block.
List of register addresses of the registers that will be included in the
1st custom Modbus block. Register addresses beyond the count
specified in the Size register will be ignored.
R/W
Default
Address
Size
Register 1
Register 2
Type
2
2
2
2
Size
Block
Block
Block
Block
0x1600
0x1601
0x1602
0x1603
45633
45634
45635
45636
16
16
16
16
U
U
U
U
RW
RW
RW
RW
0
0
0
0
45760
16
U
RW
0
…
Custom
Custom
Custom
Custom
Address
Name
Offset
Custom Register Map Block 2
Custom Block 2 Register 126
ELKOR TECHNOLOGIES INC.
0x167F
- Page 20 -
Description
Modbus address at which the 2nd custom Modbus block will be placed.
Number of registers in the 2nd custom Modbus block.
List of register addresses of the registers that will be included in the
2nd custom Modbus block. Register addresses beyond the count
specified in the Size register will be ignored.
i-Spy – USER MANUAL
R/W
Default
Address
Size
Register 1
Register 2
Type
3
3
3
3
Size
Block
Block
Block
Block
0x1700
0x1701
0x1702
0x1703
45889
45890
45891
45892
16
16
16
16
U
U
U
U
RW
RW
RW
RW
0
0
0
0
46016
16
U
RW
0
…
Custom
Custom
Custom
Custom
Address
Name
Offset
Custom Register Map Block 3
Custom Block 3 Register 126
0x177F
Description
Modbus address at which the 3rd custom Modbus block will be placed.
Number of registers in the 3rd custom Modbus block.
List of register addresses of the registers that will be included in the
3rd custom Modbus block. Register addresses beyond the count
specified in the Size register will be ignored.
R/W
Default
Address
Size
Register 1
Register 2
Type
4
4
4
4
Size
Block
Block
Block
Block
0x1800
0x1801
0x1802
0x1803
46145
46146
46147
46148
16
16
16
16
U
U
U
U
RW
RW
RW
RW
0
0
0
0
46272
16
U
RW
0
…
Custom
Custom
Custom
Custom
Address
Name
Offset
Custom Register Map Block 4
Custom Block 4 Register 126
ELKOR TECHNOLOGIES INC.
0x187F
- Page 21 -
Description
Modbus address at which the 4th custom Modbus block will be placed.
Number of registers in the 4th custom Modbus block.
List of register addresses of the registers that will be included in the
4th custom Modbus block. Register addresses beyond the count
specified in the Size register will be ignored.
i-Spy – USER MANUAL
7. FIRMWARE UPDATES AND THE BOOTLOADER
The i-Spy device contains a bootloader, a small program used to update the device’s firmware. While running in
bootloader mode, the device supports only the System registers listed in section 5.7 for adjusting Modbus settings and
rebooting the device.
The device enters bootloader mode under three different conditions:
• The value “0xB001” is written to the Reset to Bootloader register at address 0x60A.
• The device is restarted with its Modbus address DIP switch set to 0.
• The device’s firmware is corrupt, possibly due to a failed attempt to update the firmware.
While in bootloader mode, the device’s status LED periodically flashes twice. If the device’s firmware is corrupt, the LED
flashes will be red, otherwise they will be green.
To exit bootloader mode, ensure the Modbus address DIP switch is not set to 0, and either power cycle the unit, or write
the value “0xAA55” to the Reset to Firmware register at address 0x609. If the device’s firmware is corrupt, new firmware
must be uploaded to the device before it can leave bootloader mode.
If communications is done via a PC, Elkor’s software may be used to update the device firmware. Please contact Elkor for
the firmware update protocol.
ELKOR TECHNOLOGIES INC.
- Page 22 -
i-Spy – USER MANUAL
8. APPENDIX A, MODBUS PROTOCOL DETAILS
Modbus is a protocol used to read and write information from a variety of devices such as the i-Spy. Generally, the details
of the protocol are handled by the Modbus master software or device, so that the user need not be familiar with their
implementation. For full details regarding the Modbus protocol, see the official Modbus specification available for free
from http://www.modbus.org/specs.php. This section summaries the protocol as it pertains to the i-Spy device.
8.1. Modbus Frames
Modbus messages are represented as frames of no more than 256 bytes each. The start of a frame is defined as no
transmissions for at least 3.5 character periods, followed by the Modbus address (a one-byte number between 1 and 247)
and the Modbus function code (a one-byte number). The contents of the frame vary between different function codes. At
the end of the frame, comes a 2-byte checksum value used to verify that the frame was not corrupted during reception.
Fields of 2 bytes or more, including the checksum, are transmitted with the most-significant byte first (big-endian order).
The Modbus master device sends “request” messages to a slave device, which responds with a “response” message. Both
request and response messages share the same basic format:
Start
3.5 character times
Modbus
Address
(1 byte)
Function
Code
(1 byte)
Frame Contents
CRC
(up to 252 bytes)
(2 bytes)
Start: No transmission for 3.5 character times. This is about 3.65 milliseconds with the i-Spy’s default settings.
Example: At a baud rate of 9600 bits per second, with one stop bit, one character requires 10 bits to
transmit (one start bit, eight data bits, and one stop bit). Each bit takes 1/9600 seconds to transmit.
Transmitting 3.5 characters of 10 bits each, therefore, takes 35/9600 seconds, or about 3.65 milliseconds.
Modbus Address: This should match the address indicated on the i-Spy’s hardware DIP switch.
Function Code: Available function codes are described in subsequent sections.
Frame Contents: Varies with the function code, as described in subsequent sections.
CRC: Modbus 16-bit cyclic redundancy checksum. Calculating this value is described in the following section.
8.2. Cyclic Redundancy Checksum
Each Modbus frame ends in a cyclic redundancy checksum. This is computed from the other bytes in the message when
transmitting the message. When the message is received, the checksum is computed again, and checked against the
checksum found in the message. If the results differ, the message was corrupted during transmission. Below is a simple
algorithm for calculating the CRC value, shown in pseudo-code. The variable di is defined as the ith byte of the message,
and the variable size denotes the number of bytes in the message.
crc ← 0xFFFF
loop i from 0 to size
crc ← crc XOR di
loop j from 0 to 8
lsb ← crc AND 0x0001
crc ← crc LEFT-SHIFT 1
if lsb = 1
crc ← crc XOR 0xA001
ELKOR TECHNOLOGIES INC.
- Page 23 -
i-Spy – USER MANUAL
8.3. Read Holding Registers
This is the basic command used to read information from the device. The structure of its frames is as follows.
Request:
Modbus
Address
1-63
(1 byte)
Function
Code
3
(1 byte)
Starting Address
Register Count
CRC
0-65535
(2 bytes)
1-125
(2 bytes)
(CRC)
(2 bytes)
Function
Code
3
(1 byte)
Byte
Count
2-250
(1 byte)
Response:
Modbus
Address
1-63
(1 byte)
First Value
CRC
…
Hi-byte
Lo-byte
(CRC)
(2 bytes)
(2 bytes)
8.4. Read Input Registers
On the i-Spy device, this command is identical to Read Holding Registers, described above, but uses function code 4
instead of 3.
8.5. Write Single Register
This is the basic command used to write data to a single configuration register. The structure of its frames is as follows:
Request:
Modbus
Address
1-63
(1 byte)
Function
Code
6
(1 byte)
Address
0-65535
(2 bytes)
Value
Hi-byte
CRC
Lo-byte
(2 bytes)
(CRC)
(2 bytes)
Value
CRC
Response (identical to the response):
Modbus
Address
1-63
(1 byte)
Function
Code
6
(1 byte)
Address
0-65535
(2 bytes)
Hi-byte
Lo-byte
(2 bytes)
(CRC)
(2 bytes)
8.6. Write Multiple Registers
This command writes data to multiple configuration registers. The structure of its frames is as follows:
Request:
Modbus
Address
1-63
(1 byte)
Function
Code
16
(1 byte)
Starting Address
Register Count
Byte
Count
2-246
(1 byte)
0-65535
(2 bytes)
1-123
(2 bytes)
Function
Code
16
(1 byte)
Starting Address
Register Count
CRC
0-65535
(2 bytes)
1-123
(2 bytes)
(CRC)
(2 bytes)
First Value
CRC
…
Hi-byte
Lo-byte
(2 bytes)
(CRC)
(2 bytes)
Response:
Modbus
Address
1-63
(1 byte)
ELKOR TECHNOLOGIES INC.
- Page 24 -
i-Spy – USER MANUAL
8.7. Mask Write Register
This command is used to modify bits in an individual register, based on an AND mask and an OR mask. The register is
written to based on the result of the following expression:
Result = (Current Contents AND AndMask) OR (OrMask AND (NOT AndMask))
Example 1: To clear the 1st bit of a register to 0, use an AND mask of 0xFFFE and an OR mask of 0x0000.
Example 2: To set the 1st bit of a register to 1, use an AND mask of 0xFFFE and an OR mask of 0x0001.
Example 3: To AND the value of a register with 0x5555, use an AND mask of 0x5555 and an OR mask of 0.
The structure of its frames is as follows:
Request:
Modbus
Address
1-63
(1 byte)
Function
Code
22
(1 byte)
Address
And Mask
Hi-byte
0-65535
(2 bytes)
Or Mask
Lo-byte
Hi-byte
CRC
Lo-byte
(2 bytes)
(2 bytes)
(CRC)
(2 bytes)
And Mask
Or Mask
CRC
Response (identical to the request):
Modbus
Address
1-63
(1 byte)
Function
Code
22
(1 byte)
Address
Hi-byte
0-65535
(2 bytes)
Lo-byte
Hi-byte
(2 bytes)
Lo-byte
(2 bytes)
(CRC)
(2 bytes)
8.8. Read/Write Multiple Registers
This function performs reads and writes in a single command. The writes occur before the reads. The structure of its
frames is as follows:
Request:
Modbus
Address
Function
Code
1-63
(1 byte)
23
(1 byte)
Read
Starting
Address
0-65535
(2 bytes)
Read
Count
Write
Starting
Address
0-65535
(2 bytes)
1-125
(2 bytes)
Write Count
1-121
(2 bytes)
Write
Byte
Count
2-246
(1 byte)
First Value
CRC
…
Hi-byte
Lo-byte
(2 bytes)
(CRC)
(2 bytes)
Response:
Modbus
Address
1-63
(1 byte)
Function
Code
23
(1 byte)
Byte
Count
2-250
(1 byte)
First Value
CRC
…
Hi-byte
Lo-byte
(CRC)
(2 bytes)
(2 bytes)
Note: The response format for Read/Write Multiple Registers is identical to that of Read Holding Registers,
aside from the function code.
ELKOR TECHNOLOGIES INC.
- Page 25 -
i-Spy – USER MANUAL
8.9. Diagnostic Functions
This function contains a series of sub-functions used to perform diagnostic operations on the device and the
communication line. The sub-functions are described below.
8.9.1. Echo Query Data
This function simply returns the data sent to it, for testing purposes.
Request:
Modbus
Address
1-63
(1 byte)
Function
Code
8
(1 byte)
Sub-function
Code
0
(1 bytes)
Data
CRC
Any value
(2 bytes)
(CRC)
(2 bytes)
Data
CRC
The sent value
(2 bytes)
(CRC)
(2 bytes)
Response (identical to the request):
Modbus
Address
1-63
(1 byte)
Function
Code
8
(1 byte)
Sub-function
Code
0
(1 bytes)
8.9.2. Clear Counters
This function clears the device’s count of all messages, slave messages, communication errors, and exceptions since
power-up.
Request:
Modbus
Address
1-63
(1 byte)
Function
Code
8
(1 byte)
Sub-function
Code
10
(1 bytes)
Data (always 0)
CRC
0
(2 bytes)
(CRC)
(2 bytes)
Data (always 0)
CRC
0
(2 bytes)
(CRC)
(2 bytes)
Response (identical to the request):
Modbus
Address
1-63
(1 byte)
Function
Code
8
(1 byte)
Sub-function
Code
10
(1 bytes)
8.9.3. Return Bus Message Count
This function returns a count of all Modbus message this device has seen on the bus since power-up, regardless of
whether they were addressed to this device or another device on the line.
Request:
Modbus
Address
1-63
(1 byte)
Function
Code
8
(1 byte)
Sub-function
Code
11
(1 bytes)
Data (always 0)
CRC
0
(2 bytes)
(CRC)
(2 bytes)
Function
Code
8
(1 byte)
Sub-function
Code
11
(1 bytes)
Data
CRC
Counter value
(2 bytes)
(CRC)
(2 bytes)
Response:
Modbus
Address
1-63
(1 byte)
ELKOR TECHNOLOGIES INC.
- Page 26 -
i-Spy – USER MANUAL
8.9.4. Return Slave Message Count
This function returns a count of all Modbus messages addressed to this device that it has received since power-up.
Request:
Modbus
Address
1-63
(1 byte)
Function
Code
8
(1 byte)
Sub-function
Code
14
(1 bytes)
Data (always 0)
CRC
0
(2 bytes)
(CRC)
(2 bytes)
Function
Code
8
(1 byte)
Sub-function
Code
14
(1 bytes)
Data
CRC
Counter value
(2 bytes)
(CRC)
(2 bytes)
Response:
Modbus
Address
1-63
(1 byte)
8.9.5. Return Communication Error Count
This function returns a count of all Modbus messages that failed the CRC check upon reception.
Request:
Modbus
Address
1-63
(1 byte)
Function
Code
8
(1 byte)
Sub-function
Code
12
(1 bytes)
Data (always 0)
CRC
0
(2 bytes)
(CRC)
(2 bytes)
Function
Code
8
(1 byte)
Sub-function
Code
12
(1 bytes)
Data
CRC
Counter value
(2 bytes)
(CRC)
(2 bytes)
Response:
Modbus
Address
1-63
(1 byte)
8.9.6. Return Exception Count
This function returns a count of all Modbus messages that this device responded with an exception response.
Modbus
Address
1-63
(1 byte)
Function
Code
8
(1 byte)
Sub-function
Code
13
(1 bytes)
Data (always 0)
CRC
0
(2 bytes)
(CRC)
(2 bytes)
Function
Code
8
(1 byte)
Sub-function
Code
13
(1 bytes)
Data
CRC
Counter value
(2 bytes)
(CRC)
(2 bytes)
Response:
Modbus
Address
1-63
(1 byte)
ELKOR TECHNOLOGIES INC.
- Page 27 -
i-Spy – USER MANUAL
8.10. Get Comm Event Counter
This function returns a count of all Modbus messages that were successfully completed without error or exception. The
structure of its frames is as follows:
Request:
Modbus
Address
1-63
(1 byte)
Function
Code
11
(1 byte)
CRC
(CRC)
(2 bytes)
Response:
Modbus
Address
1-63
(1 byte)
Function
Code
8
(1 byte)
Status (always 0)
Event Count
CRC
0
(2 bytes)
Counter value
(2 bytes)
(CRC)
(2 bytes)
8.11. Report Slave ID
This function returns an ID number, a status code, and a text string identifying the device. The status code is 0x00 when
the device is in bootloader mode, and 0xFF otherwise. The text string is an ASCII text string containing the name of the
product, its input configuration (mA, mV, or 5A), and its hardware and software version. The string is null-terminated,
meaning a 0 is transmitted after the last character.
Example String: “Elkor Technologies i-Spy-10-mA Hardware 1.00 Firmware 1.00”.
While in bootloader mode, the string returned contains the bootloader version, for example, “Elkor Technologies
Bootloader 1.00”.
The structure of its frames is as follows:
Request:
Modbus
Address
1-63
(1 byte)
Function
Code
17
(1 byte)
CRC
(CRC)
(2 bytes)
Response:
Modbus
Address
1-63
Function
Code
17
Slave ID
Status
String identifier
CRC
120
(1 byte)
(1 byte)
A null-terminated string
identifying the device.
(Up to 250 bytes)
(CRC)
(1 byte)
0x00 or
0xFF
(1 byte)
ELKOR TECHNOLOGIES INC.
- Page 28 -
(2 bytes)
i-Spy – USER MANUAL