1
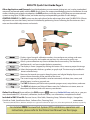
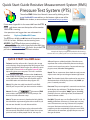
Quick Start Guide Resistive Measurement System (RMS) Pressure Test System (PTS) The online RMS Online User Manual is accessed by clicking on the www.VodderMLD.com address on the bottom right corner of the RMS main window, or enter online at VodderMLD.com/pts/ptshome ™ Gay Lee Gulbrandson ™ NCTMB, CLT-LANA, Certified Dr Vodder Instructor Pressure Testing Sensor Display VE Direct access hyperlink is also accessible from the PTS Help pull-down menu on the top bar of the monitor when PTS is running. 36.00mmHg 30.08 User questions and suggestions are welcomed via email at: [email protected]. The PTS runs reliably on Macintosh Computers using OSX 10.5 or later. Windows version coming soon. ACCESS: The PTS pull-down menu includes an About RMS screen with a hyperlink to the RMS User Manual at VodderMLD.com ; this link is also in the PTS pull-down menu and on the PTS main window. Patent Pending 1.19 -5.00s +0.50s Freeze Trace Calibration Print Metrics Appearance Preferences Help -3.00mmHg 28.41 Maximum Minimum Current Gay Lee Gulbrandson www.VodderMLD.com Example of display using PTS standard default setting. Current value is in yellow, peak is in red, and low is in blue digits. QUICK START: Use RMS now: To Start: Load the software disc. Open the disc image on the desktop. Drag the appropriate RMS program icon into the Applications folder image alias within the open RMS Folder. (Choose Intel or the earlier PowerPC icon depending upon your computer. This info is available in the About this Mac window under the menu) Now double click the program image you just dragged to the Applications folder. Enter the required registration information and code from the program disc. Next 1: Plug the wire cable into the MIC and HEADPHONE jacks on your MAC per the instruction window. button on RMS Next 2: Click the main window and follow the on-screen prompts. Perform basic initial calibration steps. Next 3: The pressure sensor is placed on the limb, held by the wide Velcro strap mounting that sticks to itself. Easy to do, even one-handed. Use soft side toward skin. Action: Place finger-tip, finger pad, or palm over the flexible sensor end, and perform an MLD stroke. You may test your own hands, or other people’s hands. You may use different fingers or whole hand/palm. Place the sensor anywhere over surfaces of the body that are not sharply curved or on sharp or bony points. Contact and cover (apply pressure to) the entire sensing pad tip. Result: The on-screen trace shows both time and pressure. Adjust screen size by mouse drag on bottom right corner. Time: The duration (time) of the stroke can be seen across the horizontal axis of the display (side to side). GOAL: approx 1.5 seconds per stroke. Pressure: The pressure applied is seen on the vertical axis of the display (up and down). The higher the trace, the greater the pressure applied. GOAL: approx 30 mmHg peak MLD pressure, returning to Zero (near bottom of screen) between strokes. For MLD: The peak pressure for effective MLD is 30 - 32 mmHg (millimeters of mercury). Greater pressure may cause micro-trauma, causing a decrease in lymphatic transport. Maximum reduction in limb volume is dependent upon the exceptionally light pressure of MLD, sufficient time of treatment, appropriate pressure, and the type of edema. RMS-PTS Quick Start Guide Page 2 Other Applications and Research: Any digital palpation or measurement (pitting test, etc.) may be standardized, measured, and learned rapidly with the RMS sensor system. For compression bandaging pressure verification, for case studies, including pain response to palpation, the RMS performs much the same as full glove pressure measurement systems costing up to $25,000 or more, and makes accuracy and repeatability possible on a low budget. CONTROL PANELS: The RMS system may be used without further adjustment after initial CALIBRATION. All basic adjustments are set at the factory and are re-initialized by performing a reset. Following the illustration are short notes on the available adjustments and controls. ➁ ➀ ➂ Displays signal strength, calibration numbers, time and pressure settings, and more. Two panels to set units and sample rate are here. Any value may be set by user. Allows system calibration any time to validate the sensor accuracy. The interface to the Macintosh is set here to make the basic connections. The display is frozen (stopped) by clicking this button. View, measure, project the image. Select the image color, thickness, gradient, or graph style. The trace may be modified in almost unlimited ways. Measures the impeak at any point along the trace, and a digital display of pressure and time are shown according to the position of the cursor. The screen image may be printed or saved on command, with date, time, name, and detailed notes, in color or grayscale, etc. The RMS Preferences pull-down menu provides program reset, setup choices, and more. The RMS Help button and Help pull-down menu has Calibration assistance, access to the online User Manual, and error recovery reset button. Online User Manual: Accessed from the RMS program HELP menu or at VodderMLD.com web site, or your previous downloaded PDF, all controls, calibration, conversion values, user information, are explained in detail. Included in RMS Silver Kit: Pressure Sensor, Wire Cable, Mounting Strap, Calibration Weight, Storage Box, Quick User Guide, Specification Sheet, Software Disc, Cleansing Pads. PATENT PENDING Macintosh, MAC OS, Velcro, Windows and Mylar are registered trademarks of Apple, Inc., Velcro Group, Microsoft, DuPont, respectively. For detailed RMS Pressure Test System (PTS) installation, operation and instructions, please refer to the Online User Manual. See front page.