1
DLC1971
Mini PTZ Dome
Installation and Operations Manual
Model Number: DLC1971
Description: 1/3”, Mini PTZ Dome
Day/Night 10X Optical / 12X Digital Zoom
CONTENTS
FEATURES....................................................... 2
SPECIFICATION .............................................. 3
DECLARATION............................................... 4
■PRECAUTION ...................................... 4
■WARNINGS .......................................... 4
INSTALLATION PREPARATION................... 5
■TOOL LIST: .......................................... 5
■CABLE: ................................................. 5
■ DIP SWITCHER AND JUMPER.......... 5
■CONNECTION DIAGRAM .................. 5
MOUNT TYPE ................................................. 6
■CEILING MOUNT ................................ 6
■BRACKET MOUNT.............................. 6
INSTALLATION GUIDE......................... 7
■CEILING MOUNT ................................ 7
■PENDANT MOUNT.............................. 7
■WALL MOUNT .................................... 8
SYSTEM CONNECTION ................................. 9
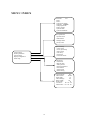
M E N U I N D E X ........................................... 10
OPERATION INSTRUCTION........................ 11
■BOOTUP THE SCREEN ..................... 11
■ OSD MENU AS FOLLOWS ............... 11
MENU OPERATION ...................................... 11
SYSTEM SETTINGS...................................... 12
■DOME ID SETTING ........................... 12
■TITLE SETTING................................. 12
■ LANGUAGE SETTING ..................... 13
■ TIME SETTING ................................. 13
■PASSWORD SETTING....................... 13
■FACTORY SETTING.......................... 13
■SYSTEM RESTART SETTING .......... 13
CAMERA PARAMETERS ............................. 13
◆DIGITAL ZOOM SETTING ............ 14
◆FOCUS LIMIT SETTING................ 14
◆PICTURE FREEZE SETTING......... 14
◆IMAGE STABILIZER SETTING .... 14
■EXPOSURE MODE ............................ 14
◆EXPOSURE MODE SETTING........ 15
◆SHUTTER SPEED SETTING.......... 15
◆IRIS LEVEL SETTING.................... 15
◆BRIGHT LEVEL SETTING ............ 15
◆AGC LEVEL SETTING................... 15
1
◆DAY/NIGHT MODE SETTING .......15
■WHITE BALANCE ..............................16
◆WHITE BALANCE SETTING .........16
◆RED GAIN SETTING.......................16
◆BLUE GAIN SETTING ....................16
◆BACKLIGHT MODE SETTING ......17
◆PRIVACY MASK SETTING............17
◆MASK ACTIVATE SETTING..........17
PAN TILT SETTING .......................................17
■PAN TILT SETTING ............................18
◆AUTO FLIP ......................................18
◆JOYSTICK RECOVER.....................18
◆SPEED PROPORTIONAL................18
■PRESET SETUP MENU .......................19
◆PRESET NUMBER SETTING..........19
◆TITLE SETTING ..............................19
◆PRESET SETTING...........................19
■CRUISE SEQUEUE SETTING .............19
◆EDIT SEQUENCE ............................19
■PATTERN SETUP ................................20
■HOME TIME SETTING .......................21
■ALARM SETUP ...................................21
APPENDIX I: SPECIAL FUNCTION
OPERATION ...................................................23
APPENDIX II: DIP SWITCH SETTINGS.......24
APPENDIX III:WIRE DIAMETER &
RANSMISSION CHART .................................28
APPENDIX IV:RS485 BUS BASI
KNOWLEDGE.................................................29
APPENDIX V: TROUBLE SHOOTING .......31
APPENDIX VI:LIGHTNING PROOF &
SURGE SIGNAL PROOF ................................32
APPENDIX VII :WARRANTY .....................33
FEATURES
υ High Quality motor, low power consumption, no vibration at low speed.
υ Warm up under extreme low temperature to protect the camera.
υ With black liner, more discreet surveillance.
υ With Embedded operation system, support Online updating the dome information like dome
title.
υ Built in OSD Menu (English, French, German, Italian, Russian, Spanish, Portguesse and
Chinese)
υ Full functional OSD menu, setting and calling presets, auto tour, pattern tour and auto scan
etc.
υ Continously 360°pan,tilt 180°with auto flip
υ With compass function,shows pan/tilt direction on screen
υ Can display the temperature inside.
υ 256 Presets, ±0.1° accuracy.
υ 300°/s preset speed
υ 8 tours,32 presets per tour
υ 8 patterns,8 scans, 8 regions
υ 4 privacy masks
υ 4 alarm inputs and 1 alarm outputs. (Optional)
υ Support changing camera ID from OSD menu.
υ Password protected menu
υ Proportional Pan/tilt
υ Auto memory function: auto running the previous function after power off/on
υ Upgraded home position function. It the camera is not controlled for a specified,it would call
preset, run auto tour, pattern tour, auto scan or show display areas automatically
υ With realtime clock and scheduled function (Color to B/W, Patrol, Pattern and Scan etc).
υ Support PelcoC, PelcoD, PelcoP, AD, Vicon, VCL, Molynx, Diamond, Kalatel, Philips etc.
υ IP66, with heater and fan
υ TVS3000V lightning proof and surge proof module
Environment
Operating Temperature
Model
InCeiling Indoor
Standard Pendant
Environmental Mount
Absolute Max
113°F (45°C)
158°F (70°C)
Sustained Max
Absolute Min
32° to 122°F (0° to 50°C)
95°F (35°C)
4°F (20°C)
140°F (60°C)
60°F (51°C)
Note:
1. Assume no wind chill factor
2. Prevents icing at sustained minimum of 50°F (45°C)
3. Deices 0.1 inch (2.5 mm) within 3 hours after powerup
2
Sustained Min
14°F (10°C)
50°F (45°C)
SPECIFICATION
Optical Zoom
12X/NTSC
12X/PAL
Camera Voltage
DC 9V ∼ 14V
Camera Power Consumption
3.6W
Imaging Sensor/Lens type
Total/Effective pixel No.
4.5mm(1/4 Type)CCD F1.6(Wide End),F2.7(Tel End)f=3.80~45.6mm
610K/570K
520K/480K
ISP
XDI-II
Optical Zoom Ratio
Scanning Frequency(H/V)
X12
15.734KHZ/59.94HZ
Digital Zoom
Video
12X
Horizontal Resolution
600TVL
S/N Ratio
50dB
Sync.System
MinimumIIIumination(50IRE)
Internal/Line Lock
Color-SENS-UP OFF:0.2lux,SENS-UP ON:0.003lux
B/W-SENS-UP OFF:0.01lux,SENS-UP ON:0.00001lux
Video Output Signal
1Vp-p Composite (75Ω)
3D-DNR(Off/Low/Middle/High)
DNR
White Balance
BLC
Auto/ATW(1,700°K~11,000°K)/One Push/Manual
OFF/BLC/HLC
Day/night
Function
On/Off
Backlight Compensation
ON/HSBLC/OFF
1/60~1/120.000
Privacy Zone Masking
Zoom speed
Low/middle, high/off
ICR(Auto/Day/Night)
Stabilizer(EIS)
Electric Shutter speed
15.625KHZ/50HZ
1/50~1/120.000
4 Mask Zones
1.84s:wide to tele
Iris control
1.75s:wide to tele
Manual/auto
3
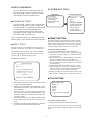
DECLARATION
This equipment generates, uses, and can radiate radio
■WARNINGS
♦
Avoid installing this speed dome in hazardous
places where inflammable or explosive
materials are stored or used.
♦
Indoor dome is not designed for outdoor
environment.
♦
This speed dome runs on 24v AC.
♦
Connect to power only after completing
installation.
♦
Disassemble can only be carried out by
qualified personnel.
♦
Use soft towel to clean the down cover when
necessary. Avoid using caustic detergent.
♦
Avoid aiming camera to strong light.
frequency energy and, if not installed and used in
accordance with the instruction manual, may cause
harmful interference to radio communications. Operation
of this equipment in a residential area is likely to cause
harmful interference in which case the user will be
required to correct the interference at the user’s own
expense.
■ PRECAUTION
♦
Only qualified and experienced person can
carry out the installation. In many countries
and areas licensed personnel is required
♦
Always take safety codes into consideration
during installation.
♦
Use reliable tools only, poor quality tools may
cause damage to both human and property
♦
Check the strength of all item onsite that are
related to installation in advance. It is
recommended that the stand of dome be 8 times
stronger than the weight of the dome and its
accessories.
♦
Keep all the original dome package materials in
case of future repacking and transportation.
Remarks: Use Silicon Gel to seal the cable
entry of the speed dome during installation, to
ensure the IP grade.
Choose and install speed dome according to
environment requirement (Refer to the Product
Features). This product conforms to IP66 standard
as specified in “Housing Protection Classification
(IP code)”
4
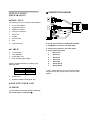
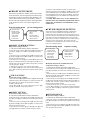
■CONNECTION DIAGRAM
INSTALLATION
PREPARATION
■TOOL LIST:
The following tools may be needed for the installation:
♦
Screw ,nut, anchors
♦
Adjustable wrench
♦
Philips screwdriver
♦
Slot type screwdriver
♦
pliers wire
♦
Ladder
♦
Electric drill
♦
Saw
♦
Socket Wrench
1. Power port connect to the DC12V or AC24V.
2. RS485 port connect to the data cable.
3 . Video port connect to the video cable.
■CABLE:
4 . Alarm input and output
♦
Coaxial Cable
♦
75Ω impedance
♦
Solid copper wire
♦
95% braided copper shield
1
2
3
4
5
6
7
Check transmission distance according to the
following chart
Model
RG 59/U
RG 6/U
RG 16/U
Distance
750ft(229m)
1,000ft(305m)
1,5000ft(457m)
♦
RS485 Cabl
♦
0.56mm (24AWG) twisted pair wire
:
:
:
:
:
:
:
Alarm com
Alarm in1
Alarm in2
Alarm in3
Alarm in4
Alarm Out-A
Alarm Out-B
ϖ Note:Alarm output is new type transistor optical
coupler contact relay output,Contact Capacity 250V
110mA.
■ DIP SWITCHER AND
JUMPER
Set dome ID, bard rate and protocol by configuring
DIP switches (Refer to APPENDIXⅡ).。
5
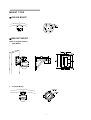
MOUNT TYPE
■CEILING MOUNT
■BRACKET MOUNT
There are 2 types brackets.
λ
Wall Mount
♦
Pendent Mount
6
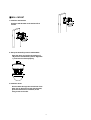
INSTALLATION GUIDE
■PENDANT MOUNT
1. Install the pendent bracket
■CEILING MOUNT
Install the pendent bracket on the ceiling and
fix 4 screws.
1. Install the plate to the ceiling
Fix the installation plate to the ceiling with 4
screws.
2. Set up the dome ID, protocol and baudrate
2. Set up the dome ID, protocol and baudrate
Open the dome and set the dip switcher of
ID,protocol and baudrate, (refer to Appendix
I), and cover the dome properly.
Open the dome and set the dip switcher of
ID,protocol and baudrate, (refer to Appendix
I), and cover the dome proerply.
3. Install the dome
Put the cables through the central hole of the
plate, line up the three screws with the plate,
push the unit and turn clockwise, fix the
fixing screw on the side.
3. Install the dome
Put the cables through the central hole of the
plate, line up the three screws with the plate,
push the unit and turn clockwise, fix the
fixing screw on the side.
7
■WALL MOUNT
1. Install the wall bracket
Install the wall bracket on the wall and fix 4
screws.
2. Set up the dome ID, protocol and baudrate
Open the dome and set the dip switcher of
ID,protocol and baudrate, (refer to Appendix
I), and cover the dome properly.
3. Install the dome
Put the cables through the central hole of the
plate, line up the three screws with the plate,
push the unit and turn clockwise, fix the
fixing screw on the side.
8
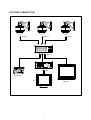
SYSTEM CONNECTION
Camera
Camera
Camera
Matrix
DVR
Keyboard
PC
Monitor
9
MENU INDEX
→Dome ID
001
Title 1
Title 2
System time & date
Language English
Change password
Factory setting
System restart
System information
→lens parameters
exposure mode
white balance
backlight mode
privacy mask
→pan tilt setup
presets setup
cruise queue setup
pattern setup
zone setup
time action
home time action
system setting
camera parameters
pan tilt setting
display configuration
alarm setup
→dome title
Presets title
Regions name
Zoom position
Direction indicators
Environment
System clock
Global setting
→input channel :
001
Alarm action:
disarm
Input mode:
no
Alarm linkage:
off
Relay output:
off
Reset delay :
30
Arm time: 00:00:00
Disarm time: 00:00:00
10
shows system time.
υ
OPERATION INSTRUCTION
υ
The PTZ can be operated via one or more buttons
on the keyboard or via OSD menu.
By calling or saving Preset #95 can call the OSD
menu. Through keyboard or other equipments
which can send command to the PTZ (e.g,
computer), user can call or save presets.
System date
On the right side of the 3th line from the
bottom shows system date.
Zone title
The 2nd line from the bottom shows zone title 1
and title 2.
υ
Position
On the left side of last line shows dome position
and pan/tilt angle.
The operation of the OSD menu is:
υ
Zoom
At the middle of last line shows zooming status.
■BOOTUP THE SCREEN
υ
Temperature & fan speed
The right side of last line shows the dome
internal temperature and fan speed. XXC/XXF
C:centigrade ;F:Fahrenheit;rpm : revolution
per minute
When power on or restart the dome, the boot up
information will be displayed on screen and the
dome begins selftesting. It last s about 40 seconds.
“System booting up” will show on the screen until
“bootup success” shows up.
MENU OPERATION
After the dome receives effective command or about
2 minutes later, these characters disappears.
Serial number
Dome ID
Baud Rate
Protocol
Camera
Version
Fan speed
Temperature
ENTER OSD MENU
υ
000001AC78B2
001
4800bps
PELCO_P
SDM-100P
1.00A
8020
+33C/91F
The OSD menu can be shown via calling or saving
preset #95.
Note: If the keyboard is from a third party,
please read the keyboard manual for how to call
preset. Different factories may use different
methods.
■ OSD MENU AS FOLLOWS
The dome can show the following info on
screen via setting:
Dome Title 1
Preset Title 1
Zone Title 1
South 187/+012
6600rpm
Dome Title 2
Preset Title 2
Dome Title
Line 1 shows Dome title 1 and title 2.
υ
Preset Title
Line 2 shows preset title 1 and title 2.
υ
System time
On the right side of the 4th line from the bottom
υ
Users need to input the password to enter the
menu when the password protection works.(The
default password is 000000)
υ
Move the joystick up or down to select 09, move
the joystick right or left to select the digits, then
press (IRIS OPEN) to confirm. If the password is
wrong, the screen disappears automatically.
If there is no operation in a minute, OSD menu
disappears automatically. all the settings would be
saved and would not lost even if power off.
00:10:00
2011-01-01
Zoom Title 2
×1
+37C/98F
υ
It can show the main menu by call preset 95#
system setting
camera parameters
pan tilt setting
display configuration
motion detection
alarm setup
11
SELECT OSD MENU
SYSTEM SETTINGS
The cursor flickers on the left side of the menu item.
Move the cursor up or down to select the menu item.
Press 【iris open】 to enter the menu item, and press
【iris close】 to cancel the operation or exit.
Main menu
system setting
camera parameters
pan tilt setting
display configuration
alarm setup
■CHANGE SETTING
Press 【iris open】 to enter the menu , the chosen item
flickers. Move the joystick up, down to change value.
Press 【iris open】 to save and back, press 【iris close】
to cancel and exit. In case of multiple digits value,
move up and down to change value, left and right to
select digits, Press 【iris open】 to save and exit, and
press 【iris close】 to cancel and exit.
the system setup menu
→Dome ID
001
Title 1
Title 2
Language English
System time & date
Change password
Factory setting
System restart
System information
■DOME ID SETTING
Note: To Increase the speed of the value changing , please
hold the joystick to top or bottom for more than 10 seconds.
This camera supports soft and hard address change, and the
default is the hardware address. When the dome’s dip switch
(SW2) that one to eight all sets at “ON” ,it may carry on the
address change establishment, otherwise the dome address is
at the hard address condition and the menu can’t revise.
■ INPUT TITLE
The title can be up to 20 characters. If users set title 1
and title 2 in one line, it can show up to 40 characters.
Φ Operation settings as follows:
1. Call preset 95 and enter the camera’s main menu.
2. Move the cursor up or down to select 【 system settings】
The Dome has ASC character and Latin ExtendedB.
The user can change the input typewriting by operate
【zoom in】 or 【zoom out】 any time.
menu items, press【iris open】key to confirm and enter the
system setup menu.
3. Move the cursor to select【Dome ID】menu item in the
【system setting】and press 【iris open】 key to
confirm ,then enter the camera serial number input menu
item, the camera menu displays a default set of 12bit input
the serial number.
4.Input the default 12digit serial number and press “open”
button with pan tilt ‘s up, down, left and right command to
enter dome ID menu. At this point the dome ID parameter
shines and use up or down to modify the dome ID.
5.Press【iris open】key to save dome ID setting and exit, press
【iris close】key without saving dome ID setting and exit.
The title input is as follows
Edit the dome title
----------------------------------Input:□
01234567890ABCDEFGHIJKLM
NOPQRSTUVWXYZabcdefghijk
Lmnopqrstuvwxyz.,:;?<>[]
{}-+`=/~!#$%&@*)(|^_’\
----------------------Zoom in/out : INPUT METHOD
■TITLE SETTING
1、 After "input:" is the space for title. Move the cursor left
or right to input/edit characters.
2、 Move cursor up and down to choose character. At this
moment the cursor moves to the central screen which
shows characters.
3、 Move the cursor up, down, right, left, then press
【iris open】to confirm the editing characters. And
the chosen characters would be shown on the title
and can be edited.
4、 Input all the characters, press【iris close】 to back
to title editing area, and the cursor moves to this
area.
5、 press【iris open】to save the title and exit , and press
【iris close】 to cancel the title input and exit.
EDIT DOME TITLE
INPUT:□
abcdefg
hijklmn
opqrstu
vwxyz
Zoom in/out INPUT METHOD
Φ Operation settings as follows:
1. Call preset 95 and enter the camera’s main menu.
2. move the cursor up or down to select 【 system settings】
menu items, press 【iris open】 key to enter the system setup
menu.
12
3. Move the cursor to select 【title 1】menu item in the
【system setting】and press 【iris open】key to confirm, then
enter the title parameter change establishment, this time
parameter twinkle.
4. Use the control lens ZOOM IN/OUT switch the input
method.
5. Refer to“Edit the title”
■FACTORY SETTING
Φ Operation settings as follows:
1. Call preset 95 and enter the camera’s main menu.
2. Move the cursor up or down to select 【 system settings】
menu items, press 【iris open】 key to confirm and enter the
system setup menu.
3. Move the cursor to select【factory setting】menu items in
the 【system setting】and press【iris open】button to restore
factory settings
■ LANGUAGE SETTING
Φ Operation settings as follows:
1. Call preset 95 and enter the camera’s main menu.
2. Move the cursor up or down to select 【system settings】
menu items, press 【iris open】 key to confirm and enter the
system setup menu.
3. Move the cursor to select 【language】menu item in the
【system setting】and press 【iris open】key to confirm, then
enter the language selection, this time parameter twinkle.
4. With pan tilt up, down, up or down to select setting.
5 Press【iris open】key to save language setting and exit, press
【iris close】key without saving language setting and exit.
■SYSTEM RESTART SETTING
Φ Operation settings as follows:
1. Call preset 95 and enter the camera’s main menu.
2. Move the cursor up or down to select 【 system settings】
menu items, press 【iris open】 key to confirm and enter the
system setup menu.
3.Just move the cursor to select【system restart】menu item
in the 【system setting】and press 【iris open】key.
■ TIME SETTING
Φ Operation settings as follows:
1. Call preset 95 and enter the camera’s main menu.
2. Move the cursor up or down to select 【 system settings】
CAMERA PARAMETERS
This menu allows you to operate on different manufacturers
and camera parameters can be configured and may be used
under different conditions and different usage requirements
for flexible settings.
menu items, press 【iris open】 key to confirm and enter the
system setup menu.
3. Move the cursor to select【system time/date】menu item in
the 【system setting】and press【iris open】to confirm, enters
the system time/date parameter change establishment, this
time parameter twinkle.
4. With pan tilt up, down, up or down to select setting.
5. Press 【iris open】 key to save system time/date setting and
exit, press 【iris close】key without saving system time/date
setting and exit.
Main menu
camera parameters setting menu
system setting
camera parameters
pan tilt setting
display configuration
alarm setup
→lens parameters
exposure mode
white balance
backlight mode
privacy mask
■PASSWORD SETTING
Φ Operation settings as follows:
1. Call preset 95 and enter the camera’s main menu.
2. Move the cursor up or down to select 【 system settings】
Attention: Different manufacturers series
camera menu, for further details, please
refer to the appropriate camera features
Setup instructions.
menu items, press 【iris open】 key to confirm and enter the
system setup menu.
3. Move the cursor to select【change password】menu item in
the 【system setting】and press【iris open】to confirm, enters
the password change establishment, this time the screen
demonstrated that “inputs the old password”.
4. Refer “edit the title” to input the password.
5. When enter the old password is successful, press 【iris
open】key, then the screen displays “ENTER NEW
PASSWORD”. If input the new password twice is the same,
then the screen prompted “PASSWORD CHANGE
SUCCESSULLY”.
NOTE: The camera original password is 000000, when
the password set to 000000,the dome turn off the
password protection .
13
4. With pan tilt up, down, up or down to select setting .
5.Press 【iris open】key to save focus limit setting and exit,
press 【iris close】key without saving focus limit setting and
exit.
LENS PARAMETERS
This menu allows user to select on the camera's zoom speed,
digital zoom, focus limit and picture freeze.
Camera parameters setting
→lens parameters
exposure mode
white balance
backlight mode
privacy mask
◆ZOOM
camera parameters menu
→zoom speed:
Digital zoom:
Focus limit:
Picture freeze:
Image Stabilizer:
Line lock phase:
◆PICTURE FREEZE SETTING
Φ Operation settings as follows:
high
off
30cm
on
on
000
1. Call preset 95 and enter the camera’s main menu.
2. Move the cursor up or down to select【camera parameters】
menu items and press【iris open】key to confirm, then enter
the lens parameters menu.
3. Move the cursor to select【picture freeze】menu item in the
【lens parameters】and press【iris open】key to confirm. then
enter the picture freeze settings, in which case the parameter
flashes .
4. With pan tilt up, down, up or down to select setting .
5.Press 【iris open】key to save picture freeze setting and exit,
press【iris close】key without saving picture freeze setting and
exit.
SPEED SETTING
Φ Operation settings as follows:
1. Call preset 95 and enter the camera’s main menu.
2. Move the cursor up or down to select【camera parameters
ϖ NOTE: Some cameras do not support this feature
】menu items and press【iris open】key to confirm, then enter
the lens parameters menu..
3. Move the cursor to select 【zoom speed】menu item in
the 【lens parameters】and press 【iris open】key to confirm.
Then enter the zoom speed settings, in which case the
parameter flashes .
4. With pan tilt up, down, up or down to select setting.
5.Press 【iris open】key to save zoom speed setting and exit,
press 【iris close】key without saving zoom speed setting and
exit.
◆DIGITAL ZOOM
◆IMAGE STABILIZER
Φ Operation settings as follows:
SETTING
1. Call preset 95 and enter the camera’s main menu.
2. Move the cursor up or down to select【camera parameters】
menu items and press【iris open】key to confirm, then enter the
lens parameters menu.
3. Move the cursor to select【Image Stabilizer】menu item in
the 【lens parameters】and press 【iris open】key to confirm.
Then enter the Image Stabilizer settings, in which case the
parameter flashes .
4. With pan tilt up, down, up or down to select setting .
5.Press 【iris open】 key to save Image Stabilizer setting and
exit, press 【iris close】 key without saving Image Stabilizer
setting and exit.
SETTING
Φ Operation settings as follows:
1. Call preset 95 and enter the camera’s main menu.
2. Move the cursor up or down to select【camera parameters】
menu items and press【iris open】key to confirm, then enter the
lens parameters menu.
3. Move the cursor to select 【digital zoom】in the 【lens
parameters】and press 【iris open】key to confirm. then enter
the digital zoom settings, in which case the parameter
flashes .
4. With pan tilt up, down, up or down to select setting.
5.Press 【iris open】key to save digital zoom setting and exit,
press【iris close】key without saving digital zoom setting and
exit.
ϖ NOTE: Some cameras do not support this feature
■EXPOSURE MODE
The user may establish camera's exposure mode ,shutter
speed iris level ,AGC level ,bright level ,backlight, DIGIslow
shutter and so on through this menu, achieves the picture
effect which the user needs.
Camera parameters setting
◆FOCUS LIMIT SETTING
You can set the camera in focus limit near the focal distance to
improve special places lens performance. For example: a
rainy day, will focus on a limit of 1 m, the lens will not be
focused to the dome of water droplets.
Φ Operation settings as follows:
lens parameters
→exposure mode
white balance
backlight mode
privacy mask
1. Call preset 95 and enter the camera’s main menu.
2. Move the cursor up or down to select【camera parameters】
menu items and press【iris open】key to confirm, then enter the
lens parameters menu.
3. Move the cursor to 【focus limit】 menu item in the 【lens
parameters】and press 【iris open】 key to confirm, Enter the
focus limit settings, in which case the parameter flashes .
14
exposure mode menu
→exposure mode :
auto
IRIS level:
Close
Shutter speed :
1/50
AGC level :
0dB
bright :
016
DIGI-slow shutter : auto
Day/night mode: auto
Day start time: 00:00:00
Night start time: 00:00:00
◆EXPOSURE
2. With pan tilt up, down, up or down to select setting .
3.press【iris open】key to save IRIS level mode of prior setting
and exit, press 【iris close】key without saving mode of prior
setting and exit.
.
ϖ NOTE:It can be set only when the exposure mode is
set to manual or aperture.
MODE SETTING
The image is good or bad and exposurerelated, Exposure and
light time (shutter speed), the light areas (aperture).
Image quality and gain and brightness establishment also
related, it make public pattern each establishment possible to
exist conflicts mutually, the interdependence situation,
regards the different camera cassette mechanism to differ
from, the special details please refer to corresponding camera
function showing.
◆BRIGHT LEVEL SETTING
Φ Operation settings as follows:
1.Move the cursor to select 【bright level】menu item in the
【exposure mode】and press【iris open】key to confirm, then
enter the bright level settings, in which case the parameter
flashes .
2. With pan tilt up, down, up or down to select setting .
3.Press 【iris open】key to save bright level setting and exit
press 【iris close】key without saving bright level setting and
exit .
Φ Operation settings as follows:
1. Call preset 95 and enter the camera’s main menu.
2. Move the cursor up or down to select【camera parameters】
menu items and press【iris open】key to confirm, then enter the
camera parameters menu..
3. Move the cursor to select 【exposure mode】menu item in
the【camera parameters】and press【iris open】key to confirm,
then enter the exposure submenu setting.
4. Move the cursor to select 【exposure mode】 menu item in
the【exposure mode】 and press【iris open】 key to confirm,
then enter the exposure mode setting.
This allows you to select :
【auto】:Automatic exposure modes. This is the camera
default setting and the camera according to the
scene brightness, CCD, ISO speed automatically
adjust the right exposure. This mode cannot be
manually set the values of other exposure mode
level.
【manual】The manual setting mode, the mode can be
chosen arbitrarily set the exposure mode.
【shutter speed】:shutter first pattern
【IRIS level】: IRIS first pattern
◆AGC LEVEL SETTING
Φ Operation settings as follows:
1.Move the cursor to select【AGC level】menu item in the
【exposure mode】and press【iris open】key to confirm, then
enter the AGC level settings, in which case the parameter
flashes .
2. With pan tilt up, down, up or down to select setting .
3.Press 【iris open】key to save AGC level setting and exit,
press 【iris close】key without saving AGC level setting and
exit .
.ϖ NOTE:It can be set only when the exposure mode is
set to manual or AGC level .
【bright level】: bright first pattern
【AGC level】:AGC first pattern
◆DIGI-SLOW SHUTTER SETTING
5.With pan tilt up, down, up or down to select setting; Press
【iris open】key to save exposure setting and exit, press【iris
close】key without saving exposure setting and exit.
◆SHUTTER
The optical fiber is insufficient, the display monitor figure
above is very likely black because the camera monitors in the
night or when the dark environment, the optical fiber is
insufficient, the display monitor figure above is very likely
black, the process establishes the slow shutter, lengthens the
camera natural lighting time, causes the image which
photographs in darkness is clearer.
SPEED SETTING
Φ Operation settings as follows:
1.Move the cursor to select【shutter speed】menu item in the
【exposure mode】and press【iris open】key to confirm, then
enter the shutter speed choice establishment item, this time
parameter twinkle.
2. With pan tilt up, down, up or down to select setting .
3.press 【iris open】key to save shutter speed setting and exit,
press【iris close】key without saving shutter speed setting and
exit .
.
ϖ NOTE:It can be set only when the exposure mode is
set to manual or shutter.
◆IRIS
Φ Operation settings as follows:
1.Move the cursor to select【DIGIslow shutter】menu item in
the 【exposure mode】and press 【iris open】key to confirm,
then enter the DIGIslow shutter settings, in which case the
parameter flashes .
2. With pan tilt up, down, up or down to select setting .
3.Press 【iris open】key to save DIGIslow shutter setting and
exit, press 【iris close】key without saving DIGIslow shutter
setting and exit .
◆DAY/NIGHT MODE SETTING
Changes in the surrounding ambient light, this feature
automatically switch between day and night images. When
you use this feature, the bright color images taken during the
day, while shooting in the dark of night will be black and
white image. You can also set a fixed day or night mode
without using this automatic conversion.
LEVEL SETTING
Φ Operation settings as follows:
1.Move the cursor to select【IRIS level】menu item in the
【exposure mode】and press【iris open】key to confirm ,then
enter the IRIS level parameters to change the settings, in
which case the parameter flashes .
15
Can be divided into :
【evening mode】:The light filter detachment image fixed is
black and white, even if in the daytime is
also blackandwhite image.
【day mode 】:Color image to light, it will not go to the black
white (night ) mode
【auto mode】:When light enough for a while, a dim light
automatically remove a filter for black
and white pictures
【 timing mode】:The time to set the camera running into a
black and white and color image
【day start time】:00:00:00
【night start time】:00:00:00
This allows you to select :
【auto】:This is the machine default mode, the
camera's white balance sensor for
environmental detection automatically
restored after a true color.
【manual】:Under this pattern the user may the hand
regulation red gain value and the green gain
value.
【automatic tracking】:automatic tracking mode
【once touch】: once touch mode
【outdoor】: the outdoor pattern, the tone is cold.
【indoor】:The indoor pattern, the tone is warm
5.With pan tilt up, down, up or down to select setting
6.press 【iris open】to save white balance setting and exit,
press 【iris close】 without saving white balance setting and
exit.
Φ Operation settings as follows:
1.Move the cursor to select 【day/night】menu item in the
【exposure mode】and press【iris open】key to confirm , then
enter the day/night settings.
2. With pan tilt up or down to change the settings and press the
【iris open】key to save the day/night mode setting and exit;
press 【iris close】key without saving the day/night mode and
exit.
3. Time settings: With pan tilt up and down the command,
move the cursor to the start time of the day, press the 【iris
open】 key to enter time or to change settings, press the 【iris
open】key to save the day/night mode setting and exit ; press
【iris close】key without saving the settings and exit.
◆RED
1.Move the cursor to select【R gain】menu item in the 【white
balance】and press 【iris open】key to confirm, then enter the
Red gain settings.
2. Change the red, can gain from 0 - 255 choose to set the
value enhancement, and red, red represents an increase, the
more shade warmer by the pan tilt’s up or down command.
3. Press【iris open】key to save red gain setting and exit, press
【iris close】key without saving red gain setting and exit.
Note: Just the white balance mode is manual, the setting can be
done.
■WHITE BALANCE
Users can set the camera through the menu of
white balanced patterns ( automatic and
manual ) red and blue, and gain benefits
adjustment.
Camera parameters setting
lens parameters
exposure mode
→white balance
backlight mode
privacy mask
GAIN SETTING
Φ Operation settings as follows:
◆BLUE GAIN SETTING
Φ Operation settings as follows:
1.Move the cursor to select【B gain】menu item in the 【white
balance】and press 【iris open】 key to confirm, then enter the
blue gain settings,
2. Change from blue gain value 0 - 255 choose to set the blue,
the greater the benefits of the value that represents an increase
in the shade of green, the more he turn chilly. by the pan tilt’s
up or down command.
3. Press 【iris open】key to save green gain setting and exit,
press 【iris close】key without saving blue gain setting and
exit.
white balance mode
→white balance mode auto
R gain
000
B gain
000
Note: Just the white balance mode is manual,
the setting can be done.
■BACKLIGHT MODE SETTING
◆WHITE BALANCE SETTING
The camera supports a variety of white balance mode,
automatic mode, and manual mode, automatic tracking mode,
and single trigger mode, indoor and outdoor mode.
The background of the strong light to a shadow objects, the
compensatory automatically adjust the aperture to facilitate
Different light. the correct image of the brightness and a clear
picture screen.
Φ Operation settings as follows:
1. Call preset 95 and enter the camera’s main menu.
2. Move the cursor up or down to select【camera parameters】
menu items and press【iris open】key to confirm, then enter the
lens parameters menu..
3. Move the cursor to select【white balance】menu item in the
【camera parameters】 and press【iris open】 key to confirm,
then enter the white balance mode setting.
4. Move the cursor to select【white balance】menu item in the
【white balance】 and press【iris open】 key to confirm, then
enter the white balance mode setting.
Camera parameters setting
lens parameters
exposure mode
white balance
→backlight mode
privacy mask
16
backlight menu
→backlight mode: off
wide dynamic mode: off
◆BACKLIGHT
MODE SETTING
◆PRIVACY MASK SETTING
Φ Operation settings as follows:
Φ Operation settings as follows:
1.Move the cursor to select 【backlight mode】 menu item in
the【camera parameters】and press【iris open】key to confirm,
then enter the backlight mode settings.
2. With pan tilt up, down, up or down to select setting .
3.Press【iris open】key to save backlight mode setting and exit,
press 【iris close】 key without saving backlight mode setting
and exit.
◆WIDE DYNAMIC MODE SETTING
When in the strong light( sun, lamps, or reflective )the high
intensity in the region and shadow, and the relative brightness
area in the image is also lead to bright because of
overexposure region became white and dark areas for
exposure of a black, serious impact on the image quality and
dynamic features in a camera system to the region can become
bright and make the scene of the soft light district has become
more and changes the visual effect.
Φ Operation settings as follows:
1.Move the cursor to select【wide dynamic level】menu item
in the 【camera parameters】 and press 【iris open】 key to
confirm, then enter the wide dynamic level settings.
2. With pan tilt up, down, up or down to select setting .
3.press【iris open】key to save wide dynamic level setting and
exit, press【iris close】key without saving wide dynamic level
setting and exit.
1. Call preset 95 and enter the camera’s main menu.
2. Move the cursor to select【camera parameters】 menu item
and press【iris open】key to confirm, then enter the camera
parameters setting menu, and then move the cursor to select
【privacy mask】menu item and press【iris open】to enter
privacy mask setting.
3. Move the cursor to select 【privacy mask setting】 menu
item in the【privacy mask】 submenu and press 【iris open】
key to confirm, then enter the camera parameters setting
menu.
4.The user control about moving the camera, place at the
centre needed privacy in an object or location,【iris open】the
monitor screen button, and center location will show a small
piece of black of the privacy of the window Sunlight.
5. According to cover the actual size, adjust the black privacy
in the window's size to the required size. move right rockers,
increased from a window size for the vacillating 。
6.Press 【iris open】key to save privacy mask setting and exit,
press【iris close】key without saving privacy mask setting and
exit.
ϖ NOTE:The camera cover all personal settings are
the same regional approach to the definition, display,
the privacy, you should choose to privacy.
ϖ NOTE:some dome can not support the setting.
◆MASK ACTIVATE SETTING
Φ Operation settings as follows:
PRIVACY MASK SETTING
Camera parameters setting
privacy mask submenu
lens parameters
exposure mode
white balance
backlight mode
→privacy mask
→mask number
Setup new mask
Mask activate
Show next mask
Delete current mask
1. Call preset 95 and enter the camera’s main menu.
2. Move the cursor to select【camera parameters】menu item
and press【iris open】key to confirm, then enter the camera
parameters setting menu。
3. Move the cursor to select【mask activate】menu item and
press【iris open】key to confirm, then enter the mask activate
setting menu.
4. Move the cursor to select【mask activate】menu item in the
【privacy mask】 submenu and press【iris open】key to
confirm, then enter the mask activate setting menu.
5. With pan tilt up, down, up or down to select setting .
6. .press【iris open】key to save mask activate setting and exit,
press【iris close】key without saving mask activate setting and
exit.
Privacy functions will be a certain area shielded display. the
user through the setting may be needed privacy in the area,
covering up the camera can support up to eight privacy
covered regional ( size can be set up. the sunlight ) can with
the machine.
ϖ REMARK:
PAN TILT SETTING
1.Privacy with builtin camera settings feature of the model,
different types of camera support of the privacy of the window
is slightly different. in addition, part of the camera does not
support the privacy protection features.
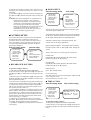
2, When the camera down a vertical ≥ 45 degrees, the privacy in
function must not be located, the following diagram :
Main menu
s
lim it
Se t 4 5
Se t
lim it
45 s
system setting
camera parameters
pan tilt setting
display configuration
alarm setup
Cannot set limits
17
pan tilt setting menu
→pan tilt setup
presets setup
sequence setup
pattern setup
zone setup
time action
home action
◆SPEED PROPORTIONAL
When manual regulation, possibly to the focal distance far
situation, the camera high speed response causes touches
when slightly the rocking bar to cause the picture to move
rapidly, thus causes the picture to lose, when near looks at the
picture burnt, easy to present the picture flutter.
In the speed proportion match opens in the situation, rapes the
speed will change according to the lens time becomes the
proportion change. The raping speed will increase along with
lens' enlargement factor slows down gradually. Like this
causes the image to rape in the rapid traverse also to be able to
maintain clear in the monitoring device. The speed which
when the lens will change time will be biggest rapes will turn
for 0.1 degrees/second.
■PAN TILT SETTING
Users through the menu for automatic flip
and joystick recover, speed proportional to
set.
Pan tilt setting menu pan tilt parameters
→pan tilt setup
presets setup
→auto flip : off
sequence setup
pattern setup
zone setup
time action
home action
Joystick recover : all
Speed proportional:on
Set north direction
Goto zero position
Φ Operation settings as follows:
1. Call preset 95 and enter the camera’s main menu.
2. Move the cursor to select【pan tilt setup】menu item in the
【pan tilt setting】and press【iris open】key to confirm, then
enter the pan tilt setup menu.
3. Move the cursor to select 【speed proportional】menu item
in the 【pan tilt setup】and press【iris open】key to confirm,
then enter the pan tilt setup menu。
4. With pan tilt up, down, up or down to select setting .
5. press【iris open】key to save speed proportional setting and
exit, press【iris close】key without saving speed proportional
setting and exit.
◆AUTO FLIP
User panned to the bottom ( vertical ) if still leash rockers,
the level of pivoting 180 degrees angle and turned up to 90
degrees, you can see to the scene, vertical 180 the whole
monitoring.
Φ Operation settings as follows:
1. Call preset 95 and enter the camera’s main menu.
2. Move the cursor to select【pan tilt setting】 menu item and
press【iris open】key to confirm, then enter the pan tilt setting
menu。
3. Move the cursor to select【pan tilt setup】menu item in the
【pan tilt setting】 and press【iris open】key to confirm, then
enter the pan tilt setup menu.
4. With pan tilt up, down, up or down to select setting .
Choice open to open automatic rollover, but the automatic
vertical 90 degrees rollover ; chosen to close and turned off
automatically. automatic vertical cannot be achieved. over 90
degrees.
5. Press【iris open】key to save auto flip setting and exit, press
【iris close】key without saving auto flip setting and exit。
◆SET NORTH DIRECTION
After carrying out this function, the system automatically the
ball machine current position preservation for the ball
machine north position, this position as the position
instruction zero spot, namely the level 0° position.
Φ Operation settings as follows:
1. Call preset 95 and enter the camera’s main menu.
2. Move the cursor to select【pan tilt setup】menu item in the
【pan tilt setting】 submenu and press 【iris open】 key to
confirm, then enter the pan tilt setup menu.
3. Move the cursor to select【set north direction】menu item
in the 【pan tilt setup】 submenu and press【iris open】 key
to confirm, then enter the et north direction setting.
4. User actions rockers, will be the lens at the set is the
direction, press the 【iris open】button confirmed that the
system will keep the camera to the position of the press 【iris
close】 button to return to the next menu.
◆JOYSTICK RECOVER
open: Select this after using the manual focus or manual iris,
just click joystick manipulation, will return to
the autofocus and automatic Iris mode..
Focus: Select this after using the manual focus or manual iris,
just click joystick control, only to return to auto
focus mode.
Iris: Select this after using the manual focus or manual iris,
the manipulation of what rocker, only to return
to the auto Iris mode.
Φ Operation settings as follows:
◆GOTO
ZERO POSITION
After carrying out this function, the system will
examine horizontal and the vertical zero point, thus
realizes in the camera accident outofstep situation to
resume the localization.
Φ Operation settings as follows:
1. Call preset 95 and enter the camera’s main menu.
1. Call preset 95 and enter the camera’s main menu.
2. Move the cursor to select【pan tilt setup】menu item in the
【pan tilt setting】and press【iris open】key to confirm, then
enter the pan tilt setup menu.
3. Move the cursor to select【pan tilt setup】menu item in the
【pan tilt setup】submenu and press【iris open】key to confirm,
then enter the pan tilt setup menu。
4. With pan tilt up, down, up or down to select setting .
5. Press 【iris open】key to save joystick recover setting and
exit, press 【iris close】key without saving joystick recover
setting and exit.
2. Move the cursor to select【pan tilt setup】menu item in the
【pan tilt setting】and press 【iris open】key to confirm, then
enter the pan tilt setup menu.
3. Move the cursor to select【goto zero position】menu item
in the 【pan tilt setup】submenu and press【iris open】 key to
goto zero position.
18
5. The user control migration camera, the central place
alignment presetting, presses the【iris open】
key, preserves the
current initialization spot to establish and to withdraw from
this establishment; Presses the 【iris close】key, cancels the
current initialization spot to establish and to withdraw from
this establishment.
■PRESET SETUP MENU
Preset time can make the camera will the current state
of the horizontal, vertical angle head tilt camera angle
and multiple locations such positional parameter, you
need to preserve the memory can quickly in order to
directly call these arguments make a quick adjustment
to the location accuracy. The camera supports 255
presets.
Pan tilt setting menu
pan tilt setup
→presets setup
sequence setup
pattern setup
zone setup
time action
home action
◆PRESET
ϖ NOTE: When must carry out the definition, the
demonstration, the elimination initialization and the
edition title, should choose an initialization serial
number first.
preset setting menu
→ preset number
■CRUISE SEQUEUE SETTING
: 000
Scans the function establishment through a initialization
cruise, may certain establish the order which the good
preplaced spot presses needs to arrange to the cruise scans in
the route, and may establish alone in each initialization pause
time, after a movement initialization cruise scans, the ball
opportunity according to a initialization order which arranges
in advance one by one transfers. The camera most may
establish saves 4 initialization cruise to scan the route, each
may save 32 preplaced spots.
title1:
title2:
Set new preset
Show next preset
Delete current
NUMBER SETTING
Pan tilt setting menu
Φ Operation settings as follows:
1. Call preset 95 and enter the camera’s main menu.
2. Move the cursor to select【pan tilt setting】menu item and
pan tilt setup
presets setup
→sequence setup
pattern setup
zone setup
time action
home action
press【iris open】key to confirm, enter the pan tilt setting
menu.
3. Move the cursor to select 【pan tilt setup】menu item in the
【pan tilt setting】and press【iris open】 key to confirm, then
enter the pan tilt setup menu.
4. Move the cursor to select【preset number】menu item in the
【pan tilt setting】 submenu and press【iris open】 key to
confirm, then enter the preset number setting menu, in which
case the parameter flashes .
5. With pan tilt up, down, up or down to select setting .
6. .press【iris open】key to save preset number setting and exit,
press 【iris close】 key without saving preset number setting
and exit.
→sequence number
Default Dwell:
Edit sequence
Run sequence
Delete current
:000
000
◆CRUISE SEQUENCE NUMBER SETTING
Φ Operation settings as follows:
1. Call preset 95 and enter the camera’s main menu.
2. Move the cursor to select 【pan tilt setting】menu item and
press【iris open】key to confirm, then enter the pan tilt setting
menu.
3. Move the cursor to select【sequence setup】menu item in the
【pan tilt setting】 and press【iris open】key to confirm, then
enter the sequence setup menu.
4. Move the cursor to select【sequence number】menu item in
the【sequence setup】 submenu and press【iris open】key to
confirm, then enter the sequence number setting menu, in
which case the parameter flashes .
5. With pan tilt up, down, up or down to select setting .
6. .Press 【iris open】key to save sequence number setting and
exit, press 【iris close】key without saving sequence number
setting and exit.
◆TITLE SETTING
Φ Operation settings as follows:
1.Move the cursor to【title】menu item in the【pan tilt setting】
submenu and press【iris open】key to confirm, then enter the
title setting menu, in which case the parameter flashes .
2. Refer “edit the title”
3.press 【iris open】 key to save setting and exit, press 【iris
close】 key without saving setting and exit.
◆PRESET
sequence setting
SETTING
Φ Operation settings as follows:
1. Call preset 95 and enter the camera’s main menu.
2. Move the cursor to select【pan tilt setting】menu item and
◆EDIT SEQUENCE
Φ Operation settings as follows:
1. Call preset 95 and enter the camera’s main menu.
2. Move the cursor to select【pan tilt setting】menu item and
press【iris open】key to confirm, then enter the pan tilt setting
menu.
3. Move the cursor to select【pan tilt setup】menu item in the
【pan tilt setting】 and press【iris open】key to confirm, then
enter the pan tilt setup menu.
4. Move the cursor to select【preset setting】 in the【pan tilt
setting】 submenu to confirm and enter the preset setting .
press【iris open】key to confirm, then enter the pan tilt setting
menu.
3. Move the cursor to select【edit sequence】menu item in the
【pan tilt setting】 and press【iris open】key to confirm, then
enter the edit sequence menu.
19
■ ZONES SETUP
Pan tilt setting menu
4. With pan tilt left, right, turn left or right to move the cursor
parameters, then, with head and orders, or to choose to set the
parameters.
5. Press【iris open】key to save edit sequence setting and exit,
press【iris close】key without saving edit sequence setting and
exit.
ϖ NOTE: Each group of parameters are composed of two
number of classes characters, first represents a
initialization serial number, second represents the
resident time, each initialization resident time take
has not tacitly approved the time in the change
situation as the standard, the user also possibly carries
on through the current menu establishes each
initialization pause alone the time, each cruise are
most may establish 32 preplaced spots.
pan tilt setup
presets setup
sequence setup
pattern setup
→zone setup
time action
home action
◆ RECORD
001
title1:
title2:
Set left limit
Set right limit
default speed: 064
Run continuously
Delete current
Areas and levels were similar, only a user can be named
for the zone. when the camera to certain areas, the name
of the region will be shown to remind operators.
It may realize the camera continuous record 1000 different
movement instructions, including the camera to rape
movements and so on control, camera convention control,
when movement the camera opportunity according to the
record movement path redundant movement, the pattern
function may establish 4.
pan tilt setup
presets setup
sequence setup
→pattern setup
zone setup
time action
home action
→zoom number:
Area is the level of a region between two points. Users
can set the region and the line.
■PATTERN SETUP
Pan tilt setting menu
zone setup
Attention: Camera only to sweep the horizon. The
camera user can be set up eight areas.
Region indicate numbers :001 displays the current key.
the value of 001 ~ 008. in 【iris open】 select, change the
values.
pattern setup
→pattern number
:001
title1:
title2:
Record new pattern
Run continuously
Delete current
Sets the name of the zone. See the page title settings P23
Set left limit
Operation of the camera moved to the needs of the
location then press the【iris open】.
Set right limit
Operation of the camera moved to the needs of the
location then press the【iris open】.
NEW PATTERN
Φ Operation settings as follows:
1. Call preset 95 and enter the camera’s main menu.
2. Move the cursor to select【pan tilt setting】menu item and
Delete current
Press 【iris open】to delete
press【iris open】key to confirm, then enter the pan tilt setting
menu.
3. Move the cursor to select【pattern setup】menu item in the
【pan tilt setting】 and press【iris open】key to confirm, then
enter the pattern setup menu.
4. Move the cursor to select【record new pattern 】menu item
in the【sequence setup】 submenu and press【iris open】key
to confirm, then enter the record new pattern setting menu,
The user may operate the top, bottom, left and right control
lens (aperture exception) and so on.
5. Presses the【iris open】key to confirm that enters the record
pattern condition, this time the screen demonstrated that “the
record pattern way”, instantly operates the ball machine the
path movement which premust record according to the user,
the ball machine movement path during this period of time
will be preserved by 11 memories.
6. When the user need finished the current record pattern,
pressed the 【iris open】, preserved the current record pattern
to establish and to withdraw from this establishment;
7. By the【iris close】button, the model set the record and exit
of the settings.
Cruise speed setting
The value of 001 to 255, the great speed higher. in【iris open】
select, change the values.
Runs the current area scan (001 ~ 008).
■ TIME ACTION
Pan tilt setting menu
pan tilt setup
presets setup
sequence setup
pattern setup
zone setup
→time action
home action
time action setting
→running channel:
001
Start time:00:00:00
End time:00:00:00
Time action: preset 1
Φ Operation settings as follows:
1. Call preset 95 and enter the camera’s main menu.
2. Move the cursor to select【 pan tilt setting】menu item and
press【iris open】key to confirm, then enter the pan tilt setting
menu.
20
2. Issues a decree with raping on, upward or downward
changes the home action, may from 14 automatic scans, 1200
presets, 14 cruises line up in formation, in 14 pattern ways to
choose.
3.Press【iris open】key to save home action setting and exit
setting, press【iris close】key without saving home action
setting and exit setting.
3. Move the cursor to select【time action】menu item in the
【pan tilt setting】 and press【iris open】key to confirm, then
enter the time action menu.
4. with pan tilt on the orders, or to change the leisure time, but
a second time. press select to set to【iris open】button and set
out in your time action and at the 【iris close】 button ,and not
saving time action setting and exit.
■DISPLAY CONFIGURATION
◆TIME ACTION
Φ Operation settings as follows:
1. Move the cursor to select【time action】menu item in the
【pan tilt setting】 and press【iris open】key to confirm, then
enter the time action menu.
2, Issues a decree with raping on, upward or downward
changes the idle function, may from 14 automatic scans, 1200
initialization, 14 cruises line up in formation, in 14 pattern
ways to choose.
3. Press 【iris open】key to save home action setting and exit,
press 【iris close】key without saving home action setting and
exit.
Main menu
Presets title
Regions name
Zoom position
Direction indicators
Environment
System clock
Global setting
■DOME TITLE
Φ Operation settings as follows:
1. Call preset 95 and enter the camera’s main menu.
2. Move the cursor to select【pan tilt setting】menu item and
press【iris open】key to confirm, then enter the pan tilt setting
menu .then move the cursor to select【dome title】menu item
in the 【display configuration】 and press【iris open】key to
confirm.
3. With pan tilt up, down, up or down to select setting
4. .press 【iris open】key to save dome title setting and exit,
press 【iris close】key without saving dome title setting and
exit.
Has not received any order from the camera to start to time, in
user hypothesis time section, if still did not have the receive to
assume the post what order, then the camera automatic
execution “carries out the function the user to assign the
establishment idle” some function, the home time may from
5255 second choice establishment.
pan tilt setup
presets setup
sequence setup
pattern setup
zone setup
time action
→home action
→dome title
system setting
camera parameters
pan tilt setting
display configuration
motion detection
alarm setup
■HOME TIME SETTING
Pan tilt setting menu
display configuration
home action setting
ϖ NOTE: presets title, zoom position, regions name,
direction indicators, environment, and system clock are the
same; please refer to the title setting out the steps below.
→home time :255
Home action :off
■GLOBAL SETTING
The settings for dome title, presets title, regions name, zoom
position, direction indicators, environmental, system clock
display to synchronize.
Φ Operation settings as follows:
◆ HOME TIME
Φ Operation settings as follows:
1. Call preset 95 and enter the camera’s main menu.
1. Call preset 95 and enter the camera’s main menu.
2. Move the cursor to select【pan tilt setting】menu item and
2. Move the cursor to select 【pan tilt setting】menu item and
press【iris open】 key to confirm, then enter the pan tilt setting
menu. then move the cursor to select【dome title】menu item
in the 【display configuration】 and press【iris open】key to
confirm.
3. Press【iris open】key, synchronizing changes the display
configuration information and press 【 CLOSE 】 key to exit
the menu.
press【iris open】key to confirm ,then enter the pan tilt setting
menu. Move the cursor to select 【home time】 menu item in
the 【pan tilt setting】 and press 【iris open】 key to confirm,
then enter the home time menu.
3. Move the cursor to select 【home time】menu item in the
【home action】 and press 【iris open】key to confirm, then
enter the home time menu .
4. With pan tilt on the orders, or to change the leisure time, but
from 5 seconds - 255 choose to set home time.
5. press 【iris open】 key to save auto home time setting and
exit, press 【iris close】key without saving home time setting
and exit.
■ALARM SETUP
Main menu
system setting
camera parameters
pan tilt setting
display configuration
motion detection
alarm setup
◆ HOME ACTION
Φ Operation settings as follows:
1.Move the cursor to select 【home action】menu item in the
【home action】 and press 【iris open】key to confirm, then
enter home action setting.
21
display configuration
→input channel :
001
Alarm action:
disarm
Input mode:
no
Alarm linkage:
off
Relay output:
off
Reset delay :
30
Arm time: 00:00:00
Disarm time: 00:00:00
■DISPLAY CONFIGURATION
■ ALARM LINKAGE
This camera supports 8channel alarm input, 4 output. camera
alarm input to switch quantity input alarm. camera alarm
menu separate edit settings on a per alarm linkage function
and alarm output ports, and routes alarming specific edit
settings in the same way. When the camera alarm,
the camera chance to do the following:
1.Carries out in the menu to edit the establishment a linkage
function, the linkage function must preserve in advance
has the corresponding function establishment. If 3
warnings are activated, the linkage function establishes as
presetting 2, then the camera instantly changes to 2
presettings to carry on the surveillance.
2 .Alarm output channel output alarm switch to start the
external alarm devices
3. Alarm system, automatic alarm by priority (1channel as
the most advanced, 4way to the lowest level).
4 .Simultaneously has when the multichannel warnings
produce, the warning output will respond also, but the
warning linkage function moves one by one priority, the
warning output may suppose to often open/often shuts
the pattern, the concrete establishment please refer to
jumps the line to establish one.
After using for establishes the current channel warning,
whether the linkage carries out the special function which
some establish in advance, like 14 automatic scans, 1255
initialization, 16 cruises line up in formation, 16 pattern ways.
1. Call preset 95, go to the camera's main menu.
2. Move the cursor to select 【alarm setup】menu item and
press【iris open】key to confirm, then enter the alarm setup
menu.
3. Move the cursor to select 【alarm linkage】menu item in the
【alarm setup】 and press 【iris open】key to confirm.
4. Use the Pan tilt up or down command, or to change the
alarm linkage, from 14 Autoscanning, pointinbox 1255, 16
cruise queues, 16 mode select a path.
5. Press 【iris open】key to save the current settings and exit;
press 【CLOSE 】 key without saving the current settings and
exit.
■ RELAY OUTPUT
The current channel is used to set the alarm, the alarm output
relay linkage.
Φ Operation settings as follows:
1. Call preset 95t, go to the camera's main menu.
2. Move the cursor to select 【alarm setup】 menu item and
■ALARM ACTION
press【iris open】key to confirm ,then enter the alarm setup
menu
3. Move the cursor to select 【relay output】menu item in the
【alarm setup】 and press 【iris open】key to confirm.
4. Use the Pan tilt up or down command to turn on or off the
relay output.
5. Press 【iris open】key to save the current settings and exit;
press 【CLOSE 】 key without saving the current settings and
exit.
Φ Operation settings as follows:
1. Call preset 95 and enter the camera’s main menu.
2. Move the cursor to select 【alarm setup】 menu item and
press【iris open】key to confirm, then enter the alarm setup
menu.
3. Move the cursor to select 【alarm action】menu item in the
【alarm setup】 and press 【iris open】key to confirm.
4. With pan tilt up, down, up or down to select setting
5. Selective time action please to press the corresponding
operation establishment cloth withdrawing from disarm time.
■ RESET RELAY
■ INPUT MODE
That is, the current channel alarm occurred, if the alarm signal
removal, the dome will by setting the alarm time to clear the
ball machine, back to their normal state. It can be set to 1255
seconds.
Sets the current channel alarm input mode :
When jumper to set at NC: Normal alarm input closed,
disconnect an alarm is generated when the input signal ;
When jumper to set at NO: Normal alarm input disconnect
and close the alert is generated when the input signal .
Φ Operation settings as follows:
1. Call preset 95, go to the camera's main menu.
2. Move the cursor to select 【alarm setup】 and press【iris
open】 key to confirm, then enter the alarm setup menu
3. Move the cursor to select 【reset Relay】menu item in the
【alarm setup】 and press 【iris open】key to confirm.
4. Use the Pan tilt up or down command to change the choices
you can choose from 1255S.
5. Press 【iris open】key to save the current settings and exit;
press【iris close】key without saving the current settings and
exit.
Φ Operation settings as follows:
1. Call preset 95 and enter the camera’s main menu.
2. Move the cursor to select 【alarm setup】 menu item and
press【iris open】key to confirm ,then enter the alarm setup
menu.
3. Move the cursor to select 【input mode】menu item in the
【alarm setup】 and press 【iris open】 key to confirm, then
enter the input mode menu.
4. With pan tilt up, down, up or down to select setting
5. Press 【iris open】key to save input mode setting and exit,
press 【iris close】key without saving input mode setting and
exit.
22
APPENDIX I: SPECIAL FUNCTION OPERATION
There are some shortcuts to operate some speed dome functions under PelcoD/P protocol.
Function
Shortcut Command
Call OSD menu
Call 95# preset, save 95# preset
Set left limit of scan area
Call 92# preset
Call 93# preset
Set right limit of scan area
Run 1st zone setup
Call 97# preset
Run continuous preset tour
Call 99# preset
Run Tour 1
Call 98,201# preset
Run Tour 2
Call202# preset
Run Tour 3
Call 203# preset
Run Tour 4
Call 204# preset
Delete Tour 1
Call 205# preset
Delete Tour 2
Call 206# preset
Delete Tour 3
Call 207# preset
Delete Tour 4
Call 208# preset
Run Pattern 1
Call 96,209# preset
Run Pattern 2
Call210# preset
Run Pattern 3
Call 211# preset
Run Pattern 4
Call212# preset
Record Pattern 1
Call 213# preset
Record Pattern 2
Call 214# preset
Record Pattern 3
Call 215# preset
Record Pattern 4
Call 216# preset
Stop Recording Pattern
Call 217# preset
23
APPENDIX II: DIP
SWITCH SETTINGS
This is the guides for setting protocol, baud
rate, dome address, video cable type, resistor
jumper and alarm output.
υ
This model of speed dome supports
multiprotocol. The setting chart is shown
below.
DIP Switches’ position
S wi t c h N u m b e r
The corresponding Dipswitches’ positions are
shown below:
Protocol
B1
B2
B3
B4
B5
B6
FACTORY
YAAN
ON
ON
ALEC
PELCO_PD
ON
ON
ON
PELCO_C
VCL
SW2
ON
MOLYNX
SW1
VICON
ON
ON
ON
ON
ON
ON
ON
DIAMOND
KALATEL304
ON
HUNDA
υ
LILIN
Protocol and baud rate setting
SW1 is for protocol and baud rate settings. Bits
1~6 of SW1 are for protocol setting and bits
7~8 are for baud rate setting as shown in the
chart below
AD*
Default setting is 4800 bps.
PANASONIC
——
2400
4800
9600
19200
〓
1
〓
2
PHILIPS*
〓
7
off
on
off
on
ON
〓
8
off
off
on
on
——
ON
ON
ON
ON
ON
——
——
——
——
——
——
——
——
——
24
ON
ON
ON
ON
ON
ON
ON
ON
ON
ON
ON
ON
ON
ON
ON
ON
ON
ON
ON
x
x
x
KALATEL
Led
Flashing green light means control commands
reach the dome.
Red light is on when effective command
received.
ON
ON
DAHUA
NISECAM
ON
ON
ON
——
PHILIPS*
υ
ON
ON
ON
ON
ON
——
——
Dip Switch Digits
〓 〓 〓 〓
3
4
5
6
ON
SANT ACH I
PELCO_PD_T
Baud
Rate
ON
ON
ON
ON
x
x
ON
B7
B8
υ
Dome address setting
υ
Address setting chart
ID
B1 B2 B3 B4
The control commands contain target dome’s
ID. The dome only reacts to the command sent
to its own address or broadcast address.
1
2
3
4
5
6
7
8
9
10
11
12
13
14
15
16
17
18
19
20
21
22
23
24
25
26
27
28
29
30
31
32
33
34
35
36
37
38
39
40
41
42
43
44
45
46
47
48
49
50
51
Each dome should be assigned an address.
Four kinds of IDs are applicable for domes:
1. Hard ID:
Hard ID is set via DIP SW2 can not be
changed from OSD menu. Hard ID ranges
from 1 to 254.
2. Programmable ID:
Set all 8bits of SW2 to ON to activate soft
address. Input 10bit camera SN number,
and then set dome ID by controller (The
dome SN number can be found on the side
of the camera or on the package and user
manual.).
3. Broadcast ID:
Broadcast ID is programmable.
When broadcast ID is available, all domes
connected to the control bus will react to the
command. The default broadcast ID is 255.
SW2 is for dome ID setting. The setting is
strictly according to binary system. If you
are not familiar with binary system please
look up the address setting chart.
Soft
Add
25
B5
B6
B7
B8
ON
ON
ON
ON
ON
ON
ON
ON
ON
ON
ON
ON
ON
ON
ON
ON
ON
ON
ON
ON
ON
ON
ON
ON
ON
ON
ON
ON
ON
ON
ON
ON
ON
ON
ON
ON
ON
ON
ON
ON
ON
ON
ON
ON
ON
ON
ON
ON
ON
ON
ON
ON
ON
ON
ON
ON
ON
ON
ON
ON
ON
ON
ON
ON
ON
ON
ON
ON
ON
ON
ON
ON
ON
ON
ON
ON
ON
ON
ON
ON
ON
ON
ON
ON
ON
ON
ON
ON
ON
ON
ON
ON
ON
ON
ON
ON
ON
ON
ON
ON
ON
ON
ON
ON
ON
ON
ON
ON
ON
ON
ON
ON
ON
ON
ON
ON
ON
ON
ON
ON
ON
ON
ON
ON
ON
ON
ON
ON
ON
ON
ON
ON
ON
ON
ON
ON
ON
ON
ON
ON
ON
ON
ON
ON
ON
ON
ON
ON
ID
ID
52
53
54
55
56
57
58
59
60
61
62
63
64
65
66
67
68
69
70
71
72
73
74
75
76
77
78
79
80
81
82
83
84
85
86
87
88
89
90
91
92
93
94
95
96
97
98
99
100
101
102
Soft
Add
B1
B2
B3
ON
ON
ON
ON
ON
ON
ON
ON
ON
ON
ON
ON
ON
ON
ON
ON
ON
ON
ON
ON
B4
B5
B6
ON
ON
ON
ON
ON
ON
ON
ON
ON
ON
ON
ON
ON
ON
ON
ON
ON
ON
ON
ON
ON
ON
ON
ON
ON
ON
ON
ON
ON
ON
ON
ON
ON
ON
ON
ON
ON
ON
ON
ON
ON
ON
ON
ON
ON
ON
ON
ON
ON
ON
ON
ON
ON
ON
ON
ON
ON
ON
ON
ON
ON
ON
ON
ON
ON
ON
ON
ON
ON
ON
ON
ON
ON
ON
ON
ON
ON
ON
ON
ON
ON
ON
ON
ON
ON
ON
ON
ON
ON
ON
ON
ON
ON
ON
ON
ON
ON
ON
ON
ON
ON
ON
ON
ON
ON
ON
ON
ON
ON
ON
ON
ON
ON
ON
ON
ON
ON
ON
ON
ON
ON
ON
ON
ON
ON
ON
ON
ON
ON
ON
ON
ON
ON
ON
ON
ON
ON
ON
ON
ON
ON
ON
ON
ON
ON
ON
ON
ON
ON
ON
ON
ON
ON
ON
ON
ON
ON
ON
ON
ON
ON
ON
ON
ON
ON
ON
ON
ON
ON
ON
ON
ON
ON
ON
B7
103
104
105
106
107
108
109
110
111
112
113
114
115
116
117
118
119
120
121
122
123
124
125
126
127
128
129
130
131
132
133
134
135
136
137
138
139
140
141
142
143
144
145
146
147
148
149
150
151
152
153
B8
Soft
Add
ON
26
B1
B2
B3
ON
ON
ON
ON
ON
ON
ON
ON
ON
ON
ON
ON
ON
ON
ON
B4
ON
ON
ON
ON
ON
ON
ON
ON
ON
ON
ON
ON
ON
ON
ON
ON
ON
ON
ON
ON
ON
ON
B6
B7
ON
ON
ON
ON
ON
ON
ON
ON
ON
ON
ON
ON
ON
ON
ON
ON
ON
ON
ON
ON
ON
ON
ON
ON
ON
ON
ON
ON
ON
ON
ON
ON
ON
ON
ON
ON
ON
ON
ON
ON
ON
ON
ON
ON
ON
ON
ON
ON
ON
ON
ON
ON
ON
ON
ON
ON
ON
ON
ON
ON
ON
ON
ON
ON
ON
ON
ON
ON
ON
ON
ON
ON
ON
ON
ON
ON
B5
ON
ON
ON
ON
ON
ON
ON
ON
ON
ON
ON
ON
ON
ON
ON
ON
ON
ON
ON
ON
ON
ON
ON
ON
ON
ON
ON
ON
ON
ON
ON
ON
ON
ON
ON
ON
ON
ON
ON
ON
ON
ON
ON
ON
ON
ON
ON
ON
ON
ON
ON
ON
ON
ON
ON
ON
ON
ON
ON
ON
ON
ON
ON
ON
ON
ON
ON
ON
ON
ON
ON
ON
ON
ON
ON
ON
ON
ON
ON
ON
ON
ON
ON
ON
ON
ON
ON
ON
ON
ON
ON
ON
ON
ON
ON
ON
B8
ON
ON
ON
ID
154
155
156
157
158
159
160
161
162
163
164
165
166
167
168
169
170
171
172
173
174
175
176
177
178
179
180
181
182
183
184
185
186
187
188
189
190
191
192
193
194
195
196
197
198
199
200
201
202
203
204
205
Soft
Add
B1
B2
ON
ON
ON
ON
ON
ON
ON
B3
B4
B5
ON
ON
ON
ON
ON
ON
ON
ON
ON
ON
ON
ON
ON
ON
ON
ON
ON
ON
ON
ON
ON
ON
ON
ON
ON
ON
ON
ON
ON
ON
ON
ON
ON
ON
ON
ON
ON
ON
ON
ON
ON
ON
ON
ON
ON
ON
ON
ON
ON
ON
ON
ON
ON
ON
ON
ON
ON
ON
ON
ON
ON
ON
ON
ON
ON
ON
ON
ON
ON
ON
ON
ON
ON
ON
ON
ON
ON
ON
ON
ON
ON
ON
ON
ON
ON
ON
ON
ON
ON
ON
ON
ON
ON
ON
ON
ON
B6
ON
ON
ON
ON
ON
ON
ON
ON
ON
ON
ON
ON
ON
ON
ON
ON
ON
ON
ON
ON
ON
ON
ON
ON
ON
ON
ON
ON
B8
ON
ON
ON
ON
ON
ON
ON
ON
ON
ON
ON
ON
ON
ON
ON
ON
ON
ON
ON
ON
ON
ON
ON
ON
ON
ON
ON
ON
ON
ON
ON
ON
ON
ON
ON
ON
ON
ON
ON
ON
ON
ON
ON
ON
ON
ON
ON
ON
ON
ON
ON
ON
ON
ON
ON
ON
ON
ON
ON
ON
ON
ON
ON
ON
ON
ON
ON
ON
ON
ON
ON
ON
ON
ON
ON
ON
ON
ON
ON
ON
ON
ON
ON
ON
ON
ON
ON
ON
ON
ON
ON
ON
ON
ON
ON
ON
ON
ON
ON
ON
ON
ON
B7
ON
υ Resistor Jumper Setting
2 120Ωresistor is needed to be set at the
fatherest dome and keyboard in the RS485
bus.
Set the JP3 ON to connect the 120Ω
resistor.
Set the JP3 OFF to disconnect the resistor
Factory default “OFF”。
OFF
JP3 ON
OFF
27
NO
APPENDIX III: WIRE DIAMETER &
TRANSMISSION
CHART
The transmission distance listed below are farthest ones recommended for each given wire diameter
when the 24V AC voltage loss ratio is below 10% (for equipment powered by AC, the allowed maximum
voltage loss ratio is 10%).
For example, a set of equipment with nominal power as 80VA, installed 35 feet (10m) away from
transformer, needs a wire with a minimum diameter of 0.8000mm.
0.8000
1.000
1.250
10
283
%
86
&
451
%
20
141
%
42
&
30
94
%
28
40
70
%
21
50
56
%
17
60
47
%
14
70
40
%
12
80
35
%
10
90
31
%
100
2.000
137
&
716
%
218
&
1811
%
551
&
225
%
68
&
358
%
109
&
905
%
275
&
&
150
%
45
&
238
%
72
&
603
%
183
&
&
112
%
34
&
179
%
54
&
452
%
137
&
&
90
%
27
&
143
%
43
&
362
%
110
&
&
75
%
22
&
119
%
36
&
301
%
91
&
&
64
%
19
&
102
%
31
&
%
258
&
78
&
56
%
17
&
89
%
27
&
226
%
68
&
9
&
50
%
15
&
79
%
24
&
201
%
61
&
28
%
8
&
45
%
13
&
71
%
21
&
181
%
55
&
110
%
25
&
7
41
%
12
&
65
%
19
&
164
%
49
&
120
23
%
7
&
37
%
11
&
59
%
17
&
%
150
&
45
130
21
%
6
&
34
%
10
&
55
%
16
&
139
%
42
&
140
20
%
6
&
32
9
%
&
51
%
15
&
129
%
39
&
150
18
%
5
&
30
9
%
&
47
%
14
&
120
%
36
&
160
%
17
&
5
28
8
%
&
44
%
13
&
113
%
34
&
170
16
%
4
&
26
7
%
&
42
%
12
&
%
106
&
32
180
15
%
4
&
25
7
%
&
39
%
11
&
%
100
&
30
190
14
%
4
&
23
7
%
37
%
11
&
%
&
&
28
14
4
22
6
%
&
35
%
10
&
200
%
28
95
90
%
27
&
APPENDIX IV:RS485 BUS BASIC KNOWLEDGE
1. Basic Property
RS485 Bus is specified by RS485 standards. It is of halfduplex data transmission cables with
characteristic impedance as 120.
The maximum load capacity is 32 effective loads (including main controller and controlled equipment).
2. Transmission Distance
For 0.56mm (24AWG) twisted pair wires as data transmission cable, the maximum theoretical
transmitting distances are as follows
Baud Rate
Max. Transmit Distance
2400BPS
1200m
4800BPS
1000m
9600BPS
800m
In case of thinner cables, or installs the dome in an environment with strong electromagnetic interference,
or connects large number of equipment to the RS485 Bus, the maximum transmitting distance will be
decreased.
3. Connection and termination resistor
31 The RS485 standards require daisychain connection between the equipment. There must be
termination resistors with 120 ohm impedance at both ends of the connection (Refer to following
pictures).
Please refer to following picture for simple connection. “D” should not exceed 7m.
29
4.
Best Practice
5. RS485
In some circumstances user adopts a star
configuration in practical connection. The
termination resistors must be connected to the
two equipment that are farthest away from
each other, such as equipment 1# and 15# in
the following picture.
Trouble
Dome can do
selftesting
but cannot
be controlled.
As the star configuration is not in conformity
with the requirements of RS485 standards,
problems such as signal reflections, lower
antiinterference performance arise when the
cables are long in the connection.
The reliability of control signals is decreased
with the phenomena that the dome does not
respond to or just responds at intervals to the
controller, or does continuous operation
without stop ( Refer to following picture).
The dome
can be
controlled
but the
operation is
not smooth
30
Possible Cause
Solution
1. The address and
baud rate settings
of dome are
not in conformity
with those of
controller.
2. The + and
connection of
RS485 Bus is
incorrect.
3. Wiring is not
fully seated.
4. There is
breakage in the
middle section of
the
RS485 Bus.
1. Change the
address and baud
rate of
controller or dome.
2. Correct the
connection.
3. Make sure the
connections are
fully
seated.
1. The RS485 Bus
line is not in good
contact with
the connectors.
2. One wire of the
RS485 Bus is
broken.
3. The dome is very
far away from
controller.
4. There are too
many domes
connected in the
system.
1. Secure the
connection.
2. Replace RS485
Bus wires.
3. Add termination
resistors to the
system.
4. Install RS485
distributor.
APPENDIX V: TROUBLE SHOOTING
Problem
Cause
Solution
Red LED on circuit board is off:
The is no AC power connected to the PCB
Board.
There is a power outage or problem of the
transformer.
Camera module is not correctly connected.
Output Voltage of transformer is too low.
The power board is not working.
Check the power connection and
outlet make sure they are working
properly.
Check power supply and
transformer to make sure if they
are working properly.
Check all power related cable.
Examine the power on the dome
side making sure it is above 16V.
Selftest is ok but
dome can not be
controlled
Wrong dip switch setting; Control cable
reversely connected or disconnected
Set the dip switch correctly
according to operation manual.
Check the control cable, making sure
it is correctly and firmly connected.
Fan speed under
1000 rps
Fan not firmly connected
Connect fan correctly. If speed is still
under 1000 rpm, please contact
dealer to replace the fan
Blurred picture
Dome in manual focus mode or bubble is
stained
Set focus to auto mode. Clear the
bubble
No movements,
no video after
power on
31
APPENDIX VI:
LIGHTNING PROOF &
SURGE SIGNAL PROOF
The product adopts TVS lightning proof technology
to prevent from damage by lightning strike below
1500 W and impulse signals such as surge.
But it is also necessary to abide by the following
precautions to ensure electrical safety based on
practical circumstances:
Keep the communication cables at least 50 meters
away from high voltage equipment or cables.
Make outdoor cable layingout under eaves as
possible as you can.
In open area shield cables in steel tube and conduct
a single point ground to the tube. Trolley wire is
forbidden in such circumstances.
In strong thunderstorm or high faradic zone (such
as high voltage transformer substation), extra
strong lightning proof equipment must be installed.
Take the building lightning proof requirements into
account to design the lightning proof and grounding
of outdoor equipment and cable layingout in
accordance with the national and industrial
standards.
The system must be grounded with equal potentials.
The earth ground connection must satisfy the
antiinterference and electrical safety requirements
and must not shortcircuited with high voltage
electricity net. When the system is grounded
separately, the resistance of down conductor should
be + 4 Ω and the sectional
32