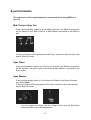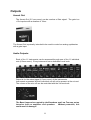
1
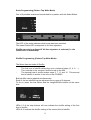
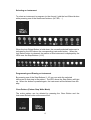
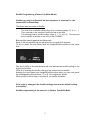
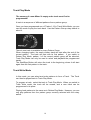
e
2
Declaration of Conformity
Manufacturer: Klaus Süßmuth Elektronik
Manufacturer´s Karlsbaderstr. 7
D-83024 Rosenheim,
Address:
Germany
The manufacturer hereby declares that the product
Product Name:
Model Numbers:
Product Options:
Bassline, Miami, Bombass
all
all
complies with the following European directives:
2006/95/EC, Low voltage directive (LVD)
2004/108/EC, EMC-Directive
The applied standards certifying the conformity are listed below:
Electromagnetic Emission:
EN 61000-6-3, EN 55011
Electromagnetic Immunity:
EN 61000-6-1
Safety (Low Voltage Directive) :
EN 61010-1
June 12, 2008
Rosenheim, Germany
Klaus Süßmuth
3
Introduction .............................................................................................5
Instruments .............................................................................................5
Parameter ranges (Tone, Decay, ... ) ...................................................5
Changes to the Bass Drum: .................................................................5
Sequencer...............................................................................................6
Modes ..................................................................................................6
Start/Stop.............................................................................................6
Pattern Group ......................................................................................6
Pattern .................................................................................................7
Pattern Play .........................................................................................7
Pattern Chaining ..................................................................................8
Pattern Copy + Paste (Pattern Play Mode) ..........................................9
Copy Function...................................................................................9
Paste Function ..................................................................................9
Pattern Write ...................................................................................... 10
Pattern Tap-Write............................................................................... 11
Clear Instrument ............................................................................. 11
Clear all Instruments ....................................................................... 12
Pattern Length Programming (Pattern Tap Write Mode) ................. 12
Scale Programming (Pattern Tap Write Mode)................................ 13
Shuffle Programming (Pattern Tap Write Mode).............................. 13
Pattern Step Write.............................................................................. 14
Selecting an instrument................................................................... 15
Programming and Erasing an Instrument ........................................ 15
Clear Pattern (Pattern Step Write Mode)......................................... 15
Pattern Length Programming (Pattern Step Write Mode) ................ 16
Scale Programming (Pattern Step Write Mode) .............................. 16
Shuffle Programming (Pattern Tap Write Mode).............................. 17
Track Play Mode ................................................................................ 18
Track Write Mode............................................................................... 18
Synchronization .................................................................................... 20
Midi Clock to Sync Out....................................................................... 20
Sync Slave: ........................................................................................ 20
Sync Master: ...................................................................................... 20
MIDI Expander Mode ............................................................................ 21
Outputs ................................................................................................. 22
Accent Out: ........................................................................................ 22
Audio Outputs: ................................................................................... 22
Power Supply........................................................................................ 23
4
Introduction
Thank you for deciding on an Acidlab instrument. Acidlab instruments are
designed for live use, bringing classic analog sounds back to the stage. Of
course, Acidlab instruments can also be used in the studio.
All Acidlab instruments are professionally manufactured in series in Germany,
ensuring high quality for low prices.
Go out and play your music LOUD!
Instruments
The sound circuitry of the Miami is identical with the 808 and has been
realized using present-day components. Its sounds closely match the original
808.
Parameter ranges (Tone, Decay, ... )
The parameter ranges are, with the exception of the Bass Drum, the same as
those of the original 808.
Changes to the Bass Drum:
The decay time of the Bass Drum can be adjusted to 2-3 times longer than the
original 808. For technical reasons the rotation of the tone knob has been
reversed.
5
Sequencer
Modes
The sequencer runs continuously in all six modes.
You can switch between modes while the sequencer is running; the switch
takes place after the last step of the current pattern has been played.
Start/Stop
The Start/Stop button works in every mode and returns the pattern to its starting
point, i.e. step 1 of the current pattern.
When the Miami is synchronized, the Start/Stop signal comes from the MIDI or
Sync-In, and the Start/Stop button is disabled.
Pattern Group
The 12 available pattern groups can be selected with the rotary switch. A
pattern group contains 16 patterns. These are selected with the pattern buttons
(1-16).
6
Pattern
The current pattern is indicated by the LEDs 1-16.
A pattern consists of up to 16 steps.
In total, 192 patterns are available:
12 pattern groups each consisting of 16 patterns.
Pattern Play
The memory of a new Miami is empty and a pattern must first be
programmed->see Pattern Write Mode.
Patterns are played back in Pattern Play mode.
The active step is illuminated on the the upper LED Row, and runs the length
of the pattern (1-16)
The patterns are selected from one of the 12 pattern groups.
Switching between pattern groups can be done at any time; the switch occurs
at the end of the next pattern. For each of the 12 pattern groups, one of 16
patterns can be selected with the buttons under the LED rows.
7
The LED over the current pattern blinks to show that it is active. When a new
pattern is selected, the corresponding LED is lit, but stays solid. After the last
step of the current pattern, the sequencer switches to the newly selected
pattern. Now the LED of the new pattern blinks.
In total, 192 patterns are available:
12 pattern groups each consisting of 16 patterns.
Pattern Chaining
In Pattern Play mode, it is possible to chain patterns within a pattern group.
For example, to chain patterns 1 and 2 when pattern 1 is active and running,
press and hold pattern button 1. Then press pattern button 2. The LEDs of
both pattern 1 and 2 will illuminate.
The two patterns will now alternate, with the active pattern blinking and the
other solid.
The chaining of two neighboring patterns is possible with patterns 1-2, 3-4, ...
15-16. Up to all of the 16 neighboring patterns of a bank can be chained. In
addition, you can also chain from the 16th pattern to the 1st pattern!
Examples of possible pattern chains:
2-3, 4-6, 13-15, 1-16,....., 15-3
When you press any two pattern buttons simultaneously, the LEDs of all of the
patterns between them will be lit solid, with the active pattern blinking. The
chained patterns repeat after the last pattern in the chain has been played.
For example:
4 pattern chain: Selected: 2-5
2, 3, 4, 5; 2, 3, 4, 5,....
2 pattern chain: Selected: 13-14
13, 14; 13, 14, ...
8
Pattern Copy + Paste (Pattern Play Mode)
In Pattern Play Mode, it is possible to copy patterns.
Copy Function
To copy a pattern, press one of the pattern buttons (1-16) while holding down
the Inst/Select- button. The pattern is now saved to the buffer memory and
will remain there until another pattern is selected.
Paste Function
To paste a pattern, press one of the pattern buttons (1-16) while holding down
the Write/Next Button. This pattern will be overwritten with the pattern from
the buffer memory.
9
Patterns can also be copied to another Pattern Group. To do so, select the
new group with the rotary switch and then use the Paste Function.
Pattern Write
The memory of a new Miami is empty and a pattern must first be
programmed.
There are two Pattern Write Modes
-Pattern Step Write
-Pattern Tap Write
You can switch to the Pattern Tap or Step Write modes from Pattern Play
Mode while the sequencer is running.
For example, if a chain from patterns 5-7 is playing in Pattern Play mode, the
chain will continue to loop when you change to Pattern Tap Write Mode. The
whole pattern chain can now be edited in Pattern Tap Write Mode.
Alternatively, if Step Write Mode is selected, only the pattern that was last
active will continue to play. It can then be edited in Step Write Mode.
For example, if one switches to Step Write Mode while pattern 6 from the
pattern chain 5-7 is playing in Pattern Tap Write mode, pattern 6 will selected.
It can then be edited in Step Write Mode.
Changing patterns is always done in Pattern Play Mode. Editing can be
done in the Pattern Write Modes.
In Tap Write Mode single patterns and pattern chains can be edited.
In Step Write Mode, only single patterns can be edited.
10
Pattern Tap-Write
In Tap Write Mode it is possible to edit sequences “live” while the sequencer is
running. The selection of patterns or pattern chains for editing should be done
in Pattern Play mode.
The upper running LED row works as in Pattern Play Mode. In the lower row,
each of the LEDs above the instrument buttons (AC,BD,SD, ... ) is the
indicator for its corresponding instrument.
The instrument buttons (BD, SD, LT, ... ), write their instrument to the running
pattern at the instant they are pressed. The accent button (AC), can be used to
add an accent to the instruments programmed on a step. The LEDs over the
instrument buttons indicate which instruments are programmed at each step.
If you program the same instrument on a step more than once, it will not affect
the pattern.
Clear Instrument
If an instrument has been programmed incorrectly or on the wrong step, it can
be erased by holding the Clear button while simultaneously pressing its
corresponding button. (AC, BD, SD, ...) The instrument will be erased from
the step at the instant the button is pressed.
If you hold the Clear button while holding one of the instrument buttons for a
longer period, that instrument will be erased from all of the steps the
sequencer passes through during the time the buttons are held.
11
Clear all Instruments
All of the instruments programmed on a step can be erased by pressing the
Clear button and the Inst./Select button simultaneously.
If the Clear Button and the Inst./Select button are held for a longer period, all
instruments will be erased from the steps the sequencer passes through
during the time the buttons are held.
By holding the Clear Button and the Inst./Select Button for the duration
of an entire pattern, you can erase the entire contents of a pattern or
pattern chain.
Pattern Length Programming (Pattern Tap Write Mode)
By pressing the Length Button and one of the Step Buttons (1-16)
simultaneously, you can choose the last step of the pattern.
For example, if the Length Button and and the button at step 12 is pressed, the
pattern will be 12 steps long; after running through the first 12 steps, the
pattern will repeat. The pattern length will stay the same even when changing
to another mode. The unplayed steps after the last step remain in memory.
12
Scale Programming (Pattern Tap Write Mode)
One of 4 possible scales can be selected for a pattern with the Scale Button.
The LED of the scale indicates which scale has been selected.
The lowest Scale-LED corresponds to 4/4 time signature.
Shuffle can only be adjusted if 4/4 time signature is selected (i.e. the
lowest LED is illuminated).
Shuffle Programming (Pattern Tap Write Mode)
The Miami has two kinds of Shuffle:
-
The first kind of shuffle delays the even numbered steps (2, 4, 6, ...).
This is similar to the common shuffle found on the 909.
The second kind of shuffle delays steps 3, 7, 11 and 15. This second
kind of shuffle is similar to the one on the CR-8000.
Both shuffles can be applied simultaneously.
Each of the two shuffles can be adjusted over a range of 5 degrees.
To do so, press the Inst./Select and the Length/Shuffle buttons at the same
time.
LEDs 1-5 of the step buttons will now indicate the shuffle setting of the first
kind of shuffle.
LEDs 8-12 indicate the shuffle setting of the second kind of shuffle.
13
Keeping the Inst./Select and Length/Shuffle buttons held, you can now press
the corresponding Step buttons 1-5 or 8-12 to adjust the shuffle.
When shuffle is set to step 1 and step 8, no shuffle is present.
If the scale is changed, the shuffle settings return to the default setting
(no shuffle)!
Pattern Step Write
With the Mode rotary switch, you can change to Pattern Step Write Mode
without stopping the sequencer.
In this mode, unlike as in Pattern Tap Write Mode, you can only playback and
edit a single pattern. The pattern to be edited depends on the pattern playing
at the moment the mode is changed. This pattern will continue to play when
the mode is switched back.
In Pattern Step Write Mode, the instruments can be edited using step-based
programming. The instruments are individually programmed at each step.
Any changes to the pattern length, scale or shuffle are retained if you switch to
Pattern Play Mode or Pattern Tap Write Mode.
14
Selecting an instrument
To select an instrument to program (or the Accent), hold the Inst./Select button
while pressing one of the Instrument buttons. (AC, BD, ... )
When the Inst./Select Button is held down, the currently selected Instrument is
indicated by the LED above the corresponding instrument button. When the
Inst./Select button is released, the pattern of this instrument is displayed by the
LEDs over the Step Buttons (1-16)
Programming and Erasing an Instrument
By pressing one of the Step Buttons (1-16) you can write the selected
instrument to that step in the pattern. The LED above the Step Button will light
up. When the button is pressed again, the instrument will be deleted from the
step.
Clear Pattern (Pattern Step Write Mode)
The entire pattern can be deleted by pressing the Clear Button and the
Instrument Select button at the same time.
15
Pattern Length Programming (Pattern Step Write Mode)
By pressing the Length Button and one of the Step Buttons (1-16)
simultaneously, you can choose the last step of the pattern.
For example, if the Length Button and and the button at step 12 is pressed, the
pattern will be 12 steps long; after running through the first 12 steps, the
pattern will repeat. The pattern length will stay the same even after changing
to another mode. The unplayed steps after the last step remain in memory.
Pattern Length Programming is the same as in Pattern Tap Write Mode!
Scale Programming (Pattern Step Write Mode)
One of 4 possible scales can be selected for a pattern with the Scale Button.
The LED of the scale indicates which scale has been selected.
The lowest Scale-LED corresponds to 4/4 time signature.
Scale Programming is the same as in Tap Write Mode!
16
Shuffle Programming (Pattern Tap Write Mode)
Shuffle can only be adjusted if 4/4 time signature is selected (i.e. the
lowest LED is illuminated).
The Miami has two kinds of Shuffle:
-
The first kind of shuffle delays the even numbered steps (2, 4, 6, ...).
This is similar to the common shuffle found on the 909.
The second kind of shuffle delays steps 3, 7, 11 and 15. This second
kind of shuffle is similar to the one on the CR-8000.
Both shuffles can be applied simultaneously.
Each of the two shuffles can be adjusted over a range of 5 degrees.
To do so, press the Inst./Select and the Length/Shuffle buttons at the same
time.
The first 5 LEDs of the step buttons will now indicate the shuffle setting of the
first kind of shuffle.
LEDs 8-12 indicate the shuffle setting of the second kind of shuffle.
Keeping the Inst./Select and Length/Shuffle buttons held, you can now press
the corresponding Step buttons 1-5 or 8-12 to adjust the shuffle.
When shuffle is set to step 1 and step 8, no shuffle is present.
If the scale is changed, the shuffle settings return to the default setting
(no shuffle)!
Shuffle programming is the same as in Pattern Tap Write Mode
17
Track Play Mode
The memory of a new Miami is empty and a track must first be
programmed!
A track is a sequence of different patterns from a pattern group.
Once you have programmed one of Tracks 1-12 in Track Write Mode, you can
use this mode to play the track back. Use the Pattern Group rotary switch to
select it.
There is one track is available for every Pattern Group.
When changing tracks, the newly chosen track will start after the end of the
current pattern. The track will start with its first pattern. If you switch to
Pattern Play Mode, pattern 1 of the current pattern group will be selected.
Track Play Mode can only be used to select and playback the programmed
tracks.
The Start/Stop Button will return the track to the beginning, where it will start
again from the first pattern in the track.
Track Write Mode
In this mode, you can select and order patterns to form a Track. The Track
can then be played back in Track Play Mode.
To program a track, select the track in Track Play Mode. When you switch to
Track Write mode, the track will be erased, and a new track can be
programmed in its place.
Playing back patterns is the same as in Pattern Play Mode. However, you can
only play patterns from the pattern group currently selected with the rotary
switch.
18
You can select from the 16 patterns in the group using the row of buttons
(1-16).
The active pattern will be indicated by a blinking LED above the corresponding
button, and will start to play after the end of the last pattern.
The pattern will repeat continuously as in Pattern Play Mode.
By pressing the Write/Next button, you can set the current pattern as the first
pattern in the Track.
If you then select another pattern and press the Write/Next button, that pattern
will be saved as the second pattern in the track.
As in Pattern Play Mode, you can chain several patterns. An entire chain can
be added all at once to a track using the Write/Next button.
For example:
Pattern 1
Pattern 1
Pattern 14-15 chain
Press Write/Next
Press Write/Next
Press/Write Next
The following sequence of patterns has now been saved into the Track
memory: 1, 1, 14, 15
If you use the mode switch to change to Track Play Mode, the track is
finalized. The sequence of patterns will now continuously repeat as a
track:
1, 1, 14, 15; 1, 1, 14, 15; 1, 1, 14, 15; ........
Switching to Track Write Mode will erase the track from the currently
selected pattern group!
19
Synchronization
The sequencer can be synchronized to an external clock using MIDI in or
Sync In.
Midi Clock to Sync Out
If the synchronization switch is in the MIDI-in position, the Miami’s sequencer
will be slaved to the MIDI Clock of a MIDI Master connected to the MIDI-in
port.
A Sync-out Signal will be generated at the Sync socket for other devices that
have a Sync-In socket.
Sync Slave:
If the synchronization switch is in the Sync-In Position, the Miami’s sequencer
will be slaved to the Sync Clock of an external Sync-Master connected to the
Sync socket.
Sync Master:
If the synchronization switch is in the Sync-Out Position, the Miami functions
as a Sync Master.
A Sync-out Signal will be generated at the Sync socket for other devices that
have a Sync-In socket.
You can adjust the tempo with the Tempo Knob, and the Start/Stop
button will start or stop the sequencer.
20
When using a sync cable, all of the pins of the cable must be wired.
Some MIDI cables do not have connections between all the pins, and
thus cannot be used as sync cables.
MIDI Expander Mode
The Acidlab Miami can also be controlled using MIDI Note Data.
To use the Miami in Midi Expander Mode, switch off the Miami using the OnOff slide switch on the right side of the rear panel. Now hold the the
Write/Next [Midi Expander] button and switch the Miami back on with the OnOff slide switch.
You can see that you are in MIDI Expander Mode when all 4 Scale LEDs
are illuminated.
Repeat the same process to resume using the internal sequencer!
By pressing the Instr./Select button and the Write/Next [MIDI Expander] button
simultaneously, the Midi-Learn-Mode is activated and will be indicated by a
blinking LED above the Write/Next [MIDI Expander] button.
The first received midi-note sets the midi-channel (1-16) and the LED stops
blinking. The midi-channel will be saved untill a new Midi-Learn-Mode is
activated.
The following MIDI Notes are used to play the Miami’s instruments:
36 -> Bassdrum
37 -> Snare
38 -> Low Tom
39 -> Mid Tom
40 -> High Tom
41 -> Rimshot or Clave
42 -> Handclap or Maracas
43 -> Cowbell
44 -> Cymbal
45 -> Open Hihat
46 -> Closed Hihat
Velocity values > 100 will put an accent on the instruments.
21
Outputs
Accent Out:
The Accent Out (3.5 mm mono) can be used as a Gate signal. The gate is a
+12v impulse with a duration of 10ms.
The Accent Out is primarily intended to be used to control an analog synthesizer
with a gate input.
Audio Outputs:
Each of the 11 Instruments can be accessed through one of the 11 individual
outs (6.3mm mono). Every instrument has a dedicated Level knob.
Output is for the mixed signal (6.3mm mono) of the instruments.
Instruments connected by their individual out will not be present at the mix out.
The volume of the mix out can be controlled with the Volume knob
The Bass frequencies created by the Bassdrum and Low Tom can put an
intensive load on amplifiers and speakers.
Without protection, this
could result in damage!
22
Power Supply
The Miami should only be used with the supplied AC Adapter
(14VAC/300mA). Do not use other AC adapters!
The Miami has an On/Off slide switch on the right side of the rear panel.
Replacement AC Adapters can be ordered from acidlab.de .
Warranty
The manufacturer warrants this product for a period of two years from the purchase
date in accordance with the conditions described here. Defects found during this
period will be repaired. Potentiometers, switches and sockets are not covered under
this warranty. The manufacturer reserves the right to make the final decision on all
warranty claims. This warranty does not apply to products which have been modified
or mechanically damaged. A repair charge will apply to products not covered by the
warranty. To determine the applicability of the warranty, the manufacturer must be
contacted before sending the product to be serviced. Excepting the manufacturer, no
third parties are authorized to confirm or effectuate this warranty. The warranty is
transferrable in the case of resale during the warranty period. The manufacturer is
not responsible for incidental or consequential damages.
acidlab
Dipl. Ing. (FH) Klaus Süßmuth
e-mail: [email protected]
web: www.acidlab.de
23