1
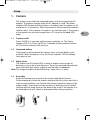
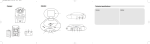
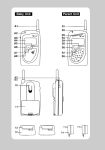
VisionNova 5 2009:Layout 1
30-10-09
14:25
Side 3
Setup
1.
Camera
The camera uses either the integrated battery or the accompanying AC
adapter. The battery charges when the AC adapter is used. The power
indicator LED flashes while the battery is charging (red if the camera is off
and green if it is turned on). When the camera is fully charged the indicator
switches off or, if the camera is turned on, is a constant green. The camera
or the monitor can also be charged from a PC using the included USB
cable.
1.1
Camera on/off
Press On/Off for 2 seconds and the camera switches on. The Power
indicator LED is lit. Press On/Off for 2 seconds and the camera switches
off. The Power indicator LED goes out.
1.2
Integrated battery
If the power is disconnected, the camera starts using the battery automatically. When the battery is low, the Power indicator LED will change
from green to red.
1.3
Night vision
The camera has 8 infrared LEDs in order to capture clear images at
distances of up to 3m in total darkness. These are activated automatically
when the inbuilt light sensor registers that the light is inadequate.
Note:The image changes to black/white when “night vision” is active.
1.4
Assembly
Screw the accompanying stand to the camera and tighten the nut.
Find somewhere to place the camera and point the lens at the area that is
to be monitored. Make sure that the child cannot reach the camera or the
adapter cable. The camera can be turned in all directions and is locked/
released with the large screw on the back of the stand. If the camera is to
be attached to the wall, check its placement before fixing in position.
3
GB
VisionNova 5 2009:Layout 1
30-10-09
14:25
Side 4
2
Monitor
2.1
LCD screen
Signal indicator. This behaves like a mobile
phone, showing whether the signal is strong
or weak. It is normal for the signal strength
to vary, even over short distances!
Alarm symbol. Shown if an alarm is set.
GB
Battery indicator. Shows the remaining battery life using 4 levels.
Becomes transparent and flashes when the battery is empty.
The monitor uses a rechargeable 3.7V 850mAH Li-ion battery (included)
or one of the included AC power adapters.
Inserting batteries
Note: The Li-ion battery that is included should be charged for 10 hours
before being used for the first time.
1.
Open the cover of the battery compartment on the back of the monitor.
2.
Insert the battery so that the contacts on the battery touch the contacts
inside the battery compartment (printed side up).
3.
Put the cover back in position.
4.
Turn on the monitor by pressing the On/Off button for 3 seconds. The
Power indicator will light.
5.
Press the On/Off button for 3 seconds to turn it off.
Note 1: The Power indicator is green when the battery is charged and red when
it is empty.
Note 2: Remove the battery if the monitor is not going to be used for
a prolonged period of time.
1.
Mains power
Plug one of the included AC power adapters into a power socket and into
the socket on the side of the monitor. The battery is now charging. This is
shown by an animated symbol on the screen. The battery is fully charged
when the symbol is constant.
Note: When the connection between the camera and the monitor is functioning
properly the link indicator will have a green light. If the connection is
broken this will go out.
2.2
4
Adjusting volume
Press M or L to adjust the volume.
VisionNova 5 2009:Layout 1
2.3
30-10-09
14:25
Side 5
Sound indicator
The LEDs show whether the child is making a sound, even if the volume
is adjusted down.
3.0 Menu
The monitor has a self-explanatory menu. You enter the menu by pressing
the OK/Menu button, navigating with the arrow buttons (M, L) and
selecting the indicated item with the OK/Menu button. You move backwards or out of the menu by pressing the On/Esc button. If no button is
pressed for 20 seconds, the menu closes. The factory setting for the
menu is English. To select another language, do the following:
Press OK/Menu. Choose Settings. Choose Language and use the arrow
keys (M, L) to select. Press OK/Menu to store this setting. The rest of the
user manual presumes that you have chosen to use English.
Zoom in
Select the desired area with the arrow buttons and press OK/Menu.
You can return to the normal image by choosing “Zoom in” again.
Brightness
Choose the desired screen brightness using the arrow keys (M, L).
Voice Activation (see also “Close Video Time” in Settings)
This function can be used to select whether the sound should be
transferred continually or only when there are sounds from the child.
If the function is activated (status set to on) and “Close Video Time” is
set to something other than “Never”, the screen will also turn on if the
child makes a sound.
Status: You can choose Off or On
Sensitivity: You can choose Low, Medium or High.
Alarm
You can choose which alarm you want to set. There are two choices for
each alarm:
Alarm status: Off or On
Alarm time: Choose a time for the alarm. Use the OK/Menu button to
select hours, minutes and to store the time.
Note: The alarm will not be active until you turn it on by selecting Alarm status.
5
GB
VisionNova 5 2009:Layout 1
30-10-09
14:25
Side 6
Settings
This provides a new menu for you to choose from:
Date and time
Date:
Set todayʼs date. Use OK/Menu to move between the fields
Time:
This sets the clock and is shown in 12/24 hour format depending on what
you choose in the next menu item.
GB
Time format:
Choose 12 or 24 hour format.
Close Video Time:
Choose whether the screen should shut down and after how many
seconds.
This function operates alongside the “Voice Activation” option, and you
choose how many seconds the screen should show the image for before
shutting down. This function can be used to lengthen battery life as the
monitor uses less power when the screen is off.
Note: If you set it on anything other than “Never” and “Voice Activation” is off
(status set to “Off”), the screen will always be turned off and the
equipment will work like an ordinary Babycall. The screen switches on
again if you press the OK/Menu button.
Search Child
The camera and monitor are coded jointly at the factory. If “Searching…”
shows on the screen even if they are very close to each other, you can
re-establish the coding by selecting “Yes” in this option and pressing the
“Reset” button on the camera. When the screen shows that the ID has
been stored, press the OK/Menu button.
Repeat the operation if it not successful.
Reset Settings
Use this option to restore the default settings for brightness and voice
activation, or if you have other problems.
Language
You can select the language for menus and system information.
6
VisionNova 5 2009:Layout 1
30-10-09
14:25
Side 7
Troubleshooting
If no image is visible.
• Check that the camera and monitor are turned on.
• Check that the link indicator is green. If not, search for the camera again
(see above).
• Check that the adapter plugs are all the way in.
• If the camera or monitor is running on battery power, use the adapter and
charge the batteries.
• Press and release the “Reset” button (use a paperclip or needle)
• If you are only receiving sound, check that “Close Video Time” is set to “Never”
and that “Voice Activation” is set to “Off”. You can also select “Restore settings”
in the menu (in settings).
• If “Searching” is shown in the display, read the “Search Child” chapter above.
If reception is poor or the image freezes.
• If there is a microwave oven between the camera and monitor, make sure it is
turned off.
• Move the camera or monitor away from wireless routers or computer
equipment.
• Try moving the camera and monitor closer to each other. (The range is up to
300m if there is clear line of sight between the equipment, depending on local
conditions). The range is considerably reduced by physical obstacles between
the units.
Storage and maintenance.
• Make sure that the equipment and accessories are out of the reach of children.
• Avoid touching the lens. Fingerprints or dirt on the lens surface will result in
poor image quality.
• If the lens gets dirty, try blowing off the dust or dirt, or wipe carefully with a soft
dry cloth.
• Ensure the equipment is not exposed to moisture. Moisture may result in
corrosion of the electronic circuits.
• Do not use the equipment in dirty or dusty environments.
• Do not use or store the equipment in hot conditions. Raised temperatures
reduce the life of the electronics and can cause deformed or melted plastic.
• Do not store the equipment in very cold conditions. This could cause
condensation when they return to normal temperatures. Condensation
can damage the circuit boards.
• Do not attempt to open the equipment. All repairs must be carried out by
professionals or the warranty will be voided.
• Avoid dropping the equipment or exposing it to severe jolts.
• Only use the included AC power adapters. Otherwise the equipment may be
damaged.
7
GB