1
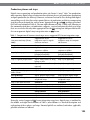
the
jaltcalljournal
issn 1832-4215
Vol. 6, No.2 Pages 103–114
©2010 jalt call sig
Steps for
integrating a
digital story into
an EFL lesson
using Photo
Story 3
Robert Maran
Osaka Shoin Women’s University
[email protected]
This forum paper describes the steps involved
in integrating a digital story into an EFL class
using a free software application called Photo
Story 3. This paper maintains that the sequencing of the often cited phases of pre-production,
production, and post-production, and the accompanying steps of digital story production,
do not completely satisfy the logistics involved
for integrating a digital story into a regular EFL lesson. Therefore, while retaining the
three phases of production, an alternative set
of steps is proposed. While some of these “alternative” steps appear trivial and axiomatic,
the often unique set of circumstances that
surround an EFL teaching setting (for example,
class time devoted to language study, learner
motivation and interest, level of computer literacy), requires a set of steps that are not only
in tune with the reality of the teaching setting
but whose sequencing also allows for smooth
class management of the assigned software.
A detailed explanation of the steps involved
in each phase is given, including potential
pitfalls teachers may encounter using Photo
Story 3, and in some cases, possible solutions
are offered.
Introduction
Forum
Before outlining the steps involved in integrating a digital story into an EFL lesson, it
would seem appropriate to first start with
a definition as to what constitutes a digital story, and to layout some of the teaching environment conditions, both physical
and curricular that are seen to be crucial
for its successful implementation. The paper is also written from the standpoint that
teachers are probably dealing with learners
103
The jalt
call Journal 2010: Forum
who are most likely non-English majors and therefore bring to the learning situation a set
of unique needs and problems.
The literature gives a number of definitions of digital story telling. (For example, see
Rule, n.d.; Kajder & Swenson, 2004; Hathorn, 2005). For the purposes of this paper, the
following is the most succinct and appropriate definition: “(It)… is a 2–5 minute film that
combines a narrated piece of personal writing, photographic and other still images, and a
musical soundtrack” (Goal School, 2008).
The implementation and integration of a digital story into an EFL lesson assumes the
following physical and curricular elements are present in the teaching situation:
a) Language classes are held in either regular classrooms with access to a wireless LAN
network, or computer labs. The former presupposes that learners have their own laptops (or access to one) with wireless LAN connection capabilities. The latter presupposes
that any class would most likely need multiple, possible consecutive session / access to
a computer lab.
b) Digital stories have been incorporated only occasionally into the syllabus.
c) EFL classes meet one or two times a week.
d) The EFL course is either part of a coordinated EFL program that has a number of teachers
following a common syllabus using common teaching materials or it is a course where
a teacher has complete curricular and syllabus autonomy.
e) Many learners, despite being very adept at using their mobile devices, are observed to
be technically challenged when it comes to computer operation.
The software
Photo Story 3 is a Windows application. While the download site stipulates that it is only
compatible with Windows XP operating system, it seems to work satisfactorily with Vista
and Windows 7 operating systems as well. It should be noted that if teachers have compatibility problems with Windows 7, Microsoft provides a free downloadable XP mode for
Windows 7. The strengths of this software, especially for the EFL setting are:
a) It is free.
b) It is user friendly and the sequencing of the steps is intuitive.
c) It is a “one-stop” application. The editing tools allow a user to do the following: adjust
color levels, correct red eye, rotate images, remove borders, auto crop, create captions
and titles, animate, and create transitions.
d) It has multiple soundtracks that allow users to narrate as well as add music. Music is
automatically formatted to the length of the frame or complete story.
e) For the integration into an EFL lesson, where time constraints may be an issue, a digital
story can be created “relatively” efficiently and quickly.
104
While this paper is written from the standpoint of using Photo Story 3, it should be noted
that there is other software that works equally well for digital story creation. For Mac users,
iMovie is an excellent user-friendly alternative that has all the functions that can be found
in Photo Story 3. Another viable option worth mentioning that is applicable for both Mac
and Windows users is Microsoft’s Powerpoint. It also contains all the functions found in
both Mac-only and Windows-only digital story making software, as well as having slideby-slide voiceover capabilities.
Maran: Digital stories with Photo Story 3
Production phases and steps
Digital story sequencing and production often cite Porter’s (2004) “rules” for production,
who sequences digital story creation into three distinct phases: pre-production, production,
and post-production (or delivery). However, an Internet review of sites dealing with digital
storytelling reveals that these often quoted phases of production and their accompanying
steps have been designed for, and are more appropriate for L1 and ESL teaching situations
(See left hand column of Table 1). The two right columns of Table 1, while still adhering to
the commonly cited phases of production, suggests, a revised and more detailed set of steps,
that are seen to be not only more appropriate for the EFL setting, but indispensible for the
class management digital story integration into an EFL lesson.
Table 1: Comparison of literature cited steps versus suggested EFL lesson integration steps
Literature cited steps (Porter,
2004)
Pre-production
Step 1: write a script
Step 2: plan a project
Step 3: organize project folders
Production
Step 4: make voice over
Step 5: gather and prepare
media sources
Post-production
Step 6: put it all together
Step 7: mix media resources
Step 8: distribute
Suggested EFL lesson
integration steps for regular
classroom situations.
Pre-production
Step 1: choose topics and
sequence in syllabus
Step 2: prepare project
(storyboard template)
Step 3: Teacher training
Step 4: notify learners to bring
laptops to class
Step 5: software installation (if
required)
Step 6: learner training
Step 7: prepare peripherals
Step 8: prepare digital images
Step 9: learners complete
storyboard/ script
Production
Step 10: create digital story
Step 11: review and edit
Step 12: format and save
Post-production
Step 13: lesson integration
Step 14: assessment
Suggested EFL lesson
integration steps for computer
lab situations
Step1: choose topics and
sequence in syllabus
Step 2: prepare project
(storyboard template)
Step 3: Teacher training
Step 4: (not applicable)
Step 5: (not applicable)
Step 6: learner training
Step 7: (not applicable)
Step 8: prepare digital images
Step 9: learners complete
storyboard/ script
Production
Step 10: create digital story
Step 11: review and edit
Step 12: format and save
Post-production
Step 13: lesson integration
Step 14: assessment
Using the revised suggested EFL lesson integration steps for a digital story as outlined in
the middle and right-hand columns of Table 1, what follows is a detailed description and
explanation of these phases and steps. Potential pitfalls are outlined, and where applicable,
possible solutions are offered.
105
The jalt
call Journal 2010: Forum
1. Pre-production phase
Step 1: Choose topics and sequence into syllabus. Digital stories have been described as
falling into one of the following three categories: 1) personal narratives 2) historical documentaries and 3) information or instruction type stories. (Robin, 2006). A quick perusal
of any writing or speaking course textbook, for example, will reveal numerous topics and
themes that fall into any of the above three categories, making then readily adaptable
to a digital story. (See Appendix A for a short list of possible topics/themes). Teachers
or syllabus designers should select those topics/themes that are of potential interest to
learners, commensurate with learners’ language ability, and achievable given the probably
time constraints allotted to a digital story in a syllabus. Sequence them into the syllabus
clearly indicating the digital story days and dates. Distribute the syllabus to other teachers
(if you are the syllabus designer) and learners on the first day of the semester. A possible
sequencing and integration of a digital story in the syllabus may look something like this:
Lesson
Syllabus details
Pre-DS
DS 1
Inform learners to prepare digital images and *bring laptops to next class.
Storyboard preparation (30–45 minutes) → digital story production starts (45–60
minutes)
Digital story production continues (30–45 minutes) → lesson integration (45–60
minutes)
DS 2
*not applicable if a computer lab is used
DS = digital story lesson
Step 2: Prepare project (storyboard template). The Educational Uses of Digital Storytelling
(University of Houston) defines storyboards as “visual representations that aid in the creation process of digital storytelling. Storyboards layout images in sequential order to create the flow of the production”. It is advisable for teachers to go through the storyboard
creation process themselves to visualize what the finished product might look like. How
teachers approach the storyboard template creation – its structure and content (e.g. number of frames, amount of teacher input such as question prompts, sentence stems, etc), will
depend on the level and ability of the learners. Naturally, high-level learners will need less
guidance and control from the teacher, while low-level learners will require much more
scaffolding and teacher input.
106
Step 3: Teacher training. Teacher training with the software – whatever forms it takes – is
stating the obvious. Ideally program coordinators would want to give teachers a hands-on
workshop using the software either before the start of the semester or well in advance of
the digital story lesson. Practically-speaking, if you are dealing with many part-time teaching staff, who have other teaching commitments, then in all probability, “software training”
will take the form of directing teachers to try it out before the digital story lesson, and of
course, relying on teachers to comply. You can assist your teaching staff by printing up a
user manual, or directing teachers to any online tutorials and digital story samples. There
are numerous excellent tutorials online. Teachers may find the following short list useful:
a) http://www.jakesonline.org/photostory.htm has an excellent step-by-step screencast tutorial. The site has a detailed PDF version that could be downloaded and printed up for
teachers, as well as being used as model for a learners’ tutorial in L1.
Maran: Digital stories with Photo Story 3
b)Another good screencast tutorial can be found at http://technogogy.org.uk/photostory/
tutorial.html.
c) See also http://millie.furman.edu/mll/tutorials/Photo Story 3/index.htm.
d) Microsoft also provides a good tutorial that can be found at: http://www.microsoft.com/
windowsxp/using/digitalphotography/photostory/tips/firststory.mspx.)
Not to belabor the point, but if a digital story is going to be created by your learners for the
first time using unfamiliar software, by pre-trialing the software, teachers may be able to
foresee potential problem areas their learners may encounter. Therefore, prior trialing of
the software by teachers becomes of greater importance when one considers the fact that
in all probability learners will use L1 versions of the assigned software. Unable to read in
learners’ native tongue, but having some idea of what is going on because of prior experience, will be a decided advantage on digital story lesson day. Unfortunately there are always
a small number of teachers who think they can get away without trialing the software (after
all, it is the learners who are going to use the software and create the stories!) and “wing it”
on digital story lesson day. If teachers are no better prepared than their learners at using
the software, (the ability to read in learners’ L1 aside), then this is a recipe for disaster in
terms of guiding and helping learners as well as wasting valuable class time.
Step 4: Notify learners to bring laptops to class (Not applicable if a computer lab is being
used). If learners are not in the habit of bringing their laptops to your institution on a
regular basis for their other classes, then teachers will need to notify learners to bring their
laptops well in advance of the digital story lesson day. (“Notify learners” is applicable not
just for the digital story production and post-production steps, but also in the case where
learners will be required to install the software themselves under teacher guidance). An
effective reminder method is to get the administrative office to mass-email learners the day
before. (Using learners’ mobile phone email addresses is preferable. Many learners are not
in the habit of checking their institution’s email accounts, so sending reminders there will
be a waste of time). In the same email message, remind learners to bring digital images if
required and their laptops fully charged or to bring power cables. All too often during the
creation of a digital story a number of learners will complain that they couldn’t complete
their digital stories because of laptop battery issues.
Step 5: Software installation (if required). Installation of Photo Story 3 can become a major
issue if learners are going to be responsible for the installation process themselves. The
following problems have been repeatedly observed with learners who are attempting to
install digital story-making software onto their own laptop computers:
a) Many learners interpret the term “download” as being synonymous with the term “install”. Consequently, when some learners attempt to start production of their digital
stories, they cannot find the program on their laptops. (Many learners may insist that
they did “install” it though.)
b) Learners who have downloaded the software (but have not installed it) don’t know or
have failed to note the saved location.
Installation suggestions for Photo Story 3:
a) Get the IT center to pre-install the assigned software either on learners’ laptops or in
the computer labs. (In the case of an institution that requires all freshmen to purchase
107
The jalt
call Journal 2010: Forum
a laptop on matriculation, IT centers often get required bundles installed onto learners’ laptops by the computer maker prior to handing over to learners. If you plan to
incorporate digital stories in your syllabus, then give ample notice to the IT center of
your intention and have the assigned software pre-installed.) If not possible, then the
following options are suggested:
b) Direct learners to download it themselves either from the website or via your institution’s intranet.
c) Include “How to download” and “How to install” explanations in learners’ L1 with clearly
labeled screenshots in the learners’ training tutorial manual.
d) Inform learners to bring their laptops one or two classes prior to the digital story lesson,
and devote a portion of this class time to overseeing the downloading and installation
process.
Step 6: Learner training. As with teachers, prior hands-on training with the software is
desirable. However, in an EFL situation (especially with non-English majors), where learners
probably have full schedules the setting up of a workshop devoted to using the assigned
software is probably not going to be a viable option. Utilizing freshmen IT orientation
seminars at the start of the academic year is one possible option, but chances are that the
time assigned to IT orientation is very limited, and will most likely be devoted to computer
basics such as setting up and accessing email accounts, accessing the institution’s websites,
etc. Given this probable scenario, where “learner training” will be limited to “learn-as-yougo”, the following option combinations are suggested for learners who will be using the
digital story making software for the first time:
a) Prepare a detailed paper-based L1 tutorial showing each step of the process with accompanying clearly labeled screenshots. Distribute it to learners well in advance of the
digital story lesson day. Learners consult the manual as they create their digital story.
b) Use the “buddy” system. During production, recruit learners who have finished early to
assist other learners who are having trouble or are behind. Often this is the most effective and efficient method.
c) Teachers create a sample digital story and place it on the web (e.g. via a LMS) for learners
to preview or direct learners to samples already created by other EFL/ESL learners, not
in order to set any particular minimum “standard”, but to give learners a taste of the
possible potentialities of the software in question.
d) Pratt (2009) suggests teachers get learners to “do another project soon after this first one,
to solidify the skills”. Getting learners used to the technology will mean they can focus
more attention and effort on the language arts and at the same time produce visually
appealing and sophisticated digital stories. (However, if digital stories are only used occasionally in the syllabus, this, although an excellent suggestion, may not be feasible).
108
Step 7: Prepare peripherals (not applicable if a computer lab is being used). The layout
and size of a regular classroom will determine if headset microphones will be necessary or
not. Most laptops these days have built-in microphones that are sensitive enough to pick
up learners’ speech clearly. The downside of course is that these built-in microphones will
also pick up surrounding noise, and if the classroom is quite small, then noise interference will become a problem, and detract from learners’ final product. Recommendations
for this step are as follows:
a) If your institution has the financial resources, then purchasing headset microphones is
Maran: Digital stories with Photo Story 3
(regardless of classroom size and layout) the best option. If money is tight, one headset
microphone per two to three learners is a reasonable benchmark. In an actual digital story lesson, learners are never at the same stage of production, so sharing is rarely an issue.
b)Alternatively, get learners to purchase their own microphone headsets. There are a number of inexpensive models on the market.
c) A potential pitfall that teachers should be aware of is that it is not always a “one fit all”
scenario when it comes to microphone headsets and laptop computers. If learners have
laptops other than standard institution recommended models, then they may experience
hardware compatibility problems during the production phase. Having IT center staff
on hand to deal with these kinds of issues (or knowing how to fix these issues yourself)
will help make production of a digital story go smoother.
d) If the classroom does not have power outlets built in to learners’ desks or strategically
placed around the classroom floor or walls, then preparing multi-socket extension cables
is a prudent move. This will allow multiple users to connect to one power outlet at the
same time.
Step 8: Digital image preparation. Teachers having already simulated the storyboard (ranging, depending on the level of your learners, from a fixed number of frames to no more
than a broad project outline), will need to inform learners one or two classes before the
production day to prepare appropriate images. When working with technological challenged learners, the following problems have been observed on digital story lesson day:
a) Learners will not have their digital images saved on their laptops ready for digital story
production. Digital images are either still on learners’ digital cameras or mobile devices.
(If a computer lab is being used, it is not so much a “problem”, as being purely a logistics
issue. Computer labs are for “public” use, so it may be difficult for learners to access the
computer lab to pre-save digital images ahead of digital story production).
b) Following from (a), learners don’t know how to upload from a digital camera to a laptop
or don’t know how to send digital images as attached mail. The latter problem is often
the result of the fact that these learners, despite having been given an institution email
account, rarely access it, or even worse, don’t know their email address!
c) Learners don’t know how to save attached images from their email accounts onto their
laptops. Learners also sometimes do not know the location where they saved their images. Suggested solutions for (a), (b), and (c) are: Include instructions that include detailed
instructions in learners’ L1 with clear screenshots in the learners’ tutorial manual, use
the “buddy” system”, and of course, teachers assist learners. Learners who don’t know the
email address given to them by their institutions, could use any other web-based email
address they may have or social networking sites that they may belong to.
d) Learners bring regular photos being under the impression that they can be used as is.
Suggested solution: Get these learners to capture these regular photos with their mobile
device cameras and send them as digital image attachments to learners’ institution’s
email account or any other web-based access point where images can be downloaded.
e) Learners forget to bring either digital images or regular photos. Suggested solutions:
One way to deal with this situation is to get these learners to quickly draw simple
sketches for each frame of their storyboard, capture them with their mobile phones, and
then send as per (c) above. Alternatively, they can search any number of free downloadable photo sites, and find near-match digital images that correspond to content of each
frame in their storyboard.
109
The jalt
call Journal 2010: Forum
Step 9: Learners’ complete storyboard. The key to producing a good digital story is contingent upon the storyboard. If the digital story lesson has been strategically placed in the
syllabus to coincide as the final lesson of an ongoing topic or theme in the syllabus, then
probably much of the relevant language will have already been covered, and learners will
need only to review and adapt previous knowledge of the topic/theme for their storyboards.
Teachers should, as Pratt (2009) advises, “…(not) compromise the writing in favor of the
media.” In other words, devote enough time to this important step, and don’t allow learners
to start the production phase until the storyboard has been completed. Learners who have
prepared strong storyboards in terms of sentence output, grammatical correctness and vocabulary appropriateness invariably produce the best digital stories. In an effort to push language output, teachers should set a minimum number of sentence targets and the content
to be covered for each frame of the storyboard. Help learners prepare their storyboards by
modeling, with key question prompts and scaffolding. Reiterating step 2 above, the degree
of teacher input and control will of course depend on the level and ability of your learners. If the syllabus does not allow multiple class meetings to be spent on the digital story,
then to save class time, teachers could assign the storyboard as a homework assignment.
2. Production phase
Step 10: Create digital story. This is the “nuts and bolts” phase. As a rule-of-thumb, and
assuming your learners are making a digital story for the first time, allow at least one
90-minute session on the production phase. (This may be spread over two class sessions).
Even though Photo Story 3 seems intuitive to use, it has been observed that there are still
learners, who despite being armed with a detailed tutorial in L1, struggle to follow the
production steps successfully. Reiterating Pratt’s (2009) suggestion above that teachers
get learners to “do another project soon after this first one, to solidify the skills” in theory,
may, in the end be the best solution. But if digital stories are only being used occasionally
in the syllabus, teachers should be aware that the chances of learners completely forgetting
what to do the next time a digital story is done are very high. The only way around these
predicaments is to utilize the “buddy” system, get learners to refer to the tutorial, and of
course, assistance from the teacher. Suffice to say, those learners who can use the software
well, end up with the more sophisticated and polished productions.
110
Step 11: Review and edit. As with a paper-based written submission, learners should review
their projects, and edit where appropriate. While it is taken for granted that this should be
common practice, in reality many learners, often because of time constraints, neglect to
review and edit. Potential pitfalls and oversights by learners using Photo Story 3 to watch
out for are:
a) Failure to crop digital images.
b) Digital images are displayed in the wrong orientation.
c) Learners don’t know that each frame of their story requires a new voice over recording
and don’t know how to proceed.
d) Learners start recording but their microphones are not turned on.
e) Background music is set too loud.
f) Voiceovers are too soft and/or inaudible.
g) Voiceover clarity is often marred by background noise such as other learners’ voices.
h)Title and/ or text fonts are too small or too large.
Maran: Digital stories with Photo Story 3
i) Title and/or text font colors are in a color that is unreadable.
Step 12: Format and save. Learners are now in the last step of production before the teacher
incorporates the digital story into an EFL lesson. How learners are instructed to save a completed digital story will depend on how the teacher is planning to (a) integrate the digital
story into a lesson and (b) assess learners’ stories. If peer-viewing and teacher assessment
is going to be done solely on learners’ laptops (or in a computer lab), then the size settings
of saved files and format type does not become an important issue. On the other hand, if
lesson integration and assessment is going to involve learners uploading to a learning
management system (LMS), and maximum size limits have been imposed for uploading
files, then teachers are going to have to virtually “police” this part of the operation and
ensure that learners have complied. The best file setting for Photo Story 3 was found to
be “profile for e-mail-3 320 × 160”. It produces a small file but at a player size setting that
is easily viewable and of acceptable quality. (Even though this has been explained in the
learners’ tutorial, a number of learners will inevitably fail to follow this important instruction). Potential pitfalls in this step are as follows:
a) File size issues. Learners fail to heed instructions regarding file size.
b) Learners can’t remember the location where they saved their digital stories.
c) Learners upload the wrong type of file to the LMS. With Photo Story 3, some learners
have been observed to upload their photo story project file (.wp3) instead of the photo
story (wmv) file to the LMS, and consequently are unreadable when teachers come to
view and assess.
d) Learners fail to save the production file (.wp3). This can become a potential important
consideration if a learner needs to reformat their original uploaded photo story file because they forgot to heed the upper limits of the file size imposed by the LMS. Without
their original project file, a learner is going to have to start production from scratch.
A final comment regarding the pre-production and production phases: Depending on the
level of learners, and if time constraints are not going to be a major issue, there may be
opportunities to incorporate these two phases of digital story production as means of promoting communication in L2 between learners. For example, as a pre-production phase
language activity, learners could be given an information gap exercise using the Photo Story
3 tutorial. Learners could dictate alternate production steps to each other. Alternatively,
learners could be given a “blank” tutorial showing only the accompanying screenshots, and
learners would have to ask the teacher questions to find out the meaning of each screenshot. Teachers could, depending on the level of the learners, provide ready-made questions,
jumbled questions (which learners would have to unscramble first), or just question stems.
For lower level learners, they could simply do a L1/L2 matching exercise of the screenshot
steps in the tutorial.
The “buddy system”, which was touted as an excellent way to help the more technically
challenged learners get up to speed, could also be used to promote L2 communication.
During the production phase, the technically more proficient learners could act as “technical resource aides”. Teachers could provide question sheets that cover potential problems/
difficulties that technically challenged learners may encounter, and have these learners ask
their more technically adept classmates any “how to” questions – the answers being either
provided by the teacher in advance, or, even more challenging, getting technically more
adept learners to create answers to the questions-either individually, in pairs or in groups. 111
The jalt
call Journal 2010: Forum
This would create a reason to communicate in L2, and of course expose learners to more
task-specific L2 language.
3. Post-production phase
Step 13: Integration. Teachers are now ready to incorporate learners’ digital stories into an
EFL lesson. There are a number of ways to integrate learner produced digital stories into
a lesson. The following “barebones” lesson plan is offered as an example of how a digital
story can be (and has been) successfully integrated in a lesson. It allows learners to not
only share their digital stories with each other, but serves as a springboard for teacher-led
discussion and language arts work.
1. Teacher prepares a worksheet that instructs learners to search for and/or listen for
specific information.
2. Distribute and explain the worksheet.
3. Learners open their photo stories on their laptop screens.
4. Learners rotate and peer-view each other’s digital stories, filling in the worksheets.
Teacher sets strict time limits on each peer-view so as to allow learners to view as many
digital stories as possible in the assigned time.
5. Learners prepare either an oral or written report according to teacher’s instructions.
6. Teacher calls on several learners to present their reports to the class.
7. Teacher does class correction of errors, and teacher-led follow-up discussion to push
learner output.
8. If times permits, and several classes are doing the same project, mix classes and repeat
steps 4–7.
9. Option: learners submit the written report for assessment as well.
112
Step 14: Assessment. Finally, learners submit their digital stories for assessment. The following modes of assessment are available:
a) If teachers have access to a LMS, then get learners to upload their digital stories as an
attachment file to a course activity that has been set up for this project. In the case of
Moodle, learners could upload to either an assignment activity or forum activity. If
learners have been instructed to upload to an assignment activity, teachers can view,
grade, and add comments, and notify learners via email. If the forum activity has been
selected, teachers as well as learners could peer-view multiple digital stories, and add
comments. If a Moodle workshop activity is being used, depending on the parameters
chosen by teachers, learners could view online and not only comment, but assess each
other’s digital stories, as well as having the teacher do the same. Weighting of grades
is also possible with the total grade being made up of learners’ peer assessments and
teacher’s assessment.
b) If learners’ files are small enough, they could also be sent to a teacher’s email address
as attachments. Teachers could view, give feedback, and grade.
c) Another way would be to get learners to upload their digital stories to designated
folder(s) on the institution’s intranet for teacher viewing and grading.
d) The last option is, if learners have DVD burning software and hardware capabilities built
into their laptops, is for learners to burn their digital stories to a DVD and submit for
teacher viewing.
Maran: Digital stories with Photo Story 3
Conclusion
Teachers, after reading this paper may come to the conclusion that integrating a digital
story into an EFL lesson is more trouble than it is worth given the potential technology
pitfalls facing both teacher and learner alike. Teachers will need to deal with learner frustration, as they strive to successfully utilize and blend technology with language learning
and their own irritation, as they, the teachers strive to successfully utilize and blend technology with language teaching. However, if meticulous planning and class management
are implemented from the start, many (not all) problems can be foreseen and alleviated.
By way of conclusion, the following positives have been observed when a digital story has
been incorporated into an EFL lesson:
a) Breaks the monotony of a regular writing or speaking class. Gives learners a chance
to combine/ utilize, and experiment with different media to complete a speaking or
writing task.
b) Learners are required to combine writing and speaking skills.
c) Specific grammar points can be discreetly targeted.
d) Gives EFL learners an opportunity to hear themselves speak in English
e) Allow learners to review, edit and improve their oral performances.
f) Gives those learners who are reticent to speak out in a regular class an unobtrusive
mode of expression.
g) Helps build learners’ confidence in speaking English.
h)Helps promote learner comprehension by the implicit connections made between the
various media.
i) The blending of various media often serves to shore up the poor quality of the language
produced by low-level EFL learners.
j) The variety of media used, serves to stimulate interest and helps learners focus on task,
both as a digital story producer and in the sharing phase of the lesson.
k) Finally, learners are observed to get a sense of enjoyment and achievement.
References
Digital storytelling (2009). Retrieved November 22, 2009 from http://en.wikipedia.org/
wiki/Digital_storytelling
Goal School. (2008). My Creative Visualization – Digital Storytelling. A Tool for Future
Visioning. Retrieved July 21, 2010 from http://www.mycreativevisualization.com/
mycreativevisualization.php
Hathorn, P. P. (2005) Using digital storytelling as literacy tool for the inner city middle
school youth. The Charter Schools Resource Journal 1 (1) Winter 2005. Retrieved May 22,
2009 from www.ehhs.cmich.edu/~tcsrj/phathorn.pdf
Kajder, S., Swenson, J. A. (2004) Visual images in the language arts classroom. Learning
& Leading with Technology 31 (8) 18–46. Retrieved August 19, 2009 fromhttp://faculty.
philau.edu/kayk/kkay/articles/DigitalStory%5B1%5D.pdf
Porter, B. (2004) Seven steps to create a digitales story. Retrieved June 26, 2010 from http://
www.digitales.us/resources/seven_steps.php
Pratt. N (2009) Digital storytelling: my top 10 lessons learned. Retrieved
August 9, 2009 from http://www.isteconnects.org/2009/06/07/
digital-storytelling-my-top-10-lessons-learned/
113
The jalt
call Journal 2010: Forum
Robin, B. R. (2006) The Educational Uses of Digital Storytelling (2006) Retrieved May 22,
2009 from http://fp.coe.uh.edu/brobin/homepage/Educaional-Uses-DS.pdf
Rule. L. Digital Storytelling. (n.d.) Retrieved May 22, 2009 from http://www.storycenter.
org/index1.html
University of Houston. (2009) The educational uses of digital storytelling. Storyboarding
Retrieved November 22, 2009 from http://digitalstorytelling.coe.uh.edu/
storyboarding.html.
Author biodata
Robert Maran is a professor in the Faculty of Child Science at Osaka Shoin Women’s
University. He has been teaching in the Japanese university system for more than 20 years.
Appendix A
A short list of possible topics/ themes for digital stories
A) Personal narratives
1. Self introductions
2. Family
3. Daily schedules/routines
4. The rooms in my house/apartment
5. My part time job
6. Friends
7. Favorite places
8. Favorite musicians
9. Autobiography
10.About my hobby/interest/sports
11.My last vacation/New year
B) Historical documentaries
1. Local historical landmark
2. Biography about a family member/relative/famous person
3. History of your school/hometown
4. Major current events of the year/decade/century
5. School year happenings
C) Information or instruction type stories.
1. My neighborhood/my hometown/my school
2. Describe shopping areas
3. Describe restaurants
4. Make an advertisement or commercial
5. How to make something/scientific processes
6. Book/movie/TV program review
7. School rules
114