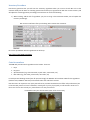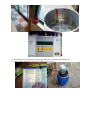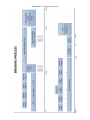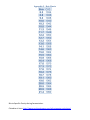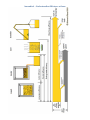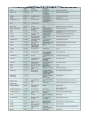
1
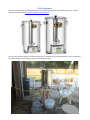
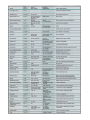
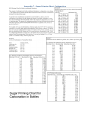
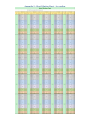
ESA ESTECHomeBrewingClub RulesandOperationsDocument Jean‐Francois Dufour Second issue August 2014 EHBC Rules and Operations Document: http://tinyurl.com/Rules‐and‐Operations EHBC Webpage: www.estechomebrewingclub.com EHBC Email address: [email protected] Booking your Brewing Sessions: www.bookingsystem.com (Organisation ID: EHBC) Inventory of our ingredient stock: http://tinyurl.com/EHBC‐Inventory Our ingredients/equipment supplier: http://www.brouwmarkt.nl/ (in Almere) Registration To become a member of the EHBC Club and make use of our facilities, equipment and ingredients, take contact with the Club's Committee (see Contact) after having paid the registration fees (see account details below). ============================================ Name: ESTEC Home Brewing Club Account: NL24ABNA0431811342 Fee: 50EUR Description: [Your Full Name] ============================================ TableofContents EHBC Committee 2014 ...................................................................................................................................................... 4 Club Objectives and their Implementation ....................................................................................................................... 4 Club Objectives ............................................................................................................................................................. 4 Implementation of the objectives................................................................................................................................. 4 Club Equipment ................................................................................................................................................................. 5 How to use the brewery ................................................................................................................................................... 6 Overview of a typical home brewing process ................................................................................................................... 6 EHBC Monthly Brewing Session Schedule 2013‐2014 ...................................................................................................... 6 Using the Equipment for Personal Brewing ...................................................................................................................... 7 Booking Procedure ........................................................................................................................................................ 7 Inventory Procedure ..................................................................................................................................................... 9 Costs for members ........................................................................................................................................................ 9 Short face‐to‐face Tutorial for Brew Kettle Utilization ............................................................................................... 10 Step‐by‐step Brewing Procedure with the Braumeister Kettles ..................................................................................... 11 Preparation (20L brew) ............................................................................................................................................... 11 Mashing process ......................................................................................................................................................... 15 Post‐Mash ................................................................................................................................................................... 16 The Boil ....................................................................................................................................................................... 18 Cooling ........................................................................................................................................................................ 19 Finishing ...................................................................................................................................................................... 19 Cleaning ....................................................................................................................................................................... 20 Step‐by‐step Transfer to Secondary Fermenter Procedure ............................................................................................ 21 Step‐by‐step Yeast Rinsing Procedure (for future re‐use of the yeast) .......................................................................... 21 Step‐by‐step Bottle Filling Procedure ............................................................................................................................. 22 Step‐by‐step Making a Yeast Starter Procedure ............................................................................................................. 23 Appendix 1 ‐ Brewing Process ......................................................................................................................................... 25 Appendix 2 – Brix Charts ................................................................................................................................................. 26 Appendix 3 – How Far will Home Brewing Take You ...................................................................................................... 27 Appendix 4 – Understanding Efficiency at large ............................................................................................................. 28 Appendix 5 – Hops Substitution Chart ............................................................................................................................ 29 Appendix 6 – Malt Chart and Characteristics ................................................................................................................. 31 Appendix 7 – Sugar Priming Chart, Carbonation ............................................................................................................ 32 Appendix 8 – Keg Force Carbonation .............................................................................................................................. 33 Appendix 9 – Wort Dilution Chart – Ice cooling .............................................................................................................. 34 Appendix 10 – Gelatinization Temperature Chart .......................................................................................................... 35 Appendix 11 – Brew Day Checklist for All Grain Recipes ................................................................................................ 36 Appendix 12 – Brewing Sheet ......................................................................................................................................... 38 Appendix 13 – Beer Tasting Sheet .................................................................................................................................. 39 Appendix 14 – Gravity/Hops Ratio .................................................................................................................................. 40 Appendix 15 – Types of Malts ......................................................................................................................................... 41 EHBCCommittee2014 The Committee in 2014 is composed of: Chairman: Jean‐Francois Dufour Treasurer: Stephane Carlier Liaison Offier: Martin Kaspers Event Officer: Jeroen Vandersteen Engineering Officer: Phil Blake ClubObjectivesandtheirImplementation ClubObjectives The Club’s objectives are, with an engineering perspective, a) to create a community of home brewers from our pool of colleagues (creating team‐building, as well as communication and learning environments), b) to educate about brewing techniques (through lectures, experiments, presentations from specialists), c) to promote interactions between home brewers, at ESTEC and also with external entities/clubs, and of course d) to give its members the opportunity to brew their own beers on‐site with colleagues and friends. Implementationoftheobjectives To achieve these goals, the EHBC will: a) set up monthly brewing events at ESTEC, sometimes with an invited guest, specialized in brewing. These events are complemented with lectures, discussions and advices on brewing and the related techniques and equipment. b) set up a small‐size home brewery at ESTEC with equipment owned by the club, which facilities will be made available to the club’s members for brewing any day (the EHBC founding survey shows that the little space in Dutch houses/apartments is why many enthusiast home brewers at ESTEC can difficultly perform this activity at home ‐ 95% of the respondents say that having the facility on‐site is a prerequisite for their participation). c) share our hard work, passion and curiosity during external events, for example the ESTEC fun day, and to organize visits to famous breweries and to other events. ClubEquipment Our club is equipped with one Braumeister 20 liters automatic brewing kettle and another Braumeister, 50 liters automatic brewing kettle (http://www.speidels‐braumeister.de/). Our top‐notch brewing kettles are complemented with a complete set of brewing equipment and a temperature‐ controlled storage room for ideal fermentation temperature of 20°C. Howtousethebrewery There are several guidelines to follow in order to ensure a clean, safe and fair use of the brewery: Do not leave your fermenting beer more than 3‐4 weeks in the fermenters (fair use of facility). It is good practice to let your beer ferment 5‐7 days in the primary fermenter, to then siphon it out to a fresh secondary fermenter in order to separate from the yeast cake (thus reducing possible off‐flavors). Once your beer bottles are filled, bring them out immediately (we cannot store filled bottles in the facility). Use the booking system to reserve the equipment and visualize the bookings (see procedure below). You may not drink alcohol in the brewing facility. Every single beer brewed in the EHBC brewery shall be written down on the Craft Brew Board. If you have never brewed by your own before, it is wise to brew your first beer in parallel to one of our monthly brewing sessions; grab a free brew kettle and use the people around you as resource if you need support! Or ask for our short 20 minutes one‐on‐one tutorial sessions! Overviewofatypicalhomebrewingprocess EHBCMonthlyBrewingSessionSchedule2013‐2014 The EHBC will organize a monthly brewing session where one communal beer will be brewed. These sessions will sometimes host invited experienced speakers who will talk about the processes and give us some tips. Here is the schedule of the next brewing sessions: Thursday August 17, 2014 Thursday September 18, 2014 Thursday October 16, 2014 Thursday November 20, 2014 UsingtheEquipmentforPersonalBrewing BookingProcedure All members have been registered on our booking system (www.bookingsystem.com). You will have received an automatically‐generated email (maybe check your spam folder?) with login information to this “temporary” booking system we will use until we have our own solution (months to year). This booking system will allow you to book the time slots for using the equipment. For the next few months, we will have a single brewing kettle, therefore do not book multiple bookings at the same time. Please change your password! To best view the bookings, check the "month" view to have a calendar view. Make sure to read the inventory procedure prior to book a private session! Follow the indicated steps to perform a booking of a resource (one of the two brewing kettles). Important NOTE: When booking, add the bill of ingredients you plan on using in the comments textbox; we will update the inventory accordingly. InventoryProcedure How do we guarantee that you will have the necessary ingredients when you arrive to brew? We can't at the moment. Ideally we will work on a booking system that will take your ingredients bill with the current inventory and will adjust the remaining quantity accordingly. But until then we ask for the following: 1) When booking, add the bill of ingredients you plan on using in the comments textbox; we will update the inventory accordingly. We receive a notification after your booking and it contains the comments. Here is the spreadsheet with the ingredients we will keep: http://tinyurl.com/EHBC‐Ingredients Costsformembers The EHBC will provide several ingredients to the brewer. These are: 1. Hops 2. Dry yeast 3. Specialized malts (e.g. chocolate malts, crystal malts, aroma malts, etc) 4. Base malts (e.g. pale malts, pilsner malts, ottis malts, etc) For each personal brewing session (beer for personal usage), the Member will contribute 5 EUR for the ingredients (20 liters brew, 10EUR for 50L brew) to be transferred to the club’s bank account. Note that due to its expensive cost, liquid yeast will not be provided. Nevertheless, the EHBC will provide mason jars to harvest used yeast for a future re-utilization, meaning that if you buy liquid yeast you will be able to reuse it for a future use. We can also include your yeast wishes in our next procurement. Unidentified mason jars with harvested yeast will be thrown away. The Committee will assess the possibility to grow our own stock of yeast from the most popular commercial liquid yeast and store it in the club’s refrigerator. Each member has to provide his own bottles for bottling or buy the bottles from the club (40c per 333ml bottle). Unidentified bottles lying around will be thrown away. Shortface‐to‐faceTutorialforBrewKettleUtilization We are at your disposal to take 20 minutes to show you the equipment personally and give you a crash course (15‐ 20mins) on how to use it. Just request it and we'll dispatch someone to do that with you. We are currently working on a full brewing protocol. We wish to give everyone this short tutorial before you brew for the first time. Another way is to brew in parallel to our monthly brews. Step‐by‐stepBrewingProcedurewiththeBraumeisterKettles Preparation(20Lbrew) Setup, heating water, measure ingredients, breaking grains 1. Make sure you are familiar with the user manual of the Braumeisters. 2. Install a brewing kettle on a stable table. 3. Fill the empty kettle with 23 Liters, which is 2cm below the top line of the middle steel rod. 4. Insert the inner mash container red band (seal) down, with a coarse filter underneath a fine filter. 5. Plug‐in the kettle and setup your mash/hops program. a. Expert note: to speed up the process, add the extra 2kw plug‐in heater provided. Also, you can setup the kettle in manual mode (press the two most left buttons 3 seconds) to start the heater before setting up your brewing programme; it takes approximately 25 minutes to heat the water to 65C, during that time you will have plenty of time to program your brewing profile. 6. Press START to start increasing the water temperature to the set mash phase temperature. 7. Prepare all the ingredients (e.g. you have enough of everything?). 8. Prepare the yeast if necessary (smash pack or rehydrate dry yeast in water). 9. Setup the grain crusher on a table and start crushing the grains (better hang a bucket or bag to receive the grains). Mashingprocess insert grains Mashing brings the grain’s enzymes to the right temperature to convert their starch reserves into fermentable sugars 10. Once the mash temperature is reached, slowly insert your broken grains in the middle container. Stir a bit to avoid clogging. NOTE: make sure that the pump is not working during this step! 11. Insert the fine filter on the center rod above the grain bed, then the coarse filter on top, then the metal bar and finally the bolt nut. 12. Confirm the current step on the machine’s program to initiate the mash timer. The kettle will increase its temperature following your program. Start of the mash phase. Post‐Mash Drain grains, fill‐in extra water 13. Once the mash completed, remove the bolt nut and the metal bar, then install on the kettle top frame the “U”‐shaped metal rod (will be used to hold our grain container). 14. With great care, pull up the grain middle container and install its 2 lower side pins on the “U”‐shaped metal rod. 15. Confirm to the machine the readiness to start the boil. 16. Let the water contained in the wet grains drop on the grains for 10‐15minutes. 17. During this time, measure approximately the volume of wort currently in the kettle and top off with fresh water to reach again 24 Liters (or see next point for advanced method). Note 1: If you wish, pour water at 77 degree Centigrade on the grain bed instead of filling the kettle with room‐temperature water; this will retrieve all the remaining sugar from the grains. Note 2: the boiler will evaporate approximately 3.2 liters per hour, whereas the cooling loss will equal approximately 4% (here about 0.8 liters). Three infusions of hops may absorb up to 1 liter. Starting the boil at 23L should give you 19 liters, the typical volume for home brewing recipe (5 gallons). 18. If you wish, take a gravity sample from the bottom valve of the kettle and a refractometer. Combined with the volume level of wort and a dilution online tool, you will be able to add a tailored quantity of extra water to obtain a precise original gravity (thus varying the final volume). 19. Now the right amount of water is in the kettle. TheBoil Bring wort to a boil, insert hops additions, sanitize chiller 20. While the kettle increases the temperature of the wort to a boil, remove the drained grain container and empty it in the BIO bin outside the facility. Be careful, it is hot. 21. 22. 23. 24. Wait for the boiling point; do not leave the lid on once above 95C otherwise there will be a mess! Once the wort starts to boil, confirm the hop step in the program and drop the first hops (bitterness) to the boil. You may use hop nylon bags to reduce the quantity of particles. At about 15 minutes before the end of the boil, insert the second hops (flavor hops). Then, insert the wort chiller serpentine in the boiling kettle to sterilize it 15 minutes long. a. Or use the plate chiller instead. In this case, you need to sterilize it by soaking it in a sanitizing solution and making sure that the solution is everywhere in the chiller and in the pipes. 25. At about 5 minutes before the end of the boil, insert the last hops addition (aroma hops). 26. Connect the input of the wort chiller to the tap water pipe and its output to the water drain. 27. End of the boil. 28. If using a plate chiller, stir powerfully in a circular motion to create a whirlpool so that the hops and proteins gather in the middle of the kettle (helps clarifying the beer). Cooling Cool wort to 22C, sanitize fermenter 29. Start the cooling by letting the fresh water flow through the wort chiller. Note: The first liters of water coming out of the chiller will be very hot. Try to save some of it for cleaning & sanitizing tasks later! 30. Swirl the hot wort in a circular fashion to increase the efficiency of the cooling and to centralize the many particles. The kettle will indicate the temperature at the bottom of the kettle only. 31. While waiting for the cooling process to complete, wash and sanitize a fermenter and its airlock. 32. When the temperature reaches 22 degrees Centigrade, stop the cooling process. Finishing Fill fermenter, add yeast, aerate wort, add identification to brew 33. Put your sanitized ferment bucket underneath the kettle’s valve, open the valve and let the cooled wort flow in the fermenter from a height (as much splashing as possible!) to ensure a good level of oxygen in the wort (needed by the yeast). 34. Incline the nearly empty brewing kettle up to 90° to empty it fully from the wort. 35. Sanitize the yeast pack, open it and inject the yeast in the fermenter. 36. Close the lid of the fermenter and add the airlock. 37. With a solid grip, violently shake the fermenter as long as possible (minimum 3 minutes) to again increase the oxygenation of the wort. It will create a nice healthy foam on top. 38. Fill the airlock with sanitizer solution. 39. Identify the fermenter with appropriate details and store in the fermentation room. Cleaning Wash kettle, clean pump, dry everything and store away 40. With soap and water, clean the kettle thoroughly and rinse properly. 41. Underneath the kettle, unscrew the pump (the whole cylinder) and clean its pieces. Reassemble the cleaned pump. 42. Dry everything and store away. 43. Clean all wet surfaces (e.g. tables, floor) and then hang cloths to dry. 44. Leave everything clean! Step‐by‐stepTransfertoSecondaryFermenterProcedure 1. 2. 3. 4. Select an empty fermenter bucket/glass carboy, clean it, sanitize it. Sanitize the auto‐siphon (tube and pipe, inside and out), as well as the airlock and the rubber cap. Install your (full) primary fermenter on a table and the sanitized secondary fermenter underneath. With the auto‐siphon pipe extremity in the secondary fermenter, insert the siphon in the primary fermenter and pump it a few times to initiate the flow down to the secondary. 5. Try not to add any oxygen to the wort during the entire process (also do not shake). 6. Once the transfer is completed, close the secondary fermenter and store. 7. With the remaining yeast cake at the bottom of the primary fermenter, you may a. [Yeast is expensive]: Rinse it to harvest back the yeast for a later use (see step‐by‐step below) or b. Dispose of the yeast cake and clean everything. Step‐by‐stepYeastRinsingProcedure(forfuturere‐useoftheyeast) 1. You have in front of you the yeast cake at the bottom of your primary fermenter. 2. Take 3 to 4 mason jars of 1.5 liters and 4 mason jars of 500ml and boil them a few minutes to kill unwanted organisms. 3. Add 3 liters of water (better have it boiled and cooled beforehand, but not critical) to the yeast cake (trub). 4. Stir the diluted trub (the trub is the layer of sediment that appears at the bottom of the fermenter after the yeast has completed the bulk of the fermentation; It is composed mainly of heavy fats, proteins and inactive yeast) energetically to have an homogeneous solution. We now need to separate the yeast from the rest of the trub. 5. Fill the 1.5 liters mason jars with the diluted trub and let rest for 15 minutes. After 15 minutes, there is a clear separation between the lighter yeast (fine white powder‐like layer on top) and the rest of the heavier trub at the bottom of the jar. 6. Slowly pour the layers of yeast into 500ml mason jars, leaving as much trub behind as possible. It is OK to pour the top empty liquid too at the same time. 7. Dispose of the bad trub (what is left in the 1.5L jars). 8. Wait from 20 minutes to 2+ hours. 9. If there is again a clear separation between yeast and trub, repeat step (6). At the end of the procedure, you should have a single 500ml jar with 3cm thick yeast layer at the bottom, the rest of the space being completely filled with dark‐colored water from the procedure. 10. Identify the mason jar (yeast type, date of rinsing, name) and store in refrigerator for up to 6 months. 11. When ready to reuse, it is best to reactivate the yeast by making a starter (see below for procedure). Step‐by‐stepBottleFillingProcedure 1. Ensure that you have clean bottles (individual visual inspection is a good idea). 2. Fill the bottle washer with sanitizer solution (warm water + sanitizer product) and insert your caps in the solution. 3. Sanitize each bottle with the bottle washer and allow them to dry on the bottle hanger. 4. Sanitize the bottle filling tube (plastic tube with bottom valve) as well as the valve of the fermenter. 5. Once your bottles are sanitized, install your fermenter on a table and insert the bottle filling tube on the valve of the fermenter. NOTE: if your fermenter does not have a bottom valve, you need to siphon its content into a new sanitized fermenter bucket that has one! 6. For carbonation, add approx. 100g of dextrose sugar (for 19 liters batches) to the beer in the fermenter bucket and stir gently (not to introduce oxygen) with a sanitized spoon. 7. Take a bottle, insert the tube in the bottom to touch its bottom and initiate the flow, and fill the bottle completely. Removing the tube from the bottle will create the perfect amount of head space to store CO2. 8. Using the crowning machine, put a cap on the bottle. 9. Repeat for all the bottles. 10. Identify the bottles right away (etiquette or writing on cap) and bring home immediately. 11. Clean and store the equipment away. Step‐by‐stepMakingaYeastStarterProcedure 1. 2. 3. 4. 5. For the best results, use a Erlenmeyer flask (made of heat‐resistant glass). Pour 200g of malt extract powder in the flask and add 1.5l of warm water. Bring to boil and boil for 10 minutes (take great care when reaching the boiling point; It can make a mess!) Allow to cool down to room temperature (in a bucket of water and ice will lead to faster results). When cooled, pitch your yeast in the flask, shake energetically and close the flask with its rubber cap and airlock. Oxygenation of the wort is very important here. 6. Leave the wort at fermentation temperature for 1 day. 7. One day later on brew day, you may use the whole starter (2L liquid) or you may dispose of the liquid part and use only the yeast in your beer. Appendix1‐BrewingProcess Appendix2–BrixCharts Brix to Specific Gravity during fermentation: Calculator is here: http://www.northernbrewer.com/refractometer‐calculator/ Appendix3–HowFarwillHomeBrewingTakeYou Appendix4–UnderstandingEfficiencyatlarge Appendix5–HopsSubstitutionChart Appendix6–MaltChartandCharacteristics Appendix7–SugarPrimingChart,Carbonation Appendix8–KegForceCarbonation Appendix9–WortDilutionChart–Icecooling Appendix10–GelatinizationTemperatureChart Appendix11–BrewDayChecklistforAllGrainRecipes Appendix12–BrewingSheet Appendix13–BeerTastingSheet Appendix14–Gravity/HopsRatio Appendix15–TypesofMalts Base Malts Lager Malt 2 L Lager malt can be used to produce ales as well as lagers. The name comes from the fact that pale lagers are the most common style of beer and this is the malt type most commonly used to produce them. Because it tends to be the most available malt, it is used for nearly every other style also. Logically, if you intend to brew a pale lager, you would be best served by using lager malt. After germination, lager malt is carefully heated in a kiln to 90F for the first day, withered at 120-140F for 12-20 hours and then cured at 175-185F for 4-48 hours depending on the maltster. This produces a malt with fine mild flavor and excellent enzyme potential. It is used as the basis of most of the world's beers in conjunction with specialty malts for added flavors. Pale Ale Malt 3 L This malt type is kilned at higher temperatures than lager malt, giving a slightly toastier malt flavor well suited to Pale Ales. Wheat Malt 3 L Wheat has been used for brewing beer nearly as long as barley and has equal diastatic power. Malted wheat is used for 5-70% of the mash depending on the style. Wheat has no outer husk and therefore has fewer tannins than barley. It is generally smaller than barley and contributes more protein to the beer, aiding in head retention. But it is much stickier than barley due to the higher protein content and may cause lautering problems if not given a "Protein Rest" during the mash. Rye Malt 3 L Malted rye is not common but is gaining in popularity. It can be used as 5-10% of the grain bill for a rye "spicy" note. It is even stickier in the mash than wheat and should be handled accordingly. Kilned Malts (need to be mashed) These malts are commonly produced by increasing the curing temperatures used for base malt production, but can also be produced by toasting finished base malts for a period of time in an oven. Suggested times and temperatures for producing these types of malts at home are given in Chapter 20 - Experiment! Biscuit Malt 25 L This fully toasted, lightly roasted malt is used to give the beer a bread and biscuits flavor. It is typically used as 10% of the total grain bill. Gives a deep amber color to the beer. Victory Malt 25 L This roasted malt is similar in flavor to Biscuit but gives a more nutty taste to the beer. Victory adds orange highlights to the beer color. Munich Malt 10 L This malt has an amber color and gives a very malty flavor. This malt has enough diastatic power to convert itself but is usually used in conjunction with a base malt for mashing. This malt is used for Oktoberfest-type beers and many others, including pale ales. Vienna Malt 4 L This malt is lighter and sweeter than Munich malt and is a principal ingredient of Bock beers. Retains enough enzymatic power to convert itself but is often used with a base malt in the mash. Dextrin Malt 3 L Also known as American Carapils, this malt is used sparingly and contributes little color but enhances the mouthfeel and perceived body of the beer. A common amount for a five gallon batch is 1/2 lb. Dextrin malt has no diastatic power. It must be mashed; if steeped it will contribute a lot of unconverted starch and cause starch haze. Caramel Malts (may be steeped or mashed) Caramel Malts have undergone a special heat "stewing" process after the malting which crystallizes the sugars. These sugars are caramelized into longer chains that are not converted into simple sugars by the enzymes during the mash. This results in a more malty, caramel sweet, fuller tasting beer. These malts are used for almost all ale and higher gravity lager styles. Various crystal malts are often added in half pound amounts to a total of 5-25% of the grain bill for a 5 gallon batch. Caramel 10 10 L This malt adds a light honey-like sweetness and some body to the finished beer. Caramel 40 40 L The additional color and light caramel sweetness of this malt is perfect for pale ales and amber lagers. Caramel 60 60 L This is the most commonly used caramel malt, also known as medium crystal. It is well suited for pale ales, English style bitters, porters and stouts. It adds a full caramel taste and body to the beer. Caramel 80 80 L This malt is used for making reddish colored beers and gives a lightly bittersweet caramel flavor. Caramel 120 120 L This malt adds a lot of color and bittersweet caramel flavor. Useful in small amounts to add complexity or in greater amounts for old ales, barleywines and doppelbocks. Special B 220 L This unique Belgian malt has a roasted nutty-sweet flavor. Used in moderation (1/4-1/2 lb.), it is very good in brown ales, porter, and doppelbocks. Larger amounts, more than a half pound in a 5 gallon batch, will lend a plum-like flavor (which may be desired in a barleywine in small amounts). Roasted Malts (may be steeped or mashed) These highly roasted malts contribute a coffee or burnt toast flavor to porters and stouts. Obviously these malts should be used in moderation. Some brewers recommend that they be added towards the end of the mash, claiming that this reduces the "acrid bite" that these malts can contribute. This practice does seem to produce a smoother beer for people brewing with "soft" or low bicarbonate water. Chocolate Malt 400L Used in small amounts for brown ale and extensively in porters and stouts, this malt has a bittersweet chocolate flavor, pleasant roast character and contributes a deep ruby black color. Black Patent Malt 580L This is the blackest of the black. It must be used sparingly, generally less than a half pound per 5 gallons. It contributes a roasted charcoal flavor that can actually be quite unpleasant if used in excess. It is useful for contributing color and/or setting a "limit" on the sweetness of other beer styles using a lot of caramel malt; one or two ounces is useful for this purpose. Roast Barley 550L This is not actually a malt, but highly roasted plain barley. It has a dry, distinct coffee taste and is the signature flavor of Stouts. It has less of a charcoal "bite" to it than does Black Patent.