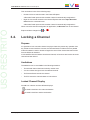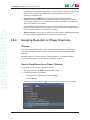
1
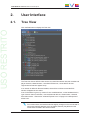
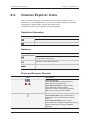
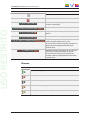
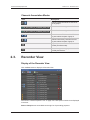
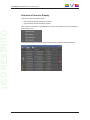
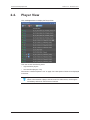
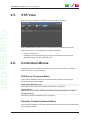
USO RESTRITO
USER MANUAL
Channel Explorer
Version 6.57 - December 2014
USO RESTRITO
USER MANUAL IPDirector 6.57 Channel Explorer
Copyright
EVS Broadcast Equipment SA– Copyright © 2005-2014. All rights reserved.
Disclaimer
The information in this manual is furnished for informational use only and subject to
change without notice. While every effort has been made to ensure that the information
contained in this user manual is accurate, up-to-date and reliable, EVS Broadcast
Equipment cannot be held responsible for inaccuracies or errors that may appear in this
publication.
Improvement Requests
Your comments will help us improve the quality of the user documentation. Do not
hesitate to send improvement requests, or report any error or inaccuracy on this user
manual by e-mail to [email protected].
Regional Contacts
The address and phone number of the EVS headquarters are usually mentioned in the
Help > About menu in the user interface.
You will find the full list of addresses and phone numbers of local offices either at the end
of this user manual (for manuals on hardware products) or at the following page on the
EVS website: http://www.evs.com/contacts.
User Manuals on EVS Website
The latest version of the user manual, if any, and other user manuals on EVS products
can be found on the EVS download center, on the following webpage:
http://www.evs.com/downloadcenter.
I
USER MANUAL IPDirector 6.57 Channel Explorer
USO RESTRITO
Table of Contents
TABLE OF CONTENTS
III
WHAT'S NEW?
V
1.
1
1.1. Product Overview
1
1.2. Opening of Channel Explorer
2
2.
3
USER INTERFACE
2.1. Tree View
3
2.2. Channel Explorer Icons
4
2.3. Recorder View
6
2.4. Player View
8
2.5. VTR View
9
2.6. Contextual Menus
9
3.
Table of Contents
INTRODUCTION
MANAGING CHANNELS
12
3.1. Introduction
12
3.2. Assigning a Player
12
3.2.1. Introduction
12
3.2.2. Setting the Default Player Channel
12
3.2.3. How to Assign a Player Channel or the Software Player
14
3.3. Assigning a Recorder Channel
14
3.4. Locking a Channel
15
3.5. Channels Modes
16
3.5.1. Introduction
16
3.5.2. Ganging Recorder or Player Channels
17
3.5.3. Associating Player Channels in PGM/PRV Mode
19
3.5.4. Associating Channels in Fill and Key Mode
20
3.5.5. Associating Player Channels in Timeline Mode
21
3.5.6. Defining a Channel Group for the AB Roll Playlist
23
3.5.7. Removing the Link between Channels
25
3.6. Defining a Default Stream Target
25
3.7. Managing the Links with a Video Router
27
3.7.1. Introduction
27
3.7.2. Assigning a Recorder Source
27
3.7.3. Assigning a Player Destination
29
III
EVS Broadcast Equipment SA
4.
STARTING / STOPPING AN INGEST
32
4.1. How to Start or Stop a Server Ingest
32
4.2. How to Start, Stop or Kill a Stream
33
5.
DISPLAYING INFORMATION ON THE OSD
35
6.
OPERATIONS ON SERVERS
36
6.1. How to Get Server Monitoring Information
36
6.2. How to Launch a Different Predefined Server Configuration
37
6.3. Multicam Web Setup Tool
38
7.
IV
Issue 6.57.A - December 2014
CHANNEL EXPLORER SHORTCUTS
39
Table of Contents
USER MANUAL IPDirector 6.57 Channel Explorer
What's New?
has been added on the left margin to highlight
In the user manual, the icon
information on new and updated features.
USO RESTRITO
No section has been updated in the Channel Explorer manual of IPDirector 6.57
(compared to version 6.56).
What's New?
V
USER MANUAL IPDirector 6.57 Channel Explorer
1.
Introduction
1.1.
Product Overview
USO RESTRITO
The Channel Explorer provides an overview of:
•
logical XNet networks as defined in the Remote Installer, tagged as high resolution or
low resolution
•
EVS servers with their channel configurations (inputs and outputs). Depending on the
server configuration, up to 8 channels can be displayed, with a maximum of 6 recorder
or 6 player channels.
•
◦
streams appear directly under the recorders as a relative path
◦
low resolution recorders appear under the associated high resolution recorders,
after the streams
VTRs being controlled by an IPDirector workstation
Several views are available from the Channel Explorer:
1. Introduction
•
Tree view
•
Rec view
•
Player view
•
VTR view
1
EVS Broadcast Equipment SA
Issue 6.57.A - December 2014
Through the Channel Explorer, any IPDirector workstation can take control of one or
several channels on EVS servers that are connected to the XNet network.
You can perform many operations from the Channel Explorer module, for example:
•
lock channels from use by others
•
start or stop an ingest
•
gang multiple channels
•
create specialized playback modes.
Indeed, the flexibility of IPDirector allows multiple channels to be managed together in a
variety of modes:
•
Ganged channels: allowing simultaneous control of several channels (recorders or
players)
•
Fill and Key: allowing the management of clips or playlists in Fill & Key pairing.
•
Program/preview: allowing the playout of audio and video transition effects between
clips, playlist elements or timeline elements.
•
Lock Timeline: allowing two channels to function as Timeline Engine for use with
IPEdit.
•
AB Roll Playlist: allowing the control and playout of material on up to 4 channels at the
same time.
See section "Channels Modes" on page 16 for more information on each association type.
1.2.
Opening of Channel Explorer
To open the Channel Explorer, click the
of the main window.
icon on the Application bar
The Tree view is displayed by default when Channel Explorer opens.
2
1. Introduction
USER MANUAL IPDirector 6.57 Channel Explorer
2.
User Interface
2.1.
Tree View
USO RESTRITO
Click the Tree button to display the Tree view:
The Tree view shows all EVS video servers from the XNet network with their recorder and
player channels, related streams, controlled VTR devices, connected XF devices.
High resolution networks appear on top.
If no network is defined in Remote Installer, there will be no XNet root and the EVS
servers will appear as root nodes.
A lot of information is given, by means of icons or additional text, on the hardware/device,
type of server channel, resolution, connected remote devices, stream status, channels
association mode... See section "Channel Explorer Icons" on page 4 for a description of
all the icons.
Note
From version 6.55, the interface skin has slightly changed, so the color shade of
some user interface elements (such as title bar, buttons) may differ from the
screenshots included in the current manual.
2. User Interface
3
EVS Broadcast Equipment SA
2.2.
Issue 6.57.A - December 2014
Channel Explorer Icons
A lot of information is given in the Channel Explorer window, by means of icons or
additional text, on the hardware/device, type of server channel, resolution, connected
remote devices, stream status, channels association mode,...
The meaning of each icon is explained in the following tables.
Resolution Information
Icon
Description
high resolution XNet.
low resolution XNet.
Hardware
Icon
Description
EVS video server connected to the XNet. The XT label is used for
any type of EVS video server.
VTR device connected to the XNet.
XF device connected to the XNet.
Player and Recorder Channels
Icon
Description
Recorder channels.
Icon with brackets: recorder channel not
associated to a Recorder Panel.
Icon without brackets: recorder channel
associated with a Recorder Panel.
Red icon: recorder channel being recording.
Black icon: recorder channel stopped.
Player channels
Icon with brackets: Player channel with no
associated control, Control Panel or Playlist
Panel.
Icon without brackets: Player channel
associated with an IPDirector application (Control
Panel, Playlist Panel, IPLogger, Database
Explorer).
4
2. User Interface
USER MANUAL IPDirector 6.57 Channel Explorer
Icon
Description
Channel locked from this workstation.
Channel locked from another workstation.
Player channel supporting the "Mix on one
channel" functionality.
USO RESTRITO
Player channel set as default player.
Player channel controlled by a ShuttlePRO
device.
Player channel controlled by a BEPlay device.
Player channel connected to an IN port of a video
router, itself associated to OUT ports.
The name of the router OUT port(s) routed from a
player channel is displayed after the player
channel name.
Recorder channel connected to an OUT port of a
video router, itself associated to an IN port.
The name of the router IN port routed to the
recorder channel is displayed after the recorder
channel name.
Streams
Icon
Description
On-line stream (green).
Recording stream (red).
Off-line stream (black).
Scheduled stream (orange).
Warning message on the stream (yellow).
2. User Interface
5
EVS Broadcast Equipment SA
Issue 6.57.A - December 2014
Channels Association Modes
Icon
Description
Channel ganged with another channel as
part of group 3.
Channel has been assigned as a PGM.
Channel has been assigned as a PRV.
Channel set as a Fill channel in a Fill &
Key association and part of group 2.
Channel set as a Key channel in a Fill &
Key association and part of group 2.
Player channel locked for use with a
timeline (Timeline mode).
Channel assigned to a group for use in AB
Roll Playlist interface.
2.3.
Recorder View
Display of the Recorder View
Click the Rec button to display the Recorder View: See section "Channel Explorer Icons" on page 4 for a description of all the icons displayed
in the view.
Start and Stop buttons are available on the right for clip recording purposes.
6
2. User Interface
USER MANUAL IPDirector 6.57 Channel Explorer
Selection of Items to Display
This view shows the following items:
•
high resolution and low resolution recorders
•
high resolution and low resolution streams
USO RESTRITO
Click the arrow to the right of the Rec button to select which items you want to display in
the Recorder view:
The following screenshot shows the view with the high resolution streams selected:
2. User Interface
7
EVS Broadcast Equipment SA
2.4.
Issue 6.57.A - December 2014
Player View
Click the Player button to display the Player View: This view shows the following items:
•
high resolution players
•
low resolution players, if any
See section "Channel Explorer Icons" on page 4 for a description of all the icons displayed
in the view.
Tip
When a user renames a player channel on an EVS video server, the change is
immediately reflected in the IPDirector interface.
8
2. User Interface
USO RESTRITO
USER MANUAL IPDirector 6.57 Channel Explorer
2.5.
VTR View
This view is only available if a VTR device is connected to the XTNet.
Click the VTR button to display the VTR View and see the available VTR devices.
From the VTR view, you can perform the following operations:
2.6.
•
locking a VTR device
•
opening a VTR Control Panel by right-clicking a VTR name and selecting the
appropriate option from the contextual menu.
Contextual Menus
Contextual menus are available when right-clicking an EVS video server, a recorder
channel, a stream or a player channel.
EVS Server Contextual Menu
All the options available for an EVS video server and the sections where they are
described are mentioned hereafter.
Show Server Monitoring Info
See section "How to Get Server Monitoring Information" on page 36.
Restart Server...
See section "How to Launch a Different Predefined Server Configuration" on page 37.
Configure Server...
See section "Multicam Web Setup Tool" on page 38.
Recorder Channel Contextual Menu
All the options available for a recorder channel and the sections where they are described
are mentioned hereafter.
2. User Interface
9
EVS Broadcast Equipment SA
Issue 6.57.A - December 2014
Open Recorder Panel
See section "Assigning a Recorder Channel" on page 14.
Open Ingest Scheduler (new ingest)
See section "How to Start or Stop a Server Ingest" on page 32.
Start XT Ingest
See section "How to Start or Stop a Server Ingest" on page 32.
Stop XT Ingest
See section "How to Start or Stop a Server Ingest" on page 32.
Lock
See section "Locking a Channel" on page 15.
Unlock
See section "Removing the Link between Channels" on page 25.
Gang
Gangs the selected channels.
See section "Ganging Recorder or Player Channels" on page 17.
Ungang
Removes the selected channels from the gang group.
See section "Removing the Link between Channels" on page 25.
Pgm/Prv
See section "Associating Player Channels in PGM/PRV Mode" on page 19.
Fill Key
See section "Associating Channels in Fill and Key Mode" on page 20.
Assign Recorder Source
See section "Assigning a Recorder Source" on page 27.
Only available when the recorder channel is connected to a video router.
Stream Contextual Menu
All the options available for a stream and the sections where they are described are
mentioned hereafter.
Open Ingest Scheduler (new ingest)
See section "How to Start or Stop a Server Ingest" on page 32.
Start Hires Stream
See section "How to Start, Stop or Kill a Stream" on page 33.
Stop Stream
See section "How to Start, Stop or Kill a Stream" on page 33.
Kill Stream
See section "How to Start, Stop or Kill a Stream" on page 33.
Set Stream Target
Opens the Select Stream Target window to define a default target for the selected stream.
See section "Defining a Default Stream Target" on page 25.
10
2. User Interface
USER MANUAL IPDirector 6.57 Channel Explorer
Player Channel Contextual Menu
All the options available for a player channel and the sections where they are described
are mentioned hereafter.
Open Control Panel
See section "How to Assign a Player Channel or the Software Player" on page 14.
USO RESTRITO
Lock
See section "Locking a Channel" on page 15.
Unlock
See section "Removing the Link between Channels" on page 25.
Gang
Gangs the selected channels.
See section "Ganging Recorder or Player Channels" on page 17.
Ungang
Removes the selected channels from the gang group.
See section "Removing the Link between Channels" on page 25.
Pgm/Prv
See section "Associating Player Channels in PGM/PRV Mode" on page 19.
Fill Key
See section "Associating Channels in Fill and Key Mode" on page 20.
Lock Timeline
See section "Associating Player Channels in Timeline Mode" on page 21.
Unlock Timeline
See section "Removing the Link between Channels" on page 25.
AB Roll Playlist
See section "Defining a Channel Group for the AB Roll Playlist" on page 23.
Set as Default Player
"Setting the Default Player Channel" on page 12.
Assign Player Destination
See section "Assigning a Player Destination" on page 29.
Only available when the player channel is connected to a video router.
2. User Interface
11
EVS Broadcast Equipment SA
3.
Managing Channels
3.1.
Introduction
Issue 6.57.A - December 2014
From the Channel Explorer, recorder channels can be assigned to Recorder Panels,
player channels can be assigned to a Control Panel or a Playlist Panel, and a default
player channel can be defined. Some of the operating procedures are described in the next
sections. Please refer to the manuals related to the modules a channel can be associated
with for more information.
3.2.
Assigning a Player
3.2.1.
Introduction
There are several ways to assign a player channel to a Database Explorer window, a
Control Panel, an IPLogger window or a Playlist Panel. See section "How to Assign a
Player Channel or the Software Player" on page 14.
If a default player channel has been defined from the Channel Explorer, this channel will
automatically be assigned to the Database Explorer,IPLogger and the IPDirector main
window when you open the application.
See section "Setting the Default Player Channel" on page 12 for more information on how
to set and how to clear a default player channel.
3.2.2.
Setting the Default Player Channel
Purpose
A default player can be defined from the Channel Explorer or from the IPDirector main
window. It will automatically be assigned to the IPDirector main window at opening.
When the user will open the Database Explorer, IPLogger or IPEdit, the default player will
automatically be assigned to these windows, and displayed in the Associated Channel
zone, as shown in the next screenshot in the case of the Database Explorer:
12
3. Managing Channels
USO RESTRITO
USER MANUAL IPDirector 6.57 Channel Explorer
Note
If the default channel is only accessible to the workstation the user is logged
into, the default player assignment may not be accessible when the user moves
to another workstation. This is due to a user rights restriction and is intentional.
How to Set the Default Player Channel from the Channel
Explorer
To define the default player channel from the Channel Explorer, proceed as follows:
1. From the Tree view or the Player view of the Channel Explorer, right-click the player
channel you wish to define as the default player.
2. Select Set as Default Player from the contextual menu.
Default is added next to the player channel name in the Channel Explorer and the name of
the default player is displayed in the IPDirector Status bar.
How to Set the Default Player Channel from the IPDirector
Main Window
To define the default player channel from the IPDirector main window, proceed as follows:
1. Right-clicking the Default Player Channel field at the bottom left of the IPDirector
main window.
A contextual menu is displayed.
2. Select the player channel you wish to define as the default player.
Default is added next to the player channel name in the Channel Explorer and the name of
the default player is displayed in the IPDirector Status bar.
3. Managing Channels
13
EVS Broadcast Equipment SA
Issue 6.57.A - December 2014
How to Clear the Default Player Channel
You can clear the default player channel, only from the IPDirector Main window, in one of
the following ways:
•
double-click the Default Player Channel field.
•
right-click the Default Player Channel field and select None from the contextual
menu.
is displayed in the Default Player field of the Status bar.
3.2.3.
How to Assign a Player Channel or the
Software Player
Users can assign a player channel to a Database Explorer window, a Control Panel, an
IPLogger window or a Playlist Panel from the Channel Explorer. This can be done in one
of the following ways:
•
Drag a player channel from the Channel Explorer window and drop it on the Database
Explorer window, a Control Panel, an IPLogger window or a Playlist Panel (in the
Channel Media and Transport Functions pane).
The name of the selected player is displayed in the Associated Channel zone or in the
Player field.
•
Double-click a player in the Channel Explorer.
A Control Panel opens and the player is automatically assigned to it.
•
Right-click a player channel in the Channel Explorer and select Open Control Panel
from the contextual menu.
A Control Panel opens and the player is automatically assigned to it.
When a channel is assigned to an application, the Player icon in the Channel Explorer
window changes from
3.3.
to .
Assigning a Recorder Channel
Introduction
There are several ways to assign a recorder channel to a Recorder Panel or a VTR Control
Panel.
How to Assign a Recorder Channel from the Channel
Explorer
Users can assign a recorder channel to a Recorder Panel or a VTR Control Panel from the
Channel Explorer.
14
3. Managing Channels
USO RESTRITO
USER MANUAL IPDirector 6.57 Channel Explorer
This can be done in one of the following ways:
•
Double-click a recorder channel in the Channel Explorer.
A Recorder Panel opens and the recorder channel is automatically assigned to it.
•
Right-click a recorder channel in the Channel Explorer and select Open Recorder
Panel from the contextual menu.
A Recorder Panel opens and the recorder channel is automatically assigned to it.
When a recorder channel is assigned to an application, the Recorder icon in the Channel
Explorer window changes from
3.4.
to
.
Locking a Channel
Purpose
It is possible to lock a recorder channel or a player channel to prevent any operation from
any IPDirector user interface. However, the Remote Panel in LSM exclusive or parallel
mode will maintain control or be able to regain the control if the channel has been locked
from the IPDirector interface.
If a ShuttlePRO is associated to the selected channel, its functions are inactive when the
channel has been locked.
Limitations
The Lock function is not available in the following situations:
•
The selected channel has been locked by another user.
•
You do not have the right to lock the selected channel.
•
The Remote Panel controls the channel.
•
The EVS server the channel relates to is shut down.
Locked Channel Display
A Lock icon or button can have different displays:
- channel locked from the current workstation
- channel locked from another workstation
3. Managing Channels
15
EVS Broadcast Equipment SA
Issue 6.57.A - December 2014
How to Lock or Unlock a Channel
Locking a Channel
To lock a recorder channel or a player channel, proceed as follows:
1. Right-click a channel
2. Select Lock from the contextual menu.
A
icon is displayed next to the recorder channel or the player channel name.
Locking a Channel
To lock a recorder channel or a player channel, proceed as follows:
1. Right-click a channel
2. Select Lock from the contextual menu.
A
icon is displayed next to the recorder channel or the player channel name.
Unlocking a Channel
To unlock a recorder channel or a player channel, proceed as follows:
1. Right-click the channel
2. Select Unlock from the contextual menu.
If the channel was locked from the local workstation, it will be unlocked immediately.
If the channel was locked from another workstation, you will need to confirm the Unlock
request in a confirmation window.
The icon disappears.
3.5.
Channels Modes
3.5.1.
Introduction
From the Channel Explorer, several channels can be grouped in various association types
to be managed together. These associations are briefly described hereafter.
•
Ganged channels: at least two channels can be associated in Gang mode for
simultaneous control: synchronized recording for recorder channels or synchronized
playback for player channels.
•
Fill & Key: two channels can be associated in Fill & Key mode for the management of
clips or playlists themselves in Fill & Key pairing.
Linked recorder channels are used to create F & K clips.
16
3. Managing Channels
USO RESTRITO
USER MANUAL IPDirector 6.57 Channel Explorer
Linked player channels are used to perform synchronized clip or playlist recalls in a Fill
& Key scenario (sometimes called Matte & Fill) for playback to a vision mixer
(switcher) or keyable device.
3.5.2.
•
Program/preview (PGM/PRV): two player channels can be associated in
PGM/PRV mode to allow the playout of audio and video transition effects between
clips or playlist elements. This is useful when the player channels do not support the
"Mix on one channel" functionality.
•
Lock Timeline: two player channels can be associated in IPEdit mode allowing the
playout of a timeline with its transition effects. This is useful when the player channels
do not support the "Mix on one channel" functionality.
•
AB Roll Playlist: up to 4 player channels can be associated in AB Roll Playlist mode
to control and play material on all these channels at the same time.
Ganging Recorder or Player Channels
Purpose
When channels are ganged, they can be controlled simultaneously: synchronized
recording by ganged recorder channels or synchronized playback by ganged player
channels.
Recorder channels, or player channels, can be ganged from the Channel Explorer.
It is not possible to gang recorder channels with player channels.
How to Gang Recorder or Player Channels
To gang two or more channels, proceed as follows:
1. Select the channels with SHIFT+click or CTRL+click.
2. Do one of the following operations:
◦
Right-click one of the channels and select Gang
◦
Press CTRL+G.
The ganged channels will have an
3. Managing Channels
icon next to them to signify their new status.
17
EVS Broadcast Equipment SA
Issue 6.57.A - December 2014
3. To add more channels to a group: select all channels of the group and the new
channel, right-click and select Gang again.
Display of Ganged Channels
In Channel Explorer, an
icon is displayed next to the ganged channels.
Several groups of ganged channels can coexist, performing different tasks on a
production. Each of the linking icons will have a number next to it in the Channel Explorer
to indicate which group the channel belongs to.
In the Control Panel and the Playlist Panel where the player channel is selected,
•
the number of the Gang group is displayed next to the name of the loaded player
channel
•
the number of the channel in the group is displayed in the title bar
In the next example, the loaded player channel was the first channel selected to be
part of Gang group 2:
18
3. Managing Channels
USO RESTRITO
USER MANUAL IPDirector 6.57 Channel Explorer
3.5.3.
Associating Player Channels in PGM/PRV
Mode
Purpose
IPDirector is able to play a series of clips or a playlist with its transition effects. A single
player channel will be sufficient if it supports the "Mix on one channel" functionality.
Otherwise, two player channels must be used and they must be set to PGM/PRV mode.
The association of two player channels in PGM/PRV mode can be set from the Channel
Explorer, the Control Panel and the Playlist Panel.
Limitation
You can only make a PGM/PRV pair of PGM1-PGM2 or PGM3-PGM4, and so on. The
odd numbered player channel is always set to PGM and the even numbered player
channel is always set to PRV.
How to Associate Player Channels in PGM/PRV Mode from
the Channel Explorer
To associate channels in PGM/PRV mode, proceed as follows:
1. Select two channels with SHIFT+click or CTRL+click.
2. Do one of the following operations:
◦
Right-click one of the channels and select Pgm/Prv
◦
Press CTRL+M.
Display of Channels in PGM/PRV Mode
In Channel Explorer, the channels are shown with the PGM and PRV icons.
In the Control Panel and the Playlist Panel where the player channel is selected, the PGM
or PRV icon is displayed in the panel title bar.
3. Managing Channels
19
EVS Broadcast Equipment SA
3.5.4.
Issue 6.57.A - December 2014
Associating Channels in Fill and Key Mode
Purpose
Recorder channels or player channels of the EVS servers can be ganged in a specific
style called Fill & Key. This mode manages assignments of clips or playlists, and forces
them to recall to the appropriate channels, so as to allow you to perform synchronized clip
or playlist recalls in a Fill & Key scenario (sometimes called Matte & Fill).
Constraint
The first channel you select will become the Fill and the second one the Key.
How to Associate Channels in Fill and Key Mode
To associate two channels in Fill & Key mode, proceed as follows:
1. Select two channels with SHIFT+click or CTRL+click.
2. Do one of the following operations:
20
◦
Right-click one of the channels and select Fill Key
◦
Press CTRL+Y.
3. Managing Channels
USO RESTRITO
USER MANUAL IPDirector 6.57 Channel Explorer
Display of Channels in Fill and Key Mode
In Channel Explorer, the channels are shown with the Fill
and Key
icons:
In the Control Panel and the Playlist Panel where the player channel is selected, the Fill
or Key information is displayed in the panel title bar.
3.5.5.
Associating Player Channels in Timeline
Mode
Purpose
IPDirector is able to play a timeline with its transition effects in the IPEdit application or in
the Control Panel.
From the Control Panel, a single player channel will be sufficient if it supports the "Mix on
one channel" functionality.
The IPEdit module requires two player channels to function. This pair of player channels is
called the Timeline Engine. The Timeline Engine can be PGM1/PGM2 or PGM3/PGM4:
•
PGM1 or PGM3 is the Timeline output channel (also called 'timeline PGM').
An external video monitor needs to be linked to PGM1 or PGM 3 for the user to
preview the timeline.
Warning
If PGM1 or PGM3 is set to 'Mix on one channel', there will be no preview when
the timeline is played.
3. Managing Channels
21
EVS Broadcast Equipment SA
•
Issue 6.57.A - December 2014
PGM2 or PGM 4 is the Player output channel (also called 'player PGM'). It can be a
normal channel or a channel with the 'Mix on one channel' functionality.
The IPDirector video board (AVH) needs to be associated to PGM2 or PGM4 for the
users to preview the player on the video display.
When PGM1/PGM2 are used as Timeline Engine, the LTC output of the server generates
a timecode based on the TC Track. This does not work with PGM3/PGM4.
When two player channels are selected from IPEdit, the Timeline mode is automatically
activated. The Timeline mode can be activated from the Channel Explorer as well.
How to Associate Player Channels in Timeline Mode
To associate channels in Timeline mode, proceed as follows from the Channel Explorer:
1. Select two channels with SHIFT+click or CTRL+click.
2. Right-click a channel.
3. Select Lock Timeline.
The player channels are locked for use with a timeline. This prevents you and other users
from using these player channels in another mode than the Timeline mode.
Display of Channels in Timeline Mode
In the Channel Explorer, the Timeline Mode icon
engine channels:
is displayed in front of the Timeline
In the Control Panel where one of the player channels is selected, the Timeline Mode
icon is displayed in the panel title bar.
22
3. Managing Channels
USO RESTRITO
USER MANUAL IPDirector 6.57 Channel Explorer
3.5.6.
Defining a Channel Group for the AB Roll
Playlist
Purpose
The AB Roll Playlist mode is intended to be used with the AB Roll Playlist module. Up to 4
player channels can be managed with the AB Roll Playlist module. This group of channels
must be defined from the Channel Explorer.
How to Define a Channel Group for Use with AB Roll
Playlist
To define a group of channels from the Channel Explorer, proceed as follows:
1. Select up to 4 player channels.
2. Right-click the selected channel group.
3. Managing Channels
23
EVS Broadcast Equipment SA
Issue 6.57.A - December 2014
3. Select AB Roll Playlist from the contextual menu.
The Configure AB Roll Playlist Channel Association window opens:
4. Edit the channel letters in the left column of the table, if so desired.
5. Click OK to accept the allocation.
The AB icon is displayed next to all the selected channels:
24
3. Managing Channels
USO RESTRITO
USER MANUAL IPDirector 6.57 Channel Explorer
3.5.7.
Removing the Link between Channels
How to Manually Remove the Link Between Channels
To unlink channels, would they be in Gang mode, PGM/PRV mode, Fill&Key mode,
Timeline mode or AB Roll mode, proceed as follows:
1. Select the ganged channels with SHIFT+click or CTRL+click.
2. Right-click one of the channels
A contextual menu is displayed.
3. Select Ungang or, for the Timeline mode, select Unlock Timeline.
Note
Channels can be selected even if they are part of different ganged groups. Each
selected channel will be removed from the ganged group of channels it was part
of.
Automatic Unlock of Timeline Mode
When you exit IPEdit or IPDirector whereas the timeline is NOT being played out, the
timeline lock is automatically removed.
When you exit IPEdit or IPDirector whereas the timeline is being played out, a message is
displayed and you can decide whether to exit IPEdit or not.
3.6.
Defining a Default Stream Target
Introduction
To be able to record files from the material ingested by the recorders, a default target must
be defined to send the stream(s) to.
If a stream does not have a default target defined, or if the corresponding target is off-line,
a warning will be displayed. This does not prevent streams from being scheduled, but
alerts the users that a default target does not exist.
How to Define a Stream Target
To define a target for a stream, proceed as follows:
1. Right click on a stream name or track.
A contextual menu is displayed.
3. Managing Channels
25
EVS Broadcast Equipment SA
Issue 6.57.A - December 2014
2. Select Set Stream Target.
The Select Stream Target window opens.
It displays the targets set from the Remote Installer and the Xsquare targets set from
Xsquare:
Note
Xsquare targets are visible provided that
• the Xsquare has been declared in the Remote Installer and that it can be
reached
• the user logged into IPDirector has an Xsquare account with the same
access codes (login and password) in both applications.
3. Select the stream target.
4. To define this stream target for all the streams, select the Set as Stream Target to
All option.
26
3. Managing Channels
USO RESTRITO
USER MANUAL IPDirector 6.57 Channel Explorer
3.7.
Managing the Links with a Video
Router
3.7.1.
Introduction
Video routers can be used with IPDirector to increase the number of incoming feeds
manageable by EVS server recorder channels and/or the number of output channels able
to play out the media from a player channel, depending on the configuration of the
installation.
An EVS server recorder channel will be physically connected to an OUT port of the router,
so the recorder channel records the feed received by the IN port of the router associated to
this OUT port.
An EVS server player channel will be physically connected to an IN port of the router, so
the media loaded on a player channel is sent to the OUT port(s) of the router associated to
this IN port.
When a video router is used with an EVS server controlled by IPDirector, the router ports
routed to the EVS server channels are shown in the IPDirector interface. So, users know
exactly which router IN port is used by a recorder and to which router OUT port a player
channel is routed.
Some configuration is performed from the Remote Installer regarding the communication
parameters and the association of router ports physically linked to EVS server channels.
However, IPDirector users with appropriate user rights have the possibility to switch the
assignment between router IN ports and router OUT ports from the IPDirector user
interface.
3.7.2.
Assigning a Recorder Source
Introduction
If a recorder channel is linked to an OUT port of a router, it records the feed received by
the IN port of the router associated to this OUT port.
IPDirector users with appropriate user rights have the possibility to manually switch the
assignment between router IN ports and router OUT ports. So, another record train will be
recorded by the server recorder channel as soon as the router IN port assigned to the
channel has changed.
This operation can be done from the Channel Explorer, from the Recorder Panel, from the
VTR Control Panel and from the Ingest Scheduler. A switch from an application
automatically applies to the other ones.
3. Managing Channels
27
EVS Broadcast Equipment SA
Issue 6.57.A - December 2014
Prerequisites
•
The appropriate configuration must have been done from the Remote Installer
regarding the communication parameters and the association of router OUT ports
physically linked to recorder channels.
•
The Router Control service is started.
How to Assign a Router IN Port to a Recorder Channel
To assign an IN port of a video router to a recorder channel from the Channel Explorer or to
change the assignment, proceed as follows:
1. Right-click the recorder channel name from the Tree view or the Recorder view.
A contextual menu is displayed.
2. Select Assign Recorder Source.
The Assign Recorder Source window opens:
It shows the name of the router IN port already associated to the recorder channel.
3. Click the arrow next to the Router IN Port field.
The list of all the router IN ports is displayed:
28
3. Managing Channels
USO RESTRITO
USER MANUAL IPDirector 6.57 Channel Explorer
4. Select an IN port.
The Router IN Port field is highlighted to warn the users that the selection has
changed but has not been saved:
5. Click TAKE to send a command to the router service and link the router OUT port
connected to the recorder channel with the selected router IN port.
The name of the IN port is displayed next to the recorder channel name.
3.7.3.
Assigning a Player Destination
Introduction
If a player channel is linked to an IN port of a router, the media loaded on the player
channel is sent to the OUT port(s) of the router associated to this IN port.
IPDirector users with appropriate user rights have the possibility to switch the assignment
between router IN ports and router OUT ports. So, the media loaded on a server player
channel will be sent to another destination as soon as the router OUT port assigned to the
channel has changed. Several OUT ports can be associated to a single player channel.
This operation can be done from the Channel Explorer and from the Control Panel. A
switch from an application automatically applies to the other one.
Prerequisites
•
The appropriate configuration must have been done from the Remote Installer
regarding the communication parameters and the association of router IN ports
physically linked to player channels.
•
The Router Control service is started.
How to Assign a Router OUT Port to a Player Channel
To assign an OUT port of a video router to a player channel from the Channel Explorer or
to change the assignment, proceed as follows:
1. Right-click the player channel name from the Tree view or the Player view.
A contextual menu is displayed.
3. Managing Channels
29
EVS Broadcast Equipment SA
Issue 6.57.A - December 2014
2. Select Assign Player Destination.
The Assign Player Destination window opens:
It lists all the router OUT ports already associated to the player channel.
3. To remove an association between a video router OUT port and the player channel,
click the X button next to the OUT port name.
4. To remove the association between all the video router OUT ports and the player
channel, click the Clear All button.
5. To select an OUT port to associate to the player channel, click the arrow next to the
Router OUT Port field.
The list of all the router OUT ports is displayed:
6. Select an OUT port.
The Router OUT Port field is highlighted to warn the users that the selection has
changed but has not been saved:
7. Click Add to confirm the selection.
The OUT port name is displayed in the list.
30
3. Managing Channels
USER MANUAL IPDirector 6.57 Channel Explorer
8. Click TAKE to send a command to the router service and link the router IN port
connected to the player channel with the selected router OUT port.
USO RESTRITO
The name of the OUT port is displayed after the player channel name.
3. Managing Channels
31
EVS Broadcast Equipment SA
Issue 6.57.A - December 2014
4.
Starting / Stopping an Ingest
4.1.
How to Start or Stop a Server Ingest
Available Options
From the Channel Explorer, you can start and stop the recording of an XT clip.
Two options are available to start the recording of an XT clip.
Menu Item
Meaning
Open Ingest Scheduler
(new ingest)
The recording starts and the Ingest Scheduler window
opens.
Start XT Ingest (Tree
The recording starts but the Ingest Scheduler window does
View), or
not open.
Start Ingest on Selected
Channels (Recorder
View)
In Tree View
To start/stop the recording of an XT clip from the Tree view, proceed as follows:
1. Select the desired recorder(s).
Use SHIFT+click or CTRL+click to select multiple recorders.
2. Right-click and select Start XT Ingest.
Depending on the settings, the clip is named automatically or the New Schedule
window appears for you to enter a name.
The name of the growing clip is shown in brackets behind the recorder name.
3. To stop the recording, right-click the recorder and select Stop XT Ingest.
32
4. Starting / Stopping an Ingest
USO RESTRITO
USER MANUAL IPDirector 6.57 Channel Explorer
In Recorder View
To start/stop the recording of an XT clip from the Rec View, proceed as follows:
1. Select the desired recorder(s).
Use SHIFT+click or CTRL+click to select multiple recorders.
2. Right-click and select Start Ingest on Selected Channels.
OR
Click the Record Now button
3. Depending on the settings, the clip is named automatically or the New Schedule
window appears for you to enter a name.
4. To stop the recording, click the Stop Recording button on the right of the red
Recording button:
4.2.
How to Start, Stop or Kill a Stream
From the Channel Explorer, you can start and stop the recording of a file from a stream.
To start/stop a stream, proceed as follows:
1. Right-click a stream in the Tree view.
A contextual menu is displayed.
2. Select the desired option.
The available options for starting streams (and ingests) depend on the selected
stream (Hi or Lo).
Hi-res Stream
Lo-res Stream
Depending on the settings, the resulting file is named automatically or the New
Schedule window appears for you to enter a name.
4. Starting / Stopping an Ingest
33
EVS Broadcast Equipment SA
Issue 6.57.A - December 2014
3. Once a stream is running, it can be stopped or killed from the Channel Explorer as
well. Right-click the stream and select the desired option:
34
4. Starting / Stopping an Ingest
USO RESTRITO
USER MANUAL IPDirector 6.57 Channel Explorer
5.
Displaying Information on the
OSD
The information to display on screen is set in the OSD Settings window.
To turn the OSD ON or OFF from the Channel Explorer, proceed as follows:
1. From the Tree view or the Player view, right-click the player channel for which you
want to display the OSD information.
A contextual menu appears.
2. Select OSD Information on Monitor.
The information is displayed on screen.
3. To hide the information, repeat steps 1 and 2.
5. Displaying Information on the OSD
35
EVS Broadcast Equipment SA
Issue 6.57.A - December 2014
6.
Operations on Servers
6.1.
How to Get Server Monitoring
Information
From the Channel Explorer, it is possible to check the EVS server monitoring information.
To do so, proceed as follows:
1. Right-click a server name in the Channel Explorer.
2. Select Show Server Monitoring Information from the contextual menu.
The [Server Name] Information window opens:
36
6. Operations on Servers
USO RESTRITO
USER MANUAL IPDirector 6.57 Channel Explorer
6.2.
How to Launch a Different Predefined
Server Configuration
It is possible to launch another predefined server configuration provided that you have the
appropriate user right.
To do so, proceed as follows:
1. Right-click a server name in the Channel Explorer.
2. Select Restart Server from the contextual menu.
The Server Configuration window opens:
On the left, the Application List displays the list of applications available on the
selected server and sorted in the same order as in the EVS menu.
The application currently launched in Multicam is displayed in red.
On the right, the parameters corresponding to the selected configuration are
displayed.
6. Operations on Servers
37
EVS Broadcast Equipment SA
Issue 6.57.A - December 2014
3. (optional) If you want to select another server, right-click the Server Name field and
choose a server:
4. Select another configuration from the Application List.
The corresponding parameters are displayed in the Application parameters pane. The
background button turns blue.
5. Click the Select and Restart Server button to apply the new configuration.
6.3.
Multicam Web Setup Tool
It is possible to access the Multicam Web Setup Tool from IPDirector.
To do so, proceed as follows:
1. Right-click a server name in the Channel Explorer.
2. Select Configure Server from the contextual menu.
The Multicam Web Setup window opens.
See the Multicam manual for more information.
38
6. Operations on Servers
USO RESTRITO
USER MANUAL IPDirector 6.57 Channel Explorer
7.
Channel Explorer Shortcuts
Keyboard shortcuts are available to perform some operations.
They are listed in the Define Shortcuts windows which can be accessed by clicking the
Tools > Define Shortcuts option from the menu bar of the IPDirector main window and
then selecting the [Application Name] button on the left.
The shortcuts can be redefined to suit individual preferences.
See section "Shortcut Definition" in the General Functions user manual for more
information.
7. Channel Explorer Shortcuts
39
USO RESTRITO
Corporate
+32 4 361 7000
North & Latin America
+1 973 575 7811
EVS Headquarters
Liège Science Park
16, rue Bois St Jean
B-4102 Seraing
Belgium
To learn more about EVS go to www.evs.com
Asia & Pacific
+852 2914 2501
Other regional offices
www.evs.com/contact
EVS Broadcast Equipment is continuously adapting and improving its products in accordance with the ever changing
requirements of the Broadcast Industry.
The data contained herein is therefore subject to change without prior notice. Companies and product names are
trademarks or registered trademarks of their respective companies.