1
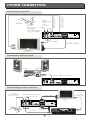
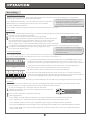
IMPORTANT SAFETY INSTRUCTIONS
To avoid to damage "Digital TV Recorder", Please switch to
standby mode before you want to unplug the "Digital TV Recorder" .
This sysmbol is intended to alert the user to avoid the risk of
electric shock. Only qualified service personnel should attempt
repair or disassembly.
Thank you for purchasing this product. Please check carefully in the box for
the following parts:
1.
2.
3.
4.
5.
6.
1 X GHD1621F2
1 X Remote control
2 x AAA Batteries
1 x RF Cable
1 x Scart Cable
Instruction manual
Unqualified attempts to repair this unit will invalidate the warranty. Refer repairs
to this unit to a qualified service personnel only.
Do not disassemble this unit. There are dangerous-voltage parts inside that may
cause electric shock even after power is disconnected.
Store your unit in a clean, dry environment, Unplug the unit immediately it gets
wet, and consult a servicing technician.
Always unplug the unit before cleaning it. Wipe dust off the cabinet of the unit
with clean, dry & soft cloth. For stubborn stains use a damp (not dripping) cloth.
Do not use any cleaning solutions on this model.
Do not place any objects on top of the unit.
Avoid exposing your unit directly to sunlight or other heat sources.
Put your unit in a well-ventilated area away from high humidity.
Do not expose this unit to rain or moissture, dripping or splashing.
Safety Tips
If smoke, abnormal noise or odour comes out of this unit, unplug from the
mains supply immediately and contact the retailer.
Never try to repair the unit on your own. Always contact the dealer for repairs.
Note
This user's manual contains for-reference-only graphics and information that are
subject to change without notice.
WEEE:
This appliance is labelled in accordance with European Directive 2002/96/EG
concerning used electrical and electronic appliances(waste electrical and electronic
equipment - WEEE). The guideline determines the framework for the return and
recycling of used appliances as applicable throughout the EU.
CONTENTS
SAFETY INFORMATION
INTRODUCTION
About the "Digital TV Recorder"
Front panel
Rear panel
Remote control
1
1
2
SYSTEM CONNECTION
Connecting to the TV
Connecting a HiFi system
Connecting a video recorder
3
3
3
GETTING STARTED
Switching on
Automatic / Manual channel scan
Accessing the Electronic Programme Guide (EPG)
4
4
4
OPERATION
Recording
Playback of recorded file
Channel List
Infor Bar information
5
6
6
7
SYSTEM SET-UP
Channel Setting
"Digital TV Recorder" Setting
OSD Setting
Factory Reset
TV Shape
Video Output
Software Version
7
7-8
8
8
8
8
8
TROUBLESHOOTING
9
SPECIFICATIONS
10
INTRODUCTION
Cursor
Channel Up/Down
Front panel
PAUSE
(pause playback
or start timeshift)
PLAY
Open the Library/Start
playback of selected
recording
Standby button
Skip forward/backwards
REC
STANDBY/ON
PL AY
STOP
PAUSE
Power indicator
Remote sensor
Display
STOP
(Stop Playback/Timeshift
RECORD
Record Current Event
Rear panel
Aerial Input
Connect the aerial to this socket
TV Scart
Connection to TV
AC Mains cable
Composite Video
Serial port
Aerial
input 1
Aerial
input 2
Video
V
R F LOOP
THROUGH
TV
L
R F LOOP
THROUGH
R
Coaxial
Digital Audio
Tuner interconnect
cable - do not
disconnect
AC 220-240V
~50/60Hz
Down Mix Audio
RS 232
AUX
Coaxial Digital
AUX Scart
for connection to a VCR
or a DVD Recorder
Down Mix Audio
2 Channel L/R
RF Loop through
Connect the supplied RF loopthrough cable to the TV.
Please note, the AUX socket can only be used to
loopthrough SCART video, it is only possible to
record from the internal tuner, it is not possible
to record from external equipment connected to
the AUX socket.
1
INTRODUCTION
STANDBY
3
4
2
3
4
5
6
9
SKIP BACKWARDS
Jump backwards during playback
7
8
9
10
PAUSE
When watching live TV, press to start
Timeshift mode.
During playback press once to pause playback,
press again to play frame by frame
11
SEARCH BACKWARDS
Press this button repeatedly during playback to
cycle through the available speeds
for searching backwards.
12
SLOW
Cycle through the available slow
motion playback speeds
13
SETUP
Display setup menu
14
CH.LIST Display channel list
15
RED BUTTON
RECALL
WIDE
0
18
GUIDE
SUBTITLE
CH
19
AUDIO
i
CH
7
OK
PLAY
REC
21
8
SKIP BACK PAUSE
STOP SKIP FWD
9
11
12
PLAY
Press once to open the video library and
also to resume playback when video is paused.
1
20
10
8
17
5
6
NAVIGATION/OK
navigate up/down/left/right in menus/on
screen displays
Confirm selection in menu/on screen
displays.
TV/ AUX
1
2
7
FRW
SLOW SEARCH
SETUP CH. LIST
TEXT
FFW
22
23
24
EXIT
26
14
27
15
28
16
29
POWER ON/STANDBY
between ON and STANDBY
2
NUMERIC ENTRY
Select a channel directly by entering
its channel number
3
WIDE
Adjust the aspect ratio of the video output
4
SUBTITLE
Cycle through the available subtitles for the
current broadcast.
5
GUIDE
Display the EPG Electronic Program Guide
6
INFO
Display the I-Bar
GREEN BUTTON
17
TV/AUX
Cycle between internal Audio/Video and
AUX loopthrough Audio/Video
18
RECALL
Return to previous selected channel
19
CHANNEL UP/DOWN
20
AUDIO
Cycle through available Audio languages
21
RECORD
During Live TV, press once to record the current
event, press again to record the following event.
When viewing the EPG, press once to select an
event for recording.
22
SKIP FORWARD
Jump forwards during playback
23
STOP
Stop playback or Recording
24
SEARCH FORWARDS
Press this button repeatedly during playback to
cycle through the available speeds for searching
forwards.
25
SEARCH
During Playback, press this button to goto a
favourite section.
25
13
1
16
2
26
EXIT
27
TEXT
Display the Digital Teletext where available
28
BLUE BUTTON
29
YELLOW BUTTON
SYSTEM CONNECTION
TUNER
INTERCONNECT
CABLE
(already
connected)
AERIAL
RF CABLE
(The existing cable
from your Aerial)
Aerial
input 1
Aerial
input 2
AC 220-240V
~50/60Hz
Down Mix Audio
Video
V
R F LOOP
THROUGH
STEREO AUDIO
(Not Supplied)
COMPOSITE VIDEO
(Not Supplied)
Connecting to the TV
TV
L
R F LOOP
THROUGH
R
Coaxial
Digital Audio
RS 232
AUX
RF CABLE
SCART CABLE
Connecting a HiFi system
COAXIAL CABLE (not supplied)
Hi-Fi (With Digital Coaxial input)
Aerial
input 1
Aerial
input 2
Video
R F LOOP
THROUGH
AC 220-240V
~50/60Hz
Down Mix Audio
V
TV
L
R F LOOP
THROUGH
Coaxial
Digital Audio
R
RS 232
AUX
Connecting a video recorder
RF CABLE
(The existing cable
from your aerial)
TUNER INTERCONNECT CABLE
(already connected)
Aerial
input 1
Aerial
input 2
Video
R F LOOP
THROUGH
Coaxial
Digital Audio
AERIAL
TV
L
R F LOOP
THROUGH
R
RF cable
TV
AC 220-240V
~50/60Hz
Down Mix Audio
V
R F CABLE
(Not supplied)
SCART CABLE
RS 232
AUX
SCART CABLE
(Not supplied)
3
VCR
Video Cassette Recorder
GETTING STARTED
Switching on
Turn on your TV set and select the corresponding AV input (For Instructions, please consult the
instruction manual supplied with the TV).
If you use the "Digital TV Recorder" for the first time or have deleted all channels in the "Digital TV
Recorder" , the "TV Setting" is shown.
TV Setting
Press "LEFT" or "RIGHT" cursor button to choose either "16:9" (widescreen)
or "4:3" (traditional) according to the TV shape you have.
Make sure that the TV aerial is connected to the unit then, press "OK" button
to continue installation.
"Scan Progress" menu will appear and list the channels as they are found.
A bar appears below the found channels indicates the progress of the
channel search.
When all channels have been found, the channel at the top of the list
will be shown on the TV.
NOTE
Please ensure the aerial is connected
Please choose correct TV Shape:
16:9
Please press
OK
to Start Scan
Select
Scan Confirm
Channels Found:
BBC ONE
BBC NEWS 24
36%
21/49
Channel No 52(722 MHZ)
Exit Exit
It may take upto several seconds for the Hard Drive to start, therefore there may be a short
delay after pressing the standby button and the unit turning on.
Automatic / Manual channel scan
If new channels are broadcast, you will need to rescan the "Digital TV Recorder" before they are
added to the channel list. Please follow one of the below methods to add these channels.
1 Press the "SETUP" button to enter the main menu of the "Digital TV Recorder" .
Channel Tuning
2 Press the cursor button to select "System Setting",then "Channel Setting",
then "Channel Tuning" .press the "OK" button to enter Channel Tuning menu.
3 Use "LEFT" or "RIGHT" cursor button to select "Auto scan"
or "Manual scan".
Channel Tuning
4 If "Auto" is selected press the "OK" button to automatically scan for auto
channels. If Manual scan (recommended for advanced users only) is selected,
the UHF channel number that the required channel is on will need to be entered
before scanning.
5 Press "EXIT"button to cancel scan for new channels.
Search Type
Exit
Exit
Auto Scan
Adjust
Select
Search Type
Manual Scan
Channel No
21
Quality
Enter
0%
Strength
Exit
OK
Exit
0%
Adjust
Select
OK
Enter
Accessing the Electronic Programme Guide (EPG)
From the EPG, you can change channels available ,check programme
information ,access one-week programme schedule which details the
times and programmes for the next seven days and set reminders/
recording timers .
1 Press the "GUIDE" button to enter the Channel Schedule.
2 Press "UP "or "DOWN" cursor button to select the desired channel.
3 Press "LEFT"or "RIGHT" cursor button to navigate the selected channel.
09 OCT,2007 14:39
Channel Schedule
12:00-18:57 This is BBC THREE
BBC THREE: Refreshing TV for thedigital age.
Tune in daily from 7.:00pm.
09 OCT,2007
14:00
BBC ONE
Updating...
BBC NEWS 24
Updating...
14:30
15:30
15:00
Updating...
BBC TWO
BBC THREE
Channel
Updating...
Program Event
OK
Reminder
Record
Press "Yellow " or "Blue "button to view information for previous or
next days.
5 Press "OK" button to add a reminder, then a white line will appear under the selected
event. When the reminder programme is about to start, a reminder window will appear.
The "Digital TV Recorder" will change automatically to the selected channel after the countdown is shown.
4
HDD
Used
Prev day
If you select "Yes" and press OK button, the "Digital TV Recorder" will change
the channel immediately.
If you select "Postpone 2 min" and press "OK" button , the reminder window
will be shown again in two minutes (this can be useful if the programme that
you are currently watching is overrunning and therefore you need to delay
the channel change).
To cancel the reminder and continue watching the current channel,
select "No" and press "OK"button.
6
Next day
Record
Free
Reminder+Record
Information
Yes
A reminder cannot be set for the currently showing program on a channel.
5684
Reserved
BBC ONE
will be played in
15 seconds.
Do you want to watch it?
Press "EXIT" button to exit the channel schedule.
NOTE
Reminder
Postpone 2 min
No
OPERATION
Recording
Recording current event:
When viewing a channel, press "Record"button to record the current event directly, to record the
following event press the record button again.
If there are two recordings you can
only watch either of the channels
Your "Digital TV Recorder" can record two events at same time.
being recorded or a program
When there is a recording on current event, it is possible
previously recorded from the library.
to view a different channel .
Press "STOP" button to stop the desired recording and return to live TV.
Recording :
Press the "SETUP" button and select "1. Record a new program" (or press the guide button on the
remote control) to display the EPG.
13:27
1 BBC ONE
Use the cursor button to select desired programme,
13:00-13:27 BBC News
13:28-13:39 South Today
Press the "Record" button, If the series information is broadcast for
the selected event a pop-up will be shown. To record only that
occurrence select "Single Event". To record the entire series,
select "Entire Series", this will then add bookings for every event that
is signalled as being part of that series - Please note, this information is broadcast by the channel.
4 To cancel a recording timer, select the programme and
The unit will update the recordings
press "Record" button again.
automatically based on any schedule
1
2
3
OK
Change Time
Change Channel
View
Record
Exit
Exit
changes that are made to the EPG by
the broadcasters.
Conflict Resolution:
Your " Digital TV Recorder" can record from two channels at once.
If you try to add a third recording the timer list screen will be shown (Pic-1).
Timer List
No ENENT NAME START Date Start End
Mode
001 Marry, kiss or miss? 23.10.2007 15:20 15:29
OK
Resolve
Delete
Auto Resolve
Pic-1
Conflicts with existed Events:
No ENENT NAME START Date Start End
Delete
Pic-2
If no alternatives can be found the unit will inform you by displaying a
pop-up window, press the OK button to close this pop-up.
In this case the conflict will have to be resolved manually.
Mode
ne Marry, kiss or miss? 23.10.2007 15:20 15:29
001 Through The Ke
23.10.2007 14:55 15:24
002 BBC News
23.10.2007 15:00 15:59
Alternative
To try and automatically resolve the conflict press the GREEN button. If the
"Digital TV Recorder" can find alternative occurrences of the event, it will
record this instead. This will be indicated by a green tick in the mode column.
To do this press OK button with the timer screen (Pic-1) shown. From the
new on screen display that is shown (Pic-2) select a recording that should be
cancelled by highlighting it and pressing the GREEN button.
SETUP Return
Finally, press the OK button to confirm any changes that have been made.
Timeshift :
Timeshift allows you to pause the currently showing programme, for example when the phone rings.
It is not possible to change channels when the timeshift function is active.
1
2
3
If the recording starts , Timeshift will be cancelled .
When viewing live TV , press the "PAUSE" button to activate
timeshift function.
Timeshift: five
-0:00:18
Press "PLAY" button to continue watching.
During playback,
Press "FRW" or "FFW" button repeatedly to cycle through the available search speeds.
Press "SKIP BACK" or "SKIP FWD" button to skip backward or forward by 30 seconds.
Press "PAUSE" button once to pause playback,press again to advance frame by frame.
Press the SLOW button repeatedly to cycle through the available slow motion playback speeds.
Press "STOP" button to stop timeshift playback and then return the live TV, the timeshift function
is then cancelled.
568
OPERATION
Playback of recorded files
Press "SETUP" and select "2. Playback a recorded program" (or press the "PLAY" button on the remote
control) to display the Video Library.
Video Library
1 Press "UP" or "DOWN" buttons to select a recording, then
press "OK" button to play.
Sky News Today
2
Sky News
Sky News all the...
Recorded at 02:45:48 PM
Press"RED" button to continue from the last viewed point.
3
Press"GREEN" button to Rename the selected recording.
Press the "GREEN" button, the rename
windows is shown,
Press "UP" and "DOWN" button to input
character, press "LEFT" or "RIGHT" button
to move cursor,
Press "OK" button to confirm the new
name after finish all revision.
1.BBC News
10/10/2007
Wednesday
2.SKY News Today
10/10/2007
Wednesday
"Digital TV Recorder" Rename Program
New Name:
Sky News Today
HDD Information
OK-Confirm
Setup- Return
Used
Delete
OK
Select charactor
Move cursor
Insert
Reserved
Play
Continue
Rename
Delete
Free
Auto discard: None
Keep
4
Press" YELLOW " button to delete the selected recording.
Press"BLUE" button to keep the selected recording.
If this is selected then the PIN code will need to be
NOTE:
entered before the file can be deleted in the future.
For "Keep"setting, you need to enter Pin code.
6 To view the synopsis of the recorded event press the i
The default Pin code is "888888".
button, a pop-up will be shown detailing the synopsis
that was broadcast at the time of recording.
Search Forward:
Search Backward:
Slow motion playback:
Press the "FFW" button repeatedly
Press the "FRW" button repeatedly
Press the "SLOW" button to
to cycle through the available
to cycle through the available
cycle through the available
search forward speeds as follows:
search backward speeds as follows:
slow motion playback speeds
as follows:
5
X2
X4
X8
X16
(Play)
X4
X8
X16
(Play)
X1/4
X1/2
(Play)
X1/8
Pause/Step:
Press the "PAUSE" button to pause playback. Once paused, press the "PAUSE" button repeatedly to
advance frame by frame.
Search:
Search
Use "SEARCH" function to jump to a specific point.
1 Press "SEARCH" button , the Search menu window is shown.
2 Use the numeric button to input the desired time and press "OK"
button to confirm. Then playback will jump to that time .
Goto:
Max Length:
OK
Confirm
00:00:00
00:00:49
Exit
Exit
Channel List
The Channel List presents a list of all channels found during the channel search. From the Channel
List you can select a channel to watch, delete a channel or Lock/Unlock the channel.
1 Press "CH.LIST " button, Channel list appears.
2
82-Sky News
83-Sky Spts News
106- Yooplay Games
723- Talk SPORT
3
Press "OK " button to view the channel.
4
Press " YELLOW" button to delete the channel.
5
Press " BLUE" button to lock/unlock the channel. If the channel is
locked the PIN number will need to be entered before the
programmes can be viewed.
6
Channel List
Press "UP " or "DOWN " cursor button to select the desired channel.
Press "EXIT" button to exit the channel list and view the channel
on full screen.
NOTE:
You will be asked to input a pin code when you want to lock /unlock
the selected channel. The default pin code is "888888".
568
Quality:
Strength:
Delete
Exit
Exit
100%
65%
Lock
Select
OK
Enter
SYSTEM SET-UP
Info-Bar information
The info-bar allows you to view limited programme details for each channel whilst watching the
selected channel.
1
Press the "i" button, the info-bar will be shown and will show the now and next programmes for
the current channel.
2
Press the "UP" or "DOWN" button to view the limited schedule information for the channel.
3
Press "LEFT" or "RIGHT" buttons to change the channel that the information is shown for.
4
With an event in the future highlighted. press the "OK" button to set a reminder for that event.
5
With an event in the future highlighted. press the "REC" button to record that event. If the series
event information for that event is being broadcast, a pop up will show, select "SINGLE EVENT"
and press "OK" to record only that occurrence or select "ENTIRE SERIES" and press "OK" to record
the entire series.
13:27
1 BBC ONE
13:00-13:27 BBC News
13:28-13:39 South Today
Change Time
Change Channel
Exit
Exit
SYSTEM SETTING
1
Press the "SETUP" button to enter the setup menu of the "Digital
TV Recorder" .
2
Press the "UP" or "DOWN" button to select "3. System Setting" .
3
Press the "OK" button to enter the sub-menu.
4
Press "UP" or "DOWN" button to highlight desired item and
press "OK" button to enter the sub-menu .
5
Select the desired option and press "LEFT" or " RIGHT" button
to select desired setting and press "OK" button to confirm..
Main Menu
1. Record a new program
2. Play back a recorded program
3. System Setting
0. System Information.
Press "EXIT" button to quit.
Channel Setting
Exit
Return
System Setting
1. Channel Setting
OK
Adjust
Select
2. "Digital TV Recorder" Setting
3. OSD Setting
Enter
4. Factory Reset
5. TV Shape
4:3
6. Video Output
RGB
Exit
Return
Adjust
Select
OK
Enter
This menu allows users to set Channel list and Channel Tune. Please see page 4 for details.
"Digital TV Recorder" Setting
These setting determine how the recording function operate.
Auto Discard:
Set this option to automatically delete files according to one of the following rules if the hard drive is full.
None:
Shortest:
Do not delete any recordings (the timer event
Discard the shortest recording first.
will not record as the Hard Drive is full)
Oldest:
Biggest:
Discard the oldest recording first.
Discard the biggest recording first.
To keep unviewed recordings please ensure that "exclude unviewed recordings" is selected. If you
wish to discard unviewed recordings as well as viewed recordings select "include unviewed recordings".
Timer:
Enter this menu,PVR can display Timer list in which include details for the reserved recordings and
events such as Event name, Start Date reserved, start time reserved,End time reserved and event mode .
In timer list,
Press "UP" or "DOWN" button to select the desired reserved event,
7
SYSTEM SETTING
SYSTEM SETTING
Press "SETUP" button to return to the timer menu,press" RED" button to
filter the selected one, press "OK" button to delete the selected one.
Event mode: White: reminder
Red: Current Recording
Yellow: Reserved Recording
Timeshift:
Timer
No ENENT NAME START Date Start End
Mode
001 Marry, kiss or miss? 23.10.2007 14:00 14:59
23.10.2007 14:00 14:59
002 MADE
This option allows you to set the amount of space reserved for timeshift.
For example if 60 minutes is selected then the unit timeshift for 60 minutes.
OSD Setting
SETUP Return
OK
Filter
Delete
These setting determine how the On Screen Displays (OSD) operate.
INFO bar time-out:
The info bar will time out after the number of seconds set for this option after the last button press.
Available options are 5 , 10 , 15 o r 20 seconds.
EPG style:
Select the default style of EPG that should be shown when pressing the "GUIDE" button. The two styles
can be cycled through by pressing the "SETUP" button with the EPG shown on screen.
OSD color style:
Change the colours used for all on screen displays.
Factory Reset
This menu allows you to Restore default settings, Delete all channels, Format Hard Disk ,
Update software and change Pin code(The default Pin code is "888888").
Factory Reset
Use this option to delete all channels and settings and reset "Digital TV Recorder" to the first time
installation mode.
Delete All Channels
Use this option to delete all existing channels .
Format Hard Disk
Use this option to format the hard drive. You will be asked to input Pin code. All recordings will be deleted.
Software Update
Use this option to Update software by Auto or Manual mode.
Auto Mode:
Select "Auto Mode",Set status to "ON" and set the desired time
you want to start updating .Then the "Digital TV Recorder" will
uptate software automatically if a update is available .
Manual Mode:
Select "Manual Mode", highlight " Scan" and press "OK" button,
"Digital TV Recorder" will update to the current software.
Change Pin Code
Status
ON
Start Time
OK
xx:xx
Confirm
SETUP
Upgrade
Current Release:
xxxx
Scan for Upgrade now
Scan
Use this option to Change pin code.
1 Input Old Pin code,
2 Move down cursor and input New Pin code,
3 Move down cursor and input New Pin code again.
4 Press "OK" button to confirm, press" Exit" to cancel.
TV Shape
HH:MM
Return
Cancel
Change Pin Code
Old Pin Code
New Pin Code
Enter Again
OK
Confirm
Exit
Exit
This option can be used to specify the type of TV that your "Digital TV Recorder" is connected to. Select 16:9
if the "Digital TV Recorder" is connected to a widescreen TV or select 4:3 if the "Digital TV Recorder" is
connected to a traditional (non-widescreen) TV.
Software Version
Video Output
This menu allows users to view software version.
Use this menu to set Video output.
SYSTEM INFORMATION
This option can be used to display information page for the "Digital TV Recorder" such as Model No,
Subtitle status, Language status, the hard drive type, Total the hard drive size, Free space, Number of
existing Channel, Helpline No., Transmitter name and Software version.
Press "SETUP" button and choose "0. System Information" to display the system information page which
displays information which may assist in the resolution of certain problems when contacting our helpline.
8
TROUBLESHOOTING
Please note indoor aerials are not recommended for use with this product (this includes loft aerials) otherwise
you may experience problems with reception or picture break ups on some channels.
Possible cause
What to do
Standby light not lit
Mains lead unplugged
Mains fuse blown
Check mains lead
Check fuse
No signal found
Aerial is disconnected
Aerial is damaged/misaligned
Out of digital signal area
Check aerial lead
Check aerial
Ensure that you are capable ofreceiving Digital TV.
No picture or sound
Tuned to digital teletext channel
Reduce to another channel
Scrambled channel
message
Channel is scrambled
channel - This "Digital TV Recorder"
is not able to decode scrambled
channels.
No response to remote
control
Receiver off
Handset not aimed correctly
Front panel obstructed
Hand set batteries exhausted
Problem
Forgotten PIN code
Plug in and turn on plug
Aim handset at front panel
Check for obstructions
Replace handset batteries
Contact help line
After moving your recorder
to another room you find
you are no longer able to
receive digital reception
The aerial feed form new point
may come through a distribution
system which may reduce the
digital signal now received by the
box.
Try a direct feed from the aerial
Timeshift will not start.
Your "Digital TV Recorder" is recording.
Stop the current recording and then
press the pause button again to
resume timeshift.
Should you experience a problem with your "Digital TV Recorder" , please contact our helpline before returning
the product to the retailer as many problems can be resolved in this manner. The contact details for the
helpline are:
Tel: 0871 230 1777
Internet: www.goodmans.co.uk
In the unlikely event of requiring spare parts, please contact our spare parts department on:
Tel: 0871 230 0790
Email: [email protected]
21
9
SPECIFICATIONS
HARD Disk
160GB
TUNER & CHANNEL
RF INPUT CONNECTOR
(IEC-TYPE, IEC169-2, FEMALE)
RF OUTPUT CONNECTOR
(IEC-TYPE, IEC169-2, MALE (LOOPTHROUGH))
FREQUENCY RANGE:
470MHz ~862MHz (UHF)
SIGNAL LEVEL:
-20 ~ -78.5 dBm
DECODER
TRANSPORT STREAM
MPEG-2 ISO/IEC 13818
PROFILE LEVEL
MPEG-2 MAIN PROFILE @MAIN LEVEL
INPUT RATE
MAX. 15Mbit/s
VIDEO FORMATS
4:3/16:9 SWITCHABLE
Audio Format
MPEG Layer I & II, 32 / 44.1 / 48KHz
VIDEO OUTPUT
RGB, CVBS
CONNECTION
MAIN POWER CABLE
TUNER
FIXED TYPE
ANTENNA INPUT, RF LOOPTHROUGH OUTPUT
VIDEO
COMPOSITE VIDEO OUTPUT , TWIN SCART
AUDIO
DATA PORT
STEREO AUDIO OUTPUT, DIGITAL COAXIAL AUDIO OUTPUT
RS-232 (for service use only)
POWER SUPPLY
INPUT VOLTAGE
AC 220-240V ~50/60Hz
POWER CONSUMPTION
MAX. 20W/STANDBY 9W
NOTE
Due to continual revision and improvements to our products design, Specifications are subject to
change without notice.
10
C
2007.12