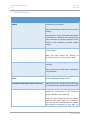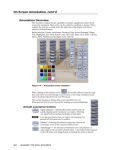
1
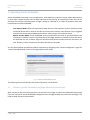
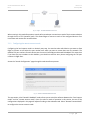
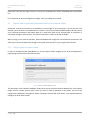
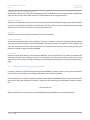
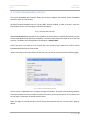
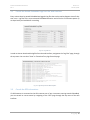
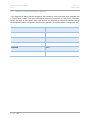
2014
Anneth Embedded
ANNETH EMBEDDED USER MANUAL
ANDRÉ LANOUETTE
Anneth Embedded User Manual
Rev 1
LR Tech inc.
February 2014
Table of Contents
1.
Anneth Embedded Description ............................................................................................................. 1
2.
Operating Anneth Embedded ............................................................................................................... 2
2.1.
2.1.1.
Configuring the remote connect mode................................................................................. 3
2.1.2.
Monitoring the remote connect mode ................................................................................. 5
2.1.3.
Configuring Edgar to connect to Anneth Embedded ............................................................ 5
2.2.
3.
Configuring the local capture mode ..................................................................................... 6
2.2.2.
Monitoring and controlling the local capture mode............................................................. 8
2.2.3.
Getting data acquired by Anneth Embedded ..................................................................... 10
Anneth Embedded Web Interface ...................................................................................................... 11
Change the Web Interface settings............................................................................................. 12
3.1.1.
Webserver Port ................................................................................................................... 12
3.1.2.
Using HTTP vs. HTTPS (SSL) ................................................................................................. 12
3.1.3.
Modifying the web interface password .............................................................................. 12
3.2.
Consult the Anneth Embedded Logs from the Web Interface ................................................... 13
3.3.
Consult the GPS informations ..................................................................................................... 13
Network Settings................................................................................................................................. 15
4.1.
5.
Capture Data using Anneth Embedded Directly (Local Capture Mode) ....................................... 6
2.2.1.
3.1.
4.
Connect to Anneth Embedded using Edgar (Remote Connect Mode) ......................................... 2
Reset your Network Settings to Defaults .................................................................................... 16
Troubleshooting .................................................................................................................................. 17
Anneth Embedded User Manual
Rev 1
LR Tech inc.
February 2014
Anneth Embedded User Manual
Rev 1
LR Tech inc.
February 2014
1. Anneth Embedded Description
Anneth Embedded is the control software running on the Annotator Pro board, installed in every LR Tech
instrument from January 2014. It allows to configure most aspects of the instrument through a web
interface, accessible with any web browsers (Mozilla Firefox, Google Chrome, Apple Safari, etc.).
Anneth Embedded will let you acquire data directly on the Annotator Pro board and share it with your
other computers using a network file share. It will also let you connect to the instrument remotely, using
the Edgar software, installed on a separate computer.
Page |1
Anneth Embedded User Manual
Rev 1
LR Tech inc.
February 2014
2. Operating Anneth Embedded
Anneth Embedded can be used in various applications. Some application requires to simply acquire data and save
it, while others require complex real-time data acquisition and processing. By combining the ease of use of the
Annotator Pro and the processing power of Edgar running on a desktop PC, 2 modes of operations have been
implemented in Anneth Embedded;
-
-
Local Capture Mode: Allows the acquisition of data directly on the Annotator Pro disk. Data from all the
connected devices will be saved in data files and shared over network. Data collection can be triggered
manually with the Anneth Embedded web interface and by using a “Pilot Interface Switch”.
Remote Connect Mode: Anneth Embedded opens communication port with its connected devices and
route them to network TCP ports. This allows the LR Tech Edgar software to remotely connect and control
the Annotator Pro over a network. Edgar can then be used to perform complex tasks over the data in real
time. No data is read or saved on the Annotator Pro board in this mode.
You can switch between the different modes of operations by navigating to the “Anneth Configuration” page. The
“Anneth Embedded Mode” section of this page explains each modes.
Fig. 1 - Anneth Embedded Mode Selection
The following sections will describe each mode of operation in more details.
2.1.
Connect to Anneth Embedded using Edgar (Remote Connect Mode)
With most day-to-day instrument operations, you will want to use Edgar to acquire and manipulate data coming
from your instrument. Anneth Embedded is designed to act as a bridge between your instrument and Edgar. This
mode is called “Remote Connect Mode”.
Page |2
Anneth Embedded User Manual
Rev 1
LR Tech inc.
February 2014
Fig. 2 - Edgar - AnnethEmbedded Connection
When running in this mode of operation, Anneth will start and open connections to each of the instrument devices
through the use of TCP (network) ports. This allows Edgar to connect to each of the configured devices of an
instrument and receive their streamed data.
2.1.1. Configuring the remote connect mode
Configuring the local capture mode is a relatively easy step. You need to select which device you want to allow
Edgar to connect to and select the port number over which you want to stream data over the network. The
defaults TCP port numbers for each devices are the same in both Edgar and Anneth Embedded. This means that
if you leave the port numbers to their defaults, you should not need to worry about configuring the TCP port
numbers in Edgar after.
Access the “Anneth Configuration” page through the web interface top menu.
Fig. 3 - Anneth Embedded Mode Selection
The top section, titled “Anneth Embedded” mode, allows you to switch the software between the “local capture
mode” and the “remote connect mode”. Once you select a mode of operation in this section, the rest of the
configurations displayed in this page will adjust according to the selected mode. Select “Remote Connect Mode”
to configure the remote connect mode.
Page |3
Anneth Embedded User Manual
Rev 1
LR Tech inc.
February 2014
Fig. 4 - Remote Connect Mode - Main Communication Settings
The second section of this page allows you to select the TCP network ports over which you want to stream the
main and required communications. This include the AnnethTalk port and the Annotator port.
The AnnethTalk port is the main way to exchange commands between the Edgar and the Anneth Embedded
software.
The Annotator port is used by Edgar to send commands to control the Annotator Pro boards, such as altitude
mode selection, selection of preamp gains, selection of data channels, etc.
Fig. 5 - Remote Connect Mode - Devices Communication Settings
The next section of the Anneth Configuration page allows you to select which device to allow Edgar to connect to,
to select the port on which the device is connected on the Annotator board and the port over which you want to
stream device access over the network.
In order to enable a device, check the “Enable” checkbox in the corresponding device box. The box will be colored
with a darker gray when the device is enabled. In the RS232 port list, select the local port on which the
corresponding device is connected. LR Tech has provided you a list of the available devices and their corresponding
RS232 ports when you acquired your instrument. Finally, select the TCP port over which you want to stream your
data to Edgar with.
Page |4
Anneth Embedded User Manual
Rev 1
LR Tech inc.
February 2014
Once you are done configuring your instrument devices, press the “Save” button to save your settings. The settings
will be applied after the next board restart. If you want your settings to be applied right away, press the “Save and
apply” button. A confirmation message will be displayed in a green box at the top of the page after the settings
are saved correctly.
2.1.2. Monitoring the remote connect mode
In order to monitor the current status of the remote connect mode, navigate to the “Current Status” page through
the top menu of the Anneth Embedded web interface.
Fig. 6 - Remote Connect Mode Status Page
This page displays the list of configured devices and the status of their connection.
Normally, if you are configured to be in remote connect mode and Edgar is not connected to Anneth Embedded
yet, every devices in this list should be colored blue. This means that every devices are configured correctly and
currently waiting for connection from Edgar.
When Edgar is connected, every devices will be listed in green, meaning they are currently connected to Edgar. If
you desire to refresh the status, you can simply reload the web page.
2.1.3. Configuring Edgar to connect to Anneth Embedded
In order to configure Edgar v.1 to connect to your instrument running Anneth Embedded, navigate to the Edgar
preference menu and select which devices you want to enable. Enter the IP address of the instrument in the
“Host” field, and select the network port you entered in Anneth Embedded for every devices you want to connect
to.
When you restart Edgar, Edgar will attempt to connect to Anneth Embedded.
Page |5
Anneth Embedded User Manual
Rev 1
LR Tech inc.
February 2014
Please take note that only Edgar version 1.5 and up are compatible with Anneth Embedded and the Annotator
Pro.
For more details on device configuration in Edgar, refer to the Edgar user manual.
2.2.
Capture Data using Anneth Embedded Directly (Local Capture Mode)
Sometimes, a network connection is not available to connect Edgar to your instrument. It can be the case if for
example, your instrument is installed airborne in a plane. In that case, Anneth Embedded is able to directly control
your instrument parameters and acquire data on its hard drive. Data can be retrieved after an acquisition is
completed, through a network share. This mode of operation is called “Local Capture Mode”.
When running in this mode of operation, Anneth Embedded will configure the interferometer parameters and
allow you to control the acquisition through a connected “Pilot Interface” or by using the web interface.
2.2.1. Configuring the local capture mode
In order to configure Anneth Embedded to run in local capture mode, navigate to the “Anneth Configuration”
page through the top menu of the web interface.
Fig. 7 - Anneth Embedded Mode Selection
The top section, titled “Anneth Embedded” mode, allows you to switch the software between the “local capture
mode” and the “remote connect mode”. Once you select a mode of operation in this section, the rest of the
configurations displayed in this page will adjust according to the selected mode. Select “Local Capture Mode” to
configure the local capture mode.
Page |6
Anneth Embedded User Manual
Rev 1
LR Tech inc.
February 2014
Fig. 8 - Local Capture Mode Collection Length Configuration
When the local capture mode starts a data collection, it will acquire data and save it to disk for as long as the
collection is not stopped. You can tweak the size of each data files with the “Data Collection Configuration” section
of the local capture mode configuration.
2 modes of collection length can be used:
-
-
By number of scans: This mode allows you to obtain data files containing exactly the same number of
instrument scans each. Once the number of scans is reached during a collection, the current collection is
closed and a new one is started.
By time: This mode allows you to obtain data files containing data for a specific period of time (specified
in seconds). Once the time in seconds for a collection is elapsed after a data collection is started, the
current collection is closed and a new one is started.
Fig. 9 - Local Capture Mode Instrument Configuration
The next section of the local capture mode configuration allows you to configure your instrument for your data
collections. 2 different configuration sets can be defined. This allows you to quickly change between the 2 sets
during an experiment. You could have one set dedicated to slow speed high resolution scanning, and another for
high speed low resolution acquisition, for example. If you have a pilot interface equipped with a configuration set
selection switch, these settings will configure the configuration sets sent to the instrument when you flip the
Page |7
Anneth Embedded User Manual
Rev 1
LR Tech inc.
February 2014
switch to one set or another. If you don’t have such a switch, you can use the local capture current status page
and switch between your configurations sets directly from the Anneth Embedded web interface.
Be careful when selecting the values in this section, as this will be used to calculate how to control your
interferometer/spectrometer hardware. Only set values defined in the specifications of your instrument.
Fig. 10 - Local Capture Mode Device Communication Settings
The “Device Communication Settings“ page allows you select the device connected to your instrument that
Anneth Embedded will control during the data acquisition. In order to enable a device, check the “Enable”
checkbox in the corresponding device box. The box will be colored with a darker gray when the device is enabled.
In the RS232 port list, select the local port on which the corresponding device is connected. LR Tech has provided
you a list of the available devices and their corresponding RS232 ports when you acquired your instrument.
Once you are done configuring your instrument and devices, press the “Save” button to save your settings. The
settings will be applied after the next board restart. If you want your settings to be applied right away, press the
“Save and apply” button. A confirmation message will be displayed in a green box at the top of the page after the
settings are saved correctly.
2.2.2. Monitoring and controlling the local capture mode
In order to monitor the current status of the local capture mode, navigate to the “Current Status” page through
the top menu of the Anneth Embedded web interface. This page will also allow you to start and stop acquisition
as well as switching between the predefined configurations sets. It is refreshed automatically every 5 seconds, to
display the most up to date status at all time.
Page |8
Anneth Embedded User Manual
Rev 1
LR Tech inc.
February 2014
Fig. 11 - Local Capture Mode Current Status
Acquisition Status
This displays if Anneth Embedded is currently saving data to disk or not. A red “Not acquiring” message means
Anneth Embedded is not saving data to disk. A green “Acquiring” message means that Anneth Embedded is
currently saving data to disk.
Scan Acquired
If Anneth Embedded is currently saving data, you can see the number of scans acquired in the currently opened
files so far. If the data is in format ###/###, it means the collection length mode has been set to “by scans”. The
number after the “/” is the threshold after which the current files will be closed and new ones will be opened.
Acquisition Time
If Anneth Embedded is currently saving data, you can see the time since the currently opened files have been
opened. If the data is in format ##:##/##:##, it means the collection length mode has been set to “by time”. The
time after the “/” is the threshold after which the current files will be closed and new ones will be opened.
Files Being Acquired
This is the base name of the files currently being acquired. It will be in YYYYmmmdd_HHMMSS format, where Y
stands for the year, m for month, d for day of the month, H for hour in 24 hours format, M for minutes of the hour
and S for seconds. The time used to label the files is the time of the file creation.
Iris Controller
If you have an iris controller configured for your instrument, this selection box will allow you to select the iris
position and control the field of view of your instrument.
Page |9
Anneth Embedded User Manual
Rev 1
LR Tech inc.
February 2014
Configuration Set 1 and Configuration Set 2
These sections display the 2 instrument configurations sets, as defined in the local capture mode configuration
page. You can use the button under each sets to switch between the 2 configurations sets.
Available Disk Space
Displays the available disk space in an easy to read pie chart. When the available size gets below 10% of the disk
size, the pie chart will be yellow. When it reaches below 5% of the disk size, it will be colored red. If the available
disk size is over 10% of the total disk size, the pie chart will be blue.
Scan Rate
Displays the current scan rate of the instrument, in scans per seconds.
System Informations
Display the load average of the CPU by averages of 1 minute, 5 minutes or 10 minutes. If those numbers get above
2.0, it means that the workload of Anneth Embedded is too heavy for what it can handle. Consider lowering the
scan rate, and make sure you are disconnected from the network share when you see such heavy loads. Also
displays the memory usage of Anneth Embedded.
Peak Tracker
Displays the peak signal level for each instrument detectors, for the last 100 scans. This allows you to determine
if the instrument gains are configured correctly. If any plot gets close to the top red section of the chart, it means
the instrument is saturating. Consider lowering the corresponding channel gain from the “Anneth Configuration”
page.
2.2.3. Getting data acquired by Anneth Embedded
In order to allow you to grab data acquired by Anneth Embedded, a network share is running on the Annotator
Pro. This allows you to connect to it using your Windows, Linux or Mac file explorer.
On the Annotator Pro, the data is saved in the /shares/external/AnnethEmbedded directory. If you want to access
this directory using your Windows file explorer, simply enter the following in your Windows file explorer address
bar:
\\###.###.###.###
When prompted for a password, enter annethembedded/annethembedded, as username/password.
P a g e | 10
Anneth Embedded User Manual
Rev 1
LR Tech inc.
February 2014
3. Anneth Embedded Web Interface
The Anneth Embedded web interface allows you to easily configure and monitor Anneth Embedded
operations from any web browser.
By default, Anneth Embedded runs on TCP port 8585, with SSL enabled. In order to access it, open the
web browser of your choice and type in the following address
https://###.###.###.###:8585
Where ###.###.###.### corresponds to the IP address of the Annotator Pro board (instrument) running
Anneth Embedded. You will then be prompted for a username and a password in order to access the web
interface. The default username/password combination is admin/admin.
Please note that it can take up to 3 minutes after the instrument got powered on before Anneth
Embedded web interface can be accessed.
When connecting to the web interface for the first time, you will be presented with the following page:
Fig. 12 - Base AnnethEmbedded Interface
The top section is dedicated to the navigation through the software. The footer of the web page displays
informations about the version number and the time currently set on the instrument. The content of the
current page is in between the header and the footer.
When you login to the web interface, you will always be presented with the “Current status” page by
default.
P a g e | 11
Anneth Embedded User Manual
Rev 1
3.1.
LR Tech inc.
February 2014
Change the Web Interface settings
Web interface settings can be modified in the “System Configuration” page.
Fig. 13 - Web Interface Settings
3.1.1. Webserver Port
In order to change the webserver port, access the “System Configuration” page, through the top menu.
In the “Web Interface” section, you can modify the web server port. Please note that once you change
the webserver port, you should modify the address used to connect to the web interface accordingly.
3.1.2. Using HTTP vs. HTTPS (SSL)
You can encrypt the connection used to exchange web page data between your web browser and the
Anneth Embedded software. This standard is called “SSL” and is turned on by default. You can enable or
disable this feature by going to the “System Configuration” page, through the top menu. In the “Web
Interface” section, you can check/uncheck the option to enable or disable SSL.
Please note that the web interface should be accessed with the https:// prefix when the SSL option is
turned on. You should remove this prefix when the SSL option is turned off.
3.1.3. Modifying the web interface password
You can change the default admin/admin username and password to any password you desire. In order
to achieve this, navigate to the “System Configuration” page, through the top menu. In the “Web
Interface” section, you will be able to change the admin user password in the “change admin user
password” section.
P a g e | 12
Anneth Embedded User Manual
Rev 1
3.2.
LR Tech inc.
February 2014
Consult the Anneth Embedded Logs from the Web Interface
Every actions taken by Anneth Embedded are logged in log files that can be used to diagnose issues if they
ever occur. Log files of the current Anneth Embedded execution and of the last 5 instrument power up
are kept locally and available for consulting.
Fig. 14 - Log Files List
In order to view or download the log files from the web interface, navigate to the “Log Files” page, through
the top menu. You can then “View” or “Download” any logs from this page.
Fig. 15 - Log View from the Web Interface
3.3.
Consult the GPS informations
If a GPS antenna is connected to the GPS antenna port of your instrument running Anneth Embedded,
you can consult its current status by navigating to the “GPS” page through the top menu of the web
interface.
P a g e | 13
Anneth Embedded User Manual
Rev 1
LR Tech inc.
February 2014
Fig. 16 - GPS Status
You can also quickly validate the given position by accessing the “View current location in Google Maps”
link. This will display your current position as reported by the onboard GPS on a Google Map page.
P a g e | 14
Anneth Embedded User Manual
Rev 1
LR Tech inc.
February 2014
4. Network Settings
Anneth Embedded is the main point of access to your instrument. Since it is accessed over a network, you
will most likely want to modify its network settings. In order to do this, access the System Configuration
page.
Fig. 17 - Network Configuration
The top section of this page displays the settings currently applied to your instrument.
In order to obtain a dynamic IP address from your router, select the DHCP option.
Otherwise, select the static IP address option and fill in the required field.
If you press the “Save” option, your settings will be saved, but will only be applied after a restart of the
instrument.
If you press the “Save and apply option”, the board will automatically restart, and the new network
settings will be applied right away. Make sure to adjust the address of the web interface in your web
browser according to the new settings you entered.
P a g e | 15
Anneth Embedded User Manual
Rev 1
4.1.
LR Tech inc.
February 2014
Reset your Network Settings to Defaults
If you forgot the IP address that was assigned to the instrument, most instruments come equipped with
a “Factory Reset” button. If you press and hold this button for 10 seconds, you will see the “Annotator
Ready” light begin to flash rapidly. After a few seconds, the board will be restarted and default settings
will be applied (network configuration and username/password. The default network configuration are:
Hostname
ANNOTATORPRO
IP Address
192.168.0.100
Netmask
255.255.255.0
Gateway
192.168.0.1
Username
admin
Password
admin
P a g e | 16
Anneth Embedded User Manual
Rev 1
LR Tech inc.
February 2014
5. Troubleshooting
Issue
Solution
Anneth Embedded Web interface does not Make sure the board is powered on and
respond
connected to your network;
Make sure the Annotator Ready Led is on and not
flashing;
Attempt to do a “ping” command to the IP address
of the board. If it responds, then attempt power
cycling the board. If it doesn’t respond, revert to
factory IP and reconfigure the board network
settings.
Edgar cannot connect to Anneth Embedded
Make sure Anneth Embedded is in “Remote
Connect Mode”;
Make sure every devices are “Waiting for
connections” from the “Current status” page
One of the device does not respond
Make sure the corresponding device is connected
physically;
Make sure the correct RS232 port is defined for
the given device.
Edgar cannot communicate with one of the Make sure the network TCP port defined in
devices
Anneth Embedded and Edgar match.
Local capture mode reports that the disk is full
Make some room on the hard drive by connecting
to the network share and deleting some data files.
Some scans are being skipped in the data
Verify that your instrument configuration sets
support the specifications of your instrument
(speed, resolution, laser frequency);
Verify the load average from the local capture
mode “Current Status” page. If it is above 2.0,
make sure you are not connected to the network
share during the acquisition of your data. The
P a g e | 17
Anneth Embedded User Manual
Rev 1
LR Tech inc.
February 2014
network share can cause heavy loads on your
system.
P a g e | 18