1
3-in-1
Scanner
Instruction
CONTENTS
Maintenance-------------------------------------------------------------------General description----------------------------------------------------------
Front panel---------------------------------------------------------------------Specification-------------------------------------------------------------------
Notice ---------------------------------------------------------------------------Operating instrations--------------------------------------------------------
1.0 Maintenance:
Keep clean with a dry cloth.
When the symbol of "battery" is display on the LCD, please unscrew and remove cover, insert
2.0
new 9V battery so as to the meter is well-balanced.
General description
The functions of meter are accurately and safely. Detects wood or metal edge ,metal pipe and AC voltage
hidden behind board.
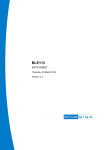
3.0 Front panel
1.Flashlight
2.Display
3.on-off button
4.Metal detection
5.Wood and metal stud edge detection
6.AC voltage detection(50-600VAC) and backlight
7.Scan button
8.Metal marking tip to mark location of stud edge
9.Operate from 9 V battery
4.0 Specification
Stud detection depth and accuracy : 1.2"
±1/8"
Metal Pipe detection depth: 2~1.2"
AC volt detection depth: 3~1/2"
Operationg Range: Non-contact AC Detector 50~600V AC 50-60HZ.
Automatism turnoff (7 minute)
Energy: 9 V battery
Operating temperature and humidity: 0 ~ 50℃
80%(MAX)
5.0 Notice
Will not detect damp wood or board. ("STUD" mode)
Will not detect a combination of defects. ("STUD" mode)
Will not detect two hot wires in a circuit. ("AC" mode)
6.0 Operating instrations
6.1 Stud detection (wood and metal)
A. Press the "STUD" button.
B. Place unit flat on the wall. Press and hold the scan button.Do not move the unit until
calibration is complete. When calibration is complete, the symbol of "READY" will display and
concomitance a buzzer.
C. If you calibrate over a stud, the level of the signal is full and the beep sounds. Move the unit a
few inchs right or left , release the scan button and iterate step "B".
D. After calibration is complete, continue to hold the scan button and slowly slide the unit across
the surface.
E, When the unit detect a stud edge, the level of the signal is full and the beep sounds. Mark this
location with the metal tip build into the top of the unit.
F.Continue scanning beyond the marked spot until the level of the signal is vacancy.Slide unit in
reverse direction to locate other edge of stud. The middle of the stud is centered between the
two marks.
6.2 Metal pipe detection
A.Press the "METAL" Button.
B.Place unit suspend in the air. Press and hold the scan button.Do not move the unit until
calibration is complete. When calibration is complete, the symbol of "READY" will display and
concomitance a buzzer.
C. When the unit detect a metal pipe , the level of the signal is full and the beep sounds.
D.Mark this location with the metal tip build into the top of the unit.
6.3
AC volt detection
A.Press the "AC" Button.
B.Place unit flat on the wall. Press and hold the scan button.slowly slide the unit across
the surface.
C.When the unit detect a "live"50V or higher source ,such as a wire, the level of the signal is full
and the beep sounds.
D.Mark this location with the metal tip build into the top of the unit.