1
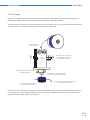
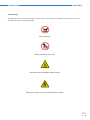
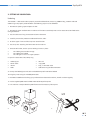
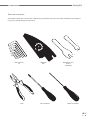
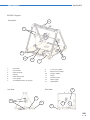
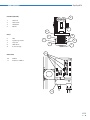
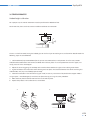
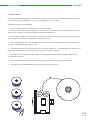
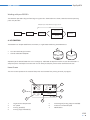
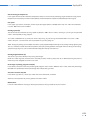
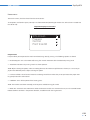
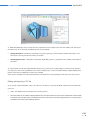
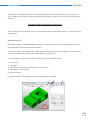
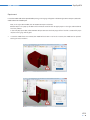
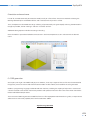
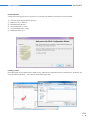
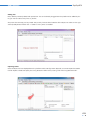
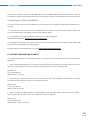
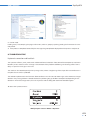
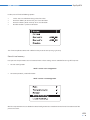
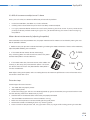
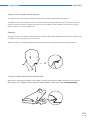
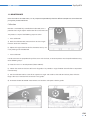
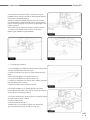
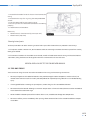
User Manual
RepRapBCN
ORIGINAL MANUAL
1
User Manual
RepRapBCN
INDEX
1. PRIOR INFORMATION
Specifications
FFF Technology
Compliance
Safety
Safety Warnings
3
3
4
5
6
7
2. SETTING UP YOUR BCN3D+
Unboxing
Tools and accessories
BCN3D+ diagram
8
8
9
10
3. STARTUP PROCESS
Calibration
Loading filament
Working with your BCN3D+
12
12
13
14
4. LCD CONTROL
Home screen
Home menu
14
14
16
5. STL FILES
Obtaining STL files
Editing and repairing an STL file
Netfabb interfance
Repairment
Orientation and move home
G-CODE generation
Slic3r configuration
Slic3r first steps
Transfering our G-Code to the BCN3D+
18
18
19
20
21
22
22
23
23
26
6. PRINTING FROM USB AND SD CARDS
26
7. FILAMENTS
PLA, ABS and Nylon
HIPS, PVA, Laybrick, Laywood and Filaflex
28
28
29
8. FIRMWARE
What is it and when to update it?
When it is necessary to update the firmware?
Downloading Arduino’s IDE
30
30
30
30
9. TROUBLESHOOTING
10. PRINT QUALITY DIAGNOSTICS
11. MAINTENANCE
12. TIPS AND TRICKS
13. TECHNICAL SUPPORT AND CUSTOMER SERVICE
14. GLOSARY
15. WARRANTY, REFUNDS AND REPLACEMENT POLICY
16. TERMS OF SERVICE
32
35
38
41
42
42
44
44
23
User Manual
RepRapBCN
1. PRIOR INFORMATION
Specifications
Print Technology:
Physical Dimensions:
Weight:
Extrusion Fused Filament Fabrication (FFF)
480mm x 480mm x 455mm
13 kg (without spool)
Printing Volume:
Length: 252mm
Width: 200mm
Height: 200mm
Number of extruders:
1 (upgradable to 2)
Layer height:
0,1-0,35mm (with standard 0,4mm nozzle)
0,2-0,5mm (with 0,6mm nozzle)
Positioning resolution:
X axis: 0,05mm
Y axis: 0,05mm
Z axis: 0,1mm
Working temperature:
Max. Hot bed temperature:
Max. extruder temperature:
Filament diameter:
15-35ºC
80ºC (measured on the perimeter)
260ºC
3mm/1,75mm
Compatible materials:
PLA
ABS
Nylon
HIPS
PVA
Laybrick (with 0,6mm nozzle)
Laywood (with 0,6mm nozzle)
Filaflex (with 0,6mm nozzle)
Electronics:
Arduino Mega 2560 + RAMPS 1.4
Connectivity:
SD Card (autonomous operation)
USB Cable (controlled through Repetier Host)
Firmware:
Compatible files:
Code converter software:
AC Input:
Power requirements:
BCN3D+ specific (based on Marlin)
STL
Slic3r, Cura
AC 100–240 V, ~4 amps, 50–60 Hz
200W
33
User Manual
RepRapBCN
FFF Technology
BCN3D+ is a 3D printer based on fused filament fabrication additive manufacturing technology, consisting in the
deposition of melted material layer by layer based on a previously divided digital model.
The head makes the necessary movements to deposit a layer of material, then a slight vertical movement to continue
with the next layer. The process is repeated until the full object is completed.
The filament is lead
to the extruder
Through rotation, the extruder
uses a hobbed bolt to insert the
right amount of filament
The heatblock fuses the filament to a
workable temperature
The material is distributed through
the model when necessary
The hot filament is extracted through
the extruder with a smaller diamater
The printing surface moves along the X/Y/Z
axes to deposit the material
The printer is ready to accept any add-on published by RepRapBCN through an easy and guide lined process. One of
its main features is interchangeable extruder heads, either for using multiple heads at the same time or extruders
designed for several other textures and materials.
44
User Manual
RepRapBCN
Compliance
Fundació Privada Centre Cim hereby states that BCN3D+ complies with the essential requirements and other relevant provisions of the following Directives:
Low Tension Directive 2006/95/CE
Directive on machinery 2006/42/CE
Directive RoHS2011/65/UE
55
User Manual
RepRapBCN
Safety
To avoid possible residual risks for the user , please read carefully the following safety measures.
REPRAPBCN IS EXEMPTED OF ANY LIABILITY IF THE USER DOES NOT FOLLOW THE FOLLOWING HANDLING
INSTRUCTIONS:
• Very important. Like with any other appliance, do not touch the terminals of the cables connected to
the main. The voltage is 230V and there is a risk of electrocution. Other cables from the machine working
at 12V and present no risk.
• This machine produces and emits radio frequencies during use. It is important to install and use
the equipment according to the instructions in this manual to avoid harmful interference to domestic
appliances such as television or radio. If the machine causes interference, increase the separation between it and other appliances.
• Print materials are not innocous and may emit toxic fumes. Always print in open or vented spaces.
• Do not breathe closer to 25cm from the extruder head or heads when printing.
• Do not place any object or body part between the moving parts of the machine when
functioning.
• Do not touch its hot parts (hotbed and hotend) when the machine is turned on, or within 15
minutes of operation.
• Do not connect or disconnect any device and/or electrical connector when the machine is on.
• Oversee proper function of the machine during operation.
• In case of an emergency, stop the machine using the STOP button and unplug.
66
User Manual
RepRapBCN
Safety warnings
The following signs have been arranged on the printer to warn users about areas of potential risk arising from its use or
possible actions that are not recommended.
Hot surface danger
Moving parts, danger of crushing.
Hot Surface, allow it to cool down before handling.
Moving parts, danger of crushing, disconnect before handling
77
User Manual
RepRapBCN
2. SETTING UP YOUR BCN3D+
Unboxing
The BCN3D+ is delivered inside a properly secured cardboard box, measuring 600mm long, 570mm wide and
590mm high. To properly unbox BCN3D+ the following steps must be followed:
1. Remove the packing tape and open the box.
2. Remove the upper cardbox cover. Inside we will find our assembled printer and an accessories box fixed to the
corrugated board.
3. Cut the cables ties fixing the accessories box and remove.
4. Carefully remove the protective cardboard from the sides.
5. Grab the upper frame and lift the printer out of the box.
6. Cut the zip ties attaching the lower cover to the machine.
7. Once out of the box, cut the zip ties holding the axes in place:
•
•
•
Ties holding the extruder carriage
Ties holding the hotbed
Ties holing the Z axis in its upper position
8. Open the accessories box, comprising:
•
•
•
•
Hotbed glass
Power cable
3DLAC
Tools
•
•
•
•
SD Card
1 Kg Spool
Frog + Calibration cube
USB containing full documentation
9. Unwrap the hotbed glass and use the included clamps to fix it onto the hotbed.
10. Plug the printer using the included power cable
11. Remove the toolkit and the fixing spray and leave them close to the machine, we will use them regularly.
12. Fit the supplied spool onto the holder mounted on top of the printer
13. The machine is ready to load the spool filament and the necessary files to print.
x3
4.7.
88
User Manual
RepRapBCN
Tools and accessories
The BCN3D+ comes with a kit with every tool necessary to build the printer from scratch included. It also includes a
fixing spray specially design for 3d printing.
1
2
Allen wrenches
set
Pliers
Calibration
tool
Flat screwdriver
Nozzle wrenches /
break 1
Hot Block 2
Phillips screwdriver
99
User Manual
RepRapBCN
BCN3D+ Diagram
Perspective
14.
7.
8.
13.
9.
4.
1.
1.
LCD Screen
2.
SD Card Slot
3.
USB Connector
4.Hotbed
5.
Hotend (Extruder)
6.
X axis guides
7.
Threaded rod and Z axis guides
8.
Y axis linear guides
9.
Mechanical endstops
10.
Stepper motors
11.Outlet
12.
ON/OFF button
13.
Power supply
14.
Spool holder
Left view
Front view
6.
3.
10.
11.
5.
2.
12.
10
User Manual
RepRapBCN
Extruder (Hotend)
6.
1.Heatsink
2.
Heat break
3.Heatblock
4.Nozzle
5.
9.
Head
5.Idler
6.
Tightening screws
7.
Layer fan
8.
Hotend fan
9.
X axis carriage
Electronics
8.
1.
7.
3.
2.
4.
10.
10.Pololus
11.
Arduino + RAMPS
11.
11
User Manual
RepRapBCN
3. STARTUP PROCESS
Hotbed height calibration
For a proper use, the nozzle movement must be parallel to the Hotbed Surface.
To achieve that, there are three screws available to calibrate its orientation.
z
x
0
y
There’s a risk of the nozzle hitting the hotbed glass or the first layer not sticking on its surface when decalibrated. The
following steps must be followed:
1. Click Autohome (Prepare/Autohome) so the printer axes move to their initial position. The first time, caution
should be exercised because the nozzle can collide with the base plate. If it is anticipated that this will happen, manually press the Z axis end stopper.
2. Adjust the screw triggering the endstop so the nozzle almost touches the glass when clicking Auto-home.
3. Tighten or loosen the three black screws leveling the base plate. The distance between the nozzle and the glass
should be 0,2 mm. (Tip: use a folded paper to check)
4. Position the extruder in the left side using your hand (in case any resistance is felt, disable the stepper motors
using Prepare > DisableSteppers). Level the base plate once again using the same procedure.
5. Move the base plate to the front to level the rear end of the plate.
6. Repeat the process until its four corners are leveled.
2.
3.
x3
END
STO
P
END
STO
P
12
User Manual
RepRapBCN
Loading filament
One of the more common operations in our BCN3D+ will be, for several reasons, loading and unloading filament: a
change of color, a change of material, using a fresh spool, cleaning, maintenance...
The following steps must be followed:
1. Heat the extruder. Warm the hotend up to printing temperature.
It is not necessary to click on Preheat, although it is advisable when wanting to print immediately after loading the
spool. If that is not the case, click Menú>Control>Temperatura>Nozzle>220ºC.
2. Click on Prepare>Move axis> 1mm>Extruder, and rotate the wheel slightly clockwise (positive values) to extrude
a few millimeters of material. This procedure will help prevent jams.
3. Click on Prepare>Move axis> 1mm>Extruder, and rotate the wheel anticlockwise (negative values) moving the
gear a few steps back until the filament is free.
4. Once the old thread is out, load the new one. Click on Prepare>Move axis> 1mm>Extruder so the screws hold it
tight . Move the wire slowly until the material exits trough the end of the hotend.
5. For a proper filament feeding, the idler screws must be tightened enough, offering a slight resistance when
assisted with our fingers.
6. Once the extruder starts pulling the filament, tighten the screws until enough pressure is reached.
7. Once these steps are followed, the filament will be loaded and ready to print.
13
User Manual
RepRapBCN
Working with your BCN3D+
The BCN3D+ operation diagram from beginning to end is show below. As shown, two alternatives operating
paths are possible:
CAM (Computer Aided Manufacturing) toolchain
SENDER
(USB connection)
CAD model
.STL file
Controller
firmware
SLIC3R utility
(G-code generator)
SD card
4. LCD CONTROL
The BCN3D+ can be operated from its LCD menu, a single button combining two movements:
•
•
Turn to move through the menu.
Click to select desired option.
Adjacently to the control button there is an emergency red button to stop the machine in case of malfunction. It
stops the printer but keeps the screen and fans on. Once pressed, the printer resets itself to resume use.
Home Screen
The main screen reports on the status of the printer at the time of the printing currently in progress.
1.
Extrudero
1 1390o
FR 140%
SD 0%
3
2.
HotoBed
0
49o
1%
Z:+099.0
4.
03:45
3 hours 4 3 minutes
7.
5.
6.
1.
2.
3.
4.
Target/Current temperature
Fan speed
Printing speed (Fr)
Printing height indicator (Z)
5.
Percentage of printing program read (SD)
6.
Status bar and time elapsed
7.Notifications
14
User Manual
RepRapBCN
Actual and target temperature
In the upper left corner four different temperatue values can be visualised, indicating target temperature (up), actual
temperatures mesured by the thermistors (down), hotend temperature (left) and hotbed temperature (right).
Fan speed
In the upper right corner, the display shows the percentage of power provided to the layer fan. A 0 % value indicates
it is OFF, 100% means FULL POWER.
Printing Speed (Fr)
The center left value indicates printing speed. By default a 100% value is shown, meaning it is printing at the specified
value in the executed printing program.
This value is modifiable at any time, even when not printing, by just turning the control button. Thus, with a 150%
value it will print 1,5 times faster than stipulated in the printing program.
NOTE: Varying the printing speed modifies the motors speed proportionally and directly to the printing velocity, affecting only
axes X, Y, Z and the extruder but no the temperature, therefore, printing problems can appear when increasing or decreasing
speed to a large degree. It is not recommended to modify this value by more than 50%.
Printing height indicator (Z)
The center right value indicates the printing head height.
NOTE: This value might be incorrect when mesured just after switching the printer on, Z=0 actually being the point at
which the printer stopped last time it was used.
Percentage of printing program read (SD)
In the lower part of the screen the percentage of program read is shown. Notice that this value states the percentage
of Gcode lines performed, not the percentage of the object being printed.
Status bar and time elapsed
In the lower right corner, a status bar shows the same information as before.
Above it, time elapsed since printing process started is shown.
Notifications
Last line shows different messages noticing the processes being carried out by the machine.
15
User Manual
RepRapBCN
Home menu
To enter the menu, click the wheel from the Home Screen.
Three options are found: Prepare, Control, Print from SD/No SD (according to whether the SD has been inserted into
the slot or not).
http://www.reprap-electronics.de/
Info screen
Prepare
Control
Print from SD
Prepare menu
Prepare allows you to operate the machine without being actually printing . The following options are found:
• DisableSteppers: Turns the motors off, easing the manual movement of the hotbed and printing head.
• Autohome: Positions the printing head in its home position.
NOTE: Before selecting this option, make sure nothing obstructs the movement of all the axes. Likewise, it is necessary to
perform the calibration process before selecting this option.
• Preheat: Unfolds a list of several materials. Selecting one of them makes the printer preheat to the proper working temperature for said material.
• Cooldown: Turns off the power of the heating parts.
NOTE: The machine cools down naturally, so the hot parts could be burning for a while.
• Move Axis: It controls axes movement. Select the distance and the axis. To move the axis, turn the control button.
Rotate clockwise to move in the positive direction, anticlockwise for the negative one.
16
User Manual
RepRapBCN
Main
Disable Steppers
Auto Home
Preheat
Cooldown
NOTE: before clicking on this option, make sure nothing obstructs the movement of all the axes. E axis will not move unless
the extruder is hotter than 150ºC.
Control menu
Allows you to modify the printer parameters before and during the printing process. They are much more specific
parameters, requiring a much deeper knowledge of the internal operations of the machine.
Main
Temperature
Motion
Store memory
Load memory
Print from SD /No SD
Allows you to Access the SD card and select a stored file to print. If the SD card is not inserted, a No SD message is
shown. In that case, the BCN3D+ can be connected to a PC through a USB cable (see printing section).
Print from SD
Print from USB
17
User Manual
RepRapBCN
Just for reference, the full menu diagram is shown below:
Move Axis
Prepare
Main
Disable steppers
AutoHome
Preheat PLA
Cooldown *
Move Axis
Main menu
Prepare
Control
No Card
Control
Main
Temperature
Motion
Store memory
Load memory
Card Menu
Main
* Preheat
PLA
ABS
Nylon
PVA
Laywood
Laybrick
5. ‘.STL’ FILES
Move 10 mm
Move 1 mm
Move 0,1 mm
Move Axis
Move X:
Move Y:
Move Z:
Extrude
Temperature
Control
Nozzle
Bed
Autotemp
Min
Max
Fact
Fan Speed
PID-P
PID-I
PID-D
PID-C
Preheat PLA Settings
Preheat ABS Settings
Preheat PLA Settings
Temperature
Fan Speed
Nozzle
Bed
Preheat ABS Settings
Temperature
Fan Speed
Nozzle
Bed
Motion
Control
VXY-Jerk
Hystrsis
Vmax-X
Vmax-Y
Vmax-Z
Vmax-E
Vtrav-min
Vmin
Amax-X
Amax-X
Amax-X
Amax-X
Aretract
Xsteps/nn
Ysteps/nn
Zsteps/nn
Esteps/nn
The backbone of BCN3D+ printing are the 3D model files.
The most commonly file type found is the *.STL format. An STL file describes a raw unstructured triangulated surface. The smaller the triangles are, the bigger the resolution and the detail of the 3D model.
Obtaining STL files
There are three different methods:
1)
Own design: The users create their own objects with a Computer-aided design best suited for people with
previous knowledge in modeling.
A wide range of available programs exist, some of them free (OpenSCAD, FreeCAD, Blender), while others requiere
a software license (SolidWorks, Rhinoceros, Inventor, etc.). In general terms, all of them allow the user to import/
export STL files.
18
User Manual
RepRapBCN
2) Download: Nowadays there are lots of online repositories where people share their own models with the rest of
the community. As an example, the following ones are mentioned:
•
www.grabcad.com – Repository specialized in engineering, design and architecture models. Not always in STL
format but in the original format used by the creator.
•
www.thingiverse.com – Repository marketed by MakerBot, contains a great deal of STL models and customization tools.
3) Digitalization: Paralel to the development of 3d printing, home scanning technology is evolving at high speed. In
this regard, it’s worth visting Autodesk’s own www.123dapp/catch. In there, free tools to obtain digital models from
pictures taken with a photographic camera are provided.
Other existing methods are: specialized softwares that combine the use of projectors and cameras or 3D scanners.
Editing and repairing a .STL file
As it has been mentioned before, a file in STL format is not always in the best condition. Some of the most common
errors are:
•
Holes. The model must be unclosed, with no holes present.
•
Faces orientation: An STL model is composed of flat faces. Their orientation must be the same and outwards. In other words,
it cannot be that some sides point in one direction and some in other, they all must be facing outwards. This usually happens
by accident when working with modeling software.
19
User Manual
RepRapBCN
Several repairing and editing softwares are available. RepRapBCN recommends Netfabb, which, in its BASIC free
version, allows you to perform the most basic editing (escale, rotate, cut, combine, etc.), repairing and mesurement
operations.
http://www.netfabb.com/downloadcenter.php?basic=1
The essential information for editing STL files is detailed below. For more detailed information, it is advisable to visit
the official site.
Netfabb interface
After installing Netfabb, it is advisable to become familiar with its interface. First of all, we will enable printing volumen visualization for our BCN3D+. For this, click on View/Show Platform.
Then, we will redefine volume dimensions. Click on Settings/Settings/General/Default PlatformSize, introducing the
values corresponding to the BCN3D+: 252 x 200 x 200. Lastly, click on Save.
In the upper tool bar several icons are found, of which we highlight the following ones:
1) 7 basic views
2) Zoom tools
3) Tool to orientate the face of the object to the printing surface
4) Move, Rotate and Escale tools
5) Repairment tools
In the right part of the screen the model’s basic info and the cutting tool are available.
3
1
4
5
2
20
User Manual
RepRapBCN
Repairment
In case the model needs to be repaired before printing, a warning sign will appear in the lower right corner. To repair it, select the
model and click on the tool Repair.
Next, in the right side window, click on Automatic Repair and select
Default Repair in the pop-up window. Click on Execute and then click on Apply Repair in the right side window to
finish the process.
In the new pop-up window, select Remove old part to erase the faulty original file. If the file is successfully repaired, the warning sign will be gone.
•
In case the model faces are inverted, the model will be shown in red. In this instance, the model can be repaired
clicking on Part/InvertPart.
21
User Manual
RepRapBCN
Orientation and move home
First of all, we need to correctly orientate the model, usually on a flat surface. The easiest method is selecting the
tool align to bottom plane and double click the side in contact with the printer’s surface.
Then, the object must be moved to its origin selecting it (represented by the green object) and using the Move tool. In
the pop-up window, click on “To origin” and then “Translate” to finish.
Additional editing options available are cutting and scaling.
Once the model is repaired and edited it’s time to save it. Click Part/ExportPart/as STL and save with the desired
name.
G-CODE generation
At this point, we’ve got a 3D model ready to print. However, a last step is required. The STL file must be converted to
file type the printer can read in order to fabricate the model. In other words, the G-Code file must be generated.
Gcode is a programming language used to control CNC machines, including the majority of 3d printers. It consists of
a set of instructions that tell the machine the positions and speed at which each of the axes must move and also the
hotend and hotbend temperatures.
There are several tools to generate a Gcode file from a STL file. RepRapBCN recommends using Slic3r, an open source
software that is constantly updated, with new functionalities added.
http://slic3r.org/download
22
User Manual
RepRapBCN
Like other GCodes generators, Slic3r sections the 3D model in layers that will be later deposited to created the 3D
model. In every layer, a distinction is made between the perimeters and the filling of the part. Also, the operational
sequence, printing speed, number of perimeters, etc can be chosen. Since there are many parameters, some of them
difficult to understand, specific configurations have been prepared to ease up the process for the novice user.
Slic3r configuration
The following printing profiles have been prepared for the BCN3D+ with a 0,4mm nozzle in mind, taking into account
the kind of object and later use.
These must be taken as a reference point and can be improved to go faster, achieve a better finish, etc.
ST: Standard configuration with a layer height of 0,2mm for most builds
HQ: High quality standard configuration with a layer height of 0,1mm
HS: Setting targeted at jobs needing a fast print without loosing much quality
SV: Special configuration for container-like pieces. There is no infill present and the object is manufactured helically
with a single surface, improving the surface finish.
WALL: Special setting for models with exotic geometries like the ones generated with the Voronoi algorithm (being
the designer Dizingof its best representative). There’s no filler present and the temperature and speed are lowered to
improve overhangs construction.
STR: Special setting for parts suffering from a significant mechanical stress. The filling is made in a honeycomb
fashion and the layer height is decreased to 0.15mm to improve adhesion between the layers.
Slic3r FIRST STEPS
We will now explore the key points needed to use Slic3R. To gain a deeper knowledge please visit the official website
of the Project and download the manual:
http://manual.slic3r.org/
23
User Manual
RepRapBCN
Printer definition
A setup wizard will appear the first time Slic3r is executed. The following information must be entered:
1)
2)
3)
4)
5)
6)
Firmware Type: RepRap (Marlin/Sprinter)
BedSize: x: 252 y: 200 mm
NozzleDiameter: 0.4mm
FilamentDiameter: 2.9 mm
ExtrusionTemperature: 220ºC
BedTemperature: 55ºC
Loading a profile
Once configured, we can load the best suited printing profile to the kind of object we are about to print. To do that, we
must go to File/Load Config… and select the preferred configuration.
24
User Manual
RepRapBCN
Adding files
Next, add the previously edited and repaired STL. The can be directly dragged over the platform or be added by clicking on. You can add as many files as you like.
Also, more than one copy can be printed. You just only have to slect the outline of the object =or select it in the right
side list) to duplicate and click the “+” button as many times as needed.
Exporting Gcode
Once the object has been deployed over the platform and the configuration adjusted, it’s time to export the GCode.
Click on Export G-Code and specify the saving location and file name, creating a file with the *gcode extension.
25
User Manual
RepRapBCN
This generating process might take a while depending on the 3D model complexity and the setup chosen. Likewise,
the computer’s power is decisive too. Processing time is between 10 and 15 minutes depending on the complexity.
Transferring our G-CODE to the BCN3D+
Finally, we just have to transfer the GCode to the printer to start the print. To do that, two different procedures are
available.
1) Using the LCD. Insert an SD containing the Gcode file you want to print in the lateral slot card of the screen and
press the control button and choose Print from SD to select the object.
2) PC connection. Use a software to connect the printer via USB. RepRapBCN
recommends RepetierHost http://www.repetier.com/download/
It’s a free open source program that allows you to visualize STL files, automatically generate the GCode from preconfigured profiles and monitor the printing progress.
A simpler alternative to RepetierHost is Printrun https://github.com/kliment/Printrun
6. PRINTING FROM USB AND SD CARDS
The included SD card comes with preloaded files for first-time printing. The characteristics of each figure are described below:
• Cube: A 20mm sided cube with a 25 % filling value ideal to check if the calibration and setup of the printer are correct. It’s the perfect figure to check the parallelism and the dimensional accuracy of the printer.
Material: PLA
Layer Height: 0,2mm
Working time: 15 minutes
• Frog: The frog is a figure that, despite its small size, presents a fairly high complexity. The overhangs in the front
are useful to check whether the layer fans are working correctly.
Material: PLA
Layer Height: 0,2mm
Working time: 35 minutes
• Tower: The tower is a good example of a detailed object. The bricks of the exterior and the steps of the interior
stairs, together with the central spiral, are a good mesure of printing quality.
Material: PLA
Layer Height: 0,1mm
Working time: 2 hours 15 minutes
26
User Manual
RepRapBCN
After selecting the piece to be printed, and having calibrated the machine and checked that everything works correctly, proceed as follows:
•
Make sure PLA is loaded in the machine
• Preheat the printer using the following commands in the LCD:
Home Menu > Prepare > Preheat PLA
• Once working temperature is reached,clean out excess material:
Home Menu > Prepare > Move axis > 1mm > Extruder
Turn the wheel clockwise until the material flows continously through the nozzle. Then clean out the extruded material.
• Insert the SD card into the left side slot of the display screen, paying attention to the position of the card.
• Start printing by selecting the desired file:
Home Menu > Printfrom SD > Fila_name
The print process wil start. Attention should be paid to the manufacturing process, especially during the first uses.
27
User Manual
RepRapBCN
7. FILAMENTS
BCN3D+ achives its best printing results with PLA, ABS andy Nylon, while accepting many other plastic materials in
3 mm filament format. A brief description of the materials currently accepted follows:
PLA
PLA (polylactic acid) is the quintessential material for 3d printing, thanks to its ease of use through deposition. It is
recommended to begin in this type of manufacturing technology with this material. A great variety of colors exists
and complex geometries can be achived without great difficulty. The finish is slightly glossy or semi-matte.
Printing is carried out at temperatures ranging between 195º and 220° C, depending on the supplier of the material and printing speed. A layer fan is required to build overhangs. It easily attaches to the glass, and if you work at a
hotbed temperature ranging 45º C-55º C, no product is requiered to ensure this adherence.
The mechanical properties are average, but presents a certain fragility in parts requiring deformation, from a temperature of about 50 °, the parts can present it. It is dissolved in caustic soda.
ABS
ABS (Acrylonitrile Butadiene Styrene) is one of the most widely used materials in 3d printing, and makes up for some
of the weaknesses of the PLA. Printing with ABS is more complex and requires some attention. ABS is not recommended for inexperienced users. The variety of colors is also very high and the finish is semi-matte or matte.
The ABS is printed at temperatures between 210º C and 240º C depending on the supplier of the material and printing speed. The ABS performs better with overhangs, and needs less air into the fan layer (excess air can be harmful).
Adherence to the platform is weaker than with the PLA, due to material shrinkage on cooling, and often requires
adhesive coating despite working with a hotbed temperature of 70 ° C. If the geometry of the piece to be printed has
a too large base, is further promotes adherence problem due to the large lift effect that occurs at the oppopsite ends
of the workpiece (known as warping. See section 11 Print quality diagnosis ).
Nylon
Nylon polyamide is an easily printable polyamide, but presents major problems regarding adhesion to the base. It is a
slightly translucent material with some flexibility. The color is white, while accepting tinting. Its use is recommended
to prevent wear on parts that suffer friction in regular use.
It prints at a similar temperature to that of PLA, and often requires the use of alternative techniques to ensure adherence to the base. The use of special bases (Garolite, tufnol) or alternatively, the lining of the glass base with masking
tape helps solve part of the problem of warping. Parts with a too bigger base do not accept the use of nylon. The
mechanical properties are better than with ABS.
28
User Manual
RepRapBCN
Materials in experimental fase
HIPS
HIPS is a material with properties similar to those of ABS but that reacts to different solvents. It’s frequently used as
support material for ABS printing.
PVA
PVA (Polyvinyl alcohol) is targeted at making support structures for overhangs printing. It is soluble in wáter, making
it easy and safe to get rid off afterwards.
Laybrick
The laybrick is a plastic-based material that imitates the finishing of stone. It’s extruded like PLA, having similar characteristics, but has a tendency to clog the nozzles. Recommended only to expert users.
Laywood
The laybrick is another plastic-based material that imitates wood finishing. Not to be extruded with standard 0.4
nozzles due to the size of its particles, causing a clog. Recommended only to expert users.
Filaflex
Filaflex is a flexible material that comes in different colors. Extrusion is simple but requires the use of a 0.6 mm
nozzle.
29
User Manual
RepRapBCN
8. FIRMWARE
What is a firmware and when to update it?
The firmware is a software needed to control a hardware. Namely, it is the internal program that controls your
BCN3D +, and allows it to perform its functions normally. The BCN3D + is delivered and installed with the latest
firmware version published on the web.
Its basic functions are:
On the one hand, converting .gcode files to useful instructions for printing, managing the motor drivers and target
temperatures.
On the other hand, it is also responsible for managing machine peripherals such as the screen, allowing you to interact with it without connecting the printer to a computer, or the endstops necessary for proper functioning of your
printer.
Usually the firmware of a device is integrated in it and you can not change or replace it unless aproved and provided
by the manufacturer.
The advantage of our RepRap printer is that it follows the Open Source philosophy so we can change or modify the
firmware to adapt our machine to new features and accessories or improve its behavior.
The ability to modify the firmware is the responsibility of each user. RepRapBCN will always develope firmwares
oriented to printing with their products and will freely disseminated them.
When it is necessary to update the firmware?
It will be always necessary when adding new functionalities that imply a change in its control system such as new
extruder head, Dual extruder heads or a Paste extruder. Changing other parameters such as pulleys or axes lenght,
printing speed and endstops will also need a firmware update.
When RepRapBCN publishes a new update, it will be announced through its web site and social networks,
highlighting improvements and new features.
Downloading Arduino’s IDE
This section describes the steps to update / modify the controller firmware. The first step is to install the Arduino IDE
on a computer. This is a program that enables us to interact with BCN3D + Arduino card.
1. Download Arduino’s software package from http://www.reprapbcn.com o execute from the provided USB
dongle.
30
User Manual
RepRapBCN
2. Install the program.
3. Once installed, plug the BCN3D+ to the computer through a USB cable, thus the connection with the Arduino
board being established.
If the board drivers are not installed automatically, please follow the steps below:
http://arduino.cc/en/guide/windows#toc3
4. Open the Arduino manager
5. From File>Open, select the saved new firmware file.
The file has the *.ino extensión and it’s located in a folder with the same name.
6. Now the desired parameters can be modified if necessary.
7. Select the card model and port usingHerramientas>Tarjeta>Arduino Mega
2560 and Herramientas>Puerto Serial>COM X
•
•
The card used by the BCN3D+ is an Arduino Mega 2560.
Port means the connector through which the board is connected to the computer (COM port). It can be checked
from Start> Computer> Right click> Properties> Device Manager> Ports COM and LPT (Windows)
31
User Manual
RepRapBCN
8. Click on Load.
Loading starts, first compiling the program for errors, and then, properly speaking, loading the firmware on the memory board.
9. If the process is completed successfully the message Charge completed is displayed and the printer is ready to use.
9. TROUBLESHOOTING
Hysteresis correction and backlash
The hysteresis effect is purely mechanical and derived from the backlash from some of the components used in our
BCN3D+ printers. It occurs when a change in the direction of the platform to follow a given drawing suffers from a
delay. It’s present in changes in the Y axis.
The result can be noticed especially when printing circles, where a lengthening of the shape of the circumference in
the point the axis shifts is produced.
The solution implemented in the firmware allows to force an X and Y axes correction right at the moment it changes
direction. The printing platform is forced to correct its position going up or down to compensate depending on the
direction in which the change occurs, thus the hysteresis and the elongation above mentioned disappear.
To access the hysteresis menu:
Menú principal > Control > Motion > Hysteresis
32
User Manual
RepRapBCN
Inside it, we will find the following options:
•
•
•
•
Circles: Sets a standard correcting values for circles
Manual X: Allows you to manually set X axis correction
Manual Y: Allows you to manually set X axis correction
Disable: Disables hysteresis correction
This firmware updates comes with a default value preset to start printing right away.
Store & Load memory
Lets you save the parameters set in the Control menu. These settings remain stored after turning off the printer.
•
To save a configuration
Menú > Control > Store Configuration
•
To restore previously saved information
Menú > Control > Load Configuration
With this improvement we can decide the control configuration best suited to the mechanical characteristics of our
printer and save it.
33
User Manual
RepRapBCN
It’s difficult to remove an object once it’s done
Once a print is finished, it’s sometimes difficult to pull it out of the platform:
•
Let the base cool down, the colder it is, the less adhesion.
•
Carefully place a cutter below the part and use it to slowly remove the object.
•
It is highly recommended to remove the cristal base by loosening the white screws. If you try to extract the
printed part directly without removing the glass first, you could be forcing the screws and/or misaligning
the platform.
Motors do not rotate correctly (adjusting the pololus)
From Home Menu/LCD Prepare/Move Axis, the proper movement of the motors can be cheked by moving the axes.
We will proceed as follows:
1. Before we start, use your own hands to check nothing is hindering the motors movement.. If there’s still no movement,
adjust the pololus following this instructions:
5 min.
2. If the motors do not move or do not move enough,
They are lacking power. Turn off the machine and turn the potentiometer clock pololu 5 minutes clockwise.
3. If the motors move but, from time to time, make sudden movements, ie, lose steps, they have too much power. In that case,
turn off the machine and turn the potentiometer clock pololu 5
minutes anticlockwise.
5 min.
NOTE: before clicking on this option, make sure nothing obstructs the movement of all the axes. E axis will not move unless
the extruder is hotter than 150ºC.
Extrusion stops
It could happen for several reasons:
• The motor does not properly rotate:
1. Adjust pololus power.
2. Check that the large gear axle nuts are not too tightened up against the extruder, but against each other. Ensure
that the actuating mechanism rotates easily by hand.
3. Check for flaws in the electrical cables and that they are properly connected.
• The thread does not advance even when the motor is running:
1. Make sure the temperature is correct according to the type of plastic.
2. Remove the extruder and thoroughly clean any remaining plastic.
3. Raise the machine temperature and, using your own hands, try to get rid of the clog jamming the extruder.
34
User Manual
RepRapBCN
• The message “Mintemp” or “Maxtemp” appears on screen:
1. Hotend temperatura has left its working range. Make sure connections are secure and wiring is not damaged.
2. If the problem persists, remove the hotend from the machine and make sure the thermistor is not broken and the wires
are not touching, which would cause a short circuit and a misreading of temperature.
• Thread has become tangled:
1. Make sure the spool rotates correctly in the holder, and that the thread descends more or less straight down into
the extruder. A tangled thread may cause it to break or fall off the coil bracket.
• The glass is too close to the nozzle:
1. Tighten the screws on the base or adjust the Z axis endstop a little higher and start again.
2. Recalibrate the base.
• SD card has been removed from its slot:
1. If the SD card is removed from the screen slot, the printing process stops and it’s not posible to continue from
where it stopped.
The screen does not responde or nothing is shown
1. Turn the printer off and back on.
2. Make sure that the cables that feed the display are properly connected. The two cables coming from the electronics must croos each other
3. Reload the firmware using a pc. If the firmware is incorrectly loaded a blank screen will appear (see section 8,
Firmware)
X,Y or Z carriage does not move fluently se desplazan con fluidez
1. Clean the guides.
2. Loosen the screws holding the guides.
10. PRINT QUALITY DIAGNOSTICS
This sections shows alist of the most common printing quality problems and how to minimize them.
Regardless, we recommend using our web configurations (www.reprapbcn.com) because they have been tested and
work well with most objects.
The part becomes separated from the hotbed (WARPING)
Sometimes the parts do not properly adhere to the glass hotbed during printing. This especially happens printing with
ABS, a material with great thermal contraction.
35
User Manual
RepRapBCN
In this case, try the following steps:
1. Clean the glass to prevent dust or other substances interfere between the base and the piece.
2. Soak the glass surface with a layer of the included adhesive spray
3. Raise the base temperature five degrees celsius.
4. Calibrate the base as shown in section 11 Maintenance.
5. Print the first layer with the hotend closer to the base. To do this, loosen the three screws from the base an
eighth of the way or loosen the screw that actuates the Z axis endstop a fifth of the way. The two actions will get the
base and hotend 0.1mm closer so the first layer adheres better.
6. Make the first layer extrude more material (from Slic3r, PrintSettings/Advanced/FirstLayer).
First layer material is not extruded throughout its geometry
1. It might happen that the first layer does not adhere properly to the glass, or leaves a steady stream of plastic
thread (little droplets forming a line) throughout the figure.
The problem is that the machine is not correctly calibrated; the extruder is too far from the base. Check the calibration section in chapter 11 (Maintenance) to see how to regulate the Z axis endstop.
2. The symptons above are present in just part of the first layer.
The reason being that the printer is not correctly calibrated, the X axis is not parallel to the base and this causes
the extruder to move away from or get too close to the base at some points. Check the calibration process section in chapter 11 (Maintenance) to know further about orienting the printer dock.
11 Maintenance, focusing on the orientation of the plane of the printer dock.
Cracks appear in the middle of the piece
This happens because the area of the piece closest to the extruder is hotter than the
lower layers.
To avoid these cracks the extrusion temperatura must be raised five degrees celsius, so
that the layers adhere more strongly.
Fused
When working with fused material, gravity causes it to drip from the nozzle. Strategies to minimize this problem and achieve better surface finishes, even with complex
geometries, should be seek.
Deposition
The thread of material being extruded has the outer diameter of the nozzle orifice. By
depositing the fused thread layer by layer, the entire surface of the part is printed.
Note that the manufacturing process occurs sequentially, which allows differentiation
between different aspects of each model (such as perimeters and filler) and choose
among different print strategies (order, framework and filling rate, etc).
36
User Manual
RepRapBCN
Strings of plastic appear around the piece
This happens when the extruder is moved from one point to another without depositing material.
To avoid this, set the retract option in Slic3r. It retracts part of the extruder motor wire, so that the pressure of the
material inside the extruder is reduced and dripping is prevented during axes movement. If the retract increases,
there’s a decrease in string-shaped waste.
Modeling
The higher we print, the need for support structures becomes more obvious.Deposited material tends to detach itself
in steep areas or hanging parts such as overhangs.
When this happens, it’s recommended to make use of Slicr options regarding the creation of support colums.
One layer is displaced relative to the lower one
When there is a discrepancy between layers position, it is likely that one of the motors lost steps. Firstly, you must
identify which axis is affected and then adjust that motor’s pololu, as explained in section 9 (Troubleshooting).
37
User Manual
RepRapBCN
11. MAINTENANCE
Given the machine characteristics, it is very important to periodically check the different components so we don’t lose
print quality and to avoid errors.
Calibration
BCN3D+ is marketed fully asembled and calibrated, but it is
possible that it might require recalibration of its axes over time.
The process is simple if the following steps are taken:
• X axis calibration
a) With the calibration tool, measure the X axis bars height
from the aluminum sheet base
b) Adjust the height at both ends of its horizontal axis by manually rotating each threaded rod.
• Z axis calibration
In order to ensure the perpendicularity of the axis Z with the base, an iterative process must be performed consisting
of the following steps::
a) Place the Z axis in a vertical position (about 180 mm).
b) Loosen the screws on the base of the Z shaft guides. This provides a range of motion that will allow us to position
them correctly.
c) Use the calibration tool as a sort of set-square or triangle and stand its short side on the base plate while the
longer side rests in contact with the vertical Z axis guides.
d) Orientate the tool so two 90ª mesurements can be taken and repeat in both Z guides.
38
User Manual
RepRapBCN
e) During mesurements, keep adjusting the perpendicularity relative to the guide using the tool and tighten the base
screws to fix its position. As mentioned before, this process has to be repeated in both guides and then correct any
imbalances.
Rods lubrication
It is recommended to grease the rods from time to time, especially when they suffer from difficulties moving or make
more noise than usual. Place a few drops on the rods, and move the axes so that the same mechanism distributes
them throughout.
The same process should be applied to the two Z threaded rods.
Filament maintenance
Filament spools should be stored in a cool, dry place, heat and humidity affecting this kind of plastic. If a coil is not to be
used for a long period of time, store it in a sealed plastic bag.
Ensure that the filament is neatly coiled. A loose coil can cause it to curl wrong, and cause jerks affecting printing and the
machine components.
Cleaning the printer dock
After several prints, the hotbed glass gets dirty, and layers of adhesive coating, plastic dust and debris accumulate. To
clean the glass, it must be removed from the printer. The remains of coating and dust are easily removed by placing the
glass under wáter with a little of soap.
Remaining sticked plastic can be removed with a cutter, being careful of not scratching the glass. Acetone can also be used
as it acts as a solvent.
Hotend maintenance
Removing the hotend to change the nozzle or any other of its parts can be performed easily by following these steps:
•
Disassembling the hotend
1. Remove the wire inside the hotend following the procedure explained in section 3. (First time setup in Loading
filament).
2. Cool down the hotend for about 15 minutes using the Prepare> Cooldown option.
3. Click Autohome and raise the Z axis to +150.00 mm
4. Turn off the printer
5. Remove the two Layer Fan ring M3 screws M3.
6. Disconnect the fan and remove the Heat sink fan cooler support.
7. Disconnect the Hotend wires connector and cut the zip ties to release the cables.
39
User Manual
RepRapBCN
8. Unscrew the Heat break+ block + nozzle set using the
Hotblock wrench, taking care that the cables do not become
entangled or uncrimped. [View 3]
9. With the above mentioned set out of the way, unscrew
the nozzle block with both the block wrench and the nozzle
wrench, watching carefully that no wires are damaged in the
process. [View 5]
10. Unscrew the Heat break using both wrenches [View 7]
11. Check all the componentes are clean, if not, clean
following the procedure explained below.
•
Assembling the Hotend
1. It’s composed by the block (ceramic resistor and thermistor
already installed), nozzle and heat break.
2. Screw the nozzle by hand until it makes contact with the
block.
3. Once screwed, loosen by a quarter of the way.
4. Once screwed, loosen by a quarter of the way.
5. Tighten the nozzle with the nozzle wrenc, holding the block
with the block wrench. [view 6]
6. Screw the whole set by hand to the printer.
If the cables ended up in an akward position, we should
remove the extruder mechanism and unscrew three heatsink
screws so we can rotate the hotend.
7. Using the break wrench, gently tighten the heatbrek and the
set against the heatsink. [view 9]
8. Plug the hotend wires.
9. Heat the extruder to 220 ° C.
10. Now that it has warmed up, tighten the nozzle back,
against the block using both wrenches. [view 10]
40
User Manual
RepRapBCN
11. Assemble the cooler fan to the heat sink and connect the
wiring.
12. Assemble the Layer fan ring using the two provided M3
screws.
13. Tie the hotend and fan wiring with a zip tie.
14. Turn the printer on and check all connections are working
properly.
15. Load filament and extrude it.
Necessary:
• Nozzle wrench / break wrench (8,2 mm/4,6 mm)
• Block wrench (20,5 mm)
Cleaning hotend parts
To clean plastic debris or other remaining material within parts of the hotend we can proceed in several ways:
1. If the plastic residue is ABS or PLA, soak it acetone and leave it overnight. Remove them with a pice of wire so they
don’t get scratched.
2. If the waste is between the heat block screw thread, we will will need to connect the wiring and heat the block to
150-220ºC, taking extreme care not to get burned. Pliers and wrenches are heat resistant.
VIEWS 8 AND 9 ALLUDE TO THE ONLINE WEB MANUAL
12. TIPS AND TRICKS
There are certain things that we must take into account when using and maintaining the machine:
•
Do not spill liquids on the hotbed or hotend as they could damage the other components. To clean them, first
remove them from the machine. The only advised product for improved printing adhesión is the included coating
spray.
•
If we’ve got difficulties removing the printed parts, remove the glass first to avoid decalibration.
•
Do not overheat the hotend. Although its maximun temperature is firmware limited, do not use other methods to
heat it above the established range.
•
Do not handle the electronic parts of the machine when it is on, it could cause damage to its components.
•
Do not turn off the printer immediately after printing. Allow some time for the fans to cool the different components down.
41
User Manual
RepRapBCN
13. REPRAPBCN TECH SUPPORT
If you do not find in this manual a solution to your problem, you can contact the REPRAPBCN team via the following
channels:
Forum
Before taking any other action, you should have a look at our forum. It is very likely another user has suffered the
same problem, and the forum is where most of them are solved.
http://www.reprapbcn.com/es/forum
E-mail
If the problem persists, you can contact us directly by email. An expert from RepRapBCN will answer you back with a
solution as soon as possible.
[email protected]
Customer Service
Call our customer service line:
+34 93 473 88 24 (TECH SUPPORT)
+34 93 348 70 25
Call this numbers to contact our team, for either directly getting your questions answered via phone or to make an
appointment and have your printer checked in our facilities.
This information is also available in our website contact section:
http://www.reprapbcn.com/es/contact
In any case, it is very important to attach the printer serial number so we can keep track of it and know in advance
the problems that might arise. A photograph could also help identify more easily what happened.
14. GLOSARY
• Arduino. Free hardware platform based on a board with a microcontroller and a development environment.
It is a very popular board, and constitutes the brain of the BCN3D + electronics. Requires loading a firmware to work.
http://www.arduino.cc/
•
Endstop. The electro-mechanical component that makes contact with the axis carriages to indicate their total
length.
42
User Manual
RepRapBCN
•
Filament: Coil of any valid printable material.
•
Firmware:. BCN3D + Internal Code which governs all electronic and allows printing. BCN3D + uses its own firmware, based on the popular Marlin.
•
Power supply: Used to power de deviced, adaptaded to the printer needs
•
Gcode: Files in G-Code format containing the printing instructions for a given figure. They’re load in the SD card
so that they can be read and printed.
•
Hotbed: Heated base on which the models are printed
•
Hotend or Extruder: Where heat is applied to melt and print the filament.
•
SD Card: Card where the files are stored in Gcode format for printing..
•
Nettfab: Recommended by RepRapBCN to edit and repair STL files.
http://www.netfabb.com/downloadcenter.php?basic=1
•
Nettfab: Recommended by RepRapBCN to edit and repair STL files.
•
Open Source. Freely developed and distributed software
•
Pololu. An electronic component that controls the functioning of the printer motors.
•
RepetierHost. Software that allows sending Gcode files directly from the PC to the machine via a USB cable. It
has other features like print monitoring.
http://www.repetier.com/
•
RAMPS 1.4. Stands for RepRapArduino Mega PololuShield. It’s a microcontroller board designed specifically to
complement the printer circuit. Contains a fuse to prevent the destruction of the Arduino board in case of an electric surge.
•
Slicer: RepRapBCN recommended software to generate Gcode files from STL files.
http://slic3r.org/
•
Thermistors. Temperature sensors. Found in the hotbed and hotend.
•
Layer fan. Fan located just off where the fused material is ejected, cooling it to match the temperature of the
already printed material.
43
User Manual
RepRapBCN
15. WARRANTY, REFUNDS AND REPLACEMENT POLICY
RepRapBCN does not offer a long term warranty. Every component has a one year warranty. RepRapBCN accepts
returns for any unaffected item within 14 calendar days from the date of receipt of merchandise. After such time,
all sales are considered final. Unaffected means a device has never been assembled, powered up, programmed, or
otherwise changed. RepRapBCn cannot accept returns on purchased items that have had electrical power applied to
them, or been otherwise programmed, changed, or affected
However, we do offer spare parts and technical assistance for items proven to suffer from a manufacturing defect
and we will work with you to get your printer back to work
16. TERMS OF SERVICE
All the information contained in this manual is subject to change at any time without notice and it is offer just for
convenience. purposes only.
RepRapBCN reserves the right to modify or revise this manual at any time. You accept being subject to any modification and/or revision. . Please contact RepRapBCN support tem if you want to obtained the most updated information.
The design of this manual and all text, graphics, information, content, and other material displayed are protected by
copyright, trademark and other laws
Certain trademarks, trade names, service marks and logos used or displayed on this Website are registered and
unregistered trademarks, trade names and service marks of RepRapBCN and its affiliates. Nothing contained on
this manual grants or should be construed as granting, by implication, estoppel, or otherwise, any license or right to
use any trademarks, trade names, service marks or logos displayed on this manual without the written permission
of RepRapBCN or such other owner. Any unauthorized use of the information, materials or trademarks included in
this manual might incur in violation of copyright laws, trademark laws, privacy and publicity laws and other laws and
regulations.
44
User Manual
RepRapBCN
BCN3D+ User manual
Fundació CIM-UPC
12, Llorenç i Artigas
08028 Barcelona
T. 934 017 171
F. 934 017 170
[email protected]
www.reprapbcn.com
RepRapBCN 2014, All Rights Reserved
45