1
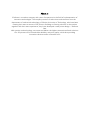
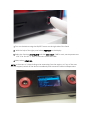
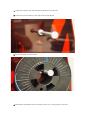
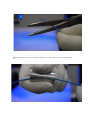
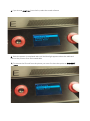
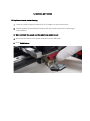
3Dgence One
User manual
1. Safety
1.1 Safety precautions
2. Printer description
2.1 Equipment
2.2 Device description
2.3 Control buttons description
2.4 Portability guidelines
2.5 Printable Materials
2.6 Technical parameters
3. Before initial use
3.1 Place of installation
3.2 Software and drivers installation
3.3 Connecting the device
3.4 Starting and calibration of equipment
3.5 Installing consumables
4. Instruction manual
4.1 Connecting the printer to your computer
4.2 Configuration of the Repetier-Host software
4.3 Doing the first printout
5. SERVICE ACTIVITIES
5.1 Replacement and cleaning of nozzle
6. ADDITIONAL INFORMATION
6.1 Warranty
6.2 Tips
Instructions version 0.4
About us
3DGence is a modern company with years of experience in the field of implementation of
innovative technologies. The company consists of enthusiasts and scientists from the
department of mechanical technology, of Silesian University of Technology, who have been
creating their own structures of 3D printers. Building on existing solutions on the market
together with their own experiences, they have developed a new printer design – 3DGence
One.
With passion and technology, we create and deliver the highest international level solutions.
Our 3D printers offer unmatchable reliability and print quality, whilst also providing
innovative solutions and a minimalist form.
1. SAFETY.
Before the first use thoroughly read the instructions.
1.1 safety precautions
To ensure that the device is kept in the best condition for as long a time as possible and that
it stays safe to use, follow these rules:
Do not install the device:
• outdoors
• in damp or flood-risk areas
• in the proximity of volatile or flammable substances
• near concentrated acids or corrosive fumes
You must not:
• touch the model, platform, or head, once printing is in progress. This could result in
burning
• insert any part of the body, or foreign objects into the workplace of the printer once
printing is in progress. This could damage the printer
• touch the heated nozzle with your hands, even if using the protective gloves
• touch high voltage parts
• handle the equipment with wet hands
• put containers holding water on the device
• climb on the device
You must:
• use only power sources with grounding (to avoid electric shocks)
• hold the cover of the plug, not the cord, when disconnecting the plug from the power
source
• disconnect the power source prior to the commencement of any repairs or
maintenance
• protect the power plug and cord from damage
• disconnect the power plug if transferring the device/moving the equipment
• disconnect the power plug if the device is not used for an extended period of time
• always wear protective gloves when working with the printer
• the device should only be operated when well away from children and animals
The 3DGence heats up and has many moving parts. Never reach into the interior of the
printer while it is in use.
NOTE:
Heated table and the head can still be hot even after printing. The temperatures of these
should be checked on the display before touching, or you should wait 30 minutes after
turning off the device (e.g. to clean, remove the model, replace the nozzle etc.)
ONLY when the blue light is on is it indicated that the table has cooled down sufficiently,
allowing you to remove the model or do other activities around the working zone.
2. Printer description
2.1. Equipment
3DGence printer
Protective gloves
USB flash drive with software
Memory card
Filament (wire, consumables in the printer)
Scraper
Network cable
USB Cable
Bowden extruder
Cleaner
Spool holder
Nozzle with a diameter of 0.4 mm (already installed)
2.2 Description of the device
1. Extruder
2. The hot-end releasing button
3. Z axis microswitch/limiting switch
4. Heated table
5. Control buttons
6. Handles
7. Cleaner
8. Filament spool holder (Note: left-hand thread!)
9. SD card slot
10. Power button
2.3 Description of control buttons
Note: left control panel works beyond the restrictions of movement (endstops), the warranty
does not cover the damage caused by improper use of the panel (buttons 1 to 4).
1. Table elevation button
2. Filament recognition button (over 200 degrees Celsius *)
3. Filament increasing button (over 200 degrees Celsius *)
4. Table lowering button
5. The Start button (use after pressing the pause button)
6. Navigation button menu up
7. Navigation button menu back and change of data
8. Navigation button menu change of data
9. Navigation button menu down
10. Navigation button OK (select)
* Applies to the PLA material, in the case of ABS the temperature of 240 degrees Celsius
must be set on hot-end to take advantage of quick access buttons.
2.3.1 The pause button:
Pressing the button once results in the program stopping
-
Pressing the button twice results in the program stopping and removal of the nozzle
Pressing the button three times results in an emergency reset of the printer
2.3.2 Description of the display
(Printhead and table temperature)
(Printhead position)
(Printhead pressure)
2.4 Portability guidelines
• Disconnect the device from the power source before moving
• The device should be cooled down, consumables should be removed
• Only specifically designated handles should be used to move the device
2.5 Printable Materials
3DGence One is able to utilize most materials intended for print.
Materials should have a diameter of 1.75 mm, the manufacturer strongly advised that the
temperature for printing should not exceed 260 ° C.
If in doubt please contact the technical department of 3Dgence.
2.6 Technical parameters
Printing technology
Layer thickness:
X, Y, Z axis Resolution:
Net weight:
Color:
Operating voltage:
Working field dimensions:
Heated table:
Extruder type:
Number of Heads:
SD card slot:
Power consumption (max.):
LCD Panel
Surface materials:
Table type:
FDM
100-400 [µm]
100 [µm]
17 [kg]
Silver, red, black
100-240 [V]
235x250x200 [mm]
YES
Direct drive
1
SO
620 [W]
YES
steel, aluminum, Plexiglas
ceramic
Connection:
Diameter of printhead nozzle
Filament diameter
Materials used for printing:
Quick replacement of cylinder head
Printer autocalibration
Nozzle pressure measurement
Lighting of the working field
Thermal protection against damage to the
heating elements
Type/name of used electronics
Software type
Software operating systems
USB 2.0
0.4 mm standard
1.75 mm
PLA, ABS, Laywood, Laybrick, Nylon
YES
YES
YES
YES
YES
Dedicated to 3D Master
Open source, RepetierHost
Windows (XP, 7, 8, 8.1), Linux, Mac Os
3. Initial Use
3.1 Place of installation of the device should meet the following conditions:
• the device should be used at room temperature
• the device is not designed to work in dusty environments
• it is necessary to ensure ventilation appropriate to the size of the room
• the device should be put on hard and stable ground
• the device may not be exposed to direct sunlight
• the device should be kept away from heat sources
• place of installation of the device should be fitted with 230V/50 Hz outlet
The device is powered by AC 230V/50 Hz. It should be connected to an outlet with a
protective plug (grounding) to avoid electric shock in the event of any malfunction of the
device.
3.2 Installation of the software and drivers
Before connecting the device to your computer, you must install the Repetier-Host software
from the USB flash drive attached to the software. The link below is for the website of the
software manufacturer, it explains the installation process.
http://www.repetier.com/documentation/repetier-host/rh-installation-and-configuration/
3.3 Connecting the device
The fixed device should be connected to the network.
3.4 Turning on the device and calibration
1. Turn on the device using the ON/OFF button on the right side of the Panel
2. With the help of the right panel select POSITION on the display
3. Select the function of EXTRUDER and then BED TEMP. If ABS is used, set temperature to
150° C for PLA 65 ° c. Wait 15 minutes to heat the table
4. Next, select: HOME ALL
NOTE: in the event of a loud clicking noise emanating from the engine, or if any of the axes
are not stopped, switch off the device immediately and contact the technical department
5. Observe the movement of all axes. When the axis Z is linked to the microswitch observe
the distance from the end of the nozzle to the table. It should be about 0.1 mm (the same
thickness as a sheet of paper)
6. If the distance is greater/smaller adjust it by loosening the screws of the microswitch
and by checking the position of the nozzle with the command HOME Z
use the command CONFIGURATION
7.
Then
8. Now, by selecting the command HEAT BED SCAN the device will level out the table
exactly and set the height of the nozzle (the whole procedure can take 20 minutes, the
device cannot be moved during this procedure)
3.5 Installing consumables
1. Unpack the spool with the filament attached to the device
2. Install the spool holder on the right side of the device
3. Place the spool on the handle
4. Release the protected end of material, then cut it using a pair of scissors
5. Follow the instructions in the photographs to place the material in the cleaner
6. Push the filament through the tube and then place it in the extruder junction
7. Pressing the tops of screws (to remove the tracing wheel from the bearing) push
the filament to the hot-end until you feel resistance
8. In order to remove the filament from the hot-end (to replace the filament or to clean the
printhead) first you need to heat it up to 200 ° C in the case of PLA, or, in the case of ABS, up
to 240 ° C. Then proceed in the opposite order to the way it was assembled.
9. To allow the filament through the hot-end you need to heat it up to, in the case of PLA 220° C, or in the case of ABS – 250° C. Next press the add filament button until material
appears at the end of the nozzle, or in the case of using the Repetier-Host software, extrude
the material by clicking the extrusion 1 icon.
4. User manual
4.1 Connecting the printer to the computer
1. PLEASE NOTE! Make sure you install the printer software
2. Connect the USB cable to the printer slot
3. Connect the opposite end of the USB cable to the computer
Configuration of the Repetier-Host software
To configure the program you need to run it and then go to the tab "Printer settings"
In the “Connection" tab, pay special attention to the settings: Port, coverage cache size
and Transmission speed and we set them as shown in the picture below. You need to enter
the other parameters as shown in the picture below
Go to the "Printer " tab, complete the settings as shown below. In the following tabs proceed
in a similar way.
4.3 Initial printout
1. Rip the prepared G-Code to your SD card using the option ’’Save’’ in the Repetier-Host
software
2. Insert the SD card into the printer reader
3. Choose the option SD CARD from the printer panel
4. Then select MOUNT CARD
5. If you choose PRINT FILE from the list, select the saved software
6. Once the process is completed wait until the blue light appears above the table and
remove the printout from the heated table
7. To remove the SD card from the printer you must first have the option to UNMOUNT
CARD
5. SERVICE ACTIVITIES
5.1 Replacement and nozzle cleaning
1. Lower the table to approximately half of its height to eject the hot-end
2. Delete material (intermediate filament) with the nozzle (see point 8 Fastening of
consumables)
3. Wait until both the nozzle and the table have cooled down!
4. Disconnect the device from power and remove the USB cable
5. Press PUSH button
6. Eject the hot-end from the fastening, while holding the button with the other hand
7. Prepare the following tools: size 10 key, the key supplied with the printer and the
replacement nozzle
8. Insert the supplied key in the flattening above the nozzle, grab the nozzle
with the size 10 key
9. Next, unscrew the nozzle (unscrew only the nozzle using size 10 key)
10. Assemble a new nozzle (or a cleaned one)
11. Put the hot-end in its place (the groove shown in the picture is to be directed towards
you)
12. Keep pushing the hot-end until the push button springs back
PUSH
6. ADDITIONAL INFORMATION
6.1 Warranty
3DGence One is covered by a 12-month warranty for the components, ie. stepper motors,
power supply, electronics, thermistors, the heatbed and the printhead heater.
In addition, the print head is covered by a 3-month additional warranty.
6.2 Suggestions
1. The filament must be kept in a clean and dry place, away from big temperature
differences. If the material gets wet, it loses its properties. In such a case you can use
it for printing only at your own risk.
2 . When printing small or very complicated objects, we recommend that you print at low
speed to allow the previous layer time to cool off before applying the next one.
3 . If you print with too low a temperature, the layers may not stick together, and gaps
may appear in the model.
4. If you print the next layers with too high a temperature, the previous one may still be
too soft. If the angle is too large the material may flow down.
5. If the printout does not stick to the table, the following problems may be responsible:
• Wrong temperature for PLA was chosen, set 65° C for ABS 150° C
•
Table height was chosen wrongly when printing the first layer. Adjust the table
setting when printing the first layer by using the quick access keys