1
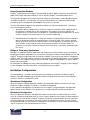
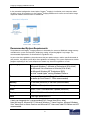
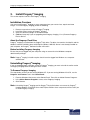
Progeny® Imaging
Installation Guide
v1.11 and Higher
00-02-1604 Rev. D
ECN P3483
Revision Date: 6/2/2015
0120
®
Progeny Imaging Installation Guide
Contents
1.
About This Manual ......................................................................... 3
Text Conventions ............................................................................. 3
2.
Welcome to Progeny® Imaging ..................................................... 4
System Components ........................................................................ 4
Installation Configurations ................................................................ 5
Recommended System Requirements ............................................. 6
Getting Assistance ........................................................................... 7
3.
Install Progeny® Imaging ............................................................... 8
Installation Overview ........................................................................ 8
Uninstalling Progeny® Imaging ......................................................... 8
Installing Progeny® Imaging ............................................................. 9
Logging in for the First Time ............................................................11
4.
Using the Configuration Utility.....................................................12
Configuring Database Options ........................................................12
Configuring General Options ...........................................................13
Configuring a PACS. Server ............................................................14
Configuring a Modality Worklist Server ...........................................15
Applying Changes ...........................................................................15
2
®
Progeny Imaging Installation Guide
1.
About This Manual
This section explains how to use this manual.
Text Conventions
The following typographic conventions are used in this manual.
Type of Information
Convention
Example
Menu selection
Bold font,
menus in path
connected by
‘>’
Select Tools > User Management
User interface
objects and
controls
Bold font
Click Next
Program
information and
information typed
by the user
Fixed-width font Change directories to
C:/program_files/Progeny®Dental
User-specific
information typed
by the user
Fixed-width font Type C:/program_files/<user_database>,
with italics and substituting the name of your database for
‘< >’
<user_database>
3
®
Progeny Imaging Installation Guide
2.
Welcome to Progeny® Imaging
This section introduces Progeny® Imaging features, system components and installation configurations.
Progeny® Imaging Features and Functions
Progeny® Imaging acquires, displays, and stores digital dental X-rays and intraoral video images.
Progeny® Imaging stores digital sensor images in DICOM format (Digital Imaging and Communications in
Medicine). The DICOM format assures that each image contains patient identification and acquisition
information.
You can use Progeny® Imaging to:
• Create login IDs for users of Progeny® Imaging
• Manage patient records
• Acquire, manipulate, and communicate images
• Configure devices to work with Progeny® Imaging
This manual is designed to guide you through installing Progeny® Imaging and image acquisition devices
(sensors) to work with it.
For information on using Progeny® Imaging, refer to the Progeny® Imaging User's
Manual.
System Components
When you use Progeny® Imaging, you work in several related contexts. This topic describes the
following:
• Progeny® Imaging Components
• Image Acquisition Modules
• 3rd Party Applications, such as practice management software
Progeny® Imaging Components
Progeny® Imaging consists of three main components: a graphical user interface, a database and
application folders. The graphical user interface is used to view and manipulate images. The database,
which runs on MS SQL Server 2005 Express, stores user and patient information. The application folders
store system settings, device configurations and patient images.
Progeny® Imaging needs to be installed on every computer where you want to view, acquire and store
images. By default, the Progeny® Imaging database is installed on the same computer where the
graphical user interface is installed. This is the standalone (application) configuration.
You can also have the graphical user interface point to a central database on another computer within
the office network. This is the networked (application) configuration.
4
®
Progeny Imaging Installation Guide
Image Acquisition Modules
Progeny® Imaging works with Progeny® VisionDX USB, VisionDX , MPSe, ClearVision, and VetPro DR
digital X-Ray image acquisition modules as well as with the Progeny® Vivid USB Video Camera.
The VisionDX USB digital X-Ray image acquisition module and the Progeny® Vivid USB Video Camera
are USB-based devices. These devices can only be installed directly to a computer's USB 2.0 port
(standalone device configuration) and cannot be shared across a network.
The VisionDX and MPSe digital X-Ray acquisition modules are Ethernet-based devices. Two options
exist for installing these devices:
1. Standalone (device) configuration, in which the module is installed (in DHCP mode) directly to
the computer's network port. In this configuration, the module can only be used from the
computer where it is connected. The computer in a standalone (device) configuration can access
an office network or the Internet only if it has a second network port.
2. Networked (device) configuration, in which the module is installed using the default standalone
(device) configuration and then reconfigured to be in Static IP mode. It can then be attached
directly to a hub or switch on the office network. In this configuration, all computers are on the
office network, and the module can be accessed from computers in different rooms. The
computers on the office network are able to have Internet access if the office network provides
this access.
Bridge to Third-party Applications
PIBridge is an additional software application from Progeny® Dental that enables you to use Progeny®
Imaging with 3rd-party applications, such as practice management software. With PIBridge, you can add
Progeny® Imaging's image acquisition and analysis capability seamlessly to your practice management
software. After accessing a patient's records in your practice management application, you use PIBridge
commands to "call" Progeny® Imaging. At your command, Progeny® Imaging opens for you to acquire
images and create studies.
For information on PIBridge and using a 3rd party application with Progeny® Imaging, contact Progeny®
Technical Support. For more information, see Getting Assistance on page 7.
Installation Configurations
Two configurations--standalone and networked--are available for installing the Progeny® Imaging
database. Any USB enabled image acquisition module is required to be physically connected to the
machine in which it is intended to be used.
Standalone Configuration
When the Progeny® Imaging application, database and application folders are located on the same
computer, Progeny® Imaging is installed in a standalone configuration.
In the standalone configuration, the computer uses the Progeny® Imaging database and application
folders located on the computer. The computer has an image acquisition module connected to it.
Networked Configuration
When the application, database and application folders are located in a central location on an office
server or a computer designated to act as a server, and the graphical user interface on other computers
is pointing to a central location, Progeny® Imaging is installed in networked mode. All of the computers
where the application is installed use the same centrally located database and can view the centrally
located patient images. In the networked configuration, all computers are on the office network and can
access the Internet, if the network provides this access.
5
®
Progeny Imaging Installation Guide
In the networked configuration shown below, Progeny® Imaging is installed on each computer and on
the office server. All computers use the Progeny® Imaging database on the office server and the image
acquisition module connected to the network hub.
Recommended System Requirements
The performance of Progeny® Imaging software is affected by the amount of RAM and storage memory
available to the system for acquisition, displaying, storing, and printing digital X-ray images. The
recommended requirements are listed below as a guideline only.
As you review these guidelines, please be aware that your patient volume, and the specific demands of
your practice, may require you to adjust these guidelines accordingly. The system requirements of other
programs operating on the same computer or network may affect these guidelines as well.
Operating System
Microsoft Windows 8 Pro or Enterprise Editions (32 & 64 bit)
Microsoft Windows 7® Ultimate or Professional (32 & 64 bit)
or Microsoft Vista® Business or Ultimate (32 & 64 bit)
or Microsoft Windows XP® Professional (SP3)
or Intel®-based Apple® running Windows Platform.
Processor
Intel® (or x86 compatible) Single Core 2 GHz
or better (or Dual Core at 1.7GHz recommended)
Memory
2 GB RAM (minimum), 3 GB RAM (recommended)
Storage
80GB Hard Drive (minimum)
Video
32 bit, 1024 X 768 Resolution Capable (minimum)
Display
1024 X 768, 32 true bit color (recommended)
Ports
Two High Speed USB 2.0
A back-up storage device is recommended (DVD, External Hard Drive, other)
Note: Microsoft 8, Microsoft 8 RT, Microsoft Windows 7® Home Premium, Microsoft Windows
Vista® Home Basic or Home Premium and Microsoft XP® Home and Tablet PC Editions are NOT
recommended.
6
®
Progeny Imaging Installation Guide
Getting Assistance
In the event that you require additional assistance, please contact your local dealer representative from
whom you purchased your Midmark products. You may also contact Midmark Technical Services:
Manufactured by:
Midmark Corporation
675 Heathrow Dr.
Lincolnshire, IL 60069
Phone:
800-MIDMARK (800-643-6275) (Press 3) (U.S. and Canada)
Phone:
+1 847-415-9800 (Press 3) (International)
Fax:
+1 847-415-9801
Email:
[email protected]
Hours:
8:00 a.m.-5:00 p.m. CT
EC
REP
0120
CE Partner 4U
Esdoornlaan 13
3951 DB Maarn
The Netherlands
To facilitate your service call, the following information should be ready and available:
•
Your computer operating system and version (example: Window 8 Pro)
•
Version of Progeny® Imaging software. To determine the version, in Progeny®
Imaging, select Help > About Progeny Imaging.
•
Serial number of your Digital System (on the box that the sensor came in) and the
individual Sensor serial number (attached to the sensor cable).
•
Type of Progeny® Imaging installation (standalone, peer-to-peer network, clientserver network).
When you call, please make sure that your Progeny® Imaging software is available
and you have access to the digital sensor.
7
®
Progeny Imaging Installation Guide
3.
Install Progeny® Imaging
This section explains how to install Progeny® Imaging.
Installation Overview
You must install Progeny® Imaging on every computer where you want to view, acquire and store
images. To install Progeny® Imaging you do the following:
1.
2.
3.
4.
Remove any previous version of Progeny® Imaging
Install the current version of Progeny® Imaging
Open the software and login as the Administrator
(Additional step only If you are upgrading from Progeny® Imaging 1.1.x.x): Remove Progeny®
Device Service
About the Progeny® Flash Drive
Progeny® Imaging is installed from the Progeny® flash drive. The drive also contains the help file and the
database software, MS SQL Server 2005 Express Edition. If MS SQL Server is not already installed on
your computer, the Progeny® Software Installer will install it.
Before Installing Progeny® Imaging
Ensure that you are logged into your computer using an account that has Windows computer
administrator privileges.
Note: Progeny® Imaging’s Installer requires that all users be logged into Windows as a computer
administrator.
Uninstalling Progeny® Imaging
If you are upgrading from a previous version of Progeny® Imaging, you must uninstall the earlier version
of Progeny® Imaging before installing the latest version.
To Remove Progeny® Imaging
The steps below assume you are running Windows XP. If you are running Windows Vista/7/8, use the
Programs and Features icon in the Control Panel.
1. From the Windows Start menu, select Control Panel. Then click on Add or Remove Programs.
2. In the Add or Remove Programs screen, select Progeny® Imaging.
3. Click Remove.
Note: Uninstalling Progeny® Imaging and the Progeny® Device Suite does not remove the Progeny®
Imaging database or MS SQL Server 2005 Express Edition: these components will be used if you
re-install Progeny® Imaging.
8
®
Progeny Imaging Installation Guide
Installing Progeny® Imaging
Installation of Progeny® Imaging takes only a few minutes.
To Install Progeny® Imaging
1. Insert the Progeny flash drive into one of the computer’s USB ports and allow the computer to
recognize the flash drive.
Note: If the Progeny Software Installer does not start automatically, use the Windows Start
menu and select Run. Then type the path to the program on the Progeny® Imaging
Installation disc.
Note: The version numbers in the image above may not reflect those displayed on screen.
2. In the Progeny® Imaging Software Installer, click Install Progeny® Imaging.
Note: The Progeny® Device Suite software must be installed prior to attempting to install the
Progeny® Imaging software.
9
®
Progeny Imaging Installation Guide
Note: The version numbers in the image above may not reflect those displayed on screen.
3. If your computer does not have MS SQL Server 2005 Express Edition installed, you will see a
license agreement. Click Accept.
4. In the Progeny® Software Installer, click the ‘Exit door’.
Note: The version numbers in the image above may not reflect those displayed on screen.
10
®
Progeny Imaging Installation Guide
Logging in for the First Time
Every time Progeny® Imaging is launched, the Login window appears. You must log in to use Progeny®
Imaging.
Progeny® Imaging allows administrator users and ordinary users. Immediately after installing Progeny®
Imaging, you will log in as Administrator. Later, the Administrator can use the User Manager window to
set up user IDs and passwords for other administrators and ordinary users.
To Log in for the First Time
1. On your computer's desktop, double-click the Progeny® Imaging icon, or select Progeny®
Imaging from your Windows Start menu.
2. In the Login screen Username field, type Administrator.
Note: If you are logging into the application in another language, you can use the localized
operating system's version of the "Administrator" login.
3. Leave the Password field blank.
4. Click Login.
11
®
Progeny Imaging Installation Guide
4.
Using the Configuration Utility
This section gives procedures for configuring Progeny® Imaging.
Configuring Database Options
Your Computer: Displays the local computer’s name
Database Type: Determines whether the machine will be storing images locally (Standalone) or will be
connecting to another Progeny® Imaging instance over a network (Network).
Server Mode: Determines whether the local computer will act as a Progeny® Imaging server (only
available in standalone mode).
Note: Progeny® Imaging requires that your office network be a setup as a workgroup (Peer-to-Peer, or
P2P) or Windows domain (client-server) network. In a workgroup or domain network, all users
must have appropriate privileges on all clients in the network. On a domain network, a domain
server is required for authentication.
12
®
Progeny Imaging Installation Guide
Configuring General Options
Images Folder: This is the folder where the patient images are stored. You can select a new location by
using the Browse button or Reset to move them to their default location.
NOTE: The software will prevent you from selecting the application’s root folder
Message Level: Determines the level at which to report errors in Progeny® Imaging – Information
applying essentially no filter to log messages; and Error applying the greatest message filter – allowing
only application errors to be logged.
13
®
Progeny Imaging Installation Guide
Configuring a PACS. Server
Patient images acquired in Progeny® Imaging can be published (sent) to a P.A.C.S. server.
In order to enable publishing to a P.A.C.S. server, you will use the Configuration Utility included with
Progeny® Imaging.
Progeny® Imaging acts in accordance with the DICOM SCP standard. It can transmit images and studies
to a P.A.C.S. server over a TCP/IP connection but does not support receiving image, studies, or image
information. Progeny® Imaging receives no return communication from the P.A.C.S. server indicating
that the images were received.
Settings:
•
P.A.C.S. Publishing: Option for “Publish” button
•
Local AETitle: DICOM Local Application Entity Title (Calling Application)
•
AETitle: DICOM Application Entity Title
•
IP Address/Hostname: IP Address or Hostname of the destination P.A.C.S. server.
•
Port Number: Destination port on the PACS server.
14
®
Progeny Imaging Installation Guide
Configuring a Modality Worklist Server
Settings:
•
Local AETitle: DICOM Local Application Entity Title (Calling Application)
•
AETitle: DICOM Application Entity Title
•
IP Address/Hostname: IP Address or Hostname of the destination Worklist server.
•
Port Number: Destination port on the Worklist server.
Applying Changes
Before the change to the database takes effect you need to hit the apply button. If there is any issue with
your configuration a red X will be displayed in the background indicating there is an issue with the
configuration. If successful a checkmark will be displayed in the background. You can now quit the
Configuration Utility and launch Progeny® Imaging.
15