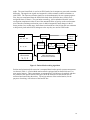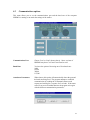
1
User Manual for IS-300 Pro/IS-600 XL Optical Systems Firmware versions 3.0171 and above Contacting InterSense Please do not hesitate to contact us for any reason. We are here to help and we value your business. InterSense Inc. 73 Second Avenue Burlington, Massachusetts 01803 USA Telephone: (781) 270-0090 Fax: (781) 229-8995 email: Internet: [email protected] www.isense.com Regulatory Statements and Approvals United States FCC Part 15, Subpart B, Class A This device complies with part 15 of the FCC Rules. Operation is subject to the following two conditions: (1) This device may not cause harmful interference, and (2) this device must accept any interference received, including interference that may cause undesired operation. Canada This Class A digital apparatus meets all requirements of the Canadian InterferenceCausing Equipment Regulations. Europe EN60950 EN55022, Class A EN50082-1 Warning This is a Class A product. In a domestic environment this product may cause radio interference in which case the user may be required to take adequate measures. 072-00005-0E99 Patents The label below identifies the protection granted by the Government of the United States to InterSense for its products: INTERSENSE U.S. Patents 5645077, 5807284, and patents pending Trademarks InterSense™, InertiaCube™, SoniDisc™, GEOS™, PULSAR™, CONSTELLATION™ are trademarks of InterSense Inc. All other trademarks are the property of their respective owners. Copyright 1999 InterSense Inc. 072-00005-0E99 2 Precautionary Statements Do not attach InertiaCube sensors to the system while the electrical power is applied. Any changes or modifications to the IS-300 not expressly approved by InterSense will void the user’s authority to operate the equipment. Do not drop or otherwise shock the InertiaCube for it can be permanently damaged. Do not bend, twist, pull strongly or tamper in any way with any part of the IS-300 cabling. Take care to avoid electric shocks. Do not plug-in or unplug the power cable with wet hands. Please see Appendix D for Health and Safety warnings and guidelines 3 Table of Contents Subject 1. Theory of Operations Page 6 1.1 InertiaCube Integrated Inertial Instrument 6 1.2 Operating Modes 7 1.2.1 Tracking Modes Overview 7 1.2.2 3-DOF Gyroscopic Earth-stabilized Orientation Sensing (GEOS) 8 1.2.3 6-DOF Fusion Mode 9 2. Specifications and performance characteristics 11 3. Setting up your new IS-300 3.1 IS-300 Components 13 3.2 Setting up the hardware 15 4. ISDEMO: Testing and configuring the IS-300 4.1 Getting started 18 4.2 File Options 21 4.3 Communications 23 4.4 Parameter Options 24 4.4.1 4.4.2 4.4.3 4.4.4 Tracker System Parameters Station and Sensor Parameters XL Tracker Setup Setup Position Sensors 24 25 28 29 4.5 Display Options 31 4.6 Tools Options 33 4.7 Window Management Commands under DOS 37 5. Interface communication protocol FASTRAK1 commands 5.1 5.1.1 1 Supported Fastrak Commands 38 38 FASTRAK is a registered trademark of Polhemus, Inc. 4 5.2 InterSense specific commands 5.2.1 5.2.2 5.2.2 5.2.4 System Configuration Commands InterSense-specific Station Parameters Station Components Configuration Commands XL mode configuration commands 5.3 Records returned from the tracker to the host 5.3.1 5.3.2 5.3.3 5.3.4 Format Considerations Fastrak System and Data Records InterSense-specific Records XL System Configuration Records 45 45 46 48 51 52 52 53 57 61 Appendices A. Genlock Synchronization 62 B. Frequently Asked Questions (FAQ) 66 C. Troubleshooting 68 D. Health and Safety warnings and guidelines 69 E. Care and Maintenance 71 F. Interface Protocol Commands – Quick Reference 72 G. Index of Terms 74 5 1 Theory of Operations Congratulations for buying the finest orientation tracker on the market! This technology offers you several advantages: • • • • Very low latency Unlimited range Prediction based on directly sensed motion derivatives Smooth, jitter-free tracking The IS-300 is an inertial 3-DOF (Degree of Freedom) orientation tracking system. It obtains its primary motion sensing using a miniature solid-state inertial measurement unit (called an InertiaCube™) which senses angular rate of rotation, gravity and earth magnetic field along three perpendicular axes. The angular rates are integrated to obtain the orientation (yaw, pitch, and roll) of the sensor. Gravitometer and compass measurements are used to prevent the accumulation of gyroscopic drift. 1.1 InertiaCube™ integrated inertial instrument The InertiaCube is a monolithic part based on micro-electro-mechanical systems (MEMS) technology involving no spinning wheels that might generate noise, inertial forces and mechanical failures. The InertiaCube simultaneously measures 9 physical properties, namely angular rates, linear accelerations, and magnetic field components along all 3 axes. Microminiature vibrating elements are employed to measure all the angular rate components and linear accelerations, with integral electronics and solid-state magnetometers. The magnetometers are included for optional yaw drift correction in the sourceless inertial orientation mode only. The geometry and composition of these elements are proprietary, but the functional performance of the multisensor unit can be understood sufficiently by reference to the equivalent diagram in Figure 1. Figure 2 illustrates the basic physical principal underlying all Coriolis vibratory gyros. Suppose that the tines of the tuning fork are driven by an electrostatic, electromagnetic or piezoelectric drive to oscillate in the plane of the fork. When the whole fork is rotated about its axis, the tines will experience a Coriolis force F = ω X v pushing them to vibrate perpendicular to the plane of the fork. The amplitude of this out-of-plane vibration is proportional to the input angular rate, and it is sensed by capacitive or inductive or piezoelectric means to measure the angular rate. By way of comparison, a conventional inertial measurement unit (IMU) senses 6 of these properties using 6 separate instruments (3 rate gyros and 3 linear accelerometers) each of which by itself would typically be larger, heavier, and more expensive than an InertiaCube. Unlike conventional rate gyro and accelerometer instruments, which must be carefully aligned on a 6 X ω x-mag. driven vibration v x-accel x-gyro F=ω Xv Y z-gyro y-gyro y-accel sensed vibration y-mag. z-accel angular rate z-mag. Z Figure 1: Functional diagram of InertiaCube Figure 2: Principle of Coriolis vibratory Gyroscope precision machined triaxial mounting block, the InertiaCube is a monolithic device with its orthogonal outputs factory calibrated to precise alignment. Being a digital device, the InertiaCube cabling and connectorization is relatively non-critical, and the cables can be extended up to 30 feet without fear of contaminating sensitive analog signals. The power consumption of the InertiaCube is 30 mA at 9V, which makes it suitable for prolonged operation from a small battery in future wireless applications. Figure 3 shows an InertiaCube next to a floppy disk for scale. Figure 3: InertiaCube 1.2 Operating Mode Descriptions 1.2.1 Tracking Modes Overview For a motion tracking system, a station means an output data stream corresponding to one particular rigid object being tracked. Some manufacturers refer to such a data channel as a sensor, which is perhaps more intuitive for a tracking system in which one physical sensor unit is always used to track one moving object. However, for an IS-600 XL tracking in a 6-DOF mode, it is necessary to attach multiple physical sensing devices (an InertiaCube and 3 or more optical sensors) to a single tracked entity. We therefore prefer the term station to reduce confusion. 7 For an IS-600 XL, each station may be configured in one of the three tracking modes described below. Which tracking mode will be used for a particular station depends on what hardware devices are assigned to that station. Hardware Assigned to Station: 1 InertiaCube 1 InertiaCube AND 3 or more Optical Sensors Resulting Tracking Mode: GEOS mode (3-DOF orientation tracking) 6-DOF Fusion mode Table 1: Hardware assignments for each tracking mode 1.2.2 3-DOF Gyroscopic Earth-stabilized Orientation Sensing (GEOS ) algorithms Figure 3 shows the processing which is used to compute orientation using this sensor configuration. The basic computation of orientation from gyroscopic angular rates (in the top line of boxes) provides the very rapid dynamic response and high resolution of the system. The accelerometers and magnetometers are used to stabilize the orientation to the earth’s gravitational and magnetic fields, thus eliminating the gradual but unbounded accumulation of gyroscopic drift errors. The Kalman filter uses an ever-evolving adaptive algorithm to discard the portion of the accelerometer measurements which are due to actual motion instead of gravity. This is a very important step, because otherwise horizontal accelerations would result in very large transient pitch and roll errors known as “slosh”. The low cost sourceless trackers used in early consumer HMDs are inclinometer/compass devices, and are thus intrinsically slosh-prone to the point of being uncomfortable to use. InertiaCube ωx, ωy, ωz Orientation Integration ax, ay, az mx, my, mz Kalman Filter Orientation Error Estimator + − Orientation Prediction Perceptual Enhancement Algorithm Figure 3: GEOS mode tracking algorithm In GEOS mode, the reference frame (hereafter referred to as Navigation frame or Nav frame or N frame) is the locally-level geographic frame with its x-axis pointing north, y-axis east, and zaxis down. The Euler angles reported by the tracker can be described as a sequence of rotations applied to the InertiaCube starting with its body axes initially aligned with the Nav frame axes and resulting in the current orientation.) 8 X The sequence starts with a rotation by (+yaw) about the Z axis, followed by a rotation by (+pitch) about the new Y axis (i.e. body frame axis), followed by a rotation by (+roll) about the new X axis (i.e. body frame x axis Roll Y Pitch Yaw Z The line from the magnetic field sensor outputs of the InertiaCube to the Kalman filter is a dotted line to indicate that the use of the magnetometers may optionally be disabled. The accelerometer measurements are sufficient to correct all the drift in pitch and roll, and the geomagnetic compassing function is only used to correct drift in yaw. In many fly-through applications absolute yaw referenced to magnetic north is not important and relative yaw tracking is sufficient. This is the case when the user can turn to face an object or rotate the virtual world to bring that object into view. In these situations it may be desirable to turn magnetic yaw compensation off if there are large variations in the direction of magnetic north over the tracking area. With the compassing turned off, the yaw value will drift a few degrees per minute. This drift is too slow to notice while it is happening, but the cumulative yaw error may eventually become noticeable if the user is seated in a fixed chair, and then it may be necessary to send a Heading Boresight command. When yaw compensation mode is disabled, the Nav frame axes are aligned instead to pseudo-north, pseudo-east, and down, where pseudonorth is simply the direction the InertiaCube x-axis was facing on power-up or after a Heading Boresight command. The Perceptual Enhancement Algorithm (PEA) indicated with dotted lines is an option provided for HMD tracking and similar applications which is designed to make the output data minimize perceivable errors rather than minimize mean square errors. Because the human observer is more sensitive to jitter and drift when still or moving slowly, the PEA uses adaptive filtering to preferentially suppress these effects as the head slows down. Interestingly, the PEA only filters the corrections to orientation made by the error estimator, and not the orientation signals themselves. Therefore, the trade-off is increased dynamic error, and not increased latency. If a head at rest suddenly makes a rapid movement, there will be no additional latency imposed by the PEA in the all-important head-motion-to-visual-feedback sensorimotor loop. The Perceptual Enhancement is a constantly evolving family of fuzzy rule-based algorithms which have been quite successful in eliminating most perceivable jitter and drift without introducing any latency. For information on controlling the PEA see the Perceptual Enhancement Level command in sections 4.4.2 and 5.2.2. 1.2.3 6-DOF Fusion Mode The 6-DOF Fusion Mode works like an inertial navigation system with optical measurements used to curtail drift in both position and orientation. Figure 9 illustrates the signal flow in this 9 mode. The same InertiaCube is used as in GEOS mode, but its outputs are processed somewhat differently. The angular rate signals are integrated in a direct manner to obtain orientation, as with GEOS. The linear acceleration signals are used simultaneously for two separate purposes. First, they are transformed from the InertiaCube body frame (B-frame) into a locally-level navigation frame (N-frame). The gravitation constant, g, is then subtracted from the vertical acceleration component in order to cancel the unwanted effects of gravity on the accelerometer triad. Then the remaining acceleration vector is double integrated to track changes in the Nframe position. In a second usage, the B-frame accelerations are also fed into the error estimator to help cancel pitch and roll drift, analogous to the way they are used in GEOS mode. I-Cube Orientation Prediction [& PEA] Orientation Integration ωx, ωy, ωz ax, ay, az Optical Position Measurements X, Y, Z Coordinate Transform -g (gravity) Double Integration Position Prediction [& PEA] EKF Orientation and Position Error Estimator Figure 9: Fusion Mode tracking algorithm Position and orientation drift correction is computed based on the optical system measurements. As shown in Table 1, a Fusion Mode station must be equipped with an InertiaCube and 3 or more optical sensors. These components are mounted on a rigid object to be tracked, and then the position of the optical sensors with respect to the B-frame axes of the InertiaCube are measured and entered into the tracker. The origin and axes of the tracked station, for the purposes of tracking, will be those of the InertiaCube. 10 2 Specifications and Performance Characteristics Performance Specifications The following performance specifications can be achieved when tracking one station in Fusion Mode. Please note that the accuracy of the IS-600 XL depends on the accuracy of the optical tracker. Specifications Maximum Angular Rate: 1200º/sec Angular Resolution: 0.02º RMS Angular Accuracy: 0.1º RMS Maximum Linear Velocity: 15'/sec Translation Resolution: 0.01" RMS Translation Accuracy: 0.1 mm RMS Prediction: 0-50ms Number of InertiaCube Sensors: up to 4 Number of Optical Sensors: up to 8 per station, total not to exceed 24. Orientation Update Rate: up to 500Hz (GEOS Mode only) Position Update Rate: up to 200Hz (Fusion Mode) Interface: RS-232C with selectable baud rates to 115,200 Protocol: Compatible with industry-standard protocol (FASTRAK) Max. System Configurations: GEOS 4 orientation-only stations FUSION 4 6-DOF stations 11 Physical Specifications Power: 12 VDC, 8.6W Operating Temperature: 0 to 50ºC (32oF to 122oF) Storage Temperature: -20 to 70ºC (-4oF to 158oF) InertiaCube Sensor Base Unit Signal Processor 1.06" x 1.34" x 1.2" 5.08" x 5.25" x 1.5" Weight 2.1 oz. 15 oz. Cable 10' extendible to 30' NA Dimensions Block Diagram Optical Tracker 115200 Baud Serial Link to Data In Port IS-300 Pro Null Modem Cable Compatibility The InterSense IS-300 is compatible with all industry leading software and hardware, including products from: •Virtual Research •Kaiser Electro-Optics •Thomson T&S •Superscape •Softimage •Sense8 •Multigen •MetaVR •nVision •Division •Xtensory 12 3 Setting up your new IS-300 3.1 IS-300/IS-600 XL Components IS-300 IS-300 Pro ISDEMO Configuration Software IS-300 Base Unit InertiaCube The base unit is the processing engine of the IS-300 system. It has the following connections: InertiaCubes (up to 4) via cable attached to the InertiaCubes Power via 12V DC power supply. User’s Computer via null modem RS232 cable The base unit should be installed in a clean, dry environment. 13 InertiaCube sensors The InertiaCube orientation sensors come with 10-foot cables that plug into the IS-300 Base Unit. NOTE: the InertiaCube sensor is a precision instrument. Care must be taken when handling this device. Most of our customers attach the InertiaCube to devices that are more fragile than the InertiaCube and, hence, require that the whole system must be handled carefully. Although the product can withstand the normal wear and tear experienced by a premium HMD or other device, abrupt actions such as dropping it, or banging it against another object can permanently damage the InertiaCube. Optional Optical Tracker By connecting an optical tracker to the auxiliary serial port (marked Data In) of the IS-300 Pro, it can be made into a 6DOF inertial-optical hybrid tracker. Use 115200 baud serial link via a standard null-modem rs232 cable. Software The following software is included with the system and is explained in great detail in Section 4: 1. ISDEMO32.EXE 2. ISDEMO.EXE 3. ISDEMO.HLP - For Windows95/98 and NT DOS version of ISDEMO program A file which contains help text also reprinted here UNIX version of ISDEMO is currently not available. To obtain sample source code for DOS, Windows 95/NT or UNIX, please contact InterSense. 14 3.2 Setting up the Hardware InertiaCube placement The InertiaCube is typically screwed or bolted to the object it is tracking. As best as possible, locate the InertiaCube level to the ground in relation to its actual position during use: Correct Incorrect Optimally, you would mount the InertiaCube onto a base plate. In cases of anticipated vibration or physical shock, it is recommended that rubber mounting pads be used. The mounting holes for the InertiaCube are illustrated below: 0.11” Diameter 1.06” 1.3” 1.34” The InertiaCube comes with a 10’ cable attached. This cable plugs into the front panel of the Base Unit. The range of the InertiaCube is theoretically unlimited and is only restrained by the length of the cable that attaches it to the Base Unit. A length of 10 feet is standard on all orders. Lengths above 30 feet have been tested without problem, but they are subject to loss of signal strength; consult with InterSense. 15 Base Unit Set-up 1. 2. 3. 4. Make sure the unit it turned off before connecting any cables. Connect the InertiaCube(s) to the front of the Base Unit. Plug in the power cord. Connect the RS232 cable between the Base Unit and the Host Computer. 5. Select baud rate using mode switch as described below. 6. Connect the optional optical tracker to the Data In port of the IS-300. 7. Turn on the optional optical tracker. Set the power mode switch to “on”. The “power on” LED on the front panel will turn on. The four (IS-300 Pro) LED lights on the front panel of the Base Unit to the left of the InertiaCube plug-in locations will flash in sequence for a few seconds then stop. Each LED corresponds to the InertiaCube plug-in pattern to the right (i.e., upper right hand LED is for the upper right hand InertiaCube plug-in # 4). When a particular InertiaCube is in motion, the corresponding LED will flash to acknowledge this. IS-300 single sensor tracker has only one sensor connector and one LED. Baud Rate The Base Unit has a switch located on the back of the unit. This gives you the option of choosing one of four baud rates: 9,600 19,200 38,400 115,200 (mode 0) (mode 1) (mode 2) (mode 3) these correspond to the mode switch at last power up Note: you must power cycle the system (power-down/power-up) after changing the mode. 16 Tracker Use Guidelines • Keep the InertiaCube(s) still (i.e., sitting on a table) for the entire boot-up period, whenever the tracker configuration is changed, and during any boresight operations. • It is recommended, though not required, that you wait for the InertiaCube to warm up (it achieves optimal performance after warming up for at least 15-20 minutes). • The InertiaCube is tuned for normal head motion. Avoid shaking/vibration. Remember, this precision instrument uses angular rate sensors which sense smooth, regular movement very well. If you keep these guidelines in mind, your IS-300 will deliver superb performance. 17 4 ISDEMO: Testing the IS-300 ISDEMO is included as a test/diagnostics/configuration tool. With it you can test all the features of your tracker. You can also use it to set and save tracker configurations. Software included with your tracking device includes the following: 1. ISDEMO32.EXE 2. ISDEMO.EXE 3. ISDEMO.HLP Win32 version. To be used under Windows95/98 and NT DOS version of ISDEMO program A file which contains help text also reprinted here ISDEMO provides a convenient graphical interface that can configure most of the tracker parameters. There are, however, some advanced features that it does not support. These features can be configured by sending single line commands through the serial port. See the section titled “Interface Communication Protocol” for descriptions of all the available commands. 4.1 Getting Started Create a directory on your hard drive where you would like the program to be installed. Copy all files and directories from the floppy disk to that location (xcopy a:\ c:\isdemo \s). When running DOS version without a mouse use following keys to control window functions: Alt+F10 Alt+F4 Alt+F2 Alt+F1 causes the active window to be maximized/restored. generates the window close request. causes a redraw in all open windows. circulates windows. If mouse is available you can also use Alt+drag to resize the window on which the mouse button is pressed. Important: Please note that ISDEMO does not save any tracker parameters to the hard disk of your computer. All settings displayed in various configuration screens are requested and received from the tracker every time the screen is displayed. All changes are immediately converted to commands, sent to the tracker, and then confirmed. 18 Using the ISDEMO The first screen you’ll see is the hardware selection window (shown below). The program creates a different interface depending on the tracker model selected. ISDEMO can detect the tracker model automatically. Serial communication must first be established with the tracker to utilize this function. Use the Autodetect option in the Communications menu to detect port and baud rate parameters if you have trouble setting them manually. IS-300 The IS-300 is a 3-Degree Of Freedom (DOF) tracker. It obtains its primary motion sensing data using a miniature solid-state inertial measurement unit (InertiaCube) which senses angular rate of rotation, gravity and earth components along three perpendicular axes. The angular rates are integrated to obtain the orientation (yaw, pitch, and roll) of the sensor. Gravitometer and compass measurements are used to prevent the accumulation of gyroscopic drift. IS-600 The IS-600 uses an InertiaCube to sense angular rate of rotation and linear acceleration along three perpendicular axes. The angular rates are integrated to obtain the orientation (yaw, pitch, and roll) of the sensor and the linear accelerations are transformed into a reference coordinate frame and double-integrated to keep track of changes in position (x, y, and z). Ultrasonic timeof-flight distance measurements are used to obtain a starting position and to correct any drift in the inertial position and orientation tracking. 19 IS-900 The IS-900 is similar to the IS-600, except the roles of the SoniDiscs and ReceiverPods are reversed. Ultrasonic range measurements are made with respect to an array of SoniDiscs. The array is positioned over the required tracking area or on a wall behind the tracker or both. The SoniDiscs are triggered by infrared triggering codes, and they respond by emitting an ultrasonic chirp, which propagates through the air. Three ReceiverPods mounted in the tracker then detect this chirp. The ReceiverPods and associated electronics on the tracker measure the time-of-flight and thereby obtain range measurements from the camera to whatever SoniDiscs are nearby and visible. IS-600 XL The IS-600 XL uses an InertiaCube to sense angular rate of rotation and linear acceleration along three perpendicular axes. The angular rates are integrated to obtain the orientation (yaw, pitch, and roll) of the sensor and the linear accelerations are transformed into a reference coordinate frame and double-integrated to keep track of changes in position (x, y, and z). Position data from the attached optical tracker is used to obtain a starting position and to correct any drift in the inertial position and orientation tracking. Note: You must select IS-300 or IS-600 XL, or ISDEMO will not be able to correctly configure your tracker. 20 ISDEMO: Main window ISDEMO has six primary menus in its main window: File Communications Parameters Display Tools Help 4.2 File options The File menu (shown above) provides you with the following options: Select Hardware Device Boresight Current Station Unboresight Current Station Save Current Settings Load Power-up Settings Load and Save Factory Settings Select Hardware Device System Initialization window (also seen at initial start-up) is shown when Select Hardware Device is selected. Use this window to select or detect the tracker model connected to your computer. Save Current Settings Sends ^K command to the tracker. This saves the current settings to nonvolatile memory in the tracker base unit. The next time the tracker is turned on these settings will be restored. 21 Load Power Up Settings Sends ^Y commands to the tracker. This restores the firmware to the power up condition. All changes made to the settings since power up or last ^K command are lost. Load and Save Factory Settings Sends W command to the tracker. This restores the system settings to the factory defaults. Boresight Current Station Sends B{stationNum}<> command to the tracker, where stationNum is the number of the currently displayed station. Please see section 4.2.9 for instructions on how to switch between stations. Please see chapter 6 for complete explanation of the boresight implementation. Unboresight Current Station Sends b{stationNum}<> command to the tracker. This reverses the effects of boresight command. 22 4.3 Communications options This menu allows you to set the communications port and the baud rate of the computer ISDEMO is running on to match the settings of the tracker. Communications Port Choose Com1 or Com2 (shown above). Some versions of ISDEMO may have Com3 and Com4 listed as well. Baud Rate You have the option of choosing one of four baud rates: 9,600 19,200 38,400 115,200 Autodetect Parameters When chosen, this option will automatically detect the port and the baud rate being used. The program attempts to establish communication by sending the S command (status record request) and waiting for a response for 2 seconds. If the status record is not received within that time the program tries again with the different communication parameters. 23 4.4 Parameter options Parameters menu gives you access to the tracker configuration controls. 4.4.1 Tracker System Parameters Output Mode Polled or Continuous. In Polled mode data records are sent out only in response to a P command. Measurement (output record) Inches Centimeters 24 Data Format ASCII (F command) Numbers are returned in ASCII format. Each number has 7 ASCII characters: a sign, 3 digits, a decimal point and 2 more digits. Binary (f command) Floats are sent as 4 bytes of IEEE 32-bit floats. This can increase the data throughput by minimizing the size of the record. 4.4.2 Station and Sensor Parameters The window shown below allows you to configure each station. A “Station” is a position and orientation sensing unit which may consist of 1 InertiaCube and 3 or more optical sensors. IS-600 XL optical hybrid can support up to 4 stations. Note that performance is reduced as more stations are configured. Before any data is displayed in this list, the program requests and then attempts to receive the configuration data from the tracker. If this fails for any reason, an error message is displayed and data in the list may not be reliable. Some configuration parameters, like prediction, are only relevant when an InertiaCube is associated with a station. When none are, N/A (not applicable) is displayed. Double clicking on the Station line or selecting the Change button will bring up the Station Configuration window where changes can be made. 25 Station Configuration window Station ON/OFF When a station is ON a data record will be sent for it, even if there is no InertiaCube or optical sensors are assigned to it. Compass This controls the state of the compass component of the InertiaCube. Compass is only used when station is configured for GEOS mode, in Fused mode compass readings are not used, regardless of this setting. When station is configured for FULL compass mode, the readings produced by the magnetometers inside the InertiaCube are used as absolute reference orientation for yaw. Compass can be affected by metallic objects and electronic equipment in close proximity to the InertiaCube. When station is configured for PARTIAL compass mode, magnetometer readings are used to reduce drift and maintain stability, but not as an absolute measurement system. In this mode system is much less susceptible to magnetic interference, but heading drift will accumulate. If compass is OFF, no heading compensation is applied. See section 5.2.2 InterSense-specific Station Parameters for more details. InertiaCube Number InterSense trackers support up to 4 InertiaCubes. Optical-inertial hybrid must have and InertiaCube assigned to each station. Perceptual Enhancement Level In order to provide the best performance for a large range of various applications, three levels of perceptual enhancement are available. None of the modes introduces any additional latency. 26 Mode 0 provides the best accuracy. The inertial tracker uses gyros to measure angular rotation rates for computing the sensor’s orientation. To compensate for the gyroscopic drift, depending on the configuration, the tracker may use accelerometers, magnetometers or optical system to measure the actual physical orientation of the sensor. That data is then used to compute the necessary correction. In Mode 0 correction adjustments are made immediately, no jitter reduction algorithms are used. This results in somewhat jumpy output (not recommended for head tracking) but with lower RMS error. Use this mode for accuracy testing or for any application that requires best accuracy. Mode 1 provides accuracy similar to that of mode 0, with an addition of a jitter reduction algorithm. This algorithm reduces the accuracy by only a small amount and does not add any latency to the measurements. Mode 2 is recommended for use with HMD or other immersive applications. The drift correction adjustments are made smoothly and only while the sensor is moving, so as to be transparent to the user. Sensitivity Level This setting is only used when Perceptual Enhancement Level is set to 2. It controls the minimum angular rotation rate picked up by the InertiaCube. Default is level 3. Increasing sensitivity does not increase latency during normal movements. It may, however, result in some small residual movements for a couple of seconds after the sensor has stopped. If your application requires sensitivity greater than maximum provided by this control, you must use Perceptual Enhancement level 0 or 1 instead. Prediction Value InterSense tracker models IS-300 Pro and higher can predict motion up to 50 ms into the future, which compensates for graphics rendering delays and further contributes to eliminating simulator lag. This feature is only available for stations configured with an InertiaCube. Commands sub-menu Refresh Status Send Boresight Command Send Unboresight Command Send Reset Angles Command Program requests status records for all the parameters displayed in this dialog box. Settings are displayed as soon as they are received. If records are not received within two seconds a communication error is assumed. Sends boresight command to the station being configured. Reverses the effects of the boresight command. Reverses the effects of the Alignment Reference Frame command. 27 4.4.3 XL Tracker Setup This screen lets you setup the supported auxiliary position tracking system. By default, None is selected and the tracker works like a regular IS-300 orientation tracker. If you choose to use the XL option you must specify the type of tracker connected to the Data In port of the IS-300 base unit. Hemisphere is the feature of the magnetic systems and not applicable to optical trackers. Source Frame Position and Orientation controls are used to specify the orientation and position of the optical system in a user-defined locally leveled coordinate system. When a multi-camera system, like Qualisys, is used, then Source Frame is the world coordinate system of the optical tracker. 28 4.4.4 Setup Position Sensors Terminology IS-600 and IS-900 models contain an ultrasonic subsystem that includes SoniDiscs (Ultrasonic Transponder Beacons) and ReceiverPods (Ultrasonic Receiver Modules). To generalize the interface protocol and configuration tools for these tracker models we defined a new term: PSE - Position Sensing Element. Same terminology is also applied to IS-600 XL. A PSE may be Mobile or Fixed. Mobile PSEs are assigned to the stations and their movements are tracked by the system. Fixed PSEs form a CONSTELLATION and must not be moved. In the case of the IS-600 XL optical sensor is considered to be a mobile PSE. Fixed PSE setup is replaced with the Source Frame configuration and not needed here. Note: All position data for PSEs is entered in meters. Mobile PSE Configuration To track position, a station must have 3 optical sensors associated with it. This window lets you add, delete and configure these Mobile PSEs for all the stations. When setting up a Fusion Mode station you must enter the positions of 3 optical sensors relative to the InertiaCube (Px, Py, and Pz in the screen above). The coordinate system for these values is the body of the InertiaCube where X is forward, Y is to the right and Z is down (see Figure 20). The origin is located in the exact center of the bottom of the base of the InertiaCube. All values are entered in meters. Please see Figure 20. You must also enter the directional vector representing the orientation of the optical sensors in the InertiaCube body coordinate frame. (Nx, Ny, and Nz in the screen above). This orientation should be interpreted as the direction of maximum visibility of the optical sensor. 29 Normal Vector (pointing up: 0,0,-1) InertiaCube Pz Px Optical Sensor X Z Figure 20. Position Sensor Coordinates To change the configuration of a sensor double click on the corresponding line or press Change. Important After entering or changing data you must explicitly activate these changes by selecting Apply Configuration item in the Commands menu or pressing the Apply button. This sends the new PSE configuration to the tracker and checks if it was applied properly by trying to retrieve it back. Position Sensor Data Entry This window lets you change the configuration parameters of a particular Mobile PSE. Station corresponds to the station number that this optical sensor is assigned to. PSE number is the index of the PSE within a station, numbers 1 to 8 are accepted. Hardware ID is the optical sensor identifier, values 1 to 24 are accepted. When finished entering data press Apply. 30 4.5 Display Options Start (and Stop) Displaying Data To display position and orientation data being received from the tracker, use the Start Displaying Data option in the Display menu or press Ctrl-D. ISDEMO first attempts to establish communication and get all configuration information necessary to correctly interpret and display incoming data. If it fails to receive a reply to any of the status record requests it will still go into the display mode, but there may be no data to display or it may not be able to display the data correctly. If such errors are detected, stop the display by selecting Stop Displaying Data option in the Display menu or pressing Ctrl-X and check the connection. Station Number Allows you to choose which station is to be displayed. 31 Display Text When this option is selected all status and some of the data records are displayed in text format in the sensor display area. To prevent graphics updates from taking over most of the processor time, no more than 20 data records per second are displayed. Please note that whenever your tracker is in continuous mode, records are displayed in the text window even when the display is off. Numeric Display Turns on/off the numeric readout for X, Y, Z, Pitch, Yaw, and Roll. This can be useful when running on a very slow computer. Synchronize to monitor This option is only available in DOS version and is designed to reduce the flickering of the image during data display. It attempts to do all drawing between monitor refresh cycles. This, however, limits the frame rate to a maximum of 60 fps, and with numeric and analog display will likely reduce it to 30 or below, depending on the speed of your computer. 32 4.6 Tools Options Display Position Allows you to view the position and yaw of the currently displayed station. 33 File options Start Displaying Data Stop Displaying Data Exit Crtl+D Crtl+X Crtl+Q Command options Reset Origin Crtl+R This command does not change the coordinate system of the tracker. It simply saves the current position and subtracts it from all the future data points before drawing them on the screen. Zoom options Zoom in Zoom out PageUp PageDn. Changes the display scale. Please note that ‘zooming in’ may cause the sensor to disappear from the screen. Use Reset Origin menu item to bring it back in the view. Display Tracking Statistics This option is used to display tracking status information for all stations. The top row lists 12 stations, which is the maximum supported by the current interface protocol. The second row displays the tracking status. Stations configured for GEOS Mode always display T (Tracking). Stations running in Fusion Mode display T when tracking position, and L (Lost) when position tracking is not possible. If a station configuration is invalid, X is displayed. Row 3 displays the number of measurements received by each station during the last cycle. In the case of IS-600 XL, a measurement is defined as one sensor data point received from the attached optical tracker. Row 4 displays the number of measurements rejected by the system. This number should normally be zero. 34 Send Command String Send Command String allows you to send single line commands to the tracker. This tool is provided to allow control over the tracker parameters not supported in the menus and dialogs. For instance, you can use this function for test and debug purposes. Type in the command and press Enter or Return. The <CR LF> pair is automatically added to the end of the line before it is written to the serial port. See Section 5 – Interface Communication Protocol for the complete list of all available commands. Send Command File This option allows you to send an entire file to the tracker over the serial port. This tool may be useful if you would like to keep a list of tracker configuration commands in a file. Send Command File opens a file selection dialog in which you can identify the file, directory and drive of a command file to be sent. When creating a command file please enter commands one per line. It is not necessary to add CR and LF to any lines in the file. 35 System Information This window provides a summary of the InterSense tracker system configuration Data Capture/Playback Utility ISDEMO has the ability to write the data it receives from the tracker to a file. To utilize this feature you must first specify the name and location of the output file. To start data collection select Record. Data can be saved As Is, or in an ASCII or binary flat file. When Flat File option is selected, only tracker data is saved, one line per update cycle. If you are planning to import data to Excel or Matlab you must set the output format to ASCII of use the ASCII Flat file option. You can display previously recorded data through ISDEMO by selecting Play. Playback option will only work on files saved with the As Is option. 36 Help Facility 4.7 Help in the ISDEMO is context sensitive. Selecting Help or pressing F1 will bring up the appropriate help subject. Window Management Commands under DOS The DOS version of ISDEMO does not have all the window management functionality of the Windows version. Alt+F10 Causes the active window to be maximized/restored. Alt+F4 Generates the window close request. Alt+F2 Causes a redraw in all open windows. Alt+F1 Circulates windows. Alt+drag Is used to resize the window on which the mouse button is pressed. To move a window, hold down the left mouse button over the window header and drag (same as in Windows). Shortcut Keys F10 Ctrl+Q Ctrl+D Ctrl+X Activate menu (same as ALT key in Windows). Closes current window. Start displaying sensor data. Stop displaying sensor data. While the sensor position and orientation are being displayed, the cursor will blink and may be hard to follow. We recommend you use the keyboard commands instead. 37 5 Interface Communication Protocol For IS-300 firmware version 3.0161 Commands Sent from the Host to the Tracker <> {} [] Carriage return line feed pair- not needed for single character commands. CR – ASCII value 13, LF – ASCII value 10. List of parameters required for command. List of optional parameters for command. Omitting them results in a query. The IS-300 emulates most (but not all) of the commands in the Polhemus Fastrak protocol, thus it is possible to use the IS-300 with most applications without writing new driver code. There are also several additional commands added to access some of the advanced features of the IS-300 which do not have any counterpart in the Fastrak protocol. 5.1 Standard Fastrak Interface Commands 5.1.1 Supported Fastrak Commands Data Record Request P Request a data record from all active stations. Only used in polled mode. Output mode C c Put in continuous output mode. Put in polled output mode. Default Polled mode Alignment Reference Frame A{stationNum},[Ox,Oy,Oz,Xx,Xy,Xz,Yx,Yy,Yz]<> Sets the coordinate frame with respect to which outputs for that station will be reported. The coordinate frame is defined by a set three points. Ox,Oy,Oz defines the origin of the new coordinate system, Xx,Xy,Xz defines a point on the positive x-axis and Yx,Yy,Yz defines a point on the positive y-axis. If optional parameters are omitted, current values are returned. Default X=North, Y=East, Z=Down, position origin is not relevant. 38 Reset Alignment Reference Frame R{stationNum}<> Resets reference frame to the default. Boresight Reference Angles G{stationNum},[yawref, pitchref, rollref]<> Sets the boresight reference angles for the specified station. If set, these values are then used by the next Boresight command instead of current orientation. If optional parameters are omitted, current reference angles are returned. Default 0,0,0 Boresight Compatibility Mode MBF<> Switch system to Fastrak Compatible mode. MBI<> Switch system to Firmware Version 2.x Compatible mode. In firmware versions prior to 3.00 the B{stationNum}<> command was implemented as the Heading Boresight (see below) and full boresight was not available. To maintain compatibility with the user software written at that time, two Boresight Compatibility modes are available. In Fastrak Compatible mode B{stationNum}<> command executes full 3-DOF boresight and MB{stationNum}<> affects heading only. In the Firmware Version 2.x Compatible mode the meanings of these commands are reversed. Default Firmware Version 2.x Compatible 39 Boresight B{stationNum}<> MB{stationNum}<> (Fastrak compatibility mode) (Firmware Version 2.x compatibility mode) Boresight a station. If boresight reference angles have been specified by the G{stationNum}[yawref, pitchref, rollref]<> command prior to issuing of Boresight command then that orientation becomes the new reference point. The angles output by the tracker at that orientation become zero. Otherwise system uses current station orientation and that becomes the new reference line of sight. Please make sure that the object being tracked (like an HMD) is leveled and is pointing down the x-axis when boresighting a station. Unboresight b{stationNum} <> Mb{stationNum}<> mode) (Fastrak compatibility mode) (Firmware Version 2.x compatibility Unboresight a station. Reference angles are cleared for the specified station. Heading Boresight B{stationNum}<> MB{stationNum}<> (Firmware Version 2.x compatibility mode) (Fastrak compatibility mode) This command is used to define a user coordinate frame for orientation. It only applies to GEOS mode stations. In GEOS mode, the default orientation reference frame is a locally-level geographic frame with its x-axis pointing towards local magnetic north if the compass is on, or towards the direction the InertiaCube was facing at power-up, if the compass is off. This command takes the current heading and makes it the new direction of the x-axis. The yaw value at that point becomes zero. This command is similar to Alignment Reference Frame command, except it only affects orientation and not position output. This command is ignored if station is configured for Fusion Mode. Heading Unboresight b{stationNum}<> Mb{stationNum}<> (Firmware Version 2.x compatibility mode) (Fastrak compatibility mode) Clears the orientation coordinate frame changes produced by the Heading Boresight command. 40 Set Communication Parameters o{rate,parity,bits,HHS}<> Change the communication parameters rate is one of 3,12,24,48,96,192,384,576,1152 (rate is multiplied by 100) parity N = none O = odd E = even bits 7 or 8 HHS (Hardware handshake) 0 = OFF 1 = ON Default Baud rate depends on hardware 'mode' switch; Parity N bits 8 HHS OFF System Record Request S Request a system status record to be sent. Station Status l{stationNum},[state]<> set the stationNum on or off. state 0 = OFF 1 = ON Default Only station 1 is on Output Units Control U u Sets output data record position units to inches. Sets the position units to centimeters. This command is not relevant to the IS-300. Default U System control ^K W ^Y ^S ^Q Save the current settings to nonvolatile memory. Restore the system settings to the factory defaults. Restart the firmware to the power up condition. Suspend data transmission. Resume data transmission. Caution: Sending W command will cause all the user configuration information to be lost. Output record mode F Put in ASCII output mode f Put in Binary output mode. Default F 41 Output record list settings O{stationNum},[p1],[p2],[p3],.....,[pn]<> Sets the output data list for stationNum. If optional parameters are omitted, a data record containing current output list settings for the station is returned. Item Description Output Format 0 1 2 4 5 6 7 11 16 18 19 20 21 ASCII space character - 1 ASCII byte ASCII CR, LF pair - 2 ASCII bytes x, y, z position coordinates - 3 floats yaw, pitch and roll Euler angles - 3 floats X-axis direction cosines - 3 floats Y-axis direction cosines - 3 floats Z-axis direction cosines - 3 floats orientation quaternion - 4 floats stylus switch status (always 0) - 1 byte (ASCII or binary) x, y, z in 16 bit binary format - see next page yaw, pitch and roll in 16 bit binary format - see next page quaternion in 16 bit binary format - see next page time stamp, in selected time units - see section 5.3.2 Default 2,4,1 Data Item 4 – Euler Angles. The Euler angles are defined as rotations about Z, then Y, then X in body frame. Angles are returned in degrees. X Roll Y Pitch Yaw Z 42 Data Items 5, 6, 7 – Direction Cosines. X-axis, Y-axis and Z-axis direction cosines can be used construct a 3x3 rotation matrix. x1 x2 x3 y1 y2 y3 z1 z2 z3 X direction cosines. Y direction cosines. Z direction cosines. This matrix can also be constructed from Euler angles: cos(P)*cos(Y) cos(P)*sin(Y) -sin(P) sin(R)*sin(P)*cos(Y) - cos(R)*sin(Y) sin(R)*sin(P)*sin(Y) + cos(R)*cos(Y) cos(P)*sin(R) cos(R)*sin(P)*cos(Y) + sin(R)*sin(Y) cos(R)*sin(P)*sin(Y) - sin(R)*cos(Y) cos(P)*cos(R) Data Item 11 – Orientation Quaternion. Quaternion is returned as q = [w, x, y, z]. Quaternion to rotation matrix conversion can be accomplished using the following formula: 1–2y2 – 2z2 2xy + 2wz 2xz – 2wy 2xy – 2wz 1 – 2x2 – 2z2 2yz + 2wx 2xz + 2wy 2yz – 2wx 1 – 2x2 – 2y2 Data Items 18, 19, 20 – 16 bit binary format. 16 bit binary format can be used in applications requiring fastest possible serial I/O. Each floating point number is stored in 2 bytes with only 14 bits containing actual data. This results in lower accuracy than the standard IEEE floating point format. Data is 2’s-complement. The first byte of the data set has its highorder bit set to 1, all others have them set to zero. This can be used for data synchronization. Data is returned low-order byte, then high-order byte. Use following code sample as an example on how to decode this format: To decode Euler angles: lo = (dataRecord[3] & 0x007F); hi = (dataRecord[4] & 0x007F); int14bit = (lo « 2) | (hi « 9); result = (float) int14bit * 180.0 / 32768.0; 43 Resulting number represents orientation and has a full range of ± 180.0 (−180.0 to +179.978) degrees. To decode Orientation Quaternion: lo = (dataRecord[3] & 0x007F); hi = (dataRecord[4] & 0x007F); int14bit = (lo « 2) | (hi « 9); result = (float) int14bit * 1.0 / 32768.0; Resulting quaternion value has range of ± 1.0. 44 5.2 InterSense Specific Commands All InterSense specific commands start with the letter M (for “Manufacturer-specific”) and must be completed by a CR,LF pair. 5.2.1 System Configuration Commands Time Units The time stamp recorded is the time when the tracker data was collected from the hardware. The time index is set to zero when tracker is first turned on. MT<> Sets the units for the data record time stamp to milliseconds. Mt<> Sets the units for the data record time stamp to microseconds. Default T InterSense System Status Record Request MS<> Request the manufacturer-specific system status record. This is information about parameters which are specific to the InterSense product, additional to the standard system status information obtained using the S command. Tracking Status Record Request Set Current Time to Zero MP<> Requests tracking status information for all 12 stations. See Section 6.3.4 for the description. MZ<> This command sets current time index of the tracker to zero. Genlock Synchronization MG[State, Rate]<> State 0 – Genlock is off 1 – External sync, autodetect strobe rate (not implemented in release 3.0161) 2 – External sync, manual (supply strobe rate) 3 – Internal sync, supply output record rate Default 0 Genlock Phase MGP[Param]<> Param can be the Phase (0 to 100%) or ‘+’ to increase to the next phase point, or ‘-‘ to decrease to the next phase point. Please see Appendix A for complete details. Default 0 45 5.2.2 InterSense-specific Station Parameters InterSense Station Status Record Request Ms{stationNum}<> Request an individual sensor status record for stationNum. This is information about parameters which are specific to the InterSense product. Compass Heading Correction MH{stationNum, mode}<> This controls the state of the compass component of the InertiaCube. To operate effectively the magnetic field in your workspace needs to be homogeneous (this can be difficult to arrange in a typical work environment). Mode 0 - Compass is OFF, no heading compensation is applied. Not recommended, Modes 1 or 2 are preferred. Mode 1 - Partial compass mode. Magnetometer readings are used to reduce drift and maintain stability, but not as an absolute measurement system. In this mode system is much less susceptible to magnetic interference, but heading drift will slowly accumulate. This mode is particularly useful when high rotational sensitivity settings are used. Mode 2 - FULL compass mode. Readings produced by the magnetometers inside the InertiaCube are used as the absolute reference orientation for yaw. For backward compatibility old style commands MH{stationNum}<> and Mh{stationNum}<> are maintained, turning compass mode to 2 and 0 respectively. Default 2 Note: These settings are only used if station is configured for GEOS Mode operation. Compass readings are not used for tracking in Fusion Mode. 46 Prediction Interval Mp{stationNum},[interval]<> Sets the time-interval of prediction for stationNum. Interval is an integer number of time in milliseconds. Suggested range is 0-50ms. If optional parameter is omitted, current prediction value is returned. Default 0 Perceptual Enhancement Level MF{stationNum},{Mode}<> In order to provide the best performance for a large range of various applications 3 levels of perceptual enhancement are available. None of the modes introduces any additional latency. Mode 0 provides the best accuracy. The drift correction adjustments are made immediately, no jitter reduction algorithms are used. This results in somewhat jumpy output (not recommended for headtracking) but with lower RMS error. Use this mode for accuracy testing or for any application which requires best accuracy. Mode 1 provides accuracy similar to that of mode 0, with an addition of a jitter reduction algorithm. This algorithm reduces the accuracy by only a small amount and does not add any latency to the measurements. Mode 2 is recommended for use with HMD or other immersive applications. The drift correction adjustments are made smoothly and only while the sensor is moving, so as to be transparent to the user. Default 2 Rotational Sensitivity Level MQ{stationNum},[Sensitivity Level]<> Adjusts rotational sensitivity of a station. These settings are only applicable when the Perceptual Enhancement Level is set to 2. Sensitivity Level is an integer 1 to 4 where 1 is the lowest and 4 is the highest sensitivity. If optional parameter is omitted, current value is returned. Default 3 47 5.2.3 Station Component Configuration Commands Associate InertiaCube with a Station MCI{station number},[InertiaCube number]<> This command assigns an InertiaCube to a station. If the second parameter is omitted current assignment information is returned. The InertiaCube number can be 1 to 4 and is the same as the number of the connector on the tracker. This command does not take effect until explicitly activated by the MCe<> command. Disassociate InertiaCube from a Station MCi[stationNum, InertiaCube number]<> This command removes an InertiaCube from the station configuration. The InertiaCube number can be 1 to 4 and is the same as the number of the connectors on the tracker. If the station number and the InertiaCube number are not associated in the current this configuration command is ignored. If both parameters are omitted all station to InertiaCube associations are cleared. This command does not take effect until explicitly activated by the MCe<> command. Associate Mobile PSE with a station MCM[stationNum],[MPSE number],[xp, yp, zp, xn, yn, zn, IDcode]<> Configures or adds a Mobile PSE. For an IS-600 XL, a Mobile PSE is an optical sensor. If only the stationNum parameter is provided, then the current data for that station is returned on the serial port, one PSE per record. Please note that only the records for configured PSEs are returned. If stationNum and MPSE number are present, then the current data for that PSE is returned. If that PSE is not configured, record will contain Hardware ID of -1. If no parameters are provided then data for all configured PSEs for all stations is returned, each PSE in a separate record. This command does not take effect until explicitly activated by the MCe<> command. 48 stationNum A unique number identifying a station. MPSE number From 1 to 8 only. Unique number identifying one Mobile PSE out of the set attached to the station. It identifies PSE within one station and starts with 1 for each station. xp, yp, zp Position vector in meters. When setting up a Fusion Mode station user must enter position of an optical sensor relative to the InertiaCube. The coordinate system for these values is the frame of the InertiaCube where X is forward, Y is to the right and Z is down. The origin is located in the exact center of the base of the InertiaCube. Coordinates of the optical sensors are measured in meters to, typically, the geometric center of the sensor. xn, yn, zn Normal vector. In a typical installation optical sensor will point up, so the normal vector values will be 0.0, 0.0, -1.0. IDcode Hardware ID of the PSE. It is the number of the optical sensor, typically 1 to 24. <> CR LF pair. 49 Disassociate Mobile PSE from a Station MCm[stationNum, Mobile PSE number, IDcode]<> If the station number, PSE number and IDcode are not associated in the current configuration, this command is ignored. This command does not take effect until explicitly activated by the MCe<> command. Clear Station Command MCc[stationNum]<> Clears all Mobile PSEs associated with a station. If the station number is omitted then all stations are cleared. This command does not take effect until explicitly activated by the MCe<> command. Apply New Configuration MCe<> This command reconfigures the system with the new InertiaCube and PSE information. A Configuration Session is the period during which the station and InertiaCube assignment commands are received and accepted. Configuration session starts when the first MC command arrives. MC commands are saved but not applied to the system configuration until the MCe<> command is received. This command executes all MC commands received since the start of the Configuration Session and computes the new system state. Cancel Configuration Session MCx<> Cancel the configuration session command. All MC commands received during the session are discarded. 50 5.2.4 XL mode configuration commands XL System Configuration MXS[Mode]<> This command is used to specify the type of the auxiliary tracking system attached to the IS-300. Mode 0 – None 1 – Polhemus Fastrak 2 – Ascension Flock of Birds 3 – Sagies SM3D Optical Tracker. Default 0 Hemisphere of Operation MXH[Hemisphere]<> This command sets up the hemisphere of operation of the magnetic tracker. IS-300 converts this data to appropriate command and sends it to the magnetic tracker. In the case of the optical-inertial tracker this command is ignored. Hemisphere 0 – Forward 1 – Aft 2 – Upper 3 – Lower 4 – Left 5 – Right Default 0 Source Frame Position and Orientation MXF[posX, posY, posZ, yaw, pitch, roll]<> Source Frame Position and Orientation command is used to specify the orientation and position of the optical tracker in a user-defined locally leveled coordinate system. Default 0, 0, 0, 0, 0, 0 Optical System Latency Md[latency]<> This command sets the latency of the optical data reported to the IS-300. Value is entered in milliseconds. Default 20 51 5.3 Records Returned from the Tracker to the Host 5.3.1 Format Considerations. Record Headers. The first byte of each record is used to identify its type. 0 – Data record. 2 – Fastrak status record. 3 – InterSense manufacturer-specific status record. Floating Point Numbers. Floating point numbers can be returned as IEEE 32 bit floats or as ASCII numbers in X.xf notation, where: X x f is the total number of characters used to represent the float. is the number of digits after the floating point. symbol indicating that number is a float. For example, number -42.6 in 10.4f format would look as follows: “ -42.6000” Status Record Hexadecimal Character Decoding. System Status, Manufacturer Status, and Manufacturer Station records use Hexadecimal Characters to encode status data. Each character can be 0 to F and can encode 4 bits. Logical AND operator can be used to test specific bits. Please see following code example: unsigned short byte1, byte2, byte3; char hexChar[2]; hexChar[1] = 0x00; hexChar[0] = statusRecordBuffer[3]; sscanf(hexChar,"%x", &byte1); hexChar[0] = statusRecordBuffer[4]; sscanf(hexChar,"%x", &byte2); hexChar[0] = statusRecordBuffer[5]; sscanf(hexChar,"%x", &byte3); 52 5.3.2 Fastrak System and Data Records. Data Record This record is sent in response to a P command in polled mode or continuously in continuous mode. A separate data record is sent for each active station. The list of data items in each station record depends on how the list was set up with the O command. For most of the commonly used data list items, the format depends on commands F, f, U, u, MT, Mt. 0{stationNum}{status}{dataItem1,dataItem2,....} stationNum A number from 1 to 4. status An ASCII space character. This status byte is currently unused. dataItemX ASCII In ASCII numbers, set with the F command, any numbers returned as floats are returned as ASCII numbers. Each number is 7 ASCII characters: a sign, 3 digits, a decimal point and 2 more digits. If programming in C use scanf(“%7.2f”, &value) to read them. Binary In binary mode, set with the f command, the floats are sent as 4 byte IEEE 32-bit floats. Time Stamp 32 bit floating point number ASCII In ASCII mode it is allowed 14 characters and is displayed as an integer (digits after the floating point are ignored). Binary In binary mode it is returned as a 32 bit float. Binary16 mode Set by selecting 18, 19 and/or 20 only with the O command. This is the fastest way to get data but the most difficult to decode and the least accurate. Example: For the default data record O1,2,4,1<> in ASCII mode F. The output record set for the active stations 1 and 2 would look as follows: '01 1.23 41.83 12.18 13.04 76.11 34.12CRLF' '02 23.01 -452.94 0.01 -1.01 23.32 12.34CRLF' For station 1: x=1.23, y=41.83, z=12.18, yaw=13.04, pitch=76.11 and roll=34.12 For station 2: x=23.01, y=−452.94, z=0.01, yaw=−1.01, pitch=23.32 and roll=12.34 53 System Status Record This record is sent in response to the S command. It contains system wide status information. Some of the information in the status record must be bit decoded. 21S{statusRecord}<> Bytes 1 2 3 4 5 6 7-9 10-15 16-21 22-53 54-55 Explanation Record type, '2' Station Number. Always '1' Sub-Record type, 'S' Config Hex Char 0 Config Hex Char 1 Config Hex Char 2 BIT error. Currently unused Blank Firmware version ID System Identification CR, LF To decode each of the Config bytes Config Hex Char 0 Config Hex Char 1 Unused Unused Config Hex Char 2 Bit 0 1 2 3 Meaning Output Format (0= ASCII, 1=Binary) Output Units (0=Inches, 1= Centimeters) Unused Transmit Mode (0 = Polled, 1 = Continuous) Output List Record This record is sent in response to a O{stationNum}<> command. It returns the list of currently selected output parameters for that station, 2 bytes per item. 2{stationNum}O{par1par2...parN}<> Bytes 1 2 3 4-5 6-7 … Explanation Record type , '2' Station Number Sub-Record type, 'O' par1 par2 CR, LF For example, the default data list would be returned as: '21O 2 4 1<>' 54 Station State Record This record is sent in response to a l{stationNum}<> command. StationNum is ignored and the record returns the state of the first four stations. This maintains the compatibility with the Fastrak protocol. Output values of are interpreted as 1 for ON and 0 as OFF. 2{stationNum}l{stat1stat2stat3stat4}<> Bytes 1 2 3 4 5 6 7 8,9 Explanation Record type , '2' Station Number. 1, 2, 3, 4 Sub-Record type, 'l' State of station 1 State of station 2 State of station 3 State of station 4 CR, LF Alignment Reference Frame Record This record is sent in response to an A{stationNum}<> command. It returns 9 ASCII floats that were last set with the A command. Each float is represented as 7 characters with 2 digits after the floating point. 2{stationNum}A{OxOyOzXxXyXzYxYyYz}<> Bytes 1 2 3 4-24 25-45 46-66 67-68 Explanation Record type , '2' Station Number Sub-Record type, 'A' OxOyOz - origin coordinates XxXyXz - vector in the direction of the positive x axis YxYyYz - vector in the direction of the positive y axis CR, LF 55 Boresight Reference Angles Record This record is sent in response to a G{stationNum}<> command. It returns 3 ASCII floats that were last set with the G command. Each float is represented as 7 characters with 2 digits after the floating point. 2{stationNum}G{yawref pitchref rollref}<> Bytes 1 2 3 4-10 11-17 18-24 25-26 Explanation Record type , '2' Station Number Sub-Record type, 'G' yawref - azimuth reference angle pitchref - elevation reference angle rollref - roll reference angle CR, LF 56 5.3.3 InterSense-specific Records. Manufacturer System Status Record This record is sent in response to an MS<> command. It returns a status record specific to the InterSense system. 31S{statusRecord}<> Bytes 1 2 3 4 5 6 7,8 Explanation Record type , '3' Station number. Always '1' Sub-Record type, 'S' Config Hex Char 0 Config Hex Char 1 Config Hex Char 2 CR, LF To decode each of the Config Hex Characters Config Hex Char 0 Reserved Config Hex Char 1 Bit 0 1 2 3 Meaning Reserved Reserved Unused Unused Config Hex Char 2 Bit 0 1 2 3 Meaning Reserved Boresight Compatibility Mode (0= Firmware Version 2.x, 1=FASTRAK) Time units (0 = milliseconds, 1 = microseconds) Unused 57 Manufacturer Station Record This record is sent in response to the Ms{stationNum}<> command. It returns a station status record specific to the InterSense system. 3{stationNum}s{statusRecord}<> Bytes 1 2 3 4 5 6 7,8 Explanation Record type , '3' Station number Sub-Record type, 's' Config Byte 0 Config Byte 1 Config Byte 2 CR, LF To decode each of the Config bytes Config Byte 0 Unused Config Byte 1 Corresponds to the Perceptual Enhancement Level. Can be 0, 1, or 2. The remaining 2 bits are reserved for future expansion of this option. Config Byte 2 Bit 0 1 2 3 Meaning Reserved Heading Compensation Mode bit 1 Heading Compensation Mode bit 2 Reserved Heading compensation bits are translated as: 00 – Compass mode 0 (compass is off) 01 – Compass mode 1 (Partial compass mode) 10 – Compass mode 2 (Full compass mode) InertiaCube Record This record is sent in response to the MCI{station number}<> command. It returns the number of the InertiaCube currently associated with this station. 3{station number}I{InertiaCube number}<> Bytes 1 2 3 4-5 6,7 Explanation Record type , '3' Station Number Sub-Record type, 'I' InertiaCube number. 1-4 or -1 if none are associated. CR, LF 58 Prediction Interval Record This record is sent in response to Mp{stationNum}<> command. It returns an ASCII integer for the number of milliseconds of prediction. 3{stationNum}p{interval}<> Bytes 1 2 3 4 5,6 Sensitivity Level Record Explanation Record type , '3' Station Number Sub-Record type, 'p' Prediction interval CR, LF This record is sent in response to MQ{station number}<> command. It returns the current sensitivity settings of a station. This setting is only relevant when Perceptual Enhancement level is 2. 3{Station Number}Q{Sensitivity Level}<> Bytes 1 2 3 4 5,6 Mobile PSE Record Explanation Record type , '3' Station Number Sub-Record type, 'Q' Sensitivity level 1 to 4 CR, LF Sent in response to MCM[station number],[PSE number]<> command. It returns the current settings of a station or a single PSE within station. 3{Station Number}M{Mobile PSE number}{Mobile PSE record}<> Bytes 1 2 3 4-10 11-40 41-61 62-68 69,70 Explanation Record type, '3' Station Number. A hexadecimal number up to C. Sub-Record type, 'M' Mobile PSE number. x, y, z components of position vector in 10.4f ASCII format Values are in meters. x, y, z components of normal vector in 7.2f ASCII format Hardware ID code in ASCII format. CR, LF 59 Tracking Status Record Sent in response to MP<> command. It returns the tracking status information for 12 stations allowed by the interface protocol. A measurement is defined as one sensor data point received from the optical tracker. 510{Tracking state record}<> Bytes 1 2 3 4 5 6 . . 3+3*N . . 39-43 44,45 Explanation Record type, '5' Station Number. Always 1. Unused. Always 0. Tracking state identifier for station 1. State can be L if lost, T for tracking, or X for invalid. Please see Section 4.6 of this manual for complete description. Number of measurements received this cycle. Number of measurements rejected. … … Tracking state identifier for station N. … … Update rate per station. CR, LF 60 5.3.4 XL System Configuration Records XL System Configuration record Sent in response to MXS<> command. It returns the identifier of the currently configured auxiliary tracking system 31XS{Mode}<> Bytes 1 2 3,4 5 6,7 Hemisphere record Source Frame record Explanation Record type, '3' Station Number. Always 1. Sub-Record type, 'XS' Auxiliary system identifier. 0 – None 1 – Polhemus Fastrak 2 – Ascension Flock of Birds 3 – Sagies SM3D Optical Tracker. CR, LF Sent in response to MXH <> command. It returns the current settings of the hemisphere parameter. Bytes 1 2 3,4 5 Explanation Record type, '3' Station Number. Always 1. Sub-Record type, 'XH' Hemisphere 0 – Forward 1 – Aft 2 – Upper 3 – Lower 4 – Left 6,7 CR, LF Sent in response to MXF <> command. It returns the current settings of the source frame parameters. Bytes 1 2 3,4 5-34 35-55 56,57 Explanation Record type, '3' Station Number. Always 1. Sub-Record type, 'XF' posX, posY, posZ in 10.3f format yaw, pitch, roll in 7.3f format CR, LF 61 A Appendix A – Genlock Synchronization Last updated: 01/28/99 Applicable products: IS-300 PRO with Genlock adapter accessory IS-600 Mark 1 with Genlock adapter accessory IS-600 Mark 2 IS-900 CT Purpose Genlock synchronization is used to guarantee constant latency between the sampling of the motion tracking sensor and the scan out of the updated image on the display device. Any jitter in the amount of latency will appear as jitter in orientation when the head is rotating. For typical head rotation rates of 300 degrees/sec, a timing jitter of 6.7 milliseconds will result in orientation jitter of 2 degrees, which is highly disturbing. On an IS-600 or 900 series product running Fusion mode with no synchronization, the tracker will update at about 150 Hz, corresponding to a 6.7 ms period. Since the 150 Hz update rate of the tracker is asynchronous with the update rate of the computer graphics rendering and display cycle, the latency will vary by up to 6.7 ms from cycle to cycle, and thus Genlock synchronization is essential if smooth response is desired during periods of moderately fast head rotation. GEOS™ mode runs several times faster (on IS-300 PRO, 600 or 900 series products), and therefore the need for Genlock is less dramatic. Nonetheless, for very high-performance systems it is still beneficial to use it in GEOS mode, and therefore a Genlock adapter accessory is being developed for the IS-300 PRO, which allows users to obtain synchronization signals from NTSC, VGA, or TTL sources and feed them in through the unused 4th InertiaCube input port on the IS-300 PRO or the IS-600 Mark 1. When using an IS-600 or IS-900 with StereoGraphics CrystalEyes, Genlock synchronization is also used to prevent the infrared signals emitted by the ReceiverPods from interfering with the infrared receiver in the CrystalEyes eyewear. Timing Diagram: IS-300 PRO interfaced to PC with 60 Hz display refresh time(ms) 0 16.7 scan out rendering tracking 33.3 50.0 latency 1 2 3 4 5 6 7 8 sample first second InertiaCube processing processing stage stage 62 This diagram illustrates the timing relationship of the tracking loop to the rendering loop with Genlock in effect. The vertical lines at multiples of 16.7 milliseconds represent the vertical sync pulses stripped from the 60 Hz VGA monitor cable. The tracker automatically determines the frequency of the Genlock synchronization signal and then decides upon a tracking loop update rate which is the highest multiple of this frequency that it can consistently maintain. In the example in the diagram, the tracker has decided to do 4 internal updates per display refresh cycle. However, ONLY ONCE per display refresh cycle is data output across the serial port to the host. This point, by default, is at the end of the last update cycle in the field, labeled 8 in the diagram above. Using this point (or point 7) provides the lowest possible end-to-end latency, only 1¼ video fields in this example. However, if the time to transmit the data across the serial port and accomplish all necessary processing and rendering cannot be guaranteed to be strictly limited to 16.7ms on every single cycle, there will be cycles when the rendering does not complete in time for the next scan out, resulting in a disturbing glitch in the image. By choosing to have the serial port data output occur at one of the earlier numbered phase points, there is a bit more latency, but also more slack to allow for an occasional rendering cycle that just slightly exceeds the allotted 16 ms. The following diagram illustrates the tracker set up to output data at phase point #3. The rendering time of the second cycle has been extended slightly as illustrated by the black bar, and the timing slack has absorbed this anomaly so that the image is still rendered with the same 1¾ frame latency as the frames before it, resulting in no visual glitch. Of course, if there are several frames in a row that run longer than 16.7 ms, the system will eventually drop a frame, resulting in a jarring transition to 2 ¾ frame latency. To prevent this, the application developer must insure that the average frame rate before attempting synchronization is ALWAYS above 60 Hz, so that once the synchronization is turned on, the frame rate will be fixed at 60 Hz with no annoying shifts. As a precaution in case there ever is a time when the frame rate of the rendering engine drops below 60 Hz, the SW driver which is reading data from the tracker should always check to make sure that it is reading the latest available data record. After reading a complete record, check to see if there are any further bytes in the receive buffer, and if so wait for there to be a complete record and read it in replacing the just read record. If this is not done, multiple data records could become queued up in the receive buffer, resulting in lots of extra latency. time(ms) 0 16.7 50.0 latency scan out rendering tracking 33.3 1 2 3 4 sample InertiaCube 5 6 7 8 first second processing processing stage stage A second reason why you may want to adjust the output record transmission to an earlier phase point is to allow for serial port transmission time. In the diagrams above, the slant of the arrow pointing up from the tracking loop to the rendering loop represents the delay of transmitting the results from the tracker to the host. If you use binary data mode, and set up the IS-300PRO to only transmit 3 Euler angles using the command O1, 4<>, then the total number of bytes per record will be 15 which corresponds to 150 bits. At a baud rate of 115,200 bits/sec, this record will take about 1.3 milliseconds to transmit. Thus the tightest timing loop illustrated in the first diagram above can be achieved, but it should probably not be attempted with any longer output data record format or slower baud rate. 63 Configuring Tracker for Genlock The default operation of the tracker is free run. That is, the tracker performs updates and, in continuous mode, outputs data records as rapidly as it can. Genlock operation causes the tracker to synchronize updates and data record output to an external sync signal or to an internal clock. When external Genlock is enabled and a valid sync signal is provided, it may take several seconds to stabilize tracking. If a valid signal not present, the tracker will wait an extra period of time for the signal, dropping the update rate to half the sync rate. Details are discussed below. Connecting Sync Signal First, set up the tracker as described in the User Manual. For an IS-300 PRO or IS-600 Mark 1, use the external sync accessory available from InterSense. Follow instructions supplied with the accessory then plug the accessory into IMU port 4 on the front of the tracker base unit. For an IS-600 Mark 2 or IS-900 CT, connect the sync signal to the BNC connector labeled Sync In on the back of the tracker base unit. Select the appropriate signal type by setting the switch near the BNC connector to TTL or NTSC. Enabling Genlock via Command Send the C command to the tracker to place it in continuous mode. If the tracker is used in polled mode, its internal updates will be synchronized to the sync signal but data record output will not. Send the InterSense-specific Genlock command to the tracker. MG[state,[rate]]<> state 0 Genlock off (free run) 1 Use external sync, autodetect strobe rate (30 Hz minimum) 2 Use external sync, strobe rate specified by rate parameter (manual) 3 Use internal sync, output data records at frequency specified by rate parameter rate For state 2, the sync strobe rate in hertz. For state 3, the data record output rate in hertz. 30 Hz minimum in either case Note: Use of state 1 is recommended instead of state 2 to avoid inadvertently specifying a rate that does not match the actual input strobe rate and may prevent synchronization. Current settings of state and rate are reported if the command is issued without parameters (or invalid ones). The Fastrak command y{state}<> is interchangeable with the MG command with state equal to 0 or 1. ISDEMO can be used to send the Genlock command using the Send Command String option. Genlock settings can be saved to the tracker using ISDEMO, using the ^K command or using the LCD (if equipped). 64 Enabling Genlock via LCD Menu (available on IS-600 Mark 2 and IS-900 CT) Select Communication→Data Output→Sample Mode→Continuous to place the tracker in continuous mode. If the tracker is used in polled mode, its internal updates will be synchronized to the sync signal but data record output will not. Select System Config→Genlock→State and then one of the following choices. Off Auto Manual Internal Genlock off Use external sync, autodetect strobe rate (minimum 30 Hz) Use external sync (select strobe rate in 5 Hz increments using arrow buttons, then press the enter button) Use internal sync (select data record output rate in 5 Hz increments using arrows buttons, then press the enter button) Verifying Synchronization To verify Genlock is working with an IS-600 Mark 2 or IS-900 CT, check the Genlock indicator in the lower-right corner of the LCD on the front panel of the base unit. When Genlock is on and stable, the indicator displays “G”, otherwise the indicator is blank. To verify Genlock is working with an IS-300 PRO or IS-600 Mark 1, display tracking statistics in ISDEMO (Tools menu of ISDEMO 4.03 or later) and check the update rate. If the tracker is synchronized, the update rate will equal or be a multiple of rate. If state is 2 and the sync signal is not detected by the tracker due to an invalid signal or incorrect configuration, the update rate will be half rate (if state is 1, update rate will equal 15 Hz). If state is 3 and the specified rate is too high, the update rate will equal 15 Hz. Using CrystalEyes To configure an IS-600 Mark 2 or IS-900 CT for use with CrystalEyes, set the sync signal type switch to TTL and send the command MG2,120 or MG2,60 to the tracker. Adjusting Phase Point A data record is output once per sync period when the tracker is in continuous mode. The phase point is the time within the sync period at which a data record is transmitted and is adjustable for internal and external Genlock. The phase point is specified as a percentage of the sync period. 0% (the default) instructs the tracker to output a data record as soon as possible after the sync period begins. 100% delays the output of a record as much as possible before the next sync period begins. To adjust phase point via command: MGP[+/-]<> MGP[p]<> Increase/decrease to next/preceding phase point Set phase point to percentage specified by p (0 to 100) The current phase point is reported if the command is issued without parameters (or invalid ones). The tracker will accept the first form of the command only after Genlock is established. With the second form of the command, the tracker will match the specified phase point as best it can, but typically with far less resolution than 1/100 th of the sync period. To set the phase point via the LCD menu, select System Config→Genlock→Phase→Set and change the value with the arrow buttons, then press the enter button. To increase or decrease to the next or previous phase point, select System Config→Genlock→Phase→Increase or →Decrease. Adjust the phase to the latest point in the cycle (for minimum latency) such that the system still behaves smoothly during head rotation (no render cycles last beyond the deadline for the next scan out). 65 B Appendix B - Frequently Asked Questions Q1. What is the maximum length of the cable between the InertiaCube and the Base Unit? The cable between the InertiaCube and the Base Unit has been tested to a length of 30 feet. Longer than 30 feet will result in loss of signal strength. Q2. Does the InertiaCube have batteries? How often do they have to be changed? The InertiaCubes do not contain batteries. Q3. Are all the interconnection cables shielded? YES Q4. What is the MTBF of each component separately? Based on supplier data, the MTBF for the system is estimated at 5 years. Q5. What type of shock can the InertiaCube sustain? These InertiaCube is designed to withstand a maximum acceleration of 500 g. Basically this means that a direct impact on the devices is not recommended. The InertiaCubes can withstand a higher level of shock if installed on the inside of an object, or mounted on rubber. Q6. What are the PIN assignments on the DB9 on the IS-300? Pin 1 2 3 4 5 6 7 8 9 Function DCD RX TX DTR GND DSR RTS CTS RI 66 To connect up to a Mini-DIN 8 (Mac’s & SGI’s) or a DB-25 serial port, use this table: InterSense signal RX TX GND InterSense (DB9) 2 3 5 DIN 8 3 (TX) 5 (RX) 4 (GND) DB-25 3 (TX) 2 (RX) 7 (GND) Note that you must connect up RXàTX and TXàRX. So the bottom line is that you only need three wires; RX, TX, and GND. Q7. Do you have any advice about working with software packages? Some software packages (such as Sense8) will not work if more than one sensor is turned on. We recommend that you turn off all sensors except one and save the settings. Q8. How do I know whether I have the latest release of ISDEMO? Check our web site, the URL is http://www.isense.com/support.html Click on the ISDEMO.ZIP hypertext link. We always post the latest release for you to download. 67 C Appendix C – Troubleshooting Problem Reason/Solution ISDEMO doesn’t work! Most common reasons (not in any order): 1) Not using a NULL modem cable. 2) Connected to wrong Com port plug on the back of the computer. 3) The selected serial port is captured by another program and can’t be opened by ISDEMO. 4) Serial port not capable of running at desired baud rate. This is usually due to older computers that cannot run at 115200 baud. The problem is a lack of a proper UART such as the 16550. 5) Incorrect port settings - use autodetect for Com parameters. 6) Not using Start Displaying Data. It may be necessary to select Stop Displaying Data first. 7) At least one of the following must be turned on under the Display Menu: Numeric Display, Display Sensor. ISDEMO is communicating, but system does not track Check for the following: 1) The InertiaCube is not plugged in. 2) The InertiaCube was plugged in after power up. 3) Selecting the wrong Sensor #. InertiaCube interference Check for the following: 1) Placement directly on top of metal. You should place the InertiaCube an inch or two away. Orientation is drifting uncontrollably 1) Make sure that InertiaCube is properly plugged in. 2) Keep InertiaCube still while the tracker is booting up or after reconfiguring it. 68 D Appendix D – Health and Safety warnings and guidelines Important: Most of the side effects described in this section usually only occur when a tracking device, like an IS-300, is used with personal displays or 3D glasses. The symptoms listed below are usually referred to as “Simulator Sickness”. Read and follow the user instructions. Before using IS-300, read and follow the user instructions. In exceptional circumstances, failure to read and follow the user instructions could result in possible side effects that may lead to accidental injury during or after use. Recommended. For use only by persons 15 years of age or older. This system should not be used by: • Persons under the influence of drugs and alcohol. • Pregnant women. • Persons suffering from a heart condition • Persons with a history of epilepsy. Take frequent breaks. It is recommended that IS-300 should be used for no more than one hour at a time. After that you should take a 15-minute rest break before re-use regardless of how you feel. If you feel uncomfortable at any time, stop using immediately. Rest after using. Rest for at least 15 minutes after using IS-300 even if you feel fine and have experienced none of the symptoms described below. If you have experienced any undesirable effects or symptoms, rest until they are completely gone. Do not walk, drive, ride a bike or operate equipment until you have rested, otherwise you risk injury to yourself and others. Epilepsy and seizures. A very small part of the population has a condition that may result in epileptic seizures or loss of consciousness. If you or anyone in your family has epilepsy or has experienced seizures or loss of consciousness, do not use IS300 without first consulting your physician. Persons who have not experienced seizures or loss of consciousness may still have an epileptic condition. We recommend that a non-user is always present when IS-300 is being used. 69 Additional possible risks of harm. While tracking technology has been used for many years, the range of sensors that are used to calculate positional and angular data continues to develop. Over the last twenty years as considerable amount of research has been conducted into possible side effects induced in users of real time computing systems that include various types of tracking sensors. This research has reported the symptoms described below from some users of these systems. IS-300 has been designed using the latest sensor technologies and we believe that the possibility of such symptoms occurring has been minimized. However, it is not possible to design for the individual characteristics of each user and it is possible that users will experience one or more of the side effects described below. Historic research shows that the effects or symptoms ordinarily occur during and immediately after use and should diminish quickly once the user stops using the system. We want you to make an informed and responsible choice about using the IS-300. Accordingly, we warn you that even if you read and follow the User Instructions, you may experience one or more of the following effects or symptoms if you use IS-300 with a personal display: eye strain, altered vision, eye or muscle twitching, headaches, neck and shoulder strain, nausea and vomiting, disorientation, dizziness, impaired balance and stability, drowsiness, fainting, fatigue, sweating, extreme paleness, impaired hand-eye or other co-ordination. Each effect or symptom, if it occurs, should be temporary and may last from a few minutes to 30 minutes. 70 Appendix E − Care and Maintenance E Care and Cleaning The first step to keeping your IS-300 clean is to keep dirt and dust from accumulating. Try to keep the area around the system clear and clean. Open ports in the rear of the base unit can quickly accumulate dust and dirt that can affect their functioning. Recommended cleaning materials are the same as those for computers. Antistatic cloths which not only clean the components, but also reduce static electricity. Cleaning solutions should be applied to the cloth and not directly on ant part of the system components. Phone & email support Any questions regarding the care and maintenance of your IS-300/IS-600 XL can be handled by phone (781) 270-0090 or by email [email protected]. Please see the Support page at www.isense.com for the technical support contact information. Returns to InterSense Should you need to return any component of your system to InterSense for replacement or repair, contact InterSense prior to shipment and when shipping use the following address: InterSense Inc. 73 Second Avenue Burlington, MA 02129 USA Batteries There are no batteries in the IS-300 system. Electrical power 12 VDC, 8.6W 71 F Appendix F. Interface Protocol Commands – Quick Reference Command Syntax Page Data Record Request P 39 Output mode C, c 39 Alignment Reference Frame A{stationNum},[Ox,Oy,Oz,Xx,Xy,Xz,Yx,Yy,Yz]<> 39 Reset Alignment Reference Frame R{stationNum}<> 40 Boresight Reference Angles G{stationNum},[yawref, pitchref, rollref]<> 40 Boresight Compatibility Mode MBF<> MBI<> 40 Boresight B{stationNum}<> (Fastrak compatibility mode) MB{stationNum}<> (Version 2.x compatibility mode) 41 Unboresight b{stationNum}<> (Fastrak compatibility mode) Mb{stationNum}<> (Version 2.x compatibility mode) 41 Heading Boresight B{stationNum}<> (Version 2.x compatibility mode) MB{stationNum}<> (Fastrak compatibility mode) 41 Heading Unboresight b{stationNum}<> (Version 2.x compatibility mode) Mb{stationNum}<> (Fastrak compatibility mode) 41 . Set Communication Parameters o{rate,parity,bits,HHS}<> 42 System Record Request S 42 Station Status l{stationNum},[state]<> 42 Output Units Control U u Set units to inches. Set units to centimeters. 42 System control ^K W ^Y ^S ^Q Save the current settings to nonvolatile memory. Restore to the factory defaults. Restart the firmware to the power up condition. Suspend data transmission. Resume data transmission. 42 Output record mode F f Put in ASCII output mode. Put in Binary output mode. 42 Output record list settings O{stationNum},[p1],[p2],[p3],.....,[pn]<> Switch to Fastrak Compatible mode. Switch to Version 2.x Compatible mode. 43 72 Time Units MT<> Mt<> Sets to milliseconds. Sets to microseconds. 46 Set Current Time to Zero MZ<> 46 InterSense System Status Record Request MS<> 46 Tracking Status Record Request MP<> 46 Genlock Synchronization MG[State, Rate]<> 46 Genlock Phase MGP[Param]<> 46 InterSense Station Status Record Request Ms{stationNum}<> 47 Compass Heading Correction MH{stationNum},{State}<> 47 Prediction Interval Mp{stationNum},[Interval]<> 48 Perceptual Enhancement Level MF{stationNum},{Mode}<> 48 Rotational Sensitivity Level MQ{stationNum},[Sensitivity Level]<> 48 Associate InertiaCube with a Station MCI{stationNum},[InertiaCube number]<> 49 Disassociate InertiaCube from a Station MCi[stationNum, InertiaCube number]<> 49 Associate Mobile PSE with a Station MCM[stationNum],[MPSE number], [xp, yp, zp, xn, yn, zn, IDcode]<> 49 Disassociate Mobile PSE from a Station MCm[stationNum, MPSE number, IDcode]<> 51 Clear Station Command MCc[stationNum]<> 51 Apply New Configuration MCe<> 51 Cancel Configuration Session MCx<> 51 XL System Configuration MXS[Mode]<> 52 Hemisphere of Operation MXH[Hemisphere]<> 52 Source Frame Position and Orientation MXF[posX, posY, posZ, yaw, pitch, roll]<> 52 Optical System Latency Md[latency]<> 52 73 G Appendix G – Index of Terms 1 C 16 bit binary format.....................See Binary 16 format Centimeters ............................................................ 54 Communications auto-detecting..................................................... 23 command..................................................... 41, 72 ISDEMO ........................................................... 23 Compass............................................................ 8, 58 command..................................................... 46, 73 ISDEMO ........................................................... 26 Compatibility.......................................................... 12 Constellation .......................................................... 29 Continuous Mode command........................................................... 38 data records ....................................................... 53 system status record........................................... 54 Coriolis....................................................................6 CR (carriage return)................................................ 38 CrystalEyes............................................................ 62 A Alignment Reference Frame commands....................................................38, 72 record ............................................................... 55 Apply Configuration command .....................................................50, 73 ISDEMO........................................................... 30 Ascension.........................................................51, 61 ASCII format command .....................................................41, 72 data record ........................................................ 53 ISDEMO........................................................... 25 Autodetect communications.................................... 23 B Base Unit............................................................... 13 mode switch ...................................................... 16 Baud Rate command .....................................................41, 72 ISDEMO........................................................... 23 mode switch ...................................................... 16 Binary 16 format .................................................... 43 Binary format command .....................................................41, 72 data record ........................................................ 53 ISDEMO........................................................... 25 Boresight commands....................................................39, 72 compatibility with Fastrak ..........................39, 72 ISDEMO........................................................... 22 record ............................................................... 56 D Data capture............................................................... 36 format command....................................................... 72 ISDEMO ....................................................... 25 output record ..................................................... 53 Direction Cosines ................................................... 43 Display Position ..................................................... 33 Display Text........................................................... 32 DOS ISDEMO ........................................................... 32 ISDEMO window management ........................... 18 sample code....................................................... 14 74 F M Fastrak ...........................................................11, 38 File menu............................................................... 21 Firmware version.................................................... 54 Fixed PSE ............................................................. 29 Fusion Mode configuring ........................................................ 29 description........................................................... 9 monitoring ISDEMO....................................................... 34 status record.................................................. 60 status record request...................................... 45 Magnetic Sensor Configuration ..................................................... 29 Hardware ID ...................................................... 49 Magnetic Tracker.................................................... 14 Hemisphere.............................................28, 51, 61 Magnetometer........................................ See Compass Mobile PSE............................................................ 29 commands ................................................... 48, 73 record................................................................ 59 Mode Switch.......................................................... 16 N G Genlock............................................................45, 62 Phase ................................................................ 45 GEOS Mode description........................................................... 8 H Hardware ID Mobile PSEs...................................................... 49 Heading Boresight.............................................40, 72 Help ...................................................................... 37 Hemisphere ISDEMO........................................................... 28 NT......................................................................... 14 Numeric Display..................................................... 32 O Optical Tracker ...................................................... 28 latency ............................................................... 51 Source Frame............................. See Source Frame Output Mode commands ......................................................... 38 ISDEMO ........................................................... 24 system status record........................................... 54 Output Record List command..................................................... 42, 72 record................................................................ 54 Output Units........................................................... 54 I IEEE...................................................................... 25 Inches.................................................................... 54 InertiaCube assignment.............................................. 48, 58, 73 care................................................................... 14 ISDEMO........................................................... 26 placement recommendations............................... 15 technology overview ............................................ 6 warm-up............................................................ 17 IS-300 ................................................................... 19 IS-600 ................................................................... 19 IS-600 XL.........................................................20, 28 IS-900 ................................................................... 20 L latency................................................................... 51 LF (line feed) ......................................................... 38 Load and Save Factory Settings.............................. 22 Load Power Up Settings......................................... 22 P Patents.....................................................................2 Perceptual Enhancement algorithm..............................................................9 command..................................................... 47, 73 ISDEMO ........................................................... 26 Polhemus ......................................................... 51, 61 Polled Mode command........................................................... 38 data records ....................................................... 53 system status record........................................... 54 Precautionary Statements ..........................................3 Prediction command..................................................... 47, 73 ISDEMO ........................................................... 27 record................................................................ 59 PSE (Position Sensing Element) .............................. 29 75 Q T Quaternion........................................................42, 43 Time Stamp............................................................ 53 Time Units ..................................................45, 57, 73 Tracker System Parameters..................................... 24 Tracking Statistics ISDEMO ........................................................... 34 record................................................................ 60 Transformation Matrix .................. See Rotation Matrix R ReceiverPod .......................................................... 29 Refresh.................................................................. 27 Rotation Matrix...................................................... 43 Rotational Sensitivity.............................See Sensitivity RS-232 Pin assignment................................................... 66 settings................................................... 23, 41, 72 S Sagies...............................................................51, 61 Save Current Settings ............................................. 21 Send Command File............................................... 35 Send Command String ........................................... 35 Sensitivity command .....................................................47, 73 ISDEMO........................................................... 27 record ............................................................... 59 Shortcut Keys........................................................ 37 Software compatibility...................................................... 12 ISDEMO......................................................14, 18 SoniDisc................................................................ 29 Source Frame command .......................................................... 51 ISDEMO........................................................... 28 record ............................................................... 61 Start Displaying Data.............................................. 31 Station................................................................... 25 state command .................................................41, 72 record ........................................................... 55 StereoGraphics ...................................................... 62 Synchronization .................................45. See Genlock Synchronize to monitor .......................................... 32 System Information................................................ 36 System Initialization window................................... 21 U Unboresight command..................................................... 40, 72 ISDEMO ........................................................... 22 UNIX..................................................................... 14 W Win32/NT sample code .......................................... 14 X XL Mode command........................................................... 51 ISDEMO ........................................................... 28 latency ............................................................... 51 record................................................................ 61 Y Yaw Boresight.................... 72. See Heading Boresight Z Zoom..................................................................... 34 76