1
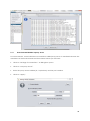
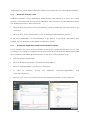
Dudal v2 Distance Learning System User’s Manual Dr. Georges Bediang Dr. Andry Ratovohery Dr. Cheikh Oumar Bagayoko Dr. Rafael Ruiz-de-Castaneda Jean-Marc Naef Prof. Antoine Geissbuhler DUDAL V2-DECEMBER 2011 Contents About this user’s manual.................................................................................................. 1 Meaning of the word « DUDAL » ..................................................................................... 2 1. How to follow an e-course ....................................................................................3 1.1. Scroll within an e-course ................................................................................................................. 5 1.2. Modify the display of the presentation ........................................................................................ 6 1.3. Ask questions during an e-course ................................................................................................. 7 1.4. What to do in case of power failure or shutdown of the program? ...................................... 8 1.5. Send the log or get help ................................................................................................................. 9 1.6. Execute Dudal behind a proxy server ........................................................................................ 10 2. How to webcast an e-course with Dudal ............................................................. 11 2.1. Convert a presentation to html format...................................................................................... 11 2.2. Create /open an e-course ........................................................................................................... 13 2.3. Edit an e-course.............................................................................................................................. 15 2.4. Modify the properties of an e-course ........................................................................................ 17 2.5. Modify the properties of the recording of an e-course .......................................................... 18 2.6. Modify the display of an e-course .............................................................................................. 19 2.7. Activate / End the transmission of an e-course ....................................................................... 20 2.8. View and share information on the forum ................................................................................ 23 2.9. What to do in case of power failure or shutdown of the program? .................................... 24 2.10. Send the log or get help ............................................................................................................. 25 2.11. Execute Dudal behind a proxy server ...................................................................................... 26 2.12. Delete the memory cache ........................................................................................................ 27 2.13. Exclude Dudal application from the antivirus analysis ......................................................... 27 About this user’s manual This manual explains the use of the distance learning system DUDAL V2. DUDAL v2 is a major evolution of the software DUDAL v1, available since 2008. This new version takes into account the technical developments on the Internet and the suggestions made by the users. The basic concepts remain the same as those of the first version: free use of the software for converting OpenOffice or Powerpoint presentations into HTML documents, capacity to operate on a low-speed network and reconnect easily in case of interruption. Some improvements have been made in this new version, both from the side of the clients (those who follow the e-courses) and from the side of the server (those that webcast the ecourses): Test the connection and configure the proxy: we can test the connection and also check if we are behind a proxy, with the possibility to configure it (Chapter 1.11). The URL of each e-course (link) is permanent, even if there is a modification in the location of the server or in the time of webcasting. Each e-course is indexed considering a unique and sequential identification number. The existence of a zoom sub-menu which makes possible to adjust the size of the image to the screen (Chapter 1.6). The discussion forum is directly on the interface of the system (Chapter 2.3). From the side of the client: You can only follow one e-course at a time. To open another one, you must close the previous application. The existence of a scroll-bar that allows you to move within the e-course (chap 2.1). The duration of the e-course is displayed in the interface (chap 2.1) In case of interruption, the application restarts the e-course where it was been interrupted. From the side of the server: Management of the presentation on a single window (chap 1.3) The existence of a configuration window for the video and audio (chap 1.5). In this version the image transmitted is clear compared to the old version, from 1 frame / sec to 5 frames / sec. You can use a password for each e-course (chap 1.4). 1 Meaning of the word « Dudal » Dudal is a Fulani word meaning “bonfire”. Dudal: The bonfire around which students gather at night to recite their lessons. The school where a lesson is taught around a bonfire. A Dudal typically has a circular shape delimited by stones. The fire is lit inside this circle and students sit around this fire to recite their lessons out loud. Each student sits so that his/her writing tablet with the day's lesson is illuminated by the light of the fire. The wood required to keep the bonfire burning is provided by all the students. The teacher also has its own place around the bonfire where he listens, monitors and corrects the students. The Dudal produces light, which can be symbolized as the science, the knowledge. The Dudal is community-dependent in the sense that the fire is maintained by the wood provided by all the students. Dudal is also the bonfire around which family members gather at night to warm up and listen to the stories told by the old people. This bonfire is generally lit during the cold season. Usually there is only one Dudal in each concession around which all members of the family join, independently of their age or sex. The atmosphere around the family Dudal is friendly. In each of the two cases, we can clearly identify three essential concepts of the RAFT: Community, inter-changes/sharing and knowledge. Dudal RAFT will only work if each participant brings the wood. The resulting light will be beneficial to all its members. The language to which belongs this word is spoken in a vast area of Africa. Although this is not the most spoken language, it is the most widespread in Africa. The Fulani (Peul, Fulfulde, Fulani) is spoken in: Senegal, Mauritania, Gambia, Mali, Sudan, Guinea (Bissau and Conakry), Sierra Leone, Burkina Faso, Niger, Nigeria, Benin, Chad, Cameroon, Togo, Liberia, Central African Republic, Ivory Coast, this is, along the entire Sahelian belt of Africa. Accordingly, Dudal also responds to the idea of the network. 2 1. How to follow an e-course : There are two different possibilities to follow an e-course on the RAFT network. 1.1 Directly on the site of the RAFT (http://raft.hcuge.ch/) where a link for each course is provided. Course in French : http://raftprog.blogspot.com/ Course in English : http://raftprog-english.blogspot.com/ Course for specialists : http://raftjinou.blogspot.com/ 1.2 Using the url : http://raft.unige.ch/ After having clicked on “To follow an educational session”, you will get to the interface that you see here below. You have to find then and select the course you want to follow within the directory. For instance, a course within the Cameroun directory of the RAFT. 3 4 The course is automatically downloaded as you can see below. If this is an e-course that has not yet started, the interface will display the date and time of broadcasting of this e-course. If the e-course is being broadcast, you can still follow it from its beginning or follow it live. You can also follow complete pre-recorded e-courses. 1.1 Scroll within the course It is possible to scroll within the course using the control pad (play, previous, stop, next) or the scroll-bar to move more rapidly. To display the scroll-bar, point with the mouse on the control pad and the bar will display. Next to the control pad is the timer: the left side (1) shows the time of the course that has already passed, and on the right (2) the time Indicates the whole duration of the course being broadcast. 5 1 2 1.2 Modify the display of the presentation: There are several choices of display of the presentation. This is in the “Display” menu of the tool-bar. It allows you to display the presentation with respect to the messages of the forum and then select a disposition. Click on “Display”. In this menu, you have: o “Slides & Messages”: Simultaneously displays the slides and the panel of questions (messages) referred to the e-course. o “Slides”: Displays only the slides of the e-course. o “Messages”: Only displays the panel of questions (messages) referred to the e-course. o The terms “Horizontal” and “Vertical” determine respectively the direction of the simultaneous display of the slides and the panel of questions (messages). Click on “Zoom” to determine the size of the display of the slides. Find below a figure showing the horizontal display of the presentation and the forum. 6 1.3 Ask a question during the course: Asking a question is very simple, just click "Slides & message" or "messages" in the “Display” menu, then you can ask a question by clicking the menu "Add a message" (1). A new message window appears (2) allowing you to write the question or make comments. 7 2 3 1 1.4 What to do in case of power failure or shutdown of the program? When following an e-course, problems on the network could take place causing a sudden shutdown of the program. When this happens, an error message appears. To the question “Do you want to try to reconnect?'”, Click ”Yes” to go back to the login section. A message asks you next: “Would you like to go back to the recording where it was interrupted?” In the case of not being able to reconnect, an error message displays in the screen allowing you to send the log of the error to the administrator. Find below and example of an error: 8 1.5 Send the log and get help If you are unable to reconnect, this may be because the error is still at the network level, or it comes from a different source of error. Click on “Send the log”(1) in the “Presentation” menu. The dialog box “Log” opens. The content of this dialog box should be sent to the program administrator. For this, there are three ways to proceed: o Click on “Send by e-mail” to the address: [email protected]. This option only works when you have an e-mail client configured properly on your machine. o Click inside the window of the dialog box “Log”. You can select all the text (CTRL + A), then copy and paste into a text editor (*. Txt, *. Doc, *. Odt) and send to the same address. o Or again, copy the file “server.log” located in the Dudal directory of your machine (C: \ Users \ Dudal \) and send to the same address. In case of problems, you can easily get help using the “Help” menu of the toolbar. 9 1.6 Execute Dudal behind a proxy server For some reasons, some institutions use machines called proxy server to mediate between the machines on the local network and the Internet. When you first start: Click on “Settings of connection”. A dialog box opens. Click on “Use proxy server”. Enter the proxy server address (i.e., hopital.cm) and the port number. Click on “Apply”. Note: The proxy server address and port number are provided by your network administrator. 10 2. How to webcast an e-course on Dudal 2 The webcasting of an e-course on the application Dudal takes place in several stages. 2.1 Convert a presentation to the HTML format The application Dudal requires the conversion of the content of the presentations (PPT or ODP) in web-pages, this is, HTML pages. This conversion can simply be done by using OpenOffice (from the version 1.1.3 to the version 3.2.1). This tool can be downloaded for free at http://download.openoffice.org/index.html. The following example uses the version OpenOffice 3.1. Click on the application “OpenOffice Impress” from the package OpenOffice. Click on “Open an existing presentation”, and then select the file of the presentation. Click on “Create”, and then click “Open read only” . Open the “File” menu, then click on “Export”. 11 Save your presentation as HTML format in a folder. It is recommended to name the folder as it follows: Year_Month_Day_NameAuthor (i.e., 2011_09_20_Bidias). Name your presentation (i.e., Pres_RAFT_Sept2011), and then click on ‘Save’. Select the type of HTML format. In this case, HTML format. Click “Next” each time, choosing the default settings except for the following three cases: select PNG images, high resolution and uncheck "Export audio". Click on “Create” at the last stage, and then name the presentation. It is recommended to check the pages created in your HTML file going through all the pages and correcting potential errors in layout. It could be that during their conversion into HTML, certain images or text change, this is why special attention should be paid to the layout in PPT or ODP. 12 Note: When you create your first presentation in HTML, the template is saved automatically under the name given at the end of the conversion. For subsequent conversions, you could step over all these previous stages, simply choose your own style by selecting "Existing design" then select the template and click the "Create" button. 2.2 Create / Open an e-course Connect to the application Dudal : http://raft.unige.ch Click on the blue panel “Would you like to webcast an e-course?” 13 Log-in by typing your user name and password The dialog box “Management of presentations” opens. This dialog box has buttons to navigate through the directory as well as the functions “Copy”, “Cut” or “Delete” in the ecourses of the directory. You have to browse the directories to find the location of the ecourse. When the desired folder is reached (in this example, the e-course will be created in the subdirectory Switzerland within the directory RAFT): Click on “Create a presentation” or on “Open” 14 Give a title to the e-course, its date and the time when it will be webcast, and then click on “Create” At this stage the e-course is created in the selected directory (Switzerland) but it does not yet contain the HTML files of the presentation. You still have to import the HTML content from OpenOffice and edit it on the application Dudal. This step is described explicitly in the next section. 2.3 Edit an e-course Click on "Edit this presentation" in the "Edit" menu. The dialogue box "Import an OpenOffice presentation" opens. Select, then open the file within which are the HTML files of the presentation (i.e., 2011_09_20_Bidias). Click on "Import a presentation". 15 After this step, a new window displays. It contains tools for the speakers to make changes in the content before saving it in the server of the application Dudal. It includes: o The button “Add a presentation” that allows you to add the contents of another HTML e-course o The button “Add an image” that allows you to add a label or a logo. Only files in image format (Jpeg, Jpg, gif, png) are supported. o The buttons “Up” and “Down” that allows you to change the order of the slides. o An area for edition that allows you to change the titles of the slides. o The button “Start of presentation” that indicates the programme the slide from which the e-course starts. o The button “Save” that allows to save the content of the e-course on the server of the application Dudal. 16 The content of the e-course is now uploaded on the server of the application Dudal and ready to be broadcast. An intermittent message showing the title of the e-course informs you that you are not on the broadcasting mode. 2.4 Modify the properties of the e-course Click on “Properties of the presentation” in the “Edit” menu. A dialog box displays. Here, the speaker has the following possibilities: o modify the title of the e-course. o modify the date and time of broadcasting of the course. o Insert a password for the e-course. This e-course will only be followed by those members of the audience that know this password. Click on “Modify” when finished Note: In this window, the URL (the link) of the e-course is also displayed. 17 2.5 Modify the properties of the recording of the e-course This box allows you to set the audio, video and encoding. Click on “Properties of the recording” in the “Edit” menu. A dialog box “Properties of the audio, video and encoding” opens. o Audio: This module allows you to select the device for audio input (microphone) and test the audio. Note: Sometimes several microphones are active simultaneously (computer microphone, microphone headset, etc.). To avoid interference inherent to this, it is recommended to disable (right click) the unused microphones in the “Recording” tab in Control Panel \ Sound (Windows). o Video: This module allows you to select the type of device to input the video (webcam or web server), select the video size (“format”) and test video. Note: You can also select to input an image. This is particularly useful when you find yourself in a network with low bandwidth. In this case, the optimal size to be defined for the image is 160 x 120 pixels. o Encoding: This unit allows you to set the encoding of the audio, video, luminance, the number of images per second, the number of frames per second and to test the encoding. 18 Note: In general, it is recommended to leave the default values for these settings since these are optimized to provide the better sound and video quality possible in a low-bandwidth network. If the bandwidth is particularly low, we can use specific settings to further reduce the amount of information transmitted. Click “Apply” once you are finished with the settings. 2.6 Modify the display of the e-course Click on “Display”. Under this menu, you find the following: o “Slides & Messages”: displays simultaneously the slides and the panel of questions (messages) referred to the e-course. o “Slides”: shows only the slides of the e-course. o “Messages”: displays only the panel of questions (messages) of the e-course. o The terms “Horizontal” and “Vertical” respectively determine the direction of the simultaneous display of the slides and the panel of questions (messages). Click on “Zoom” to determine the magnification of the display of the slides. 19 2.7 Activate / End the transmission of the e-course Click on “Start the transmission” in the “Presentation” menu. A dialogue box “Test the recording” will display. This box contains a tool bar: o The red button: Allows you to test simultaneously the audio and the video. o The squared button: Allows you to stop the tests of the audio and video. o The triangular button: allows you to re-play the test of the audio and the video that was performed. o The button “Properties” allows you to set the audio, the video and the encoding. o The button “Validate” allows you to activate the broadcasting of the e-course. 20 Note: At this level, as shown in attached figure, it is recommended to check the rate of transference of audio and video. In general, the rate of transference of audio should not exceed 3 Kilobytes (KB) per second and the video 5 Kilobytes (KB), which makes possible the application to operate under a bandwidth of 64 Kilobits (Kb) per second. All the options of the system are ready to be used. Click on the red button to start with the recording of the e-course The transmission is now active and the e-course is being recorded. At this level, on the tool-bar you have from left to right: 21 o Audio monitor. o The “Stop” button that will stop the recording of the e-course. o Timers. The first timer shows the duration of the e-course registered on the server. The second timer indicates the duration of the e-course registered on the local computer. Note: If the difference between the two values is less than 10 seconds, the display panel of the timers is blue. If it is between 10-20 seconds, it is orange, and if it is more than 20 seconds, it is red. At this stage, it is recommended to stop recording and check if the timer of the server increases (does not stop). If this is the case, the recording can be continued. If the timer of the server stops, then you will have to restart the program, this may be due to a network problem. o The red warning light “You are recording”. o The tool-box allows you to make real-time notations on the e-course. Note: First you have to select the desired pattern (arrow, rectangle or polygon), then the color, and finally, click and hold the left mouse button to make a notation. In the example above, the emphasis is on the terminal RAFT using a yellow arrow. o The blue sign “Connected” confirms that the speaker is connected to the server Dudal and is broadcasting the e-course. Note: The speaker can click on “List of Participants” in the “Presentation” menu to see the list of listeners online. 22 Click the “Stop” button to pause recording, or Click the “Stop” button and then “Finish transmission” to stop the transmission of e-courses. When the broadcasting of the e-course is completed, the speaker can: o Click “Replay this presentation” in the “Edit” menu to review the recording of the ecourse (audio and video only, no slides). Note: Several buttons and a cursor allow you to navigate through the recording. Note: The speaker can also click “Delete the transmission” in the “Edit” menu to delete the ecourse. 2.8 View and share the information on the forum Click on the small arrows at the top right of the display area of the slides. Depending on the position, click to view only slides or only messages, or both slides and messages. 23 Note: The speaker can share certain information with listeners. To do this, click on “Add a message” at the bottom of messages panel. 2.9 What to do in case of power failure or shutdown of the program? When broadcasting an e-course, problems on the network could take place causing a sudden shutdown of the program. When this happens, an error message appears. To the question “Do you want to try to reconnect?”: Click “Yes” to go back to the login section A confirmation message indicates you that the presentation is still open on the server. To the question “Do you want to take control of this presentation?”, Click “Yes” Another confirmation message tells you that there are differences between the duration of the recording on the computer (usually longer) and the server (usually shorter). To the question “Do you want to transfer the registration on the server?” 24 Click “Yes” Note: This guarantees that the last recordings made on the local machine are not lost during the previous session and ensure their transference to the server during the current session. You are then back at the e-course and you can activate the transmission as done before. Note: The option “Reconnect” in the “Presentation” menu can also reconnect in case of termination of the program. 2.10 Send the log or get help If you are unable to reconnect, this may be because the error is still at the network level, or it comes from a different source of error. Click on “Send the log” in the “Presentation” menu. The dialog box “Log” opens. The content of this dialog box should be sent to the program administrator. For this, there are three ways to proceed: o Click on “Send by e-mail” to the address: [email protected]. This option only works when you have an e-mail client configured properly on your machine. o Click inside the window of the dialog box “Log”. You can select all the text (CTRL + A), then copy and paste into a text editor (*. Txt, *. Doc, *. Odt) and send to the same address. o Or again, copy the file “server.log” located in the Dudal directory of your machine (C: \ Users \ Dudal \) and send to the same address. 25 2.11 Execute Dudal behind a proxy server For some reasons, some institutions use machines called proxy server to mediate between the machines on the local network and the Internet. When you first start: Click on “Settings of connections”. A dialog box opens. Click on “Use proxy server”. Enter the proxy server address (ie., hopital.cm) and the port number. Click on “Apply”. 26 Note: The proxy server address and port number are provided by your network administrator. 2.12 Delete the memory cache While the operation of the application, Dudal retains data related to its use in the cache memory of the computer. It may be that, ultimately, this may lead to small malfunctions when the application wants to be re-executed. Click “Delete the cache” in the “Presentation” menu to delete the memory cache of the computer. Click on “Exit” in the “Presentation” menu to terminate the application Dudal. In the case applicable, it is recommended to go directly to the folder "Documents and Settings" on your hard drive and delete the directory "Dudal". 2.13 Exclude the application Dudal from the antivirus analysis It may happen that some antivirus software prevents the application Dudal to run on your computer. It is possible to configure the antivirus software to exclude the application Dudal from its analysis. The following example refers to the open source antivirus Avast. Start the antivirus application. Click on ”Resident protection” and then on “Web Agent”. Click on “Settings Expert”, and then on “Exclusions”. In “URLs to exclude”, specify the addresses “http:/raft.unige.ch:80/*” and “http:/raft.unige.ch/*”. Click on “OK”. You can now fully execute the application Dudal on your computer 27