1
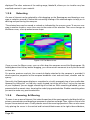
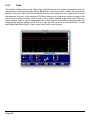
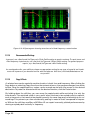
High Resolution Audio Restoration & Enhancement Tool
for soundBlade
©2006-2012 Sonic Studio, LLC — All rights reserved
This manual, as well as the software described in it, is furnished under license and may only be used or copied in accordance with the terms
of such license. The information in this manual is furnished for informational use only, is subject to change without notice, and should not be
construed as a commitment by Sonic Studio, LLC. Sonic Studio, LLC assumes no responsibility or liability for any errors or inaccuracies that may
appear in this document.
Except as permitted by such license, no part of this publication may be reproduced, stored in a retrieval system, or transmitted, in any form or
by any means, electronic, mechanical, recording, or otherwise, without the prior written permission of Sonic Studio, LLC.
SONIC STUDIO, LLC MAKES NO WARRANTIES, EXPRESS OR IMPLIED, INCLUDING WITHOUT LIMITATION THE IMPLIED WARRANTIES OF MERCHANTABILITY AND FITNESS FOR A PARTICULAR PURPOSE, REGARDING THE APPLE SOFTWARE. SONIC STUDIO, LLC DOES NOT WARRANT,
GUARANTEE, OR MAKE ANY REPRESENTATIONS REGARDING THE USE OR THE RESULTS OF THE USE OF THE SONIC STUDIO, LLC SOFTWARE
IN TERMS OF ITS CORRECTNESS, ACCURACY, RELIABILITY, CURRENTNESS, OR OTHERWISE. THE ENTIRE RISK AS TO THE RESULTS AND PERFORMANCE OF THE SONIC STUDIO SOFTWARE IS ASSUMED BY YOU. THE EXCLUSION OF IMPLIED WARRANTIES IS NOT PERMITTED BY
SOME STATES. THE ABOVE EXCLUSION MAY NOT APPLY TO YOU.
IN NO EVENT WILL SONIC STUDIO, LLC, ITS DIRECTORS, OFFICERS, EMPLOYEES, OR AGENTS BE LIABLE TO YOU FOR ANY CONSEQUENTIAL,
INCIDENTAL, OR INDIRECT DAMAGES (INCLUDING DAMAGES FOR LOSS OF BUSINESS PROFITS, BUSINESS INTERRUPTION, LOSS OF BUSINESS INFORMATION, AND THE LIKE) ARISING OUT OF THE USE OR INABILITY TO USE THE SONIC STUDIO SOFTWARE EVEN IF SONIC STUDIO
HAS BEEN ADVISED OF THE POSSIBILITY OF SUCH DAMAGES. BECAUSE SOME STATES DO NOT ALLOW THE EXCLUSION OR LIMITATION OF
LIABILITY FOR CONSEQUENTIAL OR INCIDENTAL DAMAGES, THE ABOVE LIMITATIONS MAY NOT APPLY TO YOU.
Sonic Studio, Sonic Clarity, SSE, soundBlade and the Sonic Studio logo are trademarks of Sonic Studio, LLC. All other company or product
names are either trademarks or registered trademarks of their respective owners.
reNOVAtor Legal Notice
This document may not, in whole or in part, be copied, photocopied, reproduced, translated, transmitted, or recorded to other media without
prior written consent of Algorithmix® GmbH. The information in this document is subject to change without notice.
http://www.algorithmix.com
Algorithmix® End User License Agreement
This End User License Agreement (“License”) is a legal agreement between you (either an individual person or a single legal entity) and Algorithmix GmbH (“Algorithmix®”) regarding Algorithmix® software and the accompanying documentation (collectively, the “Software”). The
Software also includes any software updates, add-on components, web services and/or supplements that Algorithmix may provide to you or
make available to you after the date you obtain your initial copy of the Software to the extent that such items are not accompanied by a separate
license agreement or terms of use.
PLEASE READ THIS LICENCE CAREFULLY BEFORE USING THE SOFTWARE. BY INSTALLING, COPYING, DOWNLOADING, ACCESSING OR OTHERWISE USING THE SOFTWARE, YOU AGREE TO BE BOUND BY THE TERMS OF THIS LICENSE. IF YOU DO NOT ACCEPT OR UNDERSTAND THE
TERMS OF THIS LICENSE, YOU SHOULD NOT INSTALL, ACCESS OR USE THE SOFTWARE.
1.
LICENCE GRANT: Subject to the restrictions set forth below, this License grants you a non-exclusive, perpetual license to (a) install the
Software on only one computer; (b) use or authorize use of the Software on only one computer; (c) make one copy of the Software, in machinereadable form, solely for backup purposes; provided you include all copyright and other proprietary rights notices on the copy and (d) transfer
the Software and this License to another party if the other party agrees to accept the terms and conditions of this License. If you transfer the
Software, you must at the same time either transfer all copies to the same party or destroy any copies not transferred. If you transfer possession
of any copy of the Software to another party, your License is automatically terminated.
2.
LICENCE RESTRICTIONS: You may not, or allow any third party to, (a) rent, lease, sell, loan or otherwise transfer the Software or any of
your rights and obligations under this License; (b) install the Software on a network for use by multiple users, unless each user has purchased
a license; c) reverse-engineer, de-compile or disassemble the Software or hardware in whole or in part; (d) remove or destroy any copyright
notices or other proprietary markings of the Software or any third-party software; (e) modify or adapt the Software, merge the Software into
another program or create derivative works based on the Software; (f) make copies of or distribute, for profit or otherwise, the Software, except
as expressly provided above; (g) make any alteration, modification, connection, disconnection, improvement or adjustment of any kind to or
use the Software except as explicitly contemplated in the enclosed documentation and in this License and (h) sublicense, transfer or assign this
License or any of the rights and obligations granted under this License, except as explicitly contemplated in this License. Any purported transfer
or assignment will be void.
3.
EXPORT RESTRICTIONS: The Algorithmix® Software may not be exported or re-exported to any country to which the European Union
embargoes goods. By downloading or using Algorithmix® Software you are certifying that you are not a national of any country to which the
European Union embargoes goods.
4.
OWNERSHIP: The license granted hereunder does not constitute a transfer or sale of ownership rights in or to the Software. Except for
the license rights granted above, Algorithmix® retains all right title and interest in and to the Software including all intellectual property rights
therein. The Software is protected by applicable intellectual property laws, including European Union copyright laws and international treaties.
Page 2
5.
TERM AND TERMINATION: This License shall be effective upon installation of the Software and shall terminate upon the earlier of (a)
your failure to comply with any term of this License; (b) return, destruction or deletion of all copies of the Software in your possession or (c)
transfer of the Software and this License to another party in accordance with Section 1(d). Algorithmix® rights and your obligations shall survive
termination of this License.
6.
LIMITED WARRANTY: Algorithmix® warrants to the original licensee that the Software, as delivered, will perform in accordance with
the accompanying documentation for a period of 30 days from the date of the original purchase (“Limited Warranty”). Algorithmix® entire liability and your exclusive remedy for breach of the preceding Limited Warranty shall be, at Algorithmix® sole option, repair or replacement of
the Software that does not meet the warranty set forth herein and that is returned to Algorithmix®. This limited warranty shall be void if failure
of the Software has resulted from any accident, abuse, misuse or misapplication by you. Any replacement Software will be warranted for the
remainder of the original warranty period or 30 days, whichever is longer.
7.
NO OTHER WARRANTIES: EXCEPT AS SET FORTH ABOVE, THE SOFTWARE IS PROVIDED ON AN “AS IS” BASIS. YOU ASSUME ALL
RESPONSIBILITIES FOR THE QUALITY AND PERFORMANCE OF THE SOFTWARE. TO THE MAXIMUM EXTENT PERMITTED BY APPLICABLE LAW,
ALGORITHMIX® DISCLAIMS ALL WARRANTIES, EITHER EXPRESS OR IMPLIED, INCLUDING BUT NOT LIMITED TO IMPLIED WARRANTIES OF
MERCHANTABILITY, NONINFRINGEMENT OF THIRD-PARTY INTELLECTUAL PROPERTY, AND FITNESS FOR A PARTICULAR PURPOSE. ALGORITHMIX® DOES NOT WARRANT THAT THE FUNCTIONS CONTAINED IN THE SOFTWARE WILL MEET YOUR REQUIREMENTS, BE UNINTERRUPTED OR ERROR FREE.
8.
LIMITATION OF LIABILITY: YOU AGREE THAT IN NO EVENT WILL ALGORITHMIX® BE LIABLE FOR ANY CONSEQUENTIAL, SPECIAL,
INDIRECT, INCIDENTAL OR PUNITIVE DAMAGES WHATSOEVER (INCLUDING, WITHOUT LIMITATION, DAMAGES FOR LOSS OF PROFITS, BUSINESS INTERRUPTION, LOSS OF INFORMATION), EVEN IF ALGORITHMIX® HAS BEEN ADVISED OF THE POSSIBILITY OF SUCH DAMAGES. IN
NO EVENT SHALL ALGORITHMIX® LIABILITY EXCEED THE TOTAL AMOUNT OF THE FEES PAID FOR THE SOFTWARE. Because some jurisdictions do not allow the limitation or exclusion of incidental or consequential damages in certain circumstances, the above limitations may not
apply to you.
9.
GENERAL: Any claim arising under or relating to this License shall be governed by the laws of the Federal Republic of Germany, without
reference to conflict of laws principles. This License constitutes the entire agreement between you and Algorithmix® and supersedes any other
communication with respect to the Software. No modification of or amendment to this License will be effective unless in writing signed by both
parties. If any provision of this License is held invalid or unenforceable, the remainder of this License will continue in full force and effect.
reNOVAtor is made by Algorithmix® GmbH, Germany. Copyright ©1998-2012 by Algorithmix® GmbH. All rights reserved.
reNOVAtor for soundBlade copyright ©2006-2012 by Sonic Studio, LLC. All rights reserved.
Page 3
NoNOISE II FR User Manual Table of Contents
Chapter 1
NoNOISE II FR....................................................................................... 5
NoNOISE II Options Installation —..................................................................................................6
1.1
Manual DeClick.......................................................................................................6
1.1.1
Interpolation Algorithms............................................................................................................. 7
1.1.2
Using Manual DeClick................................................................................................................10
1.1.3
Obscenity Reduction.................................................................................................................. 11
1.2
Broadband DeNoise............................................................................................. 11
1.2.1
Introduction................................................................................................................................ 11
1.2.2
The Noise Estimate....................................................................................................................12
1.2.3
Running the Broadband DeNoiser............................................................................................15
1.2.5
Shutting Down the DeNoiser....................................................................................................17
1.3
reNOVAtor LE.......................................................................................................17
1.3.1
Main Features.............................................................................................................................17
1.3.2
Typical Applications...................................................................................................................18
1.3.3
Getting Started...........................................................................................................................18
1.3.4
The Spectrogram........................................................................................................................19
1.3.5
Selecting.................................................................................................................................... 20
1.3.6
Zooming & Moving................................................................................................................... 20
1.3.7
Processing Controls.................................................................................................................. 21
1.3.8
Playing....................................................................................................................................... 24
1.3.9
Repairing.................................................................................................................................... 24
1.3.10
Finishing Up............................................................................................................................... 24
1.3.11
reNOVAtor LE Key Equivalents................................................................................................ 24
NoNOISE II FR User Manual Index......................................................................... 26
Page 4
Chapter 1..........................................................NoNOISE II FR
NoNOISE II is the world’s premier tool for restoring vintage and problematic audio recordings.
NoNOISE II FR includes a simplified version of the entire NoNOISE II toolkit, including Manual
Declick, Manual DeCrackle, Broadband DeNoise, FFT (Fast Fourier Transform) generation and an
easy version of Algorithmix’s reNOVAtor.
The Manual DeClick toolset precisely removes impulse noise, analog or digital overloads,
harmonic and intermodulation distortion, and provides a unique solution to obscenity masking.
The Broadband DeNoise option is the highest fidelity single–ended noise reducer available today
and can rescue both old and new recordings alike.
Production DeCrackle is the background or faster than real time version of theType E interpolator.
The DeCrackler, both manual and background versions, provide unparalleled distortion reduction
for a segment or an entire sound file.
Sonic EQ is a minimal phase EQ toolkit, providing seven different topologies, and is suitable
for both repair, enhancement and correction, while Algorithmix’s reNOVAtor LE is the high
performance spectral repair tool. Unlike work–alike products, reNOVAtor LE is able to dig into
recordings with very low signal–to–noise ratios and pull out usable program. Plus, the ability to
cut and paste time and spectral patches and its harmonic noise reducer functions all add to its
amazing usefulness.
Figure 2.1: The NoNOISE II menu
Page 5
NoNOISE II Options Installation —
NoNOISE II requires the installation of both an iLok license and Sonic Studio Options Files for
NoNOISE II FX, NoNOISE II FR or NoNOISE II SR to be enabled for use. Running the appropriate Options Installer, located in your soundBlade app folder’s Sonic Options folder, installs the
necessary software.
This does not install the actual option software, it merely enables specific options you have licenses for on your iLok.
NoNOISE II Options Notes:.
1) Options are installed on the Boot Volume at:
/Library/Application Support/Sonic Studio/Sonic Options 2.0/
2) Use the Remove NoNOISE II Options utility for removing options.
NOTE: Only install NoNOISE II options that you have licenses on your iLok for. Installing options that are not on your iLok will make soundBlade launch very slowly.
1.1
Manual DeClick
The Manual DeClick option provides tools for isolating and removing individual transient
impairments in a sound file. Manual DeClick assists in removing unwanted noises such as clicks,
pops and thumps. It offers five different interpolation algorithms that are capable of correcting
even difficult audio anomalies.
The algorithms analyze audio on either side of the anomaly and, based on this information,
synthesizes replacement samples. Manual DeClicking substitutes the repaired samples for the
original program material.
Note that Manual DeClick processes generate two new files for each sound file
that is repaired. These “.cd” and “.rl” files contain the samples removed during repair and a list of their locations, respectively. If you move or delete either of these
files, you will not be able to restore the original samples, undoing the repair.
With the exception of the Type E interplator, Manual DeClick is generally used on very short
duration regions of 14 msec. or less. Though the algorithms are capable of credible repairs
over longer durations, only experience using each algorithms will allow you to judge sensible
parameters.
Page 6
1.1.1
Interpolation Algorithms
There are several interpolators that are available in NoNOISE II. Unlike “pencil” tools found in
other products, the Manual DeClickers intelligently repair automatically, based on the spectral
content of the contextual material. Each is suited to a particular type of audio problem and
context.
1.1.1.1
The Type E DeCrackler
The Type E Interpolator, though fundamentally similar to the Type D discussed later in this
section, is implemented so it can be applied to passages of unlimited duration. As with the Type
D, expect to wait a while for your result but, it is worth it. The Type E DeCrackler is capable of
reducing distortion, including aurally offensive or harsh sounding material. Its micro–repairs
leave the audio sounding better without resorting to brute force, low pass filtering.
Figure 2.8: Type E’s micro–repairs
1.1.1.2
The Type B General Interpolator
The Type B interpolator is the general purpose algorithm for all program material. The majority
of declicking situations can be handled by simply choosing this option.
The Type B interpolator examines the audio on either side of the selection to determine the
context for resynthesizing audio to fill the gap. Here’s an example:
Page 7
Figure 2.2: The original material
Figure 2.3: A “repair,” using the Type B algorithm
1.1.1.3
The Type D DeClicker
The Type D DeClicker, along with the Type E mentioned above, are very high-order algorithms
used to correct problems that elude other repairs. Both interpolators use 64 bit precision to
produce very high quality repairs.
The Type D DeClicker is tailored for use on the human voice, though it will provide excellent
results on most any semi–periodic material. It is capable of replacing 1 second worth of material
but reasonable results will be obtained for sections in the 100 millisecond or less range. Even so,
a repair half that duration will still take a while.
Page 8
Figure 2.5: A fairly periodic section with click in Panel 1
Figure 2.6: The repair using Type D
Page 9
Figure 2.7: A zoomed in view of the above repair
1.1.1.4
The Type C Pitched Interpolator
The Type C interpolator is designed for pitched or harmonically periodic material, such as
solo instruments or any time the fine structure of a waveform is visually repetitive. The Type C
DeClicker has “validation” built into it for certain cases in which the interpolator may produce
less than perfect results. Because of this, the Type C may fail to find an “acceptable” periodicity
and will alert you to try a different algorithm. If this occurs, try the Type D or, select a slightly
different region of audio and try again.
The Type C interpolator takes contextual information from six periods to the left and right of the
selection. After interpolation, the Restore Bar may extend for some distance outside the selected
region. This is normal because these interpolators are repairing based on wavelength in addition
to simple selection duration.
1.1.2
Using Manual DeClick
Manual DeClick can perform mono or stereo repairs. Either channel of a stereo pair can be
operated on or, the repair can be performed on both.
2.1.2.1
Removing Clicks
1.
Using the Waveform display and playback, identify the location of an impairment.
2.
Zoom in until you can clearly see the impairment.
3.
Click–drag in the Panel to create a time region selection that fully contains the
damaged samples.
4.
From the NoNOISE II menu, select one of the four Manual DeClick types.
NoNOISE replaces the compromised audio with repaired samples. Don’t worry about selecting
on zero crossing boundaries, the software’s intelligence will provide a seamless transition. The
Page 10
NoNOISE II menu provides monaural repairs, where the DeClickers will be applied only to the
selected region in the selected Panel, as well as stereo repairs. The second group of DeCrackle/
DeClick - Stereo commands will provide a stereo repair, where the DeClickers will be applied to
both Panels at the selected time location regardless of which is selected.
Do remember that ticks and pops created during a transfer from a mechanical recording, such a
phonograph record, will have erroneous low frequency content after the click. This results from
ringing in the cantilever and stylus assembly. Since the long wavelength of the low frequency
disturbance is largely invisible in the waveform display, be sure to select generously after the
click so as to include the low frequency distortion in the repair.
2.1.2.2
Undoing — Restoring Repaired Clicks
1.
You can undo a Manual DeClick repair at any time, restoring the original samples back
into the sound file. To do this, zoom in on the waveform and locate the red “Restore
Bar.”
2.
Click–drag in the Panel to select a region that completely contains the Restore Bar.
3.
From the NoNOISE II menu, choose Restore Click for a mono repair, or Restore Click
Stereo to restore the original samples for both Panels.
NoNOISE replaces the reapired audio samples with the original audio samples containing the
anomaly.
1.1.2.3
Hiding Interpolation Bars
The Show Interpolations command in the NoNOISE II menu is a toggle. When enabled, it displays
the interpolation bars that mark the site of a repair. When disabled, the bars are not visible,
which reduces visual clitter.
1.1.3
Obscenity Reduction
In addition to restoration duties, Manual DeClicking can be used to insure the public acceptability
of obscene material or to conceal any audio that may not “pass muster” with downstream
listeners. Simply select the obscenity as though it were an impairment, and choose your Type.
The Type B, when given a one or two second region to “repair,” does a great job of removing
the objectionable material and inserting something that will often be preferable to editing in
replacement audio. An additional consideration is that, since no material is added or removed,
the timing or tempo is not affected.
1.2
1.2.1
Broadband DeNoise
Introduction
Broadband noise, whether white, pink or brown in spectrum, is one of the most common forms
of audio degradation. Noise can be introduced from any of a number of sources, including the
Page 11
modulation and asperity noise inherent in analog tape recording and Johnson or thermal noise
from microphones, preamps, and other analog signal processing equipment. Broadband DeNoise
is a single ended broadband noise reducer that, unlike less refined examples, can suppress or
eliminate broadband noise with little or no audible artifacts, even at extreme settings.
To suppress such noises in your program, it is necessary to analyze the noise spectrum and
adapt the denoising algorithm to the characteristics of the material. Broadband DeNoise operates
by means of analysis and resynthesis, though it can be thought of as 2048 bandpass filters,
each followed by a below–threshold expander. This is somewhat analogous to the classic analog
Dolby and dbx multi–band, double–ended noise reduction systems of yore.
An FFT or Fast Fourier Transform analysis is performed on a user–specified sample of noise
from the material to be processed. The average amplitude of noise in each of 2048 individual
frequency bands or “bins” is determined. The result of this analysis is a “Noise Estimate,” which
is used to set the average threshold of the noise reduction. The Estimate sets aggregate threshold
for the expansion.
During processing, the source material is also subjected to a 2048 point FFT analysis. The
average amplitude of signal in each bin is compared against the threshold value determined by
the noise Estimate. Based on this comparison, the algorithm determines whether a given band
at that particular instant contains audio signal or only noise.
If a frequency bin is found to be at or above threshold, its gain remains at unity. If it is determined
that the signal amplitude in that band falls below threshold, then it is considered “noise” and
the amplitude of that band is reduced by an amount determined by the Attenuation parameter,
discussed later. The results of this comparison and amplitude compensation for all bands is a
modified version of the original FFT frequency analysis. A reverse FFT is then performed using
the new, adjusted version, reconstituting the audio signal with aggregate noise attenuated by
the specified amount. Because the Broadband DeNoiser operates with high frequency resolution
and at extended precision, the removal of noise is precise and artifact–free.
1.2.2
The Noise Estimate
The first step in denoising is to derive a Noise Estimate from the material to be processed. The
Noise Estimate, or simply Estimate, is an individual “fingerprint” of the noise and determines local
threshold values for each frequency bin. The NoNOISE II menu provides a group of commands
for creating, processing, editing and storing the Estimate. The Estimate determines the result
of the entire denoising process, so it is important to ensure that the estimate taken is valid and
represents the true noise floor of the source sound file.
1.2.2.1
Noise Estimates
The procedure for taking a usable Estimate has several steps. First, open the source sound file
into a Project. Then, identify a short section of audio where there is only noise or predominantly
noise. About 0.3 to 0.5 seconds is sufficient. Click–drag to create a time region selection of the
noise. Section 2.2.2.2 below discusses where to take a Estimate in detail.
Page 12
From the NoNOISE® menu, select the Take and Interpolate Estimate command to first create
the Estimate, then automatically interpolate the Estimate, applying “Bin Controls,” which are
individual threshold controls for separate regions of the frequency spectrum.
The separate Take Noise Estimate and Interpolate Noise Estimate commands are for
experimenting when creating an optimal Estimate and can usually be skipped in favor of the
combined NoNOISE II > Take and Interpolate Estimate command. See section 2.2.2.3 below for a
discussion of these individual commands and their function.
The Auto Noise Estimate… command combines the Take and Interpolate Estimate and Write
Estimate commands for those jobs where you are in a hurry or cost takes precedence over
quality. It is not recommended to use this shortcut if you desire the best result as it does not
include the interim step of adjusting Bin Controls.
Figure 2.9: An interpolated Estimate with Bin Controls
At this point, you now have a green “Interpolation,” with blue Bin Controls attached. Select the
Write Estimate... command to save the Estimate as a file that will be used by the Broadband
DeNoise processor.
1.2.2.2
Where to take an Estimate
Once the source sound file is opened into a Panel of a Project, the first step is to identify a
suitable location from which to take the Estimate. Since the denoising algorithm depends on a
constant amplitude and spectrum in the noise floor, try to listen and locate a time region with
uniform noise. As to duration, optimum results are obtained when the Estimate is taken from a
section of pure noise between about 0.3 and 0.5 seconds in length, with a worst case minimum
of 100 milliseconds.
If a region of pure or “clean” noise, noise uncontaminated with program, is unavailable as is
often the case with tightly edited material, then choose a region with minimal program. The
resulting Estimate will require manual adjustment as discussed below. If an Estimate must
be taken in presence of signal, it is advisable to avoid sections of spectrally complex or non–
harmonic material as it makes manual adjustment more time consuming.
It is usually necessary to derive a separate Estimate for each cut or take. If these are contained in
a consolidated sound file and the spectrum of the noise varies for each cut, then the consolidated
file should be denoised in sections, so that the optimal combination of estimate and parameters
can be applied to each cut.
Unless there is strong reason to believe that each cut in a compilation or consolidated file was:
1.
Page 13
recorded in the same session with the same equipment
2. at precisely the same levels onto the same media
3. stored in the same way
4. transferred to the same intermediate media in precisely the same way
5. and converted to digital samples in the same signal chain
then it is advisable to take separate estimates for each cut or take. When denoising stereo
material, it is also recommended to derive a separate Estimate for each channel. Likewise, if
the character or level of the noise floor can be heard to change at all during the recording, then
the best results are be obtained by dividing that piece into sections to be denoised individually.
After denoising, the individual sections can edited together and sequenced to create a seamless
whole.
1.2.2.3
Post–processing an Estimate
After taking an estimate, the Panel changes to show the Estimate, a smoothed FFT. Before the
Estimate can be used to provide threshold data for denoising, it must be additionally smoothed
and, perhaps, manually adjusted to account for the presence of desired signal within the noise.
After deriving the Estimate, select the Interpolate Estimate command. soundBlade performs
a best fit approximation from the composite FFT data, displaying it as a smooth green spline
connecting a series of blue boxes, the Bin Controls mentioned above, superimposed on the
composite FFT. You can toggle the Interpolation display by clicking on the checkbox located in the
lower right corner of the Estimate display or with the Show/Hide Interpolation command.
If the Estimate is derived from a clean sample of noise, then Interpolate Estimate command
produces an accurate measurement of the representative noise floor. In cases where a clean,
program–free sample of the noise floor is not available, a smooth Interpolation can be derived
from just a portion of the FFT display, provided that the noise in question is purely analog tape
hiss, by using the Fit Estimate From Selection command.
Analog tape hiss has a characteristic noise curve or shape. Fit Estimate From Selection takes
advantage of this property to produce a smooth Interpolation from any individual region of the
Estimate based on that region’s average amplitude. Make a time region selection of a portion of
the Estimate that appears to be outside the range of the contaminating audio program. Choose
Fit Estimate From Selection from the NoNOISE II menu. soundBlade displays an Interpolation with
a characteristic tape hiss curve using the average amplitude of the Estimate’s selected region.
1.2.2.4
Editing an Estimate
The Fit Estimate From Selection technique works well for recordings containing typical tape
hiss, but many recordings have other noise sources or peculiarities. In such cases, it is often
necessary to manually adjust the Interpolation, differentiating between the desired program
content and the noise floor.
As with a waveform display in a Panel, the same Zoom In/Out and Zoom To Selection commands
work for an Estimate. This means you can zoom to a view that provides a comfortable level of
detail.
Page 14
To edit an Interpolation, hold down the option key and drag a Bin Control up or down. If,
for example, a number of piano harmonics are contaminating the Estimate, the Bin Controls
can be moved down so that the Interpolation follows the average amplitude rather than the
local amplitude. Moving a Bin Control down will command a lower threshold and cause less
sensitivity in that Bin, resulting in less noise reduction while moving a Bin Control up sets a
higher threshold, causing more noise reduction.
You can move multiple Bin Controls at once. To do so, click–drag in the Panel to create a time
region selection that contains the Bin Controls. The numeric display at the left side of the Panel
shows the selection’s start frequency, end frequency and span in Hertz. To edit the boxes within
the selection, hold both the shift and option keys and drag one of the included Bin Controls. All
Bin Controls within the selection will move together.
2.2.2.5
Saving an Estimate
Once you are satisfied with the Interpolation, you need to save it. To do so, select the Write
Estimate... command from the NoNOISE II menu. soundBlade displays a Save File dialog. Choose
a location for the Estimate file, rename it if you wish, then click OK. soundBlade saves the file,
including the Interpolation and Bin Control state, to disk.
1.2.3
Running the Broadband DeNoiser
1.2.3.1
Overview
Once you have the Estimate file written, you can start the real–time process. From the NoNOISE
menu, select the BBDN… command, which brings up the BBDN window.
II
The window, with its six controls discussed below, also has buttons to open an Estimate file, to
open and save the controls and their parameters, to bypass the process, and to toggle between
the processed signal and the suppressed or removed portion of the signal.
Figure 2.10: The Broadband DeNoise window
Page 15
1.2.3.2
Button Functions
The Open Est button spawns a standard Mac browser that allows you to specify and open an
Estimate file. This will set the threshold and sensitivity of each Bin.
The Save Param buttons allow you save all the current settings in the window, including the
name and location of the currently selected Estimate file. The Open Param button allows you
to open an existing Parameters file. These files are ASCII text and can be opened in TextEdit for
inspection.
The last two buttons are the Bypass, which patches the process in or out of the signal flow, and
the NoNOISE/Noise button, which allows you to hear either the processed signal or the portion
of the signal that is being suppressed or reduced. When in the “Noise” mode, you can adjust the
controls and hear the direct result of your actions.
The operation of the Broadband DeNoiser is a subjective process. In general though, if too much
program is present in the suppressed signal, then you are probably using setting that are too
aggressive or your Estimate requires adjustment. Also, it’s fairly easy to misinterpret noise as
high frequency content so, critical listening with wideband reproducers are required for proper
operation.
1.2.4
Broadband DeNoise Parameters
The following parameters are available as horizontal sliders:
Parameter
Threshold
Attenuation
1.2.4.1
Range
-60 to 60
-60 to 0
Default Value
0
0
Recommended
n/a
-10 to -24
Extreme
n/a
Threshold
The Estimate defines the aggregate threshold applied to each of the over 2,000 individual Bins
used by the denoise process. The Threshold parameter allows the entire curve, as a whole, to be
moved up or down. Together with the Attenuation parameter, the Threshold parameter provides
the basic control over how aggressively the process is applied.
As Threshold is raised, more of the signal at all frequencies is processed. At extremely high
settings, a distinctive watery aliasing may be heard in the resulting audio. If the Threshold is set
too low, little or no noise reduction is obtained. The Threshold can be thought of as the fine line
between noise and music, globally raising or lowering the entire Estimate curve relative to its
original position. Local adjustment of the threshold according to frequency bands is effected by
adjusting the Interpolation curve and saving a new Estimate file.
The default Threshold is arbitrary. Threshold and Attenuation settings should generally be
adjusted together for best results.The Noise/NoNOISE button can help to determine an acceptable
compromise setting.
Page 16
1.2.4.2
Attenuation
This value, in decibels, sets the maximum attenuation to be applied to any Bin. A setting of
0 produces no noise reduction. The higher or more negative this value is set, the greater the
reduction in noise, but with increasing danger of producing audible artifacts in the audio signal.
Again, Threshold and Attenuation settings should be adjusted together for best results. Critical
listening and the Noise/NoNOISE button can help to determine an acceptable compromise
setting. If the maximum attenuation setting is too extreme, ambience and/or high frequency
content may be lost.
1.2.5
Shutting Down the DeNoiser
To stop the Broadband DeNoiser, simply close the DeNoise window. A dialog will ask if you wish
to continue. Click Yes to shut down the processor, and No to continue DeNoising.
1.3
reNOVAtor LE
The ReNOVAtor™ option for soundBlade and Amarra allows localization, identification and very
precise removal of unwanted audio events without affecting the audio material you want to
keep. The removed sound is replaced by a signal re-synthesized from the surrounding material.
reNOVAtor LE does not make deep gaps in your sound track when eradicating a disturbing sound
event. Rather, it’s an exactly tailored hole in the spectral representation of the processed signal
that can be removed and replaced. The reNOVAtor LE window is fully resizable for increased accuracy and optimal compatibility with all screen resolutions.
Working with reNOVAtor LE is easy and intuitive. reNOVAtor LE loads the requested part of audio material you’ve chosen and analyzes it. The result is displayed as a 3D spectrogram with time
on the horizontal axis, frequency on the vertical axis and amplitude of the spectral components
color-coded. The color assignment follows the order of the rainbow: red and yellow for low energy; green and blue for middle energy; and finally purple and white for high energy. After getting some experience, this 3D spectrogram representation allows a good feeling for localization
and identification of sudden unwanted acoustical events. The spectral area of interest can be precisely marked with a resizable rectangular marquee. A Play button allows you to hear selected
parts of the processed signal.
1.3.1
Main Features
• up to 192 kHz sampling rates
• extraordinary results compared to any other cleaning method, due to selective treatment of spectral representation of the signal and not its waveform.
• enormous time savings when repairing critical live recordings
• easy-to-learn identification and localization of unwanted audio events
• efficient removal of unwanted audio events and their replacement by signals
• re-synthesized from the surrounding audio material
Page 17
• resizable and zoomable spectrogram window for sound repairing with surgical precision
• audition of any selected area before and after processing
• multiple undo functions
• different types of interpolations
• replacing one spectral region by another (copy & paste)
• no audible changes in desired signal and ambience after removing typical discrete
audio disturbances
1.3.2
Typical Applications
• Removing unwanted noises like sneezing, chair squeaks, coughing, car horns, fallen
coins and keys, ringing of a mobile phone, etc.
• Correcting instrumental tracks by removing scratches from stringed instruments,
wrong notes, rustle of sheet music, keyboard pedal noise, vocalist’s breathing, lip
smacks and microphone pops
• Restoring old recordings by removing scratches and dropouts
• Cleaning up environmental noise on location recordings for film and television
1.3.3
Getting Started
Start reNOVAtor LE by click–dragging a time region selection in a Project’s Panel. Then, select
NoNOISE II > reNOVAtor… to start the processor. After you have selected a wav file to be processed, the reNOVAtor LE window pops up and shows a spectrogram of the summation (left +
right) of the stereo channels. Time is displayed on the horizontal axis while frequency, up to the
Nyquist Frequency associated with your material’s sample rate, is displayed on the vertical axis.
Page 18
Figure 2.12: The main reNOVAtor LE window
Typically, files up to 10 minutes can be loaded all at once. The maximum length of audio files
is dependent on your host’s computational power and RAM complement, the required spectrogram resolution and sample rate for the source sound file. If you experience any performance
problems with long files, cancel out of reNOVAtor LE and shorten the time region selection.
Though you can undo reNOVAtor LE processing at any time, we recommend you always make
a backup of your original audio material to have the opportunity to start again if, for any reason,
the NoNOISE metadata, the “.cd” and “.rl” files, are lost.
Before you begin, remember that “tool tips” are available at any time to remind you of the function of a particular button. To see a tip for any button, simply locate your cursor over that button
and hover there for a moment. A contextually appropriate tool tip will then pop up with a brief
description of that control.
Also, section 2.3.11 below list all keyboard commands for reNOVAtor LE. After you become familiar with the user interface and operation, you can use the keyboard equivalents to speed up
your work.
1.3.4
The Spectrogram
The Color mapping scheme used in the Spectrogram corresponds to a phyisical model, with
black representing lowest energy, through red to yellow, then green to blue, with white representing the highest energy. To adjust the display color mapped to your material’s dynamic
range, simply click on one of the six choice for the Display control. The radio button labeled 1
sets dynamic range mapping to its lowest scaling, where only larger amplitude sounds will be
Page 19
displayed. The other extreme of the setting range, labeled 6, allows you to visualize very low
amplitude content in your material.
1.3.5
Selecting
An area of interest can be selected by click–dragging on the Spectrogram and drawing a marquee or selection around it. Notice the contrasting shading of the selected region to help you in
defining and positioning the marquee.
The selected area can be moved or resized as indicated by the mouse cursor. To move a marquee to another location, move the cursor to the center of the selection. The cursor changes to
the Move cursor, a four quadrant arrow shape.
Figure 2.13: The Move cursor
Once you see the Move cursor, you can click–drag the marquee around the Spectrogram. By
holding down the shift key before dragging, you can constrain movement to only the horizontal
or time axis.
For precise spectrum analysis, the numerical display attached to the marquee is provided. It
shows spectrum properties at the marquee boudaries: start and end times, duration and frequency.
Normally, the Spectrogram displays a smoothed or visually averaged view of your audio data.
However, by hitting the ` or tilde key, usually located just to the left of the 1 key on the top row
of your keyboard, you can toggle smoothing off or back on. With smoothing disabled, you are
presented with a mosaic view, showing the underlying quantized data. Disable smoothing when
you want to make very precise selections.
1.3.6
Zooming & Moving
To zoom in on an area of interest, first select the portion of the spectrogram by holding the left or
primary mouse button and drawing a marquee or selection rectangle. Then, right or control-click
to open the contextual menu. Finally choose one of the zooming operations. You can also zoom
in by placing the cursor in the vertical and horizontal black areas at the right side and bottom,
Page 20
respectively, of the Spectrogram where numeric readouts for time and frequency are shown. The
cursor will change to a “plus magnifying glass.” Hold the shift key to zoom out, the cursor will
change to a “minus magnifying glass” to confirm you’re in zooming out mode.
The selected area can be moved or resized as indicated by the cursor shape. Its length in seconds
and milliseconds is displayed inside. The visible spectrogram can also be resized and moved according to your needs. The horizontal and vertical scrollbars allow you to move the visible portion of the display.
Your keyboard’s arrow keys also control scrolling in time and zooming The vertical arrow keys
control zooming, up for out and down for in, while the left and right arrow keys move the view
earlier or later in time.
By option–clicking in either scroll bar, you can force the view directly to that time location (horizontally) or frequency range (vertically) without scrolling.
By option-clicking and holding the mouse button in the Spectrogram itself, you can move and
zoom the view. Option click–hold and move you mouse vertically to zoom symmetrically about
the cursor location. Moving the mouse up zooms out, while moving the mouse down zooms in.
The duration of the displayed material is always indicated numerically in the upper part of the
spectrogram.
1.3.7
Processing Controls
There are three controls that determine the actual repair or interpolation made by the reNOVAtor LE process. Several of the buttons at the bottom of the reNOVAtor LE window also control
repairs…
1.3.7.1
Int Type
The Int Type control provides either horizontal, for time–oriented repairs, or vertical, for frequency–oriented repairs, that will be applied to your selection. The Int Type control selects the kind of
interpolation to be applied to your selection. Either interpolation or repair type performs a two
step operation. reNOVAtor LE first removes the signal from the marqueed area and then fill the
spectral hole with a replacement re–synthesized from the surrounding audio material. The name
of the interpolation type explicitly describes the “context” used by the reapir algorithm. That is,
what part of the surrounding audio material is used for the re–synthesis.
The Hor or horizontal interpolation setting is best suited to removing transient disturbances like
clicks and pops, while the Ver or vertical setting is recommended for removing longer duration
impairments, like tones or harmonics.
1.3.7.2
Ambience
The Ambience set of radio buttons, Min, Mid and Max, set how lower amplitude noise, ambience and wallah, are handed during the repair. Set this control based on your best guess for the
material at hand, process a section, and listen to the result. Undo the processing, then try the
next nearest setting and listen to the result. As you use the software, you’ll get a better sense of
predicting which Ambience setting will work best with the material at hand.
Page 21
1.3.7.3
Profile
The Profile setting controls the “block size” applied to both the visible spectrogram and any
interpolations resulting with that setting. Block size is a numeric factor used by the software to
determine how the repair will be calculated. Use the Clicks setting for any impairment of short
disturbances, like ticks, clicks and pops. The Tones setting is for frequency–selective repairs, like
the removal of discrete tones, such as hum or buzz, which require larger block sizes. The illustrations below show a typical impairment that would require a frequency–selective repair. By
changing the Display setting from 5 to 6, you can see that the tone. at around 35 kHz, is more
easily identified. Notice that, in both cases, the Profile is set to Tones.
Page 22
Figure 2.14: A Spectrogram showing two views of a fixed frequency contamination
1.3.7.4
Recommended Settings
In general, use a Hor(izontal) Int Type and a Clicks Profile setting to repair transients. To repair tones and
fixed frequency impairments, use a Ver(tical) Int Type and a Tones Profile setting. For general purpose
repairs, try a Hor(izontal) Int Type and a Mix Profile setting.
As mentioned earlier, your ability to choose an appropriate setting for any type of material and impairment will improve as you become familiar with the software. Unitl then, the Undo/Redo buttons are
very useful!
1.3.7.5
Copy & Paste
A selected area can be copied to another location in both time and frequency. After clicking the
Copy button or selecting Copy Area from the contextual menu, the marquee changes from white
to blue. Now the copied patch or region can be moved around with the mouse to the desired
destination. To paste the selected area into the desired location, click the Paste button.
By holding down the shift key, you can move the copied patch while restricting it to only the
time domain. The restricted mode is very useful when the area to be copied contains material,
such as harmonics, that needs to be placed in exactly the same frequency relationship to its surroundings. This prevents you from accidentally pasting in material that’s transposed in frequency. Without the shift key modifier, reNOVAtor LE can repair incorrectly pitched performances by
moving a copied patch vertically in frequency.
Page 23
To exit the Copy mode, simply click outside the marquee. The marquee changes from blue back
to white.
1.3.8
Playing
All of the loaded audio material or any portion can be replayed at any time by positioning the
red and white play cursor at the desired position and clicking the Play button. Or, tap the space
bar to start and stop playback.
To place the play cursor, simply click on any position in the Spectrogram. Clicking on the Stop
button, clicking on the Play button or tapping the space bar during playback stops playback and
returns the play cursor returns to its initial position.
1.3.9
Repairing
To remove an unwanted impairment, select an area around it and set the desired Int Type, Ambience and Profile settings. To perform a repair in a selected area, click the Process button or select
Process from the contextual menu. After processing has been done, you can immediately listen
to the result by locating the play cursor and playing.
If you are not satisfied with the result, you may undo the interpolation with the Undo/Redo buttons to the right of the Process button or, by pressing command/Apple-z. The maximal number of
undo steps is limited only by the available computer memory. Once an undo step is performed,
it can still be re-done by clicking the Redo button.
As long as you stay within a reNOVAtor LE session, all processing steps are stored in temporary
memory and can be redone. However, after reNOVAtor LE has been closed with either the Accept
or Cancel buttons, all intermediate steps are lost and pending undo/redo steps are no longer
available.
1.3.10
Finishing Up
To finish your reNOVAtor LE session, click on the Accept button to accept the changes and write
them back to the track. Or, you can click Cancel to exit the process and discard all changes.
1.3.11
reNOVAtor LE Key Equivalents
General
space bar
command-z
shift-command-z
shift-c
shift-v
shift-drag
` (accent grave)
Page 24
play
undo
redo
copy selection
paste selection
constrain selection in frequency domain
toggles smoothing
Zoom
0
1
2
3
4
5
up arrow
down arrow
<
>
, (comma)
. (period)
; (semicolon)
shift-/ (forward slash or solidus)
zoom to entire
zoom 10x
zoom 5x
zoom 2x
zoom 1x
zoom 0.5x
zoom 0.5x
zoom 2x
zoom ƒ by 0.5x
zoom ƒ by 2x
zoom ƒ to top half
zoom ƒ to bottom half
zoom ƒ to middle half
zoom ƒ to entire
Presets
^ (accent circumflex)
& (ampersand)
* (asterisk)
(
6
7
8
9
set preset 1
set preset 2
set preset 3
set preset 4
load preset 1
load preset 2
load preset 3
load preset 4
Play Cursor Placement
y
u
i
o
Page 25
set play cursor before selection, 6 sec.
set play cursor before selection, 3 sec.
set play cursor before selection, 1.5 sec.
set play cursor before selection, 0.5 sec.
Note that, for the PDF version of this Index, only the page numbers, not the preceding descrip-
tive subject text, are hyperlinked.
NoNOISE II FR User Manual Index
A
A Type 10
B
Bin Controls 13, 14, 15
Broadband DeNoise 11
Broadband DeNoiser 15
B Type 7
C
C Type 10
D
dbx 12
Dolby 12
D Type 8
E
E Type 7
F
FFT 5
Fit Estimate From Selection 14
I
Interpolate Noise Estimate 13
Interpolation Algorithms 7
M
Manual DeClick 6, 10
N
Page 26
Noise Estimate 12
NoNOISE II
A Type 10
Bin Control 15
Bin Controls 13, 14
Broadband DeNoise 11, 15
Attenuation 17
NoNoise/Noise button 16
Open Est button 16
Open Param button 16
parameters 16
Threshold 16
B Type 7
C Type 10
D Type 8
editing the noise Estimate 14
E Type 7
Fit Estimate From Selection 14
Interpolate Noise Estimate 13
interpolation algorithms 7
Manual DeClick 6, 10
noise Estimate 12
obscenity reduction 11
post-processing the noise Estimate 14
saving a noise Estimate 15
Take Noise Estimate 13
Write Estimate... 15
O
Obscenity Reduction 11
P
Project
Panel 2–3
T
Take Noise Estimate 13
Page 27
© 2012 Sonic Studio, LLC • 330 Sir Francis Drake Blvd. • Suite A • San Anselmo CA 94960-2552 • 1-415-944-7642
soundBlade, NoNOISE, sonicstudio.com, the Sonic Studio logo and type are trademarks of Sonic Studio, LLC in the United States and other
countries. All other trademarks, trade names, service marks, and logos referenced herein belong to their respective companies.
Comments, corrections and suggestions regarding this manual are always welcome. Please contact us at <support@
sonicstudio.com>.
NoNOISE_II_FR_UM_V1r04
Page 28