1
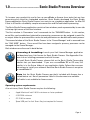
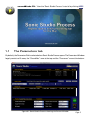
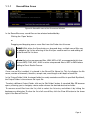
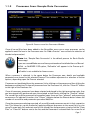
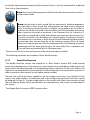
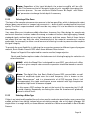
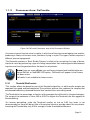
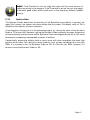
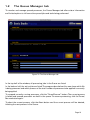
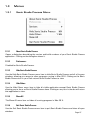
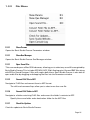
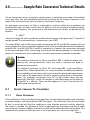
Cover
Sonic Studio Process User Manual Table Of Contents
1.0
Sonic Studio Process Overview................................................... 4
1.1
The Parameters tab................................................................................................5
1.1.1
Soundfiles Area........................................................................................................................... 6
1.1.2
Processes Area: Sample Rate Conversion................................................................................. 7
1.1.2.1
Sample Rate Conversion..............................................................................................................................8
1.1.2.2
Selecting a Filter Curve.................................................................................................................................10
1.1.3.1
Threshold (Click Fraction).............................................................................................................................12
1.1.3.2
Synthesis Order.............................................................................................................................................13
1.2
The Queue Manager tab...................................................................................... 14
1.3
Menus...................................................................................................................15
1.3.1
Sonic Studio Process Menu......................................................................................................15
1.3.1.1
About Sonic Studio Process . ......................................................................................................................15
1.3.1.2
Preferences....................................................................................................................................................15
1.3.1.3
Hide Sonic Studio Process...........................................................................................................................15
1.3.1.4
Hide Others....................................................................................................................................................15
1.3.1.5
Show All.........................................................................................................................................................15
1.3.1.6
Quit Sonic Studio Process............................................................................................................................15
1.3.2.1
Show Params ...............................................................................................................................................16
1.3.2.1
Show Que Manager......................................................................................................................................16
1.3.2.1
Open Sound File............................................................................................................................................16
1.3.2.2
Convert FLAC File to AIFF.............................................................................................................................16
1.3.2.6
Convert FLAC Folder to AIFF........................................................................................................................16
1.3.2.7
Check For Updates........................................................................................................................................16
1.3.2.8
Sonic Studio Website....................................................................................................................................17
1.3.2.9
Open Console Log.........................................................................................................................................17
1.3.3
Help Menu...................................................................................................................................17
2.0
Sample Rate Conversion Technical Details............................... 18
2.1
Sonic Issues To Consider.....................................................................................18
2.1.1
Data Precision.............................................................................................................................18
2.1.2
Low pass Filter Parameters.......................................................................................................19
Page 2
2.2.3
Classes of Rate Conversion.......................................................................................................19
2.2.3.1
Integer Ratio Conversion..............................................................................................................................19
2.2.3.2
Fractional Ratio Conversion.........................................................................................................................21
Appendix A iLok License Installation ........................................................... 22
Permanent License Installation......................................................................................................22
Trial License Installation.................................................................................................................22
Sonic Studio Process User Manual Index..................................................... 24
©2006-2013 Sonic Studio, LLC — All rights reserved
This manual, as well as the software described in it, is furnished under license and may only be used or copied in accordance
with the terms of such license. The information in this manual is furnished for informational use only, is subject to change
without notice, and should not be construed as a commitment by Sonic Studio, LLC. Sonic Studio, LLC assumes no responsibility
or liability for any errors or inaccuracies that may appear in this document.
Except as permitted by such license, no part of this publication may be reproduced, stored in a retrieval system, or transmitted,
in any form or by any means, electronic, mechanical, recording, or otherwise, without the prior written permission of Sonic
Studio, LLC.
SONIC STUDIO, LLC MAKES NO WARRANTIES, EXPRESS OR IMPLIED, INCLUDING WITHOUT LIMITATION THE IMPLIED
WARRANTIES OF MERCHANTABILITY AND FITNESS FOR A PARTICULAR PURPOSE, REGARDING THE APPLE SOFTWARE.
SONIC STUDIO, LLC DOES NOT WARRANT, GUARANTEE, OR MAKE ANY REPRESENTATIONS REGARDING THE USE OR THE
RESULTS OF THE USE OF THE SONIC STUDIO, LLC SOFTWARE IN TERMS OF ITS CORRECTNESS, ACCURACY, RELIABILITY,
CURRENTNESS, OR OTHERWISE. THE ENTIRE RISK AS TO THE RESULTS AND PERFORMANCE OF THE SONIC STUDIO
SOFTWARE IS ASSUMED BY YOU. THE EXCLUSION OF IMPLIED WARRANTIES IS NOT PERMITTED BY SOME STATES. THE
ABOVE EXCLUSION MAY NOT APPLY TO YOU.
IN NO EVENT WILL SONIC STUDIO, LLC, ITS DIRECTORS, OFFICERS, EMPLOYEES, OR AGENTS BE LIABLE TO YOU FOR
ANY CONSEQUENTIAL, INCIDENTAL, OR INDIRECT DAMAGES (INCLUDING DAMAGES FOR LOSS OF BUSINESS PROFITS,
BUSINESS INTERRUPTION, LOSS OF BUSINESS INFORMATION, AND THE LIKE) ARISING OUT OF THE USE OR INABILITY TO
USE THE SONIC STUDIO SOFTWARE EVEN IF SONIC STUDIO HAS BEEN ADVISED OF THE POSSIBILITY OF SUCH DAMAGES.
BECAUSE SOME STATES DO NOT ALLOWTHE EXCLUSION OR LIMITATION OF LIABILITY FOR CONSEQUENTIAL OR INCIDENTAL
DAMAGES, THE ABOVE LIMITATIONS MAY NOT APPLY TO YOU.
Sonic Studio, Sonic Studio Process, soundBlade, Sonic Studio Engine (SSE), NoNOISE II, Manual DeClick II, DeClick, DeCrackle,
A Type, B Type, C Type, D Type, E Type Broadband DeNoise II and the Sonic Studio logo are trademarks of Sonic Studio, LLC. All
other company or product names are either trademarks or registered trademarks of their respective owners.
Page 3
1.0...................................... Sonic Studio Process Overview
To increase your productivity and to free up soundBlade or Amarra from tasks that are time
consuming and suited for unattended execution, Sonic Studio developed the Sonic Studio
Process application. Sonic Studio Process is an easy to use, standalone application for Mac OS
X that is utilized for ultrafidelity sample rate conversion and DeCrackle batch processing.
The Sonic Studio Process application consists of two windows, each represented by its own tab
in the top right corner of the User Interface.
The first window is ‘Parameters’ and is accessed via the “PARAMS”button. In this section,
sound files can be added and selected for processing, processes can be assigned to each file,
an output folder for processed files can be set and parameters can be defined for each process.
The second window of the Sonic Studio Process is the ‘Queue Manager’ and is accessed from
the “QUE MGR” button. Once sound files have been assigned a process, processes can be
managed via the Queue Manager.
Both windows are discussed in detail below.
Licensing & Installing: Launch your iLok License Manager application
and download your iLok license for Sonic Studio Process. See Appendix A for
more info on installing permanent and trial licenses.
To install Sonic Studio Process, please click on the Sonic_Studio_Process.pkg
installer that you downloaded. If you are a soundBlade SE or HD user, this
installer is in the Extras folder of your application folder. Follow the on-screen
instructions to install your software. Note that Sonic Studio Process is an option
for soundBlade LE.
Note that the Sonic Studio Process app that’s included with Amarra has a
limited feature set. Not all parameters listed in this document are available.
DeCrackle is not available for Amarra users.
Operating system requirements:
At a minimum, Sonic Studio Process requires the following:
• Apple Macintosh Intel 2.6 GHz minimum or faster preferred
• 4 GB RAM minimum
• OS 10.6.8 or newer
• Spare USB port for iLok Smart Key (not required for Amarra)
Page 4
soundBlade TV: View the ‘Sonic Studio Process’ tutorial by clicking HERE.
1.1
The Parameters tab
By default, the ParametersTab is selected when Sonic Studio Process opens.The Parameters Window
largely consists of 2 areas, the “Soundfiles” area at the top and the “Processes” area at the bottom.
Figure 01: Sonic Studio Process showing the Params Window
Page 5
1.1.1
Soundfiles Area
Figure 02: Soundfile area of the Parameters Window
In the Soundfiles area, sound files can be selected and added by:
Clicking the ‘Open’ button
or
Dragging and dropping one or more files from the Finder into this area.
HINT: With either the Open button or drag and drop, multiple sound files can
be added to the list by selecting all the files you need to work on and adding all
to the Sound File list area.
Note that, only uncompressed files - WAV, AIFF or CAF - are supported at this time. Convert MP3, FLAC, AAC, ALAC or other compressed files to AIFF or WAV before
adding to Sonic Studio Process.
Once a sound file is added, it is placed in the Sound File Name list. This list displays the file
name, number of channels, duration, sample rate, word length or bit depth of each file.
In the ‘Output Folder’ field, the target folder for newly created sound files is specified. By default,
the Output Folder is the same as the input file.
To select a different Output Folder, click on the ‘Set Folder’ button. A standard Mac OS browser
opens, allowing you to navigate, create and/or choose the desired destination folder.
To remove sound files from the list, click to select the list entry and delete it by hitting the
backspace or delete key. To clear the list of all sound files, click the Clear All button to the lower
right of the Sound Files list.
Page 6
1.1.2
Processes Area: Sample Rate Conversion
Figure 03: Process area of the Parameters Window
Once all sound files have been added to the Soundfiles area, one or more processes can be
applied to each file here in the Processes area. An “Add a Process” menu allows for selection of
the desired process(es).
Note that, ‘Sample Rate Conversion’ is the default process for Sonic Studio
Process app.
If you are a soundBlade user and have purchased and installed either our Manual
DeClick or NoNOISE II SR option, ‘DeCrackle’ will appear in the Process pulldown menu. DeCrackle is not available for Amarra users.
When a process is selected, in the space below the Processes area, details and available
parameters are shown for the selected Process. This enables adjustment or selection of further
options, depending upon the Process selected.
Processes can be deleted from the processes list by clicking on the process and then hitting the
backspace or delete key. To clear all processes from the Processes list, click the “Clear All” button
to the right of the Processes list.
Once all necessary processes have been selected and placed in the right processing order, they
can be automatically performed upon the selected sound files by clicking the “Execute” button.
The sound files and the processes to be applied upon them are then “queued” and processing
commences. To indicate this action, the “Queue” indicator below the Execute button shows the
number of sound files and processes queued as Wait/Run.
Once the processes are being executed, all sound files and processes remain in their respective
lists. This allows for a quick method of applying different processes to the same file(s) or vice
versa. To erase both lists and start new lists for sound files and processes, simply click the “Clear
Files” or “Clear All” buttons next to the lists and the Parameters is cleared from its current list of
Page 7
sound files and processes, respectively. To remove all items in the lists automatically, enable the
Clear List on Execute option.
Note that, upon initiating a process, the Sonic Studio Process will ask to confirm
the destination folder.
Note that the order in which sound files are processed is fixed and dependant
upon the order in which sound files and processes are listed in their respective
areas. The primary processing order is defined, top to bottom, by the order in
which the sound files are listed in the Soundfiles area. The secondary processing
order is given by the order of processes in the Processes list. So, in practice, if
more than one sound file is listed and multiple processes are listed as well, first
the initial sound file in the Soundfiles list is processed by all processes listed in
the Processes list in the order in which they are listed. Be aware that each process
is performed upon the resulting file of the previous process. When all listed
processes are performed upon the first listed sound file, the following sound file
is processed with the same processing in the same order. This is repeated until
all sound files are processed with all listed processes.
The end result of this is one resulting sound file per process per sound file.
The following processes are available in Sonic Studio Process:
1.1.2.1
Sample Rate Conversion
The double precision sample rate algorithms in Sonic Studio Process SRC mode provide
conversions between each of the commonly-used sample rates, and produce 24-bit output in all
cases (which should be dithered to the appropriate release resolution if other than 24 bits).The
algorithms are designed with careful attention to filter parameters and computation precision in
order to preserve sound quality to the highest extent possible.
Because the multi-phase filters needed for the non-integer conversions (e.g. 96 kHz:44.1kHz)
require very large numbers of coefficients and customizing of dsp resources, the filters cannot
be designed “on-the-fly.” In order to offer choice in the sound of the filters, three versions of each
filter are offered- Steep, Gentle and Gentlest; the characteristics each version are described in
this section.
The Sample Rate Conversion (SRC) process offers:
Page 8
Eight choices of Target Sample Rates. Each Two Sample Rate Converter types - Sonic HD
preserves the pitch and duration of the original and Classic:
file.
Figure 05: Sample Rate Conversion type pulldown menu
The Default value is Sonic HD
See the LEARN Section on the next page
Figure 04: Sample Rate Conversion pull-down
menu showing available target sample rates
The Default value is 44100 Hz.
Three Target File Formats:
Three Filter Curves:
Figure 06: Target Format pull-down menu showing
available target file types
The Default value is WAV
Figure 07: Filter Type pull-down menu
The Default value is Steep
See Section 1.1.2.2 Selecting a Filter Curve below
Two Bit Depths (Word Length):
Three Dither types:
Figure 08: Bit Depth pull-down menu showing
available target bit depths
The Default value is 24 bits
Figure 09: Dither type pull-down menu
The Default value is Triangular PDF
See Section 1.1.2.3 Selecting a Dither Type below
LEARN: ‘Classic’ SRC is the long-established Sonic “monolithic” SRC -
monolithic meaning single stage. The monolithic SRC calculates its coefficient
set at runtime when the converter starts up. It’s perfect for general SRC.
‘Sonic HD’ (High Definition) SRC is our new multi-stage algorithm. The multistage SRC is based on pre-calculated coefficients for each stage. It’s great for
general purpose SRC and is recommend for non-integer SRC: 96 kHz -> 44.1 kHz
or 48 kHz -> 176.4 kHz for example.
See Chapter 2, ‘Sample Rate Conversion Technical Details’, below, for more
information.
Page 9
Note: Regardless of the input bit-depth, the output soundfile will be a 24-
bit file. This preserves the full dynamic range of your soundfile throughout the
conversion process. You can use Sonic Studio Process ‘Bit Depth’ and ‘Dither
Type’ parameters to change the bit depth if necessary.
1.1.2.2
Selecting a Filter Curve
The heart of the sample rate conversion process is the low pass filter, which is designed to reject
aliases (down conversion) or images (up conversion) — both of which are detrimental to sound
quality. The filter’s response above cutoff must be very steep if it is to be effective at rejecting
these artifacts.
Very steep filters can introduce audible distortions, however. Any filter design for sample rate
conversion therefore involves trade-offs among a number of factors: aliasing/imaging, inband/
stopband ripple, reduced gain at very high frequencies, and time smear. Each of these factors
has effects that can vary with the sonic characteristics of the material: sometimes it may be
preferrable, for example, to allow a small amount of aliasing in order to preserve other aspects
of signal integrity.
To provide the most flexibility in tailoring the conversion process to different types of program
material, Sonic Studio Process’ SRC offers three different filter choices:
Steep is a Nyquist filter optimized for maximum alias/image rejection
Gentle and Gentlest options trade a limited amount of aliasing/imaging for reductions in
other distortions.
HINT: while the Steep Filter is designed for most SRC, your choice of a filter
curve for a given sample rate conversion operation should be based on careful
audition.
Note: The digital filter that Sonic Studio Process SRC uses exhibits a small
amount of amplitude ripple near the cutoff frequency (this is known as the
“Gibbs Phenomenon” and is a characteristic of all FIR low-pass filters). Left
uncompensated, this ripple could cause source material with high frequencies
recorded at high levels to become clipped.
1.1.2.3
For this reason, SRC reduces the gain at the input of the conversion by 0.1 dB
to avoid clipping. Repeatedly converting the same file therefore will gradually
reduce its overall level.
Selecting a Dither Type
Dither is an intentionally applied form of noise used to randomize quantization error, preventing
audible artifacts from being induced when calculating sample rate or bit depth changes. No
single dither is a magic bullet, so three different variations of dither are available in Sonic Studio
Process.
Page 10
Sonic Studio Process Sample Rate Conversion performs sample rate conversion with ultra-high
precision, and the final step in the process of generating an output file is to round the output
to produce a 24-bit file. To preserve fine sonic details such as reverberation tails, Sonic Studio
Process SRC affords the option of applying one of three unique dithers to the output file. To
assure the highest sound quality, Sonic Studio recommends that you apply dither whenever you
use SRC or change bit depth.
Sonic Studio Process Dither Types:
Rectangular PDF (Rectangular Probability Density Function): In this random, flat dither,
the noise signal has equal energy at each frequency (think white noise). Rectangular PDF
is the most audible type of dither. With rectangular dither the increase in noise varies with
the signal. It is recommended for use on LOUD overly compressed music such as rock or
pop as it gives a certain ‘edge’ to the sound.
Triangular PDF (Triangular Probability Density Function) [Default]: Shaped triangular
dither cuts the noise level at low frequencies while boosting it a high frequencies. This
results in the dither noise being less audible. This shaping or weighting reduces the
audibility of the noise to a degree. With triangular dither, the added noise level is constant
and slightly higher. It is recommended for use on all types of music.
Noise Shaped: This dither type alters the spectral shape of the error that is introduced by
dithering such that the noise power is at a lower level in frequency bands at which noise
is perceived to be more undesirable and at a correspondingly higher level in bands where
it is perceived to be less undesirable. Since this dither is ‘packed’ at the higher end of
the hearing spectrum, this shaping or weighting reduces the audibility of the noise to a
degree. This dither is recommended for general use.
Note: In general, triangular PDF dither is preferable.
Note That with either type of dither, the added noise is very small and each
dither option acts differently with different types of program material. You should
experiment with each dither type to achieve the results that you desire.
Note: Regardless of the input bit-depth, the output soundfile will be a 24bit file. This preserves the full dynamic range of your soundfile throughout the
conversion process. You can use Sonic Studio Process ‘Bit Depth’ and ‘Dither
Type’ parameters to change the bit depth if necessary.
Page 11
1.1.3
Processes Area: DeCrackle
Figure 10: DeCrackle Parameters area of the Parameters Window
A common type of impulse noise is crackle, in which small impulses crowd against one another,
producing a nearly continuous noise, like bacon frying in a pan. This type of artifact requires a
different processing approach.
The Decrackle process in Sonic Studio Process is effective for correcting this type of dense,
impulsive noise by performing a type of sliding interpolation that isolates good audio between
impulses and uses the good audio as the basis for resynthesis.
Note If you are a soundBlade user and have purchased and installed either our
Manual DeClick or NoNOISE II SR option, ‘DeCrackle’ will appear in the Process
pull-down menu. DeCrackle is not available for Amarra users.
1.1.3.1
Threshold (Click Fraction)
This number affects the detection part of the Decrackle algorithm, in which audio samples are
separated into good and bad categories. The synthesis process then replaces the samples that
are deemed bad with synthesized material that matches the surrounding sound.
The Threshold is the percentage, or fraction of the samples that will be left in the good category.
The range of the parameter is from 0.85 to 0.99. The higher the Threshold, the less aggressive
the decrackling.
For heavier decrackling, make the Threshold smaller, as low as 0.85. Any lower is not
recommended, as there will be too little of the original signal to provide a basis for resynthesis.
Lowering the Threshold by only 0.05 is enough to make a noticeable difference.
Page 12
HINT: If the Threshold is set too high then there will be some amount of
crackle remaining in the program. If the Threshold is set too low you may begin
to decrackle good audio, which could result in low frequency artifacts (audible
thumps).
1.1.3.2
Synthesis Order
The Synthesis Order determines the precision of the Decrackler’s resynthesis. In general, the
larger this number, the cleaner and more artifact-free the output. The default value of 150 is
suitable for the majority of source materials.
If low frequency thunks occur in the processed output, try raising the value of the Synthesis
Order to 175 or even 200. However, raising the Synthesis Order markedly increases the amount
of time required to process the soundfile. Synthesis Order should generally be left at 150 unless
the process is producing unacceptable numbers of artifacts.
Paradoxically, processing artifacts tend to occur more with clean recordings that have high
signal-to-noise ratios. For (relatively) recent material, such as tape recordings from the early
1950s, it is common to set the Synthesis Order to 128. For 78s from the 1930s, however, it is
common to set the Synthesis Order to 125.
Page 13
1.2
The Queue Manager tab
To monitor and manage queued processes, the Queue Manager tab offers status information
and limited options to influence the queued jobs and tasks being performed.
Figure 7.2: The Queue Manager tab
In the top half of the window, all processing jobs in the Queue are listed.
In the bottom half, the active jobs are listed. The progress bars below this area show which file
is being processes and which process of the total number of processes to be applied is currently
being applied.
To suspend currently running processes, click the “Pause/Resume” button. The current process
is halted and queued processes are held in the queue. To resume processing, click the Pause/
Resume button again.
To abort the current process, click the Abort button and the current process will be aborted,
initiating the next process in the Queue.
Page 14
1.3
Menus
1.3.1
Sonic Studio Process Menu
1.3.1.1
About Sonic Studio Process
Opens a dialog box describing the version and build numbers of your Sonic Studio Process
application. Clicking on the dialog box closes it.
1.3.1.2
Preferences..
Disabled for Sonic Studio Process.
1.3.1.3
Hide Sonic Studio Process
Use the Hide Sonic Studio Process menu item to hide Sonic Studio Process and all of its open
windows, allowing you access to other programs running in Mac OS X. Clicking on the Sonic
Studio Process icon in your Dock returns Sonic Studio Process to view.
1.3.1.4
Hide Others
Use the Hide Others menu item to hide all visible applications except Sonic Studio Process
allowing you to focus on Sonic Studio Process alone. Clicking on any icon in the doc will return
that application to view.
1.3.1.5
Show All
The Show All menu item un-hides all running programs in Mac OS X.
1.3.1.6
Quit Sonic Studio Process
Use the Quit Sonic Studio Process menu item to quit Sonic Studio Process and close all open
windows.
Page 15
1.3.2
File Menu
1.3.2.1
Show Params
Opens the Sonic Studio Process Parameters window.
1.3.2.1
Show Que Manager
Opens the Sonic Studio Process Que Manager window.
1.3.2.1
Open Sound File...
This command opens a Mac OS file browser, allowing you to select any sound file recognized by
Sonic Studio Process. This includes AIFF, WAV, AIFC 32 bit floating point files and BWF files along
with SD2 or Sound Designer II files with region definitions. Sonic Studio Process is also able to
open audio files by dragging and dropping the files into the Parameters window.
1.3.2.2
Convert FLAC File to AIFF
Navigate to FLAC files and convert them to AIFF format.
The shift and command keys allow you to select more than one file.
1.3.2.6
Convert FLAC Folder to AIFF
Navigate to a folder containing FLAC files and convert the folder’s contents to AIFF.
1.3.2.7
Specify the source folder and a destination folder for the AIFF files.
Check For Updates
Check for updates to Sonic Studio Process.
Page 16
1.3.2.8
Sonic Studio Website...
Opens www.sonicstudio.com into a new web browser window.
1.3.2.9
Open Console Log
Allows Sonic Studio Process to log information on its operation to the Console Log. Use the
Console Application to view this log ( in Utilites Folder ).
1.3.3
Help Menu
Allows access to Sonic Studio Process Help information.
Page 17
2.0.................. Sample Rate Conversion Technical Details
All rate conversions rely on a relatively simple process, in which the source data is filtered with
a low pass filter (lpf) with bandwidth determined nominally by the Nyquist frequency of the
lower of the two frequencies (source frequency, destination frequency).
For noninteger conversions, the filter is oversampled, usually at a high rate, to produce a set
of coefficients which are then used to filter the data, but only at the output rate determined by
the destination frequency. The upconversion and downconversion factors are defined by the
equation:
T = (M/L)T’
where the integers M and L provide the smallest whole integers relating the new (T’) and old (T)
sample periods.The oversampling, or upconversion, rate is M/T.
The ratios 96:44.1 and 44.1:96 require high oversampling (M=147 and M=320, respectively) and
hence substantially more complicated implementation than the simple decimation/interpolation
ratios 88.2:44.1 and 44.1:88.2 (M=1 and M=2, respectively). However, the conversions are based
on the same low pass filters, and as long as the same filter design approach is used and high
precision is maintained in the computations, the sonic performance should be comparable.
LEARN:
The coefficient technique for Classic monolithic SRC is called windowed sinc,
meaning that, during calculation, filters are used to separate one band of
frequencies from another.
The coefficient technique for Sonic HD multi-stage SRC is optimized MeanSquared Error. Mean Squared Error is a way to quantify the difference between
values implied by an estimator and the true values of the quantity being estimated. In this case, multi-stage means that the re-sampling can be done in incremental
stages. For example, a conversion from 44.1 to 48 is broken down into two
stages of 8/7 and 20/21, so that 147 samples in yield 160 samples out (multiply by
3 to get 441 in -> 480 out). There are also stages for 2:1 and 1:2 conversion, for
doubling and halving the rate.
2.1
2.1.1
Sonic Issues To Consider
Data Precision
Filter coefficients in Sonic Studio Process algorithms are calculated using advanced arithmetic,
converted integers, and highly-efficient DSP techniques. The audio data (internal word length
24 bits) is convolved with the filter coefficients using a double precision multiply algorithm.
The output is rounded (not dithered) to 24-bit integer under the assumption that the roundoff
error spectrum is below audibility and that the output will be dithered to the final bit depth. This
implementation preserves 24-bit precision in the output data, even with very long filters.
Page 18
2.1.2
Low pass Filter Parameters
On mathematical grounds, low pass filters requiring steep rolloff in order to attenuate aliases
or images just outside the audio band will be fairly long. Depending on the design, a strictly
Nyquist filter for 96 kHz:44.1 kHz downconversion having flat inband gain to 20 kHz and stopband
attenuation at 22.05 kHz of -120 to -145 dB, has about 220-300 coefficients (or equivalently a
length of 2.3 ms - 3.1 ms in time).
Apart from ease of implementation, the advantage of simple decimation ratios, if these are
the only ratios of concern, is that optimal filter design approaches such as the Remez discrete
Chebyschev approximation can be used to compute the filter.
Other things being equal, the longer the filter, the greater the potential for smearing of the natural
time relationships in the audio source. The filter can be shortened by relaxing the steepness of
the rolloff, but at the expense either of reducing gain at the upper edge of the audio band or by
allowing aliasing.
From a sonic standpoint, aliasing, reduced gain at 20 kHz, and increased inband/stopband ripple
all create audible distortions which, at significant levels, may be greater factors than the less
objectionable effects of filter length. On the other hand, small amounts of certain distortions
may be tolerated with various audio materials in order to minimize the effects of filter length.
In many cases, the shorter filters offer clear benefits and should be judged by audition. The
rationales for the levels and choices are discussed in a preprint published by the 105th AES
Convention, San Francisco, Sept, 1998 (“Multiphase Filters for Sample Rate Conversion of High
Resolution Audio”).
2.2.3
Classes of Rate Conversion
Sonic Studio Process performs two classes of upward or downward rate conversion: integer
ratio and fractional ratio.
2.2.3.1
Integer Ratio Conversion
In integer ratio conversion, the source and output sample rates bear a simple, integer relationship
to one another (for example, 44.1 kHz to 88.2 kHz is 1:2). Integer ratio conversions are the most
straightforward.
Integer ratio down conversion is achieved by omitting every other sample, in a process known
as decimation, and is illustrated in Figure 1. Here, curve A shows the original analog waveform
with its higher-sample-rate digital representation superimposed. Curve B is the down conversion
result.
Page 19
Figure 2-01: Integer Ratio Down Conversion
Because decimation causes aliasing (folding of frequencies above the Nyquist frequency back
into the audible band), down conversion requires a steep lowpass filter which cuts off at the
Nyquist frequency of the new, lower sample rate. (The Nyquist frequency is one-half the sample
rate; it determines the usable bandwidth of the system.) For computational efficiency, the
decimator and lowpass filter are normally combined in a single processing step.
For upward sample rate conversion, the converter needs to create new sample values that are
evenly spaced between the source samples. This process is called interpolation, and is illustrated
in Figure 2-03.
Figure 2-03: Integer Ratio Up Conversion
You can think of up conversion as occurring in two steps:
•
First, zero-value samples are added between input samples at the new, higher sample rate
Page 20
(Figure 2-03 Curve B).
•
Then, the signal is filtered using a steep lowpass which cuts off at the Nyquist frequency
of the old, lower sample rate. (Figure 2-03 Curve C).
The up conversion filter is called an interpolator. Besides providing correct values for the
new samples, it also prevents images of the input spectrum from appearing in the new, wider
bandwidth.
2.2.3.2
Fractional Ratio Conversion
Fractional rate conversion takes advantage of the fact that, where the source and output sample
rates are not related by a simple integer, there is nonetheless a higher clock rate to which both
will have an integer relationship. This is illustrated in Figure 2-03.
Figure 2-03: Fractional Ratio Conversion
Here, the ratio between clock rate A and intermediate rate B is 1:4. In turn, the ratio between
clock rate B and rate C is 3:1. Oversampling at clock rate B therefore enables conversion between
signals sampled at rate A and those sampled at rate C.
In practice, fractional-rate conversion is performed by an FIR lowpass filter which cuts off at the
Nyquist frequency of the lower of the two sample rates (source or output) and is oversampled at
some high frequency to which both sample rates have an integer relationship. The Nyquist filter
prevents aliases (down conversion) or images (up conversion).
Page 21
Appendix A . ................................ iLok License Installation
All Sonic Studio software is protected with PACE Anti-Piracy’s InterLok copy protection. Your
Sonic Studio Process software is authorized with an iLok USB Smart Key.
Permanent License Installation
To download your Sonic Studio Licenses to your iLok:
1) Copy the Activation Code that was delivered with your soundBlade purchase.
2) Launch the iLok License Manager application and from the ‘Licenses’ menu at the top
of the screen, select ‘Redeem Activation Code’.
3) In the ‘Enter Activation Code’ window, paste the Activation Code you copied in step
one and click on ‘Next’
4) Select the Activation Location and download your soundBlade license to the iLok of
your choice.
To register your Sonic Studio software and iLok USB Smart Key, visit:
http://www.sonicstudio.com/sonic/reg/sonic_register
Trial License Installation
To enable a full-function 14-day trial version.
1) Copy this Activation code:
5256-7559-4679-8906-9374-1074-4207-09
Page 22
2) Launch the iLok License Manager and from the ‘Licenses’ menu at the top of the screen, select
‘Redeem Activation Code’.
3) In the ‘Enter Activation Code’ window, paste the Activation Code you copied in step one and
click on ‘Next’
4) Select the Activation Location and download your soundBlade license to the iLok of your
choice.
5) Launch Sonic Studio Process.
Page 23
Sonic Studio Process User Manual Index
A
AAC 6
Abort
14
Add a Process 7
AIFC 16
AIFF 6, 16
ALAC
6
Amarra 4, 7, 12
Audio Client
5
B
BWF 16
C
CAF 6
Classic 9, 18
Clear All 6, 7
Clear Files
7
Clear List on Execute 8
Compressed
6, 11
D
DeCrackle
4, 7, 12
E
Execute 7, 8
F
Filter 9, 10
Filter Curve
FLAC 6, 16
9, 10
G
Gentle 8, 9, 10
Gentlest 8, 9, 10
I
Page 24
iLok 4
importing
sound file types
Installing 4
16
L
Licensing
4
M
Manual DeClick 7, 12
Menus 15
MP3 6
N
Noise Shaped 11
O
Open
6, 16, 17
Operating system requirements
Output Folder 6
4
P
Parameters
4, 5, 6, 7, 12
Pause/Resume 14
Processes
5, 7, 8
Processes Area 7, 12
Project
Panel
3
Q
Queue 4, 7, 14
Queue Manager 14
R
Rectangular PDF
11
S
Sample Rate Conversion
Target Sample Rate 9
SD2 16
Set Folder
6
Sonic HD 9, 18
8, 12
Page 25
Sound File Name list 6
sound files
opening
16
Soundfiles
5, 6, 7, 8
SRC 8
Steep 8, 9, 10
Synthesis
13
Synthesis Order 13
T
Target Sample Rate
9
Threshold
12, 13
Triangular PDF 9, 11
U
Uncompressed 6
W
WAV 16
© 2013 Sonic Studio, LLC • 1340 Mission Street • San Francisco., CA 94103 • 1-415-944-7642
soundBlade, soundBlade HD, soundBlade SE, soundBlade LE, Sonic Studio Process, sonicstudio.com, the Sonic Studio logo and type are
trademarks of Sonic Studio, LLC in the United States and other countries. All other trademarks, trade names, service marks, and logos
referenced herein belong to their respective companies.
Comments, corrections and suggestions regarding this manual are always welcome. Please contact us at [email protected].
Sonic_Studio_Process_UM_v01r16
Page 26