1
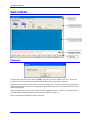
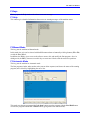
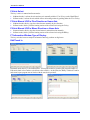
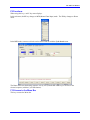
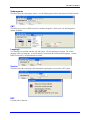
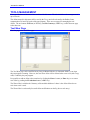
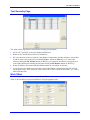
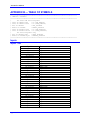
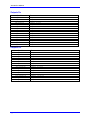
^1 USER MANUAL
^2 Advantage 400
^3 ADV 400 User Manual
^4 700-100002-xUxx
^5 November 2, 2007
Single Source Machine Control
Power // Flexibility // Ease of Use
21314 Lassen Street Chatsworth, CA 91311 // Tel. (818) 998-2095 Fax. (818) 998-7807 // www.deltatau.com
Copyright Information
© 2003 Delta Tau Data Systems, Inc. All rights reserved.
This document is furnished for the customers of Delta Tau Data Systems, Inc. Other uses are
unauthorized without written permission of Delta Tau Data Systems, Inc. Information contained
in this manual may be updated from time-to-time due to product improvements, etc., and may
not conform in every respect to former issues.
To report errors or inconsistencies, call or email:
Delta Tau Data Systems, Inc. Technical Support
Phone: (818) 717-5656
Fax: (818) 998-7807
Email: [email protected]
Website: http://www.deltatau.com
Operating Conditions
All Delta Tau Data Systems, Inc. motion controller products, accessories, and amplifiers contain
static sensitive components that can be damaged by incorrect handling. When installing or
handling Delta Tau Data Systems, Inc. products, avoid contact with highly insulated materials.
Only qualified personnel should be allowed to handle this equipment.
In the case of industrial applications, we expect our products to be protected from hazardous or
conductive materials and/or environments that could cause harm to the controller by damaging
components or causing electrical shorts. When our products are used in an industrial
environment, install them into an industrial electrical cabinet or industrial PC to protect them
from excessive or corrosive moisture, abnormal ambient temperatures, and conductive materials.
If Delta Tau Data Systems, Inc. products are directly exposed to hazardous or conductive
materials and/or environments, we cannot guarantee their operation.
REVISION HISTORY
REV.
DESCRIPTION
DATE
CHG
APPVD
1
NEW MANUAL CREATION – PRELIMINARY
12/21/04
N/A
N/A
2
UPGRADE FROM PRELIM TO FULL RELEASE
11/02/07
CP
VB
Adv 400 User Manual
Table of Contents
INTRODUCTION ................................................................................................................................................ 1
Adv 400 Control Panel Overview ...................................................................................................................... 1
MAIN SCREEN.................................................................................................................................................... 3
Password ............................................................................................................................................................ 3
F-Keys ................................................................................................................................................................ 4
F1 Help .......................................................................................................................................................... 4
F2 Manual Mode ........................................................................................................................................... 4
F3 Automatic Mode ....................................................................................................................................... 4
F4 Axis Select ................................................................................................................................................ 5
F5 Axis Manual JOG in Plus Direction or Home Axis.................................................................................. 5
F6 Axis Manual JOG in Minus Direction or Home Axis ............................................................................... 5
F7 Information Window Type of Display....................................................................................................... 5
Edit/Teach In ................................................................................................................................................. 5
F9 Functions.................................................................................................................................................. 6
F10 Access to the Menu Bar .......................................................................................................................... 6
Menu Bar............................................................................................................................................................ 7
File................................................................................................................................................................. 7
Edit ................................................................................................................................................................ 7
Tools .............................................................................................................................................................. 7
Offsets ............................................................................................................................................................ 7
Subprograms.................................................................................................................................................. 8
CNC ............................................................................................................................................................... 8
Language ....................................................................................................................................................... 8
Version........................................................................................................................................................... 8
ESC ................................................................................................................................................................ 8
TOOLS MANAGEMENT ................................................................................................................................... 9
Tool Wear Page.................................................................................................................................................. 9
Tool Geometry Page......................................................................................................................................... 10
Work Offset...................................................................................................................................................... 10
Home Position .................................................................................................................................................. 11
P Var................................................................................................................................................................. 11
Subprogram ...................................................................................................................................................... 12
DNC ................................................................................................................................................................. 13
Ethernet Connection ......................................................................................................................................... 14
File Manager .................................................................................................................................................... 14
APPENDIX A — WRITING A PART PROGRAM........................................................................................ 15
Testing an Input................................................................................................................................................ 15
Waiting State of an Input.................................................................................................................................. 15
Setting an Output Asynchronously................................................................................................................... 15
Setting an Output Synchronously..................................................................................................................... 15
Testing or Waiting on Information................................................................................................................... 15
Jump to a Label ................................................................................................................................................ 16
Limitations when Running a Program in DNC Mode.................................................................................. 16
APPENDIX B — TABLE OF SYMBOLS........................................................................................................ 17
Inputs................................................................................................................................................................ 17
Inputs True................................................................................................................................................... 17
Inputs False ................................................................................................................................................. 18
Outputs ............................................................................................................................................................. 19
Set Outputs Non-Synchrone ......................................................................................................................... 19
Set Outputs Synchrone for Programming Only ........................................................................................... 19
Reset Outputs ............................................................................................................................................... 20
Reset Outputs Synchrone for Programming Only........................................................................................ 20
Outputs On................................................................................................................................................... 21
Outputs Off .................................................................................................................................................. 21
Table of Contents
i
Adv 400 User Manual
ii
Table of Contents
Adv 400 User Manual
INTRODUCTION
Adv 400 Control Panel Overview
•
•
•
•
•
•
•
•
The Keyboard (alphanumeric and numeric) contains the necessary keys for easy control of the different
Adv 400 NC software features and for typing the different programs (part or PLC) of the machine.
The flat color Display shows the different Adv 400 NC screens.
The F1 to F10 keys permit easy control of the Adv 400 NC software, modes, and axis of the
machine.
The Cycle Start, Feed Hold and Reset buttons are used to control the start/stop/reset of the part
program.
The Hand Wheel, in manual mode, moves the axis manually. In this case, the feedrate override
button is divided in four quadrants to give the unit of the axis movement (0.001 or 0.01 or 0.1 or 0.2
millimeters per hand wheel increment). First quadrant is between 0% and 30%, second quadrant is
between 30% and 60%, third quadrant is between 60% and 90% and fourth quadrant is between 90%
and 120%.
The Feedrate Override has a range between 0 and 120%. In automatic mode, the axis speeds can be
varied from 0 to 120% of the programmed speed in the part program.
In manual mode, the axis can have varied jogging speeds from 0 to 100% of the maximum jogging
speed indicated in the Machine Setting Page. (See the Machine Setting section of this manual.)
The USB Connector connects any USB device (mouse, keyboard).
Introduction
1
Adv 400 User Manual
2
Introduction
Adv 400 User Manual
MAIN SCREEN
At power-up of the Adv 400 NC software, the following window (main screen) appears:
Password
If a password is not entered (by clicking F2 OK), the system will be at machine user level. In the user
level, the axis can be homed or moved manually and the present part program can be run.
With a first password, the system will be at machine manager level. In this level the part program can be
modified and the different menus for managing the production can be accessed (Tool menu, Work Offset
menu, Subprograms).
With a second password, the system will be at machine Integration level. At this level, all menus can be
accessed and the machine integration can be performed (PLCs, tuning, etc.).
Refer to the Integration Manual for these passwords.
Main Screen
3
Adv 400 User Manual
F-Keys
This key opens the Help window when there is an error message:
F1 Help
This window gives detailed information about errors or warning messages of the machine status.
F2 Manual Mode
This key puts the machine in Manual mode.
In this mode, the axis can be selected with the F4 button and moved manually with Jog buttons (F5 or F6)
or with the Hand Wheel.
In addition, the F8 key gives access to the editor to create, edit, and modify the Part program. Once in
editing mode, the F8 key becomes a teach-in key to create move blocks with the actual axis positions.
F3 Automatic Mode
This key puts the machine in Automatic mode.
The Part program window takes another color (not an editor anymore) and shows the status of the running
program (active block) by highlighting the active line.
This mode runs the part program with Cycle Start button, stops the program with the Feed Hold button
or resets the program with the F2 or Reset buttons (going back to the manual mode).
4
Main Screen
Adv 400 User Manual
F4 Axis Select
This key is active in manual and home modes.
• In Manual mode, it selects the axis and moves it manually with the F5 or F6 keys or the Hand Wheel.
• In Home mode, it selects the axis which will run its homing routine by pushing either the F5 or F6 key.
F5 Axis Manual JOG in Plus Direction or Home Axis
•
•
In Manual mode, this key jogs the selected motor manually in plus direction.
In Home mode, this key runs the homing routine of the selected axis using the F6 key.
F6 Axis Manual JOG in Minus Direction or Home Axis
•
•
In manual mode, this key jogs the selected motor in minus direction manually.
In Home mode, this key runs the homing routine of the selected axis using the F5 key.
F7 Information Window Type of Display
This key switches between complete information and only positions on big letters.
Edit/Teach In
In manual mode, this key is first labeled Edit. A first push on this key puts the part program window in
Edit mode (back color windows switch from color to white). At this point, the F8 key is labeled Teach In
and creates a part program moves blocks with the actual axis positions.
Main Screen
5
Adv 400 User Manual
F9 Functions
When using this key, a sub-F-key menu displays.
In this sub-menu, the F1 key changes to MDI (Manual Data Input) mode. The F2 key changes to Home
mode.
In the MDI mode, some move blocks can be entered and run with the Cycle Start button.
The Home mode runs the homing sequence axis by axis (with the F5 or F6 keys) or all axes in the
selected sequence (with the Cycle Start button).
F10 Access to the Menu Bar
This key accesses the Menu bar.
6
Main Screen
Adv 400 User Manual
Menu Bar
File
This menu manages the part program for creating, opening, and saving.
•
•
•
File Manager accesses a menu for managing the files (copying files from an external hard disk to
internal hard disk, moving files from directories, etc.). See the File Manager section for more details.
DNC runs a long part program in DNC mode. See the DNC section for more details.
With the Adv 400 Ethernet option present, Connect to Network opens a command menu to connect
the Adv 400 to the Ethernet Network. See the Ethernet Connection section for more details.
Edit
This menu provides the tools necessary to modify the program.
Tools
This menu opens the Tools Management window. See this section in this manual for further details.
Offsets
This menu accesses the Work Offset, Home Position and P Var windows. See these sections in this
manual for further details.
Main Screen
7
Adv 400 User Manual
Subprograms
This menu opens the subprogram window. See the Subprogram section in this manual for further details.
CNC
This menu gives access to different tools for machine integration. Refer to the Adv 400 Integration
manual for details.
Language
Two languages are possible with the Adv 400 system. The first language is English. The second
language can be any language. A text file must be created with the second desired language. Contact
Delta Tau Europa if a second language is needed.
Version
This menu opens the About page with information regarding the version of the CNC system.
ESC
Currently has no function.
8
Main Screen
Adv 400 User Manual
TOOLS MANAGEMENT
Enter specifications of the tools of the machine with this menu. The Adv 400 allows the management of
up to 24 tools.
The offsets entered in this menu will be used by the Txxyy tool call code and by the Radius Cutter
compensation G41 and G42 codes of the part program. There are two pages for managing the tool
offsets. The two buttons F3 Wear (or F3 F-key) and F4 Geometry (or F4 F-key) switch from one page
to the other one.
Tool Wear Page
The first page is the Tool Wear page.
The Tool Wear page can be modified at any time (in Manual Mode or in Automatic Mode), even when
the part program is running. However, the new Wear offset will be affected when a new tool (with Txxyy
code) is called by the part program.
It is possible to add an offset to the actual one by clicking the Enter+ button (or Enter key) or to enter a
new offset by pushing the F8 Absolute button (or F8 F-key).
The Wear offset is added to the Geometry offset and this addition of values is the offset affected to an
axis when a tool is used.
The Wear offset is used usually for small offset modifications on the fly (due to tool usury).
Tools Management
9
Adv 400 User Manual
Tool Geometry Page
The second page is the Tool Geometry page.
The offsets of this page must be entered before running a part program.
• Off X, Off Y and Off Z are the tool lengths in millimeters.
• Radius is the Cutter Radius of the tool in millimeters.
• Dir is the direction of the tool, used for Cutter Radius Compensation for lathe machines. It is possible
to add an offset to the actual one by clicking the Enter+ button (or Enter key) or to enter a new
offset by clicking the F8 Absolute button (or F8 F-key) or to measure the offset by moving the axis
to the right position (tool touching the part) and clicking the F9 Measure button (or F9 F-key).
• Wears are added to Geometries and this addition makes the axis offsets for this tool.
• A tool must also be called previously before using Cutter Radius Compensation with G41 and G42
part program codes. Then, when one of these codes G41 or G42 is used, the tool radius “yy” value is
taken from this table.
Work Offset
The Adv 400 provides six coordinate system Work Offsets.
These six Work offsets are selected with G54 to G59 part program codes.
10
Tools Management
Adv 400 User Manual
Work offsets must be entered in this menu and the F2 Set button (or F2 F-key) must be pushed to validate
these values.
The G54 to G59 G-codes of the part program will use these offsets.
Home Position
This menu sets the position of each axis. The value introduced here for each axis will be the machine
position at reference point.
P Var
Up to 50 user variables are available for general-purpose use (calculation, parametric programming, etc.).
This menu sets a value to these variables and puts a comment on each of them. These P-variables can
then be used in the part program and in PLCs.
Tools Management
11
Adv 400 User Manual
Subprogram
With this feature, custom subprograms, called by the main part program, can be created. Subprograms
number 2 to 999 are available for these subprograms. Subprograms 998 and 999 are reserved for special
functions. Refer to the Adv 400 Integrator manual for details.
From the main menu, the PLCs and subprograms management page creates (New), Edit, Delete, Load and
unloads subprograms.
•
•
•
•
•
•
12
New (or F2 on the keyboard) creates a new subprogram (opening text editor with blank page).
Edit (or F3 on the keyboard) opens an existing subprogram (opening text editor with this subprogram
inside) for consulting or modification.
Delete (or F4 on the keyboard) removes an existing subprogram from the list.
Load (or F5 on the keyboard) loads a subprogram in the controller. A Yes appears in the Loaded
section of this subprogram, indicating that this subprogram will be present in the controller and can be
called by a main part program at any time.
Unload (or F6 on the keyboard) removes an existing subprogram from the controller. A No appears
in the Loaded section for this subprogram, meaning that this subprogram will not be present in the
controller. This is useful when many subprograms are created and all of them are loaded in the
controller which could overload the controller memory.
When creating a new subprogram or editing an existing subprogram, a text editor opens and the
subprogram code can be entered.
Tools Management
Adv 400 User Manual
•
•
Download (or F2 on the keyboard) sends the subprogram to the controller to make it available for
calls from the main part program (e.g., the Load button on the Managing Subprogram page).
Close Editor (or F2 on the keyboard) provides an exit of this page and asks to save any entered code.
DNC
The DNC mode permits the running of long (indefinite length) programs.
The controller asks to open a part program (on the local hard disk on an external device like an USB
memory stick or on the Network if option present) and then jumps to Auto mode.
A cycle start runs this program. A few programming features are not allowed when running a part
program in DNC mode.
Tools Management
13
Adv 400 User Manual
Ethernet Connection
On this menu, the CNC displays a prompt menu. Enter the Windows command for connecting to a server
computer through the Ethernet (optional) connection.
At this point, enter the server name.
In the server, at least one shared directory must be present and, of course, the network with the user name
and password must be set.
A normal client/server connection window (with user name, password and workgroup) is displayed on the
Adv 400 and must be completed.
File Manager
This menu manages the files in the Adv 400 system.
Based on the Windows directory structure, this menu creates directories and copies files.
This menu is useful for copying files from an external device (memory stick connected to the USB
connector) to the internal hard disk, or from the internal hard disk to an external device.
This menu is organized in two windows, a left one and a right one.
One window is used as origin (from where) and the other one as target.
• The F1 and F9 keys jumps from one to the other page.
• F2 is used to show the type of files (*.NC for the part programs, *.* for all files).
• F5 performs the file copy of the selected file in the active window to the other window.
• F7 creates a new directory.
• F8 deletes the selected file.
• F10 quits this menu.
14
Tools Management
Adv 400 User Manual
APPENDIX A — WRITING A PART PROGRAM
A Part program creates movements of axis with rapid moves, interpolated moves (linear or rotary
interpolation) and manages some machine features such as spindle or tool length and radius
compensation.
G/M/T codes manage most of these features. Refer to the programming manual for further details.
The flexibility of the Adv 400 allows programming of additional useful features, such as tests of
conditions (reading input status), write an output directly to 1 or 0, loops to wait a condition, etc.
A symbol table exists in the system, giving names for inputs, name of outputs and information about
status of the system. Refer to the Table of Symbols in this manual.
Testing an Input
If (ON_INPUT1)
; test is Input1 true action
Endif
.............................................
If (OFF_INPUT4)
; test is Input4 false action
Else
other action
Endif
Waiting State of an Input
While (ON_INPUT2)
Endw
; wait as long as Input2 is true action
Note:
In a part program, it is not allowed to wait in a While loop without any action
(move) in this loop. Therefore, put at least a G04X0 function in the loop.
While (ON_INPUT2)
Endw
; wait as long as Input2 is true G04 X0
Setting an Output Asynchronously
SET_OUTPUT2
RESET_OUTPUT3
; set Ouput2 asynchronously
; Reset Ouput3 asynchronously
Setting an Output Synchronously
SETS_OUTPUT2
RESETS_OUTPUT3
; set Ouput2 synchronously
; Reset Ouput3 synchronously
Testing or Waiting on Information
With an If condition or a While loop, it is also possible to test or wait for other information coming from
the CNC. The Table of Symbols gives the list of information available.
If (CS_SPND_AT_ZERO != 0) ; test is spindle is at zero speed ; action
Endif
While (CS_SPND_AT_SPEED = 0) ; wait that spindle is at programmed speed. G04
X0
Endif
Appendix A
15
Adv 400 User Manual
Jump to a Label
It is possible to jump to a label (coming back in the program or jumping a part of the program) using the
GOTO function.
N10 G01 X15 F100 N20 G04 X1
N30 GOTO 10 ; jump to label N10
N20 G00 X0
If (ON_INPUT1) ; If Input1 is true, jump to label N50 GOTO 50
Endif
N30 G01 X10 F100 N40 G01 Y20 N50 G00 Y0 Z0
Limitations when Running a Program in DNC Mode
As the DNC mode is tacking the program partially, it is not possible to use test conditions (IF), loops to
wait a condition (While), GOTO and GOSUB statements. Only setting outputs (synchronously or
asynchronously) is possible in DNC mode.
16
Appendix A
Adv 400 User Manual
APPENDIX B — TABLE OF SYMBOLS
;**************************************************************************
; INPUTS / OUTPUTS
;**************************************************************************
;
for PLCs and Part Programs
; Test an INPUT true
: If (ON_INPUTx)
; Test an INPUT false : If (OFF_INPUTx)
; Set an OUTPUT
: SET_OUTPUTx
; Reset an OUTPUT
: RESET_OUTPUTx
; Test an OUTPUT true : If (ON_OUTPUTx)
; Test an OUTPUT false : If (OFF_OUTPUTx)
;
for Part Programs only
; Set an OUTPUT Sync
: SETS_OUTPUTx
; Reset an OUTPUT Sync : RESETS_OUTPUTx
;**************************************************************************
Inputs
Inputs True
Appendix B
Symbol
Comment
ON_INPUT1
ON_INPUT2
ON_INPUT3
ON_INPUT4
ON_INPUT5
ON_INPUT6
ON_INPUT7
ON_INPUT8
ON_INPUT9
ON_INPUT10
ON_INPUT11
ON_INPUT12
ON_INPUT13
ON_INPUT14
ON_INPUT15
ON_INPUT16
ON_INPUT17
ON_INPUT18
ON_INPUT19
ON_INPUT20
ON_INPUT21
ON_INPUT22
ON_INPUT23
ON_INPUT24
ON_INPUT25
ON_INPUT26
ON_INPUT27
ON_INPUT28
ON_INPUT29
ON_INPUT30
ON_INPUT31
ON_INPUT32
Input 1 true
Input 2 true
Input 3 true
Input 4 true
Input 5 true
Input 6 true
Input 7 true
Input 8 true
Input 9 true
Input 10 true
Input 11 true
Input 12 true
Input 13 true
Input 14 true
Input 15 true
Input 16 true
Input 17 true
Input 18 true
Input 19 true
Input 20 true
Input 21 true
Input 22 true
Input 23 true
Input 24 true
Input 25 true
Input 26 true
Input 27 true
Input 28 true
Input 29 true
Input 30 true
Input 31 true
Input 32 true
17
Adv 400 User Manual
Inputs False
Symbol
OFF_INPUT1
OFF_INPUT2
OFF_INPUT3
OFF_INPUT4
OFF_INPUT5
OFF_INPUT6
OFF_INPUT7
OFF_INPUT8
OFF_INPUT9
OFF_INPUT10
OFF_INPUT11
OFF_INPUT12
OFF_INPUT13
OFF_INPUT14
OFF_INPUT15
OFF_INPUT16
OFF_INPUT17
OFF_INPUT18
OFF_INPUT19
OFF_INPUT20
OFF_INPUT21
OFF_INPUT22
OFF_INPUT23
OFF_INPUT24
OFF_INPUT25
OFF_INPUT26
OFF_INPUT27
OFF_INPUT28
OFF_INPUT29
OFF_INPUT30
OFF_INPUT31
OFF_INPUT32
18
Comment
Input 1 false
Input 2 false
Input 3 false
Input 4 false
Input 5 false
Input 6 false
Input 7 false
Input 8 false
Input 9 false
Input 10 false
Input 11 false
Input 12 false
Input 13 false
Input 14 false
Input 15 false
Input 16 false
Input 17 false
Input 18 false
Input 19 false
Input 20 false
Input 21 false
Input 22 false
Input 23 false
Input 24 false
Input 25 false
Input 26 false
Input 27 false
Input 28 false
Input 29 false
Input 30 false
Input 31 false
Input 32 false
Appendix B
Adv 400 User Manual
Outputs
Set Outputs Non-Synchrone
Symbol
Comment
SET_OUTPUT1
SET_OUTPUT2
SET_OUTPUT3
SET_OUTPUT4
SET_OUTPUT5
SET_OUTPUT6
SET_OUTPUT7
SET_OUTPUT8
SET_OUTPUT9
SET_OUTPUT10
SET_OUTPUT11
SET_OUTPUT12
SET_OUTPUT13
SET_OUTPUT14
SET_OUTPUT15
SET_OUTPUT16
Set
Set
Set
Set
Set
Set
Set
Set
Set
Set
Set
Set
Set
Set
Set
Set
Output
Output
Output
Output
Output
Output
Output
Output
Output
Output
Output
Output
Output
Output
Output
Output
1 true
2 true
3 true
4 true
5 true
6 true
7 true
8 true
9 true
10 true
11 true
12 true
13 true
14 true
15 true
16 true
Set Outputs Synchrone for Programming Only
Symbol
SETS_OUTPUT1
SETS_OUTPUT2
SETS_OUTPUT3
SETS_OUTPUT4
SETS_OUTPUT5
SETS_OUTPUT6
SETS_OUTPUT7
SETS_OUTPUT8
SETS_OUTPUT9
SETS_OUTPUT10
SETS_OUTPUT11
SETS_OUTPUT12
SETS_OUTPUT13
SETS_OUTPUT14
SETS_OUTPUT15
SETS_OUTPUT16
Appendix B
Comment
Set
Set
Set
Set
Set
Set
Set
Set
Set
Set
Set
Set
Set
Set
Set
Set
Output
Output
Output
Output
Output
Output
Output
Output
Output
Output
Output
Output
Output
Output
Output
Output
1 true synchronously (for Part Prog only)
2 true synchronously (for Part Prog only)
3 true synchronously (for Part Prog only)
4 true synchronously (for Part Prog only)
5 true synchronously (for Part Prog only)
6 true synchronously (for Part Prog only)
7 true synchronously (for Part Prog only)
8 true synchronously (for Part Prog only)
9 true synchronously (for Part Prog only)
10 true synchronously (for Part Prog only)
11 true synchronously (for Part Prog only)
12 true synchronously (for Part Prog only)
13 true synchronously (for Part Prog only)
14 true synchronously (for Part Prog only)
15 true synchronously (for Part Prog only)
16 true synchronously (for Part Prog only)
19
Adv 400 User Manual
Reset Outputs
Symbol
RESET_OUTPUT1
RESET_OUTPUT2
RESET_OUTPUT3
RESET_OUTPUT4
RESET_OUTPUT5
RESET_OUTPUT6
RESET_OUTPUT7
RESET_OUTPUT8
RESET_OUTPUT9
RESET_OUTPUT10
RESET_OUTPUT11
RESET_OUTPUT12
RESET_OUTPUT13
RESET_OUTPUT14
RESET_OUTPUT15
RESET_OUTPUT16
Comment
Reset
Reset
Reset
Reset
Reset
Reset
Reset
Reset
Reset
Reset
Reset
Reset
Reset
Reset
Reset
Reset
Output
Output
Output
Output
Output
Output
Output
Output
Output
Output
Output
Output
Output
Output
Output
Output
1
2
3
4
5
6
7
8
9
10
11
12
13
14
15
16
Reset Outputs Synchrone for Programming Only
Symbol
RESETS_OUTPUT1
RESETS_OUTPUT2
RESETS_OUTPUT3
RESETS_OUTPUT4
RESETS_OUTPUT5
RESETS_OUTPUT6
RESETS_OUTPUT7
RESETS_OUTPUT8
RESETS_OUTPUT9
RESETS_OUTPUT10
RESETS_OUTPUT11
RESETS_OUTPUT12
RESETS_OUTPUT13
RESETS_OUTPUT14
RESETS_OUTPUT15
RESETS_OUTPUT16
20
Comment
Reset
Reset
Reset
Reset
Reset
Reset
Reset
Reset
Reset
Reset
Reset
Reset
Reset
Reset
Reset
Reset
Output
Output
Output
Output
Output
Output
Output
Output
Output
Output
Output
Output
Output
Output
Output
Output
1 synchronously
2 synchronously
3 synchronously
4 synchronously
5 synchronously
6 synchronously
7 synchronously
8 synchronously
9 synchronously
10 synchronously
12 synchronously
13 synchronously
14 synchronously
15 synchronously
16 synchronously
17 synchronously
Appendix B
Adv 400 User Manual
Outputs On
Symbol
ON_OUTPUT1
ON_OUTPUT2
ON_OUTPUT3
ON_OUTPUT4
ON_OUTPUT5
ON_OUTPUT6
ON_OUTPUT7
ON_OUTPUT8
ON_OUTPUT9
ON_OUTPUT10
ON_OUTPUT11
ON_OUTPUT12
ON_OUTPUT13
ON_OUTPUT14
ON_OUTPUT15
ON_OUTPUT16
Comment
Output
Output
Output
Output
Output
Output
Output
Output
Output
Output
Output
Output
Output
Output
Output
Output
1 true
2 true
3 true
4 true
5 true
6 true
7 true
8 true
9 true
10 true
11 true
12 true
13 true
14 true
15 true
16 true
Outputs Off
Symbol
OFF_OUTPUT1
OFF_OUTPUT2
OFF_OUTPUT3
OFF_OUTPUT4
OFF_OUTPUT5
OFF_OUTPUT6
OFF_OUTPUT7
OFF_OUTPUT8
OFF_OUTPUT9
OFF_OUTPUT10
OFF_OUTPUT11
OFF_OUTPUT12
OFF_OUTPUT13
OFF_OUTPUT14
OFF_OUTPUT15
OFF_OUTPUT16
Appendix B
Comment
Output
Output
Output
Output
Output
Output
Output
Output
Output
Output
Output
Output
Output
Output
Output
Output
1 false
2 false
3 false
4 false
5 false
6 false
7 false
8 false
9 false
10 false
11 false
12 false
13 false
14 false
15 false
16 false
21