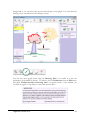
1
CogSketch v3.07
User Manual
http://www.silccenter.org/
Ken Forbus
Madeline Usher
Andrew Lovett
Maria Chang
Matthew McLure
Subu Kandaswamy
Jon Wetzel
Kate Lockwood
Version of 10/12/2015
(Hitchhiker’s Guide to the Galaxy Release)
CogSketch is being developed by the Spatial Intelligence and Learning Center,
a National Science Foundation Sciences of Learning Center
(Grant # SBE0541957)
CONTENTS
1
2
3
4
5
6
INTRODUCTION TO COGSKETCH ................................................................... 4
1.1 WHAT IS COGSKETCH?
4
1.2 WHAT YOU CAN DO WITH COGSKETCH
5
1.3 COGSKETCH: OPEN-DOMAIN SKETCH UNDERSTANDING
6
INSTALLING COGSKETCH............................................................................. 9
2.1 SYSTEM REQUIREMENTS
9
2.2 INSTALLATION
9
2.3 UNINSTALLING COGSKETCH
9
GETTING STARTED WITH COGSKETCH........................................................... 10
3.1 THE WELCOME SCREEN
10
3.2 TUTORIALS
11
3.3 COGSKETCH ESSENTIALS
11
3.4 WORKSHEET EXAMPLE: PARTS OF A CELL
15
THE COGSKETCH INTERFACE ...................................................................... 17
4.1 COGSKETCH TOOLBAR
17
4.2 THE LAYER CONTROL PANE
19
4.3 ADDING ENTITIES TO A SKETCH
20
4.4 EDITING ITEMS ON THE SKETCH
30
4.5 LOOKING AT THE KNOWLEDGE IN A SKETCH
35
4.6 ADDING NEW LAYERS AND SUBSKETCHES TO A SKETCH
36
4.7 COGSKETCH MENUS
40
ADVANCED COGSKETCH FEATURES ............................................................. 48
5.1 SPATIAL REASONING ON SKETCHES
48
5.2 USING ANALOGICAL MATCHING
49
5.3 VISUAL-CONCEPTUAL RELATIONSHIPS
50
5.4 THE KB BROWSER
51
DESIGNING A WORKSHEET........................................................................ 52
CogSketch, version 3.07
2
7
8
9
COGSKETCH GRADEBOOK ......................................................................... 59
7.1 ADDING CLASSES, ASSIGNMENTS, AND STUDENTS TO THE GRADEBOOK
59
7.2 ADDING SKETCHES TO THE GRADEBOOK
60
7.3 GRADING WORKSHEETS
61
7.4 EXPORTING/IMPORTING THE GRADEBOOK
62
COGNITIVE MODELING DEMONSTRATIONS ................................................... 64
8.1 PERCEPTUAL SKETCHPAD
64
8.2 GEOMETRIC ANALOGY
66
DATA GATHERING FOR LABORATORY EXPERIMENTS ........................................ 70
9.1 THE SAMPLE EXPERIMENT
70
9.2 DESIGNING MORE COMPLEX EXPERIMENTS
72
10 TROUBLESHOOTING ................................................................................ 74
10.1 KNOWN PROBLEMS
76
11 FUTURE PLANS AND FEEDBACK ................................................................... 79
11.1 WORD-BASED CONCEPT PICKER
79
11.2 AUTHORING ENVIRONMENT FOR SPATIAL ROUTINES
79
11.3 EVERYDAY PHYSICAL SEMANTICS
79
11.4 SPECIALIZED INTERFACES & AUTHORING TOOLS
79
11.5 SPEECH PROCESSING
80
12 REFERENCES .......................................................................................... 81
13 APPENDIX A: KEYBOARD SHORTCUTS .......................................................... 84
14 APPENDIX B: GLOSSARY .......................................................................... 86
15 APPENDIX C: EXPORTED INK FILE FORMAT.................................................... 88
16 APPENDIX D: EXPORTED HISTORY FORMAT .................................................. 90
17 INDEX.................................................................................................. 94
CogSketch, version 3.07
3
1 INTRODUCTION TO COGSKETCH
1.1 WHAT IS COGSKETCH?
People sketch to work through ideas and to communicate, especially when dealing with
spatial matters. Software that could participate in sketching could revolutionize spatial
education, and provide a new kind of instrument for cognitive science research. It would
also be an important scientific advance in its own right. CogSketch is a sketch
understanding system that we are creating to achieve these goals.
To be a participant in sketching, CogSketch must understand what you are drawing. One
part of that is understanding the visual and spatial properties of the digital ink that you draw.
Another part of that is having a conceptual understanding of what your ink is depicting, in
real-world terms. CogSketch has, built into it, a powerful set of visual and spatial processing
routines for encoding properties of what you draw in a human-like way. CogSketch also
uses a large library of knowledge about the world, to provide its conceptual understanding of
what you are drawing. It also has capabilities for analogical matching of sketches, so that it
can compare sketches in a human-like way. However, it’s important to remember that
today’s computers have far less knowledge and less computational power than people do.
So CogSketch also needs more help from you than you might need to give a person you are
sketching with. Sketching with CogSketch is not as fluent as sketching by yourself or with
another person, but we have found ways of making it flexible enough that people find it
useful.
CogSketch is very much a work in progress. All of its components are evolving to achieve
the ambitious goals outlined above. This requires sustained collaboration between the
CogSketch research team and other AI researchers, psychologists, learning scientists, and
educators. CogSketch is one of the products of SILC, the Spatial Intelligence and Learning
Center 1. SILC provides exactly the environment for sustained collaboration needed to
develop CogSketch. This version has already benefited from many rounds of feedback,
from researchers both inside and outside of SILC. We hope that you, too, will help us grow
the software in ways that will ultimately help everyone.
The next two sections provide a summary of the ways CogSketch can be used and a
summary of our approach. Section 0 describes how to install it, and Section 3 provides a
“quick start” guide to using the software. Section 4 provides a detailed description of
CogSketch’s interface. Section 5 describes some of CogSketch’s more advanced features,
including on-demand spatial reasoning operations, analogical matching, expressing
visual/conceptual relationships, and sketch annotations. Section 6 describes how to define a
worksheet in CogSketch, either for classroom use or for gathering data in laboratory
experiments. Section 7 walks through two demonstrations of cognitive modeling in
CogSketch: the perceptual sketchpad, in which objects are decomposed into their
component edges during comparison; and geometric analogy. Section 8 provides some
1
SILC is a National Science Foundation Sciences of Learning Center
CogSketch, version 3.07
4
troubleshooting tips. Section 9 discusses some of our future plans and how to provide
feedback.
1.2 WHAT YOU CAN DO WITH COGSKETCH
What can you do with CogSketch? There are different ways to answer this question,
depending on what you are interested in:
1. I’m an AI researcher, interested in sketch understanding, spatial reasoning, or tasks that involve
sketching. CogSketch can be used directly for a variety of computational experiments,
by using the query and KB extensions built into the software, and through the
socket-based KQML interface. For example, ancestors of CogSketch were used as
interfaces and reasoning components in integrated systems built by Cycorp, SRI, and
the US Army Battle Command Battle Lab. Moreover, the opt-in distributed data
collection system built into CogSketch is enabling us to gather a corpus of
conceptually labeled sketches that should be a resource for the sketch understanding
community.
2. I’m a cognitive scientist, interested in modeling human visual/spatial reasoning. CogSketch has
been used in a variety of cognitive simulation experiments [17-22]. You can use
CogSketch to provide an interface for sketching stimuli, extracting the data either via
saved files or the socket-based KQML interface.
3. I’m a cognitive scientist, interested in gathering sketching data in my lab/classroom experiments.
CogSketch gathers detailed timing data, both at the level of individual ink strokes and
at the level of glyphs. This greatly simplifies analyzing the order in which elements
of a sketch are drawn [14, 25]. It can provide timing signals to support
synchronizing it with other equipment, such as eye trackers. The grading rubrics in
Sketch Worksheets can be used to help automatically score data.
4. I’m an educator, interested in using intelligent sketch-based educational software in my classroom.
CogSketch is designed as a platform for intelligent sketch-based educational
software. We are exploring two models currently, both of which have been used in
classroom experiments:
a. Sketch Worksheets [30] are aimed at helping students learn about spatial layouts
and configurations. They are like pencil and paper worksheets, except that
they can provide immediate feedback. Moreover, grading rubrics can be
specified, and a gradebook is provided to simplify using sketch worksheets
with your classes. You can either use pre-existing sketch worksheets (we are
planning to set up a web-based Worksheet Exchange to facilitate finding
worksheets), or build your own, using the built-in Authoring Environment.
Please note that building your own requires investing time in understanding
much more about the ontology and spatial relationships that CogSketch
computes, which is not required for using pre-existing sketch worksheets.
We are especially interested in feedback on how to improve the authoring
process.
CogSketch, version 3.07
5
b. Design Coach is aimed at helping engineering design students learn to use
sketching to communicate ideas. Students explain their designs by drawing a
kind of comic strip, plus filling out a language-like form which describes
aspects of a design that are difficult to draw. CogSketch can reason
qualitatively about forces and surface contacts in 2D drawings[26], and this
ability is used to provide feedback about the student’s explanation[27-29].
No matter what your interest in CogSketch is, we are interested in hearing from you about
what you are using it for, and whatever suggestions you might have for improvement
([email protected]). We would also appreciate it if you opt-in to
allow your sketches to be sent, anonymously, to us periodically, so that we can add them to
the corpus that we are building.
1.3 COGSKETCH: OPEN-DOMAIN SKETCH UNDERSTANDING
When people sketch, they typically talk to each other about what they are drawing. Not
everyone is an artist, and even artists will often scribble a few suggestive strokes when
working through an idea on their own or when talking an idea through with other people.
When sketching with another person, we don’t have to recognize what they are drawing
based on its shape. We’re typically told, via language, what is being depicted. In other
words, visual recognition is not essential to sketching. Recognition can be a catalyst,
accelerating interaction and making it smoother, but it is not a requirement.
This insight is at the heart of our approach to sketch understanding 2. We have the user
indicate what ink belongs to a glyph – a visual entity that is part of a sketch – and use specialpurpose interfaces to tell CogSketch what they want that glyph to mean. So, while you have
to do a little more work to tell CogSketch what you are drawing, you never are blocked in
what you are trying to do by recognition failures. Our experience with several prior systems
based on these principles is that people can learn the basics of the system very quickly 3. On
the other hand, CogSketch does visual processing of what is drawn, using routines and
representations designed as models of human visual processing [21]. This has enabled
CogSketch to simulate a variety of visual tasks, and we are continuing to expand the set of
tasks in order to achieve a broadly capable model of visual reasoning.
When you assign a meaning to a glyph, you are selecting a concept or relationship from a
large library. The elements in this library are formally represented using predicate calculus.
One of the design tradeoffs in CogSketch is flexibility versus ease of use in selecting
concepts. As you will see, when setting up a worksheet, one can provide very easy and
natural access to a small number of concepts. When sketching in a more open-ended
fashion, one can access a large number of concepts – 59,312 to be exact, and 15,192
For more information about the nuSketch architecture, please see [5,7,9,11]. The single
best summary of CogSketch is [13].
2
See [1,24] for examples where nuSketch systems have been used as components in fieldtests of larger systems.
3
CogSketch, version 3.07
6
relationships and 3,652 functions, as of 8/1/2011 4. The current interface, when operating in
open-ended mode, shows you the raw concepts 5. This can be a little daunting, unless you
are an AI expert. We are working on several different ways to more naturally get to the
concept you want, but those are not in this release. For example, we think that providing
natural language phrases is a good candidate, if it can be made sufficiently robust. We have
included a special feature to gather data about what will be required for this, the open-text
concept labeler, described in sections 4.3 and 4.4 (the sections that discuss adding entities
and relations). With the open-text concept labeler, you can just type in an arbitrary piece of
text. This is very flexible, but the current version of CogSketch won’t do much with them.
The philosophy of telling CogSketch what you mean is also used when dividing a sketch into
pieces and setting up the context for a sketch. Sketches are made up of subsketches,
corresponding to parts of a sketch that are qualitatively similar6. For example, a map might
contain an overview of a region, and a close-up of the street network within a town in that
region. Similarly, a sketch illustrating how a multi-step process works might consist of
multiple subsketches, each subsketch depicting a step in the process. CogSketch requires
you to identify when you want to work with a new subsketch. Subsketches consist in turn of
a set of layers, depicting some relevant subset of the information in the subsketch. For
example, CogSketch under some conditions will add a layer to a subsketch illustrating its
reasoning in response to a query, so that the original data sketched by the user is undisturbed
on another layer. (Layers are modeled after layers in graphics programs, which in turn are
modeled on the use of acetate sheets over physical papers to easily add and remove spatially
registered information when sketching.)
This is not just a collection of terms: The meaning of these concepts and relationships are
constrained by 1.36 million facts that are also in the KB.
4
These are mostly from the OpenCyc knowledge base (www.opencyc.org). If you want to
learn more about the KB contents, we strongly recommend working through the tutorials on
this site.
5
6
Subsketches used to be called bundles, but that term is deprecated.
CogSketch, version 3.07
7
When drawing a map, one is thinking in terms of a top-down view, with a typical coordinate
system expressed in terms of north, south, east, and west. Genre is used to tell CogSketch the
overall type of what is being drawn: Something geospatial, something physical, or something
abstract. When the genre is abstract, no inference is made about the spatial relationships of
the contents based on the spatial relationships of the ink. Otherwise, genre sets what spatial
relations CogSketch uses with the contents of glyphs: up/down, left/right for physical
descriptions, north/south, east/west, and up/down for geospatial descriptions. When
drawing a physical system, one is sometimes taking a top-down view, but often taking a
sideways view, with up in the sketch corresponding to up in the world, and with gravity
acting downward. Pose tells CogSketch how to interpret sketch coordinates in terms of the
kind of thing being drawn. The three options are from the top, from the side, and abstract.
The default genre and pose for new layers is Physical View, Looking from the side. Both
genre and pose can be set by using the Layer Properties menu, which can be reached via
right-click on the layer’s tab.
You can step back and take a high-level view of all of your subsketches at once by using the
metalayer. The metalayer treats each subsketch as a glyph. One can move them around, and
use glyphs to indicate relationships between them. We call such descriptions comic graphs,
because they are similar to comic strips (each subsketch corresponds to a panel in the comic
strip), but they are more general because they can have more complicated relationships than
just linearly unfolding. Comic graphs are useful for depicting states in a sequence or process.
CogSketch, version 3.07
8
2 INSTALLING COGSKETCH
2.1 SYSTEM REQUIREMENTS
•
Hardware: Tablet PC preferred, but not required. If you are using a desktop or a
traditional notebook, we highly recommend adding an inexpensive Wacom tablet,
because many people find it easier to draw with a pen than with a mouse.
•
Operating system: Microsoft Windows Vista / Windows 7 / Windows 8.
•
CPU: At least 1.5 Ghz, 2 Ghz or better preferred.
•
RAM: 1GB minimum, 2 GB or more preferred.
•
Disk Space: At least 1.5 GB free disk space is required.
Please do not redistribute this release, since we need to gather information on who is
using the software, and we want everyone to be using the latest version.
2.2 INSTALLATION
Run the program named CogSketch-v****-64bit-setup.exe (or CogSketch-v****32bit-setup.exe) that you have downloaded from our web site. You will then be guided
through the installation process. After you have answered the installer’s questions,
CogSketch will be installed to your system and a shortcut to CogSketch will be added to your
Start\Programs menu.
Please note: Depending upon the security settings on your computer, you may need to be
logged in as Administrator on your local domain. If you have trouble installing, please
ensure that you are logged in with this level of access as the first step in debugging.
It is a good idea to back up the knowledge base. The FIRE menu 7 has operations for
backing up and restoring the knowledge base.
2.3 UNINSTALLING COGSKETCH
If you wish to remove CogSketch from your system, open the Window’s control panel from
the Settings entry on your Start menu and pick Add/Remove Programs. Find CogSketch
in the list of installed programs and press the Remove button. The CogSketch installer will
guide you through the uninstall process.
7
FIRE is the reasoning engine that CogSketch uses [6].
CogSketch, version 3.07
9
3 GETTING STARTED WITH COGSKETCH
This section provides an introduction to some of the basic concepts of CogSketch, via a
simple walk-through. Importantly, CogSketch has interactive tutorials that many will find
more fun than reading this manual. Others prefer manuals, though, and it can be useful to
have a convenient place to look for answers to specific questions.
A note about screen shots: CogSketch is being developed for multiple purposes, so the
interface has “skins” which expose different capabilities according to how it is intended to
be used. The menu items you see may vary from the screen shots in the manual, based on
the setting of switches in the preferences dialog (See Section 0).
3.1 THE WELCOME SCREEN
When you start CogSketch, or any time there is no sketch open that’s not minimized, the
welcome screen will be visible. It provides easy access to common actions and makes it easy
to get to the tutorials that are most useful for new users.
CogSketch, version 3.07
10
3.2 TUTORIALS
CogSketch comes with several tutorials, available through the welcome screen and the Help
menu, which provide step-by-step interactive instructions. The Help menu lists all the
provided tutorials, while the welcome screen shows only those thought to be most helpful
for new users. If you’re new to CogSketch, start with the Worksheet Basic Tutorial.
3.3 COGSKETCH ESSENTIALS
Start CogSketch using the shortcut made in your Start\Programs menu. CogSketch will
open its knowledge base and provide you with an empty workspace. From the File menu,
you have five options to open or start a sketch: Open Sketch, New Sketch, New
Worksheet, New Design Sketch, and New Perceptual Sketch. Open Sketch opens
sketch files saved to disk. New Worksheet allows you to create a new CogSketch
worksheet, while New Sketch makes a new basic sketch. Worksheets are useful for
researchers wanting to design controlled experiment sketches and teachers designing
problems for students (along with solutions that can be used with the CogSketch tutor).
New Perceptual Sketch opens the experimental perceptual sketchpad described in Section
8.1.
In this example, we'll be making a basic sketch, so choose New Sketch from the File menu.
This will create a new, empty sketch.
CogSketch, version 3.07
11
Now that CogSketch is up and running, you can start to draw. Each element in a sketch is
called a glyph. Glyphs have two parts. The glyph’s ink represents its visual aspects, and is
what you draw. The content of a glyph is the symbolic representation of what you are
depicting. You draw a glyph as follows:
1. You can draw when the drawing tool is selected in the sketching window’s toolbar.
Hold down your mouse’s left button and drag to draw or press your pen down on your
tablet and drag it.
2. Once you’ve drawn one or more ink strokes, click the Finish Glyph button. This tells
CogSketch to group the ink-strokes you’ve just drawn into a single glyph. Any time you
press the Finish Glyph button, all ink you’ve drawn since the last time you pressed that
button will be made into a glyph. You need to group the ink into meaningful entities
and this is the method for doing so. As an example, say you wanted to draw a house, a
tree, and a bird. It makes sense to have one glyph for each of these entities, so you
would draw several ink strokes making the house, click Finish Glyph, draw the ink for
the tree, click Finish Glyph, and then draw the bird and click Finish Glyph.
Periodically look at the glyph map, the small thumbnail on the left of the screen. It uses
false colors to show you how you have divided your ink into glyphs. If you discover that
you need to break up a glyph into more than one glyph, or merge multiple glyphs into
one glyph, you can use the lasso (Section 0) to do this. You now have three glyphs on
your sketch, but CogSketch doesn’t know what each of them represents yet.
CogSketch, version 3.07
12
3. Let’s tell CogSketch what each glyph means. Select one of the glyphs with the glyph
lasso:
With this tool, you can either draw a lasso around the things you want to select, or tap
them. When you have a single glyph selected, its properties are displayed in the sidebar
to the right of the drawing area.
Worksheets and Design Coach sketches are designed with
a small set of available concepts. Since this is just a regular
sketch, you can choose any concept in the entire
knowledge base. This makes selecting the concepts a bit
more complicated, though, since there are so many. In the
box labelled Available Concepts, start typing “house”.
As you type, CogSketch will search the knowledge base
for concepts starting with the letters you typed. Select
House-Modern, and click the upwards facing arrow icon
to add this concept to the Assigned Concepts.
CogSketch now knows your glyph represents a modern
house.
CogSketch, version 3.07
13
4. Farther down the properties sidebar is a field labelled “Name”. Use this to give your
glyph a more readable name. This name will also appear on the sketch under your glyph.
5. The Ink Properties section below that lets you change the color, line style, and line
thickness of any selected ink.
Here are some tips to help you use these facilities more effectively:
•
The activities one does when drawing glyphs versus specifying their content feel quite
different. Consequently, many people find it best to draw for a while (steps 1 and 2),
then specify the collections for all of the glyphs they have created (step 3), cycling back
and forth between these two activities as desired.
•
CogSketch does not automatically decompose glyphs into smaller pieces (but see the
Perceptual Sketchpad, in Section 8.1). This means you need to draw each entity that you
wish to mention separately as a glyph. If you are drawing a person and how they relate
to other objects, for instance, drawing the person as a single glyph might be sufficient.
But if you are trying to communicate, for example, properties of their posture, you need
to draw multiple glyphs, one for each body part that will be mentioned. You can group
these glyphs into a larger glyph representing the entire body, if you so desire. Notice
CogSketch, version 3.07
14
that grouping is different than merging/segmenting: Grouping preserves the identity of
the constituent glyph, whereas merging does not.
3.4 WORKSHEET EXAMPLE: PARTS OF A CELL
CogSketch worksheets are motivated by the structure of activities and pencil and paper
worksheets found in middle-school science classes. To see how to create your own
worksheet, please see Section 6. This section illustrates the use of the cell/DNA CogSketch
worksheet that comes with the CogSketch distribution. Select Open Worksheet from the
welcome screen and open the file called "3_Cell-DNA-Worksheet.skw". This may take up
to a minute on a slow machine, because CogSketch is doing its visual analysis of the
instructor’s sketch, which is hidden from view unless you are in Experimenter or Developer
mode.
Draw a cell, with the DNA outside of the nucleus making sure that you create the cell
membrane, the nucleus, and the DNA as individual glyphs. You will get the best results if
the cell membrane and the nucleus are both closed curves, without any gaps.
Label your glyphs with the appropriate concepts. The previous example showed how to
assign concepts using the more complicated concept picker. Worksheet authors decide
which concepts are available, so you won’t have to choose concepts from the entire
knowledge base. Instead, once you select a glyph, the properties tab in the sidebar shows a
list of available concepts and you just select the one you want.
CogSketch, version 3.07
15
Once you have finished your sketch, click on the Feedback tab on the sidebar. Then click
the Update button. The tutor will compare your sketch to the teacher’s solution sketch and
will generate feedback based on the comparison. In this case, there will be one suggestion,
in the Overall Sketch category. Expand this category and you will see that the tutor has
suggested that something isn't quite right about the location of the DNA molecule.
Move the DNA inside the nucleus, and click Update on
the Feedback tab again. The tutor has no suggestions –
your sketch is good!
CogSketch, version 3.07
16
4 THE COGSKETCH INTERFACE
This section describes each of the interface elements in CogSketch.
4.1 COGSKETCH TOOLBAR
Each sketch has its own toolbar, located at the top of the sketch’s window.
4.1.1
THE DRAWING TOOLS
4.1.1.1
Zoom-In
Use this tool to zoom in on your sketch. Each time you click this button, the current
magnification is increased. This button also has a pull down menu offering other zoom
options.
4.1.1.2
Zoom-Out
Each time you click this button the sketch’s magnification is decreased. This button also
has a pull down menu offering other zoom options.
4.1.1.3
Drawing Tool
This is the tool that’s normally active. It allows you to draw ink-strokes for glyphs and,
optionally select glyphs by tapping them (see Edit/Preferences/General). Depending
upon your preference settings or the settings authored into a worksheet, this button can
have a pull down menu offering other kinds of drawing pens. Currently these include the
normal freeform drawing tool, a straight line tool, and a circle tool.
4.1.1.4
Glyph Select
Use this tool to select glyphs on the current layer of the sketch. You can either tap to
select glyphs or draw lassos around them. Selected items may be resized, moved, and
rotated.
4.1.1.5
Ink Select
This lasso tool allows you to select ink-strokes within glyphs. Selected ink-strokes can be
resized, moved, and rotated. While ink is selected, it can also be split out into a new glyph
or merged into existing ones.
CogSketch, version 3.07
17
4.1.1.6
Erase Ink
The eraser tool is used to erase parts of ink strokes. Holding down the button allows you
to select from three different sizes of eraser.
4.1.2
OTHER CONTROLS ON THE TOOLBAR
4.1.2.1
Finish Glyph
Use this button to segment the glyphs in your drawing. When you click this, any ink
strokes drawn since the last time you clicked this button will be collected together and
made into a new glyph.
4.1.2.2
Undo
You can use this to undo many actions performed while drawing and editing a sketch.
4.1.2.3
Redo
Use this to redo actions that you’ve recently undone.
4.1.2.4
Delete Selected Items
When items are selected on the sketch, pressing this button will remove them.
4.1.2.5
Color Selector
Use this to choose the color that will be used for ink you draw.
4.1.2.6
Line Style
This selects the line style for the ink you draw. There are several varieties of dashed and
dotted styles available in addition to solid lines.
4.1.2.7
Line Width
Use this to control the thickness of the lines that you draw. The units are pixels when the
sketch is at its normal zoom level (magnification of 1.0).
4.1.2.8
Visual/Conceptual Relation Questions
This triggers the visual-conceptual relations questions, described in Section 5.3. When you
click this button a browser window will open where you can provide CogSketch with more
information about how to interpret the relationships in your sketch.
4.1.2.9 Spatial Processor Status Indicators
Beneath the general status indicator is an area that is used to display the status of spatial
processors. The left eye represents the ink processor and the right eye represents the
voronoi processor. The numbers on either side represent the number of tasks that
processor has left to do.
CogSketch, version 3.07
18
Idle – the spatial processors are waiting for new tasks.
Processing – the spatial processors are actively working on some of the ink drawn on
the sketch. The left eye indicates the status of the main ink processor. The right eye
indicates the status of the Voronoi processor.
Disabled – the spatial processors are disabled during certain interactions (like
drawing and moving glyphs) to improve the responsiveness of the system. There is
currently a minor bug wherein the processors can get stuck in this state. If this status
persists even if you’re not in the glyph drawing mode or moving, resizing, or rotating a
glyph, then the system is slacking. Clicking the eyes will restart the spatial processors.
Error – the spatial processors encountered an error and are no longer functioning.
This is now very rare, but it can happen. When you see this icon, clicking on it will reset
and restart the processors.
4.2 THE LAYER CONTROL PANE
Located along the left of each sketch is a series of buttons for
controlling the display of the various layers of the active subsketch.
Each layer is associated with one of the large buttons in the layer
control pane. The topmost layer button corresponds to the topmost
layer on the subsketch. (It might be helpful to think of the layers as a
stack of transparent sheets.) The active layer’s button is highlighted
in yellow; pressing a layer’s button makes that layer the active layer.
Each layer button has a few smaller icons that control visibility. All
layers other than the active one can be made invisible. A ghosted
layer is grayed-out (useful on complex drawings when you don’t want
to be distracted by other layers but still need to see them). You can
also control whether or not the text labels on a layer are visible.
If you have the Experimenter mode on (which can be set from the
Preferences menu, see Section 0) and have the "Debug Layers?"
checkbox selected, you will see additional layers for each subsketch
representing internal results of the spatial processing. For example,
the Voronoi diagrams and positional relationships can be displayed as
overlays. This is very helpful for understanding the underlying spatial
reasoning that CogSketch is performing.
The layer control pane also contains a thumbnail of your sketch. This
thumbnail makes it easier to determine what ink belongs to each
glyph. The glyphs are color-coded. In the screenshot to the right,
you can see that the sun is all one glyph, the tree’s top is another, and
the trunk and the ground together are yet another glyph. Ink which has not yet been
grouped into a glyph shows up as gray.
CogSketch, version 3.07
19
The drop down menu at the bottom of the layer control pane allows you to select which
subsketch is currently active. Changing the active subsketch will change the available layers.
The metalayer button toggles the display of the metalayer. The metalayer is a special kind of
layer where all of the subsketches are treated as glyphs. Thus the same facilities for adding
information to glyphs and using arrows to indicate relationships with them (see section 4.4)
can be used for providing information about subsketches. For example, you might use the
metalayer to add arrows indicating the sequential relationship between steps in a process or
to indicate causality. The metalayer also provides an excellent way of getting an overview of
your sketch.
4.2.1 SUBSKETCHES
What is a subsketch? The observation is that, when people are sketching with each other to
communicate ideas, they naturally carve up a complex sketch into subsketches, local
neighborhoods within which there is a common framework or point of view. In human-tohuman sketching, subsketch boundaries are inferred based on the shared world knowledge
of the participants and a variety of subtle cues, like visual grouping and speech acts. The
state of the art in vision, speech recognition, and dialogue management are currently not to
the point where automatic subsketch segmentation can be done reliably enough to be
unobtrusive. Consequently, we organize CogSketch’s interface to make it easy to create
subsketches and switch between them.
A simple sketch might consist of just a single subsketch. A more complex sketch might
have several subsketches. For example, a sketch of a complicated machine or building might
include one subsketch describing its abstract structure, other subsketches focusing on
specific aspects of the structure, with yet other subsketches describing functional
subsystems, site placement, etc. A sketch depicting a process unfolding over time or a
storyboard might use a subsketch to describe each state of the process or narrative. In
human-to-human interactions, the relationships between subsketches is often mentioned
verbally (e.g., “Here’s the electrical system”), marked by glyphs (e.g., arrows denoting
transitions between steps of a process), or understood via shared conventions (e.g., cutaway
drawings). In CogSketch, we use glyphs to introduce relationships between subsketches in
the metalayer, described above.
4.3 ADDING ENTITIES TO A SKETCH
To add an entity to your sketch, you must create a glyph to represent it. Simply drawing the
object on the screen does not provide enough information to CogSketch. You also need to
tell CogSketch what parts of your drawing go together to represent one object and what
object they represent. The first problem is called segmentation and the second is called
conceptual labeling.
CogSketch, version 3.07
20
4.3.1
DRAWING GLYPHS
The drawing tool is used to draw ink:
Ink-strokes that you draw are accumulated as free ink until you hit the Finish Glyph button:
At that point all the free ink is grouped together into a single glyph. In other words,
CogSketch treats all of the ink drawn between the button presses as one glyph. If you later
need to change how your glyphs are segmented, you can use the ink select tool to select ink
strokes and split them out into new glyphs or merge them into existing glyphs.
4.3.2
CONCEPTUAL LABELING
Conceptual labeling happens after you have finished drawing the glyph. Whenever you
select an item, or multiple items, editable properties are displayed in the sidebar to the right
of the drawing area. If you have a single glyph selected, those properties include the
conceptual labels. The available glyph properties are different for worksheets and regular
sketches, and they vary with the basic glyph type. The
following sections describe the differences.
4.3.2.1 Glyph Properties – entities, Worksheets and
Design Coach Sketches
The instructor who designed the worksheet determines
which concepts are available, so the glyph properties
dialog is simplified. You are given a list of concepts and
you just select the one you want. If the worksheet
designer allows it, you will also be given a field called
Name. You can use this to enter the text you want to
appear on your sketch. It won't mean anything to
CogSketch, but is useful for other people looking at your
sketch.
Design Coach sketches allow you to assign multiple
concepts to each glyph. For example, you might want to
say that something is a spring and a compressed thing.
Each time you click on a concept in the list, it toggles
between being selected or not.
CogSketch, version 3.07
21
4.3.2.2 Glyph Properties – entities, general sketches
When working on a general sketch (not a worksheet), the
glyph properties dialog allows you to choose from any
collection in the entire knowledge base. Our knowledge
base is built on top of the contents of the OpenCyc KB,
so if you have used Cycorp’s knowledge base before, you
will already have some familiarity with the available
collections. Otherwise, we advise reviewing the tutorial
materials at www.opencyc.org.
Since you can pick any concept from the entire
knowledge base, choosing the concepts is a bit more
complicated than it is with the simplified worksheet
dialog. In the type-in box below the prompt Available
Collections, start typing the name of the desired concept.
Once you type at least two letters, the box below it shows
all concepts beginning with those letters. Select one and
click the green up arrow button to add it to your glyph, or
just double-click the concept – that adds it to your glyph
without your having to click the green arrow button. You
can assign more than one concept to a glyph. If you need
to remove a concept, select it in the Assigned
Collections box and click the red "X" button.
You can use the Name field to enter the text label you
want to appear on your sketch. It won't mean anything to
CogSketch, but is useful for other people looking at your
sketch.
CogSketch, version 3.07
22
4.3.2.3 Glyph Properties – relations, Worksheets and Design Coach Sketches
Initially, the basic glyph type for any glyph is entity.
If instead you want the glyph to represent a relation
between two objects, change the glyph type to
relation. (Note that this glyph type might not be
available if the teacher who designed the worksheet
didn't allow any relations.)
Relations must be drawn as arrows. Once you tell
CogSketch what relation the glyph represents, it tries
to figure out the head and tail of the arrow. Our
recognition algorithm gets confused it you draw lines
on the tail of the arrow, but performs decently in
most other cases. If CogSketch could not figure out
what direction your arrow is pointing, a yellow
warning icon will appear over the glyph; right
clicking the glyph gives you the option to view the
problems (alerts) associated with the glyph. If
CogSketch's
arrow
interpretation
algorithm
determined a direction, a thin yellow arrow is drawn
over your arrow so that you can see that CogSketch
thinks the arrow is pointing in the direction you
intended. The figure on the right shows positive and
negative examples of arrows that CogSketch will
recognize.
CogSketch, version 3.07
23
When you first change the glyph type to relation, the properties window shows the relation
from which you can choose and also puts two handles on the arrow that you drew. These
handles allow you to select and edit which glyphs the relation is about. Ignore them for
now.
In the box labelled “What is this?”, select the relation you want. In this example, we’ll pick
“Does business with”. Once you’ve chosen a relation, CogSketch tries to guess which
glyphs should participate in the relation. It moves the handles to those participants and
displays some text summarizing the relation (“Bill does business with Diane”, in this
example). You can change which glyphs participate in the relation by dragging the handles
and dropping them on other glyphs.
CogSketch, version 3.07
24
4.3.2.4 Glyph Properties – relations, general sketches
All the information in the previous section about relations in
worksheets applies to general sketches too. Relations must
be drawn as arrows. The glyph type should be set to
relation. The difference is that you can select any binary
relation in the knowledge base. Start typing the name of the
desired concept and the selection box will show all the
binary relations starting with the letters you typed. Select
one of those to assign the relation to your glyph. As before,
drag the handles to select which glyphs participate in the
relation.
CogSketch, version 3.07
25
4.3.2.5 Glyph Properties – annotations
Annotations can be used to specify additional information about the glyphs on your sketch.
To illustrate this further, we’ll use the following example:
Let’s say that we want to denote the temperature of the tree’s leaves in the sun. Draw the
glyph that you’ll use to represent the temperature:
CogSketch, version 3.07
26
Select the glyph to edit its properties. Change the Glyph Type to annotation. In the
“What is this?” section, select TemperatureIndicator. CogSketch now knows this glyph
will denote the temperature of some other glyph. In this example, we set the value to 92
degrees Fahrenheit.
Now we have to tell CogSketch what glyph has a temperature of 92° F. As soon as you
changed the glyph type to annotation, a blue handle was added to your glyph. Drag this to
the glyph being annotated – in this case, the tree’s leaves. CogSketch now knows that the
temperature of the tree’s leaves is 92° F.
An annotation can apply to more than one item. When you hover over a selected
annotation glyph, a green plus icon appears over its center. Click this to add more drag
handles. In the following figure, we’ve added the tree’s trunk as one of the items annotated.
Now CogSketch knows that both the tree’s leaves and the tree’s trunk have a temperature of
92° F. You can remove annotation handles by dragging them to the trash icon.
CogSketch, version 3.07
27
Note that not all annotations allow you to set a quantitative value. For example, the
RotationOrigin annotation is used to indicate the point around which an object can rotate.
There are no values you can set for this – its position on the sketch conveys the necessary
information.
You must draw some kinds of annotation as arrows. The position and direction of the
arrow you draw gives some of the information. These should be drawn as described in
section 0,
CogSketch, version 3.07
28
Glyph Properties – relations, Worksheets and Design Coach Sketches.
•
AccelerationArrow
•
GravitationalForceArrow
•
AppliedForceArrow
•
InitialVelocityArrow
•
AssumedForceArrow
•
NetForceArrow
•
DirectionOfMovement
•
NormalForceArrow
•
DirectionAnnotation
•
RotationalForceArrow
•
ForceArrow
•
TensileForceArrow
•
FrictionalForceArrow
•
VelocityArrow
CogSketch, version 3.07
29
4.4 EDITING ITEMS ON THE SKETCH
4.4.1
SELECTING ITEMS
The Glyph Select tool lets you select and edit glyphs. You select items either by drawing a
lasso around them or by clicking on them. The picture below shows a lasso selection being
drawn. You can only select glyphs on the current layer (“Layer 1” in the picture below).
You can select as many glyphs on the current layer as you want. Tapping or lassoing a
selected glyph unselects it, so you can add to or subtract from your selection as desired. In
other words, each time you click or lasso a glyph it toggles whether or not it’s selected.
The Ink Select tool is used to select the ink within the glyphs. You use this tool when you
want to edit individual ink strokes, and the Glyph Select tool when you’re editing entire
glyphs at a time. When this tool is active each of your glyphs will be drawn with a colored
CogSketch, version 3.07
30
background so you can more easily see what ink belongs to what glyph. You select items by
drawing a lasso around them or by clicking on them.
You can also select glyphs when using the Drawing Tool if you enable it in the user
preferences (it’s disabled by default). To enable it, choose Preferences from the Edit menu
and check “Enable tap select in drawing tools” (see picture below). Once enabled, you
can click on glyphs (i.e. tap them) to select and unselect them.
CogSketch, version 3.07
31
4.4.2
MOVING, RESIZING, AND ROTATING
Once you’ve selected one or more items, you can use various click-and-drag maneuvers to
move, resize, and rotate the items, as shown in the picture below. When dragging the corner
hotspots, the aspect ratio of the glyph will be preserved unless you hold down the Ctrl key.
While glyphs are selected, you can also move them to other layers by dragging them over the
corresponding button on the layer controls pane.
CogSketch, version 3.07
32
4.4.3
RE-SEGMENTING GLYPHS
Changing what ink belongs to what glyph is called re-segmenting – you’re changing how the
ink is broken up into glyphs. You do this using the Ink Select tool. Select the ink strokes
you want to break out into a new glyph or to merge into an existing one. In the sidebar to
the right, all available segmentation options will be show in the section labelled “Glyph
Segmentation”. You will see choices like “Split out ink into a new glyph” or “Merge ink
into <existing glyph>” depending on the nature of your selection (if your selection includes
all the ink for some existing glyphs, you’ll be given the choice to merge the selected ink into
those glyphs).
4.4.4
GROUPING GLYPHS
Grouping glyphs is different than the kinds of merging that can happen when re-segmenting
glyphs. When re-segmenting, you’re just changing what ink belongs to a given glyph. If you
take all the ink from one glyph and merge it into another via re-segmenting, you end up with
one glyph that has all the ink. Grouping allows you to build hierarchies of glyphs, where the
sub-glyphs remain intact.
Let’s say that you have the following sketch of a cat’s head (the Glyph Map is shown as an
inset so you can see the glyph boundaries):
CogSketch, version 3.07
33
Each of the parts of the cat’s head are separate glyphs. Sometimes, though, it’s useful to deal
with the entire head and one unit. To do so, select the glyphs and choose Group Glyphs
from the Glyphs menu:
A glyph will be created in which the selected glyphs are sub-glyphs. All the facts about the
sub-glyphs remain intact (so CogSketch still knows the head is a Head-AnimalBodyPart, etc.),
but they’re been grouped together to form a new single entity. You can give the new glyph a
name, conceptual labels, and such just like you would with any other glyph.
If you want to edit the sub-glyphs or you just want to get rid of the grouping, just select the
group-glyph and choose Ungroup Glyphs from the Glyphs menu.
4.4.5
EDITING OTHER GLYPH PROPERTIES
If you decide to change the name of an entity, the collections assigned, details about a
relation glyph or annotation glyph, etc, you just do it the same way you initially assigned
those properties, as described in section 4.3.2 Conceptual Labeling. In other words, select
the glyph and use the sidebar on the right.
CogSketch, version 3.07
34
4.5 LOOKING AT THE KNOWLEDGE IN A SKETCH
CogSketch maintains a lot of information for sketches based on both the visual information
in the sketch and the knowledge from the Cyc knowledge base. Operations performed on a
sketch (for example, calculating spatial relationships) also contribute to this knowledge. To
view the knowledge you can either choose the Show Knowledge about Sketch option
under the View menu, or the Show Knowledge about Selected Item (keyboard shortcut:
ctrl-I), also available on right-clicking the glyph. This opens a browser window, and
supports drill-down through the justifications explaining why particular facts are believed.
CogSketch, version 3.07
35
4.6 ADDING NEW LAYERS AND SUBSKETCHES TO A SKETCH
Layers and subsketches on a sketch can be used to group conceptual information. It is
useful to think of layers as transparent sheets stacked on top of each other. Layers within a
subsketch can all be visible at the same time. However, there can only be one active
subsketch at a time. Subsketches are useful for representing distinct pieces of information,
for example, different steps in a process. The only way to see all the subsketches in a sketch
at once is to use the metalayer. Using the metalayer you can define relationships between
subsketches, such as the order of steps in a process. Another example of when you would
use multiple layers or the metalayer is when doing analogical reasoning (see section 5.2).
4.6.1
ADDING A NEW LAYER
Press the New Layer button in the layer control panel and you will be presented with the
following dialog:
Enter a name for the layer. Layer Type can either be "Normal Layer" or "Fixed Image
Layer". A Fixed Image Layer allows you to include a picture as a background image for your
sketch.
CogSketch, version 3.07
36
4.6.2
LAYER PROPERTIES
If you later want to change the name of a layer or edit one of its other properties, select the
layer and choose Layer Properties from the Edit menu (or right-click the layer in the layer
control pane and choose Layer Properties from the shortcut menu). You will see a dialog
like the following:
You cannot change a layer’s type once it has been created, but you can change its name. The
dialog also presents two other properties not seen when creating a layer: the Genre and Pose.
The genre of a layer describes what kind of drawing it is. A drawing showing the internals of
a mechanical construct is quite different than an abstract node/link diagram, for example.
The current choices for genre are:
•
Abstract view: No assumption is made about how spatial relationships between glyphs
might be signaling conceptual relationships between the entities that they depict.
•
Discrete graph view: Contact relationships between glyphs should be considered
significant, but distances and spatial layout are not.
•
Geospatial view: The entities in the sketch are located in a large-scale physical space
where a geographical coordinate system is assumed, i.e., the sketch is a kind of map.
•
Physical view: The spatial relationships between glyphs that depict physical entities are
considered significant, e.g., two glyphs which visually overlap may be signifying
something about the relationship between the entities that they depict.
If you pick Geospatial View or Physical View for the genre, you will have several choices for
the layer’s Pose. The pose is the orientation of the drawing with respect to the viewers.
CogSketch, version 3.07
37
•
Unspecified viewpoint: This is the only option available for the abstract and discrete
graph view, and is not available for the geospatial or physical views. This pose indicates
that nothing can be inferred about the spatial relationships of the contents of glyphs
based on the spatial relationships between their ink.
•
Looking from bottom: Only available in geospatial and physical views. The up vertical
direction is considered to be from the user into the sketch.
•
Looking from side: Only available in geospatial and physical views. The up vertical
direction is considered to be aligned with up in glyph space.
•
Looking from top: Only available in geospatial and physical views. The up vertical
direction is considered to be from the sketch to the user.
•
Looking-from-another-object: Only available in geospatial and physical views. No
assumption about the orientation of the vertical is made.
4.6.3
DELETING LAYERS
To delete a layer, right-click on the Layer Control Pane button associated with the layer you
wish to delete and choose Delete Layer from the menu. You will be asked to confirm the
deletion. If you agree to the confirmation, then the layer will be removed permanently.
Note that you cannot delete the last layer in a subsketch, since all subsketches must have at
least one layer.
4.6.4
ADDING A NEW SUBSKETCH
Press the New Subsketch button in the layer control panel and you will be presented with a
dialog asking you to name the new subsketch.
4.6.5
CLONING A SUBSKETCH
Cloning a subsketch allows you to create a new subsketch with the same sketch components
as another one. This is useful for doing things like drawing a series of steps in a process
where you need the same items in each step. To clone a subsketch:
•
Switch to the metalayer in the layer control
panel.
•
Right-click on the subsketch that you would
like to clone.
•
Select "Clone Subsketch" from the menu
•
You will be asked to name the new
subsketch.
•
The new subsketch will then open in the
CogSketch window.
CogSketch, version 3.07
38
4.6.6
SUBSKETCH PROPERTIES
To change the name of a subsketch (or one of its other properties), select Subsketch
Properties from the Edit menu (or right-click a metalayer glyph while viewing the metalayer
and pick Subsketch Properties). You’ll see a dialog like the following:
You can use this to change the name of a subsketch and to tell CogSketch what the
subsketch represents.
4.6.7
DELETING SUBSKETCHES
This can be done from the Metalayer. Right-click on a glyph that represents the subsketch
you want to delete and choose Delete Subsketch from the pop-up menu. All sketches
must have at least on subsketch, so CogSketch will not let you delete a subsketch if it’s the
only one in the sketch.
CogSketch, version 3.07
39
4.7 COGSKETCH MENUS
The menus in CogSketch vary according to different types of sketches and configuration
settings. Students using worksheets and experiment subjects see a simplified selection of
menu options, while worksheet designers, for example, see a much larger set of menu
choices. In this section we’ll describe what these menu choices do.
4.7.1
FILE MENU
4.7.1.1 Open Sketch
Opens a sketch that has been saved to disk. This can be used to open any kind of sketch
recognized by CogSketch (worksheets, sKEA sketches, and perceptual sketches).
4.7.1.2 New Sketch
Starts a new general-purpose sketch.
4.7.1.3 New Worksheet
Use this to create a new worksheet. Worksheets can be used by researchers performing
experiments and by teachers presenting tasks to students. If the worksheet has a solution
subsketch, the CogSketch Tutor can be used to give suggestions to students about their
sketches.
CogSketch, version 3.07
40
4.7.1.4 New Perceptual Sketch
Creates a new perceptual sketch, a special kind of sketch in which glyphs are decomposed
into their edges. See Section 8.1 for more information on this type of sketches.
4.7.1.5 Save Sketch
Use this to save a sketch to disk. You will only be asked what you want to name the file if
the sketch has never been saved to disk.
4.7.1.6 Save Sketch As
This can also be used to save a sketch to disk. You will always be asked what you want to
name the file.
4.7.1.7 Print Sketch
These menu choices are used to send the sketch to a printer. Only those layers that are
currently visible will appear on the printout.
4.7.1.8 Export Sketch as Image
Saves a bitmap file to disk with only the currently visible layers shown.
4.7.1.9 Exit
Closes CogSketch. If you have made changes to sketches and have not saved your work,
you will be asked if you wish to do so as CogSketch shuts down.
The bottom of the menu shows the four most recently worked on sketches for easy access.
4.7.2
EDIT MENU
4.7.2.1 Undo/Redo
Use this to undo your last action or redo the last action that was undone.
4.7.2.2 Copy/Paste
These work exactly like copy/paste in any other application.
4.7.2.3 Delete Selected Items
Permanently removes all of the items currently selected. Items can be selected with the
Selection Tool.
4.7.2.4 Select Items
Activates the Selection Tools. See the section on “Drawing Tools” for more information.
4.7.2.5 Unselect All Items
Unselects the currently selected items.
4.7.2.6 Clear Current Layer
Deletes all items from the current layer.
CogSketch, version 3.07
41
4.7.2.7 Layer Properties
Allows you to edit the name, genre, and pose of the current layer.
4.7.2.8 Delete Current Layer
Permanently removes the current layer from the sketch.
4.7.2.9 Subsketch Properties
Allows you to change the name of the current subsketch and to tell CogSketch what the
current subsketch represents.
4.7.2.10 Worksheet Property Editor
This is used by designers of worksheets.
4.7.2.11 Sketch Grid Properties
You can choose to have a grid displayed in the drawing area. This menu option allows you
to choose whether or not the grid is visible and to change the spacing, line color, and line
thickness of the grid.
4.7.2.12 Change Sketch Registration
Use this to register your sketch with “real-world” coordinates. You can set it up, for
example, so that each unit of a sketch corresponds to one meter and that the lower-left
corner is {0m, 0m}.
4.7.2.13 Edit Arrow Directions
Allows you to edit the arrowDirectionForRelation facts that are used to tell the ordering of
the objects assigned to arguments of a relation expressed by a drawn arrow. Please do not
attempt to use this until you are very familiar with the OpenCyc ontology and CogSketch
representation conventions.
CogSketch, version 3.07
42
4.7.2.14 Preferences
This will open the preferences window, thus allowing you to change configurable options.
The general preferences are shown in the picture below.
Of particular interest to researchers might be the Experimenter section, which, among
other preferences, allows Experimenter Mode to be enabled. This makes extra menu
options available and allows debug layers (like the Voronoi Diagram and Positional
Relations) to be viewed. The Developer mode provides even more information and menu
options. For students and participants in experiments, these should both be turned off.
Researchers doing data analyses and cognitive simulations will very likely want to enable
Experimenter Mode.
The server page shows options for setting up a KQML server. See the document
nuSketch-KQML-API.html in the same folder as this document, or in the start menu in
the CogSketch program group.
CogSketch, version 3.07
43
4.7.3
VIEW MENU
4.7.3.1 Current Layer Grayed Out
Toggles whether or not the current layer should be grayed out. This does the same thing as
the “G” button on the Layer Control Pane.
4.7.3.2 Refresh Window
Forces the window to be redrawn.
4.7.3.3 Zoom-In
Make the Zoom-In tool active. See the section on “Drawing Tools” for more information.
4.7.3.4 Zoom-Out
Each time you select this, the sketch’s magnification will be decreased (thus zooming-out).
See the section on “Drawing Tools” for more information.
4.7.3.5 Normal Zoom
Returns the sketch to a magnification of 1.0, centered in the current window.
4.7.3.6 Fit to Window
Adjusts the magnification of the sketch such that all the items on all the visible layers will fit
inside the sketch’s window.
4.7.3.7 Visual/Conceptual Relation Questions
This opens the visual-conceptual relations questions page, described in Section 5.3. When
you click this button a browser window will open where you can answer VCR questions for
your sketch.
4.7.3.8 Query Window
Opens a browser window where you can query the knowledge base .
4.7.3.9 Show Knowledge About Selected Items
Displays the knowledge known about the items currently selected. The knowledge is shown
using the syntax of the underlying knowledge base.
4.7.3.10 Show Knowledge About Sketch
Displays all of the logical statements constituting what CogSketch knows about the current
sketch.
4.7.3.11 Browse KB
Allows you to browse the underlying KB, the vast majority of which are derived from
OpenCyc 8.
8
www.opencyc.com
CogSketch, version 3.07
44
4.7.4
GLYPHS MENU
4.7.4.1 Finish Glyph
This menu item serves the same segmentation function as the Finish Glyph button on the
toolbar.
4.7.4.2 Import Picture as Glyph
You can incorporate image files into your glyphs. CogSketch can handle most of the
common image formats (PNG, JPG, BMP, GIF, etc.).
4.7.5
SPATIAL MENU
Spatial reasoning tools are found here. See section 5.1 for more information.
4.7.6
ANALOGY MENU
Analogical reasoning tools are found here. See section 5.2 for more information.
4.7.7
EXPERIMENTER MENU
Contains tools useful to researchers analyzing experiments.
4.7.7.1 Show Glyph Ordering
Labels each glyph in the current subsketch with large numbers indicating the order in which
they were drawn.
4.7.7.2 Show Ink-Stroke Ordering
Labels each individual ink-stroke in the current subsketch with numbers indicating the order
in which they were drawn. This also color-codes each ink-stroke, shows a large circle at the
start of the stroke, and a smaller circle at the end of the stroke, as shown below.
4.7.7.3 Sketch Playback
Allows researchers to playback the sketch as it was drawn. Currently, the playback only
shows ink being drawn; it does not show other user actions, like moving, resizing, or
deleting.
CogSketch, version 3.07
45
4.7.7.4 Store Current Sketch As Case
Stores the current sketch as a case in a case library. The case library is specified by the user.
You can also specify that the contents should be dumped as a flat-file, which can
subsequently be loaded into other FIRE-based reasoning systems.
4.7.7.5 Export Sketch Knowledge
Dumps all the knowledge about the sketch to a text file. The format used is MELD-style,
case-sensitive predicate calculus expressions. The relation ist-Information is used to
contextualize knowledge about a sketch. Each subsketch is its own microtheory, with the
microtheory for the entire sketch being in their logical environments 9.
4.7.7.6 Export Sketch as Image
Saves a bitmap file to disk with only the currently visible layers shown.
4.7.7.7 Export Ink
Saves a data file describing the ink strokes (including timing information) to a commaseparated-value file. The first line of the file contains headings for the columns; subsequent
lines each describe one piece of ink. See Appendix C: Exported Ink File Format for
details about the file format.
4.7.7.8 Export Sketch History
Creates a data file describing the history of user actions taken to create the sketch. This
includes actions like the drawing of ink strokes, moving glyphs, resizing glyphs, changing
knowledge about a glyph, deleting items, adding layers, etc. Timing information is recorded
for each action with millisecond resolution. Please see Section 15 for a description of the
format used for this file.
4.7.7.9 Create History Report
Creates an HTML document detailing the history of user actions while working with the
sketch. You can select which actions to include and select for which actions a screenshot of
the sketch should be included in the report (for example, you might want to see what the
sketch looked like each time the user requested tutor feedback for a worksheet. This can be
very useful for those running experiments. It creates a single, easy-to-read document with
pictures showing what the subject’s sketch looked like at various key points during the
experiment.
4.7.7.10 Batch Image Export
Performs the Export Sketch as Image operation on each sketch in a specified folder
(directory).
For more information about microtheories, please see
http://www.cyc.com/cycdoc/course/contexts-basic-module.html
9
CogSketch, version 3.07
46
4.7.7.11 Batch Ink Export
Performs the Export Ink operation on each sketch in a specified folder (directory). See
Appendix C: Exported Ink File Format for a description of the format used for these
files.
4.7.7.12 Batch History Export
Performs the Export Sketch History operation on each sketch in a specified folder
(directory). See Appendix D: Exported History Format for a description of the format
used for these files.
4.7.7.13 Batch History Report Creation
Performs the Create History Report action on each sketch in a specified folder (and
optionally all sketches in subfolders as well).
4.7.8
HELP MENU
The options on this menu are used for displaying information about CogSketch’s current
memory usage and for displaying CogSketch’s splash screen.
CogSketch, version 3.07
47
5 ADVANCED COGSKETCH FEATURES
5.1 SPATIAL REASONING ON SKETCHES
CogSketch performs a variety of visual computations on digital ink, including computing
qualitative spatial relationships. Some of these are automatic and some are done on demand
only. The automatic calculations include topological descriptions based on the RCC8
relational vocabulary. Other qualitative spatial relationships can be computed on demand
using the spatial menu. The information calculated includes:
•
Positional relationships: these are computed between adjacent pairs of glyphs and
include: leftOf, rightOf, above, below, etc. with respect to the glyphs, and the
corresponding relationships between the entities they describe (depending on genre
and pose, see Section 3).
•
Relative sizes: qualitative and from the set {tiny, small, medium, large, huge}
•
Articulation points: Points that, if removed, would divide the ink into disconnected
pieces.
The document CogSketch_Spatial_Reasoning.pdf that was included with your CogSketch
installation describes our spatial reasoning in more detail.
5.1.1
SPATIAL MENU
5.1.1.1 Compute Positional Relations for
This Layer / Sketch
Computes the positional relations among the
glyphs in the specified layer/sketch. These are
computed only on demand. After this option
is selected, the results will appear in the
knowledge known about the sketch.
5.1.1.2 Compute Relative Sizes
Computes the relative sizes of the glyphs in the sketch. Sizes are qualitative and from the set
{tiny, small, medium, big, huge}
5.1.1.3 Identify Articulation Points
Identifies the articulation points in the sketch. An articulation point is a point which, if
removed, would divide up a graph into disconnected components.
5.1.1.4 Recompute All Spatial Relations
Forces all automatically computed spatial relations to be recomputed. These include the
RCC8 relations.
CogSketch, version 3.07
48
5.2 USING ANALOGICAL MATCHING
CogSketch uses the Structural Mapping Engine (SME), an analogical matcher [3,4]. To
access the analogical reasoning abilities of CogSketch, use the Analogy menu. You can
compute analogical relationships between layers or subsketches. Analogies are done using
both the visual information in the sketch and the conceptual information entered through
the glyph properties dialogue and the visual conceptual relationships.
5.2.1
ANALOGY MENU
5.2.1.1 Compare Two Layers / Subsketches
These features allow you to compare two layers or subsketches on a sketch using the
Structure Mapping Engine (SME). When you select one of the analogy options, you will be
asked to select the items to compare and what factors you would like to figure into the
analogy.
The analogy results will then be presented.
The table in the middle contains the
correspondences found by SME, i.e., “what goes with what” between the base and the
target. Selecting a correspondence causes the appropriate elements in the base and target
displays to be highlighted. The Show Raw Form? check box toggles whether or not the
pretty forms of a name or its internal form is displayed. The Browse SME button enables
one to drill down into the details of a match, inspect candidate inferences, and so on, using a
dynamically generated hypertext.
CogSketch, version 3.07
49
5.3 VISUAL-CONCEPTUAL RELATIONSHIPS
For many reasoning tasks it is helpful to clarify for CogSketch what relationship holds
between the objects depicted based on the visual relationships that hold between the glyphs
that depict them. We call these visual/conceptual relationships, since they are derived from
both kinds of information. For example, two glyphs that touch could indicate that they are
rigidly connected, hinged, or any of a number of other possibilities, depending on the
specific kinds of entities involved. To specify these relationships for a sketch, click on the
icon. A browser window will open, providing a form which enables you to choose a
specific relationship for each pair of entities that have a form of visual relationship. When
you are finished selecting relationships, click the submit button. If you need to change any
of the VCR relationships, check the retract box underneath that relationship and click the
submit button. You should get the drop-down menu again and you can re-assign the
relationship between the involved glyphs.
Some things to know about this computation:
•
The set of possible candidates can be quite large or quite small, depending on the
visual and conceptual properties of the entities involved. Having over one hundred
possibilities is not uncommon. Sorting through them can be complex, and we
recommend having a KB Browser window open on the side while you are
familiarizing yourself with the options.
•
Only relations whose argument type constraints are consistent with the declared
types of the entities are presented as possibilities. No other information is currently
used to filter the set, e.g., it does not try to derive each of the possibilities and its
negation using the information in the sketch plus the KB knowledge.
•
The only visual relationships between glyphs that currently trigger this computation
are touching and insideness (i.e., RCC8-EC, RCC8-PO, RCC8-TPP, RCC8-NTPP).
If you do not get possible relationships for a pair of glyphs, check to see if one of
these visual relationships holds, and if not, redraw or move one of them.
•
If the set of relationship options does not include something that you think should
be there, check to see if that relationship is consistent with the types of entities
involved, using the KB Browser.
•
Earlier versions of CogSketch used MAC/FAC [12] to retrieve sketches, matching
on both visual and conceptual properties, to provide suggestions for relationships
based on similarity to previous sketches [10]. This capability is currently
disconnected, but it may be reactivated depending on how people are using
CogSketch.
CogSketch, version 3.07
50
5.4 THE KB BROWSER
CogSketch includes access to FIRE’s knowledge base browser, via the View | Browse KB
button (keyboard shortcut: Ctrl+K). Below is an example of how it looks, displaying
information about a collection. Typing a string in the search box in the upper left will lead
to a set of completions being generated when you hit the search button. The completions
are entities, collections, and relationships from the underlying knowledge base.
CogSketch, version 3.07
51
6 DESIGNING A WORKSHEET
This section describes how to develop a new CogSketch worksheet. As noted earlier, sketch
worksheets provide tutoring by comparing an expert’s sketch with a student’s sketch.
Developing a new worksheet thus requires specifying what concepts are involved, drawing
the expert’s sketch, and providing advice based on potential differences. Here we use the
Cell DNA worksheet that comes with CogSketch as an illustration.
To create a new worksheet, choose New Worksheet from the File menu. A new blank
sketch will be created and the Worksheet Property Editor will be opened. To edit an
existing worksheet, simply open the file (use Open Sketch from the File menu). Choose
Worksheet Property Editor from the Edit menu if you want to see the editor. Please note
that the Worksheet Property Editor menu option is only available if you are in
Experimenter Mode or if you are viewing a solution subsketch. It is hidden otherwise since
we don’t want students and research participants to be able to edit the worksheet.
The subsketch in which the student does
their work is always called the
Workspace 10. Its properties are controlled
by the first two tabs of the Worksheet
Property Editor, as shown below. The
problem
statement
provides
an
explanation of the task to the student or
participant in an experiment. This text is
displayed on the Problem tab of the
sidebar when a student is working on a
sketch.
Currently we only allow one student subsketch in a worksheet. We may extend CogSketch
to support multiple student subsketches in the future.
10
CogSketch, version 3.07
52
The Allowed Collections section on the Workspace Concepts tab is where you specify
what conceptual labels can be assigned to the glyphs in a sketch. Optionally, this can be
Free Text Entry, in which case, the student can type whatever they like when labeling a
glyph. Such free text won’t mean anything to CogSketch or its tutor, but it may be useful for
some experiments. If you don’t use Free Text Entry, you will have two options: you can
select concepts from the knowledge base or you can define new concepts altogether. We
provide our knowledge browser (click the Browse Knowledge base button) for seeking out
concepts that are already defined in the knowledge base. Once you know what concept(s)
you want, start typing its name in the box under All Collections (on the right). As you type,
all collections starting with those
letters will be shown in the box
below. Select one, click the left arrow
and it will be added to the
Collections Allowed in Sketch. If
you cannot find the concept that you
are looking for in the knowledge
base, you can define a new collection
that will be added to the knowledge
base anytime this sketch worksheet is
used. To do this, click the Define
new collection button. A dialog will
appear that allows you to specify a
name and description for your new
collection.
Please adhere to
collection naming conventions: begin
with an upper case letter and use
camel case. When you define a new
collection it will automatically be
added to the Collections Allowed in Sketch. 11 The “X”
button between the boxes can be used to remove concepts
from the Collections Allowed in Sketch section. You
can optionally provide a more readable name for a concept
by selecting it in the Collections Allowed in Sketch
section and entering a name in the box titled “Humanreadable namestring for the term …”.
When the student or experiment participant labels a glyph,
they will see these collections as available options in the
sidebar.
Note that any new collections you define here are not permanently added to the
knowledge base. They will be specific to this worksheet and will be removed from the
knowledge base when the worksheet is closed. This reduces the possibility of naming
conflicts across worksheets.
11
CogSketch, version 3.07
53
The next section, Allowed Relations, is similar. It allows you to specify which relations the
worksheet user can assign. You can search for relations in the knowledge base or define
new ones that are specific to the current worksheets.
The last section on this tab, Allowed Annotations, allows you to specify which annotations
will be available.
While setting up the workspace subsketch, you can add glyphs, background images, layers,
adjust their properties, etc. just like you would in any sketch. These will be saved along with
the worksheet.
The next tab of the Worksheet Properties Editor is used when defining a solution for the
worksheet. This is only necessary if you intend to use the CogSketch Worksheet Tutor. The
solution, if provided, will be a subsketch. Worksheets, when first created, do not have a
solution subsketch, so the tab initially looks as follows:
If you check the “Include solution subsketch?” checkbox, a new subsketch will be added to
the sketch (the “solution” subsketch) and that subsketch will be selected. This new
subsketch will include any layers you added to the workspace subsketch and those layers will
be created with the same properties (i.e., name, genre, and pose) that were used in the
workspace. The Worksheet Property Editor will then show additional options on the
Solution tab, described below.
Draw your solution in this subsketch as you would any normal sketch. Label the glyphs; add
new layers as needed, etc. When you add or delete a layer on the solution subsketch, it will
automatically be added or deleted on the workspace subsketch. Note that this does not go
the other way – after the solution subsketch has been created, layers added/deleted on the
workspace subsketch are not automatically added/deleted on the solution. This is
intentional. It allows you to have different layers in the workspace if you so desire (e.g., to
provide an extra layer in the workspace for student intermediate work).
CogSketch, version 3.07
54
After you have drawn the solution, go back to the Solution – Important Facts tab of the
Worksheet Property Editor:
Click the Update button. This will populate the Solution Glyphs box with all the glyphs
you drew on the solution subsketch. Clicking on a glyph in this box will show facts known
about that glyph. Internal bookkeeping facts and other such facts deemed not useful in
tutoring advice are not displayed. You must tell the CogSketch Tutor which facts are
actually important. To do this, select a fact and click the button with the picture of an arrow
pointing down; this will add the fact to the Facts Important for Tutoring section. You can
use the button with the “X” to remove facts from this section. In the picture above, you’ll
see that two facts about glyphs being contained were marked as important for the tutor. The
CogSketch, version 3.07
55
first one shown says that the cell nucleus is inside the cell membrane, and the second says
that the DNA is inside the nucleus.
If you click on an “important” fact, you can enter advice text that will be displayed if the
tutor thinks the student’s sketch does not meet the requirements of the fact:
In this example, if the student does not draw the DNA inside the cell nucleus, the suggestion
“You may want to reconsider the location of the DNA” will be given to the student.
If the fact included quantities (e.g. an annotation indicating that the length of another entity
is 800 meters), you will also be given the change to specify a minimum and maximum
allowed value, along with text that will be displayed if the student’s sketch falls outside those
bounds.
If the fact is about the orientation of an arrow, you can specify an angular tolerance for that
arrow. For instance, if a solution arrow is pointed toward the upper right quadrant, then its
orientation is 45 degrees. Specifying an angular tolerance of 10 degrees will mean that an
arrow that is tilted between 35 and 55 degrees will be considered acceptable. In interpreting
the orientations of arrows, 0 degrees means that the arrow is pointed to the right, up is 90
degrees, left is 180 degrees and down is 270 degrees. In general, when specifying minimum
and maximum advice for arrows, when the student’s arrow orientation is below the
minimum, it should be rotated counter clockwise and when the student’s arrow orientation is
above the maximum, it should be rotated clockwise.
The tutor can also provide advice if the student drew glyphs differently than the
corresponding glyphs in the solution. This is controlled through the Solution –
Quantitative Ink tab. In the next two screenshots shown below, the teacher wanted the
tutor to critique the student if he or she outlined marker beds differently than those of the
CogSketch, version 3.07
56
solution. The teacher did this by first enabling quantitative ink comparison and then
entering an acceptable tolerance and tutoring advice text for each marker bed. If you are
viewing the solution subsketch while doing this, an area filled in yellow will show you
visually what the tolerance means. In the two pictures below, as long as the student's
drawing for Marker bed #b falls within the yellow area, the tutor will consider that
acceptable.
CogSketch, version 3.07
57
The Security tab (see screenshot below) is used to lock your worksheet so that students
cannot view the solution. Assign a password and click the "Apply" button. If a password
has already been assigned and you wish to change it (as in the screenshot below), the "Old
Password" field will be available; you must correctly enter the old password before you can
enter a new one.
When a password-protected worksheet is opened, before you can view or edit the solution,
you must first choose Unlock Solution from the Edit menu. You will be prompted for the
password, and, if entered correctly, you will be able to view and edit the solution subsketch.
CogSketch, version 3.07
58
7 COGSKETCH GRADEBOOK
The gradebook is a convenient tool for organizing and grading sketches submitted by
students for assignments in the various courses handled by an instructor. On the File menu,
choose Open Gradebook to use it. The gradebook can be used for multiple classes, each of
which can have multiple assignments. The gradebook's main window looks like the
following (or at least it will once you've added a few classes):
7.1 ADDING CLASSES, ASSIGNMENTS, AND STUDENTS TO THE GRADEBOOK
The very first time you open the gradebook, no classes will be defined, so the initial list of
classes will be empty except for some information describing how to add classes. Click the
"New class" button to add a class. The primary and secondary titles assigned can be
anything meaningful to you. In the screenshot above, the instructor decided to use the
primary title for the course number and name and the secondary title for the quarter in
which that class was taught. You can edit and delete classes once you've added them, using
the buttons in the toolbar. You can also right-click on a class to edit its description.
Double-clicking a class shows the assignments and students for that class. The "New
assignment" and "New student" buttons are used to define assignments and students,
respectively. Edit and Delete buttons are available on the toolbar when assignments and/or
students are selected.
CogSketch, version 3.07
59
7.2 ADDING SKETCHES TO THE GRADEBOOK
Double-clicking an assignment shows the sketches submitted for that assignment. Doubleclicking a student shows the sketches submitted by that student.
There are a couple ways to add sketches – you can either use drag-and-drop, dragging
sketches from the Windows file explorer, or you can use the Add sketches button and
select the sketches you want to add from a file browsing dialog. Either way, you will be
prompted for further information about each sketch added:
If you're viewing the sketches for a given assignment when you add a sketch, the
Assignment field will already be set to that assignment for you. If you're viewing the
sketches for a student, the Students field will already have that student selected for you.
CogSketch, version 3.07
60
The Date received field is automatically set to the file date of the sketch file that you're
adding. You can, of course, change the values of any of the automatically-populated fields if
you want. The Students field shows a list of all the students defined for the class and
provides check-boxes so that you can select which student or students submitted the sketch.
To explain the “Solution Sketch?” and Score fields, let's talk a bit about grading. Through
the gradebook, you can use the CogSketch tutor plus the grading criteria defined for a
worksheet (via the worksheet property editor described in the section titled "Designing a
Worksheet") to automatically grade worksheet sketches submitted by students. If you wish
to do this, one sketch in each assignment is treated as the "solution sketch". This is a sketch
for which you, the instructor, has created a solution subsketch and defined grading criteria
using the worksheet property editor. When adding or editing such a sketch in the
gradebook, the "Solution Sketch?" should be checked. This tells the gradebook that it
should use that sketch as the solution when grading the students' worksheets. The Score
fields are present when adding or editing a sketch in case you want to assign your own grade.
They will be filled in for you if and when you run the automatic grader.
Once you click the OK button a copy of the sketch file will be made and added to the
gradebook. By default, these are added to your Windows Documents folder under
"cogSketch\gradebook\", organized by class and assignment. You can change the location
of these sketches if you wish in the Preferences.
You can always edit the gradebook's information about a sketch later by selecting a sketch
and clicking the Edit button or by right-clicking a sketch and choosing Edit <sketchname> from the shortcut menu. Double-clicking a sketch (or choosing Open <sketchname> in CogSketch from the right-click menu) will open the sketch, so you can view or
edit the sketch itself.
7.3 GRADING WORKSHEETS
CogSketch can be used to grade student worksheets automatically. To do so, the following
conditions must be met:
•
A solution sketch has been entered for the assignment.
•
That solution sketch contains a solution subsketch.
•
The solution sketch contains grading criteria (entered using the Worksheet Property
Editor described in the section titled "Designing a Worksheet").
The automatic grader uses the same CogSketch tutor that can give advice to students while
they are working on the worksheets plus the grading criteria to assign scores. Since the
grading criteria is extracted from your designated solution sketch, you don't have to decide
on it at the time you give the assignment to the students. You can change it whenever you
wish, and, of course, you can re-run the automatic grader at any time.
To use the grader, just select one or more sketches and click the Grade worksheets button.
The grader will first open the associated solution sketches in CogSketch. If the solutions are
CogSketch, version 3.07
61
password protected, you will be prompted at this time to enter the passwords. Then each of
the student worksheets will be opened in CogSketch and graded. Besides assigning a score
to each one, a grade report will be created for each worksheet that details each of the criteria
on which the student was graded. These reports can be viewed through the gradebook -when one is available for a worksheet, an icon will appear beside that worksheet's listing in
the gradebook, as seen in the screenshot below:
To view a grade report, select a worksheet and click the View grade report button or rightclick a worksheet and choose View grade report from the menu that pops up.
These reports are stored in the same folder that contains the gradebook's copy of the
sketches you've added. By default, these are added to your Windows Documents folder
under "cogSketch\gradebook\", organized by class and assignment. You can change the
location of these sketches if you wish in the Preferences. If a grade report is available for a
sketch, it will be stored in a sub-folder with the same name as the sketch (e.g.
Documents\CogSketch\gradebook\Layers_of_the_Earth\layers_Larkin
for
the
layers_Larkin sketch). The report is in HTML format can can be viewed in any web
browser.
If you later decide to change an assigned score, just edit the sketch's entry in the gradebook
(select it and click the Edit button). Entering values in the Score fields overrides scores
assigned by the automatic grader.
7.4 EXPORTING/IMPORTING THE GRADEBOOK
An instructor will often want to have the contents of their gradebook on multiple computers
– their computers at the office and at the home, for example; or you might just want to make
a backup copy of the gradebook (always a good idea). The gradebook provides some tools
to make this easy.
Click on the big Tools button at the left of the gradebook window and choose Export
Gradebook.
CogSketch, version 3.07
62
This will create a zip file containing the contents of the gradebook database plus all of its
sketches and grade reports.
To import such a zip file, choose the Import Gradebook tool and select the zip file you
wish to import. Attempts will be made to minimize duplicate entries in your existing
database, using the imported data if it is newer than what is in your existing gradebook.
CogSketch, version 3.07
63
8 COGNITIVE MODELING DEMONSTRATIONS
One goal of CogSketch is to develop models of human spatial cognition. Presently,
CogSketch includes two demonstrations of cognitive modeling: the Perceptual Sketchpad
and Geometric Analogy. Both are implemented using Spatial Routines, a modeling
approach in which the developer selects a set of basic operations such as encoding an image or
comparing two images to identify their differences. These operations can be combined to
produce a variety of routines for solving different tasks.
The Perceptual Sketchpad shows how shape information can be combined with spatial
information when comparing two images. Geometric Analogy shows how this approach can
be used to perform visual problem-solving. We describe the two demonstrations below.
8.1 PERCEPTUAL SKETCHPAD
CogSketch represents spatial relations between objects in a sketch. However, some tasks
require representing relations between the parts of an individual object or glyph. Only by
representing the parts that make up a glyph can CogSketch compare glyphs, identify glyphs
that are the same shape, and determine the transformations—such as rotations and
reflections—between two glyphs. Thus, we have been developing a system for decomposing
a glyph into its edges and representing those edges in a way that allows two glyphs to be
compared via SME (the Structure Mapping Engine, [3,4]). The goal of this subsystem is to
build up a flexible, hierarchical representation of a sketch that will allow two glyphs or two
sketches to be compared at the edge level, the object level, or even at the level of groups of
objects. In ongoing and future research, we are developing this system as a model of human
perception by demonstrating that it produces representations of static, two-dimensional
images that can be used to perform spatial reasoning tasks at human levels (e.g. [14,18,19]).
This system is accessible through the experimental Perceptual Sketchpad mode.
A perceptual sketchpad is similar to a regular sketch. Like other sketches, a saved perceptual
sketchpad can be opened with the Open Sketch option from the File menu. Users can
sketch glyphs within a perceptual sketchpad using the same tools they would normally use.
The only difference is that a perceptual sketchpad contains a sketch lattice. A sketch lattice is a
grid consisting of two or more cells, with two as the default. Glyphs drawn outside of the
grid are treated normally. However, any time a glyph is drawn inside the grid, CogSketch
will decompose the lines in the glyph into one or more perceptual edges. It will build up an
internal representation of each edge’s features, as well as the spatial relationships between
the edges. Once the decomposition process has been completed, the user can view the
system’s decomposition of the glyph or use the decomposition to compare the glyph to
other glyphs.
The perceptual sketchpad supports two types of comparisons: comparisons between
individual glyphs and comparisons between groups of glyphs. If there is only a single glyph
in each cell of the grid, CogSketch will directly compare the two glyphs, attempting to
identify their corresponding edges. If there is a one-to-one mapping between the edges in
the two glyphs, it will attempt to identify a transformation between the glyphs, such as a
rotation or reflection. Assuming it finds a valid transformation (including a perfect identity
CogSketch, version 3.07
64
match), it will report this transformation and color-code the edges of the two glyphs to
identify which edges correspond. Note that the Perceptual Sketchpad requires a very close
match for transformations—each of the corresponding edges must be rotated or reflected
about the same axis and must show the same change in length. If the edges don’t match
closely enough, it will not return a mapping.
If there are multiple glyphs in the two cells, CogSketch will begin by decomposing each
glyph into edges in order to identify attributes describing the glyph’s shape (such as straightedged vs. curved-edged). CogSketch will produce a representation for each cell that
combines this shape information with the spatial relations between the glyphs. Then, the
representations of the two cells will be compared to identify corresponding glyphs. Finally,
the glyphs will be color-coded to indicate which glyphs correspond.
In the next two sections, we first describe how you can interact with two example perceptual
sketchpads. We then describe how to create and test new perceptual sketchpads.
8.1.1
PERCEPTUAL SKETCHPAD EXAMPLES
To see the first example sketchpad, choose Open Sketch from the file menu and find the
sketch PSketchpad_Example1.sk located in the “perceptual-samples” directory. You should
see a grid consisting of two cells with an “I” shape in each cell. Before you can compare the
two glyphs, let’s see what edges CogSketch can find. To do this, hold down the right mouse
button anywhere on the grid outside of the two glyphs and choose “Perception /
Decompose All Glyphs.” The decomposition process should take only a few seconds,
although it may require more time on slower machines. After decomposition is completed,
CogSketch will assign a different color to each edge so that you can see the edges it found.
If you are unclear as to exactly where one edge stops and another begins, you can click on an
edge to select it. Note that while the “I” shape on the left appears to have been represented
perfectly, the horizontal edges of the “I” shape on the right have been broken up every place
a vertical hash mark intersects them. However, for many tasks, including the one we are
about to attempt, the system will group the horizontal edge segments back together to form
complete edges. Once you are done viewing the edges, you may go back to the normal view
by holding the right mouse button down on the grid and choosing “Perception / Unmark
All Glyphs.” Remember, you must hold the mouse outside of any glyphs to do this.
To compare the two glyphs, hold the right mouse button down on the grid and choose “Do
Routine: Compare Images.” This process may take several seconds. After comparison is
complete, CogSketch will color the edges to identify the edges that correspond in the two
glyphs. As you can see, CogSketch has identified a set of corresponding edges in which the
right glyph has been rotated 90 degrees from the orientation of the left glyph. Because the
comparison was only looking at the overall shape of the glyphs, the inner hash marks on the
right glyph were ignored during comparison. They are now grayed out to indicate that no
correspondence was found between them and edges in the left glyph. If you hold the right
mouse button down and choose “Inspect Spatial Routine,” you can see the primary spatial
operations that were used by the Perceptual Sketchpad. In this case, there is only one:
“Compare Shapes.” If you select it, it will describe the transformation it identified.
Now try opening the other Perceptual Sketchpad example sketch, PSketchpad_Example2.sk,
also located in the “perceptual-samples” directory. As you can see, this sketch contains
CogSketch, version 3.07
65
several glyphs in each cell of the grid. If you want, you can decompose the glyphs by
holding down the right mouse button on the grid and choosing “Perception / Decompose
All Glyphs.” However, if you instead choose “Do Routine: Compare Images”, CogSketch
will begin the comparison process by decomposing the glyphs.
At the end of the comparison process, CogSketch colors the glyphs to indicate those that
correspond to each other in the two cells. Those glyphs on the left that fail to correspond to
anything are left black. Note that CogSketch combined information about each glyph’s
shape with information about the spatial relations between the glyphs in order to identify the
corresponding glyphs in the two cells.
8.1.2
CREATING A NEW PERCEPTUAL SKETCHPAD
The first thing to remember when creating a new perceptual sketchpad is that the glyph
decomposition code is experimental. We appreciate any feedback you can provide regarding
problems with the glyph decompositions, including bug reports (see Troubleshooting,
Section 9.1) and actual sketch files.
To make a new perceptual sketchpad, go to the file menu and choose New Perceptual
Sketchpad. CogSketch will create a new sketch containing a grid with two cells. The grid
will be sized to fit the current window size when the sketch is first created. If you later
resize the window, you may find the grid to be too large or too small. However, you can
resize the grid by click on any edge of the grid and dragging.
To draw a glyph in the sketchpad, simply follow the usual rules: sketch out the glyph and
then click on the “Finish Glyph” button. Remember, you can hold down the right mouse
button and choose “Perception / Decompose All Glyphs” to see what edges CogSketch
found in your glyphs. If the glyphs have already been decomposed, you can also select
“Perception / Show Edges and Junctions for Glyphs.” Afterwards, you can hold down the
right mouse button on the grid and choose “Unmark All Glyphs” to go back to the normal
glyph view, although this is not necessary.
Once at least one glyph has been drawn in each cell of the grid, you can right-click on the
grid and choose “Do Routine: Compare Images” to compare the glyphs in the two cells of
the grid. As explained in the previous section, the comparison will work differently
depending on whether there is only glyph in each cell or there are multiple glyphs. If there is
just one in each cell, CogSketch will compare the two glyphs and color-code the glyphs’
edges to indicate the corresponding edges. If there are multiple glyphs, CogSketch will
color-code the glyphs themselves to indicate the corresponding glyphs, leaving those glyphs
that fail to correspond in their original color.
8.2 GEOMETRIC ANALOGY
To see our geometric analogy model in action, start CogSketch and open the sketch
“GeometricAnalogy.sk” in the “perceptual-samples” directory. This file contains our
adaptations of four geometric analogy problems from Evans’ classic ANALOGY paper [2].
(To run the full set of 20 problems, you can load “FullGeometricAnalogy.sk.” Note that
this file may take a minute or two to load.) You can use the file to run the model on those
CogSketch, version 3.07
66
problems, modify the problems, or write your own problems from scratch. Let’s begin by
going to Evans problem 1. Make sure “1” is selected under Current Subsketch:
This subsketch contains three sketch lattices. Sketch lattices are used to break up a sketch into
parts. In this case, the two top lattices describe the problem (“A is to B, as C is to…?”),
while the bottom lattice describes the five possible answers.
Hold down the right mouse button on any of the lattices, making sure not to click on an
actual glyph, and select “Do Routine: Geometric Analogy”. This will cause the model to
begin building up a representation of each figure in the problem. The model will also
segment each glyph into its component edges. This is necessary so it can determine which
glyphs have the same shape, as well as computing spatial transformations between shapes
(e.g., rotations and reflections). CogSketch will also identify qualitative spatial relations
between the glyphs in each figure. CogSketch will build up a shape representation to describe
the edges in a glyph and the relations between those edges, as well as a picture representation to
describe the glyphs in a figure and the relations between those glyphs.
After doing this, the model will perform the geometric analogy task, as described in [20,22].
Because the current model is fully implemented in Spatial Routines, we will be able to
inspect the various operations used to solve a problem.
When the task is completed, CogSketch will highlight the correct answer. You can now
examine how the model solved the problem. Try right-clicking inside the upper-left square,
making sure not to click on an actual glyph, and choosing “Inspect Spatial Routine.” This
will bring up the Routine Inspector, which shows the various spatial operations used. It will
only show you operations that involve the particular square you right-clicked on. In this
case, we are looking at operations related to “Image A” from the geometric analogy problem
CogSketch, version 3.07
67
“A is to B as C is to…?”. Try clicking on the triangle next to “Find Differences ->
Diff(A,B).”
The operation you’ve selected is the one that compared images A and B and found the
differences between them. As you can see, CogSketch has color-coded the glyphs to identify
the corresponding elements in this comparison. If you’d like to know more about this
comparison, you can click “Browse Facts” to open up a web browser with the list of facts
describing the differences between the images, or you can click “Browse Comparison” to
browse the comparison computed by the Structure-Mapping Engine. You can also inspect
the sub-operations of this operation: try clicking on the triangle next to “Compare Images.”
Note that for each pair of corresponding glyphs, a “Compare Shapes” operation was
computed to identify the relations between the shapes. If you select one of these, it will
show you the corresponding edges. Finally, there is a “Recognize Shape” operation for the
small dot. In this case, the model hadn’t seen a dot before (the model only considers shapes
CogSketch, version 3.07
68
in the current problem; so it is only “recognizing” that is has seen a shape before in the same
problem).
Let us suppose you’ve clicked on “Browse Facts.” You can now see the facts describing the
differences between images A and B. These facts are similar to the ones described in [20],
although the terminology has changed somewhat. changeBetweenImages describes a fact
that is true in one of the images but not the other. In this case, we can see that one change
between Image-2 and Image-1 is that Image-1 has an object above another object. This
above object is arbitrarily called Element-3, but you can see from the color-coding that it is
the dot. changeBetweenImagesFromTo describes how an object changes from one
image to another. In this case, the change to Element-3 is simply that it is absent in
Image-2 but present in Image-1.
Finally, note that Element-3’s shape type,
(StrictShapeTypeFn 2 0), has also been recorded. This shape type is represented by an
arbitrary symbol. Because the recognize-shape operation failed to find other objects with
the same shape as the dot, it is the only object so far with this shape type. Later, the model
will recognize that other images in the problem also contain dots, and they will be assigned
the same shape type.
At this point, if you want to consider the problem further, you could try clicking on “Infer
Image -> Image D” to see how the model inferred the answer image. Alternatively, you
could open up a Routine Inspector for one of the other squares in this problem.
Feel free to repeat this process for any of the Evans problems contained in the files
GeometricAnalogy.sk and FullGeometricAnalogy.sk. You can also create your own
variations of the problems by copying-and-pasting glyphs, deleting glyphs (use the delete
button on the toolbar or the delete key to delete a glyph), or moving glyphs around. Finally,
you can go to the final subsketch, entitled “Make-Your-Own,” and build a new geometric
analogy problem from scratch. There are two ways to make your own glyphs. You can
either draw them in CogSketch or import them from PowerPoint. You can import from
PowerPoint by drawing a shape in PowerPoint and then copy-and-pasting into CogSketch.
The advantage of using PowerPoint is that you can build exact shapes with perfectly straight
lines, such as the ones used in this example. While our system for decomposing a glyph into
its edges works reasonably well on hand-drawn glyphs, it can make errors. Thus, if you find
the model isn’t working well with hand-drawn glyphs, you can switch to PowerPoint shapes.
CogSketch, version 3.07
69
9 DATA GATHERING FOR LABORATORY EXPERIMENTS
CogSketch can be used as a platform for laboratory experiments. It gatherings timing data
for all the points sampled during each ink stroke and for each action the user takes
(undo/redo, deletions, resizing, moving, editing labels, etc.). The timing is accurate to the
thousandth of a second.
We don’t yet have a full authoring environment for experiments but we do provide a sample
experiment that you can edit. We can help design more complex experiments. Just email us
at [email protected]. More information about the capabilities of an
experiment sketch are described later in this section.
9.1 THE SAMPLE EXPERIMENT
The sample experiment can be found in the following folder:
Documents\CogSketch\samples\experiment-samples\
Upon opening the sketch you will be asked if you want to run the experiment or edit the
sketch.
CogSketch, version 3.07
70
If you choose Run, you will be prompted for the experiment participant’s ID. This can be
anything. It will be used when saving the sketch containing the participant’s work during the
experiment. Then click the Start button to begin the experiment. Your participant will then
be presented with the first subsketch in the experiment, along with the instructions for that
subsketch (if any). If there are multiple subsketches, each time the participant finishes with
one of them and clicks the Next button, the next subsketch and its instructions will be
presented. The final subsketch will have a Finish button. When that is pressed, the
participant’s sketch will be saved and you will be asked if you want to restart the experiment
or just exit.
CogSketch, version 3.07
71
If you instead choose to edit the experiment sketch, you will see a screen like this:
You can click the right side and edit the instructions that will be given for the current
subsketch. If you leave it blank, no instruction will be given to the participants and that
portion of the screen will be hidden when the experiment is running.
Each subsketch is treated as a different task within the experiment. They will be presented
to the participants in the order they were created. Each subsketch can have different
instuctions.
To try out your experiment, just save the experiment sketch and open it again. You will be
asked if you want to run the experiment.
9.2 DESIGNING MORE COMPLEX EXPERIMENTS
As mentioned before, we don’t yet have an authoring environment for creating experiment
sketches that can make use of all the capabilities that CogSketch has available. Email us at
[email protected] and we can help you create such experiments.
At present, the following can be configured:
•
For the sketch as a whole:
o Overall experiment instructions. These are displayed on the opening screen
where the participant’s ID is entered.
CogSketch, version 3.07
72
o Instructions that should be shown to the participant at the conclusion of the
experiment.
o Ordering of the subsketches within the experiment. Each subsketch will be
presented to the subject in order. So each subsketch is basically one task within
the experiment.
o Subject name prompt. (Some experimenters wanted custom text for this
prompt.)
•
For each subsketch:
o We have a variety of user-interface skins available that control whether or not
various capabilities of CogSketch are available when running the experiment.
The sample experiment sketch described above has a very simple skin.
Participants can only draw, undo, redo, delete, and create glyphs.
o Instructions shown to the participant for the subsketch
o Allowed collections for glyphs, or free-text extry; if relevant to the experiment.
o Allowed relations for glyphs, or free-text extry; if relevant to the experiment.
o Allowed annotations for glyphs; if relevant to the experiment.
o Allotted time for each subsketch.
o Default ink line width.
o Initial view boundaries. For some experiments, just fitting the view to the
current subsketch boundaries is not sufficient.
o Whether or not the right click menu should be disabled.
o Whether or not the user can assign their own namestrings to glyphs.
o Initial interaction mode (usually this is the ink drawing tool)
o Audio file to be played when the subsketch is first shown.
CogSketch, version 3.07
73
10 TROUBLESHOOTING
CogSketch is still under development. Consequently, it is quite possible that some errors will
be encountered. The email address for bugs is [email protected]. When
submitting a bug report, please include the following:
1. A description of what went wrong, in as much detail as you can muster.
2. A summary of information about the machine you were using (i.e., operating system,
amount of RAM and free disk space, CPU speed).
3. The sketch you were working on.
4. The error log. Where the error log resides depends on which operating system you
are using:
Vista/Windows 7/Window 8: \ProgramData\QRG\CogSketch\error-logs\
XP/2000/NT: \Documents and Settings\All Users\Application
Data\QRG\CogSketch\error-logs\
The format of error logs is
<year><month><date>_error_<id>.log
e.g. , 20080111_error_000.log
The ID gets incremented each time an error occurs.
Note that the error logs can get large. If a log is over 1 MB or so, you may want to
zip (compress) the file before emailing it since most email providers have a limit on
the size of email attachments.
5. Any other information you can provide. For example, a screen capture showing
what error dialog popped up, or illustrating a display problem, is often helpful.
Another source of information to include in a bug report is information from the console
window. While CogSketch is running, a small CogSketch icon will appear in your Windows
tool-tray 12. Double-clicking on this icon will pop up the console window. (It is important to
not close this window while CogSketch is running, since that will cause CogSketch to exit.
The console window is closed automatically upon exiting CogSketch.) If CogSketch seems
unresponsive, check the console window and you may find an error message displayed. If
there is, please copy and paste this into your bug report.
If the console window is still responding, you can generate a backtrace by typing
:zoom :all t :verbose t
Such traces can be very useful to include in your bug report.
When you hover your pen or mouse over it, a tooltip appears saying “Allegro Common
Lisp Console”, because CogSketch is written in Allegro Common Lisp.
12
CogSketch, version 3.07
74
CogSketch, version 3.07
75
10.1 KNOWN PROBLEMS
•
One person had trouble installing CogSketch on Windows 8 – the installer aborted
and gave the error message "The wizard was interrupted before CogSketch could be
completely installed." Getting the latest Windows Updates fixed the problem. Early
versions of Windows 8 apparently did not completely support the Windows Installer
API in a backwards-compatible manner.
•
If CogSketch crashes, it can lead to corruption in the knowledge base. The best way
to fix this is to revert to the knowledge base from the original distribution, or from a
backup that you have made. Please see Section 2.2 for instructions.
•
While ink processor crashes have become quite rare, they are still possible. The
healing touch of your cursor on the icon representing the ink processor that is
crashed should restore it.
•
Usually if your graphics driver doesn’t support CogSketch’s OpenGL windows,
you’ll get an error message saying something to that effect. On at least one machine
configuration, though, the sketching windows failed to be created but no error
message was generated – when creating a new sketch or opening an existing one,
CogSketch hung while displaying a message saying “Starting MMI and Ink-Processor
...” and no sketching window was created. Installing the latest graphics driver for
that machine fixed the problem.
•
CogSketch disables Windows Pen Flicks, which removes a lot of the delays when
inking on a pen-enabled computer. Otherwise, Windows waits until the mouse/pen
has moved certain distance before passing events to CogSketch just in case you
might be making a PenFlicks gesture, which means that there is an annoying delay
whenever you start to draw. Furthermore, in the CogSketch preferences, you can
disable press-and-hold for right-click, which reduces the delay even more. However,
due to an annoyance in Windows, unless you also disable press-and-hold for all
applications, there is still a little delay. If you wish to get rid of this delay entirely, do
the following:
1) Open the Control Panel.
2) Pick "Hardware and Sound"/ "Pen and Input Devices" (or "Pen and Touch").
3) This opens the dialog shown below. On the "Pen Options" tab, click "Press and
hold", and then click the Settings button.
CogSketch, version 3.07
76
4) On the Settings dialog, uncheck "Enable Press and hold for right-clicking”:
•
CogSketch uses OpenGL for rendering. On some very old Tablet PCs, OpenGL
hardware support only works in landscape mode, not portrait mode. If you start
CogSketch in one display mode and switch to the other, it will hang on such machines.
CogSketch, version 3.07
77
The only workaround for such machines is to close CogSketch before switching display
modes.
CogSketch, version 3.07
78
11 FUTURE PLANS AND FEEDBACK
We have a number of planned extensions for CogSketch. We seek your feedback to help us
prioritize. Here are a few of the things we are thinking of.
11.1 WORD-BASED CONCEPT PICKER
A high priority for us is making it easier to find concepts when authoring Sketch Worksheets
and in the open-interface mode. Open-interface mode is designed for scientists and
developers, so we don’t feel the need to shield you from the KB internals once you’ve found
them. But we would like to make it a lot easier for you to find and extend them. The KB
already contains mappings from WordNet to OpenCyc concepts in it. We plan to exploit
these mappings so that you can enter a word into the concept picker box, and get back a
small set of choices of possible concepts to use. The free-text concept labeler is a way for us
to gather data on the vocabulary and phrasing that people tend to use, and thus will help us
develop these capabilities.
11.2 AUTHORING ENVIRONMENT FOR SPATIAL ROUTINES
The cognitive models of visual processing in CogSketch are built in the Spatial Routines
language developed in Andrew Lovett’s Ph.D. thesis [23]. We plan on implementing an
integrated development environment (IDE) for spatial routines, so that cognitive scientists
can more easily write their own spatial models on top of CogSketch, at a level of abstraction
that should be more suitable for formulating computational models.
11.3 EVERYDAY PHYSICAL SEMANTICS
To support STEM education, CogSketch has to have a reasonable level of understanding
about how objects interact, including interactions between shape, forces, motion, and
materials, is necessary. The relevant level of understanding is mostly qualitative – detailed
numerical methods and traditional simulations are not appropriate because such information
is not yet specified during conceptual design. You can try out the current facilities by using
Design Coach, a CogSketch application built into the software. We expect that similar
properties will hold for sketching in support of geoscience education and other STEMrelevant domains. We are integrating prior QRG research results (e.g. [15]) to provide this
level of understanding for the contents of sketches. You can access some experimental
facilities from the QM menu, which only appears in Developer mode currently.
11.4 SPECIALIZED INTERFACES & AUTHORING TOOLS
We see the worksheet interface as the first of a set of specialized interfaces that allow
CogSketch to be customized for particular experimental and/or educational purposes.
Customization can allow us to develop specialized concept picking interfaces that are very
CogSketch, version 3.07
79
efficient and easy to use. For example, our military sketch understanding system [11] lets
you select from over 800 different concepts easily 13.
Our goal is to have a library of interface types, to make it straightforward for scientists to put
together experiments, and for curriculum and educational software designers (and ideally
teachers and students) to create new activities and tutoring systems. Given feedback on
what types are most effective, we can create authoring tools that simplify creating specialized
interfaces.
11.5 SPEECH PROCESSING
Given that people talk to each other during sketching, why don’t we use speech recognition
in CogSketch? The answer is a little complicated. First, prior nuSketch systems did support
speech recognition. We dropped it for CogSketch for several reasons. First, speech I/O is
generally unsuitable for classroom situations. Second, unfortunately, today’s speech
recognition systems are still not very good. To get high recognition rates requires the
speaker to train the system, wear a noise-cancelling microphone, and carefully restrict the
vocabulary and grammar of what is said. This means that for many people today, speech
recognition is too hard to use.
That said, being able to do simple speech commands (e.g., “end”) would enable someone to
leave their pen where it is, when using a Tablet PC. And the technology is improving. We
will reactivate speech recognition as an option at some point, but it is currently very low on
our list of priorities.
13
Assuming you’re a military person who already knows that symbology, of course.
CogSketch, version 3.07
80
12 REFERENCES
1. Barker, K. and Blythe, J. and Borchardt, G. and Chaudhri, V. and Clark, P. and Cohen,
P. and Fitzgerald, J. and Forbus, K. and Gil, Y. and Katz, B. and Kim, J. and King, G.
and Mishra, S. and Morrison, C. and Murray, K. and Otstott, C. and Porter, B. and
Schrag, R. and Uribe, T. and Usher, J. and Yeh, P. A knowledge acquisition tool for
course of action analysis, in Proceedings of the Innovative Applications of Artificial Intelligence
Conference, 2003.
2. Evans, T. (1968). A program for the solution of geometric-analogy intelligence test
questions. In M. Minsky (Ed.), Semantic Information Processing. Cambridge, MA: MIT Press.
3. Falkenhainer, B., Forbus, K., & Gentner, D. (1986). The Structure-Mapping Engine.
(Tech. Rep. No. UIUCDCS-R-86-1275, UILU-ENG-86-1732). Urbana, Illinois:
University of Illinois at Urbana-Champaign, Department of Computer Science.
4. Forbus, K., Ferguson, R., & Gentner, D. (1994). Incremental structure-mapping.
Proceedings of the Cognitive Science Society.
5. Forbus, K., Ferguson, R., & Usher, J. (2000). Towards a computational model of
sketching. Proceedings of QR2000. Morelia, Mexico.
6. Forbus, K., Hinrichs, T., de Kleer, J., & Usher, J. (2010). FIRE: Infrastructure for
Experience-based Systems with Common Sense. AAAI Fall Symposium on Commonsense
Knowledge, Arlington, VA.
7. Forbus, K., Lockwood, K., Klenk, M., Tomai, E., & Usher, J. (2004). Open-domain
sketch understanding: The nuSketch approach. AAAI Fall Symposium on Making Penbased Interaction Intelligent and Natural. Washington, DC.
8. Forbus, K., Tomai, E., & Usher, J. (2003). Qualitative spatial reasoning for visual
grouping in sketches. Proceedings of the Seventeenth International Workshop on Qualitative
Reasoning. Brasilia, Brazil.
9. Forbus, K., & Usher, J. (2002). Sketching for knowledge capture: A progress report.
IUI'02. San Francisco, California.
10. Forbus, K., Usher, J., & Tomai, E. (2005). Analogical learning of visual/conceptual
relationships in sketches. Proceedings of AAAI-05.
11. Forbus, K. Usher, J., & Chapman, V. (2003). Qualitative spatial reasoning about sketch
maps. Proceedings of the Fifteenth Annual Conference on Innovative Applications of Artificial
Intelligence. Acapulco, Mexico.
12. Forbus, K., Gentner, D., & Law, K. (1995). MAC/FAC: A model of Similarity-based
Retrieval. Cognitive Science, 19(2), pp 141-205.
CogSketch, version 3.07
81
13. Forbus, K., Usher, J., Lovett, A., & Wetzel, J. (2011). CogSketch: Sketch understanding
for Cognitive Science Research and for Education. Topics in Cognitive Science, pp 1-19.
14. Jee, B., Gentner, D., Forbus, K., Sageman, B. and Uttal, D. (2009). Drawing on
experience: Use of sketching to evaluate knowledge of spatial scientific concepts. In
Proceedings of the 31st Annual Conference of the Cognitive Science Society. Amsterdam, The
Netherlands.
15. Kim, H. (1993). Qualitative reasoning about fluids and mechanics. Ph.D. dissertation and
ILS Technical Report, Northwestern University.
16. Lockwood, K., Lovett, A., and Forbus, K. (2008). Automatic Classification of
Containment and Support Spatial Relations in English and Dutch. In the Proceedings of
Spatial Cognition.
17. Lockwood, K., Lovett, A. and Forbus, K. (2008). Automatic Classification of
Containment and Support Spatial Relations in English and Dutch. In Spatial Cognition VI:
Learning, Reasoning, and Talking about Space: Lecture Notes in Computer Science 5248 (pp. 283294). Berlin, Heidelberg: Springer-Verlag.
18. Lovett, A., Gentner, D., & Forbus, K. (2006). Simulating time-course phenomena in
perceptual similarity via incremental encoding. Proceedings of the Twenty-Eighth Annual
Meeting of the Cognitive Science Society.
19. Lovett, A. Forbus, K., & Usher, J. (2007). Analogy with qualitative spatial
representations can simulate solving Raven's Progressive Matrices. Proceedings of the 29th
Annual Conference of the Cognitive Science Society. Nashville, TN.
20. Lovett, A., Tomai, E., Forbus, K., and Usher, J. (2009). Solving geometric analogy
problems through two-stage analogical mapping. Cognitive Science 33(7), pp 1192-1231.
21. Lovett, A., & Forbus, K. (2011). Organizing and representing space for visual problem
solving. Proceedings of QR-2011.
22. Lovett, A., & Forbus, K. (2012). Modeling multiple strategies for solving geometric
analogy problems. Proceedings of the Thirty-Fourth Annual Conference of the Cognitive Science
Society. Sapporo, Japan.
23. Lovett, A. (2012). Spatial Routines for Sketches: A Framework for Modeling Spatial
Problem-Solving. Doctoral dissertation, Northwestern University, Department of
Electrical Engineering and Computer Science, Evanston, Illinois.
24. Rasch, R., Kott, A., & Forbus, K. (2002). AI on the Battlefield: An experimental
exploration. Proceedings of the 14th Innovative Applications of Artificial Intelligence Conference.
Edmonton, Canada.
25. Shipley, T., Glazek, K., & Forbus, K. 2010. Using CogSketch to study and teach spatial
thinking. Presentation at 6th International Conference on Geographic Information
Science, Zurich, Switzerland, September.
CogSketch, version 3.07
82
26. Wetzel, J. and Forbus, K. (2008). Integrating Open-Domain Sketch Understanding with
Qualitative Two-Dimensional Rigid-Body Mechanics. In the Proceedings of the 22nd
International Workshop on Qualitative Reasoning. Boulder, CO.
27. Wetzel, J. and Forbus, K. (2009). Automated Critique of Sketched Mechanisms. In
Proceedings of the 21st Innovative Applications of Artificial Intelligence Conference. Pasadena,
California.
28. Wetzel, J. and Forbus, K. (2010). Design Buddy: Providing Feedback for Sketched MultiModal Causal Explanations. In Proceedings of the 24th International Workshop on Qualitative
Reasoning. Portland, Oregon.
29. Wetzel, J. and Forbus, K. (2012). Teleological Representations for Multi-Modal Design
Explanations. Proceedings of the 26th International Workshop on Qualitative Reasoning. Los
Angeles, California.
30. Yin, P., Forbus, K., Usher, J., Sageman, B. & Jee, B. (2010). Sketch Worksheets: A
Sketch-based Educational Software System. Proceedings of the 22nd Annual Conference on
Innovative Applications of Artificial Intelligence.
31. Yin, P., Chang, M. D. and Forbus, K. D. (2010). Sketch-based Spatial Reasoning in
Geologic Interpretation. In Proceedings of the 24th International Workshop on Qualitative
Reasoning. Portland, Oregon.
CogSketch, version 3.07
83
13 APPENDIX A: KEYBOARD SHORTCUTS
Drawing:
•
F2: Draw mode
•
F3: Glyph select
•
F4: Ink select
•
F5: Erase
•
F7: Finish glyph
•
Ctrl-[: Decrease line thickness
•
Ctrl-]: Increase line thickness
File operations:
•
Ctrl-N: New sketch
•
Ctrl-O: Open sketch
•
Ctrl-S: Save
•
Ctrl-Alt-S: Save As
•
Ctrl-Alt-Shift-S: Save sketch as case in the knowledge base
•
Ctrl-F4: Close sketch
•
Ctrl-P: Print sketch
•
Alt-F4: Exit
Edit operations:
•
Del: Delete selected items
•
Tab: Moves to the next glyph upwards in the occlusion order on a given layer and
selects it.
•
Shift-Tab: Moves to the next glyph downwards in the occlusion order on a given
layer and selects it.
CogSketch, version 3.07
84
View operations:
•
Ctrl-B: Show underlying blob representations
•
Ctrl-G: Grey out current layer
•
Ctrl-R: Redraw
•
Ctrl-+: Zoom in
•
Ctrl--: Zoom out
•
Ctrl-W: Normal zoom
•
Ctrl-Alt-W: Fit to window
•
Ctrl-K: KQML server status
•
Ctrl-I: Inspect knowledge about selected glyphs
Analogy operations:
•
Ctrl-Alt-Shift-A: Compare two layers
Help operations
•
F1: Show help
CogSketch, version 3.07
85
14 APPENDIX B: GLOSSARY
Collection: What represents concepts in Cyc-derived knowledge bases. Examples of
collections include Dog, DestructionEvent, and SecondOrderCollection. Collections
are related via monotonic inheritance, via the genls relation. In CogSketch, conceptual
labels are typically expressed in terms of collections. In open sketching mode, the internal
collection names are used (e.g. BankBuilding, if one drew a bank), while in worksheets,
authors generally provide friendlier, everyday names for concepts (e.g. “Bank”).
Glyph: An entity in a sketch. Glyphs consist of a set of ink, the marks which represent the
spatial aspects of it in the sketch, and the content, a conceptual entity which is what that ink
stands for.
Ink Processor: A software process inside CogSketch that performs some of its visual
computations.
Layer: Just as an acetate layer can be laid over a map and drawn upon, without changing
anything on the map itself, a layer allows new spatially registered information to be added to
a sketch without changing what else is drawn there. Relationships between layer are not
automatically computed, for example. All the layers in the same subsketch are spatially
registered.
Metalayer: A special layer where each subsketch is treated as a glyph. Relations can be
drawn on the metalayer to express relationships between subsketches. For example,
subsketches might represent distinct states of a multi-state process, with arrows used to
explain the sequence in which these states take place. The genre of the metalayer is abstract,
i.e., the position of two glyphs on the metalayer tells you nothing about the relative positions
of the entities in the two subsketches.
Microtheory: A local context within either CogSketch’s working memory or the knowledge
base. Microtheories enable multiple incompatible states to be represented without causing
clashes. Microtheories are also connected via an inheritance relationship (genlMt), forming
a logical environment within which reasoning is performed. In CogSketch, there is a
microtheory for each sketch, for each subsketch of that sketch, and for each layer on that
sketch, with layers inheriting from subsketches, which in turn inherit from the sketch. This
partitioning of the facts inside it is what keeps the student and teacher sketches distinct in
worksheets, and enables sequences and processes to be represented via multiple states in the
metalayer.
nuSketch: The sketch understanding architecture underlying CogSketch.
Polyline: A list of points, which can be considered as a list of line segments. This is the
geometric part of digital ink. Digital ink also has color and width.
sKEA: The sketching Knowledge Entry Associate, the precursor to CogSketch. sKEA was
the first open-domain sketch understanding system.
CogSketch, version 3.07
86
Subsketch: A portion of a sketch that is treated as a unit. Intuitively, they correspond to
separate drawing areas within a larger sketch. Sometimes they are called bundles because
they are groups (bundles) of layers, each of which are spatially registered with each other.
Voronoi processor: A software process which calculates Voronoi diagrams for layers.
Voronoi diagrams are used to estimate proximity in some CogSketch operations.
CogSketch, version 3.07
87
15 APPENDIX C: EXPORTED INK FILE FORMAT
The files saved by the “Export Ink” option on the File menu are comma-separated-value
files – they contain rows of data where each row represents a single ink-point and the data
within the rows are separated by commas. The basic organization of the data is as follows:
•
Each row represents one point that was sampled as the user drew.
•
An ink-stroke (a polyline in most cases) is described by the points. Each stroke has its
own ID. All rows with the same “Ink ID” are describing the points making up a single
ink-stroke. The data is sorted by timestamp and ink-stroke so all the points making up a
given stroke will be next to each other.
•
A glyph is made up of ink. The “Glyph Objname” column gives the internal name used
for the glyph (really the object represented by the glyph, but that distinction only
becomes important when you start doing reasoning about the sketch). The “Glyph
Namestring” column gives the human-readable name assigned by the user.
•
Layers contain glyphs. The “Layer Objname” and “Layer Namestring” columns give the
internal name of the layer and the human-readable name, respectively.
•
A subsketch is a collection of layers. These correspond to cases/microtheories in our
reasoning system, so each subsketch gets its own reasoning context. The “Subsketch
Case” column is the name of the associated microtheory; and the “Subsketch
Namestring” is the human-readable name for the subsketch.
•
Sketches are made of one or more subsketches. These also correspond to microtheories;
each subsketch microtheory inherits from the overall sketch microtheory. The “Sketch
Case” column gives the name of the sketch’s microtheory; the “Sketch Namestring”
gives the human-readable name for the sketch.
The complete list of data columns in the file is as follows:
•
Sketch Namestring = human-readable name of the sketch
•
Sketch Case = name of the microtheory/case associated with the sketch
•
Subsketch Namestring = human-readable name of the
•
Subsketch Case = name of the microtheory/case associated with the subsketch
•
Layer Namestring = human-readable name of the
•
Layer Objname = internal name of the layer
•
Glyph Namestring = human-readable name of the
CogSketch, version 3.07
88
•
Glyph Objname = internal name of the object represented by the glyph
•
Ink ID = integer ID of the ink-stroke
•
Ink Type = Describes what kind of primitive ink object is being described. This is
usually sketch-point, meaning that an individual point is being described.
•
Ink Point X = X-coordinate of the point.
•
Ink Point Y = Y-coordinate of the point.
•
Ink Point Timestamp (seconds) = The timestamps are given in seconds (with
millisecond precision) that have elapsed since the sketch was first started. When
sketches are saved, the current timestamp is saved along with the file, so that the time
progression can start off from there when the sketch is opened again. For example, if
you create a new sketch and then start drawing exactly two minutes later, the timestamps
for the points in that bit of ink will start at 120.000 seconds. Let's say you then save the
sketch at 500s. If you later re-open the sketch and start drawing one minute after
opening it, the timestamps of that bit of ink will start at 560 seconds, no matter how
long the sketch sat around closed. So basically timestamps include only the time that the
sketch was actually open.
•
Ink Point Timestamp (clock-time) = Clock-time is given in the ISO 8601 standard
(with millisecond precision).
CogSketch, version 3.07
89
16
APPENDIX D: EXPORTED HISTORY FORMAT
The files saved by the “Export Sketch History” option on the File menu are commaseparated-value files – they contain rows of data where each row represents an action
performed and the data within the rows are separated by commas. There are several fields
(columns if you view this in a spreadsheet program) common to all types of recorded
actions:
•
Action Type (moved, deleted, created, sketch-opened , etc.)
•
Action Subtype (start, finish)
•
Sketch Time
•
Clock Time (given in ISO 8601 standard)
•
Source of action (:user, :ink-processor, etc.)
•
Source Detail (the username when source is :user)
•
Sketch Name
•
Subsketch ID
•
Subsketch Name
•
Layer ID
•
Layer Name
•
ID of object acted upon
•
Type of object acted upon
Then there are five fields for parameters specific to the given type of action. These are
labeled Param #1 through Param #5. The various actions use them as follows:
sketch-created:
1) case-name assigned to the sketch
sketch-opened:
1) full path to the file opened
sketch-closed: {none}
CogSketch, version 3.07
90
sketch-saved:
1) full path to the file opened
new-bundle:
1) case-name assigned to new bundle
2) name of new bundle
3) collections assigned to the bundle
new-layer:
1) ID of containing bundle
2) name of new layer
3) collections assigned to the layer
4) genre
5) pose
created: {none}
moved:
1) dx (distance moved along X-axis)
2) dy (distance moved along Y-axis)
rotated:
1) angle rotated (in degrees)
resized:
1) scale in X direction
2) scale in Y direction
3) anchor point X coordinate
4) anchor point Y coordinate
deleted: {none}
CogSketch, version 3.07
91
changed-collections:
1) all collections assigned after the change.
2) collections that were removed during the change.
3) collections that were added during the change.
changed-namestring:
1) old name
2) new name
changed-annotation-val:
1) old value
2) new value
changed-relation:
1) old relation fact
2) new relation fact
3) all collections assigned after the change.
4) collections that were removed during the change.
5) collections that were added during the change.
changed-genre-pose:
1) old genre
2) new genre
3) old pose
4) new pose
redrawn: {none}
compute-positional-relations: {none}
CogSketch, version 3.07
92
analogical-comparison:
1) target ID
2) target type
(note that the base ID and type are given as the object ID and type in the common
parameters)
change-grid:
{none at this time, might need to describe what was changed, but I’m not sure any
experimenter cares. The complete details, are however, recorded internally in the sketch’s
history}
change-registration:
{none at this time, might need to describe what was changed, but I’m not sure any
experimenter cares. The complete details, are however, recorded internally in the sketch’s
history}
show-vcr-questions: {none}
answer-vcr-question:
1) new fact
retract-vcr-answer:
1) old fact
tutor-suggestions:
1) tutor suggestions given as a list of strings
CogSketch, version 3.07
93
17 INDEX
Articulation points, 48
Pose, 8
Bitmap layer, 36
Looking-from-bottom, 38
Comic graphs, 8
Looking-from-side, 38
Conceptual labeling, 21
Looking-from-top, 38
how to, 12
Drawing glyphs
how to, 12
Unspecified, 38
Positional relationships, 48
Qualitative topology, 50
Genre, 8
Recognition, 6
Glyph, 12
Relative sizes, 48
Glyphs
Segmentation, 20
moving, resizing, and rotating, 32
Ink
of a glyph, 12
Ink processor
error recovery, 19
Subsketch, 7
Clone, 38
definition, 20
View
Abstract-view, 37
KB Browser, 51
Discrete-graph-view, 37
Layers, 7
Geospatial-view, 37
Looking-from-top, 38
Physical-view, 37
Metalayer, 8
CogSketch, version 3.07
94