1
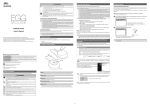
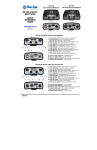
PolyVision
®
fuse™ Visualizer
User Guide
Part number 2002327-001 Rev C
©2012 PolyVision Corporation
All rights reserved
fuse Visualizer
Table of contents
Overview ........................................................................................................................................................ 3
What is fuse? .............................................................................................................................................. 3
Register your product ................................................................................................................................. 3
Preparing to use fuse ..................................................................................................................................... 4
What comes in the box ............................................................................................................................... 4
Install the fuse software .............................................................................................................................. 4
System requirements ............................................................................................................................... 4
fuse installation: Windows ........................................................................................................................ 5
fuse installation: Linux .............................................................................................................................. 5
fuse installation: Macintosh ...................................................................................................................... 6
Install the fuse camera ................................................................................................................................ 6
USB cable connection ............................................................................................................................. 6
ēno option: install the magnetic icon strip ................................................................................................ 7
Using fuse Visualizer....................................................................................................................................... 8
Three ways to use fuse ............................................................................................................................... 8
Getting started............................................................................................................................................ 8
fuse application toolbar icons ..................................................................................................................... 8
Displaying the desired image ...................................................................................................................... 9
Camera LED lighting ................................................................................................................................ 9
Rotate...................................................................................................................................................... 9
Auto Focus .............................................................................................................................................. 9
Zoom in ................................................................................................................................................. 10
Zoom out ............................................................................................................................................... 10
Zoom the selection ................................................................................................................................ 10
Screen Lock .......................................................................................................................................... 10
Reset ..................................................................................................................................................... 10
Capturing images ..................................................................................................................................... 10
Capture a snapshot ............................................................................................................................... 10
Video capture ........................................................................................................................................ 11
Copy...................................................................................................................................................... 11
Print ....................................................................................................................................................... 11
Enhancing snapshots and printed images ............................................................................................. 11
fuse application settings ........................................................................................................................... 12
Getting help ........................................................................................................................................... 13
Full Screen mode...................................................................................................................................... 13
Hiding and viewing the fuse application toolbar ..................................................................................... 13
Automatic application updates ................................................................................................................. 13
Care and maintenance ................................................................................................................................. 14
Cleaning the fuse camera ......................................................................................................................... 14
Cleaning the lens ...................................................................................................................................... 14
Lighting..................................................................................................................................................... 14
FCC compliance ....................................................................................................................................... 14
Warranty ...................................................................................................................................................... 15
Index ............................................................................................................................................................ 16
2 of 16
2002327-001 Rev C
User Guide
fuse Visualizer
Overview
Congratulations on your purchase of the PolyVision® fuse™ Visualizer. This manual describes how to
install and use the fuse Visualizer and software application.
What is fuse?
The PolyVision® fuse Visualizer provides the functions of a document camera, scanner, and web
cam in a small desktop footprint with only one USB cable connection to your computer. The USB
cable connection provides power to fuse and enables you to save digital images or video files from
the fuse camera directly to the computer where fuse software is installed.
You can use fuse alone, or add multiple features by integrating fuse with the PolyVision ēno™
interactive whiteboard and a projector. With fuse and ēno you can:
• view live images from fuse projected on the interactive whiteboard, annotate images using the ēno
stylus, and capture everything as a digital image on your computer
• control fuse features directly from the whiteboard using a small magnetic icon strip
Register your product
By registering your product, you receive enhanced customer service with information on software
upgrades.
To register your PolyVision product:
• Register on-line at:
http://register.polyvision.com
PolyVision
2002327-001 Rev C
3 of 16
fuse Visualizer
Preparing to use fuse
What comes in the box
1. fuse desktop camera
2. magnetic icon strip
3. USB cable
4. Software CD
5. Quick Reference Guide
1
4
2
5
3
Install the fuse software
System requirements
Your computer must have:
• 512 MB RAM
Your Windows-based computer must have:
• Intel Core 2 CPU or equivalent
• Windows 7, Vista or XP with SP 3
• Available USB 2.0 port
Your Macintosh computer must have:
• OS X release 10.5 or later
• Available USB 2.0 port
Your Linux system must have:
• Ubuntu 10.04 or later, Fedora 14 or later
• Available USB 2.0 port
4 of 16
2002327-001 Rev C
User Guide
fuse Visualizer
fuse installation: Windows
To install the PolyVision fuse software in Windows:
1. Insert the PolyVision fuse Visualizer Installation CD in your computer.
Or,
1. Download the fuse software from the internet at http://www.polyvision.com/
2. Double-click “My Computer” on your desktop.
3. Double-click the disk named “fuse Visualizer.”
4. Double-click the Windows folder to open it.
5. Double-click the language folder that matches your operating system.
6. Double-click “PolyVision_fuse_Setup_language.exe.” Installation begins.
7. Follow the prompts you see on the screen to install the fuse software on your computer.
8. Connect the USB cable provided with fuse to your computer. The New Hardware Wizard
dialog appears.
9. Click the radio button beside “No, not this time.”
10. Click “Next.” The Security Alert Driver Installation dialog appears.
11. Click “Yes.” The Wizard automatically completes the installation.
12. Click “Finish.”
To uninstall fuse software in Windows:
1. Click “Start” at the lower left corner of the task bar.
2. Choose “All Programs” from the menu.
3. Choose “fuse Visualizer” from the menu.
4. Choose “Remove fuse Visualizer.”
fuse installation: Linux
To install the fuse software in Linux:
1. Insert the PolyVision fuse Visualizer Installation CD in your computer.
2. Double-click the drive named “fuse Visualizer” that appears on your desktop.
3. Double-click the “Linux” folder.
4. Double-click the language folder that matches your operating system.
5. Right-click “PolyVision_fuse_Setup_language” and choose “Properties.”
6. On the “Permissions” tab, click the “Allow executing file as program” check box.
7. Click “Close.”
8. Double-click “Setup.” Installation begins.
9. Follow the prompts you see on the screen to complete the installation.
To uninstall the fuse software using Linux:
1. In a terminal window, enter:
sudo /usr/bin/PolyVision/ fuse software /uninstall
2. Enter your root password.
PolyVision
2002327-001 Rev C
5 of 16
fuse Visualizer
3. Click “Yes.” The Uninstall Complete dialog appears.
fuse installation: Macintosh
To install the PolyVision fuse software on a Macintosh:
1. Insert the PolyVision fuse Visualizer Installation CD in your computer.
2. Double-click the “fuse Visualizer” disk on your desktop.
3. Double-click the Macintosh folder.
4. Double-click “PolyVision_fuse_Setup.mpkg.” Installation begins.
5. Follow the prompts you see on the screen to complete the installation.
To uninstall the fuse software on a Macintosh:
1. Navigate to “Applications” and then to “PolyVision.”
2. Launch “fuse software Uninstaller.app.”
3. Follow the prompts as directed.
Install the fuse camera
USB cable connection
To install the fuse Visualizer:
1. Locate the fuse USB cable.
2. Connect the standard male cable end to the computer USB port.
3. Connect the mini-B cable end to the USB port on the fuse desktop camera.
6 of 16
2002327-001 Rev C
User Guide
fuse Visualizer
ēno option: install the magnetic icon strip
To integrate fuse with the ēno interactive whiteboard system, add the fuse magnetic icon strip to the
ēno whiteboard.
PolyVision
2002327-001 Rev C
7 of 16
fuse Visualizer
Using fuse Visualizer
Three ways to use fuse
To operate the fuse Visualizer:
• press buttons located on the base of the fuse desktop camera
• click buttons in the fuse software toolbar
• ēno option: When fuse is integrated with the ēno interactive whiteboard system, use the ēno stylus
to tap control icons on the fuse magnetic icon strip.
Getting started
To get started using fuse:
1. Assure that the fuse USB cable is connected to the computer.
NOTE: fuse receives power through the USB cable connection to your computer. When your
computer is turned on, fuse is on.
2. To start the fuse application on your computer, you can:
• press the Start Application button on the fuse desktop camera.
• launch the fuse application on your computer.
• Option: When fuse is integrated with the ēno interactive whiteboard system, tap the Start
Application icon on the fuse magnetic icon strip that is fastened to the whiteboard.
3. Rotate the head of the camera so it points to the object you want to display and begin using
fuse as a document camera, scanner, web cam, overhead projector and interactive tool.
fuse application toolbar icons
When you launch the fuse application on your computer, the fuse window displays the video image
from the fuse camera, plus a toolbar of options that are described below.
8 of 16
2002327-001 Rev C
User Guide
fuse Visualizer
Displaying the desired image
The fuse camera is at the end of a flexible neck so you can rotate the camera to capture images
around the room or point it down toward a page or other subject on the table.
To display the desired image:
1. Point the camera toward your subject.
2. Watch the fuse application window on your computer to see exactly what is being displayed
while you:
• Adjust the flexible neck to center the image and fill the fuse application window.
• Turn on or off the camera’s built-in LED light.
• Rotate the image by 90 degrees.
• Use Auto Focus.
• Zoom in or out on the center of the image
• Zoom in on a selected part of the image.
• Freeze the live video.
Camera LED lighting
Press this button to turn the camera LED light on and off. The LED is off when the fuse
software launches. Refer to “Lighting” on page 14.
Rotate
Press this button to rotate the live video clockwise by 90 degrees.
Auto Focus
Press this button to focus and lock the camera. If you move the camera or the subject,
press this button again to refocus.
PolyVision
2002327-001 Rev C
9 of 16
fuse Visualizer
Zoom in
Press this button to zoom in on the center of the image to a maximum of 800%. You
can also use the slider bar to zoom in or out.
Zoom out
Press this button to zoom out from the center of the image to a full size image. You can
also use the slider bar to zoom in or out.
Zoom the selection
Press this button then drag the cursor to form a rectangle around part of the image.
When you release the cursor, that portion of the image is magnified. To return to the
full-size image, select the icon again and click in the window or press ESC.
Screen Lock
Press this button to display a static image rather than live video. To return to live video,
select the icon again.
Note: While the live video is locked, you can copy to the clipboard, capture a snapshot, and reset to
defaults, but not magnify, rotate or capture video.
Reset
Press this button to reset the fuse application to default magnification, default live video,
default lighting, and default rotation.
Capturing images
fuse Visualizer enables you to capture and display images for a variety of uses:
• Capture a snapshot in a graphic file on your computer.
• Capture the live video in an mpeg file on your computer.
• Copy an area of the image to the clipboard.
• Print the current image to the local printer.
Capture a snapshot
Capture a snapshot of the image as a graphic file and save it to your computer. The file
is saved in the location defined in the configuration dialog (refer to page 12). You can
enhance the captured image. Refer to page 11.
10 of 16
2002327-001 Rev C
User Guide
fuse Visualizer
Video capture
Press once to begin capturing live video to a mpeg file on your computer and press
again to halt video capture. The mpeg file is saved in the location defined in the fuse
configuration dialog (refer to page 12).
Copy
Press this button and drag the cursor to select an area of the video to copy to the
clipboard.
Print
Prints the current image to the local printer. The default printer is defined in the fuse
configuration dialog (refer to page 12). You can enhance the captured image. Refer to
page 11.
Enhancing snapshots and printed images
The fuse application enables you to enhance the captured image using TrueSnap™ software:
• Square squares up the image. The default is OFF.
• Clean standardizes the colors. The default is OFF.
• Unbind flattens the image from a bound book, removing the curve on the edge. The default is
OFF.
To enhance captured snapshots or printed images:
1. Click the drop down arrow in the Capture snapshot or Print button in the application toolbar.
2. Click On or Off the option. The option remains on until you turn if off or choose the fuse
application Reset icon (refer to “Reset” on page 10).
PolyVision
2002327-001 Rev C
11 of 16
fuse Visualizer
fuse application settings
The fuse application enables you to configure options for saving files and printing.
Press this button in the fuse application toolbar to configure the fuse application
options.
Camera Resolution: Specify the image and video size. Options appear in the dropdown box. The
default selection is 2048 x1536.
Image Save Path: Specify the directory where snapshot files are saved. By default, snapshot files
are saved to your “Pictures” folder.
Save as file type: Specify the format of the snapshot file saved on your computer when you save an
image. Options include PDF, JPEG, TIFF, PNG, or BMP. In Windows, you can also save as GIF. On
a Macintosh, you can also save as PICT, Photoshop, SGI, TGA, and Quicktime Image formats. By
default, snapshot files are saved in JPG format (Windows) or PDF (Macintosh).
Base file name: Specify the name of the snapshot files saved on your computer when you save an
image from your PolyVision product. Click the existing base file name to enter a new file name.
Check boxes enable you to add a date/time stamp to the base filename, to add a sequential number
to the base file name, and to overwrite the existing file each time you save.
Video save path: Specify the directory where video mpeg files are saved. By default, video files are
saved to your “Videos” folder.
Video Save Quality: Adjust the quality of a saved video. As save quality increases, so does the size
of the saved file. Default is 0.75.
Select printer: Select from a list of installed printers to use to print hardcopies of snapshots.
Printer Properties: Click the “Change” link to change the page setup of printed snapshots.
Check for Updates: Press to force a manual online check for new versions of PolyVision fuse.
12 of 16
2002327-001 Rev C
User Guide
fuse Visualizer
Getting help
You can get help in the fuse application at any time.
Press this button in the fuse application toolbar to display the fuse application help.
Full Screen mode
The fuse Full Screen mode differs from maximizing the application window. When the application
window is maximized, the toolbar is opaque and the video is sized to fill the area of the window
above the toolbar.
In the fuse application Full Screen mode:
• The fuse image fills the entire monitor.
• The application toolbar background is transparent and centered on the bottom of the display.
• The application toolbar can be hidden.
Press this button in the fuse application toolbar to enter Full Screen mode. The fuse
application window fills the monitor with no title bars and no other applications. To
display the application window, press the Full Screen icon again or press Esc.
Hiding and viewing the fuse application toolbar
To hide the fuse application toolbar in Full Screen mode:
1. Click the push pin icon in the toolbar’s right corner.
When hidden, the toolbar is denoted by a small tab at the bottom of the display.
To view the hidden toolbar in Full Screen mode:
1. Hover the mouse over the tab. The toolbar appears but hides again when the mouse hovers
away from the toolbar. To lock the toolbar in place, click the pin.
Or,
1. Click the tab. To hide the toolbar, click the tab or the pin again.
Automatic application updates
The fuse application automatically checks for updates each time it starts.
PolyVision
2002327-001 Rev C
13 of 16
fuse Visualizer
Care and maintenance
Cleaning the fuse camera
To clean the camera case.
1. Before cleaning: turn off camera, unplug the USB cable and allow to cool.
2. Wipe off dust and sediment with a clean dampened cloth.
3. Moisten the cloth with water and neutral detergent, and then wipe the case.
4. Rinse all detergent from the cloth and wipe the camera again.
5. Do not allow water or soap to get between the buttons on the device.
Caution: To prevent discoloration or fading of the case, do not use abrasive alcohol-based cleaners.
Cleaning the lens
Use an optic lens cleaner found in most camera stores. Refer to the following to clean the camera
lens.
1. Before cleaning: turn off camera, unplug the USB cable and allow to cool.
2. Apply a small amount of optic lens cleaner to a clean, dry soft cloth. (Do not apply the cleaner
directly to the lens.)
3. Lightly wipe the lens in a circular motion.
4. Remove any excess cleaner prior to operation.
Caution: Do not use abrasive cleaners or solvents. To prevent discoloration or fading, avoid getting cleaner
on the device case.
Lighting
Your PolyVision fuse Visualizer operates using ambient room light. If using camera in a severely
darkened room, supplement the light entering the camera by using the LED light on the device, so
that there is more light for the camera to work with (refer to “Camera LED lighting” on page 9.
Never point your PolyVision fuse Visualizer at direct sunlight. Subjecting the camera “eye” to direct
sunlight may cause permanent damage.
FCC compliance
This equipment has been tested and found to comply with the limits for a Class B digital device,
pursuant to Part 15 of the FCC Rules. These limits are designed to provide reasonable protection
against harmful interference when the equipment is operated in a commercial environment. This
equipment generates, uses, and can radiate radio frequency energy and, if not installed and used in
accordance with the instruction manual, may cause harmful interference to radio communications.
Operation of this equipment in a residential area is likely to cause harmful interference in which case
the user will be required to correct the interference at his own expense. Changes or modifications
not expressly approved by the party responsible for compliance could void the user’s authority to
operate the equipment.
Korean Class B statement:
이 기기는 가정용(B급) 전자파적합기기로서 주로 가정에서 사용하는 것을 목적으로 하며, 모든
지역에서 사용할 수 있습니다.
14 of 16
2002327-001 Rev C
User Guide
fuse Visualizer
Warranty
PolyVision warrants this product against defects in material and workmanship for the period of three
years from date of receipt. If your product fails during the warranty period, contact PolyVision
directly:
In the US & Asia-Pacific:
Tel.: (800) 620-POLY (7659)
Email: [email protected] (works for the entire world, support in English & Spanish only)
In UK only:
Contact Anders+Kern UK Ltd
Tel.: +44(0) 1638 510900
Email: [email protected]
For rest of Europe & the Middle East:
Tel.: +33-3 88 13 35 36
Email: [email protected]
If it is determined that your unit requires service, the Technical Support agent will instruct you how
and where to return the unit.
This warranty is limited to exchange or repair, at the option of the PolyVision, and PolyVision is not
liable for any other damages, either direct or consequential. No warranty shall apply to any
PolyVision product or any part thereof which has been subject to accident, alteration, modification,
abuse, misuse, flood, fire, disassembly, or other unauthorized repair. This warranty is intended for
the original purchaser only and is not transferable.
This warranty is in lieu of and PolyVision disclaims all other warranties, express or implied or
statutory, including but not limited to the implied warranties of merchantability or fitness for a
particular purpose.
PolyVision
2002327-001 Rev C
15 of 16
fuse Visualizer
Index
Auto Focus, 9
Cable connections, 6
Camera
cleaning, 14
Capture snapshot, 10
Capture video, 11
Clean, 11
Configuration options, 12
Control icons, 8
Copy to the clipboard, 11
Energy saver, 8
File names, 12
Freeze video, 10
Full Screen mode, 13
toolbar, 13
Getting started, 9
Help, 13
Install software
Linux, 5
Macintosh, 6
Windows, 5
Lens
cleaning, 14
Lighting
care and maintenance, 14
16 of 16
On or off, 9
Magnetic icon strip, 7
Magnify, 10
On-line registration, 3
Print, 11
Register with PolyVision, 3
Reset defaults, 10
Rotate, 9
Save file as type, 12
Save to Directory, 12
Screen Lock, 10
Software updates, 13
Square, 11
System requirements, 4
Unbind, 11
Uninstall software
Linux, 5
Macintosh, 6
Windows, 5
Video save path, 12
Video size, 12
Warranty, 15
What comes in the box, 4
Zoom the selection, 10
2002327-001 Rev C
User Guide