1
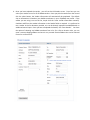
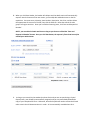
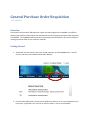
General Purchase Order Requisition
User Manual
Overview
The General Purchase Order (G#) requisition system has been migrated into mySIGMA in an effort to
speed up the issuance of PO numbers and automate the process of moving a purchase order requisition
into MAS200. The mySIGMA based system will increase speed and efficiency for all persons involved in
creating a purchase order for non-inventory materials.
Getting Started
1. Authorized users will notice a menu item for G# requisition on the MySIGMA menu. You will
notice a new menu item called Purchase Order Request.
2. From the Main GPO Screen, you will see the GPO menu and a list of any recent requisitions you
have input, if applicable. You may click on the PO number in this list to view details.
3. Select ‘Add a New Requisition’ and select the company for which you are placing the PO.
Typically this will be SGM (Sigma Corporation). Then Select the Vendor Name, or click the check
box to enter vendor information manually.
4. Once you have selected the vendor, you will see the PO header screen. From here you can
select your vendor from a list of all SIGMA vendors. Once you pick the vendor from the list and
click the select button, the Vendor information will automatically be populated. The default
ship to information is based on your default warehouse in your mySIGMA user profile. If the
vendor you are using is not on the list, simple click the “enter vendor information manually”
checkbox and fill out the vendor information in the header fields as required. It is preferred to
use a vendor in the list whenever possible, as it can be directly imported into MAS200 with no
additional manual input. Once you have completed the header, click “Save Header”. You have
the option of selecting any SIGMA warehouse from a list for a Ship to location. Also, you can
enter a custom shipping address and save it as a personal favorite address that can be selected
from a list on future PO’s.
5. When you click Save Header, the header will collapse and the detail section will automatically
expand. Near the bottom of the next screen, you can add, edit and delete items on the PO
requisition. You must enter a Quantity, Item Number, Description, Unit Price, and also Select
the appropriate GL Account for the PO, then click the add icon. Note that several GL code
groups are region sensitive. Once you are finished entering items, click ‘Save and Request PO
Number’.
NOTE: you can edit the header and items as long as you have not clicked the “Save and
Request PO Number” button. Once you click that button, the request is firmed and can only be
edited by an administrator
6.
As long as you are within the standard purchase limit and you are not purchasing a Capital
Expense Item, your G# will be automatically assigned, and you can immediately download a
copy of your completed PO form. Otherwise, Accounts Payable will need to review the PO and
make certain that all documentation is in order. AP is automatically emailed when this is
needed. Additionally, once the pending PO has been reviewed, you will automatically be
notified with the PO number via email.
7. Once a PO number has been issued/requested, the PO requisition cannot be changed. Any
changes will need to be coordinated with Accounts Payable to assure that what the vendor
invoices is the same as what the PO was issued for.
Please direct any questions to the Accounts Payable department.
Technical Support is available from the IT department