1
CW-3000HD
User Manual
Version 0.6
PAGE 1
BACK TO
TOC
Safety Precautions
Electrical Safety
●
●
●
●
●
●
●
●
●
●
●
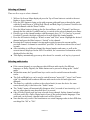
To prevent electrical shock hazard, disconnect the power cable from the electrical outlet
before relocating the system
When adding or removing signal cables or devices from the system ensure that the
power cable is unplugged before doing so.
Seek professional assistance before using an adapter or extension cord. These devices
could interrupt the grounding circuit.
Do not attempt to repair or modify the power supply. Doing so could create the risk of
electrical shock or fire.
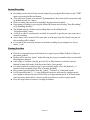
Operational Safety
Before operating the system, carefully read the manual that came with the system.
Before using the system ensure that all cables are correctly connected and there is no
damage to the power or signal cables. If any damage is detected, contact the dealer
immediately.
To avoid short circuits, keep paper clips, screws, staples and, other metallic devices
away from connectors and ventilation openings.
Avoid dust, humidity and, temperature extremes. Do not operate the system in any area
that may become wet.
Place the system on a stable surface
Do not block ventilation holes in the system. The system requires ventilation to ensure
proper operation.
If technical problems are encountered with the system, contact a qualified service
technician or the retailer where the product was purchased.
Table of Contents
System Specifications...................................................................................................................................6
Hardware................................................................................................................................................6
System Software......................................................................................................................................6
Multimedia Software................................................................................................................................7
Dimensions.............................................................................................................................................7
Package Contents.....................................................................................................................................8
System Placement....................................................................................................................................8
Remote Control Unit................................................................................................................................8
Cable Connections...................................................................................................................................9
Rev. 1.................................................................................................................................................9
Rev. 2..............................................................................................................................................10
DVB & ATSC..................................................................................................................................11
Rev 1...........................................................................................................................................11
Rev 2...........................................................................................................................................12
DUAL DVB.....................................................................................................................................13
Rev 1...........................................................................................................................................13
Rev 2...........................................................................................................................................14
PAGE 2
BACK TO
TOC
Quick Start Guide.......................................................................................................................................15
System Bootup...........................................................................................................................................17
System Setup.............................................................................................................................................18
Main Menu...........................................................................................................................................18
Admin Menu....................................................................................................................................19
Updates Menu..............................................................................................................................20
Date........................................................................................................................................21
Downloading Updates..............................................................................................................22
Adding And Editing An Updates Server...............................................................................23
Installing Updates....................................................................................................................24
Checking System Version........................................................................................................25
Backup Settings.......................................................................................................................26
Restore Settings.......................................................................................................................26
Configuration Menu.....................................................................................................................27
Adapter Setup.........................................................................................................................28
Display Setup..........................................................................................................................29
Size Setup..........................................................................................................................30
Timeout Setup....................................................................................................................31
Themes Setup.....................................................................................................................32
Network Setup........................................................................................................................33
Audio Setup............................................................................................................................34
Storage Setup..........................................................................................................................35
Shared Folders........................................................................................................................37
Satellite TV Setup...................................................................................................................39
Weather Setup.........................................................................................................................40
Antenna Menu.............................................................................................................................41
Satellite Setup.........................................................................................................................42
Adding A Satellite..............................................................................................................44
Satellite Scanning...............................................................................................................45
Editing Channels............................................................................................................46
Motor Support....................................................................................................................47
ATSC Scanning..................................................................................................................51
Edit ATSC.....................................................................................................................52
Cable Scanning...................................................................................................................53
Edit QAM.....................................................................................................................54
Profiles Menu..............................................................................................................................55
Adding A Profile.....................................................................................................................56
Editing A Profile.....................................................................................................................57
Assigning Antenna Channels....................................................................................................58
Assigning IP Channels.............................................................................................................59
Configure IP Channels.............................................................................................................60
Add IP Channel..................................................................................................................61
Assigning Applications............................................................................................................62
PAGE 3
BACK TO
TOC
System Operation.......................................................................................................................................63
Profiles.................................................................................................................................................63
Profile Applications..........................................................................................................................64
IPTV...........................................................................................................................................65
IPTV Channel Packages...........................................................................................................65
IPTV Channel Categories.........................................................................................................66
TV..............................................................................................................................................67
Navigating Through The On Screen Menus...............................................................................68
The Grid Program Guide..........................................................................................................69
The "Schedule" Menu..............................................................................................................70
Selecting A Channel................................................................................................................71
Selecting Audio Tracks............................................................................................................71
Instant Recording....................................................................................................................72
Pausing Live Video.................................................................................................................72
Replaying A Recording............................................................................................................73
Replay Control........................................................................................................................73
Editing Recordings..................................................................................................................74
Explained...........................................................................................................................74
Quick Mini-Howto..............................................................................................................75
Programming The Timer..........................................................................................................76
Video..........................................................................................................................................78
Video Selection.......................................................................................................................78
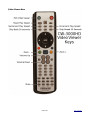
Video Viewer Keys.................................................................................................................80
Pictures.......................................................................................................................................81
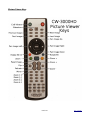
Picture Viewer Keys................................................................................................................82
Web............................................................................................................................................83
DVD...........................................................................................................................................84
DVD Viewer Keys..................................................................................................................84
Music..........................................................................................................................................85
Music Player Keys...................................................................................................................87
Roaster........................................................................................................................................88
Prepare DVD..........................................................................................................................89
Prepare Video.........................................................................................................................91
Burn DVD..............................................................................................................................92
Burn Video.............................................................................................................................93
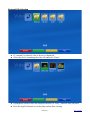
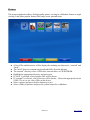
Games.........................................................................................................................................94
CD..............................................................................................................................................95
CD Player Keys.......................................................................................................................95
PAGE 4
BACK TO
TOC
Appendix...................................................................................................................................................96
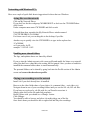
External USB Device Connection...........................................................................................................96
Keyboard / Mouse Connection................................................................................................................97
Networking With Windows PC's............................................................................................................98
Seeing Files Over The Network.........................................................................................................98
Enabling More Shared Folders...........................................................................................................98
Playing Your Recordings Over The Network......................................................................................98
Remote Control - Keyboard Cross-reference...........................................................................................99
Troubleshooting.......................................................................................................................................100
Accessing Logs...................................................................................................................................100
BIOS Settings.....................................................................................................................................100
Display Diagnostics.............................................................................................................................101
Remote Control Diagnostics.................................................................................................................102
Roaster Diagnostics.............................................................................................................................102
Satellite TV Diagnostics......................................................................................................................103
Shared Folders Diagnostics..................................................................................................................104
Software License......................................................................................................................................106
Warranty Information...............................................................................................................................107
Technical Support....................................................................................................................................107
PAGE 5
BACK TO
TOC
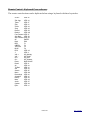
System Specifications
Hardware
●
●
●
●
●
●
●
●
●
●
●
●
●
Processor:
● Sempron 3000+ 64Bit CPU AM2 Socket (CW-3000HD rev. 1)
● Athlon X2 4000+ 64Bit CPU AM2 Socket (CW-3000HD rev. 2)
Memory: 512MB DDR2 RAM Expandable to 8GB
Flash Drive: 1 GB System Flash
Hard Drive: Not Included
Video:
● Nvidia GeForce 6150 (CW-3000HD rev. 1)
● Nvidia GeForce 7050 (CW-3000HD rev. 2)
Satellite Tuner:
○ Input terminal: F-type 75 Ohm
○ Receiving frequency: 950~2150 MHz tuning range
○ Input level: -65~-25dBm
○ Support MCPC and SCPC
○ Symbol rate: 2~45 Msps
○ FEC Codes: 1/2,2/3,3/4,5/6,7/8 and Auto
○ QPSK
ATSC Tuner
○ Latest LG 5th generation tuner for enhanced reception
○ Supports QAM 64 and QAM 256 Cable signals
○ One TV antenna 75 ohm reception port
Video Output: VGA/HDMI or DVI/Component/S-Video
Audio Ouput: Analog and SPDIF Dolby Digital Audio output
USB Ports: 4 USB v2.0 ports on back panel and 2 USB v2.0 ports on front pane
Media Reader: All In One Media Reader. Supports most popular flash cards
Ethernet Port: RJ-45 10/100/1000 Mbits compatible
DVDRW: Read/Write DVDs and CDs
System Software
●
●
●
●
●
●
Linux Operating System based on 2.6.21 Kernel
Graphical X-Windows Environment
Java 1.4.2 Based Graphical User Interface
Software Upgradeable Via Internet and/or USB Storage Device
Network sharing to Desktop computers using Samba (3)
All software is 100% Open Source with the exception of the Java user interface
PAGE 6
BACK TO
TOC
Multimedia Software
●
●
●
●
●
●
●
●
●
●
●
Satellite TV
○ DVB-S Free To Air using Video Disk Recorder (VDR)
○ ATSC Reception using Video Disk Recorder (VDR)
○ Grid And List Style Electronic Program Guides (EPG)
○ Customizable User Interface Through Themes
○ Comprehensive Digital Video Recording Functionality - Stored on Hard Drive (1)
○ Automatic Timer Recording For Series and Daily/Weekly Programs (1)
○ Pause Live TV With Full Fast-Forward and Rewind Capability (1)
○ Timer Recording Through Program Guide (1)
IP TV - Internet TV Streaming Video Player (2)
P2P TV - Peer To Peer TV Streaming Video Player (2)
Video - Viewer for popular video formats like AVI, MPG and even DVD-ISO
DVD – Viewer for DVD movie media
Music - Player for popular audio formats including MP3 and WMA
Pictures - Viewer with popular functions including Slide-show, Zoom and Rotate
Roaster (1)
○ Prepare DVD - Convert HD and SD recordings to DVD-ISO image
○ Prepare Video - Create HD or SD MPG-ISO image of recordings
○ Burn - Burn DVD-ISO and MPG-ISO images
○ Backup – Create backups of CD/DVD media (not currently active)
Web - Mozilla web browser with support for popular plug-ins including Flash (2)(4)
Games - Mame game support (1)(5)
Expandable With Hundreds of Linux Applications
(1) Requires the addition of a Hard Drive.
(2) Network connection with Internet access required.
(3) Internal network connection to a PC through a router or crossover network cable
required
(4) Requires keyboard and mouse
(5) Requires an external download and package installation
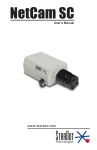
Dimensions
●
The CW-3000HD is 14" wide by 5.5" tall by 15" deep Physical Installation
PAGE 7
BACK TO
TOC
Package Contents
1.
2.
3.
4.
5.
6.
CW-3000HD Multimedia System
Remote Control Unit
A/V Connection Cable
Power Cable
(2) AAA Batteries for Remote Control Unit
CD containing system restore image and user manual
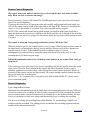
System Placement
●
●
●
●
●
●
Place the system on a stable surface. The unit can be damaged or cause damage if it
were to fall to the floor.
Place the system in a well ventilated area. The system will generate heat and needs to
have free air movement to keep internal devices from overheating.
Do not block the vents in the case. This is required to allow for free air movement.
Do not place the system on a carpeted surface. System needs to be on a solid surface.
System should be placed close to the display device. Optionally, an Internet connection
and satellite feed should be in close proximity to the installation location to use IPTV
and satellite functions of the system.
If system requires extension cables or cable installation, consult a qualified installer to
ensure signal integrity to the system.
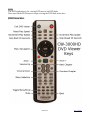
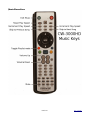
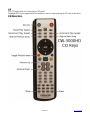
Remote Control Unit
●
●
●
The remote control unit is used to control all system functions.
Do not allow the remote control unit to be used in a wet environment. Allowing the
remote control unit to become wet can damage the unit.
Remove the battery compartment cover on the back of the unit and insert the included
batteries the remote control unit paying close attention to the battery orientation pictures
inside the battery compartment.
PAGE 8
BACK TO
TOC
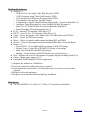
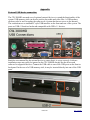
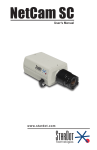
Cable Connections
Rev. 1
●
●
●
●
●
●
●
●
●
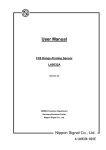
6 pin DIN Keyboard and Mouse connectors are for use with an optional keyboard/mouse.
The 4 USB-2 connectors are for connecting external devices to the CW-3000HD. This
allows external USB memory sticks, DVD/CDROM drives, or other USB devices to be
used.
RJ-45 Network connector for standard 10/100/1000 connection.
The green 1/8” mini-jack connector is the stereo analog audio output jack.
The RCA composite connector is for use with a SDTV.
The 4 pin DIN S-Video connector is suitable for SDTV.
The RGB-Video analog connectors for VGA output for use on a suitably equipped HDTV
or computer style monitor.
The 15pin D-Sub connector is a standard VGA output for use on a suitably equipped
HDTV or computer style monitor.
The 24 pin DVI-D connector is suitable for 1920x1080P, 1920x1080i, 1280x720P HDTV.
NOTE: It is recommended to use a quality DVI cable no longer than 9 feet.
PAGE 9
BACK TO
TOC
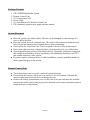
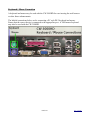
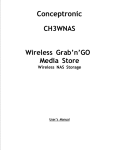
Cable Connections
Rev. 2
●
●
●
●
●
●
●
●
●
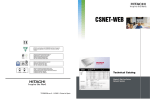
6 pin DIN Keyboard and Mouse connectors are for use with an optional keyboard/mouse.
The 4 USB-2 connectors are for connecting external devices to the CW-3000HD. This
allows external USB memory sticks, DVD/CDROM drives, or other USB devices to be
used.
RJ-45 Network connector for standard 10/100/1000 connection.
The green 1/8” mini-jack connector is the stereo analog audio output jack.
The RCA composite connector is for use with a SDTV.
The 4 pin DIN S-Video connector is suitable for SDTV.
The RGB-Video analog connectors for VGA output for use on a suitably equipped HDTV
or computer style monitor.
The 15pin D-Sub connector is a standard VGA output for use on a suitably equipped
HDTV or computer style monitor.
The 19pin Type-A HDMI connector is suitable for 1920x1080P, 1920x1080i, 1280x720P
HDTV.
NOTE: It is recommended to use a quality HDMI cable no longer than 9 feet.
PAGE 10
BACK TO
TOC
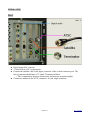
DVB & ATSC
Rev 1
●
●
●
●
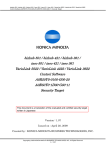
Digital Audio RCA connector
75 ohm DVB & ATSC reception ports
Connect the satellite cable to the upper connector of the vertical connector pair. The
lower connector should have a 75 ohm F Terminator affixed.
(This is important to decrease interference and increase reception quality)
Connect an antenna to the ATSC connector. It is the single connector.
PAGE 11
BACK TO
TOC
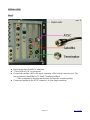
DVB & ATSC
Rev 2
●
●
●
●
Digital Audio Optical and RCA connectors
75 ohm DVB & ATSC reception ports
Connect the satellite cable to the upper connector of the vertical connector pair. The
lower connector should have a 75 ohm F Terminator affixed.
(This is important to decrease interference and increase reception quality)
Connect an antenna to the ATSC connector. It is the single connector.
PAGE 12
BACK TO
TOC
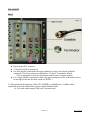
DUAL DVB
Rev 1
●
●
●
●
Digital Audio RCA connector
75 ohm Dual DVB reception ports
For dual satellite connections the upper connector in each vertical pair should be
connected. The lower connectors should have 75 ohm F Terminators affixed.
(This is important to decrease interference and increase reception quality)
For a single satellite connection connect the upper connector on the vertical pair closest
to the edge of the unit. In other words use DVB # 1
To fully utilize all the functions of the CW-3000HD you should have 2 satellite cables
connected to the unit. Both cables need to contain identical feeds.
(ie. You need a dual output LNB with 2 separate lines)
PAGE 13
BACK TO
TOC
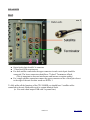
DUAL DVB
Rev 2
●
●
●
●
Digital Audio Optical and RCA connectors
75 ohm Dual DVB reception ports
For dual satellite connections the upper connector in each vertical pair should be
connected. The lower connectors should have 75 ohm F Terminators affixed.
(This is important to decrease interference and increase reception quality)
For a single satellite connection connect the upper connector on the vertical pair closest
to the edge of the unit. In other words use DVB # 1
To fully utilize all the functions of the CW-3000HD you should have 2 satellite cables
connected to the unit. Both cables need to contain identical feeds.
(ie. You need a dual output LNB with 2 separate lines)
PAGE 14
BACK TO
TOC
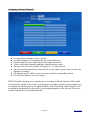
Quick Start Guide
Owners are encouraged to read through this manual to get familiar with the CW-3000HD.
Here is a quick start guide for those who simply must dive in immediately.
1. Connect the receiver to your TV.
Only use 1 video connection between the CW-3000HD and the TV. The CW-3000HD is only
capable of displaying on 1 device at a time. Shutdown the CW-3000HD before changing the
video connection.
Analog audio is connected to the middle green 1/8" minijack on the back panel. Digital audio
connection is via the RCA connector. You may connect these simultaneously.
2. Connect the Satellite and or Antenna connections.
Satellite and ATSC tuner system:
Connect the satellite cable to the upper connector of the vertical connector pair. Connect
an antenna to the ATSC connector. It is the single connector.
Dual satellite tuner system:
To fully utilize all the functions of the CW-3000HD you need to have 2 satellite cables
connected to the unit. Both cables need to contain identical feeds.(ie. You need a dual
output LNB with 2 separate lines) The upper connector in each vertical pair should be
connected. For a single cable connection you should connect the upper connector on the
vertical pair closest to the edge of the unit.
3. Connect the network connection.
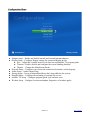
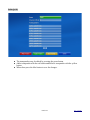
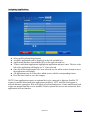
4. Start the system. The first screen you will see is the adapter settings screen. It is important
that you disable any adapters that do not have an antenna connection. Failure to do so will
result in erratic channel changes.
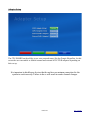
5. The second screen will be the display settings screen. IT IS EXTREMELY IMPORTANT
THAT YOU SET THESE SETTINGS CORRECTLY. Incorrect settings here may cause you to
not be able to view anything but a black screen!.This setting also chooses a video calibration
setting that is tailored for the output that you use. Changing the display connection requires
changing this setting to get the correct display calibration.
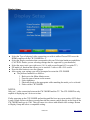
6. The next screen will be to set the system time. Set it correctly.
7. Restart the system for the display settings to take effect. That means press the power button
on the remote and then press the yellow button to restart.
PAGE 15
BACK TO
TOC
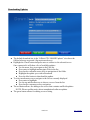
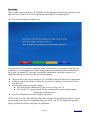
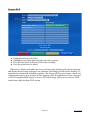
8. Check for any system updates. Enter the admin profile. Highlight updates and press enter.
Highlight system and press enter. Make note of the current version of the software on your
system. Back out to the updates screen and highlight download. Press enter. Highlight the
check button and press enter. Compare the update version to your system version. If the update
is newer download it. (For those with no network connection, you may use your browser to
check ftp://ftp.captiveworks.org/cw3000hd for the update file.)
Install the update. Instructions are available in the announcement for the update on the
Technical Support forum found at http://captiveworks.org.
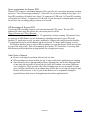
9. Setup for channels. Enter the admin profile and choose Antenna. Choose satellite or ATSC.
ATSC: (If you don't have an ATSC system, don't bother. It won't work.) The ATSC area
allows you to scan for channels. Make sure you have a good antenna connection to the ATSC
antenna connector and press the green button to begin scanning. This will configure the
channels available to you. Press the blue button to save the list when the scan is finished. If you
would like to change the channel numbers you may press the yellow button for Channels and
renumber them as you see fit.
Satellite: If you use a switch, choose your switch type. This will enable either 2 or 4 of the
positions depending on the switch you choose. Choose the LNB types connected to the switch
and then choose the satellite the LNB is aimed at. If you wish to separate the satellites you can
add an offset to the channel numbers so you may find each sats channels quickly and prevent
overlapping channel numbers. You may set that under edit. 10000 is generally a good number
to separate each satellite or provider. Once all is configured click the SAVE button. Next you
may scan each satellite you wish to view. Each satellite needs to be scanned separately. Press
the blue button to save the results of the scan.
10. Make sure the channels are available in the user profile. Enter the admin profile. Highlight
profiles and press enter. Highlight channels and press enter. Ensure that all the channels you
would like are in the selected column. You may also remove any unwanted channels if you
choose.
11. At this point you should be ready to enter the user profile and explore what all is available.
PAGE 16
BACK TO
TOC
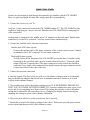
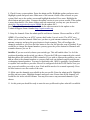
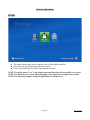
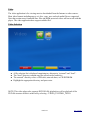
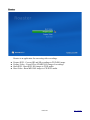
System Bootup
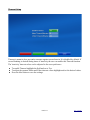
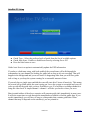
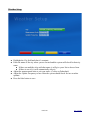
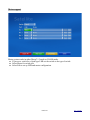
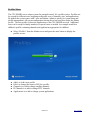
●
When first powering on the CW-3000HD you will be presented with this type of a screen.
This is what is called the bios splash screen.
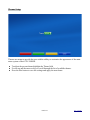
●
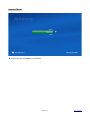
After the bios splash screen another screen much like the first will be presented.
(approx. 15-20 seconds unless the files system needs scanning)
PAGE 17
BACK TO
TOC
System Setup
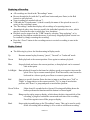
System Remote Buttons
Remote buttons in GUI screens are as follows:
Up/Down = Move up or down on large buttons or, change values in setup screens
Left/Right = Move from item to item in setup screens
Channel up/down = Scroll up and down a page at a time
Enter = Select item highlighted
Erase (←) = Backspace
Back = Move back to previous screen
Red = Context button on bottom of screen
Green = Context button on bottom of screen
Yellow = Context button on bottom of screen
Blue = Context button on bottom of screen
Numbers = Numbers or letters in text entry areas. The numbers work like a cell phone.
The letters for each number are below the number on the remote.
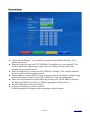
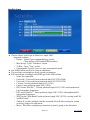
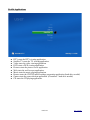
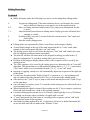
Main Menu
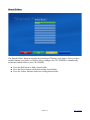
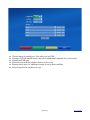
NOTE: CW-3000HD will not function without complete initial setup.
●
●
Admin – Section for profile setup and system configuration.
user – The built in initial profile
PAGE 18
BACK TO
TOC
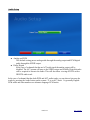
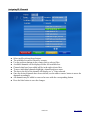
Admin Menu
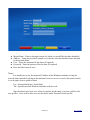
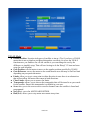
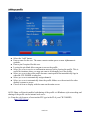
Choose Admin from the main screen.
When prompted for a pin, enter 1111 (default pin) and press the blue button.
This will bring up the Admin screen where the majority of the system configuration will take
place.
●
●
●
●
Updates - System software update download and installation
Configuration – Configuration menu
Antenna - Antenna setup menu
Profiles - User profile creation and setup
PAGE 19
BACK TO
TOC
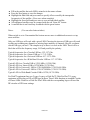
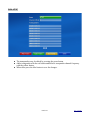
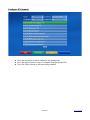
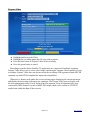
Updates Menu
One of the first things anyone with a new product that includes an update mechanism should do
is download and install the latest update. This allows the owner to get the latest features and the
improved stability of software refinements.
System updates for the CW-3000HD can be installed from the Admin screen.
Press enter on the Updates button to enter the updates screen.
●
●
●
●
●
●
Date: Allows users to set date, time and time zone.
Download: Allows the user to check for and download updates from the Internet.
Install: Allows the user to install updates downloaded from the Internet
or updates stored on external media.
System: Shows installed software version information.
Backup: Allows the user to create a hard copy of their settings by burning them to disc.
Restore: Allows a user to restore their settings from a restore disc.
PAGE 20
BACK TO
TOC
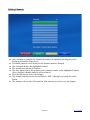
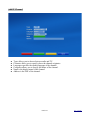
Date
●
●
Set the proper date, time and time zone for your area.
(important for the proper operation of the satellite system)
● Using the arrow keys move the highlighter to the time or date fields.
● Press enter to edit a field.
● Press back to return the arrow keys to navigation of the fields.
Press the blue button to save the changes.
PAGE 21
BACK TO
TOC
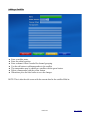
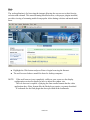
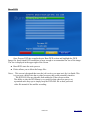
Downloading Updates
●
●
●
●
●
The default download site is the “Official CW-3000HD Updates” site where the
Official releases are posted. (ftp.captiveworks.org)
Highlight the Check button and press enter to connect to the selected server.
Once connected it will show a list of available updates.
● Use the arrow keys to navigate to the Files list.
● Press enter to highlight and navigate Files in the list.
● Press back to return the arrow keys to navigation of the fields.
● Highlight the update you wish to download.
● Press the blue button to download the update.
To select an alternate server navigate to the Server currently displayed
● Press enter to highlight.
● Use the up and down arrows to choose a server from the list.
● Press back to return arrow key navigation.
The red button allows for adding a new server that contains unofficial updates.
NOTE: Please read the notice about unauthorized software updates.
The green button allows for editing a server listing
PAGE 22
BACK TO
TOC
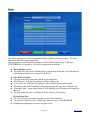
Adding and Editing an Updates Server
In an open source environment individuals may develop packages for the system
independently and share them with the community.
●
●
Having pressed the red button to add a new server or the green button to edit an existing
server enter or adjust the name, address, user name, and password of the ftp server
hosting the system updates.
(it is possible the password field may not be required for some servers)
Press the blue button to save the new addition or changes.
PAGE 23
BACK TO
TOC
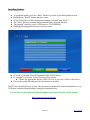
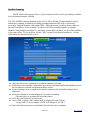
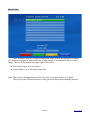
Installing Updates
●
●
●
●
●
●
●
●
●
To install an update, press the “Back” button to go back to the main updates screen..
Highlight the “Install” button and press enter.
A list of directories will be displayed containing “external” and “local”.
The “local” directory contains any downloaded files from the Internet.
The external” directory refers a USB stick or, CD/DVDROM.
Highlight the appropriate directory and press enter.
If “local” is selected, a list of downloaded files will be shown.
If “external” is selected, a list of devices will be shown.
● Choose the appropriate device (USB, CD, etc) to see a list of files on the device.
Choose the update file and press the blue button to install it.
NOTE: The external directory is used when the user has update files on an external device (e.g.
USB stick) instead of downloading it using the download utility.
If at any time you have questions about the update process please visit the on-line forums
http://captiveworks.org/forum/
PAGE 24
BACK TO
TOC
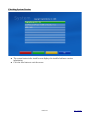
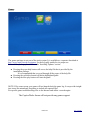
Checking System Version
●
●
The system button in the install screen displays the installed software version
information.
Click the blue button to exit the screen..
PAGE 25
BACK TO
TOC
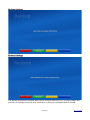
Backup Settings
Restore Settings
The Backup and Restore function allows you to create a hard copy (CD) of your settings once
you have everything exactly the way you want it so that you can restore them if needed..
PAGE 26
BACK TO
TOC
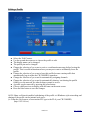
Configuration Menu
●
●
●
●
●
●
●
●
Adapter Setup – Enable and disable internal and external antenna adapters
Display Setup – Configure display settings for connected display device
● Size – Adjust the viewable area for web browser and Satellite TV program guide.
● Timeout – Enable, disable and configure the screen blanking function.
● Themes – Change the default menu theme.
Network Setup – Configure type of network connection, hostname, and workgroup
Audio Setup – Audio Output setup
Storage Setup – Set up an internal hard drive that's been added to the system.
Shared Folders – Configure the mounting of external file servers.
Satellite TV Setup – Configure program guide style and auto-scan.
Weather Setup – Configure location and update frequencies of weather applet.
PAGE 27
BACK TO
TOC
Adapter Setup
The CW-3000HD has the ability to use extra external tuners like the Genpix Skywalker. At this
screen the user can enable or disable internal and external ATSC/DVB adapters depending on
their set up.
It is important to disable any devices that do not have an antenna connection for the
system to work correctly. Failure to do so will result in erratic channel changes.
PAGE 28
BACK TO
TOC
Display Setup
●
●
●
●
●
●
Select the Type of physical video connection you wish to utilize.Choose DVI to use the
HDMI connector on the CW-3000HD Rev 2.
Select the Display resolution that corresponds with your Television hardware capabilities.
(CAUTION: Ensure you are selecting settings that are supported by your hardware)
Select the aspect ratio you wish to use (16:9 is wide screen format)(4:3 is regular TV)
Fill mode is a function that allows you to stretch 4:3 video to fill a 16:9 screen.
Press the blue button to save the changes
After saving your settings you will be prompted to restart the CW-3000HD
● The preferred method is as follows:
1. Back out to the Main Admin screen
1. Press the power button on the remote.
2. Select shutdown.
3. Physically hook up the appropriate cable matching the mode you've selected.
4. Power on the CW-3000HD
NOTES:
Only use 1 video connection between the CW-3000HD and the TV. The CW-3000HD is only
capable of displaying on 1 device at a time.
If after powering up the CW-3000HD and waiting until the boot-up screen reaches 100% there
is only a blank screen wait three seconds then aim the remote control directly at the front of the
CW-3000HD and type in 1346. This will cause it to reboot with default video settings. Return
to Display Setup and select a compatible setting.
PAGE 29
BACK TO
TOC
Size Setup
Once you have powered on the CW-3000HD with the appropriate Display Resolution you can
adjust the size for the web browser application and Satellite TV program guide.
●
Press the red button to configure size
Some models of Televisions are designed with a set amount of over-scanning. What this can
translate to is a certain amount of picture being displayed outside the physical dimensions of
the screen. For normal TV viewing it is generally unnoticeable, but when it comes to an
application like the web browser this can be unacceptable.
●
●
●
●
The green box is the current setting the CW-3000HD is using for the browser application.
Adjust the size of the red box by using the arrow keys so that it is at the extents of your
viewable area.
Press the blue button to save the changes
● The Web browser should now be the correct size for your TV.
● The Satellite TV program guide will be automatically put into cropped mode.
(Rebooting is not necessary)
Press the red button to reset the setting to full screen.
NOTE: Some new TV's have different 'HD mode' settings in their Advanced menu. If you are
experiencing over-scan it is recommended that you check your TV for settings that provide a
larger viewable area before using this size adjustment.
PAGE 30
BACK TO
TOC
Timeout Setup
Timeout is meant to be a preventive measure against screen burn-in. It is disabled by default. If
screen blanking is desired during times of inactivity the user can enable this Timeout function.
The 'inactivity' timeout values can be adjusted to the users preference.
●
●
●
To enable Timeout highlight the field and set to Yes.
To adjust the separate Menu and Video timeout values highlight and set the desired values.
Press the blue button to save the settings.
PAGE 31
BACK TO
TOC
Themes Setup
Themes are meant to provide the user with the ability to customize the appearance of the main
menu system of their CW-3000HD.
●
●
●
To adjust the present theme highlight the Theme field
Use the up and down arrow keys to scroll through the list of available themes.
Press the blue button to save the settings and apply the new theme.
PAGE 32
BACK TO
TOC
Network Setup
●
●
●
●
●
●
●
Choose Enable Network: Yes to enable the network Choose Enable Network : No to
disable the network.
Enter the Name you want your CW-3000HD to be identified as on your network. This
variable should be a unique name so that it does not conflict with any other client
machines on your home network.
Enter the Workgroup you want your CW-3000HD to belong to. This variable should be
the same as the rest of your home network.
'Obtain Address' assumes DHCP is being used on the network and needs no further setup.
(Most home networks with a router will use DHCP as a network configuration)
Enter Network Information if static addressing is being used. The IP Address, Gateway,
Net Mask and, DNS boxes need to be filled as appropriate for the network.
Press the blue button to save the changes
Press the red button to view the Current IP
(useful information for diagnosis and connecting to network shares)
PAGE 33
BACK TO
TOC
Audio Setup
●
●
Analog and PCM
This default setting passes analog audio through the analog output and PCM digital
audio through the SPDIF output.
Dolby Digital
In the case of a channel that has an AC3 audio track the analog output will be
disabled. The AC3 stream will pass to the SPDIF output and a Dolby Digital decoder
will be required to listen to the audio. This will also allow viewing of DVDs with a
DD/DTS audio track.
In the case of a channel that has both PCM and AC3 audio tracks you can choose between the
tracks by pressing the Audio button on the remote. 33 is an AC3 track. 1 is generally English
PCM audio and other numbers are alternate language PCM tracks.
PAGE 34
BACK TO
TOC
Storage Setup
The CW-3000HD comes with an automated storage setup system that allows users to
uncover enhanced features for improved usability and performance.
You've chosen to install an internal hard drive.
Here are some basic pointers and steps.
What you'll need:
● Hard drive device
● The appropriate interface cable
● Phillips screwdriver
● Needle-nose pliers (IDE only)
NOTE:
If you do not understand these instructions or lack good manual dexterity, have a qualified
technician install the hard drive for you.
If at any time you are in doubt, look for more information. There are plenty of resources
on the web as well as the CaptiveWorks forum.
1. Turn off the CW-3000HD, unplug it, and take the top cover off.
2. Make sure that you are properly grounded and if possible do the installation in an
uncarpeted area.
3. Facing at the front of the CW-3000HD the hard drive bays are on the right hand side.
Undo the top screw holding the hard drive carriage and swing it up and out.
4. Position hard drive in drive bay carriage and secure it with screws.
5. Connecting an IDE Hard drive:
a. Ensure that the jumper is set so that the hard drive will function on its own cable.
This is usually Master though some hard drives vary. Refer to the hard drive
manufacturer specifications.
b. Connect the data (ribbon) cable to back of hard drive. Align the colored band of the
cable with pin No. 1 of the hard drive.
6. Connecting a SATA Hard drive:
a. Connect the SATA cable (skinny flat) to the back of the hard drive.
7. Connect the power cable from one of the connectors on power supply. Both SATA and
4 pin molex connectors are available.
8. Slide the hard drive/carriage unit in at an angle and swing/rotate down into place.
9. Re-fasten the top screw that holds the hard drive/carriage assembly.
10. Double-check your connections and ensure the fan(s) are clear of any dangling wires.
11. Re-attach the top cover and screws.
12. Connect the power cord to CW-3000HD and power it on.
PAGE 35
BACK TO
TOC
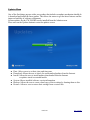
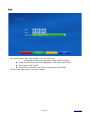
13. Enter the Admin -> Configuration -> Storage Setup menu.
14. At this point the menu will inform you to remove any usb devices
15. As it restarts the CW-3000HD will go though a hardware check and determine if it can
safely begin the Storage Setup process.
16. You will see this screen while it partitions, formats and writes the necessary files.
17. It will reboot to the same style screen without the message for approx. 30 seconds before
it reboots a final time.
PAGE 36
BACK TO
TOC
Shared Folders
The Shared Folders function supports the mounting of Windows style shares. Once you have
enabled sharing on a folder you will be able to configure the CW-3000HD to automatically
mount that shared folder to your CW-3000HD.
●
●
●
Press the Red button to Add a shared folder
Press the Green button to Edit and existing shared folder
Press the Yellow button to delete an existing shared folder
PAGE 37
BACK TO
TOC
●
●
●
●
●
Mount Name – Enter a descriptive name by which you would like the share identified.
Address – Using the provided example as a reference enter the machine name and path
to the network share.
User – Enter the username for the share (if required)
Password – Enter the password for the share (if required)
Press the blue button to save.
Notes:
It is usually best to use the numeric IP address of the Windows machine serving the
network share instead of relying on the machine's browser service to resolve the name because
it can be quite slow to update at times.
Use / (forward slash) not \ (backslash).
The \ typically used on Windows machines will not work.
Once the shares have been set a reboot is required for the share to become visible to the
user profiles. Users will be able to access the shares under 'External' in their profile.
PAGE 38
BACK TO
TOC
Satellite TV Setup
●
●
●
Guide Type – Select the preferred style of guide from the list of available options.
Guide Auto Scan – Enable or disable auto-scan by selecting On or Off
Press the blue button to save.
Guide Auto Scan is an option to automatically update the EPG information.
If you have a dual tuner setup, with both enabled, the second tuner will walk through the
transponders in your channel list looking for guide info as long as it's not recording. That will
happen in the background and you won't know it's happening other than you will have guide
info as long as you keep the system running for a reasonable amount of time.
If you only have a single tuner enabled the scan will start after 5 hours of inactivity. This means
the screen will go blank while the scan is going on. Leave the system on overnight and you will
wake up with all the guide info you have available to you. You will have to change channels to
bring the video back. A simple channel + channel - will take you back to where you were.
Bear in mind neither of the above scenarios will generate guide info immediately in most cases.
It will take some time to work through the transponders available to find the guide data. If you
need it immediately you will have to tune to a transponder that contains guide data. What
channel that may be depends on the satellite(s) you are pointed to.
PAGE 39
BACK TO
TOC
Weather Setup
●
●
●
●
●
Highlight the City field and clear it's contents.
Enter the name of the city where you are located and the system will check for that city
name.
● If there are multiple cities with that name, it will give you a list to choose from.
● If there is one city, it will automatically select it.
Adjust the measurement units to suit your tastes. (Celcius or Fahrenheit)
Adjust the Update Frequency to how often the system should check for new weather
updates.
Press the blue button to save.
PAGE 40
BACK TO
TOC
Antenna Menu
●
Select the type of antenna to configure.
PAGE 41
BACK TO
TOC
Satellite Setup
●
●
●
●
Choose either a switch type or None for a single LNB.
Supported switches:
○ Diseqc: Typical 4 port committed diseqc switch.
(Also applies to DP34 and DPP44 switches)
○ Mini Diseqc: 2 port “Toneburst” switch.
○ 22 Khz.: 2 port “Tone” switch.
○ Uncommitted: Typical 2 port or 8 port uncommitted switch
One LNB/Satellite needs to be setup at a minimum.
The port lines correspond to a diseqc switch port numbers.
Fill out each line accordingly with LNB type in the LNB column.
○ None: No connection.
○ Universal 1: Universal Linear polarized dual LOF (9750/10600)
○ Universal 2: Universal Linear polarized dual LOF (9750/10750)
○ Circular: Circular polarized single LOF (11250)
○ Linear: Linear polarized single LOF (10750)
○ DP Circular: Dish Pro™ Circular polarized single LOF (11250) with bandstacked
Left transponder frequencies.
○ DP Linear: Dish Pro™ Linear polarized single LOF (10750) with bandstacked H
transponder frequencies.
○ WB Circular: Wide Band Circular polarized single LOF (10750) covering both FSS
and DSS bands.
○ Switch: If you have multiple switches cascaded, this will allow setting the second
switch by going to the edit button.
○ Motor: This allows configuring a motorized system by going to the edit button.
PAGE 42
BACK TO
TOC
●
●
●
●
●
●
Fill in the satellite that each LNB is aimed at in the name column.
Press the blue button to save the changes.
Highlight the Edit field and press enter to specify offset or modify the transponder
frequencies of the satellite. (Press save when complete)
Highlight the Scan field and press enter to scan an individual satellite.
All configured satellites may be scanned with the red “Scan All” button.
A satellite that is not listed may be added with the green button.
Notes:
(You can also chain switches)
When switch is set to Uncommitted the bottom arrows move to additional screens to set up
more satellites.
Only one LNB type will work with a given LNB. Choosing the incorrect LNB type will result
in either not scanning any channels or missing large numbers of channels. How do you know
which LNB type you have? The simplest way to know is to look at the LNB. There will be a
label that will list the frequency range, LOF and possibly the polarity.
Typical frequencies for a Circular LNB are 12.2-12.7 Ghz.
Typical frequencies for a Linear LNB are 11.7-12.2 GHz.
Typical frequencies for a Universal LNB are 10.7-12.75 GHz.
Typical frequencies for a Wide Band Circular LNB are 11.7-12.7GHz.
Typical LOF for a Circular LNB is 11250 MHz (11.250 GHz).
Typical LOF for a Linear LNB is 10750 MHz (10.750 Ghz).
Typical LOF for Universal 1 LNB is 9750/10600 MHz (9.750/10.600 GHz).
Typical LOF for Universal 2 LNB is 9750/10750 MHz (9.750/10.750 GHz).
Typical LOF for Wide Band Circular LNB is 10750 (10.750 GHz).
For Dish™ equipment there are 2 types, Legacy or Dish Pro™/ Dish Pro Plus™. Legacy
equipment will not have a DP or DPP logo on them. These LNBs function as standard Circular
or Linear LNBs. Dish Pro or Dish Pro Plus LNBs with the corresponding logos will need the
DP circular or DP Linear settings.
PAGE 43
BACK TO
TOC
Adding a Satellite
●
●
●
●
●
●
●
Enter a satellite name.
Enter the orbital position
Enter a channel offset if needed for channel grouping.
Use the red button to add transponders to the satellite
The transponders may be edited on a satellite with the green button.
Delete a transponder with the yellow button.
When done press the blue button to save the changes.
NOTE: This is also the edit screen with the current data for the satellite filled in.
PAGE 44
BACK TO
TOC
Satellite Scanning
NOTE: If more than one provider is to be scanned, an offset can be specified per satellite
to avoid channel number collision.
The CW-3000HD numbers channels by the Service ID by default. Channel numbers can be
edited once scanning is finished, but during scanning duplicate SIDs will overwrite any
previously scanned channels with similar SIDs. This can present a problem if more than one
provider's satellite(s) is(are) scanned. An offset of 10,000 is usually adequate to separate
channels from multiple providers. For providers with multiple satellites, set all of their satellites
to the same offset. To set an offset, use the “Edit” screen for the desired satellite(s). Set the
offset and press the blue button to save.
●
●
●
●
●
●
●
Once the offset is set, scanning for available channels can begin.
Either select each satellite's scan button to scan the particular satellite individually or press
the red button to scan all configured satellites at once.
In the scanning screen, a signal meter and the scanned video and audio channels list is
displayed.
Select the internal or external adapter to be used for scanning.
(External refers to a connected Skywalker tuner)
Press the green button to start the scan.
Once a lock is achieved the satellite will be displayed beside Current.
(using AMC 15 as an example: S0.0W will change to 105.0W )
Press the blue button to save the channel list after the scan is complete.
PAGE 45
BACK TO
TOC
Editing Channels
●
●
●
●
●
●
●
●
Once scanning is complete the channels found may be edited by pressing the yellow
button in the satellite setup screen.
Unwanted channels can be deleted or the channel numbers changed.
The red button deletes the highlighted channel.
The green button deletes all channels
The enter button allows for assigning a new channel number to the highlighted channel.
(Note: duplicate channel numbers are not allowed)
Press the blue button to save the changes
The channel ordering can be reverted back to “SID” ordering by pressing the yellow
button..
The changes will not take effect until the blue button is pressed to save the changes.
PAGE 46
BACK TO
TOC
Motor support
Motor system works in either DiseqC 1.2 mode or USALS mode.
● If you use a switch for a Quad type LNB set the switch to the type of switch.
● Select Motor for switch port
● Select Edit to set up LNB and motor configuration.
PAGE 47
BACK TO
TOC
●
●
●
●
●
●
Choose motor for switch port. Goto edit to set up LNB.
If using a USALS capable motor, enter the Latitude and Longitude for your location.
Choose the LNB type.
Fill in the slots with the satellites that are to be set up.
Bottom arrows move to additional screens to set up more satellites.
Select Setup for the satellite to set up.
PAGE 48
BACK TO
TOC
Adapter: allows you to choose the internal adapter(s) or an external genpix adapter.
Type: allows you to switch between diseqc 1.2 mode and USALS mode.
●
●
Diseqc 1.2 mode:
●
●
●
●
●
●
●
●
●
●
Position: If the motor is already programmed you can enter the position if known. If not
let it choose for you.
Move: allows you to choose the number of steps for the motor to move when pressing
East or West(Yellow or Green)
Goto Position: tells the motor to move to the programmed position.
Goto Reference: moves the motor to due south in most cases but may be far East limit
depending on your particular motor.
Limits: allow you to set a stop point in either direction in case there is an obstruction
that will not allow full motor movement in both directions.
Clear Limits: allows you to remove the limits.
Transponder: allows you to choose the transponder that will be tuned to as you search
for the satellite. Ensure that this transponder is available in your area.
Scan: takes you to the scan screen to scan for channels once the satellite is found and
programmed.
Save(Blue): saves the position to the motor .
Halt(Red): allows you to stop motor movement at any time.
PAGE 49
BACK TO
TOC
USALS Mode:
●
●
●
●
●
●
●
●
●
Orbital Position: Location in degrees of satellite to aim at. (Tip: if you have a USALS
motor that is not set dead on tweaking this number can allow you to use the USALS
function once you find how far off one satellite is you can change the rest by the
difference to simplify setup. That will save having to do the DiseqC 1.2 hunt and store
setup for each location.)
Goto Position: tells the motor to move to the angular position specified by USALS.
Goto Reference: moves the motor to due south in most cases but may be far East limit
depending on your particular motor.
Limits: allow you to set a stop point in either direction in case there is an obstruction
that will not allow full motor movement in both directions.
Clear Limits: allows you to remove the limits.
Transponder: allows you to choose the transponder that will be tuned to as you search
for the satellite. Ensure this transponder is available in your area.
Scan: takes you to the scan screen to scan for channels once the satellite is found and
programmed.
Save(Blue): saves the ANGULAR POSITION.
Halt(Red): allows you to stop motor movement at any time.
PAGE 50
BACK TO
TOC
ATSC Scanning
ATSC is for Over The Air (OTA) digital broadcasts requiring an external antenna.
●
●
●
Press the green button to start the scan.
Press the yellow button to edit the channels
Press the blue button to save the channel list after the scan is complete.
PAGE 51
BACK TO
TOC
Edit ATSC
●
●
●
The transponders may be edited by pressing the green button.
Add a transponder with the red button and delete a transponder channel frequency
with the yellow button.
When done press the blue button to save the changes.
PAGE 52
BACK TO
TOC
Cable Scanning
The ATSC card in the CW-3000HD is also capable of tuning some digital cable channels
providing they are unencrypted or "in the clear". There are some additional caveats. Your cable
company must use a QAM256 modulation. Not all of them do. It is the most prevalent
modulation but the cable companies are free to do as they see fit.
This does not mean all those analog channels you got on your "cable ready" TV will show up.
They must be digital channels. Analog channels are not and will not be supported.
If your cable company uses QAM256 modulation for their digital channels you should get your
local HD channel rebroadcasts if you are in the U.S. If you are in Canada you may get nothing.
Canada does not have the "in the clear" requirement for local channels. They may all be
encrypted in Canada.
On some systems you may get more than just the locals. It is completely dependent on your
cable provider. In the U.S. some areas may get a few of the basic cable channels as well as
local channels. In other areas you may get nothing more than locals. You may have to step
through the scanned channels to find "in the clear" channels.
The QAM support is a side effect of the ATSC card. It is a novelty to play with and the bottom
line is we have no idea what you may be able to receive. You may get nothing. You may get a
lot. You may have to hunt for it.
PAGE 53
BACK TO
TOC
Edit QAM
●
●
●
The transponders may be edited by pressing the green button.
Add a transponder with the red button and delete a transponder with the yellow
button.
When done press the blue button to save the changes.
PAGE 54
BACK TO
TOC
Profiles Menu
The CW-3000HD uses a unique system for parental control. It's a profile system. Profiles can
be created for different users assigning each profile a set of channels, sites, and applications.
By default the system comes with 1 user and Admin. Admin is strictly for system setup and
profile management. All system configuration shown above has been done under the Admin
profile. The user profile is where the applications of the CW-3000HD are used. Additional
users can be setup for family members or special cases as needed. An example would be a
children's profile containing channels and applications appropriate for children.
●
Select “Profiles” from the Admin screen and press the enter button to display the
profiles screen.
●
Add is to Add a new profile.
Edit is to change the name or PIN for a profile.
Channels is to add or change satellite channels.
IP Channels is to add or change IPTV channels.
Applications is to add or change system applications.
●
●
●
●
PAGE 55
BACK TO
TOC
Adding a profile
●
●
●
●
●
●
●
●
●
Select the “Add” button.
Enter a name for the user. The name cannot contain spaces or non- alphanumeric
symbols.
Enter a pin if required for this user.
Leaving the pin blank allows anyone to access the profile.
Select yes or no to receive a confirmation message before leaving the profile. This is
useful in situations where you may not want to accidentally leave the profile.
Select yes or no to have this profile become a main profile that automatically logs in
when the CW-3000HD is turned on.
Select yes or no to automatically assign channels
Select yes or no to automatically share the profile folders over the network for other
desktop systems to access.
Choose an icon to display with the name on the main screen.
NOTE: Share on Network enables both sharing of the profile via Windows style networking and
sharing of the profile via the internal web server.
(ie. From the web browser of a networked PC type in the IP of your CW-3000HD)
(http://192.168.x.x)
PAGE 56
BACK TO
TOC
Editing a Profile
●
●
●
●
●
●
●
●
●
●
●
Select the “Edit” button.
Use the up and down arrows to choose the profile to edit.
The display name can be changed.
The profile pin can be changed.
Change the selection of yes or no to receive a confirmation message before leaving the
profile. This is useful in situations where you may not want to accidentally leave the
profile.
Change the selection of yes or no to have this profile become a main profile that
automatically logs in when the CW-3000HD is turned on.
Change the selection of yes or no for automatically assigning channels
Change the selection of yes or no for automatically sharing / not sharing the profile
folders over the network for other desktop systems to access.
A profile can be removed by pressing the green button.
Choose a different icon to display with the name on the main screen.
Press the blue button to save the changes.
NOTE: Share on Network enables both sharing of the profile via Windows style networking and
sharing of the profile via the internal web server.
(ie. From the web browser of a networked PC type to the IP of your CW-3000HD)
(http://192.168.x.x)
PAGE 57
BACK TO
TOC
Assigning Antenna Channels
●
●
●
●
●
●
●
●
Use the up/down buttons to select a profile.
Available channels will be displayed in the left available box.
Channels that have been added will be in the right selected box.
To move individual channels highlight a channel and press enter.
The box to the left of the channel will display an “x” when selected.
Once the desired channels have been selected, use the add or remove button to move the
channels accordingly.
All channels may be added or removed at once with the corresponding button.
Press the blue button to save the changes.
NOTE: If satellite channels were scanned prior to creating a profile all channels will be added
to the profile by default. If the profile is created prior to scanning, and auto assign channels was
not selected, the channels have to be added manually. Also, Rescanning satellite channels will
not add them automatically to the profiles if auto assign channels was not selected. The newly
scanned channels have to be added manually.
PAGE 58
BACK TO
TOC
Assigning IP Channels
●
●
●
●
●
●
●
●
●
●
Select profile with up/down buttons.
The available list can be filtered by country.
Use the up/down buttons in the country box to select a filter.
Available channels will be displayed in the left available box.
Channels that have been added will be in the right selected box.
To move individual channels highlight a channel and press enter.
The box to the left of the channel will display an “x” when selected.
Once the desired channels have been selected, use the add or remove button to move the
channels accordingly.
All channels may be added or removed at once with the corresponding button.
Press the blue button to save the changes.
PAGE 59
BACK TO
TOC
Configure IP Channels
●
●
●
Press the red button to add a channel to the channel list.
Press the green button to remove a channel from the channel list
Press the yellow button to edit an existing channel.
PAGE 60
BACK TO
TOC
Add IP Channel
●
●
●
●
●
●
Types allows you to choose between radio and TV.
Countries allows you to specify where the channel originates.
Languages specifies the spoken language of the channel.
Categories allows you to specify the theme of the channel.
Name is the display name of the channel.
Address is the URL of the channel.
PAGE 61
BACK TO
TOC
Assigning Applications
●
●
●
●
●
●
●
Select profile with up/down buttons.
Available applications will be displayed in the left available box.
Applications that have been added will be in the right selected box.
To move individual applications highlight an application and press enter. The box to the
left of the application will display an “x” when selected.
Once the desired applications have been selected, use the add or remove button to move
the applications accordingly.
All applications may be removed or added at once with the corresponding button.
Press the blue button to save the changes.
NOTE: Some applications require an optional device be connected to function. Satellite TV
requires a satellite dish aimed at the appropriate satellite(s). IPTV and Web both require a
network Internet connection. Web will require a keyboard and mouse. Games and Roaster both
require an optional hard drive to be installed. If these optional devices are not connected, these
applications will not function.
PAGE 62
BACK TO
TOC
System Operation
Profiles
●
●
●
The initial system start screen contains a list of all available profiles..
Select the user profile and press the enter button.
User is the default profile used in the example screens..
NOTE: The profile name “User” is the display name specified when the user profile was created
NOTE: The following screens may differ depending on the applications assigned to the profile.
NOTE: The following examples assume all applications are setup for use.
PAGE 63
BACK TO
TOC
Profile Applications
●
●
●
●
●
●
●
●
●
●
IPTV starts the IPTV viewing application.
Satellite TV starts the TV viewing application.
Video starts the video viewing application.
DVD starts a DVD viewing application.
Pictures starts the picture viewer application
Web starts the web browser application.
Music starts the music playing application.
Roaster starts the CD/DVD and recordings preparation application.(hard drive needed)
Games starts the game selection application. (if installed – hard drive needed)
CD starts the CD playing application.
PAGE 64
BACK TO
TOC
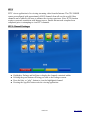
IPTV
IPTV viewer application is for viewing streaming video from the Internet. The CW-3000HD
comes preconfigured with approximately 450 IP channels from all over the world. Other
channels can be added by the user to enhance the viewing experience. Note: IPTV function
requires a network connection with Internet access. Ensure that network setup has been
completed prior to attempting to view IPTV channels.
IPTV Channel Packages
●
●
●
●
Highlight a Package and hit Enter to display the channels contained within.
Pressing the green button will bring you back to the Packages screen.
Press the blue, or “play”, button to view the highlighted channel.
Pressing the App Exit button exits the viewing application.
PAGE 65
BACK TO
TOC
IPTV Channel Categories
●
●
●
●
Pressing the red button will bring you to the Categories screen.
Use the arrow keys to navigate and select the categories.
Highlight a channel and press the blue, or “play”, button to view the highlighted
channel.
Pressing the App Exit button exits the viewing application.
Remote buttons for IPTV viewer
Button
App Exit
Stop
Vol+
Vol-
Function
Exit
Stop
Vol+
Vol-
Button
Play
Pause
Mute
PAGE 66
Function
Play
Pause
Mute
BACK TO
TOC
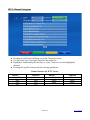
TV
TV is the satellite TV viewing application.
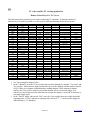
Remote Control Keys For TV Viewer
The following remote control keys are used to control the TV operation. To keep the number of
different keys as small as possible, several keys have different meanings in the various modes:
Remote Button
Normal
Menu
Channels
Exit App
Exit
Menu
Menu on
Menu off Menu off
i
Program info
EPG
EPG
Red
Recordings Menu
Record
Edit
Green
Zoom out
Audio
New
Yellow
Zoom in
Delete
Delete
Blue
Attenuate
ReplayMode Mark
Up
Ch up
Crsr up
Crsr up
Down
Ch down
Crsr down Crsr down
Left
Page up
Right
Page down
All
What's on Now
Recordings Recordings Menu
Rew
Fast-Rewind
Rec
Record
FF
Fast Forward
Back
Stop
Stop
Next
Vol+
Vol+
VolVolPlay
Play
CH+
Channel +
CHChannel Exit
Menu off VDR menu
Pause
Pause
Enter
Channel Menu
Select
Switch
0-9
Ch Select
Sort(2)
Mute
Mute
Timer
Timer Menu
-
Timers
Edit/New
Recordings
Replay
Menu off
Menu off
Menu off
Menu off
On/Off
ABC/abc Play/Commands(1)
Jump
New
Ins/Ovr
Rewind
Skip -60s
Delete
Delete
Delete
Skip +60s
Info
Info
Stop
Crsr up
Crsr up
Crsr up
Play
Crsr down Crsr down
Crsr down
Pause
Page up
Decrement
Page up
Search back
Page down Increment
Page down
Search forward
VDR menu
Discard
VDR menu
Recordings menu
Edit
Accept
Play
Progress Display
Day(3)
Numeric inp Exec cmd(1)
Editing
-
1. See "Processing Recordings" below.
2. In the "Channels" menu the '0' key switches the sort mode through "by number", "by name" and
"by provider". Other numeric input positions the cursor to the channel with the number entered
so far. If there is no channel with that number, nothing happens. While entering a channel
number, the '0' key will be treated as part of that number, not as a sort mode toggle. If no
numeric key has been pressed for more than one second, the number is reset and '0' functions as
sort mode toggle again.
3. In the "Timers" menu, when on the "Day" item, the '0' key toggles between a single shot and a
repeating timer. If "Day" indicates a repeating timer, the keys '1'...'7' can be used to toggle the
individual days ('1' is Monday).
PAGE 67
BACK TO
TOC
●
●
In a numerical input field the keys 0..9 are used to enter the data, and the Left key can be used
to delete the last entered digit.
In a text input field (e.g. the file name of a recording) the characters can be entered by pressing
the numeric keys, the same way as on a cell phone keypad.
Navigating through the On Screen Menus
●
●
●
●
●
●
●
●
●
●
●
●
●
●
●
The "VDR" menu can be called up with the Menu (M) button of the remote control unit.
The Up and Down buttons are used to select a specific item.
The Left and Right buttons can be used to change options, and the numeric buttons
allow dire input of numeric data.
The Enter button confirms any changes (or switches to a channel in the "Channels"
menu).
The Exit button goes back one level in the menu structure, discarding any changes that
might have been made in the current menu.
In the "Timers" menu, the current timer can be enabled or disabled with the Red button.
Enabled timers are marked with '>', timers that are currently recording are marked with
'#'.
If a timer has the "First day" set so that it will start recording only on the given date, it is
marked with '!'.
The Red button toggles through the "enabled" and "disabled" states, and for repeating
timers that are currently recording also a state that ends this recording prematurely and
sets the "First day" date so that it will record again the next time the timer hits.
Pressing the Enter button here opens the "Edit timer" menu.
Textual options, like channel names or recording file names, can be edited by pressing
the Right button (which puts brackets around the current character as in "[R]TL"),
selecting the desired character position with Left and Right, and changing the character
with the Up and Down buttons.
Enter then confirms the changes.
The Red button toggles between upper- and lowercase characters.
The Green button switches between insert and overwrite mode.
The Yellow button deletes the current character (or the one to the right of the cursor in
insert mode).
NOTE:
The Red, Green, Yellow and Blue buttons have special meanings in various
menus and are listed at the bottom of the on-screen-display.
At any point in the menu system, pressing the "Menu" button again will
immediately leave the menu system (discarding any pending changes).
PAGE 68
BACK TO
TOC
The Grid Program Guide
●
●
●
●
●
●
●
The EPG button will display a semitransparent grid style "Electronic Program Guide"
Up, Down, Left and Right will move the cursor through the guide.
The Yellow (Page Up) and Red (Page Down) buttons move through the guide one page
at a time.
The program information in the upper portion of the screen will give a program
description for the currently highlighted program.
Pressing the Enter button on a highlighted program will close the guide and change
channels to that program.
Pressing the Green button will change the channel to the currently highlighted channel
while leaving the guide displayed.
Pressing the Enter button on a future program to instantly create a recording timer. A
timer setup window will open.
●
The default timer is a one time switch timer. Switch Once will simply switch to the
selected channel at the designated start time without recording. This highlighted default
upper cell of the timer window can be changed by using the right and left arrow keys.
●
The Timer Type may be set to Record Once for a one time recording.
It may also be set to record the same time on the same day each week, the same time
every day of the weekday or the same time every Saturday and Sunday.
The start and stop time of the timer may be altered. The Left and Right buttons will add
or subtract one minute from the start or stop time depending on the cell that is
highlighted. Note that the Start and Stop time are offset by the Margin Start and Margin
Stop parameters in order to make sure the entire program is recorded in case it doesn't
exactly adhere to its published start/stop times. Of course, no guarantee can be given
that the default margin values will be sufficient, so in case this recording is really
important, an extra margin can be added.
The Back button will exit back to the current program without changing the channel.
●
●
●
PAGE 69
BACK TO
TOC
The "Schedule" Menu
●
●
●
●
●
●
●
●
●
●
●
●
The "Schedule" menu presents a list style "Electronic Program Guide" (EPG).
Select "Schedule" from the "VDR" menu to get a list of all upcoming broadcasts on the
current channel.
Up and Down can be used to scroll through this list, and pressing Enter displays detailed
information about the selected program. Pressing Enter again (or pressing Exit) returns
back into the "Schedule" menu.
From the "Schedule" menu, the Green button opens the “What's on now?" menu, which
displays all programs that are currently running on all channels that have EPG.
The Yellow button opens the "What's on next?" menu, which lists all programs that will
start next on all channels.
Inside the "What's on now/next?" menus the Green button toggles between the "Now"
and "Next" display, and the "Yellow" button displays the "Schedule" menu of the
current channel in the list.
The Red button allows programming a timer to record the selected program instantly.
After pressing this button, the current event will be marked with 'T', and the function of
the Red button will change from "Record" to "Timer".
Pressing Red on an event marked with 'T' will open the "Edit timer" menu for this timer,
where one can make any desired modifications. Note that the Start and Stop time are
offset by 2 minutes in order to make sure the entire program is recorded in case it doesn't
exactly adhere to its published start/stop times. Of course, no guarantee can be given
that the default 2 minutes will be sufficient, extra margin can be added if this recording
is extremely important.
VPS recordings will use the exact Start (or VPS) and Stop times as given in the event. If
a timer is newly created from within the "Schedule" menu, and its event is already
running or has its start time within the next two minutes, it goes directly into the "Edit
timer" menu in order to allow the user to make further changes to timer parameters
before the actual recording starts.
The Blue button can be pressed to switch to the channel with the selected program.
The following markers in these menus give additional information about the status of the
events:
t
there is a timer defined for this event which covers only part of the event
T
there is a timer defined for this event which covers the entire event
V
this event has a VPS time that's different than its start time
*
this event is currently running (the validity of this marker depends on whether)
(there is currently a DVB card receiving the transponder this channel is on)
Pressing 0 in the "Schedule" menu rotates through displaying "This event on this
channel", "This event on all channels" and "All events on all channels". This can be used
to find reruns of a given show, or the episodes of a series. Note that if there are many
channels in the channels list, displaying the "All events on all channels" page may take a
while.
PAGE 70
BACK TO
TOC
Selecting a Channel
There are five ways to select a channel:
1. With no On Screen Menu displayed press the Up or Down button to switch to the next
higher or lower channel.
2. Press the EPG button to bring up the grid program guide and browse through the guide
with the Up and Down or Yellow(Page Down) and Red (Page Up) buttons. Switch to the
selected channel with the ?Enter? button.
3. Press the Menu button to bring up the On Screen Menu, select "Channels" and browse
through the list with the Up and Down key; to switch to the selected channel press Enter.
4. Directly type in the channel number with the numeric keys ('0'..'9'); if no key is pressed
for about 5 seconds, the digits collected so far will define the channel number.
5. Press the All button to bring up “What's on now”and "Next" menu. Highlight the desired
channel and press the Blue button to “Switch” to the channel..
● Pressing the 0 button in normal viewing mode toggles between the current and the
previous channel. A channel is considered "previous" if it has been selected for at least 3
seconds.
● After switching to a different channel the channel number and name, as well as the
current time are displayed in the OSD. If available, the 'current/next' information will be
displayed below this line.
● This display automatically goes away after about five seconds, or if any key is pressed.
Selecting audio tracks
●
●
●
●
●
●
●
If the current channel or recording provides different audio tracks (for different
languages or Dolby Digital), the Audio button can be pressed to bring up the "Audio"
menu.
Within this menu, the Up and Down keys can be used to switch between the audio
tracks.
The Left and Right keys can be used to switch between "mono left", "stereo" and "mono
right" for channels that broadcast different audio tracks in the left and right stereo
channels.
The Enter key explicitly switches to the selected track (in case the device for some
reason doesn't play it) and closes the "Audio" menu.
The "Audio" menu will automatically disappear after 5 seconds of user inactivity, or if
any key other than the ones described above is pressed.
Once a Dolby Digital track has been selected on any channel, further channel switches
will first search for a Dolby Digital track of one of the preferred audio languages. If no
such track can be found, a normal audio track will be selected.
Note that this only works if the broadcasters use actual language codes in their PID data,
not things like "dd" or "2ch".
PAGE 71
BACK TO
TOC
Instant Recording
●
●
●
●
●
●
●
●
Recording can be started in the current channel by pressing the Red button in the "VDR"
menu or pressing the Record button.
This will create a timer event named "@channelname" that starts at the current time and
by default records for 3 hours.
If the recording time needs to be modified, the timer must be edited.
Stop instant recording by pressing the Menu (M) button and selecting "Stop Recording",
or by disabling the timer.
The default priority, lifetime and recording time can be defined in the
"Setup/Recording" menu.
As the live-video is continuously recorded, it is possible to get the just seen scene into a
normal recording.
A new timer can be created. If the start time is in the past, then the already seen part of
the recording will be added.
Or rewind to the start point and start an instant recording (by pressing the rec-key or
menu -> red)
Pausing live video
●
●
●
●
●
●
●
If the live program being watched needs to be paused, press Menu/Yellow or Pause on
the remote control.
Replay will be put into "pause" mode allowing the viewer to attend to other events while
the program is paused.
Once ready to continue viewing, press the Up or Play button to watch the current
channel in time shift mode, from the point where it was paused.
It is also possible to rewind a scene to get an instant replay. Press the Rewind (<<)
button to start rewinding. Press Play to resume playback.
Play resumes normal replay from any "pause", "forward" or "backward" mode.
Fast Forward/Rewind (<< >>) runs playback forward or backward at a higher speed;
press again to increase the speed. Press Play to resume normal speed. If in Pause mode,
runs forward or backward at a slower speed, press Pause to return to pause mode.
Press the stop button to return to viewing in realtime.
PAGE 72
BACK TO
TOC
Replaying a Recording
●
●
●
●
●
●
●
All recordings are listed in the "Recordings" menu.
Browse through the list with the Up and Down button and press Enter (or the Red
button) to start playback.
New recordings are marked with an '*'.
VDR adds the "Episode name" (which is usually the name of the episode in case of a
series) to the recording's name.
The "Recordings" menu then displays all recordings of a repeating timer in
chronological order, since these are usually the individual episodes of a series, which
may be viewed in the order in which they were broadcast.
Playback can be stopped via the "VDR" menu by selecting "Stop replaying", or by
pressing the Stop button outside the menu. A previously stopped playback session can
be resumed by simply restarting the recording.
Press the “Green” button in the recordings menu to rewind a recording to start at the
beginning.
Replay Control
●
The following keys have the listed meaning in Replay mode:
Up
Resumes normal replay from any "pause", "forward" or "backward" mode.
Down
Halts playback at the current position. Press again to continue playback.
Blue
Stops playback and stores the current position, so that playback can be resumed
later at that point.
Left/Right
Runs playback forward or backward at a higher speed; press again to increase the
speed. Press Up to resume normal speed. If in Pause mode, runs forward or
backward at a slower speed, press Pause to return to pause mode.
Red
Jump to a specific location. Enter the time to jump to and then press "Left" or
"Right" to jump relative to the current position, "Up" to jump to an absolute
position, and "Down" to jump and pause at an absolute position.
Green/Yellow
Skips about 60 seconds back or forward. Pressing and holding down the
button performs the function until the button is released again.
Enter
Brings up the replay progress display, which shows the date, time and title of the
recording, a progress bar and the current and total time of the recording
Press Enter again to turn off the progress display.
Back
Stops replaying and brings up the "Recordings" menu. This can be used to easily
delete a recording after watching it, or to switch to a different recording.
PAGE 73
BACK TO
TOC
Editing Recordings
Explained
●
0
4, 6
7, 9
8
2
●
●
●
●
●
●
●
●
●
●
●
●
●
●
While in Replay mode, the following keys can be used to manipulate editing marks:
Toggles an editing mark. If the mark indicator shows a red triangle, the current
mark is deleted. Otherwise a new mark is set at the current position.
Move an editing mark back and forward. First, jump to an editing mark for this
to work.
Jump back and forward between editing marks. Replay goes into still mode after
jumping to a mark.
Positions replay at a point 3 seconds before the current or next "start" mark and
starts replay.
Start the actual cutting process.
Editing marks are represented by black, vertical lines in the progress display.
A small black triangle at the top of the mark means that this is a "start" mark, and a
triangle at the bottom means that this is an "end" mark.
The cutting process will save all video data between "start" and "end" marks into a new
file (the original recording remains untouched).
The new file will have the same name as the original recording, preceded with a '%'
character (imagine the '%' somehow looking like a pair of scissors ).
Red bars in the progress display indicate which video sequences will be saved by the
cutting process.
The video sequences to be saved by the cutting process are determined by an "even/odd"
algorithm. This means that every odd numbered editing mark (i.e. 1, 3, 5,...) represents a
"start" mark, while every even numbered mark (2, 4, 6,...) is an "end" mark.
Inserting or toggling a mark on or off automatically adjusts the sequence to the right side
of that mark.
Use the keys described under "Replay Control" to position to, e.g., the beginning and
end of commercial breaks and press the '0' key to set the necessary editing marks.
After that use the '7' and '9' keys to jump to each mark and maybe use the '4' and '6' keys
to fine tune them.
Once all marks are in place, press '2' to start the actual cutting process, which will run as
a background process.
When replaying the edited version of the recording use the '8' key to jump to a point just
before the next cut and have a look at the resulting sequence.
Currently editing marks can only be set at I-frames, which typically is every 12th frame.
So editing can be done with a resolution of roughly half a second.
A "start" mark marks the first frame of a resulting video sequence, and an "end" mark
marks the last frame of that sequence.
An edited recording (indicated by the '%' character) will never be deleted automatically
in case the disk runs full (no matter what "lifetime" it has).
PAGE 74
BACK TO
TOC
Quick Mini-Howto
STEPS FOR EDITING RECORDINGS:
Go to recordings
Play the recording
Skip ahead to when the show starts
Hit pause
Hit 0 to create a mark
If you want to move the mark a bit use 4 or 6 depending on the direction
Hit play
Skip ahead to the commercial (or end of the show if it's commercial free)
Hit pause
Hit zero to make another mark
If you want to move the mark a bit use 4 or 6 depending on the direction
When you have reached the end of the show and are happy with the mark
locations hit 2 to begin the process of cutting and combining the
recording
Hitting 2 will take whatever data is between your first and second
mark.. your third and fourth mark .. and so on and use that data as the
new recording file.
TO RE-EDIT RECORDINGS:
Using 7 and 9 enable you to jump from mark to mark.
This is useful when wanting to move the marks slightly.
PAGE 75
BACK TO
TOC
Programming the Timer
Use the "Timer" menu to maintain the list of timer controlled recordings.
The parameters in the "Edit timer" menu have the following meanings:
●
Active: Defines whether the timer will be processed
(set it to 'no' to temporarily disable a timer).
●
Channel: The channel to be recorded (as defined in the "Channels" list). Any changes
made in the "Channels" list (like renaming or reordering channels) will be automatically
reflected in the timers settings.
●
Day: The day on which this timer shall start. This can be a date (like 2005-03-19), which
allows programming a "single shot" timer that hits once and is deleted after it ends.
○ Another option here are "repeating timers" which are defined by listing the days
of the week on which they shall record. For example, a timer that shall record
every Monday and Wednesday would have a Day setting of "M-W----".
○ The '0' key toggles between a single shot and a repeating timer.
○ If "Day" indicates a repeating timer, the keys '1'...'7' can be used to toggle the
individual days ('1' is Monday).
○ Switch to a set of predefined repeating timer settings by pressing the "Left" key
when the day is the present day.
○ To return to the single shot mode just press "Right" until a date is displayed.
●
Start: The start time of the timer in hh:mm as 24 hour ("military") time.
●
Stop: The stop time of the timer.
●
VPS: Defines whether the timer shall use VPS (if available).
○ If this option is set to 'yes', the start time must exactly match the program's VPS
time, otherwise nothing will be recorded.
○ If VPS is used, the stop time has no real meaning. However, it must be different
than the start time, and should correspond to the actual stop time of the program,
just in case there is no real VPS data available at the time of recording, so VDR
has to fall back to normal timer recording.
●
Priority: The Priority (0..99) is used to decide which timer shall be started in case there
are two or more timers with the exact same start time.
○ The first timer in the list with the highest Priority will be used.
○ This value is also stored with the recording and is later used to decide which
recording to remove from disk in order to free space for a new recording.
○ If the disk is full and a new recording needs more space, an existing recording
with the lowest Priority (and which has exceeded its guaranteed Lifetime) will be
removed.
○ A timer with a higher priority will interrupt the timer with the lowest priority in
order to start recording.
PAGE 76
BACK TO
TOC
●
Lifetime: The number of days (0..99) a recording made through this timer is guaranteed
to remain on disk before it is automatically removed to free up space for a new
recording.
○ Note that setting this parameter to very high values for all recordings may soon
fill up the entire disk and cause new recordings to fail due to low disk space.
○ The special value 99 means that this recording will live "forever", and a value of
0 means that this recording can be deleted any time if a recording with a higher
priority needs disk space.
●
File: The name under which a recording created through this timer will be stored on
disk (the actual name will also contain the date and time, so it is possible to have a
"repeating timer" store all its recordings under the same name; they will be
distinguishable by their date and time).
○ If the file name contains the special character '~', the recording will be stored in a
hierarchical directory structure.
○ For instance, a file name of "Sci-Fi~Star Trek~Voyager" will result in a directory
structure "/video/Sci-Fi/Star_Trek/Voyager"
○ The '~' character has been chosen for this since the file system's directory
delimiter '/' may be part of a regular program name.
○ Repeating timers create recordings that contain the 'Episode name' information
from the EPG data in their file name.
○ Typically (on tv stations that care about their viewers) this contains the episode
title of a series. The episode name is appended to the timer's file name, separated
by a '~' character, so that it results in all recordings of this timer being collected in
a common subdirectory.
○ If this field is left blank, the channel name will be used to form the name of the
recording.
●
First day: The date of the first day when this timer shall start recording (only available
for repeating timers).
●
A timer can also be programmed by pressing the "Red" button on the "Schedule",
"Now", "Next" or "Event" menus.
PAGE 77
BACK TO
TOC
Video
The video application is for viewing movies downloaded from the Internet or other sources.
Most video formats including mpeg, avi, divx, wmv, mov and real media files are supported.
Note that certain newer formatted wmv files and DRM protected videos will not work with this
player. The video application does support subtitle files.
Video Selection
●
●
●
●
A file selection list is displayed containing two directories “external” and “local”..
The “local” directory contains any files stored on the hard drive.
The external” directory refers a USB stick, network share, or CD/DVDROM.
Highlight the appropriate directory and press enter.
NOTE: This video player also supports DVD ISO file playback as well as playback of the
DVD file structure which is achieved by selecting ../VIDEO_TS/VIDEO_TS.IFO
PAGE 78
BACK TO
TOC
External File Selection
●
●
●
●
If “external” is selected, a list of devices is displayed.
Select the device containing the video file and press “Enter”.
Highlight the desired video file and press the blue, or “Play”, button to start playback.
Press the App Exit button to exit the player when done viewing
PAGE 79
BACK TO
TOC
Video Viewer Keys
PAGE 80
BACK TO
TOC
Pictures
The pictures application allows for high quality picture viewing in a slideshow format or single
viewing. It has other popular features like image zoom, pan and rotate.
●
●
●
●
●
●
●
●
A list of files and directories will be displayed containing two directories “external” and
“local”..
The “local” directory contains any downloaded files from the Internet.
The external” directory refers a USB stick, network share, or CD/DVDROM.
Highlight the appropriate directory and press enter.
If “local” is selected, a list of picture files will be shown.
If “external” is selected, a list of devices will be shown. Choose the appropriate device
(USB, CD, etc) to see a list of files on the device.
Select a picture and press the blue button to view it
Select a folder of pictures and press the yellow button for a slideshow
PAGE 81
BACK TO
TOC
Picture Viewer Keys
PAGE 82
BACK TO
TOC
Web
The web application is for browsing the internet allowing the user access to their favorite
websites and webmail. This award winning Mozilla browser, with proper plugins installed,
provides viewing of streaming media from popular video sharing websites and much much
more.
●
●
Highlight the Web button and press Enter to begin browsing the Internet.
The web browser behaves much like that of a desktop computer.
NOTE:
If the web browser is not completely visible on your screen see the display
configuration section for details on how to adjust the window size.
The web browser is capable of playing the same media formats that the video
application does. Other formats like the flash player require a separate download.
A bookmark for the flash plugin has been provided in the bookmarks.
PAGE 83
BACK TO
TOC
DVD
The DVD application is for viewing DVD movies on DVD disks.
Press enter on the DVD button to begin viewing the DVD disk in the drive.
DVD Viewer Keys
PAGE 84
BACK TO
TOC
Music
The Music application is for listening to audio files in MP3s and other formats. Note that
DRM protected files are not supported.
Music playback can be from local storage as well as external devices (e.g. USB stick,
CD/DVDROM). See appendix A for device connection instructions.
●
●
●
●
●
●
●
●
●
●
●
●
Music playlist screen:
The music selection screen contains the play mode drop down and a file selection list
containing two directories “external” and “local”.
Play Mode Selection:
The play mode can be selected with the up/down buttons.
“Play list once” will play the playlist in order and then stop.
“Loop entire list” will play the playlist in order and then repeat until stopped.
“Randomly play until all finished” will randomly play all songs once and then stop.
“Randomly play - repeat when finished” will randomly play all songs until stopped by
the user.
The play mode may also be changed with the red key while playing.
File Selection List:
The “local” directory contains any files stored on the hard drive.
The external” directory refers a USB stick, network share, or CD/DVDROM.
Highlight the appropriate directory and press enter.
PAGE 85
BACK TO
TOC
●
●
●
●
●
●
●
●
External Files Selection:
If “external” is selected, a list of devices is displayed.
Select the device containing the audio file and press “Enter”.
Available music files in the current directory are displayed in the left “Available” box.
All selected Music files are displayed in the right “Selected” box.
To move individual songs, highlight a song and press enter. The box to the left of the
song will display an x when selected.
Once the desired songs have been selected, use the add or remove button to move the
songs accordingly.
All music files may be added and/or removed at once with the “Add All” and/or
“Remove All” buttons.
As music plays it generates a wide spectrum of visualizations.
PAGE 86
BACK TO
TOC
Music Player Keys
PAGE 87
BACK TO
TOC
Roaster
Roaster is an application for converting video recordings.
●
●
●
●
Prepare DVD - Convert HD and SD recordings to DVD-ISO image.
Prepare Video - Create HD or SD MPG-ISO image of recordings.
Burn DVD - Burn DVD-ISO images to DVD media.
Burn Video - Burn MPG-ISO images to CD/DVD media.
PAGE 88
BACK TO
TOC
Prepare DVD
●
●
●
●
Highlight and browse the Titles
Highlight the recording under the title you wish to prepare
Press the blue button to Prepare DVD of the recording
Press the green button to cancel
When active, Roaster will update the screen with messages displaying the current operation
and display the percentage of progress per operation. Recordings created with the Satellite TV
application are comprised of multiple segments. The Prepare DVD process begins with the last
segment and works it's way down to the first segment. After all segments have been converted
to a DVD compliant MPG format It creates a DVD-ISO image which can be written to DVD
media from within the Burn DVD section.
PAGE 89
BACK TO
TOC
Space requirements for Prepare DVD
Prepare DVD requires a substantial amount of free space for it's conversion and image creation
processes. You will need approximately 3.5 times the size of your recording as free space. A 2
hour HD recording will usually have about 7-8 segments of 2 GB each. A 2 hour SD recording
will usually have about 1-2 segments of 2 GB each. If your free space is limited make sure you
do not have any recordings going or timers set to record.
HD Recordings & Prepare DVD
Converting HD recordings requires a fair amount time and CPU power. The less CPU
dedicated to other tasks the quicker the conversion process will be.
Ways of freeing up CPU for Roaster
While in your user profile the Satellite TV application is always running. This means if you
are tuned to an HD channel you are dedicating a significant amount of your CPU to the
Satellite TV application even if you aren't watching it. When at all possible keep the Satellite
TV application tuned to an SD channel and do not record TV shows while Roaster is active.
The absolute quickest way to convert HD recordings is to start the Prepare DVD process then
log out of the user profile. This will completely free up the CPU for Roaster. Users may find
this the most preferred and time saving method for overnight processing.
Other Notes of Interest
●
●
●
Roaster is designed to perform only one job at a time.
HD recordings take about an hour per gig. Longer while other applications are running.
Since Roaster jobs are background processes, meaning they run in the background and
do not stop when a profile is exited, the job itself will continue even when a different
user is logged in. These specific video files of another user are not accessible by other
users, but since the Roaster job is running they will be able to view the job progress and
Roaster will not be free to use. If you do not think a user is responsible enough to
operate Roaster then remove that application from their application list.
PAGE 90
BACK TO
TOC
Prepare Video
●
●
●
●
Highlight and browse the Titles
Highlight the recording under the title you wish to prepare
Press the blue button to Prepare Video of the recording
Press the green button to cancel
Recordings created with the Satellite TV application are comprised of multiple segments.
Prepare Video allows you to create a disc image containing the separate video segments of your
recordings. Prepare Video does not down convert the recordings. HD segments remain HD, SD
segments are made DVD compliant for improved compatibility.
When active, Roaster will update the screen with messages displaying the current operation
and display the percentage of progress per operation. The Prepare Video process begins with
the last segment and works it's way down to the first segment. After all segments have been
converted to MPG format It creates an MPG-ISO image which can be written to CD/DVD
media from within the Burn Video section.
PAGE 91
BACK TO
TOC
Burn DVD
Once Prepare DVD has completed enter Burn DVD section and highlight the DVD
Image file. Insert blank DVD media that is large enough to accommodate the size of the image.
The size is displayed at the upper right of the screen.
●
●
Burn DVD starts the write process
Delete allows you to delete the Image files
Notes: This screen is designed that once the job is active you must wait for it to finish. This
is to prevent a failed write due to other processes that could potentially interfere.
The DVD-ISO files are playable from within the Video screen section.
The ability to play the ISO format is very useful in that when free space is at
a premium users may opt to simply keep the DVD-ISO file as their preferred
video file instead of the satellite recording.
PAGE 92
BACK TO
TOC
Burn Video
Once Prepare Video has completed enter Burn Video section and highlight the Image
file. Insert the appropriate blank media that is large enough to accommodate the size of the
image. The size is displayed at the upper right of the screen.
●
●
Burn Video starts the write process
Delete allows you to delete the Image files
Note: This screen is designed that once the job is active you must wait for it to finish.
This is to prevent a failed write due to other processes that could potentially interfere.
PAGE 93
BACK TO
TOC
Games
The games package is not part of the stock system. It is available as a separate download at
http://www.captiveworks.org/games/ for those legally entitled to its proper use.
To install the package please refer to the 'Installing Updates' section.
●
●
●
Pressing the green help button will access the help file that is provided by the
installation package.
It is recommended that you read through all the pages of the help file.
Pressing the red delete button will delete highlighted game.
Pressing the blue play button will start the game.
NOTE: If for some reason your game will not launch check the game log. It can provide insight
into issues like mistakenly forgetting to include all required files.
For specific game troubleshooting refer to the Internet and utilize a search engine.
The CaptiveWorks forum will not provide any games support.
PAGE 94
BACK TO
TOC
CD
The CD application is for listening to CD music.
Highlight CD in your applications list and press enter to begin playing the CD disc in the drive.
CD Player Keys
PAGE 95
BACK TO
TOC
Appendix
External USB device connection
The CW-3000HD can make use of optional external devices to extend the functionality of the
system. USB memory stick can also be used to play audio and video files. A USB memory
stick may also be used to update the software on a system that has no access to the Internet.
The connections are a standard PC style USB interface on the front and rear of the system. The
ports are USB v2.0 and are backwards compatible with USB v1.1 devices.
Read the users manual for the external device to ensure that it is set up correctly. Software
installation steps may safely be ignored as the CW-3000HD already has the drivers and
software for supported devices. Connect the USB cable to one of the USB ports on the front or
back panel. In the case of a USB memory stick, it may be inserted directly into one of the USB
ports.
PAGE 96
BACK TO
TOC
Keyboard / Mouse Connection
A keyboard and mouse may be used with the CW-3000HD for ease in using the web browser
or other future enhancements.
The labeled connections below are for connecting a PC style PS/2 keyboard and mouse.
Ensure that the correct device is connected to the appropriate port. A USB mouse/keyboard
may also be used with the CW-3000HD.
PAGE 97
BACK TO
TOC
Networking with Windows PC's
Here are a couple of quick little howto/suggestions for those that use Windows.
Seeing files over the network
Click on My Network Places
If you don't see the the workgroup 'WORKGROUP' or don't see the CW3000HD then
click Search
Under computer name enter CW3000HD and click search
It should then show up under the My Network Places window named
'CAPTIVEWORKS (Cw3000hd)'
For future ease of use you can drag this to the desktop if you like.
Another way to quickly view the CW3000HD is to type in the explorer bar:
\\Cw3000hd\
or if you prefer, by IP:
example: \\192.168.1.102\
Enabling more shared folders
The logs, and updates shares are shared by default.
If you go into the Admin screen to edit a user profile and enable the 'share over network'
when you don't have a hard drive the setting will be ignored. Once you have a hard drive
installed the common folders share is started automatically.
The personal folders can be shared by going back into the Profile section of the Admin
screen and re-save the shared user profile.
Playing your recordings over the network
Install vlc if you don't already have it installed.
Browse to the video folder share of your choice (ie. common\video .. user\video, etc)
Navigate down in one of your recording folders until you see the 001.vdr, 002.vdr files.
If you have never played a .vdr file with vlc you'll need to associate it.
Simply right-click on the file and click properties.
Beside Opens with: you should see a Change.. button
Click Change..
You should be able to browse and select vlc media player out of the list.
Once that is done you should be able to right-click and Play the recordings.
PAGE 98
BACK TO
TOC
Remote Control - Keyboard Cross-reference
The remote control actions can be duplicated when using a keyboard with these keystrokes.
Power
Exit App
Timer
Play
Pause
Stop
CTRL+P
CTRL+X
CTRL+T
CTRL+Y
CTRL+U
CTRL+O
Record
CTRL+R
Rewind
CTRL+W
Fast Forward CTRL+F
Skip Back
CTRL+B
Skip Forward CTRL+D
Ok
ENTER
Back
ESC
RED
F1
GREEN
F2
YELLOW
F3
BLUE
F4
EPG
CTRL+G
i
CTRL+ i
VOL +
KP_Multiply
VOL KP_Divide
CH +
KP_Add
CH KP_Subtract
Erase
BCK SPACE
Recall
CTRL+L
All
CTRL+A
TV/Rad
CTRL+V
Sat
CTRL+S
Search
CTRL+E
Menu
CTRL+M
Recordings
CTRL+K
Schedule
CTRL+C
History
CTRL+H
Mute
CTRL+Q
Audio
CTRL+Z
Caption
CTRL+N
Eject
CTRL+J
PAGE 99
BACK TO
TOC
Troubleshooting
If at any time you need further troubleshooting assistance please visit the on-line forums
http://captiveworks.org/forum/
Please refer to the Latest News thread before posting.
Accessing Logs
A good way to diagnose is to look through log files. Log files can be accessed in a number of
different ways.
The system by default has the following to make accessing the logs convenient:
●
●
●
A Windows style network share named logs. This means should be accessible from
within My Network Places of your networked Windows PC.
A web based 'logs' access point. This means you should be able to point the web
browser of a Networked PC to the IP of your CW-3000HD. (example:
http://192.168.1.103)
Another option is to use an external utility like WinSCP and access the internal /var/logs
folder.
BIOS Settings
●
●
●
●
●
●
Main-> Primary IDE Master-> UDMA Mode -> disable
Advanced -> CPU Configuration-> AMD Cool 'n' Quiet Function-> Auto
Advanced-> Chipset-> Frame Buffer Size-> 64M
Advanced-> Chipset-> TV Mode Support-> NTSC-M
Power-> Hardware Monitor-> Q-Fan Controller-> Enabled
Boot-> Hard Disk Drives-> 1. 1st Master: Flash Card
PAGE 100
BACK TO
TOC
Display Diagnostics
I see the initial boot screens and then the screen goes blank.
The CW-3000HD supports one method of video connection at a time. Double-check your cable
connections to ensure your TV (or monitor) is hooked up using only one display connector
method. If after turning the unit on you get a blank screen after the initial boot screens then
wait a few minutes for the unit to be able to accept remote input and carefully point the remote
control at the unit and press 1346. The unit should reboot with a default display setting. After
that try a more compatible video setting that corresponds with your display devices capabilities.
NOTE: When using DVI-HDMI it is also important to use a short 'low-loss/low-noise' cable to
ensure your CW-3000HD can communicate properly with your display device and negotiate a
setting approved by your display device. (shortest possible cable the better)
I do not see the boot screens, but I see the menu after it boots.
Some TVs may not support the lower display resolution of the boot screens when utilizing the
DVI display mode. If you happen to have this issue and find this to be unacceptable try
utilizing a different display connection such as VGA or Component.
I do not see the boot screens, all I get is a blank screen.
If your CW-3000HD does not display any video when you first hook it up it is possible that the
memory became unseated from its slot during shipping. The first thing to do is to disconnect
the box from power and open the top lid. Locate the memory module under the DVD tray. You
may have to unscrew the DVD tray to get to it. Unclip the latches on the two sides of the
memory then push the memory back in its slot so that you hear the clicking sound from the
latches on both sides. Screw the DVD tray back in place. (Be careful not to disconnect any
cables in the process) Close the top lid and reconnect the power cord. Turn the unit on and see
if it makes a difference.
PAGE 101
BACK TO
TOC
Remote Control Diagnostics
My remote wont work unless I am three feet or less from the box, new battery's didn't
help. What can I do to increase the range?
During assembly of some of the initial CW-3000HD units there were cases where the remote
sensor was out of alignment.
If you pop the front cover off (grasp the sides and carefully pull forward with both hands you
will see the remote sensor board on the right side(it's the long PCB). Unscrew it and adjust the
sensor so it is in the middle of ir window. Put it back together and try it again.
NOTE: If the sensor still doesn't line up good enough you could do what some people have
done and unscrew the bottom screw and move the board until the eye is directly in line with the
window. Once the unit is not going to be moved too much, the top screw will be enough to hold
it in place.
My remote is acting up. I am getting random key strokes. What can I do?
When the batteries get low the remote begins to lose its range. When trying to use the remote at
its range limit it can misinterpret the key presses and give incorrect key strokes. Replace the
batteries and try it again. If the random keystrokes continue it may be a sensor
misalignment.(you can test this by using the remote directly in front of the unit). See the
statement above for increasing the range.
I think the random keystrokes have locked up some buttons on my remote. How can I get
them back?
If the remote gets in a state where keys are not responding exit the user profile and return to the
main screen. Press the Power button on the remote and select Shutdown. In these cases a
complete shutdown is necessary since a reboot keeps the remote circuits powered. When it is
powered off the remote circuits are then cleared. The remote should return to normal when the
unit is powered back on at that point.
NOTE: Pre - 1.0.1.9 systems have a repeat key issue from within Satellite TV, please check
your version and update.
Roaster Diagnostics
I get a ring buffer overrun
Sometimes the relationship between the audio and video stream information can get a little out
of sorts in sections of a recording. In order to make a proper DVD of the recording the prepare
process needs to make sure the information is set straight. If it is not within tolerance you can
receive a ring buffer overrun error along with the message to try re-editing the recording.
The process of editing the recording from within Satellite TV and trimming it slightly can
usually repair the recording. The editing process recombines the recording segments and can
usually set the information straight.
PAGE 102
BACK TO
TOC
Satellite TV Diagnostics
I get a black screen when switching channels
Double-check your adapter settings and ensure any unused adapters are disabled then re-save.
I receive a Media Not Available message
If you receive a Media Not Available message while in Satellite TV it means that something
has caused VDR (the application receiving the signal) to terminate.
Manually type in a FTA channel and check the strength and the quality of the signal by
pressing the Menu button and select Signal Information. It is important that both meters STR &
SNR are steadily in the green.
● If the values are too low you may need to readjust or increase the size of your antenna.
● If the strength(STR) is good, but the quality(SNR) is poor or fluctuating:
● It may be that you are getting interference(noise) somewhere between your
antenna and your CW-3000HD. That being the case you will have to recheck
your cabling and any other component in between (diplexers, splitters, barrel
connectors, etc.). Start by simplifying your setup and use a direct line. If that
solves the issue add any component back one at a time until you can determine
the culprit causing the noise.
● It may be that you have an improperly grounded antenna setup. This can cause
fluctuations and tuning problems. It is strongly advised that you to read National
Electric Code if you plan to do the dish installation yourself. Particularly, section
810-20 or hire a certified technician/electrician to do the job.
● It may be that you have inadequate cooling. Poor airflow can cause the tuner
cards to decrease efficiency due to heat. If the issue started shorty after the
addition of a hard drive it may be that some cables were accidentally moved and
are now impeding air flow.
● There might be a slim chance that during shipment the internal tuner cards
became slightly unseated. Disconnect the box from power and open the top lid.
Locate the tuner cards. Unscrew, remove, then return it to its original slot to
ensure it is properly seated. Repeat for the next card.
Try creating a new user profile to see if it is limited to a specific profile.
I get audio stutter on some channels
This can sometimes happen if a channel has a low quality (SNR) signal. To verify that this is
most likely the cause check the strength and the quality of the signal by pressing the Menu
button and select Signal Information.
● A commonly used method to minimize the stutter is to briefly press pause then press
pause again to increase the amount of prebuffering.
PAGE 103
BACK TO
TOC
Shared Folders Diagnostics
I need more details
When sharing a drive in Windows using drive k: as an example you will want to assign a share
name for it something like drive_k. Assigning a drive is done by right-clicking and selecting
'share as'. If your Windows machine has an IP of 192.168.1.103 you would create your share
like:
//192.168.1.103/drive_k
If you intend to share a folder within a certain drive the share should be stated directly.
The k:\files\videos folder shared as Videos would be mounted as:
//192.168.1.103/Videos
NOTES:
-Only use forward slashes.
-It is best to replicate any capital letters contained in your share name.
-It is best to avoid using special characters like : in the share name.
Do I need to add a user name and password?
It is usually best to spend a couple of minutes and create an account in Windows with a known
password for sharing and use that.
Anonymous access through the "Guest" account.
Guest access is implemented differently in XP and Vista (compared to 2000 & Prior)
Essentially the Guest account has to be enabled for the 'everyone group' to have any effect.
Depending on your current level of security you may need to add "guest" or grant full control
to 'Everyone' under advanced permissions. This is common for Windows Vista.
You would then use:
User name: guest
Password: <empty>
Could there be something blocking access?
You may also want to double-check that you don't have it blocked by firewall settings or some
sort of firewall software running. Programs like F-Secure usually require a new rule created to
allow incoming and outgoing local IP traffic.
PAGE 104
BACK TO
TOC
I just can't get it to connect
There were some changes from XP to Vista where Vista no longer supports the NTLM protocol
by default. The CW-3000HD is currently using smb version 3.0.22 which should have support
for the newer NTLM2 protocol of Vista. Some users have reported their Vista is working, yet
some other have difficulty so there may be differences in Vista releases.
If you figure the protocol change is suspect you could try forcing Vista to use the NTLM
protocol as well as NTLM2.
To do that, use these commands:
Disclaimer: This is just a suggested method of how to use the earlier protocol and not
necessarily what you should do.
Click "Start -> Run."
Type in the Run field: "secpol.msc." to bring you to Vista's security policy system.
Select "Go to: Local Policies > Security Options"
Find "Network Security: LAN Manager" authentication level.
Change the Setting from "Send NTLMv2 response only" to "Send LM & NTLM -- use
NTLMv2 session security if negotiated."
In Vista Home Premium, you won't have this tool so what can be done is:
Launch your registry editor and open key:
HKEY_LOCAL_MACHINE\SYSTEM\CurrentControlSet\Control\Lsa
Change the value of the DWORD named LmCompatibilityLevel to 1
If it isn't present, create it.
And of course reboot.
PAGE 105
BACK TO
TOC
Software License
The CW-3000HD is using open-source software. The operating system and multimedia
software licenses vary. The individual licenses can be found with the source code for the
individual applications.
Generally they fall under the GPL or it's variants.
The Java GUI Is licensed separately from the rest of the system. That license follows:
Copyright (c) 2006 By CaptiveWorks Inc
Redistribution and use of this code or any derivative works are
permitted free of charge provided that the following conditions are
met:
●
This software is distributed in binary form only. The binaries
are the property of the copyright holder and may not be
reverse engineered.
●
Redistributions may not be sold, nor may they be used in a
commercial product or activity.
●
Redistributions must reproduce the above copyright notice,
this list of conditions and the following disclaimer in the
documentation and/or other materials provided with the
distribution.
THIS SOFTWARE IS PROVIDED BY THE COPYRIGHT HOLDERS
AND CONTRIBUTORS "AS IS" AND ANY EXPRESS OR IMPLIED
WARRANTIES, INCLUDING, BUT NOT LIMITED TO, THE IMPLIED
WARRANTIES OF MERCHANTABILITY AND FITNESS FOR A
PARTICULAR PURPOSE ARE DISCLAIMED. IN NO EVENT SHALL
THE COPYRIGHT OWNER OR CONTRIBUTORS BE LIABLE FOR
ANY DIRECT, INDIRECT, INCIDENTAL, SPECIAL, EXEMPLARY,
OR CONSEQUENTIAL DAMAGES (INCLUDING, BUT NOT
LIMITED TO, PROCUREMENT OF SUBSTITUTE GOODS OR
SERVICES; LOSS OF USE, DATA, OR PROFITS; OR BUSINESS
INTERRUPTION) HOWEVER CAUSED AND ON ANY THEORY OF
LIABILITY, WHETHER IN CONTRACT, STRICT LIABILITY, OR
TORT (INCLUDING NEGLIGENCE OR OTHERWISE) ARISING IN
ANY WAY OUT OF THE USE OF THIS SOFTWARE, EVEN IF
ADVISED OF THE POSSIBILITY OF SUCH DAMAGE.
PAGE 106
BACK TO
TOC
Warranty Information
CaptiveWorks Inc warrantees the CW-3000HD to be free from
defects in the workmanship or materials for a period of 12 months
from the date of purchase by the consumer. If at any time during the
warranty period the product exhibits a defect in material or
workmanship, CaptiveWorks will repair or replace the unit within a
reasonable period of time.
CaptiveWorks' liability under this warranty is limited to servicing or
adjusting the system returned to CaptiveWorks or it's authorized
service centers. The warranty shall be limited to the hardware in the
system and does not cover damage or malfunctions caused by
misuse, abuse, improper use of third party software, insufficient care
or other act beyond the control of CaptiveWorks.
The findings of CaptiveWorks or it's service centers shall be in final
in all matters.
Technical Support
Official CaptiveWorks CW-3000HD support site: http://www.CaptiveWorks.org
The official support site contains the source code and a technical support forum. Official
updates will be found through the CW-3000HD update facility or directly on the official
support site.
Email support can be reached at [email protected]
PAGE 107
BACK TO
TOC