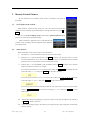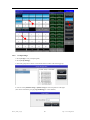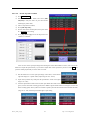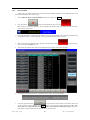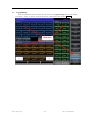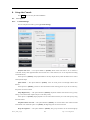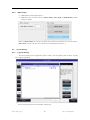
1
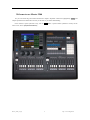
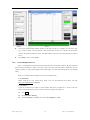
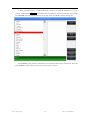
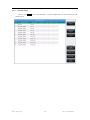
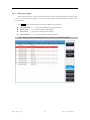
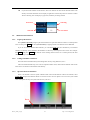
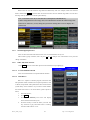
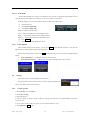
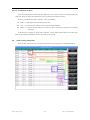
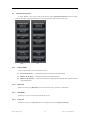
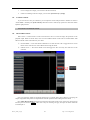
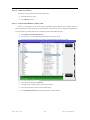
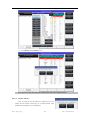
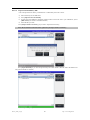
Master 2500 Lighting Controller User Manual Ver. 3.016 CODE ELECTRONIC CO., LTD. http://www.codelight.com Contents 1. Setting up Master 2500 ............................................................................................................................2 1.1. Front Panel of Master 2500...........................................................................................................2 1.1.1. Attribute keys.....................................................................................................................2 1.1.2. External Display Keys .......................................................................................................2 1.1.3. Quick Record Key..............................................................................................................2 1.1.4. Function Keys.....................................................................................................................2 1.1.5. Selection keys ...................................................................................................................3 1.1.6. Numeric keypad .................................................................................................................4 1.1.7. Grand Master.....................................................................................................................4 1.1.8. Playback Section ................................................................................................................4 1.1.9. Control Wheels...................................................................................................................5 1.1.10. Touch Screen......................................................................................................................5 1.1.11. USB Interface ....................................................................................................................5 1.1.12. Other Devices ....................................................................................................................5 1.2. The Rear Panel of Master 2500 ....................................................................................................6 1.2.1. DMX universes...................................................................................................................6 1.2.2. VGA Interface ....................................................................................................................6 1.2.3. Audio Input ........................................................................................................................6 1.2.4. MIDI Interface ...................................................................................................................6 1.2.5. Power Supper .....................................................................................................................6 1.3. Clear All Data.................................................................................................................................7 1.4. Backup and Load Show.................................................................................................................8 2. Patch ........................................................................................................................................................10 2.1. Assign fixture addresses ..............................................................................................................10 2.2. Patch fixtures ...............................................................................................................................10 2.2.1. Patch Dimmers.................................................................................................................10 2.2.2. Patch Intelligent Fixtures ................................................................................................11 2.2.3. View the Patch..................................................................................................................14 2.2.4. Setting moving light .........................................................................................................15 3. Manual Control Fixtures .......................................................................................................................16 3.1. View outputs of the Console........................................................................................................16 3.2. Select Fixtures ..............................................................................................................................16 3.3. Manual Control fixtures..............................................................................................................17 3.3.1. Light up the fixtures ........................................................................................................17 3.3.2. Change attributes of fixtures ..........................................................................................17 3.3.3. Special control of attributes ............................................................................................17 3.3.4. Seriatim light up fixtures.................................................................................................18 3.3.5. Other functions of locate .................................................................................................18 3.3.6. Clear Options ...................................................................................................................19 3.4. Groups ..........................................................................................................................................19 3.4.1. Create a group..................................................................................................................19 3.4.2. Group manage..................................................................................................................20 3.4.3. Select groups.....................................................................................................................21 -i- i Contents 4. Preset .......................................................................................................................................................22 4.1. Edit Preset ....................................................................................................................................22 4.2. Preset manage ..............................................................................................................................23 4.3. Use Preset .....................................................................................................................................23 5. Shape Effects...........................................................................................................................................24 5.1. How Effect Generator Works .....................................................................................................24 5.2. Using Effect ..................................................................................................................................24 5.3. Effect Parameters ........................................................................................................................25 5.3.1. Effect Size, Speed and Spread..................................................................................................25 5.3.2. Speed Group, Block Group and Width ...................................................................................25 5.4. Effect Direction ............................................................................................................................25 5.5. Delete Effect .................................................................................................................................26 5.6. User Effect ....................................................................................................................................26 5.6.1. Save User Effects.......................................................................................................................26 5.6.2. Delete All User Effects ..............................................................................................................26 6. Playback ..................................................................................................................................................27 6.1. Playbacks and Playback Pages ...................................................................................................27 6.2. Playback Edit Menu ....................................................................................................................27 6.3. Cue ................................................................................................................................................28 6.3.1. Save mode of cue ..............................................................................................................28 6.3.2. Run mode of Cue..............................................................................................................28 6.3.3. Save Cue ...........................................................................................................................28 6.4. Chase.............................................................................................................................................29 6.4.1. Create a Chase .................................................................................................................29 6.4.2. Edit Chase.........................................................................................................................30 6.5. Senior setting of Playbacks .........................................................................................................34 6.5.1. Playback Priority .............................................................................................................35 6.5.2. Music Trigger Function ...................................................................................................35 6.5.3. Playback start time ..........................................................................................................35 6.5.4. Set effect of fader .............................................................................................................35 6.5.5. Lock faders .......................................................................................................................35 6.5.6. Playback Legend ..............................................................................................................35 6.6. Run Playback ...............................................................................................................................36 6.7. Playback Parameters...................................................................................................................37 6.7.1. Release Mode....................................................................................................................37 6.7.2. Direction ...........................................................................................................................37 6.7.3. Run Mode .........................................................................................................................37 6.7.4. Loop run ...........................................................................................................................37 7. Senior Function.......................................................................................................................................38 7.1. Off Function .................................................................................................................................38 7.2. Copy Function..............................................................................................................................38 7.3. Delete Function ............................................................................................................................38 7.4. Move Function .............................................................................................................................38 7.5. Lock the Console..........................................................................................................................39 7.6. Record Macro Show ....................................................................................................................39 - ii - ii Contents 7.6.1. External Midi ............................................................................................................................40 7.6.2. Internal Clock ...........................................................................................................................41 7.7. Legend Manage............................................................................................................................43 8. Setup the Console ...................................................................................................................................44 8.1. User options..................................................................................................................................44 8.1.1. Console Manage ...............................................................................................................44 8.1.2. Select Language................................................................................................................45 8.2. Misc. Setting .................................................................................................................................45 8.2.1. Date and Time ..................................................................................................................45 8.2.2. MIDI Setting.....................................................................................................................46 8.3. System Manage ............................................................................................................................46 8.3.1. Upgrade Manage..............................................................................................................46 8.3.2. Manage Fixture Library..................................................................................................47 9. Touch Options.........................................................................................................................................51 10. Technological Specification ..................................................................................................................52 - iii - iii Welcome to use Master 2500 For your convenient usage, the manual divided into 9 chapters. Important contents are highlighted by shading and sample explanations are added when necessary for the sake of your better understanding. In the manual, a square symbolizes a key, such as Enter. While a square brackets symbolizes soft-keys on the touch screen, such as [Playback Parameters]. Master_2500_en.pdf 1 http://www.codelight.com 1. Setting up Master 2500 1.1. Front Panel of Master 2500 1.1.1. Attribute keys There are 9 attribute and 1 Locate keys in this area. Press the same attribute key can turn to page 2 which display other channels. Each page can display 3 channels at most. Users can control fixtures by using the different attribute keys with corresponding Wheels A, B and C. Press Locate twice rapidly, or press Locate once and select [Locate Fixture] to turn on all selecting fixtures and set all channels to default value, such as set Pan and Tilt to 128. Hold Locate, and press attribute key can set those channels to locate value. (Example: hold Locate and press Dimmer can set Dimmer and Shutter channels to their locate value but without changing other channels. Then fixtures will lamp on in the last position.) 1.1.2. External Display Keys There are Up and Down keys, for switching display details which shows on the external monitor. 1.1.3. Quick Record Key Users can quick record the programs and setting by press Store twice rapidly. 1.1.4. Function Keys Master_2500_en.pdf 2 http://www.codelight.com Keyboard —Master2500 offers users a soft-keyboard to input character; Backup — Backup programs and data; Setup — Setup the console; Save to Cue — Save Cue playbacks; Edit Playback — Create or edit Chase playbacks; Edit Preset — Create or edit presets; Patch — Patch fixtures. Off — off function; Copy — copy function; Delete — delete function; Move — move function; The functions on the keys will be introduced in their relevant chapters. 1.1.5. Selection keys The selection part includes options of Group, Fixture, Preset, Effect, Macro and Fixed, together with page switch keys. Each kind of option has 20 pages, and 20 keys for each page. The option details will be shown on the external monitor. Master_2500_en.pdf 3 http://www.codelight.com 1.1.6. Numeric keypad There are 24 keys in the Numeric keypad. The functions will be introduced in the relevant chapter. 1.1.7. Grand Master It contains with a master fader and a Blackout key. 1.1.8. Playback Section Playback section is composed of switch key Playback A/B, page switch keys, playback keys, playback faders, and playback master faders. There are 30 playback pages in Master 2500, each page with 24 faders for editing playbacks, thus 720 playbacks can be saved totally. Users can turn pages by keys ↑ or ↓, while indicator led displays the page number. The playback section can be divided into two parts as playback A and playback B by turn on Playback A/B. Each part with 12 faders can run playbacks in their own page separately. There are keys upon and under each playback faders. Their functions will be introduced in the relevant chapter. Master_2500_en.pdf 4 http://www.codelight.com 1.1.9. Control Wheels Control wheels A, B and C are used for setting attributes of the fixtures or the parameters of movement effect. Wheel D takes with a key which use for setting control values of options, and setting chases velocity. The key in wheel D can be used as Enter or save key when setting options. 1.1.10. Touch Screen There is a 10.4” TFL-LCD touch screen offers soft-keys for operating. Such as selecting fixtures, groups, presets and menu options. 1.1.11. USB Interface Users can use the USB driver to backup the shows or upgrade system version and fixture libraries. 1.1.12. Other Devices Master 2500 has a 12V DC working lamp interface on the top right of the front panel, beside which is a knob for dimming. Master_2500_en.pdf 5 http://www.codelight.com 1.2. The Rear Panel of Master 2500 1.2.1. DMX universes Master 2500 can output 4 universes of DMX signals, each of them can output 512 control channels. The console can send DMX directly to fixtures over A, B, C, D output sockets. “DMX Output A” exports signals of A001 - A512 channels; “DMX Output B” exports signals of B001 - B512 channels; “DMX Output C” exports signals of C001 - C512 channels; “DMX Output D” exports signals of D001 - D512 channels; 1.2.2. VGA Interface There is a VGA interface which allows users to connect a monitor to Master 2500. Users can get more operate information from the external display. 1.2.3. Audio Input Master 2500 can pick up the bass and rhythm of the audio signal to trigger Chase, so that Chase can auto run by the bass rhythm of audio. There are two ways to input the audio signals: one is via a 1/4 inch stereo interface; another one is by the microphone of console. After the stereo jack is connected, the console will use the audio signals from the stereo cable. Otherwise, it will use the microphone to pick up the sound. 1.2.4. MIDI Interface Master 2500 not only can be controlled by MIDI signals, but also can send out MIDI signal to control another one. Please refer to the relevant chapter for further control instruction. 1.2.5. Power Supper Master 2500 can adjust itself to quite a wide voltage range (100-240V AC, 50-60Hz). Thus, it can be used worldwide. If you need to change the fuse, please cut off the power supply for safety operation. Master_2500_en.pdf 6 http://www.codelight.com 1.3. Clear All Data We strongly recommend you to clear all data on the new console, so that you can avoid the unpredictable errors when programming. 1> Press Backup to entry “BACKUP MENU”; 2> Press [New Show]; ① ② 3> Press [Confirm] will clear all data and return to “LIVE SHOW” automatic. Note: All data created by users will be deleted (including the patched fixtures, presets and playbacks). But the system libraries and user libraries will be saved. Users can also press Delete and press [Delete All Data] twice to clear all data. Master_2500_en.pdf 7 http://www.codelight.com ①Press Twice ② 1.4. Backup and Load Show Master 2500 runs closed to a Windows-based operating system internally, so you need to backup your show after programmed. You can turn off the console by the power switch on the rear panel and will not damage the system. But those program operations without backup will be lost when turned off the console. The backup show files can be saved into the internal SD card or external USB driver. You can backup the Show by press Store twice rapidly for a quick save. The show file will be saved into the internal SD card. By this operation, the files will be saved as “defaultShow” and “defaultShow_0” by turns. Users can also define the name of backup file; 1> Press Backup to entry “BACKUP MENU”; 2> If you had inserted a USB driver, press [Disk Source] can switch the directory path between [Internal Disk] and [USB Disk]; 3> Press [Save Show]; 4> Press Keyboard to recall the keyboard and [Enter] to input the name; 5> Press [EXIT] or EXIT to quit the keyboard; 6> Press [OK] or ENTER to save. Master_2500_en.pdf 8 http://www.codelight.com Whatever you save the backup files into the internal SD card or external USB driver. The file of ‘defaultshow’ or ‘defaultshow_0’ will be renewed. We recommend that you backup frequently when programming, so that you will not loose any programs by accident. We recommend that you save the backup in the internal SD card as well as USB driver. So that you can take with the backup files in USB driver, and use them in other Master 2500. Master_2500_en.pdf 9 http://www.codelight.com 2. Patch We will introduce how to patch and setup dimmer channels and fixtures in this chapter; 2.1. Assign fixture addresses; Patch fixtures; View patch; Setup fixture channels. Assign fixture addresses First of all, you have to patch all your fixtures to tell the Master 2500 what fixtures you want to control. When you need to patch, the Master 2500 will offer a free DMX address automatically. You can patch all your fixtures first and check over their patching addresses before assign on the fixtures. You can also assign the wanted DMX addresses on fixtures first, then set the corresponding addresses when patch. 2.2. Patch fixtures To control the intelligent fixtures or dimmer channels, you should patch them on the fixture keys first. Master 2500 has 20 fixture pages, each of which has 20 fixture keys for patching fixtures. Thus, there are maximal 400 fixtures can be patched. 2.2.1. Patch Dimmers Each fixture key can control single or multiple dimmer channels. Press Patch; Press [Patch New Fixture]; Press [Patch Dimmer]. The patch window on the left will show the patched fixtures; Press [A] on “Start DMX Address” option, can find out other outputs (from A to D). Input Value “xxx” to setup the initial DMX address on the blank; you can also use numeric keys or Wheel D to setup the value; Press Wheel D can switch the cursor to option “Unit start number”. Input value “yyy” on the blank; (see photo 1 below) Press Wheel D can switch the cursor to option “Quantity”. Input value “zzz” on the blank. “zzz=1” means to patch a single dimmer channel on No.yyy unit key; and “zzz>1” means to patch a sequence of dimmers each to its own key. The range of dimmers will be patched to sequential DMX addresses; Press [Confirm] to finish patching. The “PATCH SETUP” will be renewed; Master_2500_en.pdf 10 http://www.codelight.com Photo 1 Photo 2 You can also patch multiple dimmer channels on the same unit key. For example, you can set the same “yyy” value on option “Unit start number” when patch dimmer. In that case, if the key which had been patched, the blank will display in Green. The DMX address will increase one after patched. (see photo 2 above) 2.2.2. Press [Exit] to quit to “LIVE SHOW”. Patch Intelligent Fixtures There is a bit different on patching between intelligent fixtures and dimmer channels. Because intelligent fixture has more attributes to control, such as Pan, Tilt, Colour and Gobo, but dimmer channel has only one attribute, intensity. To control the intelligent fixture needs library, you must find out and patch its corresponding library. There are two kinds of fixture libraries for your choice in Master 2500. 1> System library Master 2500 has its own system library inside. Users can download the latest library file from http://www.codelight.com for updating; 2> User library If you can not find out your library in system, Master 2500 offers you multi-way to create or edit your library. (We will introduce you how to create or edit the user library on chapter 8.3) Press Patch; Press [Patch New Fixture]; Press [Used Library = System], can switch to [Used Library = User]; Master_2500_en.pdf 11 http://www.codelight.com ① When patch system library, you can use Wheel D or scroll bar to search the manufacture; or you can recall the soft-keyboard by Keyboard, and input the name of manufacture (You can input the first several words). Press [ENTER] on the soft-keyboard will select on the right option, press [Exit] to quit the soft-keyboard. Press [Confirm] to entry the menu of manufacture and search the needed fixture as the same way above and press [Confirm]. (Channels details will be listed when the model is selected.) Master_2500_en.pdf 12 http://www.codelight.com ② When patch user library, you can select the model directly on touch screen or Wheel D. Press [A] on “Start DMX Address” option, can find out other output options (from A to D). Input Value “xxx” to setup the initial DMX address on the blank; Press Wheel D can switch the cursor to option “Unit start number”. Input value “yyy” on the blank; Press Wheel D can switch the cursor to option “Quantity”. Input value “zzz” on the blank. Press [Confirm] to finish patching, the “PATCH SETUP” will be renewed automatically; Press [Return] and quit to “LIVE SHOW”. Note: The blank will turn RED if the DMX address or unit number was used when setting the “initial DMX address” or “Unit start number”. After patched, the soft-key on touch screen will turn to dark blue, and the model name will be shown on the soft-key. Master_2500_en.pdf 13 http://www.codelight.com 2.2.3. View the Patch Users can press Patch to entry “PATCH SETUP” to check the DMX address or other information of the patched fixtures. Master_2500_en.pdf 14 http://www.codelight.com 2.2.4. Setting moving light Master 2500 allows users to swap or invert Pan and Tilt of the moving lights installed on the stage. So that users can control the moving lights to run as mirror movement more conveniently. Dimmer channels can be inverted as well. Press Patch to entry “PATCH SETUP” can setup the channels of moving lights: [Swap PAN/TILT] -------- to swap the controlling of Pan and Tilt channels; [Invert TILT] -------- to invert the controlling of Tilt channel; [Invert PAN] -------- to invert the controlling of Pan channel; [Invert Dimmer] -------- to invert the controlling of Dimmer channel. Note: All the same model of moving lights will be inverted if invert the Dimmer channel. Master_2500_en.pdf 15 http://www.codelight.com 3. Manual Control Fixtures We will introduce how to manually control fixtures, set attributes, save groups in this chapter. 3.1. View outputs of the Console Master 2500 has a VGA interface on the rear. Users can connect an external VGA computer monitor and check up the DMX outputs or running information by press Up or Down. You can press [External Display setup] and press option [Monitor DMX Port A] to switch if you want to check up different outputs. When you had run a playback or more, on the bottom right of touch screen will display the latest playback and its dimming level and speed rate. 3.2. Select Fixtures Master 2500 offers several ways for users to select the fixtures: 1> Touch Screen --- users can select the fixtures on the touch screen directly. 2> Selection keys --- when the indicator led is on Fixture of “Select” area, press keys from 1 to 20 can select the needed fixtures. If you want to select a serial of fixtures, you can hold the first key and then press the last one. A serial of fixtures will be selected after released. 3> Numeric select --- on “LIVE SHOW”, when the indicator led is on Fixture of “Select” area,input the number can select those fixtures. For example: If you want to select fixtures 1 to 9, you can press keys orderly as 1,THRU,9. The top right of touch screen will display “1~9”. Then press ENTER will select those fixtures; If you want to select fixtures of 1,3,5,7, you can press keys orderly as 1,+,3,+,5,+,7.The touch screen will display “1+3+5+7”. Then press ENTER will select those fixtures; If you want to select a serial of fixtures but without any in it, such as select 1,2,4,5, you can press keys orderly as 1,THRU,5,-,3. The touch screen will display “1~5-3”,Then press ENTER will select those fixtures; Those fixtures being selected display in gray blue on touch screen, while the indicator led of the keys in Fixture of “Select” will turn on. If press the selecting keys again, the soft-keys will change from gray blue to light blue. It means they had ever selected. Master_2500_en.pdf 16 http://www.codelight.com If you had set the channels on the fixtures, select new fixtures will turn off the selected fixtures. The soft-keys of fixtures had been set will display in light blue. It means they had ever selected or edited. The new selecting ones will display in gray blue, means they are being selected. Selecting Non select Non Patch Selected 3.3. Manual Control fixtures 3.3.1. Light up the fixtures Press [Fixture Open/Full] to light up the selected fixtures in open white and move them to a central position. Users can also press Locate and select [Locate Fixture] to light up fixtures. All attributes will be defaulted. If you do not want to default other attributes, you can hold Locate and press attribute key. The channel attributes on that key will be defaulted, but attributes on other keys will keep their latest values. For example: hold Locate, and press Tilt/Pan. Pan and Tilt of the selecting fixtures will be set to central position, but other channels will keep in their own value. 3.3.2. Change attributes of fixtures Select the fixtures and attribute keys and change their value by using Wheels A, B or C. After selected the attribute key, users can also input the number value, then touch the channel name on the touch screen. So that can set the channel value directly. 3.3.3. Special control of attributes There is an absolute color-mix system in Master 2500. If the selected fixtures with tricolor channels, select Colour Mix and press the attributes names on touch screen can call out a palette. Users can select your needed color on the palette directly, the system will auto-mix your color. Press Master_2500_en.pdf 17 http://www.codelight.com Master 2500 can read the channels range data from R20 library files. For example, when users selected fixtures and attribute Colour, press the name on touch screen can call out a channel range table. You can select the range value by Wheel D or touch the options directly. Note: 1. The function can only be used in fixtures which patched with R20 library. 2. Before using Wheel D to select range value, users should notice whether the channel range table with focus on. Otherwise, you may change the speed of the running chase. Focus on displays in a yellow frame. 3.3.4. Seriatim light up fixtures Users can select and control the fixture from a series of selected fixtures one by one. After located a group of fixtures, users can press → or ← to lamp on one of the fixtures one by one and change its attributes. 3.3.5. Other functions of locate Press Locate, users can select other options for more functions except lighting up. 3.3.5.1. Locate Without Pan/Tilt Users can locate the fixtures except Pan and Tilt channels. 3.3.5.2. Run Macro Macro is a sequence of fixtures program, which run with time parameter. Some of fixtures can run special operations, such as Reset, Lamp On/Off. After patched, the macro function from system library will be loaded in. If you want to check whether the fixtures have macro or to run the macro, please operate as follow; 1. Select the fixtures; 2. Press Locate; 3. Press [Macro function]. The screen will display macro functions if the library has; 4. Press the soft-key to select the macro you want. The key will show in gray blue when macro is running, and will resume when it is over. Master_2500_en.pdf 18 http://www.codelight.com 3.3.5.3. Fan Mode The fan effect normally use on Pan or Tilt attributes, but it can also be applied to other attributes such as color-mix. If the fixtures with tricolor channels, you can mix a rainbow by fan effect. We kindly suggest you not to use less than 4 fixtures in order to get a better effect. ① Select the fixtures; ② Press [Fixture Open/Full]; ③ Press [Fixture Align=Off]; There are 3 modes for fixture align: Left ----- Fixtures align fan base on the leftmost fixtures; Right ----- Fixtures align fan base on the rightmost fixtures; Expand ----- Fixtures align fan base on the middle fixtures; 3.3.6. ④ Press Tilt/Pan; ⑤ Set the fan effect using the Wheel A, B or C. Clear Options After finished operated on the fixtures, you can press Clear to clear manual operation. It can clear the upload preset or manual operation when running playbacks. When using clear operation, you can hold Clear and select the options on touch screen to change different modes; 3.4. 1. [Clear All Fixtures] ----- all manual operations will be cleared; 2. [Clear Selected Fixtures] ----- Manual operations of the selecting fixtures will be cleared. Groups One or more fixtures can be grouped for quick selection. The group soft-key will turn brown when it is edited. The group number and name will be shown on the relevant soft-key. 3.4.1. Create a group 1> Press [Group] on “LIVE SHOW”; 2> Press [Save Group]; 3> Select the fixtures; 4> Select a soft-key on ‘Groups’ section. If there was a group in the soft-key, it will remind whether you want to overwrite or not; 5> If you want to create or edit more groups, you can repeat from steps 3> to 4>; 6> Press [Return] or Exit to quit. Master_2500_en.pdf 19 http://www.codelight.com ② ① ③ 3.4.2. Group manage 1> Press [Group] to entry “Group Program”; 2> Press [Group manage]; 3> Select the group want to edit. It will list all the fixtures contain in the selecting group; 4> You can select [Attribute Setup] or [Delete Group] for relevant operation on the right. (You can also rename the group by [Legend Manage] in “LIVE SHOW”) Master_2500_en.pdf 20 http://www.codelight.com 3.4.3. Select groups Master 2500 offers several ways for users to select the groups: 1> Touch Screen --- users can select the groups on the touch screen directly. 2> Selection keys --- when the indicator led is on Group of “Select” area. If you need to select a serial of groups, you can hold the first key and then press the last one, a serial of groups will be selected after released. 3> Numeric select --- on the “LIVE SHOW”, when the indicator led is on Group of “Select” area, input the number can select those groups. For example: If you want to select groups 2 to 5, you can press keys orderly as 2, THRU,5. The top right of touch screen will diasplay“2~5”. Then press ENTER will select those groups; If you want to select groups of 2,4,6,8, you can press keys orderly as 2,+,4,+,6,+,8.The touch screen will display “2+4+6+8”. Then press ENTER will select those groups; If you want to select a serial of groups but without any in it, such as select 1,2,4,5, you can press keys orderly as 1,THRU,5,-,3. The touch screen will display “1~5-3”,Then press ENTER will select those groups; Those groups being selecting display in yellow on touch screen, while the indicator LED of the keys in Group of “Select” will turn on. Master_2500_en.pdf 21 http://www.codelight.com 4. Preset We will introduce how to create and use preset in this chapter. When programming or performing, users always need to add in some attributes, such as color, gobo and so on. In that case, users can save one or more attributes of fixtures on the preset keys. So that you can change attributes rapidly when you are in programming or performing. 4.1. Edit Preset Although each preset key can store all attributes of fixture, it's more convenient to operate the console if you create some presets which only save color, some for gobo and so on. 1> Select the fixtures; 2> Use the attribute keys and attribute wheels to set the needed effect; 3> Press Edit Preset to entry “Preset Edit Menu”; There are some different modes for your different required: Current Attr.: all channels value in the current attribute key of selecting fixtures will be saved. All Attr.: all channels value of selecting fixtures will be saved. Changed Attr.: all channels had been edited of selecting fixtures will be saved. 4> Select a soft-key on preset section; If there is not any data in the soft-key, users can name the preset and set the fade in time. Press [Confirm] to save, the soft-key will turn to dark green. Master_2500_en.pdf 22 http://www.codelight.com If there is something in the soft-key, users can also rename the preset and set the fade in time. Then select [Merge]、[Replace] or [Cancel] to finish operation. Note: Fade in time only for LTP channels. 5> Press [Return] to quit. 4.2. Preset manage Users can rename and set fade in time of preset in the “Preset Manage Menu” 1> Press Edit Preset; 2> Press [Preset Manage]; 3> Select the preset want to edit. It will list all fixtures which can use the preset; 4> Preset [Attribute Setup]. You can edit the name and fade in time of the preset; 5> Press [Delete Preset] can delete the selected preset; 6> Press [Return] to quit. 4.3. Use Preset Master 2500 provides several ways for users to recall the presets. The soft-key of latest selected preset displays in gray green. 1> Select fixtures and recall: users can recall the preset after selected fixtures, those fixtures without selected will not be added in the preset. 2> Non select fixtures and recall: users can recall the preset directly. In this case, all fixtures which can use the preset will be added in the preset. To recall the preset, if you had set the fade in time, it will use the time to fade in the preset; if you had not set any time (default time is 0s), it will recall the preset immediately. However, if you entry a value (0.0~200.0) before recall the preset, it will use the time (seconds) to fade in the preset. ① Input value by numeric keys in “LIVE SHOW”, such as 5; ② Select a preset on touch screen, such as a color mixed by RGB or a location; ③ Then you will find the preset is recalled with fade in 5s. Master_2500_en.pdf 23 http://www.codelight.com 5. Shape Effects Master 2500 offers an effect generator for users to quickly create exciting light shows with the minimum of programming. 5.1. How Effect Generator Works Effect is a series of sequenced repeated movement of preprogram. The representative effects are circle, square, spiral and etc., they are the non repeat random effects. For example, lighting beams move in a round route on the stage. When you run an effect, the fixtures will work according to present setup. If the effect is applied to pan and tilt attribute of the fixtures, the center of effect will depend on the present location of pan and tilt. By changing pan and tilt position, the overall effect will show on the stage. Effect generator can also be applied to other attributes of fixtures. You can use the effect generator to create various colours, gobos, irises, and many other changes. Each effect can be used to produce a regular change for one attribute. 5.2. Using Effect 1. Select the fixtures and light up; 2. Press [Effect]; 3. Select effects on soft-keys. When you want to select effect, you can search by their types. Default option is [All Effects]. You can get other options by press the soft-key. Those effects in selecting will display in “Current Load Effects”, for your convenient editing later; Master_2500_en.pdf 24 http://www.codelight.com Those different types of effect include Intensity, Position, Colour and Beam Effects. The basic point of effect can be modulated. By changing its attribute, to set the size and speed to “0” can get the basic position of effect. Each effect should work with its attribute. The type of effect can not be used if the fixtures do not have that attribute. 5.3. Effect Parameters Each shape effect has its own default parameters. Users can modify the parameters to create various effects. 5.3.1. Effect Size, Speed and Spread When you had selected an effect, [Effect attribute 1] offers parameters of ‘Effect Size’, ‘Effect Speed’ and ‘Effect Spread’ for your setting. If several effects are running, you can select each of them in “Current Load Effects” to edit one by one. 5.3.2. The minimum size or speed is 0. It can stop the fixtures,however the effect is still active. Spread can make the effects more impressive. Speed Group, Block Group and Width Press [Effect attribute 1] can switch to [Effect attribute 2], which offers ‘Speed Group’, ‘Block Group’ and ‘Width’ for your setting. The ‘Speed Group’ can divide the selecting fixtures into ‘n’ groups. Each group of fixtures runs in the same velocity. After set the ‘Speed Group’, the ‘Spread’ will be disabled. In order to get the effect of ‘Block Group’. The value on Spread should not in 0. The ‘Block Group’ can set the close fixtures on the value to run in the same velocity. 5.4. The ‘Width’ is coming soon. Effect Direction Effect direction can be inverted by [Effect Direction]. Master_2500_en.pdf 25 http://www.codelight.com 5.5. Delete Effect Users can delete the useless effect from the selected effects: 1. [Delete Effect] --- you can choose and delete any one from the selected effects, others will keep running. 2. [Delete All Effect] --- delete all the selected effects. 5.6. User Effect After created a new shape effect you can save it to ‘User Effect’ so that you can use the same effect in other fixtures in future. 5.6.1. Save User Effects ③ ② ⑤ ④ ① 5.6.2. 1. Select the Shape Effects and finished setting; 2. Select [Edit user Effect]; 3. Select a soft-key on the list of ‘User Effects’; 4. Entry the name for your shape effect on the window and [Confirm]; 5. Press [Return] to exit edit. Delete All User Effects Select [Delete All User Effects] can delete all the user effects you had saved. Note: If you want to delete one of the user effects, you can use Delete function and select the right key on the Effect on selection part. Master_2500_en.pdf 26 http://www.codelight.com 6. Playback We will introduce how to save and edit Playbacks in this chapter. 6.1. Playbacks and Playback Pages There are two kinds of playback in Master 2500: Cue and Chase. Usually, they are operated manually. A Chase comprises of one or several steps. Cue equal to a scene, it may contain shape effects. Master 2500 has 30 playback pages, each of which has 24 playback faders for programming, thus totally 720 playbacks can be saved. Each playback fader can save as a Cue or a Chase. Those 24 Playback faders can be divided into two parts (Playback A and B) when the key Playback A/B is on. It allows users to run 24 Playbacks at the same time in this section. There is a Fixed part for playbacks on selection section. It has 20 pages, each of which has 20 keys for programming, thus totally 400 playbacks can be saved. Playbacks can be output by the same key in different pages. But maximum output 20 playbacks at the same time. 6.2. Playback Edit Menu Users can press Edit Playback to entry “Playback Edit Menu” to find out those saved playbacks details from the list. The number of Playback display in “PxA/y”, “PxB/y” and “FPx/z”. Thereinto, A and B means the sections of Playback A and Playback B. “Px” means the page number of the playback; while “y” means which fader is; and “z” means which Fixed key is. Besides, you can find functions of playback type, total steps, priority level, link mode, fader effect and so on from the menu. Master_2500_en.pdf 27 http://www.codelight.com 6.3. Cue 6.3.1. Save mode of cue Record All Stage ----- All fixtures in stage will be saved whatever they are being selected or not. Record Mode = Fixture ----- All attributes of selecting fixtures will be saved. Record Mode = Changed Attr. ----- Only the changed attributes of selecting fixtures will be saved. This function makes cues in different attributes can be run synchronously. 6.3.2. Run mode of Cue Mode 1 -- Enable fade in time only. If the times are set to 0,value of HTP channel depends on fader position. Mode 2 -- Enable both HTP and LTP time. If the times are set to 0,value of HTP channel depends on fader position. Mode 3 -- Enable both HTP and LTP time. If the times are set to 0,values of HTP and LTP channels depend on fader position. 6.3.3. Save Cue ① Select the fixtures; ② Adjust the attributes to create a Scene or an effect; ③ Press Save to Cue in “LIVE SHOW”; ④ Select record mode and run mode you want, select [Playback type=Cue]; ⑤ Press a key upon playback fader or on Fixed to record. Note: If the fader had programmed, users will have options “Replace”, “Merge” or “Save to Last Step” as needed. Master_2500_en.pdf 28 http://www.codelight.com 6.4. Chase 6.4.1. Create a Chase ① Press Edit Playback in “LIVE SHOW”; ② Press a key upon playback fader or on Fixed for editing chase; ③ Select the fixtures; ④ Set a scene by attribute keys and wheels; ⑤ Press [Rec. Mode] to select a record mode you want; Rec. Mode = Fixture ----- all attributes of fixtures will be saved. Rec. Mode = Channel ----- only the changed attributes of fixtures will be saved. This function makes fixtures in different attributes can be run synchronously. Rec. Mode = Stage ----- all fixtures in stage will be saved whatever they are selecting. ⑥ Press the twinkling playback key for saving step (or press [Save Step]); ⑦ Repeat steps from ③ to ⑥ till the end. Press Edit Playback to exit. Master_2500_en.pdf 29 http://www.codelight.com Besides, users can create chase by cues. ① Press Save to Cue in “LIVE SHOW”; ② Select record and run mode you want, select as [Playback type=Chase]; (At this time, indicator led of Edit Playback will twinkle.) ③ Press a key upon playback fader. The top right of touch screen will display “Current PLBK=n” (“n” means the number of playback fader); ④ Select the fixtures and set a scene by attribute keys and wheels; ⑤ Press the playback key which indicator led is on again to record, the top right of touch screen will display “Total Steps=1”; ⑥ Repeat steps from ④ to ⑤ till the end. Press Edit Playback or Save to Cue to quit. 6.4.2. 6.4.2.1. Edit Chase Edit chase step ① Press Edit Playback in “LIVE SHOW”; ② Select a Chase you want to edit; ③ Select the fixtures and set a new scene; ④ Select the Chase step needs to be edited; ⑤ Select the record mode you want; ⑥ Press [Save Step]. Press [Overwrite Step] to take place the old step; Press [Merge Step] can add it into the original step; Press [Save to last step] will add a new step; ⑦ Press Edit Playback to quit when finished. Master_2500_en.pdf 30 http://www.codelight.com 6.4.2.2. Insert a chase step ① Press Edit Playback in “LIVE SHOW”; ② Select a Chase to be edited; ③ Select the needed fixtures; ④ Set a scene by attribute keys and wheels; ⑤ Select a step you want to insert. For example, if you want to insert into 2nd step, then select step 2; ⑥ Press [Insert Step], then the serial number of step displays in 1.5; ⑦ Press [Renumber] to realign the number; ⑧ Press Edit Playback to quit when finished. ① ③ ② Master_2500_en.pdf 31 http://www.codelight.com 6.4.2.3. Delete a chase step ① Press Edit Playback in “LIVE SHOW”; ② Select a Chase to be edited; ③ Select a step to be deleted; ④ Press [Remove Step]; ⑤ Press [Renumber] to realign the number; ⑥ Press Edit Playback to quit. 6.4.2.4. Edit Chase time After created a new chase, you will have a default time for it. You can amend the global time to change its running speed. The operation will set a same time for all the steps. If you want different times for each step, you have to set them in the chase. After adjusted step time, you can set the “step time type” as needed. There are 6 runtime options for each Chase: 1. Wait in----the latency time of the chase from the beginning to fade in the first step. 2. Fade in----the fade in time for HTP channels when the chase begins. 3. Wait out---- the latency time of the chase from the end to fade out the step. 4. Fade out---- the fade out time for HTP channels when the chase stops. 5. LTP Wait----the latency time between the beginnings of one step to the beginning of next LTP fade in step. 6. LTP Fade----the fade in time for all LTP channels of chase. 6.4.2.4.1. Set the global time of Chase ① Press Edit Playback; ② Select a Chase need to be edited; ③ Press [Edit Global Time]; ④ Set the value on the needed options; ⑤ Press ENTER to save setting. Master_2500_en.pdf 32 http://www.codelight.com 6.4.2.4.2. Set the step time of Chase ① Press Edit Playback; ② Select a Chase to be edited, and select [Edit Playback] to entry the chase. Or press the relevant twinkling key of the chase; ③ Select a step need to be edited; ④ Press [Edit Step Time]; ⑤ Set the value on the needed options, then press wheel D or ENTER to save setting; ⑥ Press [Step Time Type] can set the step time to use “Global” or “Internal”. Users can also set the speed percentage when running the Chase. When faded in a chase, users can use the Wheel D to adjust the speed directly. If you need to adjust other Chase speed, then you have to hold Shift and press the needed playback key to set the chase at current: ① Roll the Wheel D to set the speed percentage of the Chase, on the bottom right will displays as: “Speed=100%”(adjust range at 10%~500%) ② Input value by numeric keys and press the speed frame to set the value (input range at 10~500); ③ Press the speed frame to make it turn red, then press Wheel D to make it turn green (it is the start mark of setting speed). Press Wheel D again and the frame turn red again (it is the end mark of setting speed). Then system will calculate a speed by the time slot between start mark and end mark (range at 10~500). Press the speed frame again to quit setting. 1> Master_2500_en.pdf 2> 3> 33 http://www.codelight.com 6.4.2.5. Link Mode of Chase Users can set the link state of each chase step. When Link = ON, it means it will go on running after the end of this step. However, when Link=OFF, the step will stop, until the next running instruction. There are 3 link modes for Chases: “Internal”, “Auto” and “Manual”; Inside ---- Chase steps run by link setting of each steps. Auto ---- No matter the link setting is, chase will keep running automatic. Manual ---- No matter the link setting is, the chase will pause on each step, until get the next running instruction. If chase mode is in ‘Manual’ or ‘Inside’ with ‘Link=OFF’. The key under playback fader can be used as goto function when playback had faded in. Press it once means to run one step. 6.5. Senior setting of Playbacks There are many options for users to edit playback parameters for each playback in “Playback Edit Menu”. Master_2500_en.pdf 34 http://www.codelight.com 6.5.1. Playback Priority [Playback Priority] option allows users to set the running priority level of different playbacks. The option can be set into options such as very low, low, normal, high and very high. Each new playback is defaulted in normal. The function is very useful for performing. When some of fixtures are running in a playback, run a new playback with the same fixtures will cover the old one if the new one is in the same priority or higher. However, if the priority of new playback is lower than the old one, the old playback will not be covered. 6.5.2. Music Trigger Function [Trigger Mode] option allows users to set the chase runs by bass. 6.5.3. Playback start time If you had ever edited the running time for the chase, the time may affect the beginning running effect. For example, if you had set the fade in or wait time, the fixtures will use the time to move from the last position to the first step, and then start to run the chase each time. You can skip the affect by option [Skip start run time] as “Fade”, “Wait” or “Fade+Wait”. 6.5.4. Set effect of fader If there is a Cue saved with shape effects, users can set the fader trigger with 4 modes by option [Effect By Fader] as “Size By Fader”, “Speed By Fader” or “Size+Speed By Fader”. 6.5.5. Lock faders Users can lock the playback by option [Lock Page For Fader]. Once select the option, the playback will be locked in the page where locates in. You can run the same program by the same fader even though in other pages. Note: Once the playback was locked. Playbacks in the same fader in other pages will be unavailable. 6.5.6. Playback Legend Select a playback in the list can rename the playback by option [Playback Legend]. The name of the playback will be displayed on the bottom right when fade in the playback. The name can be displayed in the external monitor too. We strongly recommend you to connect with a monitor when performing. So that more running details can be read on. Master_2500_en.pdf 35 http://www.codelight.com 6.6. Run Playback It’s easy to run a Playback. Select the Playback page, and fade in the Playback. When running several playbacks, on the bottom right of touch screen will display the latest playback which had been faded in. You can switch the running playback to present state by press Shift along with the key upon playback fader or the Fixed key. The velocity of chase at present state can be adjusted by Wheel D. Running state in the page(s) of playbacks can be displayed if you had connected with an external monitor. The keys upon or under playback faders have different functions for running playbacks. 1> Keys upon playback faders can be used for blackout or pause. The key can be used as “Pre-locate” function before the playback is faded in. Press the key upon the fader. All LTP channels of fixtures will be set to the first scene of playback with lamp off. Once the fade in the playback, the fixtures will lamp on and begin to run the playback from the first scene immediately. If you had faded in a playback, the keys upon are used for pause. If there is a chase, fixtures will stop on the last step. If it is a shape effect, the fixtures will stop on the basic point of the shape. 2> Keys under playback faders can be used for flash or manual control. The key under playback fader can be used as flash if the playback is not faded in. Press and hold the key can run the playback as the same as fade in the playback fully. Once the key is released, the playback will stop running. If there is a chase had faded in, the key can be used for manual control. Which to run one step of the chase. Note: The setting of ‘Playback GO+/GO-‘ in ‘Console Manage’ should be in [Enable], and the chase steps should be set as “Inside” with Link Off or Link mode is Manual. Master_2500_en.pdf 36 http://www.codelight.com 6.7. Playback Parameters In “LIVE SHOW”, users can also edit the playback by option [Playback Parameters]. Some of setting inside are the same as “Playback Edit Menu”, and we will introduce other functions in this part. Chase 6.7.1. Cue Release Mode Users can set the release mode for playback as follow: 6.7.2. [Freeze All Attribute] ---- All attribute channels will be hold except HTP channel; [Release All Attribute] ---- Resume all attributes to the beginning state; [Release Only Pan/Tilt] ---- Resume Pan and Tilt to beginning state and hold other attribute channels except HTP channel Direction If there is a Chase, press [Direction] option can set the chase runs “Forward” or “Backward”. 6.7.3. Run Mode If there is a Cue, you can set one of run modes for the cue. 6.7.4. Loop run If there is a Chase, press [Loop run] option can change the run mode to [Stop in Last Step]. Master_2500_en.pdf 37 http://www.codelight.com 7. Senior Function We will introduce the senior functions such as Off, Copy, Delete, Move, Legend and Record show in this part. 7.1. Off Function Press Off in “LIVE SHOW” to entry off function. [Off effects] --- close the shape effect on the selecting fixtures, those ones not being selected will not be affected; [Off all effects] --- the shape effect will be closed no matter the fixtures are selected; [Off selected Fixtures] --- lamp off and stop the selecting fixtures; [Release All Playbacks] --- release all running playbacks. Besides, when Off is on, you can release a single playback by press the key under playback fader. But you have to fade in again if you want it runs again. 7.2. Copy Function Copy function can be used in groups, presets and playbacks. Press Copy and select a root, then select a target: 7.3. 1. If it is an empty plaster target, you can achieve the simple function of copy and plaster; 2. If there is something in the plaster target, you can select [Overwrite it] or [Merge]; 3. If the copy and plaster root and target are playbacks, there is an added option [Copy to Last Step]. The function makes you more convenient to compose several cues to be one chase. Delete Function You can delete the data edited on Master 2500. Press Delete to entry delete function. 1. Delete All Data --- It can delete all edited data on Master 2500. The operation equal to system clearance. 2. Delete All Preset --- It can delete all presets you edited. 3. Delete All Playbacks --- It can delete all playbacks you programmed. 4. Delete All Group --- It can delete all groups you edited. Besides, you can delete a single fixture, group, preset, user effect, macros show or playback by delete function. The function should be operated by keys. 7.4. 1. Select the option Group, Fixture, Preset, Effect, Macro or Fixed at selection, you can delete a single fixture, group or preset by press the key twice. 2. If you want to delete a playback, you can press the key upon the fader twice directly. Move Function It is easy to move the group, preset or playback to other position on Master 2500. Press Move and select a root, then select a target: Master_2500_en.pdf 38 http://www.codelight.com 7.5. 1. If it is an empty move target, you can achieve the move function; 2. If there is something in the move target, you can select [Overwrite it] or [Swap]. Lock the Console If you want to leave away for a moment, you can input the console with password in numbers or letters in “LIVE SHOW”, and then press [Lock Console]. When the console is locked, any operation is uselessness before input the right password. Note: Restart can unlock the console. 7.6. Record Macro Show Macro show is a function base on time code which for users to record and replay the operation on the playback output. When record the show, users can select different mode of time code as needed. Master 2500 offers two kinds of time code modes for your choice. ① External MIDI ---- This mode needs a MIDI device to offer the time code to trigger the show record. Please set the controller in to ‘Slave Mode’ before using this mode. ② Internal Clock ---- This mode should record and trigger the show record by the clock base on the controller. Users can replay the outputs of playbacks and presets by recall the macro show. When it is replaying, the outputs of playbacks and presets are completed followed the operations when making the macro show. Press [Show Record Mode] on touch screen and select the mode of time code. At this time, the option on selection part will switch to Macro. Then select a key for recording. The gray bar upon will shown where the record had put in. Master_2500_en.pdf 39 http://www.codelight.com 7.6.1. External Midi In this mode, you should connect the controller with external MIDI equipment via the MIDI cable first. And the controller should be set to ‘Slave mode’. 1. Select [Timecode Mode = External MIDI] and select a record key on Macro; 2. Press the soft-key , it will turn red what means start to record . Play the music on external equipment. At this moment, the internal clock will change into the audio time code. It shows as followed. 3. Put out the playbacks or presets follow the music as you need. The playbacks can be the ones from faders and fixed buttons. If there is a chase playback, you may use the function of GOTO to record. 4. Fade out all playbacks when the music finished. And press the soft-key show record. Press [confirm] to save. 5. After saved, the window will list all the used playbacks and presets as well as the operations. 6. The location of macro show and its record mode will be shown on top of the window. 7. Users may press the soft-key on record window when need to run the macro show. But can also press the corresponding key on Macro section to run the macro if had exited the window. The macro show is in ready state after selected the soft-key, and wait for the MIDI signal to play. (Shown as photo below.) At the moment, the time bar still show in internal clock. Master_2500_en.pdf 40 to stop and save http://www.codelight.com 8. Users may play the music on external equipment again. The macro show will run the playbacks or presets follow the time code as when recording. The internal clock will change into audio time code when begin playing the music. The operation state will be shown on the touch screen if it is in record window. 9. The macro show will be closed automatic when finished playing. 7.6.2. Internal Clock This mode can be used in the situation when users do not have the midi cable or midi device. 1. Select [Timecode Mode = Internal Clock] and select a record key on Macro; Master_2500_en.pdf 41 http://www.codelight.com 2. Press the soft-key , it will turn red means start to record . The macro show begins to record once this soft-key turns red. The time code is based on the internal clock which shows as follow. 3. Put out the playbacks or presets follow the music as you need. The playbacks can be the ones from faders and fixed buttons. If there is a chase playback, you may use the function of GOTO to record. 4. Fade out all playbacks when the music finished. And press the soft-key show record. Press [confirm] to save. 5. After saved, the window will list all the used playbacks and presets as well as the operations. 6. The location of macro show and its record mode will be shown on top of the window. 7. Users may press the soft-key on record window when need to run the macro show. But users can also press the corresponding key on Macro section to play the macro if had exited the record window. 8. The macro show begins to run immediately once select the soft-key. 9. The macro show will close automatic when finished playing. to stop and save Note: The macro show begins to record once press the record key. If there is a time slot without any operation at the beginning, it will run out as the fact when you begin to run the macro show. You may skip it on console setting if you do not need the time slot. Master_2500_en.pdf 42 http://www.codelight.com 7.7. Legend Manage Users can rename all the selection options on touch screen. Press [Legend Manage] and select the soft-key on “Fixtures”, “Groups” or “Presets” section on touch screen. Then entry the name and press ENTER. Rename Master_2500_en.pdf 43 http://www.codelight.com 8. Setup the Console Press Setup, users can entry the “SETUP MENU”. 8.1. User options 8.1.1. Console Manage You can setup the run mode by pressing [Console Manage]: Playback GO+/GO- --- The option defaults in [Enable]. When chase link mode is set as manual or ‘Link=Off’, the key under playback fader can be used as GO+ or GO- function (Go+ or Go- depend on the setting of chase direction). If the option is in [Disable], if the playback fader is not fully output, the keys under the faders can be used as intensity flash output. Quick Palette --- The option defaults in [Enable]. Users can recall presets even though without select fixtures. If the option is in [Disable], you have to select the fixtures before recalling presets. If you do not select any, the presets can not be recalled. Shape High Priority --- The option defaults in [Disable]. Playbacks with the same fixtures run by priority setting; it will run the latest output if they are in the same priority. If the option is in [Enable], shape playbacks can run at the same time if they are in the same priority using the same fixtures. Skip MacroShow start time --- The option defaults in [Disable]. It is used for macro show which recorded with internal clock. When the option is in [Enable], the beginning time slot will be canceled. Keep the brightness --- The option defaults in [Disable]. The group of fixtures will be switched light up Master_2500_en.pdf 44 http://www.codelight.com one by one from function of ‘Seriatim light up fixtures’. (Refer to chapter 3.3.4) If the option is in [Enable], the fixtures will keep on after lighted up. Master A/B enable --- The option defaults in [Disable]. The master faders of playback A and B control the intensity of playbacks. After switched into [Enable], the master faders of playback A and B control the outputs of the playbacks on each part. Users can fade in and stand by the whole part of playbacks and fast switch two parts of playbacks by each master fader by this function. Page for Touch Screen --- The option defaults in [Disable]. User can turn pages on selection part while the option on touch screen will stay at its own page. You may select the right options in different pages at the same time. While the option is in [Enable], the option on touch screen will turn pages together when you turn pages on selection part. Users can reset all options here by [Set to Default]. 8.1.2. Select Language Users can set display language of the console in Chinese or English. 8.2. 8.2.1. Misc. Setting Date and Time Users can set the local time which will display on top of touch screen. Master_2500_en.pdf 45 http://www.codelight.com 8.2.2. MIDI Setting ① MIDI Channel: setting range from 0-15. ② MIDI mode: You can set the console in [Master Mode], [Slave Mode] or [MIDI Disable]. Default setting is in disable. (When in [Master Mode], the console is the master device which can control the slave one; and while in [Slave Mode], console is the slave device which can be controlled by master device.) 8.3. System Manage 8.3.1. Upgrade Manage The option provides users to upgrade the system or library. You can upgrade system or library via USB driver when you get the file. You can check up the system version and date of library here. Master_2500_en.pdf 46 http://www.codelight.com 8.3.2. Manage Fixture Library If you can not find the fixture library from system, you can create or edit user library on the console. When entered the option, it will list all loaded or created user libraries on the left. Select any one will list its channel details, you can edit it again. 8.3.2.1. Create new fixture ① Press [Add New Fixture]; ② Input the “Fixture Name”, “Manufacture” and “DMX channels”, then press [Confirm]; ③ The fixture information will list on the left. And will list all channels when you select the fixture name. The number of rows equal to your setting of DMX channels; ④ Select row “n” and press [Channels Attributes]; ⑤ The call out window will list different kinds of attribute names on the left which is relevant to attribute keys. You will find many attribute names in each of them. Then you can select the channel name, set DMX channel (fine channel or not), set locate value and set the key pages and wheels to control; ⑥ Press [Confirm] to finish setting on that channel; ⑦ Repeat steps from ④ to ⑥ until finish all the channel list; ⑧ Press [Return] and select [Confirm] to save your setting. Master_2500_en.pdf 47 http://www.codelight.com 8.3.2.2. Delete User library The option can only delete user library but system library. 8.3.2.3. ① Select the name list on left; ② Press [Delete] to delete. Import and edit library from system If there is a system library which can be used, but something should be adjusted. You can import the system library and adjust it for actual using. (Note: The modulation on import library will not change the initial library in system. But those pre-setting functions in system library will be deleted after adjusted.) ① Press [Import From Internal Library]; ② The window will list all manufacture names from system library on left; ③ Search and select the manufacture, all libraries of the manufacture will be list on right; ④ Select the library then press [Confirm]; ⑤ The import library will be listed on “List of User Fixtures”; ⑥ Select the import library and select the needed channel; ⑦ Press [Channels Attribute] and amend the information of the channel; Master_2500_en.pdf 48 http://www.codelight.com ⑧ Press [Return] and [Confirm] to save. Note: All preset, range table and macro details will be delete after edited the library. 8.3.2.4. Export Library Users can export all the user libraries to USB driver. You can backup the user libraries which may use in another Master 2500. Default name of backup file is “codeusrlib.bin”. Master_2500_en.pdf 49 http://www.codelight.com 8.3.2.5. Import external library File Users can import the user library “codeusrlib.bin” or R20 library file to the console. ① ② ③ Put in the library file to USB driver; Press [Import From external File]; System will read USB driver automatic and the window will list all files in your USB driver; (Press [Disk Source] can switch to read Internal Disk.) ④ Select the file you want; Press [Import whole User Library] if you want to import the user library; Note: All user libraries in the list will be replaced if you import whole User Library. Press [Import R20 File] if you want to import library file in R20 format. (The info area at the bottom will turn green if R20 file is selected.) ⑤ Press [Return] and quit to “List of User Fixtures”. Master_2500_en.pdf 50 http://www.codelight.com 9. Touch Options There are three default options for users selecting on touch screen. Which are Fixtures, Presets and Groups. Users can set other options on ‘Select’ part to touch screen for more convenient selecting. For example, we can hold the key Macro and select ‘Fixtures’ on blue bar of touch screen. And hold the key Fixed and select ‘Presets’ on blue bar of touch screen. Hold the Macro and select here Master_2500_en.pdf Hold the Fixed and select here 51 http://www.codelight.com 10. Technological Specification Total 2048 channels with 4 individual optical isolated DMX outputs. Maximum 400 Units for patching all kinds of Fixtures. 10.4"TFL-LCD touch screen for operating. Offers a VGA interface for external monitor to display more edited information. Up to 1120 playbacks can be programmed which controlled by 24 playback faders × 30 pages together with 20 playback keys × 20 pages. Totally 44 playbacks can be run simultaneous. Offers 4 optical encoders for details setting. Up to 400 Groups. Up to 400 Presets. Up to 400 Macro Shows can be saved which allow to be triggered by external MIDI time code or internal clock. Up to 400 user-defined shape effects. Shortcut area provides a quick way for selecting Fixtures, Groups, Presets, Custom Shape Effects, Macro Shows or Fixed Playbacks. Color-mix system provides a color palette for users to control fixtures with RGB or CMY channels more conveniently. Shape Generator provides various effects which can be modified with different parameters. User-defined shape effects can be saved for convenient calling out again. Provides 5 levels of precedence for playbacks. Playbacks can be divided into two sections as, Playback A and Playback B. Allows playbacks on Playback A or B stand by output. Options on touch screen can be changed into other display options. Provide over 8000 Libraries in system. Enable users to edit System Library or create custom Library. Freely download Upgrade Version and System Library. An internal electronic disk allows user to backup show data. USB interface allows users to backup shows in external disk. Provide MIDI in and out interfaces to connect and work with other consoles. Option: 12V auxiliary light. Power supply: AC100-240V, 50-60Hz. Size: 650mm × 490mm × 130mm. Net weight: 19Kg approx. Master_2500_en.pdf 52 http://www.codelight.com