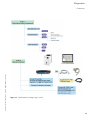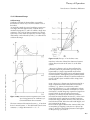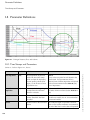
1
User’s Manual ASL 5000, SW 3.5, Rev.2 © IngMar Medical, Ltd. 2015 This page intentionally left blank User’s Manual ASL 5000, SW 3.5, Rev.2 © IngMar Medical, Ltd. 2015 2 User’s Manual ASL 5000, SW 3.5, Rev.2 © IngMar Medical, Ltd. 2015 Legal Information Product Warranty Educational tools and test instruments manufactured or distributed by IngMar Medical Ltd., are fully warranted, covering materials and workmanship, for a period of one year from the date of shipment, except for products with stated warranties other than one year. IngMar Medical reserves the right to perform warranty service(s) at its factory, at an authorized repair station, or at the customer's installation. IngMar Medical's obligations under this warranty are limited to repairs, or at IngMar Medical's option, replacement of any defective parts of our equipment, except fuses and batteries, without charge, if said defects occur during normal service. Claims for damages during shipment must be filed promptly with the transportation company. All correspondence concerning the equipment must specify both the model name and number, and the serial number as it appears on the equipment. Improper use, mishandling, tampering with, or operation of the equipment without following specific operating instructions will void this warranty and release IngMar Medical from any further warranty obligations. The above is the sole warranty provided by IngMar Medical, Ltd. No other warranty, expressed or implied, is intended. Representatives of IngMar Medical are not authorized to modify the terms of this warranty. For factory repair service, call: Toll free: 1-800-583-9910 International: (412) 441-8228 Facsimile: (412) 441-8404 or contact us via e-mail at:[email protected] Our shipping address: IngMar Medical, Ltd. 5940 Baum Blvd Pittsburgh, PA 15206 USA Please note that a valid return merchandise authorization (RMA) no. is always required before sending in any products for repair, calibrations, or updates. Limitation of Liability IngMar Medical Ltd.'s liability, whether arising out of or related to manufacture and sale of the goods, their installation, demonstration, sales representation, use, performance, or otherwise, including any liability based upon above defined product warranty, is subject to and limited to the exclusive terms and conditions as set forth, whether based upon breach of warranty or any other cause of action whatsoever, regardless of any fault attributable to IngMar Medical, and regardless of the form of action (including, without limitation, breach of warranty, negligence, strict liability, or otherwise). THE STATED EXPRESSED WARRANTIES ARE IN LIEU OF ALL OTHER WARRANTIES, EXPRESSED OR IMPLIED, INCLUDING, WITHOUT LIMITATION, WARRANTIES OF MERCHANTABILITY, FITNESS FOR ANY PARTICULAR PURPOSE, OR NONINFRINGEMENT. IngMar Medical, Ltd. shall not be liable for, nor shall buyer be entitled to recover, any special incidental or consequential damages or for any liability incurred by buyer to any third party in any way arising out of or relating to the goods. Patents The device is protected under US patent 5975748 which it uses under exclusive license . Trademarks ASL 5000™, RespiSim™, andQuickLung® are trademarks and registered trademarks of IngMar Medical, Ltd., respectively Windows® and MS-DOS® are registered trademarks of Microsoft Corporation. LabVIEW™ is a trademark of National Instruments Corporation. OxSim™ is a trademark of Pronk Technologies All other trademarks or registered trademarks are property of their respective owners. Copyright © 1998 - 2015, IngMar Medical, Ltd. No parts of this document may be reproduced, stored in a retrieval system, translated, transcribed, or transmitted, in any form, or by any means, without identifying its authorship as IngMar Medical, Ltd. 3 Software License Agreement Acknowledgement of this license agreement is also part of the host software installation process: LICENSE AGREEMENT BY INSTALLING AND USING THE SOFTWARE, YOU INDICATE ACCEPTANCE OF THE FOLLOWING TERMS AND CONDITIONS. ENTIRE AGREEMENT YOU ACKNOWLEDGE THAT YOU HAVE READ THIS AGREEMENT AND UNDERSTAND THIS AGREEMENT (THE “AGREEMENT“) IS THE FINAL, COMPLETE AND EXCLUSIVE STATEMENT OF THE ENTIRE AGREEMENT BETWEEN INGMAR MEDICAL, LTD (“INGMAR“) AND YOU. THIS AGREEMENT SUPERSEDES ANY PRIOR AND CONTEMPORANEOUS PROPOSALS, PURCHASE ORDERS, ADVERTISEMENTS, AND ALL OTHER COMMUNICATIONS IN RELATION TO THE SUBJECT MATTER OF THIS AGREEMENT, WHETHER ORAL OR WRITTEN. NO TERMS OR CONDITIONS, OTHER THAN THOSE CONTAINED IN THIS AGREEMENT, AND NO OTHER UNDERSTANDING OR AGREEMENT WHICH IN ANY WAY MODIFIES THESE TERMS AND CONDITIONS, SHALL BE BINDING UPON INGMAR UNLESS MADE BY A WRITTEN AGREEMENT, EXECUTED BY DULY AUTHORIZED REPRESENTATIVES OF BOTH INGMAR AND YOU. 2. NO WARRANTY ON SOFTWARE OR DOCUMENTATION. INGMAR LICENSES THE SOFTWARE AND DOCUMENTATION SOLELY ON AN “AS IS“ BASIS WITHOUT WARRANTIES OF ANY KIND, SUCH AS WARRANTIES OF MERCHANTABILITY OR FITNESS FOR ANY PARTICULAR PURPOSE. THE ENTIRE RISK OF QUALITY AND PERFORMANCE IS WITH YOU. IF EITHER THE SOFTWARE, DOCUMENTATION OR BOTH PROVE TO BE DEFECTIVE, YOU ASSUME THE ENTIRE COST OF ALL SERVICING, CORRECTION OR REPAIR. REMEDY FOR DEFECTIVE MEDIA Your sole and exclusive remedy in the event of a defect in a warranted item is expressly limited to replacement of the defective media. To receive a replacement USB flash drive, you must send the defective flash device, with proof of purchase, to IngMar at the address indicated below, postage pre-paid and postmarked within the Warranty Period. IN NO EVENT SHALL INGMAR BE LIABLE FOR ANY OTHER OBLIGATIONS OR LIABILITIES INCLUDING, WITHOUT LIMITATION, LIABILITY FOR DAMAGES (WHETHER GENERAL OR SPECIAL, DIRECT OR INDIRECT, CONSEQUENTIAL, INCIDENTAL, EXEMPLARY), OR FOR ANY CLAIM FOR THE LOSS OF PROFITS, BUSINESS OR INFORMATION, OR DAMAGE TO GOOD WILL EVEN IF INGMAR HAS BEEN ADVISED OF THE POSSIBILITY OF SUCH DAMAGES. IN ANY EVENT, INGMAR'S MAXIMUM LIABILITY SHALL BE LIMITED TO THE AMOUNT OF THE PURCHASE PRICE. U.S. GOVERNMENT RESTRICTED RIGHTS LEGEND The Software and Documentation have been developed exclusively at private expense, and are provided with RESTRICTED RIGHTS. Use, duplication or disclosure by the Government is subject to restrictions as set forth in subparagraph (c) of the Rights in Technical Data and Computer Software clause at DFARS 252.227-7013 or subparagraphs (c) (1) and (2) of the Commercial Computer Software-Restricted Rights at 48 CFR 52.227-19, as applicable. IngMar is the Contractor, and is located at 5940 Baum Blvd, Pittsburgh, PA 15206. EXPORT RESTRICTIONS The program or underlying information or technology may not be installed or otherwise exported or re-exported where prohibited by law. MISCELLANEOUS This Agreement shall be considered severable, and if for any reason any term or condition is determined to be invalid, illegal or unenforceable under current or future law, such invalidity shall not impair the operation of, or otherwise effect, the valid terms and conditions of this Agreement, so long as the intent of this Agreement is maintained. This Agreement shall be governed by, construed and enforced in accordance with the laws of the Commonwealth of Pennsylvania, with the exception of its conflict of law provisions. The parties consent to the personal jurisdiction of the Commonwealth of Pennsylvania and agree that any legal proceedings arising out of this Agreement shall be conducted solely in such Commonwealth. No action, regardless of form, arising out of this Agreement may be brought by either party more than one (1) year after a claim has accrued. FreeDOS License The FreeDOS operating system running on the ASL5000 CPU is distributed in acccordance with the provisions of the GNU GPL (General Public License) granted by the FreeDOS Project (www.freedos.org). 4 User’s Manual ASL 5000, SW 3.5, Rev.2 © IngMar Medical, Ltd. 2015 SOFTWARE AND DOCUMENTATION LICENSE 1. IngMar hereby grants you a non-exclusive, non-transferable license to use the enclosed computer instrumentation software (the “Software“) and any associated printed documentation (the “Documentation“), subject to the limitations set forth in this Agreement (the “License“). You may use the Software only on one central processing unit with one input terminal at any time. All right, title and interest to the Software and the Documentation are, and shall remain, in IngMar and/or its licensor. You have no right of access to the source code of the host system software (the software running on your PC) or the ASL 5000 firmware (the software running in the ASL 5000 instrument). You are entitled to updates or upgrades of the Software or Documentation only as set forth in your purchase agreement for the ASL 5000 instrument. 2. You may not alter, assign, decompile, disassemble, distribute, lease, modify, reverse engineer, sublicense, transfer or translate in any way the Software or Documentation except as provided in the following clauses: i) You may permanently and simultaneously transfer all of the Software, Documentation and the License if: a) you deliver to the transferee the Software and Documentation (including updates and upgrades) supplied by this Agreement; b) notify IngMar in writing of such transfer; and c) destroy any archival/backup copy. A transfer immediately terminates the License. You agree that the transferee must expressly accept all terms and conditions of this Agreement. 3. YOU MAY NOT COPY THE SOFTWARE OR DOCUMENTATION; provided, however, that you may make one (1) copy of the Software for archival/backup purposes. 4. If either the Software or Documentation is used in any way not expressly and specifically permitted by this License, then the License shall immediately terminate. Upon the termination of the License, you shall thereafter make no further use of the Software or Documentation, and you shall return to IngMar all licensed materials, postage prepaid. 5. THE SOFTWARE IS NOT INTENDED TO BE USED FOR ACTUAL ANALYSIS AND DIAGNOSIS OF MEDICAL CONDITIONS OF HUMANS OR ANIMALS. WARRANTIES 1. LIMITED WARRANTY ON MEDIA. For a period of thirty (30) days following the date of delivery to you as the original licensee, if evidenced by your receipt as such, (the “Warranty Period“) IngMar warrants the Fflash memory device on which the Software is embodied to be free from defects in materials and workmanship under normal use. The warranty is personal to you, and no warranty is made to your transferees. THE FOREGOING WARRANTIES ARE THE SOLE WARRANTIES ON THE DISKETTES AND ARE IN LEIU OF ALL OF WARRANTIES OF ANY KIND, SUCH AS WARRANTIES OF MERCHANTABILITY OR FITNESS FOR ANY PARTICULAR PURPOSE. What is New in SW 3.4/3.5 Window Manager. Interactive Contrtol Panel The Interactive Control Panel has been updated to now allow also the use of pre-configured dynamic patient models (time-varying parametes). The scenarios folder has been revamped to include many more patient conditions and -types useful to educators in mechanical ventilation management. Figure 0-1 ASL Software Window Manager User’s Manual ASL 5000, SW 3.5, Rev.2 © IngMar Medical, Ltd. 2015 Beginning with SW 3.4, all main features of the host PC software are organized under a unified interface based on tabs called the Window Manager. Individual windows can be “un-tabbed“ by a simple drag operation. TCP Waveform Broadcast Traces for the primary analog input and the value of O2 (vol%) have been added to the set of waveforms that can be pulled from this network broadcast. In addition, there is now the choice of raw or processed data (the latter including parameters such as flow, as well as the volume correction factors for different volume standards). Figure 0-2 ICP - Patient Library Tab The Script Editor received a greatly simplified user interface for saving and activating scripts. The less frequently used Tokens are now separated into a normally hidden column. Additional Breath Parameters A number of new parameters has been added to the brbfiles generated during a simulation. These are: ftot (BPM) Pmin PmusTP PEEP_1 auto PEEP_2 auto EEP_1 tot PEEP_2 tot Ext Insp Work Ext Insp Elastic Work Ext Insp Res Work Ext Exp Work Ext Exp Vent WorkExt Exp Res Work Ext Exp Heat Production Pmean Insp Pmean Exp Pbaro Ambient Temp Wall Temp PawTP300 (cmH2O*ms)PawTP500 (cmH2O*ms) Figure 0-3 Script Editor Saving 5 RespiSim Software for the ASL 5000 is fully prepared for our newest option, RespiSim (Patient Ventilator Interaction). For more information on RespiSim, please visit our website at: http://ingmarmed.com/RespiSim.htm or consult this manual’s chapter "RespiSim", page 86. There is also a separate addendum to this manual covering RespiSim in significant detail. RespiSim optionally includes a hardware interface to the most commonly used ICU ventilators for capturing their data for the purpose of a true 360-degree view of all interactions between patient and ventilator. For a list of compatible ventilator models, please see "RespiSim Ventilator Interface Kit (VIK) Compatibility and Communications Settings", page 143. A trial version that allows playback of a recorded simulation session sample can be accessed via the RespiSim tab on the Window Manager. Please contact sales at 412 441-8228 (extension 107) or at [email protected] for pricing. To facilitate multi-stage simulation scenarios, an Instructor Dashboard has been added in version 3.4, as well as a Virtual Vital Signs Monitor to display patient status to students. This display can also be made visible on a remote iPad or other computer. Figure 0-5 RespiSim Vital Signs Monitor Optical Output for Oxygen Saturation An interface to supply values of SpO2 to a Pronk OxSim™ has been added to Software 3.4. This enables RespiSim based simulations to realistically interface with ventilators that take advantage of saturation readings and/or heart rate for their advanced control modes. Figure 0-4 RespiSim Instructor Dashboard 6 User’s Manual ASL 5000, SW 3.5, Rev.2 © IngMar Medical, Ltd. 2015 Figure 0-6 Oxygen Saturation Output RespiPatient™ As part of the RespiSim system, IngMar Medical has added a dedicated torso manikin (RespiPatient™) to help with training for more realistic scenarios: — Cardio-pulmonary resuscitation – lifelike recoil during chest compressions — Intubation - orotracheal, nasotracheal, combitube, LMA placement, difficult airway (tongue edema) — Bag-valve-mask ventilation techniques — Tension pneumothorax — Identification of tracheal deviation and jugular vein distension — Either right or left tension pneumothorax (Needle decompression with familiar “hiss” sound) — Chest tube insertion (Recognition of correct position in the 5th intercostal space) — Blunt surgical skills — Cricothyrotomy — Tracheotomy CO2 production for capnography. User’s Manual ASL 5000, SW 3.5, Rev.2 © IngMar Medical, Ltd. 2015 RespiPatient and ASL 5000 can be placed together on a dedicated cart that then creates a fully mobile platform for ventilator management training, called the RespiSim Pro. (see Figure 0-6 on the next page). Test Automation Interface (TAI) The TAI enables users to integrate the ASL 5000 Breathing Simulator into their proprietary systems for automated device testing. The TAI makes programmatic, remote control of the ASL 5000 a reality. The TAI specifications for programmers are available upon request. A functional diagram for TAI can be found on page 90. Figure 0-7 RespiSim Pro System 7 3.3 Starting the ASL 5000 ................................24 Limitation of Liability ................................... 4 4 Operation .............................25 Patents ......................................................... 4 4.1 4.1.1 4.1.2 4.1.3 4.1.4 4.1.5 4.1.6 Getting Started...........................................25 License Keys ...............................................25 Screen Navigation ......................................25 Welcome Window and Window Manager .25 Project File Tool .........................................26 Full Choice Welcome Window. .................28 Window Manager Tabs, Overview .............29 4.2 Modeling Using the Simulation Editor Environment ..................31 Working with the Simulation Script Editor ..31 Manipulating Scripts...................................32 Using Tokens..............................................33 Modeling Using a Scenario Script ...............34 Step-by-Step Script Generation Without Using a Scenario Script .................35 Step 1. Select Simulation Parameter Set ......35 Lung Model Types ......................................36 Advanced Model Settings Compensations ...........................................36 Advanced Model Settings Time Varying Parameters (TVP) ..................37 Advanced Model Settings Parabolic/Linear Resistors ...........................39 Advanced Model Settings - Independent Inspiratory and Expiratory Resistor Settings .39 Advanced Model Settings Non-Linear Compliances ............................40 Step 3. Choose a Patient Effort Model .........41 Step 4. Save Simulation Parameter Set ........42 Legal Information ....................4 Product Warranty ........................................ 4 Trademarks .................................................. 4 Copyright..................................................... 4 Software License Agreements....................... 5 What is New in Software 3.4/3.5 ................. 6 3.2.5 1 Operator Safety.....................12 1.1 1.1.1 1.1.2 1.1.3 Definitions................................................. 12 Warnings and Caution Statements ............ 12 Nomenclature............................................ 12 Typing Conventions ................................... 12 1.2 1.2.1 1.2.2 Intended Use ............................................. 12 Intended Use of the RespiSim Option ........ 12 Use of the Smart Pump™ Mode ................. 13 1.3 General Precautions ................................ 13 2 Introduction .........................14 2.1 Overview .................................................. 14 2.2 Available Options...................................... 14 4.2.10 2.3 System Features......................................... 15 4.2.11 2.4 Host Computer Requirements ................... 16 2.5 2.5.1 2.5.2 2.5.3 Simulator Software.................................... 17 Software Components ................................ 17 Software Structure...................................... 17 Remote Control of the Host Software ......... 17 3 Preparation ...........................18 3.1 Software Installation on the Host PC ..................................................... 18 RespiSim.................................................... 18 4.2.1 4.2.2 4.2.3 4.2.4 4.2.5 4.2.6 4.2.7 4.2.8 4.2.9 4.2.12 4.2.13 4.2.14 4.3 3.1.1 3.2 3.2.1 3.2.2 3.2.3 3.2.4 8 Connections .............................................. 20 Electrical Connections ............................... 20 Communication Setup via Ethernet ............ 20 Communication Setup via serial connection (RS-232/USB) .......................... 21 Changing the Default Communications Port............................................................ 21 4.3.5 4.3.6 4.3.7 4.3.8 Running Simulations From the Run Time Home Display ............................43 Initializing the ASL 5000 Simulator.............44 Starting a Simulation...................................44 Pausing a Running Script ............................45 Display Options of the Run Time Home Window...........................45 Lung Fill Indicator Window ........................47 Auxiliary Parameter Displays ......................47 Modifying Waveform Displays ...................48 Stopping a Simulation.................................49 4.4 4.4.1 Using the Virtual Ventilator .......................50 Concept of the Virtual Ventilator ................50 4.3.1 4.3.2 4.3.3 4.3.4 User’s Manual ASL 5000, SW 3.5, Rev.2 © IngMar Medical, Ltd. 2015 3.2.6 Communication Setup for the RespiSim Option ........................................21 Pneumatic Connections ..............................22 Contents 4.5 Running Simulations Using the Interactive Control Panel (ICP) ..................51 Lung Model Parameters Tab .......................53 Spontaneous Breathing Parameters Tab ......54 Trends Tab .................................................55 Closed Loop Vt Tab ....................................56 Closed Loop MV Tab..................................57 Closed Loop “CO2Y“ Tab...........................58 Patient Library Tab .....................................59 7 Test Automation Interface ......90 7.1 TAI Overview.............................................90 8 Using ASL Utilities .................92 8.1 Exporting Data Files ...................................92 8.2 AUX Channel Resampling ..........................93 8.3 RespiSim File Conversion ...........................93 4.6 Breath Detection / Real-Time Analysis Window .......................................60 8.4 Using the Patient Flow Data Processor ...................................................94 4.7 TCP Broadcast Configuration .....................61 8.5 4.8 Run Time Home Report Generation .....................................62 Using the Pressure Profile Resampling Utility......................................96 4.9 Working With the Analog Inputs ...............63 9 TCP Data Broadcast ..............97 4.10 Working With the Digital Outputs .............63 9.1 Breath Parameter Broadcast.......................97 4.11 Exiting the ASL Software ............................64 9.2 Waveform Broadcast..................................97 5 Data Analysis ........................66 10 Options ................................98 5.1 Post-Run Analysis Main Menu ...................67 10.1 Simulator Bypass and Leak Valve Module (SBLVM) ........................................98 5.2 Process Data (Blue Button) ........................68 10.2 5.3 Display Data Selections (Green Buttons) .........................................70 Advanced Graph Analysis Tools: The Graph and Cursor Palettes ...................71 Breath by Breath Display ............................73 Multi-Parameter Graph ...............................74 Loop Display ..............................................76 Continuous Time-Based Data ....................77 Trend Graph Display ..................................79 Using the Cylinder Temperature Controller (CTC) ......................................100 10.3 Using the Fast Oxygen Measurement Option (FOM)....................100 10.4 Using the Auxiliary Gas Exchange Cylinder (AGEC).......................................101 10.5 Chest Rise Module....................................101 4.5.1 4.5.2 4.5.3 4.5.4 4.5.5 4.5.6 4.5.7 User’s Manual ASL 5000, SW 3.5, Rev.2 © IngMar Medical, Ltd. 2015 5.3.1 5.3.2 5.3.3 5.3.4 5.3.5 5.3.6 5.4 5.4.1 5.4.2 5.4.3 Display Performance Analysis Selections (Yellow Keys) .............................................81 WOB Analysis Display ..............................81 Trigger Analysis Display .............................82 Servo Control Performance Display ............84 6 RespiSim ..............................86 6.1 6.1.1 6.1.2 6.1.3 RespiSim Screens .......................................86 RespiSim Interface Overview ......................86 RespiSim Modes of Operation ....................87 Role of Training Modules Within the RespiSim Simulation Environment ..............88 6.2 Use of RespiSim with Dedicated Educational Modules.................89 Philosophy of Instructor-Driven Multi-stage Clinical Simulations .................89 Role of the Instructor ..................................89 Instructor and Student Aids.........................89 Authoring Training Modules .......................89 6.2.1 6.2.2 6.2.3 6.2.4 10.6 10.6.1 10.6.2 10.6.3 10.6.4 10.6.5 Preemie Lung Cylinder Kit........................102 Intended Use ............................................102 Assembly ..................................................102 Software Adjustments ...............................102 Firmware Adjustments ..............................103 Operation with Attached Preemie Cylinder ......................................103 10.6.6 Unmounting the Preemie Cylinder............103 10.7 Mobile Cart Option..................................104 11 Troubleshooting ..................105 11.1 Common Errors ........................................105 12 Maintenance........................106 12.1 Instrument Identification .........................106 12.2 Service and Calibration Intervals .............106 12.3 Firmware Upgrade ...................................107 12.4 Schematic Overview ................................108 9 Theory of Operation ............109 13.1 13.1.1 13.1.2 13.1.3 Introduction to Ventilatory Mechanics ... 109 Normal Lungs .......................................... 109 Abnormal Lungs ...................................... 115 Energetics ................................................ 117 13.2 13.2.1 13.2.2 13.2.3 Introduction to Modeling ........................ 119 Model Background .................................. 119 Limitations of the Model .......................... 119 Realization of the Model.......................... 119 13.3 13.3.1 13.3.2 13.3.3 Ventilatory Model Types ......................... 120 Single-compartment Model...................... 120 Dual-compartment Model ....................... 120 Model Enhancements .............................. 120 13.4 13.4.1 13.4.2 13.4.3 13.4.4 13.4.5 13.4.6 13.4.7 Patient Effort Model ................................ 121 Passive Model.......................................... 121 Flow Trigger ............................................ 122 Sinusoidal Breath Profile .......................... 122 Trapezoidal Breath Profile ....................... 123 Patient Backing Off .................................. 123 User-defined Breath Profile ...................... 125 External Analog Input ............................. 125 13.5 SmartPump™ Mode ................................ 126 13.6 Theory of the Virtual Ventilator ............. 126 13.7 Patient Model Library............................. 128 14 Parameter Definitions ..........130 14.1 Time Stamps and Parameters .................. 130 14.2 Parameters in the *.brb-(Breath Parameter) File .................. 131 14.3 Data File Parameters ............................... 139 15 Support Resources ..............140 16 Technical Data ....................141 16.1 Performance Specifications ..................... 141 16.2 Electrical Specifications........................... 144 16.3 Physical Specifications ............................ 144 16.4 Software Specifications ........................... 144 16.5 Environmental Specifications .................. 144 Index ..................................146 List of Figures .....................149 10 User’s Manual ASL 5000, SW 3.5, Rev.2 © IngMar Medical, Ltd. 2015 13 User’s Manual ASL 5000, SW 3.5, Rev.2 © IngMar Medical, Ltd. 2015 This page intentionally left blank 11 Operator Safety Definitions Intended Use 1 Operator Safety For correct and effective use of the product it is mandatory to read and to observe all instructions, WARNINGS, and CAUTION statements in this manual. If the product is not used as instructed, the safety protection provided may be impaired. 1.1 Definitions Items from the drop-down menus of the host software are indicated by use of a bold font, e.g.: Open Script Software windows (or tabs) in the user interface are designated in italics and bold font, e.g.: Breath Detection/RT-Analysis Since tabs on the main Window Manager screen can be “torn off“ and turned into separate windows, the terms window and tab are used interchangeably at times in this manual. 1.1.1 Warnings and Caution Statements WARNING ! Indicates a potentially harmful condition that can lead to personal injury. CAUTION ! Indicates a condition that may lead to equipment damage or malfunction NOTE: Indicates points of particular interest or emphasis for more efficient or convenient operation. 1.1.2 Nomenclature Definitions of breath parameters as they are calculated in the ASL 5000 Analysis Software can be found under "Parameters in the *.brb-(Breath Parameter) File", page 131. 1.1.3 Typing Conventions For easy recognition within a sentence, file names are typed in italic font, e.g.: ...\ASL5000\vars\example.sct Buttons and controls in the software user interface are designated with <...>, e.g. : <EXIT> Drop-down menus are shown as <File> 12 Intended Use The IngMar Medical ASL 5000 is a breathing simulator for ventilator demonstrations and evaluations, inservices, and respiratory staff training. It enhances the educational value of patient parameter modeling by employing computer graphics to visualize patient ventilator interaction similar to today's advanced intensive care ventilators. With appropriate software (test scripts), the ASL 5000 may be used for ventilator performance verification (see also "Test Automation Interface", page 90). When using the device for this purpose, one has to bear in mind, however, that the design of modern ventilators is complex and these devices incorporate a great variety of features and performance parameters. It is therefore mandatory to always follow ventilator manufacturers' instructions and recommendations regarding performance verification procedures. IngMar Medical, Ltd. does not recommend any specific ventilator test or calibration procedures and no portion of these instructions shall be construed as doing so. The purpose of the breathing simulator within the context of ventilator performance verification is solely to assist in implementing test procedures mandated or recommended by the ventilator manufacturer. WARNING ! Do not use the ASL 5000 as a ventilator. The capability of moving tidal volumes of gas that is implemented in the ASL 5000 is not intended to be used for any kind of treatment of humans or animals. 1.2.1 Intended Use of the RespiSim Option RespiSim is intended to create a fully integrated respiratory simulation experience for training students in the subjects of mechanical ventilation and ventilator User’s Manual ASL 5000, SW 3.5, Rev.2 © IngMar Medical, Ltd. 2015 Throughout this manual and in the software, the word “patient“ is used occasionally to describe a simulated patient as defined by the lung model settings. This will correspond to the use of “patient” in ventilatory patient monitoring in that the lung model is a representation of a patient receiving ventilatory assistance. 1.2 Operator Safety General Precautions management. It gives the educator the ability to capture data from a real ventilator as well as from the ASL 5000 Breathing Simulator and to mark and annotate events as well as display patient vital signs on a separate monitor. Replay of simulation recordings assists in debriefing sessions or can be used for classroom instruction. RespiSim is intended to bring the advantages of medical simulation (accelerated, immersive learning, training with “permission to fail”) to respiratory care education. Preconfigured Curriculum Modules form an integral part of this new method of instruction. WARNING ! 1.3 General Precautions CAUTION ! Electrical Supply: Connect instrument only to a properly grounded wall outlet providing 100 - 240 V AC, 50 - 60 Hz. WARNING ! Electric Shock Hazard: Always disconnect from line power before opening ASL 5000. - NOT FOR USE ON A PATIENT Do not operate ASL 5000 when it is wet due to spills or condensation. Never sterilize or immerse the device in liquids. WARNING ! CAUTION ! Electromagnetic Interference: Do NOT use the ASL 5000 in patient rooms or other areas where life supporting equipment is in use. 1.2.2 Use of the Smart Pump™ Mode In addition to the applications of the ASL 5000 as a breathing simulator (using R, C, patient effort), it may also be used as a flow or volume waveform generator, assisting, e.g., in tests performed in the development of devices for the delivery of pharmaceutical aerosols. User’s Manual ASL 5000, SW 3.5, Rev.2 © IngMar Medical, Ltd. 2015 CAUTION ! The ventilator data acquisition and storage system of RespiSim is not intended to monitor, chart, or store data coming from actual patients or for the purpose of assisting in clinical decisions regarding actual patient CAUTION ! Do not allow aerosols to contaminate the cylinder of the ASL 5000. Equipment malfunction may result. For applications requiring the “inhalation“ of substances, always use accessory 31 00 600, the “Auxiliary Gas Exchange Cylinder (AGEC)“. WARNING ! Explosion Hazard: Do NOT use the ASL 5000 in the presence of flammable anesthetics. Use of this instrument in such an environment may present an explosion hazard. Always use dry air or oxygen with the ASL 5000. “Rainout“ inside the cylinder may impair its function and may eventually damage the simulator. Please contact IngMar Medical for the necessary procedures if operation with humidified gas is intended (requires heater - CTC option or filter). CAUTION ! Do not operate the ASL 5000 if it appears to have been dropped or damaged. WARNING ! Fire Hazards related to the use of oxygen: When using the ASL 5000 with elevated concentrations of oxygen (ventilators set to FiO2 > 21%), observe all precautions applicable to the use of oxygen indoors. • • • • • • Always use extreme caution when using oxygen! Oxygen intensely supports any burning! No smoking, no open fire in areas where oxygen is in use! Always provide adequate ventilation in order to maintain ambient O2 concentrations < 24 %. Always secure O2 cylinders against tipping, do not expose to extreme heat. Do not use oil or grease on O2 equipment such as tank valves or pressure regulators. Do not touch with oily hands. Risk of fire! Open and close valves slowly, with smooth turns. Do not use any tools. 13 Introduction Overview Available Options 2 2.1 Introduction Overview The IngMar Medical ASL 5000 (Active Servo Lung) is the first and most advanced representation of a novel concept in lung “analogs”. Whereas traditional lung simulators are either passive or require an external device to provide the functionality of spontaneous breathing, it is an integral part of the ASL 5000’s representation of respiratory mechanics. The device is based on a piston moving inside a cylinder that is computer-controlled to accomplish motion. The movement of the piston is governed by the basic equations for gas exchange in a ventilated and/or spontaneously breathing patient. Please note that there are no actual springs or orifices in the system, nor is a flow sensor required. The simulation is performed very accurately by executing the necessary calculations at a high rate (>2000 Hz) and by moving the piston accordingly to generate the appropriate response. Figure 2-2 ASL 5000 with SBLVM and PC Figure 2-1 Functional Overview Resistance is defined by dP = R • dV/dt, so the piston is moved at a speed of dV/dt = dP/R. Different values for resistance can be selected during inspiration and expiration. Resistor settings for the value of Rt (resistance of the trachea, or single resistor in the system, respectively) can additionally be chosen as linear or parabolic. Parabolic resistors have been the choice for most physical resistors due to the fact that implementations of linear resistors require flow to be laminar over the whole range of flows in use. The simulator avoids those difficulties and allows you to choose either types. For more details, see "Advanced Model Settings - Parabolic/ Linear Resistors", page 39. 14 2.2 Available Options Options that can be added to the base system include: • Simulator Bypass and Leak Valve Module (SBLVM) • Fast Oxygen Measurement (FOM) • Cylinder Temperature Controller (CTC) • Auxiliary Gas Exchange Cylinder (AGEC) The ASL 5000 also forms the basis for IngMar Medical’s RespiSim Mechanical Ventilation Training workstation, which adds software and hardware to the base unit: • RespiSim software option (the framework for multistage scenario simulations) • RespiSim Ventilator Interface Kit (VIK) for capturing ventilator information (modes, alarms, etc.) • Optical Oxygen Saturation Simulator (O2S2), and • RespiPatient, a high-fidelity respiratory torso-manikin, including CO2 production, and scenario-based auscultation sounds (optional). User’s Manual ASL 5000, SW 3.5, Rev.2 © IngMar Medical, Ltd. 2015 Compliance is simulated by moving the piston according to dV = dP • C. This relationship between pressure and volume can even be made non-linear for the purpose of better representing the S-shaped p/V response curve of a human patient. The simulator is housed in a desktop enclosure, similar to that of a “tower“-style personal computer. Its functions are controlled via a host PC that is connected to the simulator by a Local Area Network (LAN) physically removed from the host PC. Alternatively, the simulator may be operated via a USB connection (older models use RS-232 with a serial-to-USB converter). A laptop computer (or touchscreen all-in-one PC when the system is mounted on a cart) is included, with preinstalled software to support all functions of the system. Introduction System Features Please refer to "Technical Data", page 141, for ordering information and specifications of the options. The Simulator Bypass and Leak Valve Module is an externally connected system component. It serves two functions. For one, it allows ventilation of a simple test lung (IngMar Medical QuickLung, for example) or breathing bag while no simulation is running on the simulator. In this way, nuisance alarms from connected ventilators are avoided. In addition, the SBLVM also provides a (manual) setting of system leaks at three levels. Fast Oxygen Measurement is based on a paramagnetic oxygen sensor capable of breath-by-breath oxygen analysis. It is completely integrated into the simulator and the data is fully shared with the analysis software. The Cylinder Temperature Controller allows temperature of the simulator cylinder walls to be controlled for calibration-type measurements. The controller operates independently from the host software on the PC, but data on cylinder wall temperature is fully shared with the analysis software. User’s Manual ASL 5000, SW 3.5, Rev.2 © IngMar Medical, Ltd. 2015 The Auxiliary Gas Exchange Cylinder is a bag-in-bottle external accessory and allows the use of the simulator with aggressive aerosols or anesthetic agents as well as humidified gas. Via the new Virtual Ventilator™ feature, the software can be used to demonstrate and evaluate the interaction between a ventilator and a patient without involving the physical hardware (either ASL 5000 or actual ventilator). In this fashion, online training can be performed with students primarily for the benefit of understanding basic concepts of ventilation before they are exposed to a clinical scenario simulation. RespiSim has significantly evolved from sw version 3.3, where it was first introduced, to the current sw version 3.5. It creates a fully integrated respiratory simulation experience for training students in the subjects of mechanical ventilation and ventilator management. It gives the educator the ability... — to control a structured, multi-phase simulation scenario from a dedicated Instructor Dashboard. — to capture data from a real ventilator1 as well as from the ASL 5000 Breathing Simulator via the VIK — to mark and annotate events, and 1 IngMar Medical has partnered with Bridgetech Medical, a specialist in electronic charting systems for respiratory care environments, to integrate data from a wide range of ventilator manufacturers. For more information on Bridgetech Medical solutions for electronic charting, please visit www.bridgetechmedical.com. — to replay the compiled recording during debriefing sessions or for classroom instruction. RespiSim is designed to bring the advantages of medical simulation (accelerated, immersive learning, training with “permission to fail” ) to respiratory care education. Preconfigured Curriculum Modules form an integral part of this new method of instruction. Please see "RespiSim" on page 86 in this manual for more details, as well as the separate RespiSim manual. RespiPatient is a respiratory feature-centered torso manikin with bilateral chest rise and intubation-grade normal and difficult airway. In addition, it allows for training of needle decompression (pneumothorax), chest tube insertion, and cric and tracheotomy procedures. Oxygen Saturation (SpO2) Simulation generates optical signals corresponding to the level of oxygen saturation in the patient model to be fed into an SpO2 monitor or ventilator. The third-party device (OxSim) used for this purpose is connected via RS232/USB directly to the host PC. 2.3 System Features The ASL 5000 allows setting/controlling the following parameters: — Compliance (linear, non-linear) — Resistance (linear, parabolic, mixed, inspiratory and expiratory) — Muscle pressure (for defining spontaneous breaths) as: —pressure trigger (rectangular pressure waveform) —flow trigger (rectangular flow waveform) —sinusoidal breath waveform (with individually adjustable rise, hold, and fall, as well as expiratory effort). Breath suppression in the presence of positive pressure ventilation (Hering-Breuer Effect) is selectable. —trapezoidal waveform (with individually adjustable rise, hold, and fall, as well as expiratory effort).. Breath suppression in the presence of positive pressure ventilation (Hering-Breuer Effect) is selectable. —externally defined waveform, e.g. using tracings of a patient’s esophageal pressure or patient flow, (typically used in conjunction with the flow waveform generator capability of the ASL 5000, see below). In the alternative SmartPump™ mode of operation, the simulator operates as a flow waveform generator, where no R and C are simulated, but system input directly defines flow or volume output. Sinusoidal, trapezoidal, and user-defined flow waveforms are possible (see above). 15 Introduction Host Computer Requirements Parameter sets for simulations are defined using a convenient graphical user interface (GUI) and may be sequenced together as a script of consecutive models to be run for a predefined number of breaths, chosen at will within the context of patient and disease state scenarios, or modified by a user in real time (interactive control). Simulation runs performed using these parameter sets can be analyzed in real-time, generating more than 90 breath parameters that may be displayed during the simulation (see "Parameters in the *.brb-(Breath Parameter) File", page 131). Alternatively, the raw data collected may be (re)analyzed off-line using the ASL 5000 Post-Run Analysis software component described in more detail in the chapter "Data Analysis", page 66, of this manual. Using a binary/ASCII file translation routine (included), the files can also be viewed with a general spreadsheet application, such as Microsoft Excel. Raw data files contain a data stream of up to 512 data points per second (may be scaled down) for pressure and piston position (volume, flow), as well as parameters calculated from the model in use. Lower frequency data on oxygen concentration (if option is installed), barometric pressure, gas and wall temperature will also be saved to the captured breath parameter file. Gas Temperature Measurement is a standard feature installed independent of the Cylinder Temperature Controller (CTC). It provides a way for added accuracy in gas volume calculations. Volume corrections for gas temperature are made automatically in the data analysis package. Test Automation Interface (TAI). Beginning with software 3.4, IngMar Medical has created an API (application programming interface) that allows remote control commands to be embedded in third party software applications for testing and validation of respiratory care devices. For a pdf version of the specification document of this interface, please consult the /documentation subdirectory in the sopftware installation on the PC. 16 Host Computer Requirements The controlling host PC should be at least a 1.5 GHz dual-core or i3-class computer running Windows XP or Windows 7, or Windows 8 operating system software (both 32bit and 64bit versions are compatible). A higher CPU performance is recommended when handling large data sets (TDMS-files generated by RespiSim). Users should also take into account concurrent applications taking up some of the PC’s computing resources. The recommended PC operating systems’ minimum RAM requirements should be met or exceeded. Increasing memory to a level beyond the recommended minimum (to 4GB or 8GB) is typically an inexpensive way to boost performance of a PC as it ensures avoiding time-intensive disk operations which could lead to unacceptable time delays in the real-time operations. The host computer must either feature network connectivity (i.e. an Ethernet network card) or a serial port (default COM1). If the PC is not equipped with a serial port, a USB-to-serial converter (included) may be used for legacy ASL 5000 hardware. We recommend always using the adapter that was supplied with the original purchase of the system, since its performance has been verified. Not all USB-to-serial adapters reliably support the high data throughput required. NOTE: Settings in the Project File need to be adjusted from the host software when using a COM-port different from COM1. A color screen with at least XGA (1024 x 768) pixel resolution is required for the host PC (higher screen resolutions are recommended). Due to the amount of information to be displayed on screen, a smaller screen size would yield unacceptable results and is therefore not supported. Approximately 250 MB of free hard drive space is required for installation of all software components. Data file sets take up approximately 3.5 to 4 MB per minute of simulation at highest resolution waveform capture. TDM-files generated with the RespiSim option use about 15 MB per minute. As with most software applications, a disk that has ample space for recording files will improve application speed and avoid delays that might not be acceptable for real-time calculations by the software. NOTE: LabVIEW allows you to not use the localized operating system’s setting for decimal points, and to override the PC’s settings, always using a decimal point. This setting is used for our compiled host software. User’s Manual ASL 5000, SW 3.5, Rev.2 © IngMar Medical, Ltd. 2015 Automatic Barometric Correction employs a second pressure transducer for the added convenience of having barometric pressure entered automatically into the host analysis software for volume corrections. 2.4 Introduction Simulator Software 2.5 Simulator Software 2.5.1 Software Components The complete software package (including optional components) for the ASL 5000 host computer contains: • System software (Windows DLL) • Virtual instrumentation software (host software) for controlling the simulation, defining its parameters, as well as analyzing the results, comprising a main screen with detachable tabs for: • • • • • • • • • User’s Manual ASL 5000, SW 3.5, Rev.2 © IngMar Medical, Ltd. 2015 • Run Time Controller (the simulation controller interface), with Virtual Ventilator capabilities (if licensed) Simulation Editor (including the Script Editor and nonlinear C editor as well as editors for time-varying parameters) Interactive Control Panel (ICP) Real-Time Breath Analysis Interface Post-Run Data Analysis Interface Utilities Selector for the following components: —Data File Translation utility —Pressure Profile Resampling utility —Patient Flow Data Processing utility —XML Breath Parameter Client example —XML Waveform Parameter Client example —Examples for remote control RespiSim Main (debriefing) Panel RespiSim Instructor Dashboard (Embedded) service software and parameter files performing tests and verification procedures as well as troubleshooting on the Embedded Controller PC . Software license keys (supplied separately), required for accessing full functionality of the software beyond demo mode. NOTE: For firmware upgrades on the ASL 5000 Embedded Controller, please refer to the specific instructions that are delivered with any upgrade and the instructions in section "Firmware Upgrade", page 107. This will assure that the correct procedure is followed for the different versions of firmware currently installed in a unit. NOTE: Serial no’s up to and including 0799 cannot be upgraded to the current firmware level and should first receive a hardware upgrade to the most current CPU. 2.5.2 Software Structure The system software running on the Embedded Controller PC in the instrument is assigned the task of calculating the model and giving the appropriate commands for piston movement in real time at the internal control frequency (2 kHz). It also sends the essential data to the host running the Windows DLL, for displaying parameters during simulation. Data is also passed to the Real Time Analysis routines for storage and breath parameter calculation. An important task of the host software is to initialize the simulator at the beginning of each simulation and to synchronize the instrument and host PC properly before each simulation run. The runtime software module also checks the embedded controller’s resident firmware in the instrument and alerts the user to update if a newer version is found on the host. NOTE: An update is not usually mandatory to run newer host software as long as the installed firmware in the simulator supports version 3.5 of the ASL host software (choose “Ignore“ when the update alert pops up). Certain features for which firmware support from a newer version would be required, might not work in this case. NOTE: Beginning with SW release 3.1, the system uses 32-bit firmware in the ASL simulator (firmware 4.6.xx or higher) which requires a special preparation as part of the upgrade process when applied to an older system with 16-bit firmware. See "Firmware Upgrade", page 107. We recommend contacting IngMar Medical for details on how to perform this upgrade before attempting this on your own. 2.5.3 Remote Control of the Host Software The Virtual Instrumentation Software is a stand-alone LabVIEW™ application. For users who would like to use the device under the control of other test instrumentation software (LabVIEW-based or otherwise), we include the Test Automation Interface API as part of this package. It is automatically installed as a separate executable in a folder \ASL Test Automation Interface 1.0 under the \Program Files (x86) directory. Please refer to the command definitions in the TAI specifications or contact IngMar Medical for details. NOTE: Units with serial numbers above 1500 are already equipped with all connectivity needed for use with IngMar Medical’s RespiPatient. Units with serial numbers beginning with ???? (but below 1500) can be retrofitted with the necessary connector/functionality without CPU upgrade, older units require a more complete upgrade, including a new CPU, for this purpose. Please inquire about pricing. 17 Preparation Software Installation on the Host PC 3 Preparation 3.1 Software Installation on the Host PC Installation is performed by simply running the installer program setup.exe from your USB flash drive on which the software was delivered or from the unzipped file that was downloaded from the cloud. By default, your applications will be created in a folder C:\Program Files\ASL Software 3.5 in the Program Files subdirectory on your C: drive (C:\Program Files (x86) in 64-bit Win7 or Win8). NOTE: The default installation location (c:/program files (x86)\ASL 5000 SW 3.5) has changed from previous versions. Existing parameter files moved from older installations require their (static) scripts to be adjusted to reflect the correct subdirectories. They can either be adjusted manually (using NotePad) or be converted to use tokens. (See "Using Tokens", page 33) NOTE: Throughout this manual, it is assumed that installation has been to the default location. Wherever file paths are indicated, your installation directory may be substituted for the directory name \ASL Software 3.5. Please read the Software License Agreement carefully. Installation of the software indicates your acceptance of the terms of the IngMar Medical and National Instruments End User License Agreements (EULAs) as displayed during the installation of the software. After installation, please launch the software and check that it has been installed properly. NOTE: License keys can be purchased separately (for the Virtual Ventilator option) or are part of the delivery of the RespiSim option. When software is updated through a new download, it is necessary to replace the key after the installation is complete as the key will be reset during a standard installation From the Welcome-tab presented at startup you can make the selection of how to connect to an ASL 5000 simulator, either via Ethernet (preferred method) or via RS-232 serial connection (see "Starting the ASL 5000", page 24). NOTE: If you are upgrading from a 1.n.n-, 2.n.n or 3.0.n-version of the ASL 5000 software, you will need to first upgrade the firmware on the embedded controller of the simulator to a 32-bit version. Please follow the instructions in section "Firmware Upgrade", page 107, in order to ensure a smooth upgrade process. As long as the installed firmware in the simulator is a 32bit version (version 3.1 of the ASL host software or higher), you may use it with the 3.5 release of the host program to perform a direct upgrade of the firmware (no 32-bit prep necessary). For details, please consult the documentation files that are part of the installation package. (See also the NOTE on page 17). 3.1.1 RespiSim This software for the ASL 5000 (SW 3.5) is fully compatible with the RespiSim (Patient Ventilator Interaction) option. For more information on RespiSim, please visit our website at http://ingmarmed.com and navigate to “RespiSim System” under the “Products” tab. A trial version that allows playback of a recorded simulation session sample can be accessed via the RespiSim tab or the Instructor Dashboard on the WindowManager window. The operation of RespiSim is detailed in a separate chapter in this manual ("RespiSim", page 86). Please contact sales at 1-800 583-9910 or 412 441-8228 ([email protected]) for pricing, if you would like to use RespiSim functionality. 18 User’s Manual ASL 5000, SW 3.5, Rev.2 © IngMar Medical, Ltd. 2015 NOTE: If you intend to launch the software from the Windows Start Menu, you must first specify the directory from which Windows is to start the program as the installation directory (by default C:\Program Files\ASL Software 3.5 or C:\Program Files (x86) in 64-bit Win7 or Win8). To do this, right-click the shortcut that the installation created in the program list under the program group “IngMar Medical“. Click on “Properties“. On the “Shortcut“ tab, enter the file path C:\Program Files\ASL Software 3.5 or C:\Program Files (x86) in 64-bit Win7or Win8 (or the actual installation directory) for the “Start in:“ item. The software, as installed, will run, without applying any license keys, in a stand-alone Demo Mode, without the ability to communicate with an ASL 5000 device or the Virtual Ventilator option. These additional capabilities are accessed by placing a license key into the main installation folder. Preparation Software Installation on the Host PC NOTE: If you purchased the PC together with the RespiSim option for the ASL 5000, the installation of the database for the RespiSim VIK (Bridgetech database) has already been performed and the system is ready to go. If you need to perform an installation on a new PC or if the option was purchased at a later time, set the Bridgetech database up on the same PC that is running the ASL 5000 host software. Use the USB storage device supplied with the RespiSim software component. NOTE: The installation of the Bridgetech database requires Windows XP or Windows 7 on the PC. Launch the setup.exe file and follow the online instructions as requested by the wizard. The AutoScan application performs, as its name implies, the frequent automatic scans of ventilator data via the VIK. This populates a database for ventilator parameters to be included into the simulation data sets. The AutoScan application should be launched separately before the RespiSim panel in the ASL host software is opened the first time. It may also be launched at any time for checking the proper data connection of the VIK and ventilator (see next page).The StudentScan app is a PC version of a ventilator data charting application that can also be installed onto a tablet-style mobile device (Windows 7) that would be used in a real ICU environment. This application also supports annotations by the caregiver that would be expected for proper documentation of patient status. Figure 3-1 Bridgetech Installer User’s Manual ASL 5000, SW 3.5, Rev.2 © IngMar Medical, Ltd. 2015 NOTE: The installation process for the Microsoft SQL environment might take a few minutes. Do not interrupt the process. At the end of a successful installation, you will see the following screen: Figure 3-1 Completed SQL Installation With this installation, you now have two applications on your desktop, and in the Start Menu, respectively. One is called the Autoscan application, with its own distinct icon the other one the StudentScan application, with a different icon. 19 Preparation Connections 3.2 Connections 3.2.1 Electrical Connections The ASL 5000 Breathing Simulator must be connected to line power supplying 100 - 240 V AC, 50/60 Hz. NOTE: The heater of the cylinder temperature controller option (CTC) should be configured for either 100 - 120 V or 200 - 240 V range for best performance. Please contact IngMar Medical if your ASL 5000 is equipped with this option and you require a change to its configuration. CAUTION ! Electrical Supply: Connect instrument only to a properly grounded wall outlet providing 100 - 240 V AC, 50 - 60 Hz. WARNING ! Electric Shock Hazard: Always disconnect from line power before opening ASL 5000. Connect the SBLVM (Simulator Bypass and Leak Module, available option) to the instrument by plugging its 1/4“ audio-style plug into the labeled receptacle at the front of the instrument (see Figure 3-1). CAUTION ! new image with new SBLVM connector Figure 3-1 SBLVM Connection 20 Ethernet networking has the advantage to allow for flexibility as to the relative locations of PC and Breathing Simulator. It also provides the option to connect the system wirelessly via a 802.11b/g/n WiFi-equipped PC. The communication protocol is the ubiquitous TCP/IP, and given a high-speed internet connection, a PC connected via a VPN (virtual private network) may even host an ASL 5000 from a remote location. The system is set up for DHCP server-issued IP addresses. For creating an “ad-hoc” network, we recommend using the included wireless router as a DHCP server to assign IP addresses to both the PC and the ASL 5000. Fixed IP addresses are supported as well. A specific routine in the “Maintenance” section of the Full Choice Welcome menu helps to assign a fixed IP address to the ASL 5000. NOTE: The host PC and the ASL 5000 Breathing Simulator must have compatible IP addresses in order to establish a proper connection via UDP broadcast, the method normally used by the ASL 5000. This means that the first three sets of digits in the IP address have to match (both devices on the same subnet). For a network where your PC is typically assigned its address by a DHCP server, verify that the range from which it receives its address, is compatible with the address that is assigned to the ASL 5000. With more recent firmware versions (4.7.nn), it is now possible to use fixed IP addresses beyond subnet boundaries without the services of a UDP broadcast. Accessing a device with a fixed IP address can be made the default via the Project File Tool (see page 26). For questions related to assigning IP addresses to networked devices, please consult with your network administrator. The physical Ethernet connection can be made using the two networking patch cables provided (blue, no crossover). The notebook PC may alternatively connected to the router via WiFi. NOTE: The Breathing Simulator will always attempt to synchronize using the method specified in your selection in the Welcome screen or the last settings. Please make sure that the connection you attempt to use is physically available. User’s Manual ASL 5000, SW 3.5, Rev.2 © IngMar Medical, Ltd. 2015 Always fully insert plug. Do not leave plug in a partially inserted position. 3.2.2 Communication Setup via Ethernet Preparation User’s Manual ASL 5000, SW 3.5, Rev.2 © IngMar Medical, Ltd. 2015 Connections 3.2.3 Communication Setup via serial connection (RS-232/USB) 3.2.4 Changing the Default Communications Port On older devices, a serial connection between instrument and host is made via a RS-232 serial cable (extension-style, male/female DB9) and a separate serialto-USB-converter (included). The cable must be connected to COM1 on the ASL 50001 and the serial port generated by the converter must also be assigned COM1 on the host computer (default). Please follow the converter manufacturer’s instructions regarding installation of driver software when installing on a thirdparty PC (the driver is pre-installed on the included laptop). It is important to assign the correct COM-port (COM1) using the software included with the adapter or the Windows Device Manager. For changing the default COM-port used by the ASL 5000 software , please see instructions below ("Changing the Default Communications Port"). Please note that IngMar Medical cannot endorse other than the included model of adapters for their feasibility for the specific requirements of the real-time communication of the ASL 5000 software. Please contact IngMar Medical with questions you may have setting up this type of serial communication. Depending on your PC hardware and other applications installed on your PC, it might become necessary to assign a different COM-port to connect the ASL 5000 when using serial communication. In order to do so, you simply need to make this change in the ASL Project File Tool accessible from the Full Choice Welcome window. The COM-port labeled “Terminal” on older ASL 5000 is used for connecting a PC for service and troubleshooting purposes as a terminal (using, for example, “Hyperterminal“, which is part of MS Windows Accessories under Windows XP or the freeware program PuTTY). Using a terminal program allows a technician to directly interface with the embedded PC in the ASL 5000 for troubleshooting or other service purposes. On newer devices with dual USB-ports, the one used as a service port is plugged with a removable rubber insert to avoid attaching the standard communication cable by mistake. After saving your change on the PC, the host software will store the assigned COM-port for communicating with the ASL 5000 instrument in the Project File. NOTE: Please make sure that the communication port selected actually exists on the PC (COM-port assignment for the USB/RS-232 converter). 3.2.5 Communication Setup for the RespiSim Option RespiSim comprises a hardware component, the RespiSim Wireless Adapter (“VIK Bridge”), that connects directly to a ventilator’s serial (RS-232) data port (please see specifications for a list of compatible ventilators). NOTE: Please note that some ventilators require more than one connector from the kit. There are two types of adapters, the original Bluetoothbased version (left) and the second generation WiFi Bridge (right). Figure 3-3 RespiSim Wireless Adapters Figure 3-2 ASL 5000 connector configuration (new style, dual-USB) Included in the kits are a few pieces of adhesive hookand-loop mounting strips for the purpose of conveniently attaching the Bridge to any of the ventilators. An optional electronic charting device (handheld device, Tablet PC running Windows 7, not included in the RespiSim package) may be used to install the StudentScan software and to practice proper 1 the connection labeled “Host“ 21 Preparation Connections documentation of a respiratory patient’s treatment. Please contact IngMar Medical for details if this configuration is desired. Plug in the 5V wall-mount power adapter to power the VIK Bridge (if used). After you have made the required pneumatic connections (see "Pneumatic Connections" on this page), you can switch on the ASL 5000. A connected ventilator (if applicable) should now be ventilating the test lung if such an auxiliary test lung was installed together with the SBLVM module. For adjusting the cylinder wall temperature (CTC, available option), please refer to "Using the Cylinder Temperature Controller (CTC)", page 100. 3.2.6 Pneumatic Connections The system is designed to be connected with regular patient circuits using 22mm ISO-fittings. The Simulator Bypass and Leak Valve Module (SBLVM, available option) connectors are female 15 mm ISO ports. The test lung and the connecting circuit piece are attached to the SBLVM with 22/15 mm adapters. Please refer to the diagram below for the proper connections. NOTE: For the individual steps of the routine setup (, you may also refer to the Quick Reference Startup Guide printed on the next pages. A copy of this document is also located in the \documentation\ subdirectory under the installation folder on your PC. Ventilator bypass connection QuickLung or other testlung SBLVM Figure 3-4 Pneumatic Connections Overview 22 User’s Manual ASL 5000, SW 3.5, Rev.2 © IngMar Medical, Ltd. 2015 Ventilator Preparation User’s Manual ASL 5000, SW 3.5, Rev.2 © IngMar Medical, Ltd. 2015 Connections (USB cable for units >1400) Figure 3-5 Quick Reference Startup, Steps 1 and 2 23 Preparation Starting the ASL 5000 3.3 Starting the ASL 5000 24 User’s Manual ASL 5000, SW 3.5, Rev.2 © IngMar Medical, Ltd. 2015 Figure 3-6 Quick Reference Startup, Steps 3 and 4 Operation Getting Started 4 Operation 4.1 Getting Started 4.1.3 Welcome Window and Window Manager After launching the software, a software loading screen is presented. Launching the software on your host PC after all connections have been made and the simulator has been turned on, will allow you to edit simulation models, to run them, and to analyze the results. Below you will find an overview on the software, how it is structured, and how to get started using the ASL 5000. More detailed information on individual aspects of operation can be found in separate chapters later in this manual. 4.1.1 License Keys User’s Manual ASL 5000, SW 3.5, Rev.2 © IngMar Medical, Ltd. 2015 Beginning with version 3.3, the operation of the ASL host software is controlled by license keys that are coded into the initialization file of the software, ASL5000_SW3.5.ini (see also page 18). The default (demo) installation will not have access to the Virtual Ventilator, or connect to the ASL simulator. RespiSim is restricted to playback of a demonstration data file, RespiSim_Demo.tdms, located in .../RespiSim_Modules/RespiSim_Demo. To gain access to additional features, a new file ASL5000_SW3.5.ini (a new license key needs to be copied into the main installation folder after the original (demo) software installation. Figure 4-1 ASL Software Loading When the software has been loaded, a Welcome window will appear that allows you to quick-launch with the last settings used (saved in a “Project File”). Alternatively, you can switch to the “Full Choice Menu” (see "Full Choice Welcome Window.", page 28) for more options. Additionally, you may also launch the software in Demo-Mode (PC only, no ASL hardware attached), which will include the Virtual Ventilator feature if this option is licensed for your installation. NOTE: When an update is made available to your ASL host software, it will also be necessary to copy the existing file ASL5000_SW3.5.ini with the licensing information into your updated installation folder in order to have again access to the full, licensed functionality of the software. A new license key file will only be necessary and supplied for upgrades to a newer version of the software (3.5 or higher). 4.1.2 Screen Navigation Beginning with software version 3.4, navigation is now structured into panels that are accessed from tabs on the Window Manager. They can also be detached (dragged off), for example when different panels need to be visible simultaneously. This structure optimizes the user interface for improved user software interactions. Figure 4-2 ASL Quick Launch Menu 25 Operation Getting Started 4.1.4 Project File Tool Beginning with software 3.4, basic settings for your work environment are stored in a Project File. Clicking on the <Modify/Load ASL 5000 Project File> button will open a window for loading and editing project files. From the Appearance/General Settings tab color choices for graphs can be pre-set as well as descriptive notes entered for the project file. Figure 4-4 Project File Tool - Graph Colors Output Data Settings will define the defaults for standard report headers as well as the output data path. The Connection Settings tab lets you default to either Demo mode (stand-alone, no ASL hardware), Ethernet, or a specific COM port (1...8) on your PC. When Ethernet is selected, you can also force the software to connect to a specific ASL simulator identified by its serial number in the format “ASL_nnnn“ where nnnn is the four-digit serial number of the device. This is helpful when working in environments where more than one ASL are in use. In the Project File, this serial number is stored for reference when starting the software later on. NOTE: If your ASL 5000 is operated with a fixed IP address (see page 20), identification via serial number becomes unnecessary. Leaving the entries blank or entering 0000 will cancel selective connecting by serial number. 26 Figure 4-5 Project File Tool - Output Settings User’s Manual ASL 5000, SW 3.5, Rev.2 © IngMar Medical, Ltd. 2015 Figure 4-3 Project File Tool - Device Identification Operation Getting Started Relative paths (or path segments) can be configured as tokens from the Script Editor Preferences tab when you invoke the Relative Paths Configuration Tool. For details on this tool, please see "Using Tokens", page 33. As a new option in SW 3.5, the settings of the Virtual Ventilator (see page 50) are also part of the Project File Tool. Figure 4-6 Project File Tool - Relative Path Tokens From the tab Default Analysis Parameters you can preselect the 8 parameters showing in the Real Time Analysis window as well as those for the Post Run Analysis Trends. User’s Manual ASL 5000, SW 3.5, Rev.2 © IngMar Medical, Ltd. 2015 Figure 4-8 Project File Tool - Virtual Ventilator Settings After making all edits for a desired project file, you can save this file with the <Save As> button on the bottom of the Project File Tool window. NOTE: You will need to close the Project File Tool in order to proceed with launching the ASL software. NOTE: As a convenience introduced in SW 3.5, the Project File Tool can always be accessed from the menu bar above the Window Manager tabs. Figure 4-7 Project File Tool - Default Analysis Param. 27 Operation Getting Started , Figure 4-9 Quick Launch Menu Options with the tab for the Run Time Home window selected. If your installation folder contains a file aslident.txt (and you are using Ethernet connectivity), a reminder will appear that you are attempting to connect to an ASL 5000 with a specific serial no. only (see also "Project File Tool", page 26). At that time, you can change the content of aslident.txt to reflect the serial number of the simulator you actually want to connect to (useful when more than one ASL 5000 are on the network) or you can opt to delete this filter and to connect simply to the first ASL that is “seen“ on the network. This feature allows to specify a particular ASL to be paired with a host software installation on a PC. . After making the selection, the Welcome window will either disappear or you will see more options if <Full Choice> had been selected 4.1.5 Full Choice Welcome Window. Figure 4-11 ASL Identification Edit Figure 4-10 Full Choice Menu Connection Options Here, you can pick the method of connectivity as well as opting for customization and other maintenance links. When opting for launch of the ASL Host Software either through Ethernet or RS-232 connectivity or in demomode (see ), the Window Manager will present itself 28 User’s Manual ASL 5000, SW 3.5, Rev.2 © IngMar Medical, Ltd. 2015 NOTE: It is not necessary to have the simulator turned on before you launch the software. However, the runtime module of the software will attempt to synchronize with the instrument and show an error message if synchronization was not possible within 10 seconds. You then have the opportunity to make the necessary cable connections or switch the simulator on before proceeding. If no communication is occurring after this step has been taken, you may continue to reattempt connection or cancel the operation. Operation Getting Started The status line on the Run Time Home window will tell when the simulator has successfully synchronized with the PC and a simulation may be started, executing the current script (see "Running Simulations From the Run Time Home Display" on page 43). The Interactive Control tab allows parameter changes of a simulated patient “on the fly”. In SW 3.5, interactive editing capabilities now nearly match those in the full Patient Model Simulation Editor. Additionally, you can also invoke autonomously adjusting effort models (constant Vt or MV) from within the Interactive Control. Interactive control represents an overriding mode that can be used during scripted simulation sessions as well as when running RespiSim Curriculum Modules. Figure 4-12 Run Time Home Sync Message 4.1.6 Window Manager Tabs, Overview Opening the Script/Patient Model tab allows to select a script to run or to edit its model parameter files (see "Working with the Simulation Script Editor", page 31). Figure 4-14 Interactive Control Panel User’s Manual ASL 5000, SW 3.5, Rev.2 © IngMar Medical, Ltd. 2015 NOTE: The Interactive Control Panel is, by default, not active and needs to be started before it becomes active. The reason for that is that it supersedes script control as well as RespiSim-based control of a simulation. Figure 4-15 Start Interactive Control When switching to the Interactive Control tab from the Script/Patient Model tab, interactive control is automatically started, and this step is not necessary. Figure 4-13 Script/Patient Model Tab - Scenario Scripts NOTE: All tabs of the Window Manager can be “detached” and made to “float” as independent windows for simultaneous viewing. Click and drag a tab to create a separate window, minimize the window to re-attach it to the Window Manager You can also move directly from there to fully interactive models, starting the Interactive Control Panel tab, or start the RespiSim environment. 29 Operation Getting Started The Real Time Analysis tab is used to view the breath parameters as they are entered into the data stream and to verify proper breath detection. More details are given under "Breath Detection / Real-Time Analysis Window", page 60. Finally, the UtilitiesSelector tab gives access to a number of auxiliary software features regarding data input and output. For details on this topic, see "Using ASL Utilities", page 92). Figure 4-18 Utilities Selector Tab Figure 4-16 Real Time Analysis Tab The Post-Run Analysis tab gives access to all data analysis functionalities that are built into the ASL software. Detailed coverage on this topic can be found beginning on page 67, "Post-Run Analysis Main Menu". 30 Figure 4-19 RespiSim Tab User’s Manual ASL 5000, SW 3.5, Rev.2 © IngMar Medical, Ltd. 2015 Figure 4-17 Post Run Analysis Tab The RespiSim main interface panel is the last tab on the right. Again, it is not active by default and needs to be activated with the <Start RespiSim> button. Please note that only playback of a demo recording is possible without a proper license key. The RespiSim option is covered in a general way starting on page 86, more detail is provided in a special addendum to this manual. Operation Modeling Using the Simulation Editor Environment 4.2Modeling Using the Simulation Editor Environment Full-featured modeling is performed from the Simulation Script Editor tab on the Window Manager. The following paragraphs explain how parameters are set and their significance in the modeling process. For an introduction into the background of the modeling process, please refer to "Introduction to Modeling", page 119 as well as "Introduction to Ventilatory Mechanics", page 109. NOTE: In addition, the Interactive Control Panel provides an alternate method of patient parameter manipulation in an interactive fashion, while a simulation is running (see "Running Simulations Using the Interactive Control Panel (ICP)", page 51). When the software is first launched, the Simulation Script Editor will appear as in Figure 4-20, with its Scenario Scripts tab as the default selection. Choosing a specific scenario script allows you to quickly pre-load patient parameter files for specific disease states and patient types. These scripts are fully editable for further customizing. NOTE: The factory default location for scenarios is ...\ASL Software 3.5\vars\scenarios. You can change this “Script Editor Working Folder” to a different directory as your customized default with the Project File Tool (Configured Relative Paths tab) The different screens of the Simulation Editor and the associated parameter editors (for non-linear compliance, time-varying parameters, etc.) present a structured environment for all parameter settings of the simulated patient. Parameter files as well as script files may be called and saved from the Simulation Editor. The steps to generate a valid model are presented as individual screens STEP 1 through STEP 4. User’s Manual ASL 5000, SW 3.5, Rev.2 © IngMar Medical, Ltd. 2015 4.2.1 Working with the Simulation Script Editor The ASL 5000 Simulation Script Editor is based on the paradigm of a script file that allows you to use a sequence of parameter sets (*.vr3-files, also referred to as segments of a script) for a complete simulation run. The Script Editor is also the place where different simulation segments are assigned a number of repetitions for which specific parameter files are in effect. Figure 4-20 Script File Editor - Scenario Scripts Figure 4-21 Project File Tool - Editor Working Folder You may also open a stored script file by using the <Open Script> selection from the <Script File> menu (see Figure 4-22) and selecting a *.sct-file by browsing the Open-File Dialog window. NOTE: To familiarize yourself with the Simulation Editor, you may want to open a ready-made script, such as example.sct provided in the ...\ASL Software 3.5\vars\ subdirectory. Figure 4-22 Script File Editor - ScriptFile Menu Items 31 Operation Modeling Using the Simulation Editor Environment Alternatively, a brand new script can be generated by using New Script from the <Script File> menu and selecting a name for the new script to be created. The default parameter file pause.vr3 will be inserted as a first script segment entry, (assigned one repetition only). Figure 4-23 Script File Editor - Manual Scripting You may then edit this parameter file and store the resulting vr3-file under a different name, as well as further add more segments to the new script. Whenever a script is opened, the Script Editor will evaluate its content and verify that any parameter files referenced actually exist. If that is not the case, those segments of a script that cannot be found will be highlighted in red (see Figure 4-29). Figure 4-24 Script File Editor - Script Errors Segments in a script can be highlighted, copied, and pasted by right-clicking and selecting from the pop-up menu or using the <ParameterFile> menu. There are two additional script saving options on the <ParameterFile> menu. Save Selected as NewScript allows users to directly create a new script from a highlighted selection and to give it a unique name. You may also import highlighted segments from another script via Merge Scripts with a simple “drag and drop“-operation. NOTE: In software versions prior to 3.5, the saving as current.sct had to be performed by the user manually, using Save as current.sct from the <Script File> menu. This is no longer necessary. NOTE: Any changes made to a parameter file in use during a simulation will go into effect immediately upon saving the *.vr3-file, providing a second way to operate in an interactive fashion (in addition to using the Interactive Control Panel). NOTE: You cannot save a parameter file under the file names current.vr3, interactive.vr3, or respisim.vr3. These names are reserved internally . Figure 4-25 Script File Editor - Editing Techniques For this, you must first identify the script to paste from via the blue <Select Script> button in the Script Merge window. NOTE: Non-contiguous selections will be dropped into the script under construction as contiguous sequences. 32 User’s Manual ASL 5000, SW 3.5, Rev.2 © IngMar Medical, Ltd. 2015 The software uses a color scheme for the script path name box in the top of the Script Editor reminding the user of the saving status of a script. It will be yellow when a new or changed (and yet unsaved) script is shown. After a script has been saved, the box background will appear green. Saving a script automatically also generates a copy of the script under the name ..\vars\current.sct, which is the work-copy used by the simulator. 4.2.2 Manipulating Scripts Operation Modeling Using the Simulation Editor Environment 4.2.3 Using Tokens A system of relative path designations is available based on the use of tokens representing file path names (or file path segments). This facilitates moving scripts to different locations. The buttons for Token operations are accessed via the <Work with Tokens> button on the Script Editor window. Configuring tokens is easily done with the Relative Path Configuration Tool that opens after clicking the <Configure Token/Paths> button. Figure 4-27 Tokens - Relative Path Configuration Tool Figure 4-26 Script File Editor - Tokens NOTE: Access to the Relative Path Configuration Tool is also available from the Project File Tool (Script Editor Preferences tab). User’s Manual ASL 5000, SW 3.5, Rev.2 © IngMar Medical, Ltd. 2015 A token is a “friendly name” given to a file path, in Figure 4-26, it is <ASLDefaultInstallDir>. With the <Configure Token/Paths> button, you can assign actual file paths (or elements of file paths) to tokens. The other buttons on the left of the Script Editor window are used to switch between tokens and original file paths either individually (for the highlighted script segment) or as a whole. The purpose of tokens is to allow convenient changes of file paths when, for example, a script with its inventory of patient parameter files (*.vr3-files) is relocated to a drive or directory, different from where it was originally created. In this case, configuring the new path as a token and replacing the existing token or file path will avoid having to recreate the whole script. Clicking <New> will let you select a folder location that you may want to give a friendly name to. From the Add/Edit Relative Path window you can browse to an existing folder that you wish to select. The path is entered into the “Actual Path“ space. Alternatively, you can also write directly into the “ActualPath“ space, e.g. when a folder to be assigned a token has not yet been created (you would not be able to browse to it). NOTE: The tokens <ASLVarsDirectory> and <ASLDefaultInstallDir> are protected names and cannot be edited. After your configurations are complete, click on the <Done> button to return to the main Simulation Script Editor. 33 Operation Modeling Using the Simulation Editor Environment Using the <Exchange with Configured Token> button now allows to switch between tokens, for example to accommodate a new file location for parameter files. Figure 4-28 Tokens - Exchange with Configured Token If a token is used that does not refer to an existing file path, the script segment will be highlighted in red. 4.2.4 Modeling Using a Scenario Script The first method is to select the preferred patient parameters by making a choice from the list, specifying different patient types and disease states in the “Scenario Scripts” tab of the Simulation Script Editor. Figure 4-30 Script Editor - Scenario Scripts There are three patient types (neonatal, pediatric, and adult) and multiple patient conditions to choose from. Disease states include: — ARDS — apnea — asthmatic/obstructive condition — COPD/obstructive condition — pneumothorax — bronchiolitis, pneumonia Due to the wide variety of clinical conditions associated with different lung diseases, it is not always possible for a specific patient parameter setting to be representative of such disease states. Scenarios in the ASL 5000 software are therefore intended as suggestions only. The user is advised to apply his or her own clinical expertise to use and edit the scenario scripts. Figure 4-29 Token Configuration Errors In this case, you can still double-click on the script segment and then navigate to an actually existing parameter file. Generally, scripts can be generated in one of two ways, using preconfigured scenarios, or manually from scratch. 34 After highlighting a script from the list, click “Choose Scenario Script File” or double-click the respective script. This will open the Manual Scripting tab with the patient model file entries and allow you to further edit the preconfigured script, using the methods described below. NOTE: Most scripts from the Scenarios list consist of just one line entry, with a vr3-file describing the specific type of patient. User’s Manual ASL 5000, SW 3.5, Rev.2 © IngMar Medical, Ltd. 2015 WARNING ! Operation Modeling Using the Simulation Editor Environment 4.2.5 Step-by-Step Script Generation Without Using a Scenario Script For the alternate method of selecting different simulation parameter sets and to assemble a script sequence, use the “Manual Scripting” tab directly, following the procedure described below. 4.2.6 Step 1. Select Simulation Parameter Set In Step 1, you can —browse for a different parameter file (*.vr3-file), —change the number of repetitions that a particular parameter set will run, or —enter the simulation editor to modify the selected *.vr3-file by clicking <Edit>. In the simulation editor, several advanced model settings can be selected for the lung models. They are: —compensations (see page 36) —time varying parameters (see page 37) —parabolic/linear/mixed resistors (see page 39) —independent inspiratory and expiratory resistor settings (see page 39) —non-linear compliance (see page 40) In addition, you can also select the waveform sampling rate, which is set to its highest value, 512Hz, by default. NOTE: Please note that the advanced model settings do not apply to waveform generation in the form of SmartPumpTM models After clicking <Edit>, you will be working in Step 2, the “Lung Model” stage, describing the “passive” respiratory mechanics of the patient, Compliance and Resistance. User’s Manual ASL 5000, SW 3.5, Rev.2 © IngMar Medical, Ltd. 2015 Figure 4-31 Script Editor - Manual Scripting Double-click the highlighted script line in the Manual Scripting tab to edit the model. This will open the window in Figure 4-31. labeled “Step 1“. Figure 4-32 Step 2 - Lung Model 35 Operation Modeling Using the Simulation Editor Environment 4.2.7 Lung Model Types The simplest, single compartment model requires just 3 parameters. —The value for “URC” URC = Uncompensated Residual Capacity designates a baseline volume as measured from the simulator piston home position (not accounting for the 200 mL in the “safety zone1“ or “Cylinder Deadspace” in the very front of the cylinder). (Please see also NOTE below regarding this parameter.) —One value for Resistance (with the additional choice of a second, independent value Rout. (for independent setting of resistance during expiration). —The value for Compliance, which represents a compound patient compliance combining chest wall and lung compliance. Alternatively, the basic two compartment model consists of 6 parameters: long as <Compensations> (the switch in the lower half of the window) has not been set to ON, the compressibility of this volume will add “parasitary“ compliance. (See also "Advanced Model Settings - Compensations" below. For additional information on the single and two compartment lung model, please refer to "Introduction to Modeling", page 119. The alternative to setting a “lung model“, i.e., flow or volume waveform generation in SmartPump™ mode, is described in a separate chapter of this manual. (See page 126). Parameter values may either directly be entered into their respective control fields or may be increased or decreased by using the scroll controls next to the number entries . 1. The value for “URC“ 4.2.8 Advanced Model Settings Compensations 2. The value for tracheal resistor Rt (which can either be linear, parabolic, or mixed, depending on the respective switch setting in the lower half of the screen), Compensations for parasitary volumes (i.e. compliances) and resistances may be selected for lung models (single or two compartment) and are disabled when using SmartPump™ mode. 3. The values for R1 and R2, the respective bronchial resistors leading to compartments 1 and 2 (with the additional, independent values Rout, R1out and R2out (for independent setting of resistance during expiration) if the switch in the lower half of the screen has been activated) NOTE: It should be noted that the value of the simulator “URC“ does not need to correspond to a patient’s true FRC (Functional Residual Capacity) for the typical simulations performed. Please keep in mind that FRC of adult patients might be larger that what is allowed as the largest setting, 1.5 L (plus 0.2 L of the safety zone).The calculations for model response do not depend on the value of FRC and, therefore, a value for URC may be chosen that is practical for purposes other than those of matching real FRCs. For example, a sufficient baseline volume allows the simulator to follow excursions required by negative pressures applied (forced exhalation) without running into the forward piston position limits. Also, URC values need to be chosen that allow the expected tidal volumes within the capacity limit of the simulator (Vt+URC+0.2L < 3L required). As 1 36 0.2 L is the value of the home position volume that is always maintained as a safety zone against any piston overruns at the forward position. This value is 0.025 L when using the Preemie Cyllinder Add-On option. Figure 4-33 Lung Model Settings - Compensations The purpose of entering values into the compensations fields is to allow the Simulation Editor to consider the effect of all parasitary volumes (volume of the URC, the simulator’s safety zone and the tubing system) as well as resistances (the resistance of the connector port and other connected accessories). These factors will otherwise render the response of the overall simulator system slightly different from the behavior expected from the selected lung model parameters alone. The simulation editor will enter values into the *.vr3-file that User’s Manual ASL 5000, SW 3.5, Rev.2 © IngMar Medical, Ltd. 2015 4. The values for C1 and C2, i.e. the respective (compound) compliances of compartments 1 and 2. Operation Modeling Using the Simulation Editor Environment are correcting for these effects so that, looking at the system from the outside, it accurately shows the behavior associated with the set model parameters. When using the SmartPump™ mode, compensations are always set to 0; the same is true when using non-linear compliance models. Please remember that compensations entered in the Simulation Editor serve to better match the physical simulator behavior with the theoretical model. Compensation settings offered in both the RealTimeAnalysis or the Post-Run Analysis (see page 61), on the other hand, are used to more accurately determine volumes as they would be reported by a ventilator versus “patient” volumes, taking into account tidal volume “absorbed” in the patient circuit. NOTE: Switching on “Time-Varying Parameters” (TVP) requires that all applicable parameters are now set via the Time-Varying Parameters Editor. Parameters that are meant to remain static can easily be made so by using appropriate selections. Double-clicking a parameter opens the Variable Parameters Editor window. The concept is similar to the Simulation Script Editor. You can shape a parameter’s variation over time in individual segments that will apply to a predefined number of breaths (see Figure 4-35, page 37). NOTE: For the purpose of calculating tidal volumes, the gas compressed in the URC and “safety zone” are always considered in the ASL analysis, and these values of Vt are, therefore, not just a reflection of the piston excursion. User’s Manual ASL 5000, SW 3.5, Rev.2 © IngMar Medical, Ltd. 2015 4.2.9 Advanced Model Settings Time Varying Parameters (TVP) For editing parameters when time-varying parameters (TVP) is switched on, click on the <Edit> button below the switch (it will be visible only when TVP has been switched on). Figure 4-35 Time Varying Parameters Editor The Variable Parameters Editor graphs show the total sequence of parameter segments with the currently selected segment highlighted by bold dots (lighter dots for all other segments in the sequence). The segment entries show the number of repeats for each segment as well as details of the parameter equation defining the transient behavior. This opens a dialog box (Time Varying Parameter Menu) from which to choose parameters to edit. Double-clicking on a segment will open the Parameter Curve Segment Editor. Figure 4-34 TVP Menu The concept of time-varying parameters means that within each parameter segment in your script, parameters can be made to change gradually from breath to breath, providing a much more realistic rendering of a patient’s behavior over time. Besides the (passive) lung model parameters R and C (including the optional Rin<>Rout and non-linear C), the parameters of the spontaneous breathing effort (i.e., the muscle pressure profile), may also vary over time. Figure 4-36 TVP Curve Segment Editor 37 Operation Modeling Using the Simulation Editor Environment The curve types for defining the time-varying characteristics of a lung model parameter can be selected from the depicted choices: Figure 4-37 TVP Curve Types Depending on the curve type selected, different parameters needed to describe a transient lung model are then presented for editing. Exponential Figure 4-40 TVP Curve Editing - Exponential Sinusoidal The following choices are possible: Linear (defined by Slope or by Endpoint) Figure 4-41 TVP Curve Editing - Sinusoidal User-supplied Profile (from File) Figure 4-42 TVP Curve Editing - From File Power NOTE: When sequencing parameter curve segments, it is the user’s responsibility to match up parameter values at intersections between segments, if smooth parameter transitions are desired. Uniform Random Distribution with Thresholds Figure 4-39 TVP Curve Editing - Power Figure 4-43 TVP Curve Editing - Uniform Distribution 38 User’s Manual ASL 5000, SW 3.5, Rev.2 © IngMar Medical, Ltd. 2015 Figure 4-38 TVP Curve Editing - Linear Operation Modeling Using the Simulation Editor Environment Gaussian Distribution with Thresholds 4.2.10 Advanced Model Settings - Parabolic/ Linear Resistors Parabolic resistor response according to the definitions used in ASTM F1100 may be selected with this switch. In the case of a two-compartment model, this choice applies only to the “tracheal“ resistor Rt. In the singlecompartment configuration, the switch setting determines behavior of the single resistor R. Figure 4-44 TVP Curve Editing - Gaussian Distribution The number of repetitions in a sequence of parameter segments in the TVP-Editor does not necessarily have to match the number of breaths assigned to the lung model *.vr3-file segment in the Script Editor. In case of diverging breath numbers, either the transient described for the particular parameter in the Parameter Curve Segment Editor will be curtailed or the parameter will be continued with the last value of the transient curve definition (if the number of repeats in the Script Editor is higher than that for the curve segment)1. The TVP environment also allows a simple method to generate static model parameters. Choosing a number of repeats of one and the appropriate start value for a “Linear“-type segment in the Parameter Curve Segment Editor will continue that value for any number of repetitions. User’s Manual ASL 5000, SW 3.5, Rev.2 © IngMar Medical, Ltd. 2015 Once you have defined the desired parameter curve segment in the Parameter Curve Segment Editor, click <OK>. When you have completed setting the time varying behavior for an individual parameter, click <OK> in the TVP window, and move on to the next model parameter. When finished editing the desired time-varying parameters, click <Done> in the Time Varying Parameter Menu dialog box. This will return you to the Lung Model screen. NOTE: Model parameters pertaining to the Patient Effort Model (spontaneous breathing definitions) are set in the same fashion in Step 3 of modeling process when TVP has been chosen (see page 41). Parabolic response is the “natural“ behavior of an orifice resistor, with turbulent flow. Linear response assumes laminar flow which means that flow through the resistor increases relative to the driving pressure in a strictly proportional fashion. Figure 4-45 R-Types NOTE: There are two implementations of the parabolic resistor response, a purely parabolic or the mixed case. For the latter, resistance is calculated in such a way that always the larger of the linear or parabolic resistance values applies. For very low flows this means that the linear value is used (which, in this case, has the higher P/Flow ratio). This approach avoids the value for Resistance being very close to 0 for small flows, enhancing overall system stability. 4.2.11 Advanced Model Settings - Independent Inspiratory and Expiratory Resistor Settings A second switch related to resistor behavior allows the selection of independent values of resistance during times of expiratory flow. Figure 4-46 Independ. R NOTE: As of software 3.5, pre-configured TVP patient parameter files can now also be used in conjunction with the Interactive Control Panel (ICP). Individual control of parameters is then disabled in the ICP tabs. 1 Please note that as of SW 3.2, any transients are defined relative to the beginning of the segment. Previously, they were referring to the beginning of the whole script. 39 Operation Modeling Using the Simulation Editor Environment Choosing Rin<>Rout implies that all resistor values in the model need to be defined both for inspiratory and expiratory flow conditions. The respective parameter controls will appear in the Lung Model Editor screen when the switch is operated. Figure 4-47 Independent R Settings Rin<>Rout 4.2.12 Advanced Model Settings - Non-Linear Compliances If a two compartment lung model has been selected, the non-linear compliance switch becomes available. (Otherwise, it is grayed out and, therefore, inactive.) Switching non-linear compliance on will add an <Edit C1> and <Edit C2> button to the screen. The original screen control(s) for compliance are grayed out and the settings made there become invalidated. The compliance curve is modeled in three segments, with a linear middle segment (for volumes between “intercept 1“ and “intercept 2“) and lower and upper portions of the curve, shaped by a polynomial. Inflections points 1 and 2 are the equivalent of what is commonly referred to as the lower and upper inflection point in P/V graphs. In the red control lines, the links (indicated by dots in the curve) may be “grabbed“ with the cursor (click and hold) and moved around. Similarly, the horizontal intercept lines may be moved to increase or decrease the linear, middle portion of the compliance response curve. You also have the option to check C1=C2, which will turn the model you define effectively into a uniform model, where compartments C1 and C2 represent half of the overall compliance. NOTE: It is important to ensure that the compliance response created covers the whole range of pressures expected to occur in a simulation run. Otherwise, undefined behavior of the simulator may result. NOTE: Internally, the ASL 5000 always operates a twocompartment model. So, even in the 1-compartment case, you are manipulating two chambers (which, in this case, are maintained identical). To help the user keeping this in mind when shaping the pressure/volume relationship, a second volume scale for the combined compartments is shown on the right side of the NonLinear Compliance Editor graph whenever the C1=C2 option had been selected. The straight green line pointing to the middle of the linear portion of the curve indicates the compliance value that would be used if you switched back to linear compliance from the current non-linear selections. User’s Manual ASL 5000, SW 3.5, Rev.2 © IngMar Medical, Ltd. 2015 Clicking on the <Edit C1> or <Edit C2> button opens the Non-Linear Compliance Editor window, where the shape of the compliance response can be modeled by entering numbers in fields or directly into the graph. In cases where it is difficult to discern the individual curve segments (because the red control lines are at the edge of the graph, for example), it is a good idea to start editing by using the numerical parameter fields first, and to begin moving the control lines directly from within the graph only afterwards. Figure 4-48 Non-Linear C 40 Figure 4-49 Non-Linear C Editing Operation Modeling Using the Simulation Editor Environment 4.2.13 Step 3. Choose a Patient Effort Model User’s Manual ASL 5000, SW 3.5, Rev.2 © IngMar Medical, Ltd. 2015 The spontaneous breathing pattern of a model is selected as Step 3 in the “Patient Effort Model“ window. Figure 4-50 Simulation Editor - Patient Effort Model For a detailed description of the different pressure profile configurations, including the use of profiles from userdefined files, see "Patient Effort Model", page 121. Please note that only the sinusoidal and trapezoidal profiles and user-defined profiles are accessible in the SmartPump™ mode (plus analog input of a profile). Only some of the patient effort model parameters can be turned into time varying parameters as described in Step 2. If time varying parameters have been selected when preparing the lung model (Step 2), the “Edit“ button below the pressure profile graph will be visible and certain parameter selections to the right will be grayed out. All these selections will then have to be made via the <Time Varying Parameters Menu> button from the Time Varying Parameters Editor window. In this fashion, a varying spontaneous breath rate may be set, or the depth of the breath (Pmax) can be varied over time. 41 Operation Modeling Using the Simulation Editor Environment 4.2.14 Step 4. Save Simulation Parameter Set After all parameter selections have been made, you are ready to save the parameter set for the current segment. either retaining the name the set had already been given (<Save> button) or using <Save As> for a new name. The use of the .vr3 file extension, which identifies ASL 5000 patient parameter files, is automatically appended. Figure 4-51 Simulation Editor - Saving a Parameter Set After Saving the parameter set, you will be returned to the Script Editor, from where you can edit other segments or directly run your assembled script, using the button It is important to keep in mind the conceptual difference between a script file (scriptname.sct) and a patient parameter file (filename.vr3). While the script dictates how parameter sets are applied over the course of a simulation, a patient parameter file contains the details of each segment of your simulation. You may compare it to the difference between a recipe and the ingredients for a dish to be prepared. For moving script files to a different location in your PC’s file structure, see also "Using Tokens", page 33, and "Manipulating Scripts", page 32. 42 User’s Manual ASL 5000, SW 3.5, Rev.2 © IngMar Medical, Ltd. 2015 NOTE: Before running a script that has modifications in its structure (different number of repetitions or patient files (vr3-files), it will need to be saved (green highlighting in the Script Editor’s Script File Name field), either using the <Save> or <Save As> buttons or the Save Script or Save Script As options from the <Script File> drop-down menu). If a patient file has been edited but retained its name, there is no need to re-save, since the script itself did not change. The editions will be automatically applied when running the script. Operation Running Simulations From the Run Time Home Display User’s Manual ASL 5000, SW 3.5, Rev.2 © IngMar Medical, Ltd. 2015 4.3 Running Simulations From the Run Time Home Display Figure 4-52, Waveform Window Clicking the Run Time Home tab on the Window Manager reveals the Central Run Time Display which features a comprehensive user interface to take control of your simulation runs, specifically to: —start and stop simulations, —select display options, such as the FillBar —select and view waveforms and loops, —enable additional parameters, —print reports, and —launch the Interactive Control Panel or RespiSim. 43 Operation Running Simulations From the Run Time Home Display 4.3.1 Initializing the ASL 5000 Simulator 4.3.2 Starting a Simulation Upon launching the host software and selecting “Use Software with ASL 5000“ or “From Current Project File“ from the Welcome window, the host computer will attempt to synchronize with the ASL 5000. The software will continue to keep sending its sync-message. If no ASL 5000 can be found on the specified communication port (either COM-port/USB or Ethernet port), a dialog box opens indicating that no communication of the host with the simulator has been established (see also "Changing the Default Communications Port", page 21, for making a change to the assigned COM port when operating a RS-232/USB connection). At this time, the user may still switch on or re-start the simulator. It is, however, recommended to then wait until the red light in the “Motor Enable/Disable” switch is off before acknowledging the message by clicking OK. In this fashion, you will ensure that the simulator has properly initialized first before the next attempt at synchronization. If still no handshake is achieved after another 20 seconds, the user will first need to remedy the situation (plug in the serial, USB or Ethernet cable into the correct port, etc.) Only then click the <Retry> button again. , With the Run Time Home screen active, clicking the <Start Sim.> button will start a simulation. This push-button switch is also duplicated on the Script Editor and the Interactive Control Panel as well as on the RespiSim main panel and Instructor Dashboard. At the completion of the initialization procedure, on the Central Run Time screen’s status line, you will see the message: “Ready. Use the Simulation switch to begin or the Exit button to stop.“ You are now ready to run a simulation. If the Central Run Time screen is not the active window (when “floating“ windows), you can also start a simulation from one of these other locations or using the <Control> drop-down menu on the top of the Window Manager. The simulator will be now be loaded sequentially with parameter sets stored in the segments of the current script on a breath-by-breath basis to perform the programmed simulation script. The script is also, at this time, evaluated again for errors (for example, script segments that cannot be located on disk). Before the simulation starts, the user has the choice of naming a data file and path for storing breath parameters (file *.brb) as well as, optionally, waveform data. No file name extensions need to be used for the destination, since these are assigned automatically, as yourname.rwb for the raw data file, yourname.dtb for the processed waveform data file and yourname.brb for the breath parameter file (for data saving options, see chapter "Data Analysis", page 66). NOTE: The default filename is data in the ...\ASLdata subdirectory. Files in this default location will be overwritten by the next simulation unless you save them under a different name. A personalized default location for the data files can be assigned with the Project File Tool (see page 26). After closing the data file selection dialog, the first breath profile is generated and loaded, and the simulation will begin. At this time, the simulator bypass valve in the SBLVM (if this option is connected) will audibly close and a ventilator connected to the system will now be ventilating the simulator instead of the auxiliary test lung attached to the SBLVM. 44 User’s Manual ASL 5000, SW 3.5, Rev.2 © IngMar Medical, Ltd. 2015 NOTE: It is still possible to use the modeling environment of the software after canceling a failed connection attempt. When closing the software, simply select “Yes” to the question of whether you want to return to the Welcome window, and allow the software to open in demo mode again. NOTE: After successful synchronization, default files are transmitted and you will hear the simulator move the piston to its home position. Figure 4-53 Simulation Start Operation Running Simulations From the Run Time Home Display 4.3.3 Pausing a Running Script Besides intervention into a running script via the Interactive Control Panel, it is also possible to simply invoke a specific parameter set named pause.vr3 via the PAUSE-switch on the Run Time Home Display. To apply PAUSE, — click the <Set Pause> button in the top right of the Run Time Home Display. Figure 4-54 <Set Pause> Key The indicator will then show “Release Pause“. Click the button again to return to executing the script. The indicator will now show “Set Pause“ again. When Pause is active, the simulation script is interrupted, for example to adjust the experimental setup or to provide additional information to students in an educational setting. After releasing a PAUSE, the script will be reactivated and continue from where it had been left. The patient parameter file pause.vr3 located in ..\ASL Software 3.5\vars is active when Pause is set. NOTE: The content of pause.vr3 \ may be edited just like any other patient model parameter file to accommodate specific needs for these situations. 4.3.4 Display Options of the Run Time Home Window User’s Manual ASL 5000, SW 3.5, Rev.2 © IngMar Medical, Ltd. 2015 The Run Time Home window features two graphical views, waveform plots and loop displays. In the Waveform View (see Figure 4-52, page 43), three individual plot areas show flows, pressures, and volumes. The number of traces for each plot will depend on the model chosen and may include: — — — — — — — — — — — — — calculated model flow for compartment 1 calculated model flow for compartment 2 calculated total model flow simulator (piston) flow airway pressure (this is the actual pressure measured inside the simulator cylinder) calculated tracheal pressure calculated alveolar pressure for compartment 1 calculated alveolar pressure for compartment 2 negative muscle pressure (the programmed pressure profile from Step 3 of the simulation editing process) calculated model volume for compartment 1 calculated model volume for compartment 2 calculated total model volume simulator (piston) volume NOTE: No corrections for barometric pressure, temperature, etc., are made at this time to render true BTPS or other standard gas values in the Central Run Time Display waveform or loop graphs. Volumes and flows displayed are geometric values at the existing gas temperature (shown in the digital display to the right of the plots, see also "Parameters in the *.brb-(Breath Parameter) File", page 131) and represent piston movement only. NOTE: Please note that “autoscaling“ is the default in both the waveform and loop view. If you prefer to have autoscaling turned off, right-click on the respective graph and uncheck “Autoscale Y“ in the pop-up menu. Do NOT uncheck “Autoscale X“ as this will render your graphs invisible. It is quite feasible, depending on the level of detail and accuracy desired, to use the graphs of the Run Time Home window for quantitative evaluations. The purpose of the graphs, however, is to check, in a general fashion, selected model parameters, to obtain an understanding of the parameter ranges, and to judge the overall interaction of a simulation with external devices, such as ventilators. True breath-by-breath data waveform analysis should be performed off-line with the ASL 5000’s comprehensive Post Run Analysis software (see "Data Analysis", page 66). From the Run Time Home screen, you may control the chart length (entered in seconds) with the respective control in the “Display“ field. Figure 4-55 Freeze Switch The selector button <Waveform View/Loop View> may be operated at any time to toggle between these views. Screen plots may be frozen at any time for better viewing using the <Freeze> button in the “Display“ section. The number of breaths displayed in the status line will continue to update, as will the <Script Time Remaining> display, in this case. The plot itself will stop updating at the time of the Freeze. It is helpful in this case to closely observe the status line displaying the currently active model parameter file (vr3file) or to go to the Script Progress window. 45 Operation Running Simulations From the Run Time Home Display In the Loop View, two separate plot areas show the flow/ volume loop and the pressure/volume loop for the chart length selected (i.e., several loops may be seen superimposed at any given time). The flow/volume loops are displayed for calculated model volume for compartment 1 and 2 versus calculated model flows for these compartments (or just the total model flow versus volume in case of the single compartment model). The pressure/volume loops are plotted for airway pressure versus the respective volumes (compartment 1 and 2 or total calculated model volume). 46 NOTE: Please note that “autoscaling“ is now also the default in the loop view. If you prefer to have autoscaling turned off, right-click on the graph and uncheck “Autoscale X“ and “Autoscale Y“ in the pop-up menu as needed. Loops also may be frozen at any time for better viewing using the <Freeze> button in the “Display“ field. User’s Manual ASL 5000, SW 3.5, Rev.2 © IngMar Medical, Ltd. 2015 Figure 4-56, Loop View Operation Running Simulations From the Run Time Home Display 4.3.5 Lung Fill Indicator Window Clicking the check box for the <Fill Bar> indicator next to the <Freeze/ Run> switch (see Figure 4-53, page 44) opens an additional window indicating delivered volume as a colored bar graph. This window will stay on top as long as the <FillBar> checkbox is checked. Threshold settings control the coloring of the Lung Fill Indicator: For volumes less than “Low“, the bar will appear black, above “High“, they will show as red. In between the thresholds, green is used to indicate that the desired range of volumes is applied. These settings can be edited by the user in the Lung Fill Indicator window.The overall volume scale adjusts automatically with the upper threshold. Figure 4-57 To close the Lung Fill Indicator window, use the <Close Window> button. 4.3.6 Auxiliary Parameter Displays In addition to the data plots, additional analog parameters are collected from the simulator as follows: — Barometric pressure: Barometric pressure is displayed in units of kPa. — Gas temperature: Gas temperature is displayed in degrees Celsius. Please note that the gas temperature sensor, with its time constant of several seconds, measures an averaged temperature for the purpose of normalizing to standardized conditions of volume measurement.1 User’s Manual ASL 5000, SW 3.5, Rev.2 © IngMar Medical, Ltd. 2015 — Oxygen concentration (default setting: numerical display off): O2 concentration is displayed as vol% O2. Values are from partial O2-pressure oxygen transducer (available option), corrected for barometric pressure. — Wall temperature (default setting: numerical display off): Wall temperature is displayed in degrees Celsius. The wall temperature is read from the RTD2 of the optional Cylinder Temperature Controller (CTC). Figure 4-58 Lung Fill Indicator The purpose of this display is to assist users who are using the ASL 5000 for educational purposes. The boldly colored bar graph allows to see the filling condition of the simulated patient lung from a good distance, for example when having a resuscitation trainer head attached to the breathing simulator. A student practicing with a manual resuscitator or manipulating the controls of a ventilator can judge, at a glance, the success of his or her treatment of the “patient“. — Auxiliary data (default setting: numerical display off): AUX1 and AUX2 may be used for displaying externally collected analog data (via the 2-channel analog port located on the back of the simulator). See also "Working With the Analog Inputs", page 63. The display indicates the input voltage to these channels (range of 0 to 10 V). 1 2 Temperature fluctuations induced by the pressure changes in the cylinder are not considered RTD = Resistive Thermistor Device 47 Operation Running Simulations From the Run Time Home Display 4.3.7 Modifying Waveform Displays The parameters O2 concentration, wall temperature, AUX1, and AUX2 will be visible only after the respective check box to the left of the digital displays has been checked. The ASL5000 software allows you to modify the appearance of waveform displays. By default, each trace in a waveform plot is labeled with a name. To the right of the plot label is the plot sample. Each plot sample has its own pop-up menu to change the plot, line, color, and point styles of the plot. From among all the possibilities to alter the appearance, the color and line style selections are the most relevant selections for the ASL waveform plots. Optionally, the analog channels may be recorded (see "Working With the Analog Inputs", page 63). Figure 4-60 Trace Colors Figure 4-59 Analog Parameters NOTE: TCP/IP data broadcast for both breath parameters and waveforms is also supported with the ASL software acting as a server. For details, see "TCP Data Broadcast", page 97. First, right-click the sample that you want to modify. The Color item displays the palette for selecting the plot color. The Line Style, Line Width and, further down in the menu, the Point Style, items display styles you can use to distinguish a plot. The line width subpalette contains widths thicker than the default 1 pixel, which is helpful for emphasis of plot lines, particularly in printouts of screenshots. The Fill Baseline item indicates a fill setting for the baseline. Zero fills from your plot to a baseline generated at 0. Infinity fills from your plot to the positive edge of the graph. -Infinity fills from your plot to the negative edge of the graph. By using the bottom portion of this menu, you can fill to a specific plot of the graph. NOTE: It is recommended to carefully experiment with these display options to obtain the optimum view for a particular purpose. It is helpul to keep in mind that certain setting combinations, especially those for color, can render traces invisible, which may or may not be intended. 48 User’s Manual ASL 5000, SW 3.5, Rev.2 © IngMar Medical, Ltd. 2015 Figure 4-61 Graph Modifications Operation Running Simulations From the Run Time Home Display 4.3.8 Stopping a Simulation A simulation can be stopped by clicking the <Stop Sim> button in the top right corner of the screen, the “Simulation“ field. Figure 4-62 Simulation ON/OFF At that time, you will hear the electromagnetic valve in the SBLVM (if connected) being activated. This will switch a connected ventilator back to the auxiliary test lung attached to the SBLVM. Simultaneously, the green SIM indicator light on the simulator will extinguish and the simulator piston will move back to its home position at the last URC setting. With the simulation OFF, changes to the simulation parameter script will be accepted for the next simulation run as described in "Working with the Simulation Script Editor", page 31. User’s Manual ASL 5000, SW 3.5, Rev.2 © IngMar Medical, Ltd. 2015 After saving the new script, the simulator will use this script as its new source for locating parameter sets and assigning numbers of repetitions for the sets. Immediate (“quasi interactive“) changes of parameters are possible (without stopping a simulation) by applying the standard method of editing simulation models on the currently running parameter set and saving the set without changing its name. The intended method, however, is to use the Interactive Control Panel described in 4.5 below, which gives the user also control over all the patient model parameters. NOTE: Some parameters, such as the URC setting, will only be applied as defined in the first *.vr3-file in a script. Changes made to these parameters after a simulation has been started will not be considered for a simulation already running. 49 Operation Using the Virtual Ventilator 4.4 Using the Virtual Ventilator 4.4.1 Concept of the Virtual Ventilator The Virtual Ventilator (VV) is a newer feature introduced with software 3.3. With it, realistic simulations may be performed that include positive pressure traces in waveform graphs, as they would be generated by an actual ventilator. This makes the ASL 5000 software an even better tool for classroom instruction, long distance learning, and learning management systems (LMS). The Virtual Ventilator feature is included in the license for software accompanying ASL 5000 simulators. It can be made available separately as a purchase of the standalone version of the ASL software 3.5. The VV is invoked from the Run Time Home tab of the Window Manager and is only available in demo mode (no ASL 5000). The Virtual Ventilator may be operated in either Pressure Control (PC) or Volume Control (VC) mode. When used in VC, flow is going to be a dependent variable, derived from the set volume and inspiratory flow time. It will be indicated on the bottom of the VV panel. In PC mode, volume will be a function of the <Peak Pressure> setting and, again, timing. WARNING ! Intensive care ventilators are complex therapy devices with many features and modes. The Virtual Ventilator is not intended to be an exact rendering of an actual ventilator and its behavior. The user should use care when interpreting results from the Virtual Ventilator and always take into account that the modes implemented are a significant simplification.1 1 The Vent Compliance and Resistance Settings represent internal pneumatic properties of the ventilator. A reasonably large number for Cvent 2...5 mL/cmH2O) as well as Rin0 and Rex0 (at least 2 cmH2O/L/s) is essential for stable operation. For more details, see "Theory of the Virtual Ventilator", page 126. Clicking the button will turn the VV off and will close its user interface panel. 1 50 For further reading on the topic of ventilator mode classifications, please see Chatburn, Respiratory Care 2007; 52(3):301–323. User’s Manual ASL 5000, SW 3.5, Rev.2 © IngMar Medical, Ltd. 2015 Figure 4-63, Virtual Ventilator Panel Both VC and PC can be either operated as patient triggered or as machine triggered, which means that the patient’s breathing pattern has no influence on the timing of positive pressure from the ventilator. . Operation Running Simulations Using the Interactive Control Panel (ICP) User’s Manual ASL 5000, SW 3.5, Rev.2 © IngMar Medical, Ltd. 2015 4.5 Running Simulations Using the Interactive Control Panel (ICP) Figure 4-64, Additional functionality of the ICP includes the ability to start and stop simulations and to save parameter sets that have been adjusted from within the ICP. Interactive Control Panel, Lung Model Parameters (R and C) tab “Patient“ settings are usually prepared and altered using the Script and Simulation Editor windows when designing tests and doing research with the ASL 5000. However, for a more interactive style of modeling, the Interactive Control Panel (ICP) may be invoked from the Run Time Home tab or from other panels in the software. The ICP allows the user to choose the parameters of a patient model — interactively (manually) — via automatic parameter adjustment mode for muscle pressure and breath rate based on tidal volume or minute ventilation targets. — by invoking prepared patient model files at will Instead of a step-through approach with multiple windows for model parameter settings, the ICP uses a number of tabs across the top of the window to access its different functions. The left side of the window is reserved for general controls and settings The typical use of the ICP would be for adjusting a parameter set in a running script. While the ICP is active, a parameter set called interactive.vr3 is inserted into the running script. This parameter set is a duplicate (work copy) of the *.vr3-file currently processed from the script at the time the ICP was activated. ICP settings take precedence over any other settings that might otherwise be active, including RespiSim patient settings 51 Operation Running Simulations Using the Interactive Control Panel (ICP) . To enter Interactive Control — click the GoTo-button in the top left of the Run Time Home tab or the RespiSim Instructor Dashboard, and click the button on the ICP itself. Figure 4-65 Go To ICP Alternatively, from the RespiSim tab, you can activate the ICP by simply clicking the button. NOTE: In the Instructor Dashboard, you have an indication that ICP is active via a blinking message i the top right corner of the window. Figure 4-66 ICP Active Message in Instructor Dashboard In the Run Time Home tab, an active ICP is indicated in the parameter file path box (Status Line) by the entry: C:\Program Files (x86)\ASL Software 3.5\vars\interactive.vr3. From the middle section of the control strip, you can select to call in a “Default Patient“ that has been defined in a parameter set default.vr3. This patient setting may be changed in the same way as any other *.vr3-file to suit a user’s special needs The top third of the control strip shows basic information about the currently running simulation, which can be expanded with the information about the originating *.vr3-file. The middle third of the control strip will allow you to make basic decisions about setting up a patient model. The bottom third contains the controls for starting and stopping, the simulation Figure 4-67 View Original Model After editing from within the ICP is complete, you may save the resulting parameter set (*.vr3-file) either under its old or a new name by clicking the <Save Current Model Settings> button. NOTE: Please note that for the reasons illustrated above, the name interactive.vr3 is reserved and cannot be used when saving parameter files. With this approach of using a working copy of the current parameter file, you can always return to your running script (by clicking <End Interactive>) if editing was not satisfactory, and no changes to the original *.vr3-file will occur. 52 Figure 4-68 ICP Controls “Const. Vt“, “Const. MV“ and “CO2Y“ refer to additional automatic modes available to control muscle pressure (and breath rate) in order to achieve a Vt or MV target, respectively, or an EtCO2 value. They are accessed via ICP tabs Closed Loop Vt, Closed Loop MV, and Closed Loop CO2Y and will make automatic adjustments to the Pmax (and breath rate) parameters in order to achieve a Vt, MV, or EtCO2 target, respectively. In manual mode (No Loop), the parameters are used as they are set by the user on the tab-accessed panels Lung Model Parameters and Spont. Breath Parameters to the right. User’s Manual ASL 5000, SW 3.5, Rev.2 © IngMar Medical, Ltd. 2015 The name and the settings of the the *.vr3-file currently being applied and edited in the ICP out of a running script or RespiSim scenario can be accessed by clicking on the < View Original Model Settings> button in the left of the ICP window. The left side of the Interactive Control Panel is divided into three sections. Operation Running Simulations Using the Interactive Control Panel (ICP) The automatic parameter adjustment modes are a convenient way to add realism to the model when a ventilator is attached. The work of breathing performed by the ventilator is taken into account for setting patient effort. WOB done by the ventilator is not simply superimposed, resulting in a larger tidal volume or minute ventilation. Instead, the ventilator intervention will result in a reduced patient effort. The leftmost tabs of the ICP will set “Lung Model Parameters“ and “Spont. Breath Parameters“. 4.5.1 Lung Model Parameters Tab Setting values for R and C may be performed by clicking and positioning (“dragging“) the blue pointer on the knobs to the desired setting, or by entering numerical values into the field below the knob.When making an adjustment to a setting, the knob color will change to orange, indicating that a new value has not yet been applied. Once the new parameter setting has become active, usually after a breath cycle, the color of the knob will return to green. NOTE: When working with the Interactive Control Panel, please note that, as of sw 3.5, the ICP can be used effectively with pre-configured dynamic (time varying) models from the patient library. You may only work with models that do not employ time-varying parameters if you intend to manipulate individual settings on-the-fly. User’s Manual ASL 5000, SW 3.5, Rev.2 © IngMar Medical, Ltd. 2015 The lung model parameters are displayed as screen images of dial knobs (Figure 4-69). Only those parameters that are part of the current model type (single versus two compartment, etc.) will show. Figure 4-69, ICP, Lung Model Parameters (R and C) tab 53 Operation Running Simulations Using the Interactive Control Panel (ICP) 4.5.2 Spontaneous Breathing Parameters Tab ICP, Spontaneous Breathing Parameters tab Again, setting the parameters of the spontaneous breath component of the patient model may be performed by clicking and positioning (“dragging“) the blue pointer on the knobs to the desired setting, or by entering numerical values into the field below the knob.When making an adjustment to a setting, the knob color will change to orange, indicating that a new value has not yet been applied. Once the new parameter setting has become active, usually after a breath cycle, the color of the knob will return to green. Figure 4-71 ICP Adjustment Not Yet Applied 54 User’s Manual ASL 5000, SW 3.5, Rev.2 © IngMar Medical, Ltd. 2015 Figure 4-70 Operation Running Simulations Using the Interactive Control Panel (ICP) User’s Manual ASL 5000, SW 3.5, Rev.2 © IngMar Medical, Ltd. 2015 4.5.3 Trends Tab Figure 4-72, Interactive Control Panel, Trends Tab In this tab, historical trends are displayed for three parameters: — Inspiratory tidal volume Vtin — Pmus (spontaneous profile) maximum Pmax — Breath Rate If additional trends from a simulation are needed, please go to the Post-Run Analysis Menu and select a saved data set (by the name you gave it when the simulation was started). For further reference, see "Trend Graph Display", page 79. 55 Operation Running Simulations Using the Interactive Control Panel (ICP) 4.5.4 Closed Loop Vt Tab From the Closed Loop Vt tab, a target of tidal volume (Vt) may be set directly, in servo-control fashion. This means that the simulator will try to maintain the desired Vt by making adjustments to the muscle pressure profile, specifically by adjusting the maximum (negative) pressure of the excursion (Pmax). Before opening this tab, please make sure that the slide switch on the left of the ICP window is set to “Const. Vt“, otherwise a reminder will show up on the tab stating that: Lung is passive or Closed Loop Vt is not active Figure 4-74 Constant Vt 56 Setting the Vt target for the interactive patient model and the adjustment thresholds may be performed by clicking and positioning (“dragging“) the blue pointer on the knobs to the desired setting, or by entering numerical values into the field below a knob. The adjustment is not immediate, but rather gradual, to give a more realistic representation of patient changes. However, please keep in mind that there is no underlying physiological model applied here that would make allowances for disease states and other patient conditions. NOTE: There is no automatic adjustment of the breath rate in this mode. Depending on the external conditions (ventilator settings, etc.) the model may or may not be able to reach the desired, preset Vt. Both actual and set values for Vt are displayed in the trend diagram on this tab. User’s Manual ASL 5000, SW 3.5, Rev.2 © IngMar Medical, Ltd. 2015 Figure 4-73, Closed Loop Vt tab Operation Running Simulations Using the Interactive Control Panel (ICP) 4.5.5 Closed Loop MV Tab User’s Manual ASL 5000, SW 3.5, Rev.2 © IngMar Medical, Ltd. 2015 Figure 4-75, Interactive Control Panel, Closed Loop MV Tab In this mode, both Vt and bpm settings are manipulated automatically with the goal to accomplish a preset level of minute ventilation. Upper and lower limits may be set for both parameters to keep adjustments within a physiologically relevant range. The algorithm used adjusts both parameters (Vt and breath rate) simultaneously, i.e larger tidal volumes are associated with faster breath rate and vice versa. Before opening this tab, please make sure that the slide switch on the left of the ICP window is set to “Const. MV“, otherwise a reminder will show up on the tab stating that: Also in this mode, a trend window is displayed that shows the approximation towards the set value (MV). As in Vt Loop mode, external conditions such as ventilator support will cause adjustments automatically. Setting the MV target for the interactive patient model and the adjustment thresholds may be performed by clicking and positioning (“dragging“) the blue pointer on the knobs to the desired setting, or by entering numerical values into the field below a knob. Please note that the algorithm does not represent a model of respiratory control based, for example, on CO2 elimination. It is furthermore important to keep in mind that, depending on the restrictions imposed by limit thresholds, as well as by external conditions, it will not always be possible to actually reach the set value of minute ventilation. Lung is passive or Closed Loop MV is not active Figure 4-76 Constant Vt 57 Operation Running Simulations Using the Interactive Control Panel (ICP) 4.5.6 Closed Loop “CO2Y“ Tab In this mode, Pmax and bpm settings are manipulated automatically. Upper and lower limits may be set for both parameters to keep adjustments within a physiologically relevant range. Before opening this tab, please make sure that the slide switch on the left of the ICP window is set to “CO2Y“, otherwise a reminder will show up on the tab stating that: Lung is passive or CO2Y is not active Figure 4-78 No Loop 58 NOTE: It is important to keep in mind that, depending on the restrictions imposed by limit thresholds, as well as by external conditions, it will not always be possible to actually reach the required value of minute ventilation for attaining a particular EtCO2-value. User’s Manual ASL 5000, SW 3.5, Rev.2 © IngMar Medical, Ltd. 2015 Figure 4-77, Interactive Control Panel, Closed Loop CO2Y Tab Operation Running Simulations Using the Interactive Control Panel (ICP) User’s Manual ASL 5000, SW 3.5, Rev.2 © IngMar Medical, Ltd. 2015 4.5.7 Patient Library Tab Figure 4-79, Interactive Control Panel, Patient Library Tab From the Patient Library tab, pre-configured patient parameter sets can be invoked at any time by selecting a file name and clicking the <Change Patient Parameter (.vr3) File> button (or double-clicking the file name in the list). This is particularly useful in situations where certain disease states (scenarios) are being simulated and transitions from one to the other state would require changing multiple parameters at once. Using a preconfigured set of patient parameters makes all changes occur simultaneously. Time-varying patient models may also be invoked to create transitions or patterns for purposes such as simulating the induction of anesthesia. For this reason, this is the tab that is shown first when entering Interactive Control. Alternatively, you can also browse to a different directory where a user has stored special scenarios. NOTE: The directory selected for this purpose will also become part of the Project File. NOTE: Please note the difference between scenario scripts and creating flexible scenarios via the Patient Library tab in the Interactive Control Panel. In the case of scenario scripts (from the Simulation Script Editor Scenario Script tab), you not only invoke a particular patient parameter file. In this case, the sequencing (and duration) is also part of the scenario and no longer instructor-driven. The default directory for such scenario-related parameter files is ..\vars\scenarios. Patient files saved in this directory will show up in the listing on this tab. 59 Operation Breath Detection / Real-Time Analysis Window 4.6 Breath Detection / Real-Time Analysis Window The Real Time Analysis (RTA) tab is accessible from the Window Manager. From the RTA tab, the user has control over the analysis and capture of data from a simulation run. The selection of parameters to be displayed (2 x 4) may be changed at any time. Selections made here are stored in the Project File and may also be changed at the start or close of the software from the Project File Tool. The four parameters chosen for the left column are shared with the parameter selections in the Trend Graph Display. Vice versa, changes made there are also reflected in the RTA tab (see page 60). In the upper half of the window, parameters relevant for the breath detection algorithm and for the ventilatorvolume-related compensations are set. You can control the saving of waveform data with the checkbox to save disk space or even turn analysis off completely by unchecking (it is enabled by default). 60 You can also choose to have a digital filter applied to the airway pressure data (default setting is a 10-point moving average). Figure 4-81 Pressure Filter Choices A 5Hz 2nd-order Butterworth filter may be chosen to prepare data during pressure stability tests for CPAP devices (ISO 17510). Alternatively, filters may be turned off if desired. Click the up or down arrow to scroll through the options. Breath detection parameters (right side of the RTAwindow) should not be modified from their default settings unless you notice that the volume plot in the RTA-window does not show properly identified individual breaths. User’s Manual ASL 5000, SW 3.5, Rev.2 © IngMar Medical, Ltd. 2015 Figure 4-80, Real-Time Analysis Tab Operation TCP Broadcast Configuration For neonatal applications, on the other hand, threshold values should routinely be changed from their value of 5 mL to a smaller setting, typically 0.5 mL. NOTE: As of software 3.2, an adjustment is applied for the amount of both inspiratory and expiratory threshold volume. Tidal volumes reported are not diminished by the thresholds. Compensations (“Auxiliary Compensation Parameters“) set in the RTA-window are for properly adjusting calculations with regard to the compressible volume and external resistances introduced to the system via connectors and external circuits. The effect of the compensations will be that volumes indicated as “ventilator volumes“ will more closely match the measurements made by a ventilator. Especially when using the simulator in neonatal applications, careful adjustments will be helpful in eliminating unwanted biases in this regard, if a ventilator itself does not correct for these factors (volume “lost“ in circuits). NOTE: The tidal volumes displayed as Insp. Vt and Exp. Vt already take into account volume compressibility in the cylinder (URC and deadspace), which is why you will see small deviations of these numbers from the volume tracings in the Run Time Home display. 4.7 TCP Broadcast Configuration While a simulation is running, both waveform and breath parameters are being “broadcast“ on the network, which allows third-party applications to connect via TCP/IP and to use the data in real-time. The configuration for this broadcast can be set from the menu bar of the Real Time Analysis tab. Figure 4-82 Configure TCP Broadcast Menu Selection Clicking <TCP Broadcast Configuration> brings up this dialog window: User’s Manual ASL 5000, SW 3.5, Rev.2 © IngMar Medical, Ltd. 2015 By checking the checkbox, you can match the volume graph to the one seen in the Run Time Home window. If it is left unchecked, the standard compensations performed when processing data (see NOTE above) are applied Volumes with corrections towards different standard gas conditions (BTPS, ATPD, STPD ...) may be viewed by clicking on the <Conditions> indicator. “As measured“ (no correction) is the default setting. Please keep in mind that data written to file is not affected by this choice. Real-Time Analysis operates with the same core software modules as does the Post-Run Analysis (see page 67), but performs data analysis concurrently. By observing the breath identification markers (start of breath, begin of expiration, etc.) you can make adjustments to the breath detection algorithm parameters as needed in real time. The breath parameters displayed in the middle of the window (2 x 4 parameters) may be selected from a total of more than 90 parameters. The parameters selected here will also be used in the Reports generated from the Run Time Home tab (see below). The selection is also part of the Project File. Figure 4-83 Broadcast Configuration Dialog Window You can broadcast either raw waveforms or processed waveforms (includes flow, which is not part of the raw data set). The waveforms use port 6343 as the default and breath parameters are communicated via port 6342. The port settings may be changed as needed in a particular network to avoid conflicts. The settings from standard gas conditions (BTPS, ATPD, STPD ...) as they are made in the Breath Detection/Real Time Analysis window also apply to the broadcasts. Thus a convenient way is provided to make these adjusted parameters and waveforms available to other applications 61 Operation Run Time Home - Report Generation The software installation includes two separate client applications, TCP Waveform Client.exe and TCP Breath Client.exe for demonstrating and monitoring the broadcast. They are helpful when developing third-party applications that are using the data streams from the ASL application. They can also be used as a remote monitoring tool to verify that a simulation is running properly when installed on a separate PC. In software 3.5, they are conveniently accessed via the Utilities tab of the Window Manager (yellow buttons, “Parameter Sharing“). Please refer to "TCP Data Broadcast" on page 97 for more information. 4.8 Run Time Home Report Generation From the Run Time Home window, you can directly produce simple simulation reports, either formatted for printing or as HTML (select “Save Report“). A typical report might look like this Figure 4-84 Create Report Key A file header.txt located in ..\ASL Software 3.5\ASL Reports\ is used as a container for a institution-specific header. You can place text there that you would like to always appear at the top of each report. Editing of this header is done via the Project File Tool (Output Data Settings tab), see Figure 4-5, page 26. NOTE: The <Create Report> button will only be available after the number of breaths to be included in the report have actually elapsed in the simulation. 62 Figure 4-85 Sample Report User’s Manual ASL 5000, SW 3.5, Rev.2 © IngMar Medical, Ltd. 2015 The number of breaths (repetitions) saved as waveforms depends on the setting in the numerical box shown in Figure 4-84. The parameter selection is taken from the parameters displayed in the Breath Detection/Real Time Analysis window. This selection is also preserved in the Project File, but can be modified at any time. Operation Working With the Analog Inputs 4.9 Working With the Analog Inputs Your ASL 5000 is equipped with inputs for two analog channels AUX1 and AUX21. The specifications for these inputs are as follows: 0 to 10 V, differential input 2.44 mV, 16 bit A/D up to 30 V inputs not opto-isolated! 1024 Hz -primary control analog input channel 512 Hz -secondary analog input Hypertronics Connector (style used for serial no.s mates with Hypertronics D01 circular 4 pin D01PB406MST up to 1400) Connector (style 4-position ODU, mates with used for serial no.s ODU S11M07-P04MJG0-5260 or above 1400) equivalent LEMO plug User’s Manual ASL 5000, SW 3.5, Rev.2 © IngMar Medical, Ltd. 2015 Input range Resolution Over voltage protection Max. sampling rate Figure 4-86 Data Recording Checkboxes Data from the analog channels is retrieved while the simulator is running. A separate data file data.aux may be written which contains the readings for both channels as well as vol% of oxygen (when checked), in addition to a time stamp. This feature is activated by checking the <Record AUX> check box. Updates to this file are written approximately 4 to 5 times a second. Recorded values of other analog signals retrieved by the ASL 5000 are also provided in the standard data file set as follows: Data File Parameter Update rate xxx.brb / xxx.bra O2 once per breath xxx.avb / xxx.ava Gas temp. once per breath xxx.avb / xxx.ava Cyl. wall temp. once per breath xxx.avb / xxx.ava Barom. pressure once per breath 1 Analog outputs are not yet supported in the current firmware 4.10 Working With the Digital Outputs The digital output connector of the ASL 5000 provides three TTL2-signals. The first channel is used to provide a high/low signal switched with the direction of flow (high for inspiration, low for expiration). A second channel provides a pulsewidth modulated signal (PWM) proportional to the inspiratory flow. This signal type is used for controlling the chest rise of an attached Laerdal SimMan (Chest Rise Module accessory, part no. 31 00 730, see "Chest Rise Module", page 101). In ASL 5000 devices below serial no. 1400, both signals share a line and the output for this channel is, by default, set to generate the PWM signal. In order to change the behavior, the file L.bat in the firmware’s c:\batch directory will need to be replaced with the file L_no_PWM.bat. In newer devices (above serial no. 1400) that have the new configuration of communication sockets as shown in Figure 4-87 below, each of the signals has its own line. The third signal provides a 50 ms TTL pulse at the time of the beginning of a pressure profile excursion (start of the spontaneous effort). This signals provides an easy means of triggering/synchronizing external instruments with breaths from the ASL. Output Short circuit protection Signal delay Connector (style used for serial no.s up to 1400) Connector (style used for serial no.s above 1400) TTL yes, outputs not opto-isolated 2 ms Hypertronics mates with Hypertronics D01 circular 3 pin D01PB306MST 8-position ODU, mates with ODU S11M07-P08MFG0-6550 or equivalent LEMO plug On ASL 5000 Simulators beginning with serial no. 1401, the configuraion in the back looks like this Figure 4-87 Communication Connections (Back Panel) For pin assignments of the sockets, please refer to the “Preparation Addendum“ that is provided with the mating cables for Digital Out and Analog I/O in your ASL 5000 Accessory Kit (included). 2 TTL = Transistor-Transistor Logic, referring to a logic signal that has nominal voltage levels of 5 V (high) and 0 V (low) 63 Operation Exiting the ASL Software 4.11 Exiting the ASL Software Clicking on the <EXIT ASL Software> button on the Run Time Home window or tab will shut down all LabVIEW program modules. Figure 4-88 Software Exit Alternatively, you can also click the in the top right corner of the Window Manager, or select <Exit ASL Software> from the Control drop-down menu (Run Time Home). A dialog window will open indicating that the software is about to close and where users are given the opportunity to save their personal default settings in the Project File. Figure 4-89 Project File Dialog The next dialog allows for a return to the Welcome window to start a new session with the simulator. Data that was written to a raw data file (*.rwb) will not be erased. Restarting the software, you may still analyze data from this last simulation run by loading its data file (or, of course, from other saved simulations), even if not running a new simulation. NOTE: If you start a simulation without assigning a new name for the new data set to be saved, the previous data will be overwritten at that time 64 User’s Manual ASL 5000, SW 3.5, Rev.2 © IngMar Medical, Ltd. 2015 Figure 4-90 Welcome Window Return Option User’s Manual ASL 5000, SW 3.5, Rev.2 © IngMar Medical, Ltd. 2015 This page intentionally left blank 65 Data Analysis 5 Data Analysis The ASL 5000 software package contains modules for data analysis both in real-time (while the simulation is running, see ", Real-Time Analysis Tab", page 60), and “post-run“. The purpose of the data analysis package is to provide the user with the tools for an in-depth review of data generated by a simulation run and to supply a host of automatically generated breath parameters that characterize each breath. In addition, data may be analyzed in spreadsheets and other, third-party software. Aside from providing ASCIIversions of the data files collected (via the Utilities tab and <Data File Export>), there is even the possibility of third-party software connecting directly to the data stream (taking advantage of the built-in TCP server). Thus, data generated from the ASL 5000’s Analysis package can be merged with other signals from separate devices in a convenient fashion (see also "TAI Overview", page 90) When collecting data at high speed (512 Hz maximum), you will have waveforms available for an in-depth look at the characteristics of each breath as it develops. You may want to scale down the data rate or limit the time data is collected because of the significant amount of data stored. However, breath parameters may be collected without limitations from simulation runs that may extend over several hours or even days. An important tool for this type of data is the Trend View (see page 79), where you have an instant overview of a prolonged simulation run. Thus, it is possible to display a trend of calculated breath parameters that have been obtained using the raw data and the known modeling parameters associated with the data file. The Post-Run Analysis module enables the user to store analysis results in two types of files, a breath parameter file and a time-based (waveform) file. The module allows printing and viewing of analysis results in several task-specific screen windows. NOTE: The Real-Time Analysis tab is always available as an adjunct to the Run-Time module of the ASL 5000 software. It is used to monitor data analysis in real time while a simulation is running, thus allowing for adjustments of thresholds to ensure that already the initial pass of data analysis yields useful results (see ", Real-Time Analysis Tab", page 60). NOTE: The structure and performance of the Real-Time Analysis is very similar to the Post-Processing window opened by clicking on the blue <Process Data> button in the Post-Run Analysis Menu. The latter is used to perform a re-analysis of previously collected waveform data when necessary. 66 User’s Manual ASL 5000, SW 3.5, Rev.2 © IngMar Medical, Ltd. 2015 The Post-Run Analysis Module is automatically loaded and started when the main LabVIEW application is launched. To access the Post-Run Analysis Main Menu screen, click on its tab in the Window Manager. Data Analysis Post-Run Analysis Main Menu 5.1 Post-Run Analysis Main Menu User’s Manual ASL 5000, SW 3.5, Rev.2 © IngMar Medical, Ltd. 2015 Figure 5-1 Post-Run Analysis Menu As a first step in the standard procedure, a data file (*.rwb) needs to be loaded for analysis. By graying all other menu selections in the window (except for the <Select a Simulation> button), the user is guided automatically to perform this step. You can also open a data file from the <File> drop down menu Figure 5-2 Post-Run Analysis, Select Data File Loading a data file set (with the rwb-extension, raw binary type) will also automatically load the breath parameter file belonging to the same simulation run that was generated by the Real-Time analysis. Therefore, you do not necessarily have to go to the “Process Data“ step if you do not intend to re-process data for the purpose of optimizing breath detection performed by the software. You may, however, perform that step at any time for data sets that included waveforms and in this way check the breath detection performed by the ASL 5000 Post-Run data analysis processing. Once a raw data file has been loaded, all analysis menu options become accessible and you can freely pick and choose between them, provided that the data set contained waveform (high resolution) information. Very large data files may require you to allocate more memory to the LabVIEW application (depending on the Windows OS version). Do so if you receive the respective message from LabVIEW. Alternatively, for very long runs, you may want to reduce the waveform data sample rate (see page 35.) Pressing the <RETURN> button provided on each analysis screen will return the user to the Post Run Analysis Menu screen for further selections. 67 Data Analysis Process Data (Blue Button) 5.2 Process Data (Blue Button) The functionality of the Post-Run Data Re-Processing window (PRDRP-window) is, as mentioned before, very similar to that of the Breath Detection/Real-Time Analysis window. This interface is used to check and re-perform breath detection and the associated calculation of breath parameters. Breath detection parameters (right side of the Post-Run Data Re-Processing window) should only be modified from their default settings if you notice that the volume plot (in the bottom half of the window) does show improperly identified individual breaths. For neonatal applications, as already stated for Real-Time Analysis, threshold values should routinely be changed from their default value of 5 mL to a smaller setting, typically 0.5 mL, to assure that small tidal volumes are correctly interpreted as individual breaths. 68 Airway pressure filtering (<Pressure Filter>) may be applied in the same way as from the Breath Detection/ Real-Time Analysis window (see page 60). The setting <Fraction of Target for Steady State> determines a range of “steadiness“ for the algorithm to use when determining whether a ventilator breath is a pressuretargeted (constant pressure) or flow-targeted (constant flow) breath (see also "Servo Control Performance Display", page 84). If these targets are known up front, they may be entered into the fields <Inspiratory Target Override> or <Expiratory Target Override>. The default value of -1 is used for automatic calculation with the steady state criterium. Compensations set in the PRDRP window will allow, as in the Breath Detection/Real-Time Analysis window, for properly adjusting calculations with regard to the compressible volume and external resistances which User’s Manual ASL 5000, SW 3.5, Rev.2 © IngMar Medical, Ltd. 2015 Figure 5-3 Post-Run Data Re-Processing Window Data Analysis Process Data (Blue Button) may be introduced into the system via connectors and external circuits. The effect of the compensations will be that volumes indicated as “ventilator volumes“ will more closely match the measurements from a ventilator itself when its calculations do not already include any compensations for these effects. Especially when using the simulator in neonatal applications, where parasitary effects can be significant, careful adjustments will be helpful in eliminating unwanted biases in this regard. As an example, let us assume that the ventilator delivers a tidal volume of 550 mL to a patient with a very low compliance of 10 mL/cmH2O. If the circuit compliance is 1 mL/cmH2O, the overall compliance of the system is now 11 mL/cmH2O and only 11/12 of the volume hat leaves the ventilator actually reaches the patient (550 mL), the rest is “lost“ in gas compressibility of the ventilator circuit. Entering the volume of the circuit into the <Compensations> field will result in showing the full volume that left the ventilator instead of just the volume that reached the simulator. User’s Manual ASL 5000, SW 3.5, Rev.2 © IngMar Medical, Ltd. 2015 NOTE: If, on the other hand, compensations of this kind are performed by a ventilator (and most ventilators do this, for example, by calibrating a patient circuit at startup), you can leave these values set to zero. Please be aware that it will not be possible for the breath detection algorithm to successfully identify breaths under all circumstances. It is therefore recommended to always perform a plausibility check. A higher-thanexpected number of breaths for the total time period of recorded data (viewed in the Breath Data display), for example, will normally indicate an improper identification. In this case, small fluctuations most likely have been incorrectly separated into individual breaths, and an increase in the breath detection threshold is indicated. An example would be a situation where high frequency oscillations are superimposed on a bi-level, regular breath pattern. In the Post-Run Analysis, you can further fine-tune aspects of the analysis algorithm. For example, you can introduce a manually selected threshold for “start of effort“, in effect “filtering out“ small artifacts of the patient effort. In addition, it is possible to manually override the simulator-side calculation of a target flow or volume during inspiration or expiration (a parameter related to ventilator performance). This target is effectively known a priori in many situations, for example given as a ventilator setting (the peak pressure in a pressure-controlled mode). <Insp. Waveform SD Threshold> is a setting to be used by the algorithm for determining the type of the inspiratory waveform (pressure or flow as the primary control variable). It is the fraction of the mean below which the standard deviation of pressure must fall to consider it the primary control variable. This setting does normally not require adjustment. When clicking <Start>, new *.brb and *.dtb data files are produced. Whereas the *.brb file contains the updated breath parameters, the *.dtb file is a real-time data format (waveforms) that contains the processed raw data with additional calculations for flow, etc. The already existing files in the data set of the same name will be overwritten. However, the raw data in the set remains unchanged, which means that further reprocessing may be performed, for example with changed threshold parameters, if needed. The data file sets are written in binary file format with column headers but they can easily be converted into tab-delimited ASCII files using the File Translation Utility enclosed with the ASL 5000 software package (see page 92). After conversion, files are ready for direct import into Excel, MATLAB, or any other data analysis/graphics program. Lower frequency analog data, such as O2-concentration (if the FOM1 option is installed), AUX1 and AUX2 signals, are saved in the *.brb-file (at a rate of one value per breath). A separate waveform data file data.aux is written when the <Record AUX> box is checked on the Central Run Time display. This file then contains readings for both analog channels as well as vol% of oxygen (when checked), in addition to a time stamp. For update frequencies for these recordings, please see "Working With the Analog Inputs", page 63. NOTE: Beginning with software 3.4, O2 and the primary AUX signal are also included in the waveform files and TCP broadcasts. NOTE: In the following pages, it is mentioned for many of the Analysis views that volume corrections can be applied to display volumes according to the different standards. (BTPS, ATPD, etc.). It is important to note that these corrections are only applied for viewing of the data, but that the data itself (even the processed data) is in now way altered by making different selections in this regard. NOTE: In sw 3.5, all analysis views will consistently show the volume offset caused by PEEP, in the same fashion as this is plotted in the Run Time Home graphs. in the past, the volume at the begin of a breath was set to zero in some instances. 1 FOM = Fast Oxygen Measurement 69 Data Analysis Display Data Selections (Green Buttons) NOTE: As of software 3.5, it is now possible to have multiple analysis windows open at the same time. This facilitates comparison of data using different views. 5.3 Display Data Selections (Green Buttons) The column of options regarding display of breath data is colored in green and offers 5 different views (see Figure 5-4 below): — Breath by breath data, 3 graphs — Multi-parameter graph, a simultaneous display of 4 different variables versus time, breath by breath — Two-parameter loops, Y versus X plots, breath by breath — Multiple breath view, a timeline graph of 4 parameters and: — Trend graph of breath parameters, from a breath parameter *.brb file. 70 User’s Manual ASL 5000, SW 3.5, Rev.2 © IngMar Medical, Ltd. 2015 Figure 5-4 Display Data Selections Data Analysis Display Data Selections (Green Buttons) 5.3.1 Advanced Graph Analysis Tools: The Graph and Cursor Palettes The ASL5000 software offers considerable flexibility in terms of the appearance of the graphs displayed in both the simulation model set-up and the post-run analysis. In all graph displays (except the Run Time Home screen), you should notice one or two small grids, depending on which graph is being displayed. They are called the Scale Legend (1) and Graph Palette (2) 1 2 By using the scale format buttons, you can maintain runtime control over the format of the X and Y scale markers respectively. Use the three buttons on the right side of the Graph Palette to control the operation mode for the graph cursor. Figure 5-5 Legends/ Palettes In the Run Time Home graphs, you can make the Graph Palette and Scale Legend visible by right-clicking in each of the three plot areas themselves and selecing Graph Palette from Visible Items (see Figure 5-6 below). The Cursor Legend (3) is already visible by default . 2 If you want the graph to autoscale either one of the scales continuously, click on the lock switch to lock autoscaling on. 3 1 Normally, you are in standard operating mode, indicated by the plus or crosshatch appearance of the cursor. In standard operating mode, you can click in a graph to move cursors around. Clicking the panning tool will switch to a mode in which you can scroll the visible data by clicking on and dragging sections of the graph. . If you press the Zoom tool (the magnifying glass symbol ), it opens a submenu from which to choose ways to zoom in on a section of the graph by dragging a selection rectangle around that section. Figure 5-7 Zoom Tool User’s Manual ASL 5000, SW 3.5, Rev.2 © IngMar Medical, Ltd. 2015 The options are as follows: Figure 5-6 Graphs- Visible Items If you uncheck autoscale X in the pop-up menu, (click on <Y.YY>), the graph will stop autoscaling the Y data, which is sometimes useful for the purpose of comparing different graphs. In the legends and palettes, different icons represent specialized graphing tools. From the graph palette (2), the panning tool and the zoom function are used to get more detail of a specific part of a graph. The cursor legend (3), is described with Figure 5-8, page 72. Although these graphing tools appear on all but the Run Time Home graphs, the cursor palette is available only in the Display Data and Display Performance screens of the ASL 5000 Post Run Analysis Menu. — Zoom by rectangle. — Zoom by rectangle, with zooming restricted to X data (the Y scale remains unchanged). — Zoom by rectangle, with zooming restricted to Y data (the X scale remains unchanged). — Undo last zoom, (resets the graph to its previous setting). — Zoom in about a point, (if you hold down the mouse on a specific point, the graph continuously zooms in until you release the mouse button). — Zoom out about a point, (if you hold down the mouse on a specific point, the graph continuously zooms out until you release the mouse button). NOTE: For the last two modes, zoom in and zoom out about a point, <Shift>-clicking will zoom in the opposite direction. 71 Data Analysis Display Data Selections (Green Buttons) The Cursor Legend . cursor selected. The size of the displayed region also stays constant. This feature is helpful when the cursor is used to mark a point of interest in the graph, such as a minimum or a maximum, and you want to see that point. Figure 5-8 Cursor Legend As indicated in the above figure, each cursor for a graph has the following parts: — A label — X and Y coordinates — A button that enables cursor movement with the cursor movement control pad — A button that controls the look of the cursor — A button that determines if the cursor is locked to a plot or able to be moved freely To label the cursor, click on the highlighted word in the Cursor Legend, (“Flow“ in the example in Figure 5-8). Replace the word with any label of your choice. To assign coordinates to the cursor, highlight and replace the numbers currently showing in the two boxes to the right of the cursor label. The first immediately to the right of the label identifies the X-coordinate. The second box contains the value for the Y-coordinate. Clicking on the cursor display control displays a pop-up menu to control the look of the cursor and the visibility of the cursor name on the plot. Select Attributes -> Show Name to make the cursor name visible on the plot. Selecting Bring to Center moves the cursor to the center area of the graph. Selecting this item changes the X,Y coordinate position of the cursor. Figure 5-9 Cursor Legend Options Selecting Go to Cursor moves the displayed region of the graph so the cursor is visible. The cursor position remains constant, but the scales change to include the 72 Figure 5-10 Cursor Lock Select Lock to Plot to attach the cursor to a specific plot. The first time you select Lock to Plot, the cursor attaches itself to the first point on the plot. After freeing the locked cursor and moving it to any new position, selecting Lock to Plot moves the cursor to the last location of the locked cursor. User’s Manual ASL 5000, SW 3.5, Rev.2 © IngMar Medical, Ltd. 2015 You can move a cursor on a graph by dragging it with the mouse, or by using the cursor movement control pad. To drag a cursor, make sure the graph does not have the panning or zooming tool selected. Click and drag the cursor to the desired location. Alternatively, to enable the cursor movement control pad, click on the cursor movement select button. Clicking the arrows on the cursor movement control causes the cursor to move in the specified direction, i.e., up, down, right, left. You can use the last button to lock the cursor onto a particular plot. By clicking the lock button, you can see a pop-up menu that can be used to lock the cursor to a specific plot. If you lock the cursor onto a plot, the button changes to a closed lock. Select Free if you want to place or move the cursor anywhere on the graph. Select Snap to Point if you want the cursor to always attach itself to the nearest point on any plot. Data Analysis Display Data Selections (Green Buttons) User’s Manual ASL 5000, SW 3.5, Rev.2 © IngMar Medical, Ltd. 2015 5.3.2 Breath by Breath Display Figure 5-11 Analysis: Breath-by-Breath Display In this view, data is displayed one breath at a time. Scrolling through or selecting single breaths is easily performed with the (fast) forward/reverse arrows. You can also see the current breath highlighted in the graph at the bottom of the window. Parameters displayed are grouped into separate fields for — timing — inspiratory flow — pressure — volume You may zoom into a detail area at any time by clicking into the display and dragging open (holding mouse button down while moving cursor) a detail window. To return to the normal view, go to the slide-rulers for X-and Y-scaling (X and Y in the graph manipulation palettes to the right of the graphic display areas) and double click there. By clicking the X- and Y-resolution buttons (identified as <X.XX> and <Y.YY> in the Graph Palettes), you may also change the labeling of the X- and Y-axis to suit your needs. The Cursor Palettes below each graph may be used to change the visual appearance of the cursor and to position the cursor lines (see also page 71). Parameters for each graph can be freely selected from the drop-down list of available parameters (click on the symbol next to the parameter name to the right of each waveform graph). Please refer to "Parameters in the *.brb-(Breath Parameter) File", page 131 for details on the individual parameters displayed in this data view. Volume corrections may be performed towards different standard gas conditions. (BTPS, ATPD, STPD ...) by clicking on the symbol next to the “Conditions of 73 Data Analysis Display Data Selections (Green Buttons) Volume Measurement“ label. “As measured“ (no correction) is the default setting. Please also see NOTE on page 69. “Breath Type“ refers to the distinction between mechanical breaths (no patient contribution) and spontaneous breaths (patient makes effort). You may change the background color of the graphs using Graph Colors from the <Help/Customize> menu in the menu bar of each of the analysis windows. Use a light color when printing the screen. The <RETURN> button will bring you back to the Post- Run Analysis Menu screen. NOTE: Please note that in software 3.5 it is no longer necessary to close dedicated analysis windows (using the <RETURN> button) before you can open any other view from the Post-Run Analysis Menu window. 74 The multi-parameter graph display uses more screen area for the graph and allows the overlay of parameters so that you can view them in a synchronized fashion. Data is displayed breath by breath. Scrolling through or selecting single breaths is easily performed with the (fast) forward/reverse arrows or by entering the desired breath number into the <Breath> field. You can also see the current breath highlighted in the graph at the bottom of the window. You may zoom into a detail area at any time by clicking into the display and dragging open a detail window (holding mouse button down while moving cursor). To return to the normal view, go to the slide-rulers for Xand Y-scaling in the graph manipulation palette on the right of the screen just above the graphic display area and double click there. User’s Manual ASL 5000, SW 3.5, Rev.2 © IngMar Medical, Ltd. 2015 Figure 5-12 Analysis: Multi-Parameter Graph 5.3.3 Multi-Parameter Graph Data Analysis Display Data Selections (Green Buttons) By clicking the X- and Y-resolution buttons (identified as <X.XX> and <Y.YY> in the Graph Palette), you may also change the labeling of the X- and Y-axis to suit your needs. Clicking on the + symbol in the graph manipulation palettes will allow the pointer to take hold of the green cursor lines and move them about. In this view, the cursors are, by default, not locked to a parameter. You may lock them, however, by clicking on the padlock symbol in the graph palette in the upper right corner of the graph. A little pop-up menu will allow you to check the parameter that you want your cursor to be locked to. After doing this, the parameter value at the intersection of the X and Y cursors is always displayed in the cursor palette indicators. You may change your selection at any time. Parameters for each graph can be freely selected from the drop-down list of available parameters (click on the arrow symbol next to the parameter name). Please refer to "Parameters in the *.brb-(Breath Parameter) File", page 131 for details on the individual parameters displayed in this data view. User’s Manual ASL 5000, SW 3.5, Rev.2 © IngMar Medical, Ltd. 2015 Volume corrections are performed towards different standard gas conditions. (BTPS, ATPD, STPD ...) by clicking on the arrow symbols next to the “Conditions“ label. “As measured“ (no correction) is the default setting. Please also NOTE on page 69. In this view, gains for each parameter can be adjusted individually to adjust the view of multiple graphs (click on the symbol next to the gain factors to view dropdown menus for available choices). Figure 5-13 Parameter Gains You may change the background color of the graphs using Graph Colors from the <Help/Customize> menu in the menu bar of each of the analysis windows. Use a light color when printing the screen. When you are done with data analysis in this view, the <RETURN> button will bring you back to the Main Analysis Menu screen. NOTE: Please note that in software 3.5 it is no longer necessary to close dedicated analysis windows (using the <RETURN> button) before you can open any other view from the Post-Run Analysis Menu window. 75 Data Analysis Display Data Selections (Green Buttons) 5.3.4 Loop Display Figure 5-14 Analysis: Loop Display You may zoom into a detail area at any time by clicking into the display and dragging open (holding mouse button down) a detail window. To return to the normal view, go to the slide-rulers for X- and Y-scaling in the graph manipulation palette on the right of the screen just above the graphic display area and double click there. By clicking the X- and Y-resolution buttons (identified as <X.XX> and <Y.YY> in the graph palette), you may also change the labeling of the X- and Y-axis. 76 Clicking on the + symbol in the graph manipulation palette will allow the pointer to take hold of the yellow cursor line and move it about.The parameter value at the intersection of the X and Y cursors with a trace is continuously displayed in the cursor palette indicators at the bottom of the graph; the default is Inspiration. Parameters for displaying loops may be freely selected for each axis from the drop-down list of available parameters. Click on the parameter name currently displayed next to the + symbol, on the right hand side of the screen. Please refer to "Parameters in the *.brb(Breath Parameter) File", page 131 for details on the individual parameters displayed in this data view. You may change the background color of the graphs using Graph Colors from the <Help/Customize> menu in the menu bar of each of the analysis windows. Use a light color when printing the screen. The <RETURN> button will bring you back to the Main Analysis Menu screen. NOTE: Please note that in software 3.5 it is no longer necessary to close dedicated analysis windows (using the <RETURN> button) before you can open any other view from the Post-Run Analysis Menu window. User’s Manual ASL 5000, SW 3.5, Rev.2 © IngMar Medical, Ltd. 2015 The Loop Display allows you to freely define X versus Y plots for each breath, in order to generate the familiar pressure/volume and flow/volume loops. A dividing line separates the inspiratory and expiratory portions of each loop. Data is displayed breath by breath. Scrolling through or selecting single breaths is easily performed with the (fast) forward/reverse arrows or by entering the desired breath number into the <Breath> field. You can also see the current breath highlighted in the graph at the bottom of the window. Data Analysis Display Data Selections (Green Buttons) 5.3.5 Continuous Time-Based Data User’s Manual ASL 5000, SW 3.5, Rev.2 © IngMar Medical, Ltd. 2015 Figure 5-15 Analysis: Continuous Time-Based Data This option provides a real-time chart of up to 4 parameters, displaying multiple breaths without breaking data into individual breaths. This view is helpful in cases where the breath detection algorithm was not able to detect breaths properly, while data still can be explored in this view. Scrolling through or selecting a group of breaths is easily performed with the (fast) forward/reverse arrows. You can also see the current group of breaths highlighted in the graph at the bottom of the window. You may zoom into a detail area at any time by clicking into the display and dragging open (holding mouse button down) a detail window. To return to the normal view, go to the slide-rulers for X- and Y-scaling in the graph manipulation palette on the right of the screen just above the graphic display area and double click there. By clicking the X- and Y- resolution buttons (identified as <X.XX> and <Y.YY> in the graph palette), you may also change the labeling of the X- and Y-axis to suit your needs. Clicking on the + symbol in the graph manipulation palette will allow the pointer to take hold of the yellow cursor lines and move them about. The parameter value at the intersection of the X and Y cursors is always displayed in the cursor palette indicators in the upper right-hand corner of the graph. In this view, the cursors are locked to trace one of the plots, by default. You may change this setting by clicking on the padlock symbol in the graph palette and creating a different link. 77 Data Analysis Display Data Selections (Green Buttons) A drop-down menu will allow you to check the parameter that you want your cursor to be locked to. After doing this, the parameter value at the intersection of the X and Y cursors is always displayed in the cursor palette indicators. You may change your selection at any time. Parameters for each trace of the plot can be freely selected from the drop-down list of available parameters (click on the parameter name next to the arrow symbol in the list displayed above the graph area). Please refer to "Parameters in the *.brb-(Breath Parameter) File", page 131 for details on the individual parameters displayed. In this view, gains for each parameter can be adjusted individually to adjust the view of multiple graphs (click on the symbol next to the gain factors to view dropdown menus of available choices). Figure 5-16 Parameter Gains You may change the background color of the graphs using Graph Colors from the <Help/Customize> menu in the menu bar of each of the analysis windows. Use a light color when printing the screen. The <RETURN> button will bring you back to the Main Analysis Menu screen. 78 User’s Manual ASL 5000, SW 3.5, Rev.2 © IngMar Medical, Ltd. 2015 NOTE: Please note that in software 3.5 it is no longer necessary to close dedicated analysis windows (using the <RETURN> button) before you can open any other view from the Post-Run Analysis Menu window. Data Analysis Display Data Selections (Green Buttons) User’s Manual ASL 5000, SW 3.5, Rev.2 © IngMar Medical, Ltd. 2015 5.3.6 Trend Graph Display Figure 5-17 Analysis: Trend View In trend view, gains can be adjusted individually for each parameter to adjust the view of multiple graphs (click the boxes with gain factors to view drop-down menus of available choices). Volume corrections may be performed for different standard gas conditions. (BTPS, ATPD, STPD ...), by clicking inside the control labeled <Conditions>. “As measured “(no correction) is the default setting. Please also see NOTE on page 69. The trend view then allows you to select parameters from the drop-down list of available parameters (click on the symbol next to the parameter names in the list above the graph area). Please refer to "Parameters in the *.brb-(Breath Parameter) File", page 131 for details on the individual parameters displayed in this data view. The defaults for the four parameters may be selected in the Project File Tool at the beginning or at the end of a simulation session. NOTE: Changes you make to selections here are also reflected in the left column of parameters in the Breath Detection/Real Time Analysis tab parameters (see page 60). Scrolling through or selecting a group of breaths is easily performed with the (fast) forward/reverse arrows. You can also see the current group of breaths highlighted in the graph at the bottom of the window. The number of breaths for which the breath parameters are displayed may be selected by directly entering the number into the control field labeled <Display width>. 79 Data Analysis Display Data Selections (Green Buttons) With the (Fast) Forward /Reverse buttons in the left top corner of the screen you may position the viewed breaths window to the range of interest. Two vertical cursors may be adjusted to qualify a range of breaths for the calculation of mean and standard deviation. These statistics are then immediately updated. Click the cursor on one of the green vertical lines and drag it to the desired position in the graph. The graph additionally features a second vertical cursor. It is used to create a defined range of breaths for the calculations of mean and standard deviation. You may change the background color of the graphs using Graph Colors from the <Help/Customize> menu in the menu bar of each of the analysis windows. Use a light color when printing the screen. The <RETURN> button will bring you back to the Main Analysis Menu screen. NOTE: Please note that in software 3.5 it is no longer necessary to close dedicated analysis windows (using the <RETURN> button) before you can open any other view from the Post-Run Analysis Menu window. User’s Manual ASL 5000, SW 3.5, Rev.2 © IngMar Medical, Ltd. 2015 80 Data Analysis Display Performance Analysis Selections (Yellow Buttons) 5.4 User’s Manual ASL 5000, SW 3.5, Rev.2 © IngMar Medical, Ltd. 2015 5.4.1 Display Performance Analysis Selections (Yellow Buttons) WOB Analysis Display Figure 5-18 Analysis: Work of Breathing Display The WOB-analysis allows for separation between patient (i.e. simulator) and ventilator work components. WOBanalysis is performed on a breath-by-breath basis. To obtain meaningful results, it is important to verify that the breath to be considered for analysis has been identified properly (see also page 60). Individual breaths are selected in the same way as in the breath data screens by clicking on the (Fast) Forward / Reverse buttons until you arrive at the desired breath number position. Alternatively, you may click on the up or down arrow next to the breath number to go to a specific breath. You can also see the current breath highlighted in the graph representing the full length of the simulation at the bottom of the window. WOB parameters are displayed either as “Total System Work“, “External Work“ or as “Patient Work“ parameters (looking at the muscle pressure and condition in the patient’s lungs). Click on the box which displays either one of these three terms for a drop-down menu that allows you to make a new selection (see above). The volume referenced work parameters in the rightmost column on the screen use the expiratory volume as reference. Please refer to "Parameters in the *.brb-(Breath Parameter) File", page 131 for details on the individual parameters displayed in this data view. 81 Data Analysis Display Performance Analysis Selections (Yellow Buttons) Total System Work is the combination of Patient Work and External (imposed) Work. Please also refer to an indepth section on WOB in "Introduction to Ventilatory Mechanics", page 109. Volume corrections are performed for different standard gas conditions. (BTPS, ATPD, STPD ...), by clicking inside the control labeled <Conditions>. “As measured“ (i.e. no correction) is the default setting. Please also see NOTE on page 69. You may change the background color of the graphs using Graph Colors from the <Help/Customize> menu in the menu bar of each of the analysis windows. Use a light color when printing the screen. The <RETURN> button will bring you back to the main analysis menu screen. NOTE: Please note that in software 3.5 it is no longer necessary to close dedicated analysis windows (using the <RETURN> button) before you can open any other view from the Post-Run Analysis Menu window. 5.4.2 Trigger Analysis Display Trigger Analysis shows breath-by-breath plots of the critical time period for triggering after a patient breath was initiated by the simulator with parameters flow, pressure, and volume, as well as calculations for trigger response time and other trigger performance characteristics. Trigger analysis is performed on a breathby-breath basis. 82 Individual breaths are selected in the same way as in the breath data screens by clicking on the (Fast) Forward / Reverse buttons until you arrive at the desired breath number position. Alternatively, you may click on the up or down arrow next to the breath number to go to a specific breath. User’s Manual ASL 5000, SW 3.5, Rev.2 © IngMar Medical, Ltd. 2015 Figure 5-19 Trigger Analysis Display Data Analysis Display Performance Analysis Selections (Yellow Buttons) You can also see the current breath highlighted in the graph representing the full length of the simulation at the bottom of the window. To obtain meaningful results, it is important to verify that the breath to be considered for analysis has been properly identified (see page 73). In particular, it is important to recognize that the lowest point in the volume excursion is used to determine the begin of a breath. Depending on the circumstances, this might not always be appropriate. In both the Real-Time and the Post-Run Analysis windows, the user should visually inspect the placement of the markers at the beginning of breaths (Figure 4-80, page 60, and page 68) to verify that the trigger analysis will be able to yield meaningful results. You may change the background color of the graphs using Graph Colors from the <Help/Customize> menu in the menu bar of each of the analysis windows. Use a light color when printing the screen. The <RETURN> button will bring you back to the main analysis menu screen. NOTE: Please note that in software 3.5 it is no longer necessary to close dedicated analysis windows (using the <RETURN> button) before you can open any other view from the Post-Run Analysis Menu window. There is also a vertical cursor in order to manually determine the point of trigger. Simply drag (click and hold mouse button during cursor movement) to the desired position. Clicking on the “Recalculate Work Parameters“ button will perform a recalculation of trigger-related work parameters for the updated trigger point. User’s Manual ASL 5000, SW 3.5, Rev.2 © IngMar Medical, Ltd. 2015 Trigger time is calculated as the time from the beginning of the inspiratory effort (i.e., start of the patient effort pressure profile) to the time of return of pressure to baseline1. See also "Parameters in the *.brb-(Breath Parameter) File", page 131. You may zoom into a detail area at any time by clicking into the display and dragging open (holding mouse button down) a detail window. To return to the normal view, go to the slide-rulers for X- and Y-scaling in the graph manipulation palette on the right of the screen just above the graphic display area and double click there. By clicking the X- and Y- resolution buttons (identified as <X.XX> and <Y.YY> in the graph palette), you may also change the labeling of the X- and Y-axis to suit your needs. Clicking on the + symbol in the Graph Palette will allow the pointer to take hold of the yellow cursor lines and move them about. Volume corrections are performed for different standard gas conditions. (BTPS, ATPD, STPD ...), by clicking inside the control labeled “Conditions“. “As measured“ (no correction) is the default setting. Please also see NOTE on page 69. 1 Please note that this definition has changed from sw versions prior to 3.0, where trigger time was determined as the time to the volume threshold (default: 5 mL). 83 Data Analysis Display Performance Analysis Selections (Yellow Buttons) 5.4.3 Servo Control Performance Display Figure 5-20 Servo Control Performance Display Please refer to "Parameters in the *.brb-(Breath Parameter) File", page 131 for details on the individual parameters displayed in this data view. Servo analysis is performed on a breath-by-breath basis. Individual breaths are selected in the same way as in the breath data screens by clicking on the (Fast) Forward / Reverse buttons until you arrive at the desired breath number position. Alternatively, you may click on the up or down arrow next to the breath number to go to a specific breath. 84 To obtain meaningful results, it is important to verify that the breath to be considered for analysis has been identified properly (see page 73). You may zoom into a detail area at any time by clicking into the display and dragging open (holding mouse button down) a detail window. To return to the normal view, go to the slide-rulers for X- and Y-scaling in the graph manipulation palette on the right of the screen just above the graphic display area and double click there. Occasionally, the target values for pressure or flow might be known independently (pressure limited ventilation or flow limited ventilation). In this case, the target override may be entered in the Data Re-Processing window when re-processing waveform data (see page 69). Volume corrections are performed for different standard gas conditions. (BTPS, ATPD, STPD ...), by clicking inside the control labeled “Conditions“. “As measured“ (no correction) is the default setting. User’s Manual ASL 5000, SW 3.5, Rev.2 © IngMar Medical, Ltd. 2015 The ventilator servo control performance window analyzes pressure adjustments made by a ventilator connected to the simulator. It attempts to detect both the inspiratory and expiratory target pressures and calculates parameters that describe the transition between these pressure levels. Data Analysis Display Performance Analysis Selections (Yellow Buttons) You may change the background color of the graphs using Graph Colors from the <Help/Customize> menu in the menu bar of each of the analysis windows. Use a light color when printing the screen. The <RETURN> button will bring you back to the main analysis menu screen. User’s Manual ASL 5000, SW 3.5, Rev.2 © IngMar Medical, Ltd. 2015 NOTE: Please note that in software 3.5 it is no longer necessary to close dedicated analysis windows (using the <RETURN> button) before you can open any other view from the Post-Run Analysis Menu window. 85 RespiSim RespiSim Screens 6 RespiSim RespiSim is the Ventilator Management Training environment created with the ASL 5000 Breathing Simulator at its core. It encompasses, in its full scope, a number of additional hardware components, including IngMar Medical’s RespiPatient™, but significantly is also an extension of the ASL 5000 software, with greatly expanded functionality. It is accessed via the RespiSim tab of the Window Manager. NOTE: In the scope of this manual, only a brief overview of the software screens and windows associated with RespiSim is given. Much more detailed instructions for its use are available in a separate RespiSim User’s Manual 6.1 RespiSim Screens 6.1.1 RespiSim Interface Overview RespiSim for the ASL 5000 is accessed via its own tab on the Window Manager. Clicking on the tab brings forward the RespiSim main screen, which provides a unified view of data during a simulation debriefing. Since an active RespiSim screen takes precedence over standard script-based simulation (but not over Interactive Control!), the RespiSim option first needs to be activated by clicking . Figure 6-1 RespiSim Mobile Ventilator Management Training Station The RespiSim interface consists of three separate windows. Figure 6-2 RespiSim Instructor Dashboard The virtual Vital Signs Monitor (VSM): and the RespiSim Debriefing Panel shown on the next page. It is a component attached to the Window Manager, which also can be made to “float“. 86 Figure 6-3 RespiSim Virtual Vital Signs Monitor User’s Manual ASL 5000, SW 3.5, Rev.2 © IngMar Medical, Ltd. 2015 The Instructor Dashboard (ID): RespiSim RespiSim Screens Clinical Events (Alarms) Instructor-entered Events Breath Indicators Control Real-time Graphical Data (Waveforms, Loops, or Trends) from Breathing Simulator User’s Manual ASL 5000, SW 3.5, Rev.2 © IngMar Medical, Ltd. 2015 Figure 6-4 RespiSim, Main Interface The RespiSim Debriefing Panel has distinct regions. A history plot (Event Graph) shows significant events on a timeline during the simulation such as alarms or instructor comments. An area for Graphical Data may show waveforms, loops, or trend lines for select breath parameters. A field for Numerical Data can be preset with up to 18 different breath-by-breath readings from the ASL simulator, an attached ventilator, and the virtual Vital Signs Monitor. While the simulation is running under control of RespiSim, all values are updated continuously. For debriefing of a simulation session, Playback Mode gives convenient access to all data collected during the session. In Run Mode, an instructor can invoke patient models at will from an inventory that is displayed in the control area of this screen. For a true plug-and-play experience, the RespiSim option includes a special Instructor Dashboard from which to load all elements of dedicated RespiSim Curriculum Modules. Numerical Data from Breathing Simulator The Instructor Dashboard is automatically opened as a separate window when RespiSim is started ("Use of RespiSim with Dedicated Educational Modules", page 89). 6.1.2 RespiSim Modes of Operation RespiSim can be used both for running an actual simulation as well as for playing back such a simulation for purposes of debriefing,. The latter aspect is of critical importance for enhanced instruction methodology since the debriefing process is where a significant portion of the learning actually occurs. RespiSim is therefore designed around the concept of a comprehensive debriefing. 87 RespiSim RespiSim Screens When the button <Open Playback Mode> in the control area of the RespiSim window is clicked, the visual appearance of the left portion of the window changes and all the pertinent information for the recorded simulation is displayed, together with a play/end-oftrack/beginning-of-track set of buttons. This is also the mode you can use to invoke a demonstration of RespiSim, if no license was purchased. The function of the end-of-track/beginning-of-track buttons is to allow easy navigation to the first or last use of a specific patient parameter set during a simulation. The cursor in the Event Graph will be placed in this location so that waveforms and numeric values can be read off at transitions between different patient states with ease. While the Event Graph is expanded (using the arrow in its left bottom corner), hovering with the mouse cursor over the Instructor Events marked in the file will bring up any comments that had been recorded with the specific event. The Event Graph shows a bright yellow vertical cursor line that is used to navigate inside of a selected recording. This is the primary method of accessing a particular point in time of a recording. The play button on the top left also has a step back/forward feature. Clicking on these elements forwards the starting point of the playback to the next (or previous) change of patient parameter file. Clicking the play button starts a playback of recorded data from the point of the cursor. The numeric parameters in the field on the bottom right change as the recording moves along, and so do the waveforms/loops in the Graphics field. The cursor position represents the right edge of the waveform display. On the left, the currently playing patient parameter file is indicated as well as the Preferences file associated with the recording. 6.1.3 Role of Training Modules Within the RespiSim Simulation Environment Figure 6-5 RespiSim Control Field Initially, you will need to select a TDMS file1 for replay. Click the folder icon under “Recorded Simulation to Load”. With the demo version of RespiSim, you have access to: ...\ASL Software 3.5\RespiSim_Modules\RespiSim_Demo\ RespiSim_Demo.tdms You will see information about the Curriculum Module to which this data file belongs, a brief description, and the associated preferences file. 1 88 A TDMS file contains all data to be displayed in RespiSim playback mode. It is a file in the set of saved files from each simulation, provided the simulation was performed while RespiSim was active. The regular waveform files are also saved as usual for a more detailed look at pressure, volume and flow. The RespiSim system is capable of providing training in many aspects of tasks related to patients treated with ventilator support. The mechanical ventilation curriculum in respiratory care programs has, of course, the most tasks with a need for such training. On the other hand, however, other caregivers, such as nurses, also have to be trained in the basic handling of ventilators, as well as in recognizing potentially dangerous or challenging patient conditions. Scenarios for teaching those skills are also easily within the scope of the RespiSim system and it will require only a creative instructor to implement exercises that will greatly enhance the depth and speed with which such skills can be learned. Since the ventilators report alarm limit settings and alarms, training modules around these subjects are expected to play an important role already in the near future. User’s Manual ASL 5000, SW 3.5, Rev.2 © IngMar Medical, Ltd. 2015 Playback provides a superb way for viewing data for the purpose of debriefing after a a simulation session or to demonstrate effects in the context of e-learning, as a stand-alone. RespiSim Use of RespiSim with Dedicated Educational Modules 6.2 Use of RespiSim with Dedicated Educational Modules 6.2.1 Philosophy of Instructor-Driven Multistage Clinical Simulations RespiSim employs a specific approach to immersive simulation described below. High-level clinical simulations generally have to accomplish two things simultaneously. While they are meant to create situations that trainees perceive as realistic (at least as far as their task-critical aspects are concerned), they also need to “reign-in“ realism to a degree, in order to make a simulation successful. An instructor has to be enabled to impart, where needed, information that the learner needs in order to complete the challenges successfully. Except for in high-stakes testing, trainees are not usually left to their own devices to figure out the solutions to all problems that arise in the course of the simulation. Particularly in what is called multi-stage simulations, a mostly successful completion of each individual stage is necessary for moving on to the next stage in a meaningful way. RespiSim modules therefore are structured in such a way as to strike a balance between the flexibility of conducting the simulation and this need for controlled outcomes at each stage. User’s Manual ASL 5000, SW 3.5, Rev.2 © IngMar Medical, Ltd. 2015 6.2.2 Role of the Instructor Specifically, RespiSim modules are “instructor-driven“. The educator stays in control of the unfolding events at all times. Each stage of a simulation (labeled “Change Event“ in the Instructor Dashboard) is divided into a set of possible scenarios which are based on likely choices made by the student. Associated with these choices of ventilatory treatment are patient vital signs that could be expected given the ventilation that this patient now receives (manifest in the columns on an Instructor Dashboard page). The instructor has the responsibility to classify the student choices and to adjust, when needed, a patient parameter to perhaps emphasize a particular effect that might be critical to get across as a significant learning objective. The patient responses are thus not based on physiological modeling, but rather expose the medical expertise of the instructor and the authors of the training modules. As far as the progression of a simulation is concerned, the instructor is not relegated to a passive role, leaving everything to physiological models that work out the patient’s response. Rather, he or she has an active role as educator at all times, with the ability to make changes to patient response “on-the-fly“. 6.2.3 Instructor and Student Aids In order to facilitate this type of simulation philosophy, RespiSim offers a number of tools for instructors and students. The introductory (cognitive learning) component of each RespiSim module is intended to provide educators with a ready-made, learning management system-compatible presentation of basic concepts. It is called the Scenario Concept Presentation. The presentation can take the form of a PowerPoint presentation, an animationenhanced lecture or similar forms, that can be enhanced by instructors to include specific quizzes or the like. It is expected that students are exposed to the material before being admitted to the simulation class itself. This material is provided to optimize the efficacy of the valuable time spent in the simulation lab. There is, with each RespiSim module, also an Instructor Scenario Guide, a pdf worksheet outlining the learning objectives, a case description, the rationale for the separate stages, and details on the settings for ventilator and patient model, similar to what is found in the software module itself (Instructor Dashboard). This instructor worksheet might also contain suggestions for debriefing questions As part of the module package included are also files for x-rays as well as lung and heart sounds (where applicable). Also loaded with the each module are compilations of ABG results and lab results for each stage. These file can be played/presented as part of the Vital Signs Monitor by student request and under instructor control. 6.2.4 Authoring Training Modules A special bulletin and other information (style guides and templates) can be made available for individuals who are interested in authoring RespiSim curriculum modules. Please contact IngMar Medical for details. For further information on RespiSim, please consult the dedicated RespiSim User Manual, see our website at www.ingmarmed.com/respisim or contact IngMar Medical directly 89 Test Automation Interface TAI Overview 7 Test Automation Interface IngMar Medical Ltd. has developed an interface for the ASL5000 Breathing Simulator, which will provide the end user with the capacity to incorporate the ASL 5000 into automation testing. This server software will run independently from the ASL 5000 software and provides a command-based interface for the ASL control. The server will run in the background with a visible icon in the Windows task bar notification area. It can be accessed remotely or locally by connecting to a TCP/IP port and sending ASCII formatted commands. For controlling the ASL 5000(s) the server will open the ASL software in “hidden mode” which prevents unwanted user interference through the graphical interface (GUI) of the ASL 5000 software. 7.1 TAI Overview User’s Manual ASL 5000, SW 3.5, Rev.2 © IngMar Medical, Ltd. 2015 Figure 7-1 Test Automation Interface 90 The GUI can still be made visible if needed. The TAI server also has the capacity to run multiple instances of ASL systems through additional copies of the ASL Software package on the same CPU running the server.The remote interface will directly communicate with the ASL software. Third party users can create external applications in any independent language (C#, C++, VB, LabVIEW, etc.) to communicate with the server protocol via TCP connection. It is also possible to use an existing Telnet client (e.g. PuTTY) to connect to the server. Furthermore, a server internal terminal with script editor will be developed (future) for the creation and execution of predefined command scripts. For more information or the full specification of this API, please contact IngMar Medical. User’s Manual ASL 5000, SW 3.5, Rev.2 © IngMar Medical, Ltd. 2015 This page intentionally left blank 91 Using ASL Utilities Exporting Data Files 8 Using ASL Utilities Clicking the <Data File Export> button in the File Utilities column opens up the quick conversion utility. The Utilities Selector provides access to a number of file translation and processing modules as well as to examples for data sharing using TCP clients. Figure 8-2 Utilities: ASL 5000 Data File Conversion Clicking on any of the blue buttons on the top of the window opens a file dialog for choosing the file (set) or directory to be processed. Figure 8-1 Utilities Selector 8.1 Exporting Data Files For reasons of speed and reduced file size, data generated with the ASL 5000 host software is saved in binary format. The following file extensions are used in the ASL 5000 data files and will be processed with this utility (the last letter of the extension is used to label either binary (b) or ASCII (a) files). binary *.brb÷ *.dtb ÷ *.rwb÷ *.avb÷ *.ain ÷ 92 ASCII *.brabreath parameter data file *.dta processed breath waveform data file *.rwahigh resolution raw waveform data file *.avamodel parameter file *.ain log file NOTE: The *.bra breath parameter files are easily imported into Microsoft Excel. Use the “text file“ setting for the import and make sure that “All Files“ are enabled. Excel’s Text Import Wizard will detect that the file is tabdelimited and will guide you through the import process. When importing waveform data (*.rwa or *.dta) into a spreadsheet, keep in mind that each second of data will generate as many as 512 rows. Reducing the data sample rate before the start of a simulation (in Step 2 of the Simulation Editor for a *.vr3-file) is usually a good idea if any length of waveform is to be processed in a spreadsheet. User’s Manual ASL 5000, SW 3.5, Rev.2 © IngMar Medical, Ltd. 2015 To make this data available to other software (spreadsheets, etc), a file translation utility is provided. It opens by clicking the <Data File Export> button (top blue button) and performs a summary translation of either a single data set or, alternatively, of a whole directory of captured data. You may also choose to manually select an individual file (as opposed to a complete data set). When translating files using the <Advanced> option, it is the responsibility of the user to properly assign extensions. In this case, it is strongly recommended to follow the file naming convention for the ASCII-files generated shown in the list above with respect to their extensions. Using ASL Utilities AUX Channel Resampling 8.2 AUX Channel Resampling AUX1 and AUX2 signals recorded by the ASL 5000 don’t provide natively equidistant data points. The frequency with which they are recorded, varies based on the processor load and other factors. It can be expected to be around 3 Hz. The ASL 5000 software provides a utility which can turn the data stream into an interpolated signal with equidistant points of a userspecified sample rate. To open the utility, click <AUX Channel Output Resampling> on the Utilities tab. A file setup window will open: 8.3 RespiSim File Conversion Data recorded when using the RespiSim training environment (see "RespiSim" on page 86) is in a format called TDMS. A special utility is provided to make such data “import-friendly“ for spreadsheets and the like. It will convert the whole file into a *.txt-file with the same name as the original file. From this file, portions, such as the breath parameters, can be imported or marked and pasted easily into other applications. Click the <RespiSim File Conversion> button on the Utilities tab. A file dialog window will open. Figure 8-4 Utilities: RespiSim File Conversion User’s Manual ASL 5000, SW 3.5, Rev.2 © IngMar Medical, Ltd. 2015 Navigate to the desired TDMS-file and click <Convert File>. You can find the converted file in the same directory as the original. NOTE: Please be aware that the size of TDMS files generated during simulations many minutes long can easily be several hundred Megabytes and may not process quickly, or cannot be opened with some text editor programs. Figure 8-3 Utilities: AUX Resampling In the utility, you can define the output sample frequency as well as gains for all three channels independently. The third channel is reserved for the signal of the O2-measurement and reports oxygen concentration in percent when the default gain factor of 1 is applied. After defining the output destination and, optionally, a descriptive text to be inserted into the file, you can click <Resample>. 93 Using ASL Utilities Using the Patient Flow Data Processor 8.4 Using the Patient Flow Data Processor Figure 8-5 Patient Flow Data Processor “Offset“ is used to compensate for bias in the original data. Flow sensors typically will not produce a signal that, when integrated over a longer period of time, would produce a perfectly neutral volume. Over time, this would lead to an unacceptable “out-of-bounds“ volume drift for the simulator. Testing a script in Demo Mode (no physical simulator attached) will allow to determine the amount of that bias (as L/min). With the proper offset in place, simulation runs over extended periods of time should show a volume that returns to baseline. EDF files typically will contain several parameter traces as well as headers (column labels). It is the user’s responsibility to properly select the column of data representing flow. The user must also determine the number of rows to be skipped at the beginning of an ASCII data file for the purpose of excluding headers included with the file. The “Gain“ setting can be used to convert data that is reporting flow in L/s or mL/s to the required L/min (multiply by 60 or 0.6, respectively). You might also have to invert flow direction (multiply with -1) if the recording does not conform to the requirement of the ASL 5000, i.e., counting inspiratory flow as positive. User’s Manual ASL 5000, SW 3.5, Rev.2 © IngMar Medical, Ltd. 2015 94 This utility is essentially an expansion of the utility described in the next paragraph ("Using the Pressure Profile Resampling Utility", page 96). Whenever a long patient flow data set needs to be played back in SmartPump mode, this utility can automatically create a script of vr3- patient files using segments of the flow data, each of which is a few seconds in length. The utility allows to extract the flow data from ASCII files, as well as files saved as EDF (European Data Format). Using ASL Utilities Using the Patient Flow Data Processor The file naming process assigns to the *.vr3-files names that use the base file name of the flow data file, extended with the number of the segment in the script. The resulting script may be inspected using the Script Editor and Simulation Editor. Figure 8-6 Script From Recorded Patient Flow User’s Manual ASL 5000, SW 3.5, Rev.2 © IngMar Medical, Ltd. 2015 Each segment represents a small “snippet“ of the original, recorded flow. NOTE: It is important to keep in mind that this procedure does not generate a patient model with R and C, but is based on a flow pump model. Therefore, playing back the script will not respond to a ventilatoar in the way a Pmus-R-C-model would. Rather, the flows (the piston movement of the simulator) is prescribed at any point in time by the flow rate that was part of the recording (pressure feedback is off for pump models. Alternatively, if data is available that, in fact ,would describe Pmus over time (instead of flow), the same utility can be used to generate a true patient model for a playback. All you need to do is to modify the “seed“.vr3file to represent a patient model with R and C (instead of the flow pump model). That file can be found at: C:\Program Files (x86)\ASL Software 3.5\vars\ASCII_flow.vr3 Of course, the values of R and C for the patient whose Pmus was recorded (for example, via an esophageal catheter), need to be known or estimated Figure 8-7 Script From Recorded Patient Flow 95 Using ASL Utilities Using the Pressure Profile Resampling Utility 8.5 Using the Pressure Profile Resampling Utility The Chest Wall Modeling option of “user defined“ muscle pressure profile (or “user defined“ flow profile in SmartPump mode, see page 126) often requires a reprocessing of available profiles (e.g. from a patient flow profile). Data to be used has to be presented at a 512 Hz sample rate, which is typically a higher rate than that used by patient monitors, for example. The Pressure Profile Resampling Utility allows you to manipulate such data sets in the time domain as well as multiplying them with a gain factor. The utility includes a batch processing feature that allows efficient processing of a large number of these files at once. First, the profile(s) to be processed is/are selected from an input directory, to which you can navigate from a standard browse dialog window. There, assumed original and desired new sample rates are entered (512 Hz as default). Data sample rates of flow measuring devices typically sample at much lower rates and entering the actual value of sampling as “Original Sample Frequency“ will preserve the time-domain characteristics of the data by interpolating up to the 512 Hz needed for operating the simulator at its highest fidelity. Additionally, a gain factor other than 1 may be chosen. 96 This allows for scaling of patient efforts or tuning of flow profiles to meet a specific tidal volume requirement If, for example, data for a patient flow profile was collected in L/s, then a gain factor of 60 must be used to obtain the correct flow rate from the simulator (L/min). If data needs to be inverted, a negative gain factor may also be used. The new profile may then be saved under a new name via the dialog box that opens once the “Resample“ button has been clicked. User’s Manual ASL 5000, SW 3.5, Rev.2 © IngMar Medical, Ltd. 2015 Figure 8-8 Pressure Flow Resampling Utility TCP Data Broadcast Breath Parameter Broadcast 9 TCP Data Broadcast 9.1 Breath Parameter Broadcast It is possible to “broadcast“ or stream the breath parameter data (the content of the brb-file) to a listening client on the network. A demonstration application1 (TCP Breath Client.exe) is included with the host software as a separate executable, accessible from the Utility tab of the Window Manager.The default port used to connect to the server (i.e., the PC running the ASL host software) is port 6342. In order to establish a connection from a separate PC, you need to launch this application (after copying it to the PC you want to act as a client or “listener“), and then enter the correct server identification (the network IP address of the PC running the ASL host software). The port to “listen to“ is still the same (6342). If a change to the server port is necessary to avoid conflicts on a network, it can be done from the TCP Configuration option in the Control drop-down menu of the Window Manager (see "TCP Broadcast Configuration", page 61). User’s Manual ASL 5000, SW 3.5, Rev.2 © IngMar Medical, Ltd. 2015 9.2 Figure 9-1 TCP Breath Client Waveform Broadcast Similarly, waveforms are made available on the network via port 6343 for all raw or processed volume and pressure data as shown in the plots (see Figure 9-2). The demonstration application for a listening client, TCP Waveform Client.exe, is also included in the ASL host software installation and conveniently accessed via the Utility tab of the Window Manager. Copy this executable to a PC on which you plan to observe the waveforms and then enter the correct server identification (the network IP address of the PC running the ASL host software). For pre-configuration of the TCP waveform client, please refer to "TCP Broadcast Configuration", page 61. It also shows you how to make the choice of either “raw“ or “processed“ data to be broadcast. Figure 9-2 TCP Waveform Client 1 Other TCP/IP listening applications may be developed by users in different programming environments. 97 Options Simulator Bypass and Leak Valve Module (SBLVM) 10 Options 10.1 Simulator Bypass and Leak Valve Module (SBLVM) The Simulator Bypass and Leak Valve Module (SBLVM) is an accessory intended to be used when connecting ventilators to the ASL 5000. A typical problem of using a simulator with most ventilators is that various alarms are likely to be triggered on the ventilator when no simulation is running. With the SBLVM connected (see diagram below), an electromagnetic valve bypasses the simulator while no simulation is running and allows the ventilator to use the attached breathing bag or test lung. At the beginning of a simulation, the valve shuts off so that only the ventilator and simulator are connected. The SBLVM connections are female 15 mm ISO ports. The test lung and the connecting circuit piece are attached with 22/15 mm adapters to the SBLVM. Please refer to the diagram below for the proper connections. Figure 10-1 Simulator Bypass and Leak Valve Module 98 User’s Manual ASL 5000, SW 3.5, Rev.2 © IngMar Medical, Ltd. 2015 Figure 10-2 SBLVM Schematics Options Simulator Bypass and Leak Valve Module (SBLVM) User’s Manual ASL 5000, SW 3.5, Rev.2 © IngMar Medical, Ltd. 2015 The second feature of the SBLVM is that it allows you to set 3 different sizes of leaks. This feature can be used to simulate particular patient conditions, such as an ETtube leak. The leak orifices for these settings may be exchanged for differently sized leak rates. The diagram below shows the characteristics of leak flow versus pressure for the standard orifices. Figure 10-3 SBLVM Orifice Characteristics 99 Options Using the Cylinder Temperature Controller (CTC) 10.2 Using the Cylinder Temperature Controller (CTC) 10.3 Using the Fast Oxygen Measurement Option (FOM) The PID controller for maintaining wall temperature inside the cylinder is a unit that operates independently from the host computer. Therefore, all settings are made directly on the controller interface on the ASL 5000 and not in the PC host software. Figure 10-5Paramagnetic Oxygen Transducer The FOM-Option consists of a paramagnetic oxygen sensor with a miniature vane pump for sidestream measurement of oxygen. Figure 10-4 Cylinder Temp. Controller Front Panel As part of the instrument documentation, a separate Operator's Manual for the temperature PID controller is enclosed for further reference. You may also contact IngMar Medical for additional setup documentation, in case the basic settings of the controller become inadvertently changed. 100 Figure 10-6 O2 Data at Run Time NOTE: Please note that no corrections are made in the breath analysis to adjust for O2-values other than 21%. Ventilators always include that type of correction for their flow sensors and should report accurate volumes independent from the oxygen concentration. For specifications of the FOM, please see "Technical Data", page 141.. WARNING ! Fire Hazards related to the use of oxygen: When using the ASL 5000 with elevated concentrations of oxygen (ventilators set to FiO2 > 21%), observe all precautions applicable to the use of oxygen indoors. See also "General Precautions", page 13. User’s Manual ASL 5000, SW 3.5, Rev.2 © IngMar Medical, Ltd. 2015 To change the temperature setting, simply press the <MENU>-button on the controller, until “SP1“ starts blinking to the left of the set temperature display. To enter a new temperature value, press the <^/MAX>button for changing digits, the <>/MIN>-button for proceeding to the next digit. After you have finished, press <ENTER> and the controller will acknowledge that the new value has been stored. When decreasing the temperature setting, keep in mind that the CTC unit cannot actively cool and the decrease in temperature, therefore, will depend on heat diffusion to the environment. For this reason, factors such as gas exchange of the simulator, room temperature, etc. will determine the lowest possible temperature and the time it takes to reach a lower temperature. If this option is installed in your ASL 5000, simply click the checkbox in the ASL Central Run Time tab window to see the value of O2 readings. Options Using the Auxiliary Gas Exchange Cylinder (AGEC) Chest Rise Module 10.4 Using the Auxiliary Gas Exchange Cylinder (AGEC) User’s Manual ASL 5000, SW 3.5, Rev.2 © IngMar Medical, Ltd. 2015 The Auxiliary Gas Exchange Cylinder (AGEC) is intended for situations where it is necessary to work with substances (aerosols, anesthetic agents, etc.) that are incompatible with the simulator. It consists of a clear acrylic cylinder with openings at the top and bottom that allow it to be used as a “bag-in-bottle“ device. 10.5 Chest Rise Module The ASL 5000 Breathing Simulator can be combined with Full Scale Patient Simulators, improving on the pulmonary mechanics provided by these simulators for use with ventilators and providing them with the ability to truly breathe spontaneously (as opposed to simply showing the chest rise). Specifically, an option for the ASL 5000 has been developed, the Chest Rise Module, for use with Laerdal’s family of SimManTM manikins. The kit consists of a valve module that can take over the SimMan’s chest rise, reflecting the amount of volume that has been applied to the ASL 5000 and making the movement synchronous with the inhalation/exhalation effort of the patient model. Please refer to the special Application Note for details of this setup for both the classic SimMan as well as SimMan 3G. It can also be used to give the more basic Laerdal Kelly manikin simulator true high-fidelity lungs and respiratory mechanics, including the abiltiy to breathe spontaneously.. Figure 10-7 Auxiliary Gas Exchange Cylinder The simulator connects to the female 22mm ISO port at the base of the AGEC, a second 22 mm port is located on the top and would normally be routing gas into a bellow or bag placed inside the AGEC. Inspiration by the simulator will start to evacuate the space surrounding the bag or bellow and therefore inflate it. Expiration will press gas out of the bellow or bag again. Figure 10-8 Setup withManikin The additional (compressible) volume of the AGEC is approximately 3 L, therefore adding a parasitary compliance of 3 mL/cmH2O. This may be compensated by entering the 3 L as a tubing volume in the simulation editor compensation settings (see page 35). Please see also a special Application Note regarding the AGEC for further details 101 Options Preemie Lung Cylinder Kit 10.6 Preemie Lung Cylinder Kit 10.6.1 Intended Use The preemie range cylinder improves volume resolution of the ASL 5000 by approximately a factor 8 to approximately 0.2 μL. It can be used when simulations are fully within the range of 200 mL maximum volume and flow rates below 40 L/min. CAUTION ! Misalignment of the threads could cause damage to either the Preemie Cylinder or the ASL main unit! Fully thread the piston in (until the shoulder ring sits directly against the brass receptacle). Gently tighten. Figure 10-10 Installation of Preemie Cylinder 10.6.2 Assembly The piston for the 2.5” cylinder is first attached with its extension rod to the regular (7”, adult size) piston plate. Gently screw the assembly into the threaded adapter on the large piston plate, taking care not to damage the seal on the small piston. Take the preemie cylinder and slide it over the 2.5” piston plate from a slight angle, so that no sharp edge cuts into the seal on the piston. Push cylinder gently all the way towards the threaded inlet of the ASL and turn clockwise to engage the threads. Be careful that the threads mate as intended. When turning the cylinder, only the friction from the kapseal should inhibit the motion. 102 10.6.3 Software Adjustments After the initial installation of the ASL software on the host PC, the following adjustment need to be made for proper functioning of the unit with a neonatal external cylinder. — Patient parameter files (vr3-files) for use with the Preemie Cylinder should have the value for parasitic dead space adjusted to 25 mL (instead of 200 mL). Use Notepad or similar text editor to make the change in all vr3-files that are going to be used with the Preemie Cylinder. (parasitic_constants) cylinder_dead_space (float) cylinder_dead_space = 0.025 (liters) User’s Manual ASL 5000, SW 3.5, Rev.2 © IngMar Medical, Ltd. 2015 Figure 10-9 ASL 5000 with Preemie Option Installed Connect 3-pole Hypertronics plug into the receptacle marked “External Cylinder Temp.” on top of the ASL 5000. The short cable connecting the internal temperature sensor (regular “adult/neonatal“ cylinder) to the measuring circuit, should be removed. This will connect the temperature measurement system to the gas temperature sensor of the preemie cylinder instead of the regular sensor on the adult cylinder. Options Preemie Lung Cylinder Kit 10.6.4 Firmware Adjustments For the proper functioning of the device it is important to invoke the correct mechanical parameters from an initialization file in the ASL 5000 CPU. In the directory c:\lung of the embedded CPU, a file named ASL5000.DOS is responsible for setting those parameters. With the two sets of cylinder hardware, two different files will be used for this purpose. For use with the 2.5” Preemie Cylinder, the file Please make sure that the line for pressure measurement is properly reading the pressure from the cylinder that is in use. Use the stopcock orientation as it is indicated on the label on the front of the ASL. c:\lung\ASLNEO25.40 needs to be copied into ASL5000.DOS Using PuTTY or a similar terminal program on the COM2 serial port of the ASL 5000 (labeled “Terminal”, 9600-8-N-1), interrupt the program flow with the button combination Ctrl/C. Switch to the c:\ prompt (type: c:) and change directories to c:\lung (type: cd c:\lung)1 Then execute the command: copy ASLNEO25.40 ASL5000.DOS Before use of the ASL 5000 with the standard 7” Adult Cylinder, perform the copy command using the file ASLADL70.40 to return to the standard setting: copy ASLADL70.40 ASL5000.DOS User’s Manual ASL 5000, SW 3.5, Rev.2 © IngMar Medical, Ltd. 2015 10.6.5 Operation with Attached Preemie Cylinder Please keep in mind that maximum flow rates and volumes are reduced by approximately a factor of 8 when using the Preemie Cylinder. Patient parameter files (vr3-files) require settings that are compatible with the physical characteristics of the altered system. As a general rule, it is the relative size of the piston (area) rPC2/rAC2 = 0.12755 that is responsible for the differences. Figure 10-11 Preemie Cylinder: Pressure Line Manifold CAUTION ! Do not block port of main cylinder while operating the ASL 5000 with the Preemie cylinder attached. It would prevent piston motion and could damage the unit! 10.6.6 Unmounting the Preemie Cylinder Follow the steps of assembly in reverse order. Before unscrewing the cylinder from the ASL 5000, detach all lines and cables. Place all components into the protective case provided with the kit. Take special care to not damage the piston seal when handling the parts. Close the front of the unit with the large aluminum lid that had to be removed when installing the Preemie Cylinder. Tighten gently. CAUTION ! Misalignment of the threads could cause damage to both the lid and/or the ASL main unit! 1 When using an ASL 5a000 equipped with the most recent CPU (Helios), user interface (cosole) redirection first needs to be turned on. For this purpose, immediately use the <Esc> key to enter BIOS mode. 103 Options Mobile Cart Option 10.7 Mobile Cart Option . Frequently, it is easier to move the simulation to a location where a ventilator is available that students need to be trained on. A height-adjustable cart for placing the entire ASL 5000 system is available as an option that will create a mobile simulation station. The ASL 5000 is mounted to a tray on the cart, the notebook computer sits on a shelf with a lockable compartment underneath. The cart also facilitates mounting a screen (up to a 40“ diagonal or 20 lbs, not included with the cart option) and is the ideal platform for in situ training, where the complete training station is brought right into an ICU or NICU for training staff in small groups or oneon-one. There is also a version of this cart as part of the RespiSim/ RespiPatient system. Please refer to the RespiSim Addendum to this manual as well as to the RespiPatient Manual for a description. A screen can be mounted using a standard VESA-mount 100 x 100 mm adapter that is supplied with the cart. For larger screens an additional adapter may be used (also included) that provides the VESA 200 x 100 mm pattern. NOTE: Before purchasing a screen, make sure the model you are selecting supports one of these commonly used wall-mount standards. WARNING ! Always observe the load limit of 20 lbs (9 kg) for a monitor mounted on the cart. An overly top-heavy assembly would present a risk of tipping and bodily injury. A surge-protected, 6-outlet power strip for powering all items on the cart is included in the package. The two front casters are lockable to prevent inadvertent roll-away. CAUTION ! • • • • 104 Always secure all loose items when moving the loaded cart. Make sure simulator is clamped tightly in its tray. Always lower height adjustable column before moving unit. Use special care when rolling over bumps or uneven surfaces, such as going through elevator doors. Figure 10-12 ASL Mobile Cart User’s Manual ASL 5000, SW 3.5, Rev.2 © IngMar Medical, Ltd. 2015 The height adjustability allows for a sitting position with the appropriate height for the notebook keyboard, or a standing position. The adjustment is operated with a foot pedal at the front of the base of the cart releasing the column lock. Troubleshooting Common Errors 11 Troubleshooting 11.1 Common Errors The following conditions are problems that can be easily identified and remedied by the user. NOTE: Please also check IngMar Medical’s website -> FAQ for an expanding list of frequently asked questions. Simulator piston does not move: — At the simulator power entry module (back of the unit), check that power is switched on (light in the green switch must be lit). — Verify that the Motor Enable/Disable switch on the front panel is not in the disable position (red light must be OFF after the initial bootup of the system, approximately 15-20s). User’s Manual ASL 5000, SW 3.5, Rev.2 © IngMar Medical, Ltd. 2015 If light stays on, even after switch is pressed down, this indicates a software motor disable. The simulator might have disabled the motor because the simulation requested a piston position that resulted in an unacceptable position error (tidal volume too large, considerable negative pressure applied at the ventilator connection, acceleration demands exceeding simulator capabilities, etc.). In order to reset the ASL 5000 in this case, switch power off, wait a few seconds, then switch power back on again. The software will also not enable the motor in case of a failed boot procedure. Host does not sync up with simulator: — Check that power is switched on at the simulator power entry module (switch must light green). — Power cycle simulator (turn power off, then back on again), wait until simulator has initialized (approximately 20 seconds after power-up, red light OFF), then re-try synchronizing the LabVIEW software. — Check serial cable connection (DB9 connector must be connected to the COM-port labeled “host“ on the ASL 5000. — Check that the serial port of the host computer is not engaged by another application (for example, PuTTY). You may also try disabling and re-enabling the serial port of the PC in the Windows Device Manager. Restart the LabVIEW application (ASL5000_SW3.5.exe). Restart computer, if necessary, to free up a locked serial port. — Verify network connection (Ethernet cable connected to a “live“ network outlet) Discrepancies between traces for “Lung Model“ and “Piston“ in Runtime Flow and Volume charts: Situations that exceed the dynamic capabilities of the simulator can be identified by the fact that noticeable differences exist between the two traces for “Piston“ and “Lung Model“ (in a one compartment model) for flow and volume charts. Charts do not seem representative of the simulator behavior (e.g. during HF ventilation): The screen updating of the chart in the ASL Run Time module is considerably less detailed than the data collection rate for the raw data file. Only every 10th to 60th data point is actually displayed (dependent on the choice of <Chart Length>, see "Display Options of the Run Time Home Window" on page 45). It is intended for general orientation only and not for strict data analysis. Looking at the Display Data views accessed from the Post-Run Analysis Module (with waveform data saving turned on) will show any details that might not have been visible in the real-time charts of the ASL Run Time Home view. Dissynchrony between calculated and “piston“ flows and volumes in Runtime charts: Serial communication is not able to download the new pressure profile for a breath in the time it had available. This might happen if you switch from a faster to a significantly slower breath rate. To prevent time constraints at higher bpm, the simulator actually places several breath profiles into one “breath“, (see page 123). However, when a longer profile needs to be downloaded for an upcoming slow rate while the simulator is still operating at a higher rate, dissynchrony is possible. Inserting a parameter file segment containing just one breath of an in-between rate can be used to prevent this. This effect is not to be expected when operating in TCP on a network (Ethernet connection). SmartPump models result in motor disable (red light ON): When using SmartPump mode, the pressure profile acts as a flow or volume profile, calibrated in L/min or L, respectively. For volume pumps, numerical values have to be very small compared to regular models. Excessive volumes will exceed the physical capabilities of the simulator and therefore might cause a motor disable. Use values < 2.1 L when operating with a residual volume of 0.5 L (the default setting for URC). In this case, the piston was not able to follow the required movement fast enough and maintained a higher speed for a longer time to compensate for the effect. In such situations, it will be necessary to return to model parameters and/or conditions that are within the performance range of the simulator system. 105 Maintenance Instrument Identification 12 Maintenance 12.1 Instrument Identification Please refer to the separate maintenance manual for details about maintenance for the ASL 5000. When inquiring about maintenance, please have the following reference information available. This label can also be found on the bottom of the instrument as well as in the maintenance manual. 12.2 Service and Calibration Intervals While it is not always necessary, depending on the type of use of the instrument, to mandate specific calibration intervals, users in research and development facilities, especially those operating under some regulatory framework, will find the following guidelines helpful Service Interval Leak Test = every month* Calibration Check = yearly Recalibration = if Calibration Check determines that sensor is out of spec. Seal Exchange = based on leakage rate determined by Leak Test = *more frequently if indicated by continuous use of the instrument or by good scientific practice NOTE: In software 3.5, maintenance reminder messages for both calibration and seal replacement are implemented. For details about available service subscriptions or extended warranty plans, please contact IngMar Medical Customer Care at Figure 12-1 ASL 5000 Component Serial Numbers From the file e_log.txt (to be found in the main installation directory), as well as via the <Maintenance> button on the Full Choice Welcome window, the user can check the status between service intervals. Example: odometer.install_date = 09-09-11 odometer.leadscrew_revs = 170749 odometer.simulation_secs = 101807 odometer.piston_cycles = 12520 As a reference, 250,000 revolutions of the spindle equal 1 km of piston travel (relevant for the life of the piston seal). 1000 hrs of operation equals 3.6 x 10⁶ seconds. Ventilation at a rate of 15 bpm, with 500 mL tidal volume (that is, a MV of 7.5 L/min) generates approximately 18 km of piston travel in 1000 hours or 4.5 x 10⁸ leadscrew revolutions. 106 or e-mail to [email protected] User’s Manual ASL 5000, SW 3.5, Rev.2 © IngMar Medical, Ltd. 2015 Newer versions of firmware in the ASL 5000 instrument (4.6.n and higher) also keep track of spindle revolutions, accumulated time of simulation runs, and breath cycles, like the odometer in a car. 1-800-683-9910, or +1 (412) 441-8228 ext. 107 Maintenance Firmware Upgrade 12.3 Firmware Upgrade the following window will appear.. NOTE: The following instructions only apply to devices that have been delivered with or have been already upgraded to a version of SW 3.1 or higher, i.e., a firmware of 4.6.nn or higher. Older units first require a 32-bit prep with service firmware. In this case, please contact IngMar Medical or your local technical representative to perform the necessary steps. Switch power to simulator off, and, after waiting a few seconds, back on. Figure 12-3 Firmware Upgrade - Confirm Select the “Upload...” option, and confirm the next window. User’s Manual ASL 5000, SW 3.5, Rev.2 © IngMar Medical, Ltd. 2015 Figure 12-4 Firmware Upgrade - Disconnect Warning The upload process is completed after a few seconds using Ethernet. It might take up to one minute using RS232. Confirm the final message: Figure 12-2 Firmware Upgrade, Normal SW Launch (Re-)launch the host software 3.5 on your PC and select operation with the simulator via Ethernet (recommended) or RS-232 from the full choice menu. If the software detects a firmware mismatch (older firmware on the simulator than what the host software application expects, Figure 12-5 Firmware Upgrade - Restart Notice The software will close automatically. Switch power to simulator off, and, after waiting a few seconds, back on. Verify that the red motor enable/ disable switch on the front of the ASL will now go off again after 20 seconds, as usual. 107 Maintenance Schematic Overview 12.4 Schematic Overview SBLVM (Simulator Bypass and Leak Valve Module) One-way valve Test lung Solenoid valve Mech. leak valve 2 1 3 0 Optical limit switches Brushless DC Motor w/ encoder Ventilator PWM power Hall signals COM1 COM1 COM2 Ethernet COM2 (Host) (Terminal) Press. cal. switch valve SIM ON gr Differential press. transducer -40...110 cm H2O Brushless motor amplifier 5/10 A, 55V Motor Control Signal Barometric press. transducer yl 486 133 MHz CPU 16-bit A/D converter 2kHz motion controller O2 sample pump Fast paramagnetic O2 transducer Press. transducer CAL signal Simulation ON signal Thermolinear network thermistor Universal input switching power supply + 5V, ± 12 V Rev. 3.5-2014 Figure 12-6 Schematic Overview ASL 5000 System 108 CAL ON I/O Mod. Systems interconnect board Universal input switching power supply +48 V User’s Manual ASL 5000, SW 3.5, Rev.2 © IngMar Medical, Ltd. 2015 Enc. signal Theory of Operation Introduction to Ventilatory Mechanics 13 Theory of Operation For the airway: (pAO – pPL) = υL/CL + RAW ύL 13.1 Introduction to Ventilatory Mechanics1 User’s Manual ASL 5000, SW 3.5, Rev.2 © IngMar Medical, Ltd. 2015 For the purposes of this discussion, the ventilatory system is subdivided into the pulmonary system and the chest wall. The pulmonary system comprises the lungs, usually two, and their associated airways leading to the airway opening – the mouth and nares. The chest wall comprises all of the passive extrapulmonary mechanical structures that participate in the production of a breath. These include the rib cage – the ribs, sternum, and spinal column – and the respiratory muscles – among them, the diaphragm, intercostals, abdominals, and scalene – in their tonic state. Thus, as used here, the ventilatory system encompasses all the passive mechanical properties involved in breathing, e.g., compliances, resistances, and so forth. On the other hand, there are two prime movers that drive the ventilatory system, and its components. The first are the forces produced by the active contraction of the respiratory muscles in support of ventilation. (These do not include the forces produced by these muscles in support of posture or mobility etc.) The second prime mover is the pressure difference between airway opening and the body surface, (pAO – pBS). This can be controlled by a mechanical ventilator. The mechanical behavior of the ventilatory system in response to these driving forces can be described mathematically by relations among pressure differences across the system, volume changes of the system, and their respective rates of change. (1)2 For the chest wall: (pPL – pBS) + Δpmus = υL/ CW (2) We follow the convention that a positive pressure difference produces expansion of the lungs. Likewise, expansion of the lungs is positive; deflation is negative. Changes in esophageal pressure, pES, that can be measured clinically, are considered equivalent to changes in pleural pressure, and are substituted for them. NOTE: The patient effort as used in the ASL software environment (plots and pressure profiles) is pictured as the negative value of Δpmus with the intention of creating more clearly distinguishable plots. 13.1.1 Normal Lungs Governing Equation Normal lungs, together, act, primarily, as a single, pneumatic, visco-elastic compartment. This implies their mechanical properties are uniformly distributed across both lungs. Figure 13-1 shows a flow-resistive airway leading to a single, representative, elastic lung compartment, contained within a distensible shell representing the chest wall. The lung and chest wall are separated by a thin intrapleural space. The governing equation for this configuration can be developed by considering each component individually. 2 1 This section authored by Frank P. Primiano, Jr., Even in normal lungs, these relations may be more accurately portrayed as non-linear. However, a first approximation as a linear system has been found to be extremely useful, clinically. 109 Theory of Operation Introduction to Ventilatory Mechanics Besides the airway resistance, RAW, and the total compliance, Ctot, another mechanical property of importance is their product, called the time constant, τtot : τtot = RAW Ctot (6) The time constant is a measure of how long it takes the lungs to deflate to FRC after the total effective pressure difference that is maintaining an inspiratory hold is instantaneously reduced to zero. (The condition is reached after about 3 x τtot.) Equation (4) describes a single-compartment system with a single degree of freedom. The salient characteristic of a single-degree-of-freedom system is that it can be characterized by a single time constant. Clinically, this implies that both lungs, when simultaneously subjected to the same pressure difference, will inflate and deflate in unison. Figure 13-1 Thus, equation (2) can be rearranged, and written: (3) Δpmus = – [(pES – pBS) – υL/ CW] Combining equations (1) and (2), we obtain the governing equation for a single compartment ventilatory system: Δptot = (pAO – pBS) + Δpmus = υL/Ctot + RAW ύL 4) in which ∆ptot is the total effective pressure difference driving the ventilatory system, and, Ctot, the total system compliance, is given by Ctot = CLCW/(CL + CW) 110 (5) Normal lungs exhibit age- and stature-appropriate values for RAW, Ctot and τtot . For a non-apneic patient on a ventilator, equation (4) shows that the pressure difference driving the system has two components, as previously described: the physical pressure difference across the system that can be manipulated by the ventilator, and the equivalent pressure difference produced by active contraction of the respiratory muscles. Figure 13-2 shows example wave shapes that could result from a normal ventilatory system driven by a ventilator (assisted breaths) and the respiratory muscles. The Work of Breathing The work done on a pneumatic system as its components are moved relative to one another is the product of the pressure difference driving the movements, and the change of volume resulting from the movements. This can be written as wAB = ∫Δpmus dυ (7) where wAB is the work done going from volume A to volume B ∆p is the pressure difference across the system dυ is the differential volume and the integral along the path from A to B on the Δp-υ plane. For the ventilatory system, for an entire breath numbered N, this can be written: Vee(N) ⌠ wBR(N) = | Δptot dυL (8) Vee(N-1) ? User’s Manual ASL 5000, SW 3.5, Rev.2 © IngMar Medical, Ltd. 2015 A one-compartment ventilatory system in which... pAO is the change in pressure at the airway opening pBS is the change in pressure on the body surface is the change in pressure within the intrapleural pPL space ∆pmus is the change in the net force produced by the respiratory muscles expressed as an equivalent pressure difference; often called muscle pressure difference υL is change in lung volume ύL is rate of change in lung volume, interchangeably referred to as flow CL, CW is lung compliance, and chest wall compliance, respectively R is resistance of the pulmonary system; sometimes called airway resistance or RAW Theory of Operation Introduction to Ventilatory Mechanics where Vee(N)and Vee(N-1) are the end-expiratory volumes for breaths N and N-1, respectively. where Vei is end-inspiratory volume, and VT is tidal volume. In this way, we can separately compute the work of the ventilator, wventI(N), and the work of the respiratory muscles, wmusI(N), during inspiration. We can also substitute the extreme right hand terms of equation (4) into equation (7) to yield: wI(N) = ∫(υL/CL + RAW ύL)dυL =∫ υLL/CL)dυL + ∫RAW ύLdυL = welI(N) + wresI(N) (10) Thus, the work stored in the elastic components of the ventilatory system, welI(N), can be separated from the work dissipated, or lost, in the resistive components, wresI(N). These ideas are illustrated graphically on Figure 13-3, a ∆p-υL plot of the data of Figure 13-2. We can see that, except for the initial pressure drop in curve (a), required to trigger the ventilator, the pressure differences and volume changes are both positive on all the curves. Thus, the calculated work is positive in these regions. Positive work corresponds to work done on the ventilatory system by the various pressure differences. User’s Manual ASL 5000, SW 3.5, Rev.2 © IngMar Medical, Ltd. 2015 Negative work corresponds to work done by the ventilatory system on the components producing the pressure differences. The negative area in the initial portion of Figure 13-3(a) represents work done by the respiratory muscles on the ventilator to cause it to trigger. Figure 13-2 Normal ventilatory system responses during assisted inspiration (with expiratory muscular forcing). Vei and Vee are end-inspiratory, and endexpiratory volumes, respectively. VT is tidal volume. Inspiratory Work In practice, work of breathing is routinely calculated for segments of the breath, e.g., inspiration and/or expiration, separately. Let us begin with inspiration. We can rewrite equation (7), after substituting the middle terms of equation (4), as: ⌠ wI(N) = |[(pAO – pBS) + Δpmus]dυL Vei ? The work under the total driving pressure differencevolume curve is divided into two regions: elastic work to the left of the total compliance curve, and resistive work to the right of it. Elastic work is stored and can be used by the system to compress the volume back to endexpiratory volume. Resistive work is dissipated as heat and cannot be reclaimed or reused by the system. It should be noted that, although Figure 13-3 is reminiscent of a Campbell diagram, it is not a Campbell diagram. In a Campbell diagram, esophageal pressure change minus body surface pressure change, (pes– pBS), is plotted against lung volume change, vL, along with the static ∆p-?L characteristic of the chest wall, the chest wall compliance, CW, curve. These two curves are then used to graphically solve equation (3) for ∆pmus, and depict the components of work given in equation (10) VT (8) VT ⌠ ⌠ = | (pAO – pBS) dυL+ | Δpmus dυL Vei ? Vei ? VT = wventI(N) + wmusI(N) (9) 111 Theory of Operation Introduction to Ventilatory Mechanics . Figure 13-4 (c) ∆p-υL plot for (c) total driving pressure difference However, because a simulation permits the calculation of variables that may be unobservable in real life, we have the effective muscle pressure difference available here, and can plot it directly, as in Figure 13-3(b). There is no need to resort to plotting (pES – pBS). This makes visualization of the various driving pressure differences much clearer. Figure 13-3 ∆p-υL plots for... (a) airway-body surface pressure difference, (b) effective muscle pressure difference, and (c) total driving pressure difference, each versus ventilatory system (lung) volume change during inspiration (for data in Figure 13-2). Cg is the compressibility of the gas in the ventilatory system; PEEP is positive end-expiratory pressure. 112 User’s Manual ASL 5000, SW 3.5, Rev.2 © IngMar Medical, Ltd. 2015 Expiratory Work During quiet breathing, both spontaneous and assisted, the prime mover of expiratory flow is the energy stored in the expanded elastic components of the ventilatory system. Complementing this are effective pressure differences, if any, produced by the respiratory muscles, ∆pmus, and the ventilator, (pAO – pBS). These two pressure differences can be positive, in which case they retard, or act as a brake on expiratory flow. Or, they can be negative and compress the system, and assist expiratory flow. Theory of Operation Introduction to Ventilatory Mechanics Again, using Figure 13-2, we can construct a ∆p-υL plot for the expiratory portion of the breath, Figure 13-5. User’s Manual ASL 5000, SW 3.5, Rev.2 © IngMar Medical, Ltd. 2015 Figure 13-6 ∆p-υL plots for data in Figure 13-2 with expiration included. As the lung volume decreases, the expiratory pathway on the total pressure difference-volume plot continues counterclockwise from the end-inspiration (Vei = Vee+VT) point on the total compliance curve. It eventually meets the υL axis, at which point ∆ptot is zero and both the ventilator and the respiratory muscles are passive. The ventilatory system continues to deflate, driven by its internal elastic forces. However, before end-expiratory volume is reached, in this example, the patient momentarily contracts his expiratory muscles to increase the expiratory flow. Then, he fully relaxes again just above end-expiratory volume. Rewriting equation (7) for expiration, we obtain: Vee⌠ wE(N)= |(pAO – pBS) dυL + ΔpmusdυL VT ? = wventE(N) + wmusE(N) Figure 13-5 ∆p-υL plots for data in Figure 13-2 with expiration included. (11) These integrals represent the area between the expiratory curves and the υL-axis. In the upper portions of Figure 4, just below the end-tidal volume, the change in υL is negative, i.e., the lung volume is decreasing, while the ∆p is positive. Therefore, the product ∆pdυL is negative. Negative work indicates work is being done by the system on its surroundings. In Figure 13-5(a), the work is done on the ventilator since the (pAO – pPL) component of 113 Theory of Operation Introduction to Ventilatory Mechanics ∆ptot is non-zero. In Figure 13-5(b), the work is done on the inspiratory muscles as they lengthen while actively contracting before they completely relax to ∆pmus = 0. However, further down the expired volume, in this example, the expiratory muscles are momentarily activated, and ∆pmus becomes negative, assisting expiration. Since both ∆pmus and υL are negative, their product is positive, and this portion of the expiratory work is positive. Thus, work in this region of volume change is done on the ventilatory system by the expiratory muscles as they shorten while contracting during expiration. Work of the Breathing Cycle Figure 5 shows an alternative way of plotting the ∆p-υL relation for a complete breathing cycle that might help visualize the work involved. Inspiration is plotted as in Figure 13-3. However, expiration, i.e., negative changes in lung volume, is plotted upward from Vei, the endinspiration point. Thus, the expiratory curve is the upward reflection of the expiratory portion of Figure 13-5. All area to the right of the υL-axis in the lower (inspiratory) curve is positive work, done on the system. In the upper (expiratory) curve, the opposite holds. Area between ∆p and the lung volume axis, to the right of the lung volume axis, is negative, and represents work done by the system. Area to the left of the υL-axis is positive, and represents work done on the system. The same type of plot can be constructed for (pAO – pPL) and ∆pmus. Using all three curves we could examine the work done by these pressure difference components for the various segments of the breath. Work can be done on the ventilatory system by the respiratory muscles, or the ventilator, or both, and vice versa. If the work done on or by the respiratory muscles is to be evaluated, then the ∆pmus-υL curve is used. If the work done on or by the ventilator is of interest, then the plot of (pAO – pPL) versus υL is required. If the entire load represented by the ventilatory system is desired, then ∆ptot-υL is needed. When analyzing the work of the breathing cycle and its subdivisions, one must include both the (positive) work done on the system, and the (negative) work done by the system. An alternative way of viewing Figure 13-5 and Figure 13-7 is to consider the fate of the work done on the ventilatory system during inspiration. For expiration to occur, i.e., υL to decrease from Vei toward Vee, work (energy) is required. This is supplied by the stretched elastic components of the chest wall and lungs. Work was stored in them as potential energy when the system was expanded during inspiration (welI in Figure 3). This energy is used to compress the ventilatory system during expiration. Figure 13-7 ∆ptot- υL curve for an entire breath with expiratory volume change plotted upward from end inspiration on the υL-axis 114 User’s Manual ASL 5000, SW 3.5, Rev.2 © IngMar Medical, Ltd. 2015 Figure 13-5(c) shows that the potential (elastic) energy, i.e., the area between the Ctot line and the υL-axis, is divided into two regions by the expiratory ∆ptot-υL curve. The area [1], between the ∆ptot-υL curve and the υL-axis, represents the work done on the ventilator and the respiratory muscles by the ventilatory system’s elastic elements as they decrease in length. The energy this represents is lost as heat to the atmosphere. The area [2], between the ∆ptot-υL curve and the Ctot line, is work (energy) dissipated (lost) during expiration in the passive resistive components of the ventilatory system, i.e., airway and tissue resistances. This process is the same as occurs during inspiration when work (energy), represented by area [3], is dissipated (lost) in the system’s resistive elements. Over the complete breathing cycle, all of the work invested in the breath is ultimately lost as heat. Theory of Operation Introduction to Ventilatory Mechanics 13.1.2 Abnormal Lungs : Uniform Lungs Ventilatory mechanical abnormalities can manifest themselves in various ways. We will consider a few of them here. As previously stated, the normal ventilatory system acts as a single unit with approximately constant (linear) mechanical properties, C and R. It exhibits a single time constant (τ =RC). Each of these parameters in a normal system has a value within its respective “normal” range. Abnormality can be inferred by an R, C, or τ either above or below this range. Figure 13-9 (b) The ∆ptot- υL for the three cases. User’s Manual ASL 5000, SW 3.5, Rev.2 © IngMar Medical, Ltd. 2015 Note that, in the time allotted, the obstructed system’s volume does not return to the same Vee as the other systems. “Restrictive” diseases, such as chest wall paralysis, pulmonary fibrosis or pneumonia, typically may be represented by a single compartment model with a decreased compliance (stiffer system) and approximately normal resistance. Although the system would be harder to expand, the product of R and C would be smaller than normal, and the system would be able to empty faster than normal. Figure 13-8(a) Volume and flow responses to the same ∆ptot forcing function, for ventilatory systems with different time constants. The time constant of the restricted system, τR, is less than that of a normal system, τN. The obstructed system’s time constant, τO, is larger than normal: τR < τN < τO. Some “obstructive” diseases may be characterized by a single compartment model with either an increased resistance, e.g., asthma, tracheal tumor, and/or increased compliance, e.g., early emphysema. In these cases, inspiration may be harder (increased R) or easier (increased C), and the lungs may expand to a larger than normal volume for the same effort (increased C). Expiration, in contrast, because the time constant is increased (increased R and/or increased C), can be much longer than normal, requiring an extended expiratory time for the lungs to deflate. In many cases, they do not reach the normal FRC before the next breath begins, and gas is trapped in the lungs. From it can be appreciated that the “intrinsic PEEP” that accompanies gas trapping is not seen on a plot of ∆ptot versus υL. However, this residual pressure would appear on the plot of (pes–pBS) versus υL. 115 Theory of Operation Introduction to Ventilatory Mechanics In some disease processes, even for tidal volumes and breathing rates in the quiet range, the ventilatory system, while still acting as a single compartment, exhibits nonlinear relations for the terms in the right hand side of equation (4). Thus, The parameters and variables are as in Figure 1, except that here a distinction is made between the resistance, compliance, and volume of the two compartments, and Rt represents the resistance of the larger, upper airways leading from the carina, (tracheal resistance). ∆ptot = (pAO – pBS) + ∆pmus = f1(υL) + f2(ύL) The governing equations for this configuration are (13) where f1(υL) and f2(ύL) are functions of lung volume change and flow. These functions can exhibit a variety of nonlinearities, including hysteresis, power curves, directional sensitivities, and time variation. In such cases, the time constant may not be a mathematically appropriate mechanical parameter. However, in some situations, an average time constant with its concomitant average resistance and average compliance, are used – not necessarily correctly – to approximate the system behavior. Non-uniform Lungs In some disease states, e.g., advanced COPD, tissue loss and airway obstruction can be distributed in multiple locations throughout the lungs. Consequently, a singlecompartment model does not describe the system’s behavior very well. The minimum number of compartments that will exhibit the essential responses of such systems is two. Figure 13-10 shows a two-compartment pulmonary system within a chest wall compartment. It is important to note that the two compartments do not necessarily correspond to the two lungs. Instead, they represent the aggregation, across both lungs, of all regions that have time constants sufficiently different from one another. (pAO – pC) = RtύL (pC – pPL) = υL1/CL1 + R1 ύL1 (pC – pPL) = υL2/CL2 + R2 ύL2 (pPL – pBS) + Δpmus = υL/ CW υL = υL1 + υL2 a) b) c)(14) d) e) Combining these equations, and collecting terms yields: Δptot + K Δptot = γ0υL + γ1 ύL + γ2ϋL (15) Equation (15) has the same form as the equation for an isolated two-compartment pulmonary system (chest wall and common airway not included) derived by Otis et al (1956)1. They showed that, in such a relationship, the apparent (dynamic) compliance and the apparent resistance of the system each decrease from their respective low frequency (static) values as the frequency (rate) of breathing increases. Equation (15) extends Otis et al’s work by showing how changes in chest wall compliance and common airway resistance affects the system response. 1 116 Otis AB, McKerrow CB, Bartlett RA, Mead J, McElroy MB, Silverstone NJ and Radford EP Jr. Mechanical Factors in Distribution of Pulmonary Ventilation. J Appl Physiol 8:427, 1956. User’s Manual ASL 5000, SW 3.5, Rev.2 © IngMar Medical, Ltd. 2015 Figure 13-10 Two compartment pulmonary system within the chest wall. Theory of Operation Introduction to Ventilatory Mechanics Figure 13-11 illustrates the effect of increasing breath rate in a two compartment ventilatory system. isometric contraction, no work is done, no matter how much force is produced. Nonetheless, energy (oxygen) is consumed. In a similar manner, a ventilator, or other mechanical device, uses energy to produce the pressure difference required to assist or support breathing. This energy, usually, electrical or pneumatic, is above and beyond that required to maintain the device in an “on” or active state. During inspiration, the vast majority of work done by the respiratory muscles and/or the ventilator is positive, i.e., done on the ventilatory system. Depending on the wave form, breath rate, and system mechanical properties, a portion of this positive work is stored as potential energy in the elastic elements of the tissues, and the remainder is dissipated by the resistive elements, as heat, to the atmosphere. Figure 13-11 ∆ptot- υL relation for a two compartment ventilatory system as breathing frequency is increased. The same amplitude ∆ptot is applied at all breathing frequencies, but only during inspiration. User’s Manual ASL 5000, SW 3.5, Rev.2 © IngMar Medical, Ltd. 2015 The apparent compliance decreases so that, for the same driving pressure difference – by either the ventilator or respiratory muscles, or both – the tidal volume decreases. The peak flow can increase. 13.1.3 Energetics The mechanical work of inspiration – i.e., the work of deforming the lungs and chest wall, and of creating a pressure gradient through which a volume of gas is moved – is the primary work-related term used to describe the status of the ventilatory system. However, it does not necessarily account for all the energy expended during inspiration. Whenever a muscle actively contracts, it uses energy – sometimes expressed in terms of oxygen use, e.g., the “oxygen cost” of muscle activity. This is over and above its basal metabolism, which we will disregard. For the same force produced, the most energy is required when the muscle shortens during contraction. Less energy is required when the muscle lengthens during contraction. The least is used when the muscle does not change length during (isometric) contractions. When the muscle changes length under load, work is involved. During Not all inspiratory work may be positive. In those ventilators that require a drop in airway pressure, or flow, to initiate an assisted breath, positive work is performed by the respiratory muscles, and the same amount of negative work is done on the ventilator, as the intrapulmonary gas is expanded by the respiratory muscles at the beginning of the breath. The increase in ∆pmus exceeds the decrease in (pAO – pBS) by the amount needed to expand the lungs and chest wall sufficiently to drop the airway pressure to trip the trigger. Thus, the ∆ptot-υL plot shows simultaneous increases in lung volume and ∆ptot that follow the Ctot curve as the lung expands prior to triggering. The net work shown on the ∆ptot-υL plot is just that required to expand the chest wall and lungs, even though the respiratory muscles do additional work to trigger the assisted breath. This additional work is shown on the ∆pmus-υL and (pAO – pBS)-υL plots. In some breathing patterns, prior to the start of expiration, there is a pause during which the lungs remain at end-inspiration for a period of time. This has been called the “inspiratory hold.” If this hold time, TH, is considered part of inspiration, then the energy required to maintain the static tidal volume should be accounted for. During an isovolumetric “hold”, no work is done since the volume change is zero. If the ventilator maintains the hold, depending on its design, energy may, or may not, be used. In contrast, if the respiratory muscles maintain the static tidal volume, then they must do this while contracting isometrically. Energy is used by the muscles involved. 117 Theory of Operation Introduction to Ventilatory Mechanics The so-called pressure-time product (∆pTH) has been used by various authors as an “index of effort,” or, interchangeably with work (of breathing). The ∆pTH is analogous to the impulse in mechanics. It is not a work term per se. However, in as much as it provides a basis for comparing ventilators and ventilatory systems, we will use it as a measure of energy, provided it is scaled using an appropriate factor to provide it with an appropriate magnitude and units of energy. The scaling must also account for the different rates of energy expenditure by the various components, i.e., the ventilator and the respiratory muscles. calculation of the various work terms can be obtained by substituting equation (3) for ∆pmus. Again, a simulation can calculate and plot (pes – pBS) versus υL with a superimposed chest wall compliance curve, if a Campbell-type diagram is desired, or if intrinsic PEEP is to be visualized. Thus, the energy expended during inspiration is: For the ventilator: EventI = wventI(+) + IwventI(-)I+ αvent (pAO – pBS)HITHI (16) For the respiratory muscles: EmusI = wmusI(+) + αmusΔpmusHITHI (17) where α is a factor that relates the pressure-time product to energy for the different components. The total inspiratory energy is EtotI =wtotI(+) + IwventI(-)I + [αvent (pAO – pBS)HI + αmusΔpmusHI] THI (18) EventE = wventE(+) + IwventE(-)I + αvent(PEEP)THE (19) For the respiratory muscles: EmusE = IwmusE(-)I + wmusE(+) (20) The total expiratory energy is EtotE =IwventE(-) + wmusE(-)I + wventE(+) + wmusE(+) + αvent(PEEP)THE(21) For the complete breath cycle: Etot = EtotI + EtotE (22) Many of these terms are zero during most breathing patterns. Equations (19) – (22) can be evaluated in a straightforward manner in a simulation in which ∆pmus is available. Even though it is more complicated, 118 User’s Manual ASL 5000, SW 3.5, Rev.2 © IngMar Medical, Ltd. 2015 During expiration, the ventilator and/or the respiratory muscles may be silent (zero work done), they may retard exhalation (negative work), or they may aid exhalation (positive work). (The pressure-time product can be used to estimate the energy required to maintain an expiratory hold, e.g., zero volume change at PEEP.) The energy expended during expiration is: For the ventilator: Theory of Operation Introduction to Modeling 13.2 Introduction to Modeling 13.2.2 Limitations of the Model 13.2.1 Model Background Based on the ventilatory mechanics (i.e. the lungs, airways, diaphragmatic muscle activity, and chest wall recoil forces) discussed in the previous chapter, a model of passive and active breathing of a lung simulator was developed, meeting the challenge of appropriate simplification and approximation. A more technical “translation“ of the Equation of Motion for the model (as described in the previous section, "Normal Lungs", page 109, and "Non-uniform Lungs", page 116, is shown below Single Compartment The model, as implemented in the simulator controller software, does not take into account any neural response to external ventilation. Further extensions should allow implementation of some approximate ventilatory responses based on patient characteristics and disease states that would enhance the spontaneously breathing patient mode. 13.2.3 Realization of the Model F Dual Compartment In p (A ce Th ar yo sp lu User’s Manual ASL 5000, SW 3.5, Rev.2 © IngMar Medical, Ltd. 2015 Figure 13-12 Simulation Model Electrical Analog where: Paw Ptrach Δp1mus Ctot R ύL = = = = = = U de fe be p airway pressure (cmH2O) tracheal pressure (cmH2O), across Rtrach transalveolar muscle pressure (cmH2O) total compliance (mL/cmH2O) Overall airway resistance (cmH2O/(L/s) flow 1. In the lung model window and graphs, Δpmus is simply called Pmus, but it still refers to the muscle pressure difference. Please note that in these model compositions, there is no distinction made between chest wall compliance and lung compliance, instead they are lumped together so that in the simplified case of the single compartment model, C represents the total Compliance, see page 110 Ctot = CLCW/(CL + CW) and, similarly, in the case of non-uniform lungs, C1 = CL1CW/(CL1 + CW) C2 = CL2CW/(CL2 + CW). (5) Figure 13-13 Simulator Concept The hardware implementation of the model works via a pressure feedback control loop that takes care of moving the piston inside the simulator cylinder in such a fashion that the set values of R, C, and chest wall profiles can be observed externally. 119 Theory of Operation Ventilatory Model Types 13.3 Ventilatory Model Types 13.3.2 Dual-compartment Model 13.3.1 Single-compartment Model Figure 13-15 Two Compartment Model Figure 13-14 Single Compartment Model The single compartment model consists of a single (linear or parabolic) resistor and a single (linear) compliance. The icon of this model symbolizes this configuration. The differential equation for this setup is (see page 110, Equation 4): Δptot = (pAO – pBS) + Δpmus = υL/Ctot + R ύL with pAO – pBS = Paw= external (ventilator) pressure at the airway and ΔPmus = internal pressure (patient effort)1 As an enhancement to the model, the value of R can be chosen independently for inspiratory and expiratory flow direction, (see next page). 13.3.3 Model Enhancements In addition to linear or parabolic response of the respective resistors, the modeling environment also allows different settings of resistance during inspiratory and expiratory flows. This is intended to give the user added flexibility for generating models representing particular pathologies or “disease states“ (e.g. high expiratory resistance in patients with asthma). Compliance may be modeled both as a linear relationship between volume and pressure or as the familiar sigmosoidal curve representative of actual patients. For adjusting compliance in this fashion, please refer to "Advanced Model Settings - Non-Linear Compliances", page 40. NOTE: For use of the non-linear compliance feature, a two compartment model has to be selected. The user may choose to have both compartements modeled identically, by simply checking the C1=C2 checkbox. 1 120 Please note that, for better visibility, the trace for “Muscle“ in the Central RunTime pressure waveform plots as well as the graphs in the Patient Effort Model (Step 3 of the model-editing process) actually represent the negative of muscle pressure (-Pmus). giving you a picture that resembles that from an oesophageal pressure tracing. User’s Manual ASL 5000, SW 3.5, Rev.2 © IngMar Medical, Ltd. 2015 Compliance and Resistance parameters may also be modeled as time varying parameters, with small adjustments being made in a breath-by-breath fashion, please see "Advanced Model Settings - Time Varying Parameters (TVP)", page 37. The two compartmenttwo compartment model consists of a single (linear or parabolic) tracheal resistor, two branch resistors (always linear) and a dual (linear or nonlinear) compliance. The icon of this model symbolizes the configuration. For the mathematical description, please refer to page 116, Equations (14) and (15). Theory of Operation Patient Effort Model 13.4 Patient Effort Model Pressure Trigger The different spontaneous patterns (Δpmus profiles) are pre-defined through the Patient Effort Model pop-up menu as: — passive — simple pressure trigger — simple flow trigger — sinusoidal pressure profile — trapezoidal pressure profile — user defined pressure profile — external analog input. 13.4.1 Passive Model Figure 13-17 Patient Effort Model: Pressure Trigger Selecting “Pressure Trigger“ shapes the pressure waveform as a rectangular pressure drop (no ramps), defined only by amplitude and duration, the set trigger time. For the condition of an occluded port, this setting will produce a rectangular pressure profile as mouth pressure (see Figure 13-18, page 121). User’s Manual ASL 5000, SW 3.5, Rev.2 © IngMar Medical, Ltd. 2015 The excursion of the piston is reversed by the recoil forces programmed into the system as its compliance C (or C1 and C2 in case of the two-compartment model). Figure 13-16 Patient Effort Model: Passive The “passive“ setting will not add any spontaneous breathing to the “Lung Model“ defined in step 2. A passive model will respond just like a spring-loaded conventional lung model with orifice resistors and one or two compartments. However, you set a passive cycle rate, which will be used to indicate the length of the passive interval, similar to a spontaneously breathing model. NOTE: All pressures of the Patient Effort Model are plotted inversed (negative trace producing an inspiration). See also the footnote on page 120. The repeat rate of this pattern, as in all other types of profiles generated from within the Simulation Editor, is determined by the bpm parameter. The small profiling window always shows the time allowed for one breath, unless the rate exceeds 24 bpm (see also NOTE on page 123). Figure 13-18 Pressure Trigger Effort Detail 121 Theory of Operation Patient Effort Model 13.4.2 Flow Trigger 13.4.3 Sinusoidal Breath Profile Figure 13-19 Patient Effort Model: Flow Trigger Figure 13-21 Patient Effort Model: Sinusoidal “Flow trigger“ generates a constant flow defined by duration and amplitude (where the pressure profile is calculated internally from the desired flow amplitude). Please note that the flow profile is generated for a noload situation (open port) and flow levels will be influenced by negative pressure in the circuit in case of delayed flow delivery from a ventilator. This is because of the fact that the system is still operating within the context of a lung simulation (with feedback pressure), and the model is therefore designed to respond to external pressure signals. The sinusoidal pressure profile can be used to generate more realistic patient breaths and is defined by a peak (negative) pressure, the breath frequency (bpm), and the time percentages for the pressure drop (inspiratory), the pressure maintaining time (hold), and relaxation (expiratory). In addition to the inspiratory effort to produce an inhalation, it is also possible to generate forced expiration, e.g., to mimic a patient “fighting“ a ventilator1. NOTE: All pressures of the Patient Effort Model are plotted inversed (negative trace producing an inspiration). See also the footnote on page 120. . NOTE: All pressures of the Patient Effort Model are plotted inversed (negative trace producing an inspiration). See also the footnote on page 120. Figure 13-22 Sinusoidal Effort Detail Figure 13-20 Flow Trigger Effort Detail 122 1 This feature has been available as of SW 3.1, Hering-Breuer response has been added with SW 3.4. User’s Manual ASL 5000, SW 3.5, Rev.2 © IngMar Medical, Ltd. 2015 If flow patterns independent from pressure changes are needed, you may use the "SmartPump™ Mode", page 126. Theory of Operation Patient Effort Model When designing a spontaneous breathing pattern, it is the responsibility of the user to ensure that the patterns do not exceed the range of possible volumes (or flow rates). A simple calculation is that of URC + C/Pmus < 2.5 L, ignoring the resistance to arrive at the maximum volume. Of course, if there is a ventilator connected, the external pressure applied will also make a contribution to tidal volume which has to be taken into account. Similarly, a “volume undershoot“ due to forced expiration programmed into the patient effort profile could lead to a stop at the forward limit switch for the piston Please refer to the "Patient Backing Off" for a description of the functionality of the Pmus modified by Paw (%) control parameter. 13.4.4 Trapezoidal Breath Profile Figure 13-24 Trapezoidal Effort Detail NOTE: For rates faster than 24 bpm, the diagram indicating the effort profile will show two (or for bpm>48, three) breaths. For these faster rates, only every 2nd (or 3rd, respectively) breath is actually updated in order to allow enough time for the download of the profile to the simulator, and several breaths are rolled into one. In this case, “Repeats“ in the Script Editor refer to these multiple breaths. In order to accomplish 10 breaths with a breath rate of 28, the correct setting in the Script Editor is therefore 5. 13.4.5 Patient Backing Off User’s Manual ASL 5000, SW 3.5, Rev.2 © IngMar Medical, Ltd. 2015 The following description of the two control parameters Pmus modified by Paw (%) applies to both sinusoidal and trapezoidal patient efforts. Figure 13-23 Trapezoidal Breath Profile The trapezoidal breath profile is configured in the same fashion as the sinusoidal setup, with a peak (negative) pressure, the breath frequency (bpm), and the time percentages for pressure drop (inspiratory), pressure maintaining time (hold), and relaxation (expiratory). The only difference to the sinusoidal profiles is that in the trapezoidal pattern straight ramps are used for pressure buildup and release. NOTE: All pressures of the Patient Effort Model are plotted inversed (negative trace producing an inspiration). See also the footnote on page 120. Two data entry fields for Pmus modified by Paw (%) in the sinusoidal and trapezoidal breath profile editor windows provide a way to let patient efforts be reduced in realtime as external (ventilator) pressure is applied. This is helpful for added realism in the model behavior when a ventilator is used with a spontaneously breathing patient model. It provides a modeling somewhat analogous to the Hering-Breuer effect, which releases muscle pressure once the stretch receptors of a patient’s respiratory system have responded to a significant tidal volume. The ASL 5000’s backing-off feature is based not on volume, but on pressure. However, the two parameters are, of course, directly connected via V = P x C. Inspiratory The amount of ventilator pressure multiplied with the percentage that has been entered into the <Inspiratory backing-off (%)> field is subtracted from the programmed patient effort profile at any point during inspiration. 123 Theory of Operation Patient Effort Model As an example, assume that the ventilator, after being triggered, develops a positive pressure of 10 cmH2O to support the patient effort. If the patient effort had been set to 13 cmH2O (Pmax), it would now be reduced to a maximum of just 3 cmH2O if the backoff parameter was set to 100%, and to 8 cmH2O if the backing off was 50% (50% of 10 cmH2O = 5, 13 - 5 = 8). Expiratory Expiratory backing off acts to limit active expiration to just those cases where a patient would have a need to push against external pressure to accelerate or even accomplish expiration. Here, the reduction of patient expiratory effort is based on the amount of pressure at the airway the system “sees“ during a breath, measured above baseline pressure (PEEP). No backoff occurs when PIP-above-PEEP is greater than the spontaneous effort; otherwise, the reduction of spontaneous effort is by the specified fraction of PIP-above-PEEP. Figure 13-25 Patient Effort: Inspiratory “Backing Off“ It might require some experimentation to optimize the percentage value for a realistic “backing off“ of the spontaneous breath at the onset of ventilator support. A value of 30 or 40 % may work well as a starting point. Using this feature with larger percentages will reduce the spontaneous breath to a small trigger effort. 124 User’s Manual ASL 5000, SW 3.5, Rev.2 © IngMar Medical, Ltd. 2015 As an added feature for realistic patient behavior, beginning with SW 3.4 (firmware 4.7.20 or higher) a full breath inhibition caused by external ventilation can be modeled into the Patient Effort Model (secondary Hering-Breuer Effect). When a patient model is scheduled to take a breath, this spontaneous breath can be fully skipped if a positive pressure breath is delivered by a ventilator. The setting <Cycle Inhibition after positive pressure> adjusts the time for which, after the positive ventilator pressure was present, the inhibition will apply. This time interval is defined as a fraction of a spontaneous breath cycle. A setting of 0.0 (default) disables the effect (no skipping of breaths). Figure 13-26 Patient Effort: Expiratory “Backing Off“ Theory of Operation Patient Effort Model 13.4.6 User-defined Breath Profile 13.4.7 External Analog Input As an alternative to breath profiles from files to determine the muscle pressure of a patient model, the analog inputs of the ASL may be used for this purpose. The input range of 0 to 10 V is used with a bias of 5V in order to allow both positive and negative excursions (forced exhalation or flow pump with both negative and positive flows).. Figure 13-27 File-based Patient Effort User-defined pressure profiles allow breath configurations completely independent from the predefined patient effort models. User’s Manual ASL 5000, SW 3.5, Rev.2 © IngMar Medical, Ltd. 2015 External data files for defining spontaneous breathing patterns may be synthesized using a spreadsheet application or by taking data from esophageal pressure tracings from actual patients. They must contain a column of pressure values at the pre-defined sample rate. Time increments of the pressure data are expected by the software at the same rate as is used internally by the software, i.e. 512 data points per second. The usersynthesized pattern should describe one or more complete breath cycles which will be repetitively used during a simulator run until the simulation is stopped. Figure 13-28 Effort Model - Analog Input A gain factor setting makes it convenient to adapt a given voltage source to the exact model requirements. This may also be used to invert the signal without having to invert the voltage applied. A Pressure/Flow Resampling utility is available from the Utilities tab of the Window Manager. There, you can set the “old sample rate“ to the value that represents the time increments of the file you are using for your pressure profile. After clicking on <Resample>, a file dialog will ask for a new file name to be used for the resampled data and the new file is generated. The new sample frequency is, by default, 512 Hz. For details, see "Using the Pressure Profile Resampling Utility", page 96. NOTE: Please note that the maximum length of breath profiles allowed is 20 seconds (or 10240 data points), equivalent to a breath rate of 3. 125 Theory of Operation SmartPump™ Mode 13.5 SmartPump™ Mode 13.6 Theory of the Virtual Ventilator The following paragraphs describe the simple ventilator model that is used in the code driving the VV. The ASL 5000 continuously measures the pressure at its orifice, computes the lung volume(s) from the patient model parameters, and moves the piston to match the calculated volume(s). The VV code provides a pressure at the orifice that replaces the measured pressure; Without the VV, and with no ASL 5000 (no pressure transducer), demo mode will just have to assume that orifice pressure is always zero. Figure 13-29 Effort Model - Flow Pump The SmartPump™ Mode covers special cases of a nonfeedback model. Pressure feedback is ignored, motion of the simulator piston is exclusively controlled by the programmed breath profile. Calibration of the configuration is in units of flow (L/min) or volume (L). Internally, a setting of R=1 is performed so that the numerical value for peak excursion entered in the “Chest Wall Model“ will generate peak flows (calibrated in L/ min). Similarly, a volume waveform can be created (4th selection in the “Lung Model“ choices), where the peak excursion is directly calibrated in Liters. Paw = Rin0 * ύL + Rin1 * ύL2. When the flow reverses (i.e., when the ASL 5000 is exhaling) the flow does not go back into the supply plenum. Instead, it goes to atmosphere through a discharge tube. The discharge tube has a resistance, Paw is higher than Pambient, and Rex0 and Rex1 are the coefficients that specify it.. EXAMPLE: For a continuous sinusoidal flow pump with a peak flow of 18.78 L/min and a frequency of 12, the following parameters are entered: 12 18.78 25 0 25 Spontaneous Breathing Rate Peak Flow Inspiratory Hold Expiratory BPM L/min % % % This model will yield a tidal volume of 500 mL, which is a result of the chosen peak flow and breath rate. Similarly, a waveform model entered as a volume waveform will have a peak flow that is a result of the volume and breath rate chosen. Figure 13-30 Virtual Ventilator - Basic Controls 126 User’s Manual ASL 5000, SW 3.5, Rev.2 © IngMar Medical, Ltd. 2015 In SmartPump™ Mode, only sinusoidal, trapezoidal, and user-defined waveforms are permitted. When generating, they are always symmetrical (i.e. automatically duplicated as positive pressure profile after the negative pressure (flow) part of the cycle has been completed). The simplest ventilator is a supply plenum (just a big box with specified pressure) connected by a zero-resistance circuit to the ASL 5000's orifice; the pressure in the box doesn't depend on how much flow is going to or coming from the ASL 5000. A more realistic ventilator has some resistance in the supply circuit. When there is flow into the ASL 5000, the pressure at the orifice will be less than the pressure in the “big box’s“ supply. The resistance Rin in the VV control panel represents the pressure drop in this supply-tube. It has two parts: Rin0 is the coefficient of linear resistance and Rin1 is the quadratic or parabolic component, so Psupply. Theory of Operation Theory of the Virtual Ventilator This VV model assumes that the choice of flow path is determined by two valves. When the VV wants to supply air to the patient it opens the supply valve and closes the exhaust valve. Air flows from the supply plenum through the supply-tube resistance to the ASL 5000. When the VV “holds“, it closes the supply valve, and at the time the VV is programmed to allow the patient to exhale, it opens the exhaust valve. Because this simple VV has only open/close valves the pressure changes suddenly at a transition. (A more realistic model would have proportional valves.) The numerical difference equations used to compute flow at each time step do not react well to such sudden pressure changes, wherefore a model compliance was introduced. The physical justification for such a compliance is that there is a finite volume of air trapped in the tubing between the supply valve and the exhaust valve. The trapped air and the elasticity of the tubing have compressibility that prevents a fastacting valve from generating a huge pressure spike. The Cvent parameter in the control panel is the user's control over this bit of the model: lower its value to get sharper edges at breath-state transitions; raise it to soften the pressure curve. the physical device. The internal modeling equations are identical: a measured (physical ASL 5000) or specified (virtual demo-mode ASL 5000) pressure serves as input; lung volume is output. There is no way to input the specified flow of the conceptually simplest flow-control ventilator. Instead, an “error“ is calculated - the difference between the calculated flow into the ASL 5000 and the user-specified ventilator flow - and a control loop is used to adjust the airway pressure to drive this error toward zero. User’s Manual ASL 5000, SW 3.5, Rev.2 © IngMar Medical, Ltd. 2015 Volume control mode in the VV is intended to drive a constant flow into the ASL 5000 during the inspiratory phase. The desired constant flow is specified by the user with the <Continuous Mandatory Ventilation> control of the VV control panel, as “VC-CMV“. Because the flow is specified (by the setting s of the two controls <Inspiratory Flow Time> and <Set Tidal Volume>), the VV does not need to know upstream conditions and there is no need for Rin. Its value in the VV control panel is ignored. During the hold phase of the vent cycle (set via the <Insp. Pause Time> control) the model is the same as it is in the hold phase of the pressure-control mode. A valve in the supply tube is closed instantaneously (a simplifying assumption), which stops the flow in the supply circuit. Cvent describes the combined compliance in the chamber defined by the closed valve in the supply tube, the closed valve in the exhaust tube, and the ASL 5000's inlet. The airway pressure and the air mass trapped in this volume are known at the time of the transition from inspiration to hold. Subsequently, the pressure computation uses this compliance as the air flows out of the volume into the ASL. During the expiratory phase, the supply valve is still closed but the exhaust valve is open. Flow from the ASL to atmosphere (or PEEP) is resisted by Rex, just as it is for pressure-control mode. How is this theory implemented in detail? The physical ASL 5000 measures airway pressure. There is no other way for it to know what is attached to its inlet orifice. The demo-mode virtual ASL 5000 attempts to replicate 127 Theory of Operation Patient Model Library 13.7 Patient Model Library Included in the regular ASL 5000 software is a comprehensive library of patient models describing adult and neonatal respiratory mechanics of certain disease states. The table on the following two pages illustrates the parameters used. For questions regarding the rationale for individual choices, please contact IngMar Medical’s Clinical Education Business Unit. 128 User’s Manual ASL 5000, SW 3.5, Rev.2 © IngMar Medical, Ltd. 2015 Figure 13-31 Patient Model Library Parameters, Static Theory of Operation User’s Manual ASL 5000, SW 3.5, Rev.2 © IngMar Medical, Ltd. 2015 Patient Model Library Figure 13-32 Patient Model Library Parameters, Time-Varying 129 Parameter Definitions Time Stamps and Parameters 14 Parameter Definitions Figure 14-1 Timing of Pressure, Flow, and Volume 14.1 Time Stamps and Parameters (Points A...F refer to Figure 14-1, above) Label/Unit Definition Comment Start Insp Effort [SoE] End of Expiration (of previous breath) The time (time stamp count) at which the inspiratory pressure profile (patient effort) begins, i.e. the inverse of Pmus drops below zero Point A Serves as the zero point for each breath in the time domain. If no spontaneous effort is detected, Start of Patient Inspiration will default to the volume minimum before Point B ([SoI], Start of Inspiration). Start of Inspiration [SoI] Time stamp for the beginning of an inspiration (the minimum volume in a breath) Software uses Point B to discriminate breaths and takes minimum volume (before Point B) as [SoI] Point B Time when the “Breath Start Volume Threshold” has been exceeded Volume threshold default value is 5 mL, suitable for adult size models, 0.5 mL is recommended for neonatal models. Point E The time mark for the maximum This marks the begin of expiration. However, volume when a "flat" volume maximum is encountered, the end of that line is used as Start of Expiration. User’s Manual ASL 5000, SW 3.5, Rev.2 © IngMar Medical, Ltd. 2015 130 Parameter Parameter Definitions Parameters in the *.brb-(Breath Parameter) File Parameter Label/Unit Definition Start Expiration [Start Exp] The time stamp for the beginning Usually the point of maximum volume (Point of expiration E), except in cases of small local volume maxima (see comment for Point E above), where [StartExp] is determined as the last of any small volume local maxima (less than threshold volume). Time when the “Exp Start Volume Threshold“ has been exceeded. Point F Comment Volume threshold (counted down from the volume maximum in a breath) default value is 5 mL, suitable for adult size models, 0.5 mL is recommended for neonatal models. Time to Pmin after SoE ms From Point A to Point C The time interval to the largest Paw depression below baseline pressure occurs, calculated from [SoE] Trigger Time [Ttrig] From Point A to Point D Point in time at which airway pressure has returned to baseline after a downward deflection (i.e., the pressure level before the start of inspiratory effort) User’s Manual ASL 5000, SW 3.5, Rev.2 © IngMar Medical, Ltd. 2015 14.2 Parameters in the *.brb-(Breath Parameter) File NOTE: Parameters appear in alphabetical order of names in the drop-down menus in the analysis windows. Parameter names are given as they are used in dropdown menus in the analysis windows. [name] and [unit] indicate parameter names and units in brb-file (where different). Points A...F refer to Figure 14-1, page 130). Parameter Unit Definition Comment % of Peak Flow when exp begins % Relative flow at the time 20 ms before [Start Expiration] A measure of the rapid opening of an expiratory valve of a ventilator (at Point F). Parameter definition changed in sw 3.5 (20 ms) Ambient Temp oC Gas temperature inside the This is always an average temperature cylinder as measured by the ASL Added parameter in sw 3.4 5000’s own gas temp. sensor Auto-PEEP 1 cmH2O P_compartment_1 - Paw at [End of Expiration] [PEEP_1auto] Pcompartment_1 = Alveolar Pressure in Compartment 1 of the lung model Added parameter in sw 3.3 131 Parameter Definitions Parameters in the *.brb-(Breath Parameter) File Unit Auto-PEEP 2 cmH2O P_compartment_2 - Paw at [End of Expiration] Pcompartment_2 = Alveolar Pressure in Compartment 2 of the lung model Added parameter in sw 3.3 Aux 1 Volt [V] Signal on channel 1 of analog input (0-10V) default value, when no source is connected, is 5 V Aux 2 Volt [V] Signal on channel 2 of analog input (0-10V) default value, when no source is connected, is 5 V Breath Num. integer The number of the breath starting from the beginning of the simulation, as determined by the analysis software Only breaths that exceed the inspiratory and expiratory volume thresholds are counted, eliminating “volume noise”. The count is "a posteriori", independent from ventilator or model settings! Breath Rate BPM overall breath rate calculated from the time between peak volumes Combines mechanical and spontaneous breaths Added parameter in sw 3.3 Breath Type flag Spontaneous (1) or Mechanical (0) Based on the presence of spontaneous effort anywhere during the breath End Exp Index integer Time stamp for End of expiration Internally used index for marking the times of = Start of a new breath cycle specific events during a breath cycle. Spacing is (1/ data rate), default at 1/512 E Time s Expiratory time, counted from [StartExp] to [EndExp] Between Point E (or just before F) and G Exp Active Work mJ If [Exp Work] is < 0, [Exp Active Work] = -[Exp Work], zero otherwise A Total System Work parameter, Expiratory, Active Exp Mean Squared Error cmH2O2 Mean squared deviation from [Exp Target] during expiration A ventilator performance parameter Exp Overshoot % Relative pressure change from Pmax to [Exp Target]: ([Exp Target] - Pmin) / (Pmax [Exp Target]) A ventilator performance parameter Exp Res Work mJ [Insp Elastic Work] - [Exp Work] A Total System Work parameter, Expiratory, Resistive [PEEP_2auto] [ftot] Exp Settling Time ms 132 Definition Comment Time from [Start Exp] to the point Will always refer to pressure where fluctuations around [target] are less than 10% User’s Manual ASL 5000, SW 3.5, Rev.2 © IngMar Medical, Ltd. 2015 Parameter Parameter Definitions User’s Manual ASL 5000, SW 3.5, Rev.2 © IngMar Medical, Ltd. 2015 Parameters in the *.brb-(Breath Parameter) File Parameter Unit Definition Comment Exp T90 ms The time to accomplish 90% of the drop from peak pressure to [Exp Target] (PEEP) A ventilator performance parameter Exp Target cmH2O The pressure at steady state during expiration (where steady state is derived from median airway pressure during expiration), normally equivalent to PEEP If known in advance (for example, because it is a ventilator setting) this parameter may be set via an override in the Post Analysis Data Re-Processing window Exp Vt mL Expiratory tidal volume From start of expiration to end of expiration Exp Work mJ (Pairway - PEEP + Pmus) dV from [Start Exp] to [End of Exp] A Total System Work parameter, Expiratory Definition changed with sw 3.3 Ext Exp Res Work mJ [Ext Insp Elastic Work - External Exp. Work] An external (imposed) WOB parameter, Expiratory Added parameter in sw 3.3 Ext Exp Vent Work mJ If [Ext Exp Work] is < 0, [Ext Exp An external (imposed) WOB parameter, Expiratory Active Work] = -[Ext Exp Work], Added parameter in sw 3.3 zero otherwise Ext Exp Work mJ (Pairway - PEEP) dV from [Start Exp] to [End of Exp] An external (imposed) WOB parameter, Expiratory Added parameter in sw 3.3 Ext Insp Res Work mJ [Ext Insp Work] - [Ext Elastic Work] An external (imposed) WOB parameter, Inspiratory Added parameter in sw 3.3 Ext Insp Elastic Work mJ An external (imposed) WOB parameter, Inspiratory ((Pairway{at Vmax} - PEEP) x [Vmax-Vo] - (Pmin x [Vo-Vmin])) Added parameter in sw 3.3 Parameter definition changed in sw 3.5 / 2, where Vo is volume at Paw=PEEP and Pmin is the smallest pressure during inspiration Ext Insp Work mJ (Pairway - PEEP) dV from [SoI] to [StartExp] An external (imposed) WOB parameter, Inspiratory Added parameter in sw 3.3 Heat Production mJ If [Exp Work] is > 0, [Heat Production] = [Exp Work], zero otherwise A Total System Work parameter, Expiratory I Time s Inspiratory time counted from the minimum to the maximum volume (positive flow is detected) Between Point A and Point E (or just before F) 133 Parameter Definitions Parameters in the *.brb-(Breath Parameter) File Unit Definition I/E ratio Inspiratory time / Expiratory time Inspiratory time includes a potential pause time Ins Settling Time ms Time from [Start Insp] at which inspiratory steady state (insp. pressure or flow between 0.9 ... 1.1 of target) is reached A ventilator performance parameter, either a value of pressure or of flow, depending on the type of inspiratory breath delivered by the ventilator Insp % % [I Time] expressed as % Between Points A and E (or just before F) Insp Breath Type flag Pressure controlled or Flow controlled Based on the behavior of pressure and flow, an algorithm determines the type of the breath (and the target and performance parameters are selected accordingly ((Paw{at Vmax}-PEEP+Pmus) x (Vmax-Vo) - ({Paw-PEEP +Pmus}min x [Vo-Vmin])) / 2, where Vo is volume at Paw=PEEP and {PairwayPEEP+Pmus}min is the smallest value during inspiration A Total System Work parameter, Inspiratory, Elastic Mean squared pressure or flow deviation from [Insp Target] during inspiratory flow time A ventilator performance parameter, either a value of pressure or of flow, depending on the type of inspiratory breath delivered by the ventilator A ventilator performance parameter, a value derived of either pressure or flow, depending on the type of inspiratory breath delivered by the ventilator Insp Elastic Work mJ Insp Mean Squared Error cmH2O2 or (L/min)2 134 Comment Insp Overshoot % Pressure (or flow) overshoot relative to [Insp Target] Insp Res Work mJ [Insp Work] - [Insp Elastic Work] A Total System Work parameter, Inspiratory, Resistive Insp T90 ms The time to accomplish 90% of the rise to [Insp Target] pressure or flow Insp Target cmH2O The pressure (or flow) at steady or state during inspiration (where (L/min) steady state is derived from median pressure during the middle part of inspiration) Insp Vt mL A ventilator performance parameter, either a value of pressure or of flow, depending on the type of inspiratory breath delivered by the ventilator If known in advance (for example, because it is a ventilator setting) this parameter may be set via an override in the Post Analysis Data Re-Processing window Tidal volume measured from SoI Note that threshold size does not affect reported to [Peak Volume] tidal volumes User’s Manual ASL 5000, SW 3.5, Rev.2 © IngMar Medical, Ltd. 2015 Parameter Parameter Definitions User’s Manual ASL 5000, SW 3.5, Rev.2 © IngMar Medical, Ltd. 2015 Parameters in the *.brb-(Breath Parameter) File Parameter Unit Definition Comment Insp Work mJ (Pairway - PEEP + Pmus) dV from [SoI] to [StartExp] A Total System Work parameter. Definition changed with sw 3.3 Max Flow Acc L/s2 Maximum change of slope of the Parameter may be used as a measure of a Insp. flow curve. ventilator’s “flow ramp” setting Max Pres Drop During Trig cmH2O Deflection of airway pressure from baseline [PEEP] to [Pmin] A parameter that can be used to evaluate the quality of CPAP or the adequacy of flow settings Mean Flow L/min Value derived from flow taken over inspiratory part of a cycle, excluding a flow pause, if it exists Median Exp Res cmH2O Median of {(Pairway - Median of Values of exp. flow less than 2 L/min are excluded from the calculation /(L/s) Pairway) / (dV/dt)} during expiration Median Flow L/min Median value of flow taken from Value derived from flow taken over inspiratory part [SoI] to [Ppeak] of a cycle, excluding a flow pause, if it exists Min Flow Acc L/s2 Maximum (initial, negative) A measure for the level of a patient “cough” (forced change of slope for the Exp. flow exhalation) curve. Oxygen % Oxygen concentration measured Value will be assumed to be 20.9 vol% if no in the ASL cylinder oxygen sensor is connected Pat Exp Muscle Work mJ If [Pat Exp Work] is < 0, [Pat Exp A Patient Work parameter Muscle Work] = -[Pat Exp Work], zero otherwise Pat Exp Res Work mJ Mean value of flow taken from [SoI] to [Ppeak] [Pat Insp Elastic Work] - [Pat Exp A Patient Work parameter, Expiratory, Resistive Work] Pat Exp Work mJ -Pmus dV from [Start Exp] to [End of Exp] A Patient Work parameter, Expiratory Pat Heat Production mJ If [Pat Exp Work] is > 0, [Pat Heat Production] = [Pat Exp Work], zero otherwise A Patient Work parameter, Expiratory Pat Insp Elastic Work mJ Pmusmax x (V{at EndPatEffort} V {at StartPatEffort}) / 2 where maxima and minima are taken during the time between [SoI] and [Start Exp] A Patient Work parameter, Inspiratory, Elastic Pat Insp Res Work mJ [Pat Insp Work] - [Pat Insp Elastic A Patient Work parameter, Inspiratory, Resistive Work] Pat Insp Work mJ Pmus dV from [SoI] to [StartExp] A Patient Work parameter, Inspiratory, Elastic 135 Parameter Definitions Parameters in the *.brb-(Breath Parameter) File Parameter Unit Definition Comment Pat Total Res Work mJ [Pat Insp Res Work] + [Pat Exp Res Work] A Patient Work parameter, Resistive Pat Trig Work to PEEP mJ Pmus dV from [SoE] to [Trigger Time] (during Trigger Response Time) A Patient Work parameter, Trigger Work, see also its components: Work between SoE and Pmin and Work between Pmin and PEEP Pause % % [Pause time] expressed as % Pause Time s Time counted from the point of maximum pressure to [StartExp] Algorithm uses peak pressure instead of peak volume Parameter calculation changed in sw 3.5 P_awTimeProduct cmH2O (Pairway - PEEP) dt from [SoE] to (prior to sw 3.4 labeled: Pressure Time Product also [Pressure Time *ms in drop-downs) [End of Inspiration] Product] cmH2O (Pairway - PEEP) dt from [SoE] to May be used as a substitute for Trigger-WOB *ms Added parameter in sw 3.5 [Time to PEEP after Pmin] P_aw_TP300 cmH2O (Pairway - PEEP) dt from [SoE] to *ms Added parameter in sw 3.5 300 ms P_aw_TP500 cmH2O (Pairway - PEEP) dt from [SoE] to *ms Added parameter in sw 3.5 500 ms P_baro kPa Barometric pressure Reading from a dedicated pressure sensor Added parameter in sw 3.4 Peak Flow L/min Maximum flow highest positive value of flow PEEP cmH2O Minimum pressure maintained at PEEP = Positive EndExpiratory Pressure the end of the breath cycle P_mean cmH2O Average pressure over the full breath cycle Includes any offset due to PEEP/CPAP (definition has been restored to previous, was averaged over the inspiratory cycle in sw 3.3 only!) P_mean Ch1 cmH2O Average pressure for comp. 1 over the full breath cycle Includes any offset due to PEEP/CPAP Added parameter in sw 3.5 P_mean Ch2 cmH2O Average pressure for comp. 2 over the full breath cycle Includes any offset due to PEEP/CPAP Added parameter in sw 3.5 P_mean Insp cmH2O Average pressure over the inspiratory part of the breath cycle Includes any offset due to PEEP/CPAP Added parameter in sw 3.4 User’s Manual ASL 5000, SW 3.5, Rev.2 © IngMar Medical, Ltd. 2015 136 P_aw_TPtrigger Parameter Definitions Parameters in the *.brb-(Breath Parameter) File Parameter Unit Definition Comment P_mean Ch1 Insp cmH2O Average pressure for comp. 1 over the inspiratory part of the breath cycle Includes any offset due to PEEP/CPAP Added parameter in sw 3.5 P_mean Ch2 Insp cmH2O Average pressure for comp. 2 over the inspiratory part of the breath cycle Includes any offset due to PEEP/CPAP Added parameter in sw 3.5 P_mean Exp cmH2O Average pressure over the expiratory part of the breath cycle Includes any offset due to PEEP/CPAP Added parameter in sw 3.4 P_mean Ch1 Exp cmH2O Average pressure for comp. 1 over the expiratory part of the breath cycle Includes any offset due to PEEP/CPAP Added parameter in sw 3.5 P_mean Ch2 Exp cmH2O Average pressure for comp. 2 over the expiratory part of the breath cycle Includes any offset due to PEEP/CPAP Added parameter in sw 3.5 P_min cmH2O Lowest pressure reached during a breath cycle, typically during inspiration P_mus Time Product cmH2O Pmus dt from [SoE] to [End of *ms Effort] Pmus Pressure-Time Product Added parameter in sw 3.3 P_pause cmH2O Pressure at start of expiration Calculated as median of pressure between time of peak pressure and [StartExp] Ppeak cmH2O Peak pressure Highest pressure during the breath cycle SD Exp Res cmH2O Standard deviation of Pairway / /(L/s) (dV/dt) during expiration Time between Pmin and PEEP ms The time it takes, during a patient see also [Time to Pmin after Start of Effort] and effort, to return to baseline [Time to Trigger] pressure, counting from [Time to Pmin] Time to Pmin after Start of Effort ms [Time to Pmin after SoE] Time to Trigger ms [Time to Pmin after SoE] + [Time With this definition trigger delays are measured as the total time it takes for a ventilator to supply between Pmin and PEEP] pressure sufficient to restore baseline pressure, counting from the very beginning of patient effort, see also [Time to Pmin after Start of Effort] and [Time between Pmin and PEEP] User’s Manual ASL 5000, SW 3.5, Rev.2 © IngMar Medical, Ltd. 2015 [PmusTP] see also [Time between Pmin and PEEP] and [Time to Trigger] 137 Parameter Definitions Parameters in the *.brb-(Breath Parameter) File Unit Definition Total PEEP 1 cmH2O PEEP + PEEP_1auto Total PEEP in Compartment 1 of the lung model Added parameter in sw 3.3 cmH2O PEEP + PEEP_2auto Total PEEP in Compartment 2 of the lung model Added parameter in sw 3.3 Total Res Work mJ [Insp Res Work] + [Exp Res Work], Resistive Work A Total System Work parameter Vent Exp Vt mL Expiratory volume as seen by the ventilator, taking into account compressible gas volumes in circuits, as defined in Auxiliary Compensation Parameters in the Breath Detection / RT-Analysis window Ventilators that actually use corrections to take into account volume “lost” in circuits would be expected to report volumes similar to the ASL’s uncompensated parameter (Vtin), at BTPS conditions Vent Insp Vt mL Inspiratory volume as seen by the ventilator, taking into account compressible gas volumes in circuits, as defined in Auxiliary Compensation Parameters in the Breath Detection / RT-Analysis window Ventilators that actually use corrections to take into account volume “lost” in circuits would be expected to report volumes similar to the ASL’s uncompensated parameter (Vtex), at BTPS conditions Vol 1 Peak mL Total Volume = Vol1peak + Vol2peak In a 2-compartment model, volume is distributedbased on R & C values input into the Lung Model Vol 2 Peak mL Total Volume = Vol1peak + Vol2peak In a 2-compartment model, volume is distributedbased on R & C values input into the Lung Model Vol Max Index integer Time stamp for the time of maximum volume during a breath cycle Internally used parameter for marking the times of specific events during a breath cycle. Spacing is 1/(data rate), default at 1/512 Wall Temp oC Temperature as measured on the Added parameter in sw 3.4 aluminum cylinder Work between Pmin and PEEP mJ Pmus dV from [Time of Pmin] to [Paw = PEEP] Work between SoE and Pmin mJ Pmus dV from [SoE] to [Time of A component of Trigger-WOB Pmin] [PEEP_1tot] Total PEEP 2 [PEEP_2tot] 138 Comment A component of Trigger-WOB User’s Manual ASL 5000, SW 3.5, Rev.2 © IngMar Medical, Ltd. 2015 Parameter Parameter Definitions Data File Parameters 14.3 Data File Parameters From the data files in use with SW 2.0 ASCII types can be generated using the File Translation Utility (see page 92). These are: binary *.brb÷ *.dtb ÷ *.rwb÷ ASCII *.brabreath parameter data file *.dta high resolution breath data file *.rwahigh resolution raw data file The headers of these files contain information on the different parameters contained in them. ASL 3.5 .bra ASCII The format of this file is tab delimited text. Each entry is 12 characters wide and padded with spaces. Breath Num. Pause Time Peak Flow Trigger Response Time Insp Res Work(J) Total Res Work(J) Pat Exp Res Work(J) Time to Min Pres after Trig (s) Breath Type Pause %Insp Vt Mean Flow Vent Exp VT Exp Work(J) Pat Insp Work(J) Pat Exp Muscle Work (J) Max Pres Drop During Trig Insp % Ppeak Ppause Insp Work (J) Exp Active Work(J) Pat Insp Res Work(J) Pat Total Res Work(J) E Time Pmean PEEP Insp Elastic Work(J) Heat Production(J) Pat Exp Work(J) Pat Trig Work(J) Exp Overshoot (%) I Time Exp Vt Median FlowI/E Vent Insp Vt Exp Res Work(J) Pat Insp Elastic Work(J) Pat Heat Production(J) Work between flow starts after trig to pmin (J) Exp T90 (ms) Exp Mean Squared Error SD Exp Res (cmH2O/l/s) Exp Target Insp Overshoot (%) Exp Settling Time (ms) Vol Max Index Oxygen (%) PawTP PEEP_2 auto Ext Insp Res Work Pmean Insp (cmH2O) PawTP300 (cmH2O*ms) Pmean Ch1 Exp (cmH2O) Insp Breath Type Vol 1 Peak Start Exp Index Aux 1 (V) ftot (BPM) PEEP_1 tot Ext Exp Work Pmean Exp (cmH2O) PawTP500 (cmH2O*ms) Pmean Ch2 (cmH2O) Insp T90 (ms) Vol 2 Peak End Exp Index Aux 2 (V) Pmin PEEP_2 tot Ext Exp Vent Work Pbaro (kPa) PawTPt (cmH2O*ms) Pmean Ch2 Insp (cmH2O) Median Exp Res (cm H2O/l/s) Percent of Peak Flow when exp begins Insp Target Start Insp Effort Index Max Flow Acc (mL/s**2) Time betw. Pmin and PEEP (ms) PmusTP Ext Insp Work Ext Exp Res Work Ambient Temp (C) Pmean Ch1 (cmH2O) Pmean Ch2 Exp (cmH2O) Ins Settling Time (ms) Insp Mean Sq’d Error Start Insp Index Min Flow Acc (mL/s**2) WOB betw. Pmin and PEEP (mJ) PEEP_1 auto Ext Insp Elastic Work Ext Exp Heat Production (mJ) Wall Temp (C) Pmean Ch1 Insp (cmH2O) User’s Manual ASL 5000, SW 3.5, Rev.2 © IngMar Medical, Ltd. 2015 Figure 14-2 Breath Parameter Data File (*.brb, *.bra) ASL 3.4 .dta ASCII The format of this file is tab delimited text. Each entry is 12 characters wide and padded with spaces. Breath Num.Vol Comp In FRCP airwayP chest wallTotal Vol (mL)Total Flow (L/s)P ch1P ch2 Vol2 (mL)Flow1 (L/s)Flow2 (L/s) P trachVol Vent Flow Vent Vol1 (mL) Press Vent Figure 14-3 Processed Waveform Data File (*.dtb, *.dta) ASL 3.4.rwa ASCII Time (sec) Airway Pressure Esophageal Pressure Tracheal Pressure Breath Segment L Breath File AUX1 O2conc (%) Model Left vol Model Right vol Piston Volume L Model Pressure R Model L Pressure Figure 14-4 Raw Data File (*.rwb, *.rwa) 139 Support Resources Data File Parameters 15 Support Resources Recognizing that the ASL 5000 is a versatile instrument with users in a large number of fields and applications, IngMar Medical is dedicated to support its users in many different ways. We encourage you to visit our website at www.ingmarmed.com as the entry point for up-to-date information on support options. While the primary source of user information is the Operating Manual, there are a number of other resources to receive additional support. Updated editions of this Operating Manual can be downloaded from the IngMar Medical website A video tutorial is available online and can be accessed directly through the Help menu item Tutorial Answers to Frequently Asked Questions (FAQs) are accessible via our website. In addition, we can offer live support (Virtual Visit) for users who have an internet connection for the PC that is being used as host for the ASL 5000 Breathing Simulator. Figure 15-2 Online Support Sessions 140 A Virtual Visit (live conversation while the customer shares his/her screen) is a very effective way of accelerating the learning curve of a novice user. 3 Hours of this type of support are included wit the purchase of each ASL 5000 Breathing Simulator Please contact Customer Care at 1-800-583-9910, ext. 107, about additional support plans that you might be interested in purchasing. User’s Manual ASL 5000, SW 3.5, Rev.2 © IngMar Medical, Ltd. 2015 Figure 15-1 Video Tutorial Access On the IngMar Medical website, we also offer a section labeled "Tips and Tricks". http://www.ingmarmed.com/support/asl-5000-trainingsupport/tips-tricks/ We recommend looking there for information about a wide range of topics Technical Data Performance Specifications 16 Technical Data Leak 16.1 Performance Specifications User’s Manual ASL 5000, SW 3.5, Rev.2 © IngMar Medical, Ltd. 2015 Modes of Operation — Passive — Spontaneous — Interactive (with adjustable response to ventilator breaths) — Flow waveform generator (SmartPump™ mode) Volumes (Standard 3 L Cylinder) Total Tidal FRC setting Deadspace 3.1 L 2 to 2500 mL 100 ...1500 mL 200 mL Volumes (6 L Cylinder) Total Tidal FRC setting Deadspace 6.9 L 2 to 6000 mL 100 ...1500 mL 200 mL Volumes (Preemie AddOn Cylinder) Total Tidal FRC setting Deadspace 0.4 L 0.5 to 200 mL 100 ...150 mL 25 mL Frequencies Spontaneous breath rate Small signal bandwidth Flow rise Low flow Passive Model Resistance Compliance Pressure trigger, flow trigger, sinusoidal, trapezoidal, user-file defined Pressure Measurement Airway Barometric error < than 1% fso error < 1% (1 kPa) Gas Temperature error <0.5°C (20 - 45°C) Servo System update rate 2048 Hz O2 Meas. Range O2Error Response time Cylinder Temperature Controller (CTC Option) Principle better than 15 Hz (10 cm passive response to HF ventilation) 3 Flows Peak flow Active Model Chestwall pressure profiles Fast Oxygen Module (FOM Option) Principle 0 to 150/min (infant Vt) 270 L/min (for units with 4mm, 180 L/min for units with 2.5 mm pitch ball screws) t90flow < 50 ms < 1 L/min 3 to 500 cmH2O/L/s linear and parabolic 1 or 2 compartment, 0.5 to 250 mL/cmH2O overall on SBLVM (avail. option), approx. 4, 9, 15 L/min at 20 cmH2O leak orifices exchangeable Wall temperature setting Auxiliary Gas Exchange Cylinder (AGEC Option) Principle Volume Chest Rise Module Option Principle Part no. 31 00 300 Paramagnetic (partial pressure measurement) 0 to 100% O2 less than ±0.5% O2 <350 msec (t90, 21 to 100% O2) Part no. 31 00 400 PID-controlled foil heater on cylinder circumference ambient +5 ºC to 45 ºC Part no. 31 00 600 Bag-in-bottle external cylinder approximately 3.0 L (accommodates bags/bellows up to 4.5 inches) Part no. 31 00 730 Pneumatic controller for manikin simulator chest rise “pillow“ 141 Technical Data Performance Specifications Compatibility designed for use with Laerdal SimManTM(Classic and 3G) RespiSim VIK Principle Part no. Ventilator data capture via RS-232 to WiFi interface Please see table on the following page Ventilator Compatibility User’s Manual ASL 5000, SW 3.5, Rev.2 © IngMar Medical, Ltd. 2015 142 Technical Data Performance Specifications User’s Manual ASL 5000, SW 3.5, Rev.2 © IngMar Medical, Ltd. 2015 RespiSim Ventilator Interface Kit (VIK) Compatibility and Communications Settings 143 Technical Data Electrical Specifications Physical Specifications Software Specifications 16.2 Electrical Specifications 16.4 Software Specifications Supply Voltage Interface to PC host via 10/100 MBit Ethernet (units with serial no.’s > 0800), alternatively RS 232 at 57600 Baud, 8 bit, no parity, 1 checkbit (built-in USB converter beginning serial no. 1400) Host Software LabVIEW modules for: — modeling — simulation — data analysis Current (120 V) (230 V) Fuses universal input 100 to 240 V AC (CTC option either 220 to 240 V AC or 100 to 120 V AC, please specify at time of ordering) < 1.0 A typical (2.0 A max) < 0.5 A typical (1.0 Amax) 3.0 A time delayed (2 x) (size 5 x 20 mm) 16.3 Physical Specifications Dimensions ASL 5000 SBLVM Weight ASL 5000 SBLVM 144 8.6 x 16.8 x 12.4 inches (219 x 425 x 315 mm) 4.8 x 4.8 x 4.3 inches (123 x 123 x 108 mm) (not including cable) 16.5 Environmental Specifications approx. 22 lbs (10 kg) in standard configuration Storage 3.5 lbs (1.6 kg) Operation anodized aluminum, silicone sealant aluminum, closed cell foam pad Teflon®, Nylon®, rubber Nylon, brass Temperature: -10 ºC to 50 ºC (allow device to reach approximate room temperature before use) Humidity: 10 to 95%, noncondensing Temperature: +10 ºC to 40 ºC Humidity: 10 to 95%, noncondensing NOTE: Specifications are subject to change without notice. User’s Manual ASL 5000, SW 3.5, Rev.2 © IngMar Medical, Ltd. 2015 Materials Used Inside the Simulator Cylinder Piston plate Piston seal Temperature sensor LabVIEW utilities for — breath profile resampling — interface module for remote control via external LabVIEW software — TCP/IP Breath Parameter Client — TCP/IP Waveform Client User’s Manual ASL 5000, SW 3.5, Rev.2 © IngMar Medical, Ltd. 2015 This page intentionally left blank 145 Index A AGEC .................................................................. 101 Analog Channel Option ......................................... 63 Analog data ........................................................... 69 Analysis Module, starting ....................................... 66 Anesthetics ............................................................ 13 ASLanalysis.vi ........................................................ 45 Auxiliary Gas Exchange Cylinder ......................... 101 E Barometric pressure ......................................... 16, 47 Breath Detection / Real-Time Analysis window ..... 60 Electrical supply .....................................................13 Enclosure ................................................................14 Equation of motion ...............................................119 Errors, common ....................................................105 Ethernet communication setup ......................................20 Event Graph ...........................................................87 Excel ......................................................................69 Exiting software ......................................................64 Explosion hazard ....................................................13 C F B D Damage ................................................................. 13 Data file types ........................................................ 92 Data file, naming ................................................... 44 Data files, external, for pressure profiles .............. 125 Data, auxiliary ....................................................... 47 Data.raw ................................................................ 67 DB9, serial cable ................................................... 21 Definitions nomenclature .................................................. 12 DHCP server .......................................................... 20 Fast Oxygen Measurement (FOM) ........................100 Features, system .....................................................15 Flow pattern generator ............................................15 FOM .......................................................................14 FRC ........................................................................36 G Gains, adjusting ......................................... 75, 78, 79 Gas temperature .....................................................47 H Hard drive, required space .....................................16 HF ventilation .......................................................105 Host PC, requirements ............................................16 I ICP -> see Interactive Control Panel .......................51 Identification, instrument ......................................106 Installation, software ...............................................18 Instructor Dashboard ....................................... 87, 89 Instructor Scenario Guide .......................................89 Instructor-Driven ....................................................89 Interactive Control Panel ........................................51 L Lung Model Parameters, in Interactive Control Panel 53 Lungs, non-uniform ..............................................116 Lungs, uniform .....................................................115 User’s Manual ASL 5000, SW 3.5, Rev.2 © IngMar Medical, Ltd. 2015 Calibration Intervals ............................................. 106 CD-ROM ............................................................... 18 Central runtime module ......................................... 45 Chart length ........................................................... 45 Chest wall model ........................................... 41, 121 Closed Loop MV .............................................. 52, 57 Closed Loop Vt ...................................................... 52 CO2Y .................................................................... 58 COM2, serial port .................................................. 21 Compensations, Real-Time Analysis window ......... 61 Compliance, simulation ......................................... 14 Configuration, voltage for CTC .............................. 20 Connections .......................................................... 20 electrical ......................................................... 20 Connections, pneumatic ........................................ 22 Connector, specification for analog channel .......... 63 Control frequency .................................................. 17 CTC ....................................................................... 14 Cylinder Temperature Controller ........................... 15 Cylinder Temperature Controller (CTC) ................ 100 146 Digital filter pressure ...........................................................60 Disease states .............................................. 119, 120 DLL ........................................................................17 M R Maintenance ........................................................106 MATLAB .................................................................69 Measurement, fast oxygen ......................................15 Measurement, gas temperature ...............................16 Model, chest wall .................................................121 Model, dual-compartment ....................................120 Model, limitations of ............................................119 Model, passive .....................................................121 Model, single-compartment ..................................120 Modeling, introduction to .....................................119 Multi-stage Clinical Simulations .............................89 MV target ...............................................................57 Ramps, pressure profile ........................................123 Resampling, pressure profile ...................................96 Resistance, definition ..............................................14 Resistor, linear ........................................................14 Resistor, parabolic ..................................................14 Resistors, bronchial ................................................36 RespiSim-PVI ..........................................................86 Response, neural, to ventilation ............................119 Restarting software .................................................64 RETURN button .... 67, 74, 75, 76, 78, 80, 82, 83, 85 N New Script .............................................................32 Non-feedback model (SmartPump mode) .............126 Numeric parameters ...............................................88 O User’s Manual ASL 5000, SW 3.5, Rev.2 © IngMar Medical, Ltd. 2015 Odometer, install date ..........................................106 Odometer, piston cycles .......................................106 Operator's Manual, for CTC .................................100 Options ........................................................... 14, 98 Oscillations ..........................................................106 Over voltage protection ..........................................63 Overview ...............................................................14 Overview, schematic ............................................108 Oxygen concentration ............................................47 Oxygen, use with ...................................................13 P Parameter file .........................................................44 Parameter files ........................................................31 Patient ....................................................................12 patient effort, reducing .........................................123 Patient rooms .........................................................13 Pausing ...................................................................45 Performance analysis, display selections .................81 Performance verification, ventilator ........................12 Pmus, modified by Paw ........................................123 Precautions .............................................................13 Pressure feedback, in control loop ........................119 Pressure trigger, as chest wall activity ...................121 Procedures, ventilator test or calibration .................12 PuTTY ....................................................................90 S Safety, operator ......................................................12 SBLVM ...................................................... 14, 44, 98 Scenario Concept Presentation ...............................89 Screen chart, updates ...........................................105 Screen, Multi-Parameter Display ............................74 Screens, analysis trend display ................................79 Screens, Continuous Time-Based Data ...................77 Screens, Post-Run Analysis Loop Display ................76 Screens, servo control performance display ............84 Screens, Trigger Analysis Display ...........................82 Screens, WOB Analysis Display .............................81 Selections, analysis data display .............................70 Sidestream measurement, oxygen .........................100 Simulation Editor Module .......................................31 Simulation, pausing ................................................45 Simulation, stopping ...............................................49 Simulations, running ...............................................43 Simulations, saved ..................................................64 Simulator Bypass and Leak Valve Module ....... 15, 98 Sinusoidal breath profile, as chest wall activity .....122 SmartPump mode ...................................................15 SmartPump™ Mode .............................................126 SmartPump™ mode ..............................................126 Specifications ASL 5000 .......................................................141 electrical ........................................................144 environmental ................................................144 physical .........................................................144 software .........................................................144 Spills ......................................................................13 Step 3, of modeling ................................................41 Student Aids ...........................................................89 Switch, motor enable/disable ................................105 Symmetrical profiles, for SmartPump mode ..........126 Synchronization, problems with ...........................105 Synchronization, with host-PC ................................28 147 T TAI (Test Automation Interface) .............................. 90 Target pressure ...................................................... 84 TDMS file .............................................................. 88 Technical data ..................................................... 141 Terminal, connecting PC as ................................... 21 Test lung, ventilating the ........................................ 22 Theory of operation ............................................. 109 Time varying parameters, in chest wall model ....... 41 Training Modules ................................................... 87 Training Modules, authoring .................................. 89 Trapezoidal breath profile, as chest wall activity .. 123 Trends, in Interactive Control Panel ....................... 58 Trigger response time ............................................. 82 Troubleshooting ................................................... 105 U UDP broadcast ...................................................... 20 Update, software ................................................... 17 User breath profile, maximum length ................... 125 User-defined breath profile, as chest wall activity 125 V Vane pump, for O2 sampling ............................... 100 Ventilator ............................................................... 12 Volume corrections .......... 69, 73, 75, 79, 82, 83, 84 Volume threshold, for trigger time calculation ....... 83 Vt target ................................................................. 56 Wall temperature ............................................. 15, 47 Waveform sampling rate ........................................ 35 Z Zooming ........................................73, 76, 77, 83, 84 148 User’s Manual ASL 5000, SW 3.5, Rev.2 © IngMar Medical, Ltd. 2015 W User’s Manual ASL 5000, SW 3.5, Rev.2 © IngMar Medical, Ltd. 2015 List of Figures ASL Software Window Manager ...............................5 RespiSim Instructor Dashboard.................................5 RespiSim Vital Signs Monitor....................................6 Oxygen Saturation Output........................................6 RespiPatient..............................................................6 Functional Overview .............................................14 ASL 5000 with SBLVM and PC ..............................14 Bridgetech Installer................................................19 Completed SQL Installation ...................................19 SBLVM Connection ...............................................20 ASL 5000 connector configuration (new style, dual-USB) ............................................21 RespiSim Wireless Adapters...................................21 Pneumatic Connections Overview.........................22 Quick Reference Startup, Steps 1 and 2 .................23 Quick Reference Startup, Steps 3 and 4 .................24 ASL Software Loading............................................25 ASL Quick Launch Menu.......................................25 Project File Tool - Device Identification.................26 Project File Tool - Graph Colors ............................26 Project File Tool - Output Settings .........................26 Project File Tool - Relative Path Tokens.................27 Project File Tool - Default Analysis Param. ............27 Project File Tool - Virtual Ventilator Settings..........27 Quick Launch Menu Options ................................28 Full Choice Menu Connection Options .................28 ASL Identification Edit ...........................................28 Run Time Home Sync Message .............................29 Script/Patient Model Tab - Scenario Scripts............29 Interactive Control Panel .......................................29 Start Interactive Control .........................................29 Real Time Analysis Tab .........................................30 Post Run Analysis Tab ...........................................30 Utilities Selector Tab .............................................30 RespiSim Tab.........................................................30 Script File Editor - Scenario Scripts ........................31 Project File Tool - Editor Working Folder...............31 Script File Editor - ScriptFile Menu Items ...............31 Script File Editor - Manual Scripting.......................32 Script File Editor - Script Errors ..............................32 Script File Editor - Editing Techniques....................32 Script File Editor - Tokens ......................................33 Tokens - Relative Path Configuration Tool .............33 Tokens - Exchange with Configured Token ............34 Token Configuration Errors ....................................34 Script Editor - Scenario Scripts ...............................34 Script Editor - Manual Scripting .............................35 Step 2 - Lung Model ..............................................35 Lung Model Settings - Compensations ...................36 TVP Menu .............................................................37 Time Varying Parameters Editor .............................37 TVP Curve Segment Editor .....................................37 TVP Curve Types ....................................................38 TVP Curve Editing - Linear.....................................38 TVP Curve Editing - Power ....................................38 TVP Curve Editing - Exponential ............................38 TVP Curve Editing - Sinusoidal ..............................38 TVP Curve Editing - From File................................38 TVP Curve Editing - Uniform Distribution ..............38 TVP Curve Editing - Gaussian Distribution.............39 R-Types .................................................................39 Independ. R ...........................................................39 Independent R Settings Rin<>Rout.........................40 Non-Linear C.........................................................40 Non-Linear C Editing .............................................40 Simulation Editor - Patient Effort Model .................41 Simulation Editor - Saving a Parameter Set.............42 , Waveform Window ...............................................43 Simulation Start .....................................................44 <Set Pause> Key ....................................................45 Freeze Switch ........................................................45 , Loop View .............................................................46 Lung Fill Indicator .................................................47 Analog Parameters..................................................48 Trace Colors ...........................................................48 Graph Modifications..............................................48 Simulation ON/OFF...............................................49 , Virtual Ventilator Panel .........................................50 , Interactive Control Panel, Lung Model Parameters (R and C) tab .......................................51 Go To ICP .............................................................52 ICP Active Message in Instructor Dashboard..........52 View Original Model .............................................52 ICP Controls ..........................................................52 , ICP, Lung Model Parameters (R and C) tab ............53 TVP files cannot be used for ICP ............................53 ICP, Spontaneous Breathing Parameters tab ...........54 ICP Adjustment Not Yet Applied............................54 , Interactive Control Panel, Trends Tab ....................55 , Interactive Control Panel,Closed Loop Vt tab.........56 , Interactive Control Panel, Closed Loop MV Tab ....57 , Interactive Control Panel, Closed Loop CO2Y Tab 58 No Loop ................................................................58 , Interactive Control Panel, Patient Library Tab ........59 , Real-Time Analysis Tab .........................................60 Pressure Filter Choices...........................................60 Configure TCP Broadcast Menu Selection..............61 Broadcast Configuration Dialog Window ..............61 Create Report Key..................................................62 Sample Report .......................................................62 Data Recording Checkboxes..................................63 149 150 ASL Mobile Cart ..................................................104 ASL 5000 Component Serial Numbers.................106 Firmware Upgrade, Normal SW Launch ..............107 Firmware Upgrade - Confirm ...............................107 Firmware Upgrade - Disconnect Warning ...........107 Firmware Upgrade - Restart Notice......................107 Schematic Overview ASL 5000 System................108 A one-compartment ventilatory system................110 Normal ventilatory system responses during assisted inspiration (with expiratory muscular forcing)................................................................111 ∆p-υL plots for (c) total driving pressure difference .......................112 ∆p-υL plots for data in Figure 13-2 with expiration included......................................113 ∆p-υL plots for data in Figure 13-2 with expiration included........................................113 ∆ptot-υL curve for an entire breath with expiratory volume change plotted upward from end inspiration on the υL-axis...............................114 (a) Volume and flow responses to the same ∆ptot forcing function, for ventilatory systems with different time constants........................................115 (b) The ∆ptot-υL for the three cases........................115 Two compartment pulmonary system within the chest wall. ..........................................116 ∆ptot-υL relation for a two compartment ventilatory system as breathing frequency is increased.............................................................117 Simulation Model Electrical Analog.....................119 Simulator Concept...............................................119 Single Compartment Model .................................120 Two Compartment Model....................................120 Patient Effort Model: Passive ................................121 Patient Effort Model: Pressure Trigger ..................121 Pressure Trigger Effort Detail................................121 Patient Effort Model: Flow Trigger........................122 Flow Trigger Effort Detail.....................................122 Patient Effort Model: Sinusoidal ...........................122 Sinusoidal Effort Detail ........................................122 Trapezoidal Breath Profile ...................................123 Trapezoidal Effort Detail.......................................123 Patient Effort: Inspiratory “Backing Off“ ...............124 Patient Effort: Expiratory “Backing Off“................124 File-based Patient Effort .......................................125 Effort Model - Analog Input .................................125 Effort Model - Flow Pump....................................126 Virtual Ventilator - Basic Controls........................126 Patient Model Library Parameters, Static..............128 Patient Model Library Parameters, Time-Varying.......................................................129 Timing of Pressure, Flow, and Volume ................130 User’s Manual ASL 5000, SW 3.5, Rev.2 © IngMar Medical, Ltd. 2015 Communication Connections (Back Panel) ........... 63 Software Exit.......................................................... 64 Project File Dialog ................................................ 64 Welcome Window Return Option ........................ 64 Post-Run Analysis Menu ....................................... 67 Post-Run Analysis, Select Data File ....................... 67 Post-Run Data Re-Processing Window................... 68 Display Data Selections ........................................ 70 Legends/ Palettes .................................................. 71 Graphs- Visible Items............................................ 71 Zoom Tool............................................................ 71 Cursor Legend ...................................................... 72 Cursor Legend Options ......................................... 72 Cursor Lock .......................................................... 72 Analysis: Breath-by-Breath Display ....................... 73 Analysis: Multi-Parameter Graph .......................... 74 Parameter Gains ................................................... 75 Analysis: Loop Display ......................................... 76 Analysis: Continuous Time-Based Data................. 77 Parameter Gains ................................................... 78 Analysis: Trend View ............................................ 79 Analysis: Work of Breathing Display ..................... 81 Trigger Analysis Display ....................................... 82 Servo Control Performance Display ...................... 84 RespiSim Mobile Ventilator Management Training Station .................................................... 86 RespiSim Instructor Dashboard ............................. 86 RespiSim Virtual Vital Signs Monitor..................... 86 RespiSim, Main Interface ...................................... 87 RespiSim Control Field .......................................... 88 Test Automation Interface ..................................... 90 Utilities Selector ................................................... 92 Utilities: ASL 5000 Data File Conversion .............. 92 Utilities: AUX Resampling .................................... 93 Utilities: RespiSim File Conversion ....................... 93 Patient Flow Data Processor ................................. 94 Script From Recorded Patient Flow ....................... 95 Script From Recorded Patient Flow ....................... 95 Pressure Flow Resampling Utility .......................... 96 TCP Breath Client ................................................. 97 TCP Waveform Client ........................................... 97 Simulator Bypass and Leak Valve Module............. 98 SBLVM Schematics ............................................... 98 SBLVM Orifice Characteristics .............................. 99 Cylinder Temp. Controller Front Panel................ 100 Paramagnetic Oxygen Transducer ...................... 100 O2 Data at Run Time.......................................... 100 Auxiliary Gas Exchange Cylinder ........................ 101 Setup withManikin.............................................. 101 ASL 5000 with Preemie Option Installed ............ 102 Installation of Preemie Cylinder .......................... 102 Preemie Cylinder: Pressure Line Manifold........... 103 User’s Manual ASL 5000, SW 3.5, Rev.2 © IngMar Medical, Ltd. 2015 Breath Parameter Data File (*.brb, *.bra)..............139 Processed Waveform Data File (*.dtb, *.dta) ........139 Raw Data File (*.rwb, *.rwa)................................139 Video Tutorial Access..........................................140 Online Support Sessions ......................................140 151 User’s Manual ASL 5000, SW 3.5, Rev.2 © IngMar Medical, Ltd. 2015 IngMar Medical, Ltd. ISO9001: 2008 certified www.ingmarmed.com 152