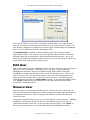
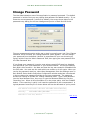
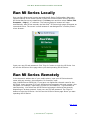
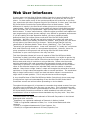
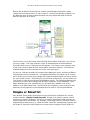
1
MI Series Mobile Controller USER MANUAL Version 4.0 March 2013 Rain Bird® MI Series Mobile Controllers User Manual Table of Contents Introduction .................................................................................................... 4 MI Series Configuration ..................................................................................... 5 Launch Central-Control App ........................................................................... 5 Check Default Communications Settings .......................................................... 5 Check Default Web Ports................................................................................ 6 Check Default Firewall Settings ....................................................................... 6 MI Series Licenses ............................................................................................ 7 License Formats and Types ............................................................................ 7 Trial License ................................................................................................. 8 License Replacement ..................................................................................... 8 GSP & Permanent Licenses ............................................................................. 9 License Renewal ......................................................................................... 10 Manage MI Series Users .................................................................................. 11 Add User.................................................................................................... 12 Edit User.................................................................................................... 14 Remove User .............................................................................................. 14 Change Password ........................................................................................ 15 Web Browser Settings ..................................................................................... 16 JavaScript Settings ..................................................................................... 16 Cookies Settings ......................................................................................... 16 Run MI Series Locally...................................................................................... 17 Run MI Series Remotely .................................................................................. 17 Web User Interfaces ....................................................................................... 18 Simple or Smart UI ..................................................................................... 19 Simple UI Login .......................................................................................... 20 Smart UI Login ........................................................................................... 21 Home Page ................................................................................................ 21 On-Screen Controls ..................................................................................... 23 Operation Home ......................................................................................... 23 User Preferences ............................................................................................ 25 Default Method ........................................................................................... 25 Tree List .................................................................................................... 25 QuickMethod .............................................................................................. 26 Default Station-View ................................................................................... 26 Default Process ........................................................................................... 27 Default Station-Data ................................................................................... 27 Browser Settings ........................................................................................ 27 Lines/Screen ........................................................................................... 28 Chars/Line .............................................................................................. 28 Command Delimiter .................................................................................... 29 Command Definitions .................................................................................. 29 Commands Operators .................................................................................. 30 View Scale Settings ..................................................................................... 31 Predefined View-Scales ............................................................................ 31 Automatic View-Scale .............................................................................. 32 Customize View-Scale .............................................................................. 32 QuickMethod Operations ................................................................................. 35 Send (button or hyperlink) ........................................................................... 36 Status (button or hyperlink) ......................................................................... 38 Data (button or hyperlink) ........................................................................... 39 © 2013 Rain Bird® Corporation 2 Rain Bird® MI Series Mobile Controllers User Manual Command Options .......................................................................................... 40 Override Default Run Minute ........................................................................ 40 Change Command Processing Time ............................................................... 40 MI FREEDOM ................................................................................................. 41 Diagnostics.................................................................................................... 41 LINK Diagnostics......................................................................................... 42 Decoder Diagnostics .................................................................................... 42 60 Hz Mode ................................................................................................ 44 Decoder On/Off Test ................................................................................... 44 Terminating the Tests .................................................................................. 44 ICM Diagnostics .......................................................................................... 45 Station Diagnostics .................................................................................. 45 Address Connect ..................................................................................... 46 Faults Finding ......................................................................................... 46 Faults Report .......................................................................................... 46 Stop Faults Finding .................................................................................. 46 Station Finder ......................................................................................... 46 Accessories ................................................................................................... 47 Water Saver ............................................................................................... 48 Demand Flow ............................................................................................. 48 SmartPump ................................................................................................ 49 SmartWeather ............................................................................................ 50 Activity Log ................................................................................................ 51 Online Users............................................................................................... 52 Alarm Log .................................................................................................. 52 Cancel All Irrigation..................................................................................... 53 Site Settings .................................................................................................. 54 Programs/Schedules ....................................................................................... 55 Licensed Features ....................................................................................... 56 Operation Methods ...................................................................................... 56 Tree List Operation ..................................................................................... 57 QuickMethod Operation ............................................................................... 57 Send Command ....................................................................................... 59 Status Command ..................................................................................... 60 Data Command ....................................................................................... 60 Areas/Stations ............................................................................................... 62 Station Layout Views ................................................................................... 63 Licensed Features ....................................................................................... 63 Tree-List Operation ..................................................................................... 64 Uniqueness of ICM Addresses ....................................................................... 68 Temporary Station Adjustment ..................................................................... 71 Appendices .................................................................................................... 71 On-Screen Controls ..................................................................................... 71 Troubleshooting ............................................................................................. 74 Failures of Running MI Series Web ................................................................ 74 Communication Service Problems ................................................................. 74 License Key Problems .................................................................................. 75 Trial-Key Problems .................................................................................. 75 Activation-Key problems ........................................................................... 76 © 2013 Rain Bird® Corporation 3 Rain Bird® MI Series Mobile Controllers User Manual Introduction Rain Bird® MI Series Mobile Controllers are a brand new type of portable controller for Rain Bird irrigation systems. The Rain Bird MI Series was designed to work on a standard cell phone with Internet connectivity and offers the user far more options than the simple remote controls currently available in the marketplace. Once connected, up to 9 users can simultaneously perform many operations ranging from activating sprinklers and programs, observing real-time status information or directly editing central control sprinkler and program data. All activity is logged for convenient review. Rain Bird MI Series Mobile Controllers is a sophisticated system in which an Internet server is linked to your central control system and a Web service is used to issue Web pages to a remote device. This diagram is a very basic description overview of the system architecture. Rain Bird MI Series Mobile Controllers utilize a server running on your central control computer. A remote Web browser such as the micro-browser commonly found on newer cell phones is then used to contact that server and remotely operate your central control. The following chapters describe the use of Rain Bird MI Series Mobile Controllers. Because there are a wide variety of Internet appliances available and they are constantly changing, every device cannot be described in detail. With Rain Bird MI Series Mobile Controllers User Preferences are provided to help you customize the behavior of you controller to work well with almost any Web-enabled phone. All phones do not offer the same level of Internet browser capability however. Some phones are very easy to use and others require practice. The instructions presented here are intended to cover typical devices. Back To Top © 2013 Rain Bird® Corporation 4 Rain Bird® MI Series Mobile Controllers User Manual MI Series Configuration Rain Bird MI Series Configuration is the primary tool used to configure your MI Series and manage users. Launch the MI Series Configuration from its shortcut on the desktop. You can find another shortcut by clicking START, then PROGRAMS and finally RAIN BIRD. A third shortcut is added to toolbar 3 in the Front Office of your central control application. For Rain Bird Go and Go200 applications, click menus 'Tools' -> 'MI Series' -> 'MI Settings'. Note: if the MI Series Configuration has been left idle for 15 minutes, it will close automatically. Launch Central-Control App Rain Bird MI Series is designed for multiple Rain Bird central-control applications. However, there is only one running central-control that will be actively linked to the MI Series at runtime. The MI Series needs to get central-control information from the running application. Please do not run two or more Rain Bird central-control apps simultaneously. This will confuse you and the MI Series. If no Rain Bird central control application is running, the MI Series Configuration will warn you to launch a central control application. If the running central-control app is linked with the MI Series, its name will be displayed in the MI Series Configuration. Check Default Communications Settings Rain Bird MI Series is shipped with default settings that fit most cases where Windows Firewall is used. If your installation is one of these cases, the Rain Bird MI Series Configuration main window should look like a screenshot below. Communication status link Rain Bird Central-Control Rain Bird Communication Service Rain Bird MI Series Web Service Rain Bird Communication Service is a bridge between the central-control app and MI Series Web Service. A little square indicator at Rain Bird Communication Service shows the service status. If the indicator is green, the Rain Bird communication service is functioning correctly. If the indicator became red, the service is not working. Please refer to Communication Service Problems at the Troubleshooting chapter that help figure out problems. Two green line-bars show communications © 2013 Rain Bird® Corporation 5 Rain Bird® MI Series Mobile Controllers User Manual status. If left line-bar became gray, communications to central-control stops. Possible reasons will be displayed in red warning. If right line-bar became gray, communications to MI Series Web Service may be in re-retry or in trouble. Please read following sections that help solve the problems. Check Default Web Ports The MI Series Web application is installed on your Default Web Site with port 80 and 50080 for HTTP traffics. Since port 80 is blocked by many ISPs, port 50080 is selected as primary port for MI Series. If both port 80 and 50080 are not available in your organization network or blocked by your Internet Service Provider (ISP), you have to add other ports for MI Series and test them. In the MI Series Configuration, click "Settings" menu then "Website Ports" submenu to popup Website Ports window (screenshot below). Input a new port (e.g., 50088) and click ―Add‖ button. Then select the new port in ―Default Web Site Identities (Identifications)‖ list as testing port. Click OK button back to main window. If the added port works, you should see a green link between MI Series Web Service and Rain Bird Communication Service. Check Default Firewall Settings By default, the MI Series uses Windows Firewall that is turned on and configured automatically by the MI Series installation. In the MI Series Configuration, click "Settings" menu then "Firewall" submenu to popup Firewall Settings window. If you use Windows Firewall, make sure all check-boxes on the Firewall window are checked (see screenshot below). If you get a runtime error or this window cannot be displayed correctly, your Windows Firewall may be disabled by network administrator. You must work with your network administrator to enable the Windows Firewall for your computer. © 2013 Rain Bird® Corporation 6 Rain Bird® MI Series Mobile Controllers User Manual If you use 3rd-party firewall and do not know how to set for the MI Series, please call your Rain Bird distributor or Rain Bird GSP for help. Back To Top MI Series Licenses License Formats and Types MI Series 4.0 introduces new expiration-date-based licensing system. The new license key length is increased from old 5X5 to 5X6 characters. For example, 3XTZWJ-V5N4JB-MXDBAA-K9CYK7-2XUWSU is a 5X6 key. This allows expirationdate be embedded in the key and digitally signed for security. For backward compatible, MI Series 4.0 also supports old 5X5 permanent licenses issued for MI 3.2 or earlier versions (see table below). MI Version Key Format 3.2 or earlier 5X5 XXXXX-XXXXX-XXXXX-XXXXX-XXXXX 4.0 or later 5X6 XXXXX-XXXXX-XXXXX-XXXXX-XXXXX-XXXXX Note: You cannot remove ―-‖ from the key. You cannot put leading, ending or other characters in the key. © 2013 Rain Bird® Corporation 7 Rain Bird® MI Series Mobile Controllers User Manual Table below lists license types and MI versions supported. Type MI Version Valid Days Key Note Product Trial 4.X 30 days 5X6 GSP 4.X 1 year plan 3 year plan 5X6 30 day grace period for renewal. Permanent 1.0-4.X Never Expires 5X5 5X6 MI 3.2 or earlier must use 5X5 key. MI 4.X can use 5X5 or 5X6 key. Trial License We will no longer provide old 5X5 trial license key for MI 3.2 or earlier. If a customer wants MI trial, just install MI 4.0 and use new 5X6 trial license. Your local Rain Bird distributor will provide you with a Trial-Key when the MI Software is delivered. You can also obtain a Trial-Key by calling Rain Bird GSP at (866) 477-9778. Launch the Rain Bird MI Series Configuration. Select Settings menu then License submenu to popup License windows. In the License Key panel, a textbox is for entering a License Key. Copy and Paste or type your Trial-Key into the space provided. Click the Apply button to load the key into Rain Bird MI Series software. If the key is authenticated, a message will appear that indicates the licensing levels and the date valid through. Trial-Key allows your Rain Bird MI Series software be fully functional for 30 days. Sometime during that 30 day period you should request your MI Activation-Key. If the trial period expires and you have not completed activation, all features of your Rain Bird central control will continue to function normally, but you will be unable to login to your Rain Bird MI Series Mobile Controller. You can still enter an ActivationKey in your Rain Bird MI Series software even after the trial period has expired. At that time, all MI Series functionality will be restored and you will be able to login any licensed user. License Replacement The new licensing system allows using any type of license to replace existing license without other changes. For example, you can replace a GSP license with a permanent license. Or if you want additional 10 days trial, just request a new 10-day trial license from Rain Bird and replace existing license. © 2013 Rain Bird® Corporation 8 Rain Bird® MI Series Mobile Controllers User Manual GSP & Permanent Licenses GSP and permanent license keys are used to activate MI Series. They are also called Activation-Key. The Activation-Key contains information of a unique hardware identifier from the system components of your computer. You can obtain the Activation-Key through your local distributor or by contacting Rain Bird GSP at (866) 477-9778. You will need to provide you Golf Course name (irrigation site name), central control System-ID and unique computer Registration-ID to the engineer who answers the phone. The computer Registration-ID can be found in the Rain Bird MI Series Configuration, selecting Settings menu then License submenu. You will find the Registration-ID on the license window. Click ―Save ID‖ button and you can export the Registration-ID and related information into a text file like below. Information for Rain Bird® MI Series License =============================================== User Description: My Country Club Central-System: Cirrus, ID: 1148616 Registration-ID: DVGQ-W340-5QE7-N58K Then you can email this text file to your local distributor or to Rain Bird for your Activation-Key. Once the Registration-ID is received by Rain Bird, a Activation-Key will be generated. The Activation Key may be provided in the form of an email or text file. If that is the case, it will look something like the one shown here. ========================================================= Rain Bird® MI Series License for Golf Applications ========================================================= User Description: My Country Club User-ID (GSP#): 1003368674 Central System-ID: 1148616 Registration-ID: FG6Y-RT89-1HVW-GEX5 ---------- License Key for MI 4.0 or Later -------------BEMNX-STJ6V-RFD3M-PLHFR-YMEE5-4GABT * 3-Year GSP Plan, VALID THRU 7/30/2015 ---------------- License Volumes -----------------------Professional Users = 1 Advanced Users = 1 --------------------------------------------------------License-Control Version: 1.0 Notice that in the license file from Rain Bird, the golf course name, the System-ID and Registration-ID are all shown. The license file indicates the type and quantity of licensing levels or license volumes. Since existing MI users are running MI version 3.2 or earlier with permanent licenses, the new permanent license contains 5X5 and 5X6 keys. 5X5 key is for MI 3.2 or earlier and 5X6 key is for MI 4.0 or later. When apply a permanent license in MI, please make sure using right key to match your MI version. Otherwise, you will get a message of ―Invalid license key‖. Below is an example of the permanent license content. ------------ License Key for MI 3.X or Earlier -------------7XHS7-DDX2V-5KK5T-C4NKA-MJVXC -------------- License Key for MI 4.0 or Later -------------3XTZWJ-V5N4JB-MXDBAA-K9CYK7-2XUWSU © 2013 Rain Bird® Corporation 9 Rain Bird® MI Series Mobile Controllers User Manual Once a License Key is provided, the next step is to apply it into Rain Bird MI Series software and activate the software. Launch the Rain Bird MI Series Configuration. Select Settings menu then License submenu to popup License windows. In the License Key panel, a textbox is for entering a License Key. Copy and Paste or type the Activation-Key into the space provided. Then click the Apply button to load the key into Rain Bird MI Series software. If the key is authenticated, the license status will indicate license type, valid through date, and licensing levels (see screenshot below). If the license file does not work, please refer to Troubleshooting License Key Problems. The Activation-Key can be applied to the MI Series Software on that computer an unlimited number of times. However, if you need to install Rain Bird MI Series software on a different computer you will need to resend another computer Registration-ID and get a new Activation-Key. License Renewal If your MI runs with a GSP license, renewal messages may display on MI login screen of your mobile device in following days close to expiration date. © 2013 Rain Bird® Corporation 10 Rain Bird® MI Series Mobile Controllers User Manual Day Message 180 Your GSP Plan License will expire in 6 months. You may begin your budget planning now. 90 Your GSP Plan License will expire in 3 months. Please make sure it is in your budget for next year. 0 GSP Plan License expired on [date]. Please renew your GSP Plan in the next X days. -30 * Please contact your Rain Bird Distributor to renew your GSP Plan. * -30 is grace period. Note: The messages will display for 3 days and disappear. After a GSP license expires, you can still run MI for 30 days as grace period to renew the license. You cannot login MI from your mobile devices after the grace period is over. Please request a new GSP license to replace the expired one. Back To Top Manage MI Series Users Users of Rain Bird MI Series Mobile Controllers are required to be licensed. The features available to each user are determined by the type of license associated with that particular user. Run Rain Bird MI Series Configuration, in the License Status panel of the License window, you can see how many of each type of user is authorized to use the product simultaneously. And the type and quantity of activated licenses will be indicated. In the screenshot below, 2 Basic, 2 Advanced and 2 Professional user licenses have been purchased. Rain Bird MI Series Mobile Controller offers the ability to allow up to 9 simultaneous users with any combination of license levels. © 2013 Rain Bird® Corporation 11 Rain Bird® MI Series Mobile Controllers User Manual To begin managing users, select the Settings menu and choose User Management. A password dialog will appear. Enter the User Management password. The default password is ‗rainbird‘. You can change this to another password for security (see Change Password for details). Add User After entering you User Management password, you will see the User Management window similar as below. There are four steps plus one optional step to define a user. 1. Enter a 1-20 character user name 2. Enter a 1-10 character User ID 3. Enter a 4-10 character password & confirm 4. Select the User Role for that user. Optionally, identify the user as an administrator After completing these steps, click the ―Add/Update‖ button to add the new user to the User List on the left side of the screen. While for the most part, these steps are self-explanatory, experience has shown that proper choices here can make using Rain Bird MI Series easier. Keep in mind that the User ID and Password selected here must be keyed in to your cell phone‘s micro-browser every time you log in to use your Rain Bird MI Series. Short passwords may be better than longer ones. Also, on some cell phones it is easier to type numbers and some make it easier to © 2013 Rain Bird® Corporation 12 Rain Bird® MI Series Mobile Controllers User Manual type letters. Don‘t worry too much about this though. You can always change your User ID and password later if it is cumbersome to enter on your device. The User List on the left is for all practical purposes, unlimited. You may define one User or 50 Users, regardless of the type and quantity of licenses you purchased. You manage these users by assigning User Roles. For example, supposed you purchased only 1 Professional license and 1 Advanced license. You could create 4 users in the user list named user1, user2, user3 and user4. Each user must have a different User ID and Password. At any given time however only one user can be assigned the role of ―Professional User‖ and one can be assigned the role of ―Advanced User.‖ The remaining users must have their roles set to ―Disabled.‖ For example, the user list might look like this. You can come back to the User Management window and exchange user roles at any time. At no time however could two users have the role of Professional. Users whose role is ―Disabled‖ cannot log on to the Rain Bird MI Series Mobile Controllers system. The Log In page will not authenticate (allow access to) a disabled user. This method of managing users is primarily designed to help support a wider variety of remote cellular phones. Preferences for remote behavior are assigned directly to users in the User List. Many of these preferences are determined by the type of device you are using to remotely access Rain Bird MI Series Mobile Controllers. In the most obvious scenario, there might only be a single User license purchased. That user might want to use Rain Bird MI Series Mobile Controllers with a basic cell phone some of the time and using a high end PDA or desktop computer at other times. In that case, it might make sense for the user to create three User IDs for himself similar to the list shown here. © 2013 Rain Bird® Corporation 13 Rain Bird® MI Series Mobile Controllers User Manual One User ID might be used with his cell phone and the other one might be used when he is sitting at his desk and the third when he is using his high end PDA. He just needs to remember to disable the cell phone User ID and assign his purchased user role to the PDA User ID before leaving the office. The Administrator checkbox is used to identify users who will have remote Administrator rights. The Activity Log, the list of Online Users and the Command Definition page are all reserved for users identified as Administrators. Any or all users can be made Administrators, but with that role comes the ability to review the list of online users and remotely disable a user. Edit User After a list of users has been established, there will often be times when you need to edit some of the information. Editing a user is very easy. Bring up the User Management window by launching the Rain Bird MI Series Mobile Controllers Configuration manger and selecting ―Users‖ from the Settings menu. Click on the user in the User List. This will select that user from the list and display the user name, password and User Role on the right side of the form. Edit anything that needs changing then click the ―Add/Update‖ button. If you are done editing users, click ―Close‖ to dismiss the form and return to the Rain Bird MI Series Mobile Controllers Configuration form. Remove User Removing a user is just as easy as editing one. Click on the user in the User List. This will select that users and the user name, password and User Role will appear on the right side of the form. With the proper user selected, click the ‗X‘ button to remove the user. You cannot undo this action so be sure you really want to remove the user. Adding a mistakenly removed user back into the list is not difficult, but you will lose any preferences stored for that user. If you are done removing users, click ―Close‖ to dismiss the form and return to the Rain Bird MI Series Configuration window. © 2013 Rain Bird® Corporation 14 Rain Bird® MI Series Mobile Controllers User Manual Change Password The User Administration area of this application is password protected. The default password is ‗rainbird‘ but you may change that password for added security. If you know the current password (‗rainbird‘ by default), the screen shown below is the password entry dialog for the User Management portion of Rain Bird MI Series. The user management section at the top is what is normally seen, but if the ‗Change Password‘ box is checked, the ‗Change Password‘ panel appears. You can change your password from the default ‗rainbird‘ to a password of your own choosing by typing ‗rainbird‘ into the ‗Admin Password‘ field, then typing the new password into the ‗New Password‘ box. If you forget your password, it can be reset using a special 5X5 pass key obtained from Rain Bird, your local distributor or your Rain Bird dealer. The key provided by Rain Bird is time sensitive - the date and time the key was created is embedded into the 5X5 code. You must use the code within two months or it will expire. When you receive the password reset key, select User Management from the Settings menu in Rain Bird MI Series Mobile Controllers Configuration window and place a checkmark in the box below the password field but do not type a password. The password window will change to include the ‗Change Password‘ panel. Type a new password into the ‗New Password‘ box, then copy or type the Password Reset Key into the ‗Reset Key‘ box. When all this information is in the proper place, click the CHANGE button. If the reset key is valid, it will reset the password to this new password. A typical password reset key file is shown below and can be delivered to you by email. ==================================================================== Rain Bird MI Series Mobile Controllers User Admin Password Reset-Key ==================================================================== Reset-Key: GAV92-NVARA-JLAPD-Q7AHN-1BAUR -------------------------------------------------------------------Effective to: Year 2009, Month 12 Back To Top © 2013 Rain Bird® Corporation 15 Rain Bird® MI Series Mobile Controllers User Manual Web Browser Settings JavaScript Settings MI Series Web app uses Javascript to control clientside events, data transferring and others. If Javascript is turned off in client‘s Web browser, nothing would happen when tapping a link or button in MI Web user interfaces. MI Series 4.0 will automatically detect whether Javascript is enabled in your Web browser. If it is disabled, a reminder message will be displayed on MI login page (screenshot right). You should turn Javascript on in browser settings. Then go back to MI login and refresh the page. The reminder message will disappear if Javascript is enabled. Cookies Settings Some MI Series attributes are specific to Web browsers. For example, View-Scale is depended on device screen size; MI FREEDOM asynchronous communication method may not be supported by some versions of Web browsers. MI Series 4.0 remembers these attributes in Cookies of client‘s Web browsers if Cookies are enabled. If Cookies are disabled, MI Series cannot remember the attributes that users changed in the browser. MI Series has to use default data for these attributes for every login. In this case, you may need to select correct values after every login. MI Series 4.0 will automatically detect whether Cookies are enabled in your Web browser. If Cookies are disabled in your Web browser settings, a reminder message will be displayed on MI login page (screenshot right). You should turn Cookies on in browser settings. Then go back to MI login and refresh the page. The reminder message will disappear if Cookies are enabled. You can set Cookies for MI only in some browsers if do not want Cookies for other Websites. © 2013 Rain Bird® Corporation 16 Rain Bird® MI Series Mobile Controllers User Manual Run MI Series Locally Run your Rain Bird central-control app and the MI Series Configuration. Make sure communications of the central-control to Rain Bird Communication Service and the MI Series Web Service are established. Click Run menu and then select ―MI on This Computer – http:// ~” submenu. The Internet Explorer browser will open automatically. After a few seconds, the Rain Bird® MI Series login page will appear as screenshot below. The screen is small because it was designed for a mobile phone‘s micro-browser. Input your user ID and password. Click ―Sign In‖ button to login the MI Series. You will see the MI Series home page where you start operating the MI Series. Run MI Series Remotely In the browser‘s address bar of your mobile phone, input your MI Series domain name with port number, plus sub paths. For example, input http://MyGolfCourse:50080/rb/. If you have not registered a domain name for the MI Series, input numerical IP of your MI Series host computer with port number, plus sub paths. For example, input http://12.164.211.34:50080/rb/. Tap Go button to start browsing. You should see the MI Series login page in about a few seconds depending on wireless network. Input your user ID and password. Tap ―Sign In‖ button to login the MI Series. You will see the MI Series home page where you start operating the MI Series. Back To Top © 2013 Rain Bird® Corporation 17 Rain Bird® MI Series Mobile Controllers User Manual Web User Interfaces In many ways, the Rain Bird MI Series Mobile Controller‘s remote Interface is like a Web browser – it is just designed to fit comfortably on a screen the size of a cell phone. For that reason many of the remote operations will be familiar to you from your experience with other programs found on the Internet. In other ways, Rain Bird MI Series Mobile Controllers are quite different from a Web browser. These differences lie mostly in the fact the all cellular phone micro-browsers are not created equal. Some of the more current model cell phones include Web browsers which are small, but very sophisticated. Other phones have very poorly designed Web browsers. In some cases however, different cellular providers have added their own programming to these phones making it very difficult to guarantee performance. If you are reading this User Operation Manual, you have probably already determined that your cellular phone works with Rain Bird MI Series Mobile Controllers. We offer a 60-day trial period to ensure the product will meet your expectations before you actually purchase the product. As a general rule, the newer the cell phone, the better the micro-browser. Mobile devices that fall into the classification of Windows Mobile 1Smart Phone, BlackBerry2, Treo 3and iPhone4 5 almost all give good performance. Lower-end ―clamshell‖ or ―candy bar‖ cell phones with small screens may result in a less pleasant experience. However, there are many exceptions to this general rule and trying Rain Bird MI Series Mobile Controllers on your own cell phone is the only real test. This User Operation Manual will cover all aspects of Rain Bird MI Series Mobile Controllers in detail, but before getting into those details, it is helpful to get the big picture. Rain Bird MI Series Mobile Controllers can be thought of as a small screen Web browser and using it is similar to using a Web site. Please note the words sprinkler and station are used somewhat interchangeably though out this guide. Technically a ―sprinkler‖ is the device which sprays water on the turf while ―station‖ refers to the electrical output of an individual field controller station or decoder address. Many times a single ―station‖ output will energize the solenoids of several sprinklers or a single valve that supplies water to several sprinklers. The trend these days is single-head control in which an electrical station output is connected to a single valve-in-head sprinkler. This is why the two terms have merged. A very simplified view of Rain Bird MI Series Mobile Controllers is shown next page. It helps have a high level understanding of how the Rain Bird MI Series Mobile Controllers screens are laid out before proceeding on to the details. Throughout this document it is important to remember that actual screens from your cell phone may be different from the ones you see here. This is because there are almost as many micro-browser implementations as there are cell phones. Rain Bird MI Series Mobile Controllers conforms to a WML standard, but each cell phone manufacturer is free to implement those standards any way they wish. Also, Rain 1 Windows Mobile is a registered trademark of Microsoft Corporation in the United States and other countries 2 BlackBerry is a registered trademark of Research in Motion Limited 3 TREO is a registered trademark of Palm, Inc. in the United States and other countries 4 Cisco® is a registered trademark of Cisco Systems, Inc. 5 iPhone® is a registered trademark of Cisco® Systems, Inc. © 2013 Rain Bird® Corporation 18 Rain Bird® MI Series Mobile Controllers User Manual Bird MI Series Mobile Controllers has certain user-definable preferences which change the look and behavior of many screens. In this User Operation Manual, we will describe each of these preferences and how they affect Rain Bird MI Series Mobile Controllers as a whole. The first time you connect with a Rain Bird MI Series Mobile Controller, you will see the Log-in page. This page requires a User ID and Password for authentication. Once past that screen, a Home screen will appear. The Home screen contains links to the most common Rain Bird MI Series Mobile Controller features. The features available depend on the licensing level of the user that logs in. As you see, links are available for accessing the diagnostic tools, accessory software, site settings and user preferences. A Programs/Schedules link takes you to screens which allow you to control and manage the programs and schedules you have written for your central control. Depending on your personal preferences, you will either see Tree-Views or Rain Bird‘s exclusive QuickMethod screen. The Satellites/Stations link allows you to control and manage the sprinkler properties in your database. Once again depending on your preferences, you will with see a satellite view of the stations or an area-based view. Just like with the programs, a user preference will determine if the pages are to be displayed as tree-view or via the QuickMethod. Simple or Smart UI Rain Bird MI Series Mobile Controllers has two mobile User Interfaces for various mobile browsers: Simple UI and Smart UI. Simple UI is used for regular mobile browsers on regular cellphones. Smart UI is used for advanced mobile browsers on some smartphones and tablets. For example, recent Apple iPhone, Windows Phone 7, and Android smartphones (e.g., Motorola Droid X and HTC smartphones) support the MI Smart UI. But some old smartphone browsers do not support the MI Smart UI. © 2013 Rain Bird® Corporation 19 Rain Bird® MI Series Mobile Controllers User Manual When you first browse your MI Web address, MI may ask you to select UI if it cannot decide which UI for your browser. If using a regular cellphone, you have to select the simple UI. The simple UI supports all mobile browsers include advanced browsers in smartphones. If using a smartphone and you do not know whether your mobile browser supports MI Smart UI or not, just try the Smart UI. If you can login but some features do not work, usually the mobile browser does not support MI Smart UI. In this case, you can either use simple UI or upgrade your mobile browser from your vendor Website. You may directly browse to simple UI sub-address at http://YourMiAddress:port/rb/cell/ You may directly browse to Smart UI sub-address at http://YourMiAddress:port/rb/smart/ Simple UI Login Logging in to Rain Bird MI Series Mobile Controllers is similar to other programs or Web sites. You enter the appropriate webpage address into your browser and the log-in page will appear. It is recommended that you save your Rain Bird MI Series Mobile Controller Web address as a favorite in your browser. If you use a dynamic IP (most people do) then you will want to open an account with a domain name service. What Domain Name Services do is store a Web address for you and also keep track of your computer‘s IP on the Internet. You then always log on to the Web address you defined in your account with the domain name service – then because the domain name service always keeps track of your computer‘s IP address the service can easily re-route Web traffic to you current IP. In addition to your golf course name, the login page will indicate the number of days remaining in the product trial period if applicable. At the log in screen enter your User Id and Password. Once you have this information in place, click the ―Sign In‖ button and your User ID will be authenticated. For security, Rain Bird MI Series Mobile Controllers allows for up to 5 incorrect passwords with a User ID. After 5 failing attempts to log in, that user ID will be disabled. To re-enable the account go to the User Management area of Rain Bird MI Series Mobile Controllers Configuration and assign the now Disabled user a new user role. Rain Bird MI Series Mobile Controllers does not keep track of a user‘s past roles. Any time you use Rain Bird MI Series Mobile Controllers after logging out, you must enter your User ID and password at the Login page. Please note that Rain Bird MI Series Mobile Controllers are designed to automatically log you out after 30 minutes of inactivity. © 2013 Rain Bird® Corporation 20 Rain Bird® MI Series Mobile Controllers User Manual Smart UI Login When a smart mobile browser first loads a webpage, it sets the initial scale to fit the webpage completely width-wise on the device screen, for example, width to 980 pixels on iPhone Safari browser. This shrinks the page contents to a small part of the page. You have to zoom in with pinch gesture. MI Series Smart UI will automatically match a viewscale for your mobile browser. For example, if you are using an Apple iPhone, MI Series will automatically select predefined Apple iPhone view-scale for you. If your mobile device is an Android tablet, MI Series 4.0 will select predefined Android Tablet 7‖ view-scale for you. If your mobile device is none of predefined devices, Default View-Scale will be used. If it does not fit your device screen, you have to customize a viewscale for the device. See section View Scale Settings for details. MI Series Smart UI also remembers your primary task. For example, if you set FREEDOM as your primary task, the FREEDOM UI will be directly displayed after login without through Home page. Home Page Successful log in will bring you directly to the home page. You may see different home page screens depending on your mobile browsers. Below are home pages of a Simple UI and a Smart UI. Simple UI Smart UI © 2013 Rain Bird® Corporation 21 Rain Bird® MI Series Mobile Controllers User Manual The home page contains links to the major sections of the application. Areas/Stations or Satellites/Stations: This link takes you to the portion of Rain Bird MI Series Mobile Controllers which manages, monitors and controls sprinkler and their individual properties. Following this link to edit sprinkler data, monitor system performance by course-Hole-area-station, activate and cancel sprinklers individually or in groups. Programs/schedules: This link takes you to the portion of Rain Bird MI Series Mobile Controllers which manages, monitors and controls irrigation programs and their schedules. Following this link to edit program and schedule data, monitor system performance by program or schedule, activate and cancel programs and schedules. Accessories: The Accessories link takes you to the Accessories home page. The Accessories home page is where you find links to accessory applications such as SmartWeather, SmartPump and more. Available accessories depend on the licensing level of the logged on user. Diagnostics: This link takes you to the Diagnostics home page. Diagnostic tools are available for Professional users only and refer to specially designed remote troubleshooting tools for the centrally controlled irrigation system. Follow this link to access Decoder or LINK system diagnostics when troubleshooting these types of systems. Diagnostics ICM: This link takes you to the IC system module Diagnostics home page. ICM Diagnostic tools are available in Smart UI only for Professional users. These remote troubleshooting tools perform the same IC system diagnostics as you do those in the central-control application at office. Alarm Log: The Alarm Log link produces a printout of all alarm logs recorded in the Central Control system. Cancel All: The Cancel All link is the emergency stop for water. cancel any active irrigation. Select this link to Site: The Site link is used to select the map number, course number and box number you plan to work with. If you only have one map, course or box, you would not need to use this link. Preferences: This link is used to set Rain Bird MI Series Mobile Controllers preferences for the logged in user. User preferences control the viewing method, the preferred data view and other preferences. Exit: The Exit link is used to exit and log out from Rain Bird MI Series Mobile Controllers. Note: Some following sections may describe operations with Simple-UI screenshots only, but operations also apply to Smart-UI. Back To Top © 2013 Rain Bird® Corporation 22 Rain Bird® MI Series Mobile Controllers User Manual On-Screen Controls As stated many times before, using Rain Bird MI Series Mobile Controllers is like using a Web browser. It is IMPORTANT to note however that the look of these controls depends on the Web browser you are using. Rain Bird MI Series Mobile Controllers conforms to a standard used on most cellular phone micro-browsers. The designers of cell phone browsers are free to take in particular are continuously changing the look of these controls. It turns out however, that WML Standard refers only to the data format provided to the micro-browser for the convenience of cell phone design engineers. There is no current stand regarding the way the data is actually displayed in a micro-browser. Cell phone browser technology was less capable in the past and micro-browser designers had to find ways to take a standardized WML page then make it work on the small screen with limited color options and very restricted button control. Some of these creative solutions work quite well, others do not. The good news here is that a standard appears to be developing. In the last two years, powerful new cellular phone products with very sophisticated browser controls have become commonplace. As more people use this technology, it is driving the industry to seek better solutions and we are beginning to see much more usable Web page displays. Usually, while there is much variety in the look of these on-screen objects their function is clear. You will need to become familiar with the look and operation of each of these controls as they pertain to your particular cell phone micro-browser. This User Operation Manual will include comments on some of these variations in cases where they are known. You can find this information in the On-Screen Controls section of the Appendix. Operation Home After signing in you arrive at the home page. From here you can access all major areas of the system. Any time you see a Home link in Rain Bird MI Series Mobile Controllers, selecting it will bring you back to this home page. From the Home page you select from among the available links to perform an activity. The most important activities are sprinkler and irrigation program management. In addition to sprinkler and program management, there are diagnostic tools, user preferences and access to accessory and administrates features. Most of these links can be clearly understood by using them and reading the details provided later in this guide. Sprinkler and program management is often confusing at first so we will now focus on an overview of these areas. Using Rain Bird MI Series Mobile Controllers is like browsing the Internet. The particular device you use may take some getting used to, but Rain Bird MI Series Mobile Controllers itself was designed to help with that. To use Rain Bird MI Series Mobile Controllers, open your Web browser and key in the URL for your system. It is recommended that you save the Rain Bird MI Series Mobile Controllers as a Favorite on your browser to limit the amount of typing required. © 2013 Rain Bird® Corporation 23 Rain Bird® MI Series Mobile Controllers User Manual The Rain Bird MI Series Mobile Controllers log in page will appear and you will key in your User ID and password. After signing in, you will see the Rain Bird MI Series Mobile Controllers Home Page which looks like this. From the Home page, you use the links available to select your next activity. Items at the bottom of the page are used to configure Rain Bird MI Series Mobile Controllers settings when necessary. Items in the middle of the screen are remote control activities. The Stations link may indicate your preference for Satellites or Areas. The Accessories and Alarm Log links are only available to users with a Professional license so they may or may not be visible. The Cancel All link is used to cancel all currently active irrigation. Throughout the application, a Home link will bring you back to the Home page. A Back link will return you to the previous page. The links available on the Home page depend on the licensing level of the user. The following table summarizes the links by license. Back To Top © 2013 Rain Bird® Corporation 24 Rain Bird® MI Series Mobile Controllers User Manual User Preferences User Preferences is one of the most important parts of the remote application because these settings determine how most other screens will look. Many of the settings found in User Preferences will be changed daily or possibly more than once a day. The reason for this is that Rain Bird MI Series Mobile Controllers was designed to work on cell phones with very rudimentary keyboards. Some preference settings (Station-Data) are designed help reduce clicking be allowing you set the type of work you will be doing that day. Other preferences (QuickMethod versus Tree List) are used to offer control options which either make Rain Bird MI Series Mobile Controllers easier to use without training or give you a powerful control panel to work very quickly using customized commands. In this section, we will discuss each of the user preferences in detail. To change the default preferences, start at the Home page and select the Preferences link. The main screen for preferences will appear with a summary of your current settings. Preferences are assigned to individual users so the summary page identifies the user when it is displayed. Default Method The Default Method preference refers to the navigational method you prefer to use when working with Programs and Sprinklers. The Options are ―Tree List‖ and ―QuickMethod‖ and your current preference setting is identified in the link. The ―Cell Phone Numeric-Key‖ choice can be used with some cell phone to ensure that numbers are used when the numeric keys on your cell phone are pressed. Not all phones support this standard and the setting for Text versus Numbers must be set within the phone itself. To change the navigational method, select the Method: link and a screen with the available options will appear. Choose the option you prefer then save the settings using the and Sprinklers. button. Remember, this preference applies only to Programs Tree List This option is easy to understand because it causes Rain Bird MI Series Mobile Controllers to retrieve data lists from the central control and display them in logical groupings. The Tree List method is useful when you are not comfortable with the command codes used in QuickMethod. It can be awkward to use on certain types of cell phones however because it may produce many pages of information. © 2013 Rain Bird® Corporation 25 Rain Bird® MI Series Mobile Controllers User Manual QuickMethod The QuickMethod is a unique dialog screen designed to offer complete control over sprinklers and programs from a single screen. This input method is especially useful on cell phones because it offers a way to quickly and easily operate programs and schedules with the numeric keypad on a phone. The QuickMethod control panel can be seen here. This is for Sprinkler control when viewing by Area (another preference). The links you see on a QuickMethod control depend upon the context. This page has links for the Home page, course selection and the preferences main view. There are also links to some helpful information such as a station list, an area list, a command summary and some online help. The command buttons you see also depend upon the context. In this case, there are buttons to send an action command (turn on/off, etc.) get status, or edit sprinkler data. The two boxes on the screen are where you enter the command codes so Rain Bird MI Series Mobile Controllers knows what you want to do. Again, the purpose of the boxes will depend on the context, but in general, the box on the left (or top in some cell phones) is where you tell your Rain Bird MI Series Mobile Controllers what you want to do (Start/Stop/Pause) and the box on the right (or bottom in some phones) is where you tell Rain Bird MI Series Mobile Controllers what station or program the operation applies to. Default Station-View The Default Station-View Method is used to select between satellite view and area view. The default is Areas. When looking at the Preferences summary view, the Station-View: link will tell you what your current setting is. To change the setting, select the Station-View: link and the Default StationView page will appear. After choosing your setting, click the button to store this preference in the Rain Bird MI Series Mobile © 2013 Rain Bird® Corporation 26 Rain Bird® MI Series Mobile Controllers User Manual Controllers server. The new setting will remain in effect for your user name until you change it. Please note that change this setting will change the look and behavior of the sprinkler control pages. The sprinkler QuickMethod control expects different station identifiers depending on how you set this preference. Default Process The Default Process option is used to streamline your use of Rain Bird MI Series Mobile Controllers with certain operations. This option only applies to Sprinkler management when using the Tree List viewing option. To change this setting, pick your preference from the list and select the button. This setting is stored for your personal user name and will remain in effect until you change it. When a sprinkler is selected as an item in a Tree list, Rain Bird MI Series Mobile Controllers will use this setting to determine what page to display next – a sprinkler control page, a sprinkler status page or a data edit page. You may find it useful to change this option frequently. If you plan to spend the day conducting a sprinkler audit to make sure the central control database accurately reflects the rotor types and nozzles in the field, you might set the Default process to . If you are planning to use Rain Bird MI Series Mobile Controllers for hand-watering, you might prefer the setting. These settings can be changed are any time. They are provided as a convenience. Default Station-Data The Default Station-Data option is similar to the Default Process option in that is used to predict the type of station data screen to display when you select a station. It applies to both the QuickMethod control and the Tree List option. To change the setting, choose the option and select . The Default Station Data option will be saved with your user name and remain in effect until you change it. Once set, the option will help Rain Bird MI Series Mobile Controllers predict the type of sprinkler data you are interested in for more convenient operation. You can always change the setting and you may do this frequently. If you plan to spend your time editing runtime data, set Default StationData to and whenever you bring up a sprinkler data screen, you will get runtime data by default. Browser Settings The Browser Settings are used to help customize some aspects of screen format. Many of these settings may also be available on your cell phone. Using the options © 2013 Rain Bird® Corporation 27 Rain Bird® MI Series Mobile Controllers User Manual here may or may not be an improvement over the settings offered by your phone. To view your Browser Settings, select the Browser Settings link on the summary view. To change your settings, move your phone‘s selection cursor to the text box you want to edit. What happens next depends on your phone but it should be clear to you once you are familiar with your phone. You will then enter your new settings and select the Submit button to store that preference in the database. The settings here are applied to your user ID and remain in effect until you change them. Most Web browsers advertise their type when they hit a Web server. The Rain Bird MI Series Mobile Controllers server was designed to accept this information and in some cases, modify the data screens it returns to work better with the browser. For that reason, the top of the Browser Settings screen will identify the browser type and screen size when available. The browser type is displayed as a link and selecting it allows you to choose among the three basic browser types Cell-Phone, Pocket-PC and Win32/Apple. This feature is provided for future enhancements and there is no reason to make changes to the browser type settings at this time. Lines/Screen The ―lines per screen‖ option is used to break longer lists of information into convenient pages of text sometimes called ―pagination‖. This setting does not apply to all Rain Bird MI Series Mobile Controllers pages, only the screens where Rain Bird MI Series Mobile Controllers is dynamically displaying information from the central control. For example, a program list when viewed by Tree List would be limited by this Lines/Screen setting. This setting may not be needed on your cell phone. Some cell phones automatically paginate and have settings in the phone for this same purpose. Other phones have scroll bars that appear when they need to display more lines than will fit on the screen. Even on phones that have their own methods for dealing with lengthy lists, the lines per screen setting may be helpful. The lines per screen setting in Rain Bird MI Series Mobile Controllers is applied to the data by the Rain Bird MI Series Mobile Controllers server running on the irrigation central control computer – the setting on your phone applies those settings to data after it is received into the phones memory. Limiting lines per screen with Rain Bird MI Series Mobile Controllers will make the page load faster and also prevents crashing your phone‘s memory by trying to load too much information at once. Chars/Line The ―Chars/Line‖ setting is used to fix the width of the data displayed on the screen. As with Lines/Screen, the Chars/Line only applies to certain dynamically created screens displaying lists of information from the central control server. All Rain Bird MI Series Mobile Controllers screens are designed to wrap lengthy text onto the next line. Most cell phones also have a setting like this. Just like the Lines/Screen setting, Rain Bird MI Series Mobile Controllers applies this setting at the central control computer reducing the data which much be sent over the Internet and stored in the cell phone‘s memory. This means speedier downloads and few bytes of data transferred. It can also help improve the way text is displayed on screen in the cell phone micro-browser. For example, if your program names in the central control are © 2013 Rain Bird® Corporation 28 Rain Bird® MI Series Mobile Controllers User Manual so long they wrap around when viewed in the Tree List, reducing this setting will make the program names easier to read if they the first few letter in each program name is descriptive enough. At the schedule level, QIRR programs may all appear to have the same name if the Hole number is cut off. Fortunately you can either change the schedule names or realize that QIRR schedules are in Hole number order so the first schedule in a QIRR program is Hole number 1 and so on. Command Delimiter The Cmd Delimiter (Command Delimiter) setting is used to match the QuickMethod commands to the way your phone works. A command delimiter is a character used to separate two items in a list of commands. The default command delimiter is a blank space ― ―. Most, but not all cell phones are designed to easily enter a blank space using the ―0‖ button on the key pad. On other phones, typing a blank space may be very difficult, but there may be another keystroke such as the ―#‖ which is easier to enter. If typing a ―#‖ is easier on your phone than typing a ― ― you would want to change this setting. For example, with the default command delimiter of ― ― a command string in the QuickMethod might look like this . If you change the command delimiter to―#‖ the same command would look like this . There is no right or wrong value here. The choice depends on your preference and how your phone works, Command Definitions The Command Definitions setting is different than the other preferences. This setting is only available to users assigned the administrator role. The reason for this is that command definitions, once saved, apply to all logged in users not just the user ID who saved them. Making changes to these settings should be restricted to prevent confusion. Command Definitions allows you to customize the command codes to make them easier to remember, easier to key in on you cell phone or both. An administrator can select any of the supported QuickMethod commands using the drop down menu shown and define alternate codes for each command. Remember, each command has a numeric code so it can be conveniently keyed in on a cell phone‘s number pad. Some cell phones and PDA‘s have full QWERTY keyboards like a computer so there is no need to memorize numeric codes for Rain Bird MI Series Mobile Controllers. The QuickMethod is still the best way to use Rain Bird MI Series Mobile Controllers because it is very fast and flexible. Users of Rain Bird MI Series Mobile Controllers with advanced cell phones or PDA phones who also use the QuickMethod should use the text-based command codes. They are easier to remember, less prone to error and can be customized to suite your preference. You can define up to two alternate command codes for each command operations. Each command code must be unique. © 2013 Rain Bird® Corporation 29 Rain Bird® MI Series Mobile Controllers User Manual Once set, any time you select an Operators link a menu of defined operators similar to the one shown here will be displayed. In the list shown here, you can see each of the available command operations (Turn On, Turn Off, etc.) and the defined command codes. The numeric codes cannot be redefined. To stop schedule number 3 in program 4 using the numeric commands you would key in the following set of codes: Note: the use of a blank space as the command delimiter To stop schedule number 3 in program 4 using alternate command codes, you would enter this set of codes: Note: the use of a blank space as the command delimiter This is a simple example, but the control options available through the QuickMethod are extensive and you will find yourself using it all the time. Commands Operators Currently there are 9 commands available in Rain Bird MI Series Mobile Controllers. These 9 commands coupled with other parameters offer dozens of command options in a compact, easy to remember format. The 9 commands are listed below with functional definitions: Turn On (used with Send button): Turns on programs, schedules and sprinkler stations. Only one program at a time can be activated using this command, but multiple schedules can be listed. When used to turn on sprinkler stations, all sprinklers in an area can be turned on by leaving off the station numbers. If station numbers are added, one to all stations in an area can be turned at once by listing the station numbers after the Area. When the turn on command is used to operate sprinkler stations, the command code is typically followed by a runtime in the form which means turn on for 9 minutes. If a runtime is not included, Rain Bird MI Series Mobile Controllers assumes a default runtime of 5 minutes. Turn Off (used with Send button): Turns off programs, schedules and sprinkler stations. When used with programs, would turn off all stations being controlled by program 2. would turn off all stations being controlled by program 2 schedule 2. When used with Areas/Stations, it can turn off individual stations, several stations in an area or all the stations in an area. Block Turn On (used with Send button): The block command is only valid with sprinkler stations on the Area/Station QuickMethod control panel. The block command lets you turn on a group of stations by providing the first and last station © 2013 Rain Bird® Corporation 30 Rain Bird® MI Series Mobile Controllers User Manual in the list. For example will turn on stations 5T1, 5T2, 5T3, 5T4, and 5T5 for 4 minutes. This is the same as but easier to key into your phone. Block Advance (used with Send button): The block advance command is used to step through a set of stations running in a particular Area, Program or Schedule. This control is difficult to describe because it is influenced by Flo-Manager and other parameters in the central control. The best way to understand it is to try it. When a Block Advance command is issued on a particular Program, Schedule or Area, stations already running will stop and the central control will turn on as many of the next waiting stations as possible without exceeding any Flo-Manager or electrical demand limitations. Pause and Resume (used with the Send button): These commands are used to Pause and Resume programs, sprinklers and stations. The Pause command can be applied in the same way as the Off command. Sprinklers Paused with the Pause command is Paused until someone resumes them. The resume command resumes Paused stations, but there is a catch. Rain Bird irrigation systems run in real time with Flo-Manager manager making sure things happen safely. Real-Time means that if you Pause some sprinklers, Flo-manager will immediately detect the available flow and try to use it with some other stations. If other stations are running when you try and resume the Paused stations they may not turn on immediately because there is not enough capacity. Runtime Data, Device Data and Rotor Data (used with the Data button): These commands are used with the data button. When these commands are issued, Rain Bird MI Series Mobile Controllers will display the appropriate Rain Bird MI Series Mobile Controllers data screen according the command issued regardless of the setting used in User Preferences. View Scale Settings Smartphone browsers do not have windows — there are no scroll bars or resize knobs. Therefore, the "window" is a fixed size determined by the smartphone screen size. The user pans to see more of the webpage, and can also zoom in and out using double tap or the pinch gesture. Predefined View-Scales When a mobile browser first loads a webpage, it sets the initial scale to fit the webpage completely width-wise on the device screen, for example, width to 980 pixels on iPhone Safari browser. This shrinks the page contents to a small part of the page. You have to zoom in with pinch gesture. MI Series 3.2 or earlier includes five View-Scales for users to define their preferred view scales. MI Series 4.0 extends to 9 User-Definable View-Scales plus 6 predefined View-Scales for most popular mobile devices: © 2013 Rain Bird® Corporation 31 Rain Bird® MI Series Mobile Controllers User Manual Apple iPhone-1 Apple iPhone Apple iPad (include iPad mini) Android Phone Android Tablet 7‖ Android Tablet 10‖ The predefined view-scales are based on mobile browsers of Apple Safari and Google Chrome. View-Scale of Apple iPhone v1.0 is different from all later iPhone versions. This is why it is listed separately. These View-Scales are available at MI Login page. After select a right View-Scale before login, all MI pages will fit to your mobile device screen. Screenshot at right shows the View-Scales listed at an Apple iPhone. Automatic View-Scale If your mobile device is one of the predefined devices, MI Series 4.0 will automatically match a view-scale for your mobile browser. For example, if you are using an Apple iPhone, MI Series 4.0 will automatically select predefined Apple iPhone view-scale for you. If your mobile device is an Android tablet, MI Series 4.0 will select predefined Android Tablet 7‖ view-scale for you. If your mobile device is none of predefined devices, Default View-Scale will be used. If it does not fit your device screen, you have to customize a view-scale for the device (see next section for details). After you select or set a right view-scale for the device, MI Series 4.0 will remember your view-scale on the device (stored in your browser‘s cookies). Next time the remembered view-scale will be automatically used when you login MI. If you find the MI cannot remember your view-scale, please set your browser to ―Accept Cookies‖ at the browser‘s settings. Customize View-Scale The predefined View-Scales should work for most smartphones and tablets using Apple Safari or Android Chrome browsers. If none of predefined View-Scales works for your mobile device, you can customize a view-scale for the mobile device. At toolbar of the MI Home page, tap icon and ―Preferences‖ page will display. Tap ―View-Scale‖ link and ―View-Scale Settings‖ page will display with your current View-Scale, for example, Apple iPhone, in sample screenshot below. © 2013 Rain Bird® Corporation 32 Rain Bird® MI Series Mobile Controllers User Manual Tap the dropdown list and all View-Scales will be listed. Select ―Undefined – 1‖ to load the ―Undefined – 1‖ view-scale. Below are View-Scale settings that you need to modify to fit the device‘s screen. © 2013 Rain Bird® Corporation 33 Rain Bird® MI Series Mobile Controllers User Manual Property Value Name Text View-Scale name description you define. You cannot change predefined name such as ‗Apple iPhone‘. Initial_Scale Scale when a webpage is first displayed (range: 0.01 – 10). You need to change this value to fit your device screen. Usually 1.5 – 4.0 for screen of 3‖ – 10‖. User_Scalable Whether allow user change the scale using gestures or not. Most Android browsers require YES but Apple Safari needs NO for value. Visible_In_List Whether show this view-scale at Login page or not. Set YES to show this view-scale, or set NO to hide this view-scale. In sample screenshot at left, we renamed ―Undefined – 1‖ to ―My smartphone-1‖ and changed other settings (as shown on the screenshot). Then tap ―Submit‖ button to save changes to the database. If the saving is succeeded, you will see message ―View-Scale ‗My smartphone-1‘ changes saved‖ on screen. Next time when you go to Login page, ―My smartphone-1‖ view-scale will be listed on the page. Please note that the view scale settings control most pages in the MI Series except for log pages such as Alarm log, User activity log, and Weather data. These pages have wider width and are always scalable. Login page is also always scalable. Back To Top © 2013 Rain Bird® Corporation 34 Rain Bird® MI Series Mobile Controllers User Manual QuickMethod Operations The QuickMethod of control is a unique method for quickly and confidently managing sprinklers and programs. Most new users of Rain Bird MI Series Mobile Controllers start off using the Tree List approach because it is easier to learn. The QuickMethod of control however offers extraordinary power and flexibility with an easy to remember set of commands. These commands can even be redefined using the Command Definitions feature in User Preferences. QuickMethod is activated by setting it as the Default Method in User Preferences. When the Default Method is set to QuickMethod, selecting Areas/Stations, Satellites/Stations or Programs/Schedules from the Home Page will bring up a QuickMethod control panel like the one shown here. The look of this control panel will vary from one type of microbrowser to another, but all the information on the screen is always the same this control panel is used for Program and Schedule control. The Satellite/Station version and Area/Station version are very similar with minor differences in the links available on screen. On any QuickMethod control panel you will find two text boxes (see text boxes in the On Screen Controls section for more information on this type of control). Depending on the screen size of the phone, these boxes may be placed side by side or stacked on top of each other. The leftmost or topmost text box is always the command operator(s). The rightmost or bottom box always contains the operand. Command operators are codes which define the action you are trying to perform. Command Operators are codes which mean Turn On, Turn Off, etc. To see a list of available commands and their codes, click the Operators link. Operands are codes which identify the thing you are trying to control. Operands might be program numbers, schedule numbers sprinkler station ID or satellite addresses. You will also find some command buttons on the QuickMethod control panel. These buttons are used to execute commands, request status from the central control or bring up data screen for viewing or editing. All QuickMethod control panels have the Command Operator/Operand format in common. You can think about the Operator/Operand pair as: © 2013 Rain Bird® Corporation 35 Rain Bird® MI Series Mobile Controllers User Manual Allowable codes for each box in the control panel depend on what you are trying to do. For example, if you want to turn on a program, the only allowable codes are the Turn On codes 1, o and on. If you are trying to just turn on one sprinkler, codes in the Command Operator box are the codes for Turn on, and a number to indicate the number of minutes to run the station. If you try to act on an invalid code, Rain Bird MI Series Mobile Controllers will refuse to accept the command and post an invalid command message. It is possible to key in an entirely valid string of characters and act on them unintentionally. For example, the command string shown here is valid but may not be what you intended. Note: that both these sets of commands are equivalent This command will Turn On (1 or on) all stations on Hole 1 Green (1 1 or 1G). For this reason, some otherwise valid command strings are not allowed. For example the command string on the Area/Station QuickMethod control panel means Turn on (1) all stations on Hole 1 (1). Commands like this are dangerous and therefore not allowed. You will need to use other methods that require longer more complex strings of codes or alternatively write a program to do this and run the program from Rain Bird MI Series Mobile Controllers. Now that you have a basic idea how command strings work with the QuickMethod control panel, we will go through several sample command strings. The sample commands shown here are not meant to be a complete list of all possible commands, rather, these samples are meant to show what is possible. Recall that the QuickMethod control panel included three command buttons used to issue the commands to the server. Because command strings return different results depending upon the action you select, the samples below are grouped by action. Send (button or hyperlink) Program/Schedule Example 1: Turn on schedules 4 and 7 of program 2 on current course: OR - To issue action commands like on and off, use the Send button - Note „ „ blank space command delimiter Program/Schedule Example 2: Turn on Program 2 on current course: OR – Program number only means turn on the entire program Note: there are three optional command operators. The number (‘1’) is fixed and always means turn on. The other two (‘o’ and ‘on’) are user definable © 2013 Rain Bird® Corporation 36 Rain Bird® MI Series Mobile Controllers User Manual Area/Station Example 1: Turn on station 3 in Green Area (number = 1) of Hole 2 on current course for five minutes: OR - Green is Area #1 on this course - Notice the „ „ blank space command delimiter - When using area letter (G) „ „ delimiter is not required - Optional on command „o‟ is used In this example, a runtime of 5 minutes is on the command operator side of the equation. Rain Bird MI Series Mobile Controllers actually uses a default runtime of 5 minutes if no runtime is given so the following command string is equivalent to the ones above: Area/Station Example 2: Turn on stations 3, 4 and 7 in Green Area (number = 1) of Hole 2 on current course for five minutes: OR - Note all three stations separated by „ „ blank space. - Delimiter required so 3, 4 and 7 are not confused with 347 Area/Station Example 3: Turn on stations from 3 to 7 in Green Area (number = 1) of Hole 2 on current course for five minutes: OR - Note use of Command 3 – block turn on turns on stations 3,4,5,6,7 - Delimiter required so 3 and 7 are not confused with 37 Area/Station Example 4: Turn on all stations on Hole 4 Green Area (number =1 ) on current course for five minutes: OR - Leave station number off and all stations in are assumed - Delimiter not required in this case © 2013 Rain Bird® Corporation 37 Rain Bird® MI Series Mobile Controllers User Manual Status (button or hyperlink) Program/Schedule Example 1: Get current status of schedules 2 and 3 in program 4. - Status is retrieved by selecting the Status button. - Command operator codes are ignored by Status request. Program/Schedule Example 2: Get current status of Program 4. - Leave out schedule number for Program only Area/Station example 1: Get current status of station 3 in Green Area (number = 1) of Hole 2 on current course: OR - Note that delimiter is not required in this example. Area/Station example 2: Get current status of Green Area (number = 1) of Hole 2 on current course: - Leave off station number to get status of area. OR Area/Station example 3: Get current status of Hole 2 on current course: - Leave off area and station to get Hole status. Area/Station example 4: Get current status of current course: © 2013 Rain Bird® Corporation 38 Rain Bird® MI Series Mobile Controllers User Manual - Leave off Hole, area and station to get course status. - Course is selected on the Site link. Data (button or hyperlink) Program/Schedule Example 1: View or edit settings for Schedule 2 in Program 4: - Data is retrieved by using the Data button. Program/Schedule Example 2: View or edit settings for Program 4: - Leave off schedule number for program only. Area/Station Example 1: Get station data from station 3 in Green Area (number = 1) of Hole 2 on current course using the default data setting in user preferences: OR - Note use of alternate command operators. Area/Station Example 2: Get runtime data from station 3 in Green Area (number = 1) of Hole 2 on current course regardless of user preference setting. OR - This brings up the preferred default data form based on user preference. Note that station-data is by definition data assigned to a station. In the QuickMethod control panel for Areas/Stations, a station number is required or an error will be produced. Back To Top © 2013 Rain Bird® Corporation 39 Rain Bird® MI Series Mobile Controllers User Manual Command Options Override Default Run Minute If central-control application received Turn On or Block On command for a station or an area without run minute included in the command, 5 minutes will be used as default for the command. If you want to use your own default run minute to override the default in the central-control application, MI Command Options feature allows you to do it. At MI FREEDOM screen, tap Method screen, tap icon (at Quick- icon) to show settings screen (screenshot right). Tap Options link to display ―Command Options‖ screen (screenshot below) where you can put your own override minute. This override minute will be automatically added into your Turn On or Block On command if no run minute included in the command. If you do not want to override the default run minute in the central-control application, simply keep Override Minutes empty or set to ―0‖. Change Command Processing Time If your central-control application is version 7.6 or later, FREEDOM commands can be processed immediately or at beginning of minute. This feature applies to all commands in MI. You can choose which command processing time at FREEDOM simulator in the central-control application. You can also change command processing time at MI Command Options screen (screenshot right). This feature is not available on MI Command Options screen if your central-control application version is earlier than 7.6. © 2013 Rain Bird® Corporation 40 Rain Bird® MI Series Mobile Controllers User Manual MI FREEDOM Many Central-Control users have years of experience using Rain Bird FREEDOM system. To extend their FREEDOM experience from handheld radios to smartphones, Rain Bird MI Series 4.0 introduces MI FREEDOM user interfaces. In addition to existing action command set, MI FREEDOM also creates new status and data command sets for users to get irrigation status and edit data of stations, programs and schedules. MI FREEDOM provides two smartphone user interfaces for users to implement FREEDOM commands: (1) Handheld radio keypad user interface for users with years of handheld radio keypad experience (see screenshot at right); (2) Soft Keyboard user interface for users with good smartphone virtual keyboard skills. To see details, please read ―MI FREEDOM Manual‖ from Help menu of MI Configuration. Back To Top Diagnostics The Diagnostics link is only available to Professional users. Other licensing level will not have the Diagnostics link. Diagnostics are used to perform certain irrigation system diagnostics remotely. Availability of these options depends on you license level and the type of system you have. At this time, diagnostics are available for DECODER systems and LINK systems. If you do not have either of these system types, selecting the Diagnostics link from the Home Page will bring you to the Diagnostics selection page with only an Irrigation Mode link as shown in the picture to the right. The Irrigation Mode link is used to test the central and see if it is in Irrigation Mode. Selecting this link will run the Irrigation Mode query and return the system‘s irrigation status – either ―Irrigation is running‖ or ―Irrigation is not running‖. © 2013 Rain Bird® Corporation 41 Rain Bird® MI Series Mobile Controllers User Manual LINK Diagnostics Rain Bird LINK systems will include the LINK-System link as shown here. The LINK test is used to query the central control and return the LINK status for all online radios by channel. This is the same diagnostic available through the Monitor Log/Link Diagnostics view in your central control. LINK diagnostics are a measure of radio performance. LINK systems continuously check radio status when the central control is running. The diagnostic is the ratio of calls to and responses from each satellite expressed as a percentage. 100% is perfect communication, 0% would be no communication. The diagnostics is tagged as Pass, Check or Fail depending on the percentage. To perform the LINK diagnostic test, select the LINK-Test link. This brings up the LINK System Diagnostics control panel. Begin by selecting the box which controls your LINK system. If there is only one LINK box, it will be automatically selected. The checkbox is used if you want to include unused channels in the test. Unused channels are channels that have been defined in the central, but are not being used by any stations. Normally you will not have many channels like this. After selecting the box, press the button. This brings up the wire group selection box. Choose the wire group you want to test and then press the button. This brings up the Channel selection box. At this point you have two choices. You can select a channel and use the button to return only the LINK diagnostic for that channel. Alternatively, you could use the button to run the test on all channels on the group. Test results are returned in the format shown here. For additional information on interpreting LINK diagnostics, instructional material is available from Rain Bird. Decoder Diagnostics Decoder diagnostics with Rain Bird MI Series Mobile Controllers are a subset of the diagnostics available at the central control. For a complete explanation of the decoder diagnostics available from your central control, please refer to the decoder system manual. The two test modes available with Rain Bird MI Series Mobile Controllers are: 60 Hz Decoder Test Mode also known as the fault-finding © 2013 Rain Bird® Corporation 42 Rain Bird® MI Series Mobile Controllers User Manual mode On/Off Decoder Test To access the decoder diagnostics, select Diagnostics from the Home Page. This brings you to the Diagnostics selection page. If your central control includes a decoder interface, you will see ―Decoder Diags‖ link to Decoder Diagnostics page. Because running decoder diagnostics will cancel ongoing irrigation or prevent irrigation from starting, the Decoder Diagnostic panel includes two supplementary queries. The Decoder Mode link and the Irrigation Mode link are provided to query the central for status when using the decoder diagnostics. When selected, the Decoder Mode link will attempt to determine the current irrigation mode at the central. The possible responses are: Query Result System in irrigation mode Box # selected On/Off Testing Box # selected In 60 Hz test mode box # selected Meaning Decoder diagnostics not active – system will irrigate Decoder diagnostics window is open by local user. Test cannot be determined, but box # should not be used for irrigation until local user is finished. System is performing an On/Off test – box # cannot be used for irrigation 60 Hz mode enabled – box # cannot be used for irrigation The Irrigation Mode link is used to see if the system is currently irrigating because running a decoder diagnostic will cancel any active irrigation. Results of this query are: Query Result Meaning Irrigation is not running The central is not currently running any water. It is safe to run the decoder diagnostic Irrigation is running The central is currently irrigating. You should wait to run decoder diagnostics Query decoder test mode: Succeed. Indicates the test mode query was successful Use of these queries is optional. If you know it is safe to run the diagnostics, there is no need to perform the queries. If there is a chance that another system user may be running water or using the decoder diagnostics, you should run these two tests. Decoder Diagnostic Rules: 1. Allow only one user to process Diagnostics tests. 2. Local user has priority over the remote users. If a local user starts a diagnostic test, remote user access will be terminated and blocked. 3. A local user should close the Diagnostics form when finished. Otherwise it will block remote users to process the tests. © 2013 Rain Bird® Corporation 43 Rain Bird® MI Series Mobile Controllers User Manual 60 Hz Mode With Rain Bird MI Series Mobile Controllers, you can remotely toggle the 60 Hz decoder system test mode on and off. The 60 Hz mode places a tone onto the field wires of a decoder interface box so a clamp meter can be used on the wire path to search for line breaks or bad decoders. Use of the clamp meter is covered extensively in the Decoder System Manual. Before toggling on the 60 Hz mode, verify the central is not currently irrigating and no one else is currently running a decoder test. You do this using the Query links discussed in the previous section. After ensuring it is safe to continue, select the Decoder – 60Hz link. The 60 Hz Test control will appear. Any boxes defined as decoder interfaces will be listed as MDI Box#. In the text box, enter the box number you want in 60 Hz mode and select the button. At the central control, the Decoder Diagnostic window will open and the decoder interface will be placed in 60 Hz mode. The decoder diagnostic window is displayed at the central to inform someone who walks up to the computer that testing is in progress. Closing the decoder diagnostic window at the central will cancel the 60Hz mode. Decoder On/Off Test The On/Off test is a basic decoder mA test. It is useful to determine if the decoder will respond to the standard on command. In this test, the decoder is sent an On command and three current samples are taken at 40 ms intervals. The first sample is the ―before‖ current, the second sample is the ―inrush‖ current and the last sample is the ―after‖ current. If either the inrush or the after current exceeds the before current by 25 mA, the decoder passes. If not, the decoder fails. To initiate the Decoder On/Off test, select ―Decoder Diags‖ from the Diagnostics Page then select On/Off Test from the diagnostic selection screen. This brings up the On/Off Test control panel shown here. Because the On/Off test will cancel any currently running irrigation you should use the decoder mode and irrigation mode links to make sure it is safe to proceed. If you continue even though irrigation is active, a message ―Irrigation is interrupted” will be returned. If it is, enter a decoder station ID in the text box then select the button. At the central, the decoder diagnostic window will open and an on/off test will be initiated. This is done to inform a local user of the central control that decoder testing is being performed. When the test finishes the results will be displayed as shown here. Terminating the Tests When finished testing, you should go back to the Decoder Diagnostic Selection page and select the Terminate Tests link. This will place the system back in irrigation © 2013 Rain Bird® Corporation 44 Rain Bird® MI Series Mobile Controllers User Manual mode and close the decoder diagnostic window at the central. The Terminate Tests link cannot override testing launched locally at the central. If the decoder diagnostics window was opened locally at the central rather than via Rain Bird MI Series Mobile Controllers, you will receive a message which says ―Test mode not set by Rain Bird MI Series Mobile Controllers‖. Just like performing these tests from the office, it is possible for other users to interrupt the test. While Rain Bird MI Series Mobile Controllers can tell if a local user is running decoder tests, it cannot tell if decoder tests are being run by another Rain Bird MI Series Mobile Controllers user. If you are not certain there are no other users performing decoder diagnostics, it is always recommended you use the Decoder Mode and Irrigation Mode links to check the status of the system before proceeding. ICM Diagnostics ICM diagnostics are available only at Smart UI of Rain Bird MI Series Mobile Controllers. If your central control includes an ICI interface, the ―ICM Diagnostic‖ menu will appear at Diagnostics page. Select ―ICM Diags‖ menu from the Diagnostics page. This brings you to the ICM Diagnostics selection page that lists function menus as shown here. Station Diagnostics Select ―Station Diagnostics‖ menu from the ―ICM Diagnostics‖ page. ―Station Diagnostics‖ provides all ICM tests on a single ICM station. First make sure the current course # is what you want to work on. If not, you can click ―Change Courses‖ link to select a course as current course. Second you must input station ID information. For example, input 1G5 (or 1 1 5) that means Hole-1, Green area, and station number-5 (as figure shown here). Click ―Run Diagnostics‖ button to start the tests. You will get test results in a few seconds. Typical results would look like: --- ICM Station Status --Status: Off Voltage: 21.31v Connect: Fast Connect ------Box: 1 Group: 2 Long Address: 2372 Channel: 9 Station 19 You can also quickly check a station here. First input © 2013 Rain Bird® Corporation 45 Rain Bird® MI Series Mobile Controllers User Manual ―Run Minutes‖, for example one minute. Then click ―Turn On‖ button to see if the station can be turn on or not. After the station is on, click ―Turn Off‖ button to see if the station can be turn off or not. Address Connect If ICM addresses are changed, the changes will not take effect until they are programmed to ICMs. If you change ICM station addresses by MI, MI will provide an option for you to connect changed ICM addresses to ICMs. If you forget to do this, sometimes the central control will do Fast Connect Programming process that sends changed addresses to ICMs, but you do not know when. If you doubt some issues might be caused by ICM address changes, you can request the central control send all changed ICM stations address to ICMs. Select ―Address Connect‖ menu from the ―ICM Diagnostics‖ page. Then click ―Connect Addresses‖ button to request the central control start Fast Connect Programming process. The process may take several minutes to finish. Faults Finding Select ―Faults Finding‖ menu from the ―ICM Diagnostics‖ page. The 'Faults Finding' process will poll status of all ICMs in entire system to find fault ICMs and store results in 'Faults Report'. The process is also called 'System Poll' at central control. Click ―Start Process‖ to start the process. It may take several minutes to finish. You have to wait for a few minutes to see results at ―Faults Report‖ page. Faults Report Select ―Faults Report‖ menu from the ―ICM Diagnostics‖ page. ―Faults Report‖ page only lists ICM stations that failed for status-poll in latest 'Faults Finding' process. Stop Faults Finding After you started 'Faults Finding' process by MI but want to stop it for some reasons. Select ―Stop Faults Finding‖ menu from the ―ICM Diagnostics‖ page and click ―Stop Process‖ button. Please note that MI can only stop current 'Faults Finding' process that was launched by MI. MI cannot stop ―System Poll‖ process that was launched locally by central control users. Station Finder After replaced a broken ICM module with a new one in field, you need to change the station‘s long address to the new ICM long address in central-control database. The first job is to find which station that has old ICM long address in the database. The ―ICM Station Finder‖ is designed as field tool to do this job. Select ―Station Finder‖ link at ―ICM Diagnostics‖ page and ―ICM Station Finder‖ page will display. Input the old ICM long address, for example, 31AE7. Click ―Find‖ button to find the station. If the station is found, it will be displayed on the page, for example, ―Station Course-1: 1S3 has the long address‖ (screenshot below). If you want to change the old ICM long address to the new one, click ―Data‖ button. You will be navigated to ―ICM-Address Data‖ page (screenshot below) where you can clear the old long address and input the new address. Then click ―Submit‖ button to update the database with the changes. © 2013 Rain Bird® Corporation 46 Rain Bird® MI Series Mobile Controllers User Manual Accessories The Accessories link is used to access several accessory options within Rain Bird MI Series Mobile Controllers. Accessory options include SmartWeather, Smart Pump and other important options. The Accessories link takes you to the Accessories selection page. From the Accessories selection page you choose the accessory item you would like to work with. The Accessories selection page contains link contains a Home link which returns you to the Home Page. The golf course name will also be show on this page below the page title. The links you see on this page depend on the user, their license level and the administrator setting. The table below summarizes the available links by license type: © 2013 Rain Bird® Corporation 47 Rain Bird® MI Series Mobile Controllers User Manual Link Name Basic Advanced Professional Admin. Water Budget (rel. 2) Demand Flow SmartPump SmartWeather Activity Log Online Users In this table you see that the Water Budget link is only available to users with a Professional license. You also see that the Activity log is available to all license levels, but the Administrator role must also be assigned to this user. Water Saver The Water Saver link adjusts the System Waterbudget setting in the central control application. Water Saver is only available to users with the Professional license. Available settings are from 0% to 300% just like the central control. Changing this setting will cause ALL runtimes in automatic programs and schedules to have their runtimes adjusted by this percentage. The Rain Bird MI Series Mobile Controllers Water Saver screen is shown here. The top portion of the screen is used to set a System Waterbudget. Enter the percentage desired in the box proved then select the button to update the setting in your central control. The lower portion of the Water Saver screen is used to set the central control System Mode. To set the System Mode, 0=Off and 1=On. Entering a 0 (zero) in the box provided, the selecting the button will place the central control in Auto: OFF mode which means the central will not respond to any automatic starts. Manual operation of the central is still possible but programs will not start at the scheduled start time. To return the system to Auto: ON mode, enter a 1 (one) in the box provided and select the button. Demand Flow The Demand Flow link, available to Professional and Advanced users, brings up the demand flow screen. Demand Flow, also called theoretical flow, refers to the flow rate your central has determined should be coming from your pump station. This value is a mathematically calculated value determined by adding up all station demand sprinkler by sprinkler. Just like your central, demand flow in Rain Bird MI Series Mobile Controllers is reported on a per pump basis so the Demand Flow lists each pump defined in the central control along with the current estimate of flow. Total Flow is the sum of all flow rates from all pumps. Flow rates © 2013 Rain Bird® Corporation 48 Rain Bird® MI Series Mobile Controllers User Manual are reported in the units indicated by your central control. request are displayed for reference. The date and time of the The flow rate reported by the Demand is the same information reported in the central control‘s Flow Bar for that pump station. The flow bar in your central is the icon near the top of the computer screen which looks something the picture here. The Demand Flow link has a Back link and a Home link. The Home link returns you to the Home Page. The Back link returns you to the Accessories selection page where you can select another accessory to work with. SmartPump The SmartPump link is available to Professional users only. SmartPump is a feature of Rain Bird central controls which integrates the central with the pump station. For more information on SmartPump and its features, see the SmartPump User Operation Manual. With SmartPump, the central always knows the current pump station capacity, the current station discharge rate and the current system pressure. In Rain Bird MI Series Mobile Controllers, the SmartPump link will display current pump station discharge rate, discharge pressure and station capacity. The units of flow are displayed using the settings defined in your central control. To use this feature, select the SmartPump link and you will see the SmartPump station selection page. All pump stations linked to the SmartPump feature in your central will be shown. Pump stations which have not been designated as SmartPump stations will not be listed. The SmartPump stations appear as links followed by the word Active or Not Active. Active means that for this SmartPump station, SmartPump is active and Rain Bird MI Series Mobile Controllers can report pump station data. This setting is the Rain Bird MI Series Mobile Controllers version of the SmartPump Active checkbox in the SmartPump configuration screen in your central control. It is not recommended to keep SmartPump active for any pumps if you plan to run uncontrolled flow. For example, during the day if you plan to use quick-couplers to water, SmartPump should not be active because SmartPump cannot distinguish between excess flow from an unexpected line break and intentionally opening a manual valve for watering. With Rain Bird MI Series Mobile Controllers, all commands to run water are controlled by the central and are fully flow managed. This means Rain Bird MI Series Mobile Controllers is a great way to hand water during the day while still keeping SmartPump active. © 2013 Rain Bird® Corporation 49 Rain Bird® MI Series Mobile Controllers User Manual To use the SmartPump feature in Rain Bird MI Series Mobile Controllers, select the SmartPump station you want to view from the list. A SmartPump data page will be displayed for that station. The SmartPump data page identifies the pump by number. If the pump has SmartPump active, the data page will show Available Capacity, Actual Flow and Pressure. This information is retrieved in real-time from the pump station via SmartPump. It is important to note that Available Capacity is as reported by the pump station – if a pump in the station is not working, available capacity will be reduced accordingly. Similarly, Actual Flow is the real-time discharge rate from the pump station. The Flow Rate and pressure shown on the SmartPump data page are the same as the Flow and Pressure windows at the bottom of the Front Office of your central control. Under normal circumstances, this number is either slightly more or less that the theoretical value but rarely the same as Demand Flow page discussed earlier. Small discrepancies between the Actual Flow reported by SmartPump and Demand or Theoretical flow reported by your central are normal. Larger differences may indicate a problem with the pump station, underground piping or sprinklers. The SmartPump data page has links for Home, Back, as well as buttons for and / . The Back link returns you to the SmartPump selection page. The button refreshes the pump station data. The / buttons allow you to remotely turn SmartPump on and off for that particular pump and toggles the ―SmartPump Active‖ checkbox in your central control. To deactivate SmartPump, you key in a 1 or ‗y‘ or ‗Y‘ into the box provided to confirm your intentions then select the button. SmartWeather The SmartWeather link is only available to Professional users. Using the SmartWeather link, users with a Professional license can view weather information and initiate a data download from the weather station. Rain Bird central controls support up to five independent weather stations. The weather information in Rain Bird MI Series Mobile Controllers is presented one station at a time. To view weather information, click the SmartWeather link and the weather information control panel is displayed. Select the weather station number from the drop down menu, then using the buttons below to get weather information. The Weather Information page contains a Home link and a Back link. The Home link returns you to the Home Page. The Back link returns you to the Accessories Selection page. The activity buttons are described below. Download Data: This button will cause SmartWeather at your central control to communicate with the weather station and retrieve the most current weather data. When you depress button, you will receive a message from the Rain Bird MI Series Mobile Controllers server indicating the request was received and © 2013 Rain Bird® Corporation 50 Rain Bird® MI Series Mobile Controllers User Manual telling you the process may take a minute. Inside the office, your central control will be initiating a manual download to retrieve weather data. You will need to wait a few minutes before checking the weather data using button discussed below. It is not required that you download 24-hour data before checking 24-hour data – you only need to download if you want up to the minute information. Collected 24Hr Data: This button retrieves the 24-hour data from your weather station as it was recorded during the last weather station download. The data presented here is summarized over 24 hours. Just like in the central control, the ET value displayed refers to inches of water used by the turf during the 24 hours preceding the download. The 24-hour data page has a date and time stamp. If you need more current information, choose the Back link and then depress the button. Wait a few minutes to let the download process complete and return to this page. If the date and time stamp has not changed, it means the 24download has not yet finished. Process Log: The Process log button download the SmartWeather process log. This is a diagnostic tool which is normally not needed. If you attempt to download 24-Hour data and receive a message indicating a problem, or the 24-hour data will not update to the current time and date, you may wish to review the process log. In the process log you will see all the communication activity logged by SmartWeather including download errors. You can see this same information in your central control by choosing the ―View Communication Log‖ button in SmartWeather. Activity Log The activity log is available to any user with who has been assigned the Admin. role. This log shows all Rain Bird MI Series Mobile Controllers activities performed by logged in users and is maintained for 12 months. Time is displayed in 24-hour format. This is done to make it easier to fit the information on the small screen of a micro-browser. Log text is wrapped into the next line unless the settings in your phone are configured differently. The ―Lines/Screen‖ setting under Rain Bird MI Series Mobile Controllers user preference is honored by this page. When more lines are to be displayed, pagination buttons will appear at the bottom of the page. Optionally, you could set ―Lines/Screen‖ to a much higher number like 100 and use the scrolling capability of your cell phone to scan down the list. The activity log is searchable using the box at the top of the screen. Type the text to search such as a date and select the button. © 2013 Rain Bird® Corporation 51 Rain Bird® MI Series Mobile Controllers User Manual Online Users The Online Users link is available to any user who has been assigned the Admin role. When viewing this page, a Rain Bird MI Series Mobile Controllers administrator can see exactly which users are currently online and also, remotely disable the account of any online user. After selecting the Online Users link, the Online Users list is displayed. Users are identified by name and license type. Notice that each of the listed online users is also a link. An administrator selects on of these user links will see ―User Kill‖ page for that user. Select the button and that user‘s account will be disabled at the Rain Bird MI Series Mobile Controllers server. You must return to the office to reactivate this user account. What actually happens is selecting the button changes the assigned role for that user to . To re-activate that user, go back the office, launch Rain Bird MI Series Mobile Controllers Configuration, bring up the User Management page and set this user back to the appropriate role. Alarm Log The Alarm log is found on the Home Page. This feature is available to Advanced and Professional users, but not Basic users. Selecting Alarm Log from the Home Page brings up the Alarm Messages page. The alarm messages page will show all alarms currently posed in the Alarm Center in your central control. Alarm events are copied directly from the central control and displayed in the format user there. Log text is wrapped into the next line unless the settings in your phone are configured differently. The ―Lines/Screen‖ setting under Rain Bird MI Series Mobile Controllers user preferences is honored by this page. When more lines are to be displayed, pagination buttons will appear at the bottom of the page. Optionally, you could set ―Lines/Screen‖ to a much higher number like 100 and use the scrolling capability of your cell phone to scan down the list. The date format used is shorted to month and day (no year). The time format is 24-hour. The same information can be found in your central control by viewing the alarm center. © 2013 Rain Bird® Corporation 52 Rain Bird® MI Series Mobile Controllers User Manual Cancel All Irrigation The Cancel All link found on the Home Page and is available to all users. This command is used to stop all currently running irrigation being controlled by the central. The behavior of this command is identical to the selecting the ―Cancel All‖ clicking the Water Saver command in FREEDOM or button in your central control which can be found by button. After selecting the Cancel All link a control will appear. This control is provided to ensure you really intend to turn off all irrigation. From the control, place a ‗1‘ or ‗y‘ in the box provided then select the button. The Rain Bird MI Series Mobile Controllers server will respond with a message indicating the command was received and all irrigation will be canceled in the central control. Just like the FREEDOM command or selecting ―Cancel All‖ in your central control, this command stops currently running irrigation, but does not prevent your system from automatically launching future programs. In other words, the control does not change this to this . Back To Top © 2013 Rain Bird® Corporation 53 Rain Bird® MI Series Mobile Controllers User Manual Site Settings The Site link is available to all users. This feature is used to establish the high level system or Site settings for Rain Bird MI Series Mobile Controllers. For example, if you have multiple courses assigned in your central, you select the one you want to work with in this area. Selecting site options in this way simplifies other areas of Rain Bird MI Series Mobile Controllers by not requiring you to indicate a Course Number each time you use the remote. The settings are not required for everything you do with Rain Bird MI Series Mobile Controllers. When they are required, a Site link is provided to easily change these settings. To use this control, select the Site link from the Home Page and the Site Settings panel will appear. From the Site Settings panel you can assign Map#, Course# and Box#. The current settings are indicated by the link as a number after the link‘s description. When the Map# link is selected, the Map List is displayed. Maps in this list are taken directly from the maps defined in your central control. In most cases, only a single map is defined, or if there are 2 or more maps, only Map 1 is used. In some cases, multiple maps are used. If you are not sure which case applies to you, the single map case most certainly does. On the Map List, select the map you want to work with then select the button to save the setting in your Rain Bird MI Series Mobile Controllers server. The Map link is depended upon the defined maps in your central control. Blank, unused maps without programs or stations will not appear in the pick list. Only active maps are shown. When the Course# link is selected, the Course List is displayed. Courses in this list are the courses already defined in your central control. On the Course List, select the course number you want to work with from those available and select the button to save the setting in your Rain Bird MI Series Mobile Controllers server. When the Box# link is selected, the Box List is displayed. Boxes refer to the field interface boxes set up in your central control. On the Box List, select the box number you want to work with from those available and select the button to save the setting in your Rain Bird MI Series Mobile Controllers server. Back To Top © 2013 Rain Bird® Corporation 54 Rain Bird® MI Series Mobile Controllers User Manual Programs/Schedules Before covering how Rain Bird MI Series Mobile Controllers work with Programs and schedules, it is useful to review the way irrigation programming works with Rain Bird centrals. In a Rain Bird system, Programs are containers for schedules. Schedules are containers for lists of sprinklers. This diagram shows the relationship between Programs, Schedules and Station Sequences using a file cabinet as the analogy. In this diagram we have one program (Program 1: Greens) – this is the file cabinet itself. The program contains three schedules for Hole 1, Hole 2 and Hole 3 – the schedules are the drawers of this file cabinet. Inside the drawers are file folders. Inside the drawers are file folders. The file folders contain the list of stations to be run by the schedule (drawer) that contain them. Notice the Program is set to run at 8:00 pm (2000). The schedules for Hole 1 is set to start at 8:00 pm (2000), the schedule for Hole 2 is set to start at 8:30 pm (2030) and the schedule for Hole 3 has no start time. In Rain Bird systems, schedules without a start time (the default) assume the start time of the program – so in this case, the start time for schedule 3 is 8:00 pm (2000). Now that we see how the programs and schedules are set up, we can discuss what actually happens. At 8:00 pm (2000) the Rain Bird central is asked to go to then File Cabinet for program 1 this launches the program and allows the schedules (drawers) to be opened. The Rain Bird system examines each drawer to find any that should be opened right away. In this case Schedule 1 and Schedule 3 should be opened. Schedule 2 is not to be opened until 8:30 pm (2030). The Rain Bird system then opens schedules 1 and 3 to read the folders inside. The folders tell the central control what stations to run and for how long. At 8:30, the central control opens schedule 2, reads its folder and begins signaling those stations to turn on. Rain Bird centrals offer a quick way to write programs called QIRR. QIRR automatically writes programs and schedules according to a specific organization. All QIRR programs are written with Programs organized by Area and Schedules organized by Hole. A Typical QIRR program would look exactly like the one in the diagram above. The program might be called greens and it will contain 18 schedules – one for each Hole. Each schedule will contain only the greens stations on that particular home. This is the most convenient way to write and manage your programs. Rain Bird does not require that you write your programs this way. There are many ways to organize your programs. You can put any kind of schedule with any list of stations in any order you like. For more on writing and using programs, see the User Operation Manual supplied with your central control. © 2013 Rain Bird® Corporation 55 Rain Bird® MI Series Mobile Controllers User Manual Licensed Features Rain Bird MI Series Mobile Controllers cannot write new programs remotely. Rain Bird MI Series Mobile Controllers can however manage these programs allowing you to turn them on and off, change start times and days and much more. The Options available to the user with programs and schedules depends on the licensing level. The following table provides an overview of these licensed options by license type. Basic Basic Advanced Professional Execute Programs Get Status Edit Data Execute Schedules Get Status Edit Data Operation Methods The Programs/Schedules link is one of the areas most significantly affected by User Preferences. Depending on your selection for Method, Process and View (see section on User Preferences earlier in this guide) The Program/Schedule views will change. The most important of these preferences is the View preference. The options are Tree List and QuickMethod. Toggling between these two methods dramatically change the way information is displayed and commands are issued. The pictures below show examples of these two alternate viewing methods. The pictures here are Tree Lists. The Tree List shows lists of data in an organized way. In the pictures shown here, all the programs assigned to Map-1 are listed. The user selected the QIRR Prog. No. 1 program link and all the schedules inside that program were listed in the next picture. You can see the selected Program-1 at the top of the list in the second picture with all the schedules below offset slightly to indicate they are a subset of Program-1. All Tree Lists work this way. Tree lists are subject to the lines per page setting in the Device category of user preferences. When the list of programs or other items exceeds your lines per page setting, pagination buttons will be provided (see sections on pagination earlier in this User Operation Manual). © 2013 Rain Bird® Corporation 56 Rain Bird® MI Series Mobile Controllers User Manual The picture on the right is the QuickMethod view. The QuickMethod allows you to do everything the Tree List does with almost no clicking, selecting or scrolling. Using a special set of command codes (see command code chapter earlier in this document) this simple control panel is the only screen you need to use Rain Bird MI Series Mobile Controllers. Because the View preference so fundamentally changes the way you use Rain Bird MI Series Mobile Controllers, this section will describe of these viewing methods separately. Tree List Operation If your preference for View is set to Tree List, Programs and Schedules will appear as tabbed lists of programs and schedules. Upon selecting a Program link such as the Link you will see a Tree List of Schedules as shown here. Your list may be different from the one you see here because the list is drawn directly from the programs defined in your central control. On this page the Home link will take you back to the Home Page. When you select a program from the list happens depend on your setting of the command and your user preference for ―Process.‖ Clicking the command will cause it to toggle between and you user preference for ―Process.‖ If your ―Process‖ is set to the will default to which means selecting the Program name or a Schedule from this list will automatically retrieve the ―Execute Command‖ control. If the command is set to a selection screen will be displayed and you can select the process you want to use next. The options for and the associated process are presented in the table below. The table on the next page displays all possible combinations of Default Process options. Command QuickMethod Operation The QuickMethod is a unique type of control designed to give you quick access to the entire suite of program and schedule options. Use of the QuickMethod control is covered earlier in this User Operation Manual. Options available in Rain Bird MI Series Controllers are determined by your license level as discussed earlier in this User Operation Manual. © 2013 Rain Bird® Corporation 57 Rain Bird® MI Series Mobile Controllers User Manual In contrast to the pages of controls just described for Tree List, the QuickMethod has only one control panel. The QuickMethod control panel may seem intimidating at first, but once you learn to use it, you will find it is much faster and simpler than the Tree List approach. The QuickMethod section of this User Operation Manual Program Screen Schedule Screen Command described the command codes in detail. In this section we will focus on using the QuickMethod with programs and schedules. To access the QuickMethod control panel, start at the Home Page and select . From the User Preferences summary page, ensure the QuickMethod option is selected. With QuickMethod selected as your preference, begin at the Home Page and select the link. This will bring up the QuickMethod control for programs and schedules. A link is provided to see a quick list of © 2013 Rain Bird® Corporation 58 Rain Bird® MI Series Mobile Controllers User Manual available program numbers. A schedules in the selected program link is provided to see a quick list of available QuickMethod controls are distinguished by the two text boxes in the middle of the control. These boxes may appear side-byside or they may be stacked on top of one another. This depends on your cell phone or Web browser. The first box (top or left depending on your browser) is used for commands – what you want to do. For example, commands like turn on, turn off, Pause, etc. all go here. To see the list of available commands and the defined command codes, select the link. An example of the available commands is shown here. The second box, (bottom or right side) is used to identify to whom the command in the other box applies. For example, to turn on program 1, schedule 1, the two boxes might look like this. Remember that the command delimiter – a character used to separate command codes, is a blank space by default but can be changed to any character easily entered with your cell phone. You make this change in User Preferences under . An equivalent form of this command using the commands or ―operators‖ defined in this example, would look like this. Notice also that the QuickMethod control has buttons , and . These are also the three Processes which can be selected as user preferences. With the QuickMethod, the Default Process is not required because you can select the process directly from the control. Send Command The button is used to send the commands in the left hand or topmost box. When this button is selected, the command sent for the program or schedule identified in the right hand or lower-most box. In the example above, to send a command to turn on Program 1, Schedule 1 you select the the command for (Prg 1, Sch 1). button which issues To turn on all the schedules in program 1, the second box (right or bottom) would contain only the identifier for the program. In other words, instead of keying in you would only key in a to identify Program 1. With that change, any commands executed from the command box (left or top) would be applied to Program 1 and all the schedules contained within it. © 2013 Rain Bird® Corporation 59 Rain Bird® MI Series Mobile Controllers User Manual Pause ( ) and Resume ( ) commands apply only to schedules. They have no effect on programs just like their FREEDOM System counter parts. The Pause command can be used to temporarily suspend operation for one or more schedules. Once Paused, schedules remain in this state until a resume command is executed. Status Command The button returns the current status of the item identified in the second (bottom or right) box on the control. If you enter only a program number, you will get program status. If you enter a program number and a schedule number separated by the command delimiter (blank space by default) you will get the status of the schedule. You can only get the status on one schedule at a time. A typical Program status screen is shown here. A typical Schedule Status screen is shown here. Note the difference between a program status window and a schedule status. Program status identifies the schedules running within the program. Schedule status identifies the stations running within the schedule along with their soak status. Data Command The Data view allows you to view and edit program and schedule settings. You cannot write new programs or schedules and you cannot change the sequence of stations within the schedules. You are able to remotely modify other program and schedule settings including start times. The Program Data view is shown here. The selected Map and Program are shown. © 2013 Rain Bird® Corporation 60 Rain Bird® MI Series Mobile Controllers User Manual The following program settings are possible: Option Description This setting is identical to the Auto setting for programs found in your central control. Placing a checkmark in this checkbox means this program will start automatically at the assigned day and time. If the box is unchecked, the program can still be run manually, but it will not start automatically. This setting is identical to the ET setting for programs in your central control. A checkmark in this box means the program will determine runtimes based on ET. If this box is unchecked, the runtime values programmed into the station sequent for schedules in this program will be used. The Water% setting is identical to the Waterbudget setting for programs in your central control. A percentage adjustment between 0% and 300% is entered and runtimes for all stations in that program will be adjusted accordingly. The Days setting allows you to edit the days of the week this program runs. Days are identified by number and Day 1 = Monday, 2=Wednesday, etc. Key in the values corresponding to the days you want this program to run The link is used to edit the program‘s start times. When you select this link, the start time worksheet appears. Programs in your central control support up to 6 start times and 1 stop time. Selecting one of the links or the link brings up a control for editing the time. On this control, key in the new time using the format used in your central control then press the button. The settings and procedures for settings at the schedule level are identical to the program settings. The difference is that these settings apply only to the stations in a single schedule. The other difference has to do with schedule start times. As discussed more fully in the introduction to programs and schedules earlier in this User Operation Manual, schedules do not need start times. In fact, by default schedules do not have start times. When a schedule has no start time, you central control assumes the start time of the program that calls it. Start times can be used in schedules, but they are typically used to delay the start of watering in a particular area. The other difference is that schedules can have up to 12 start times and they do not have stop times. Back To Top © 2013 Rain Bird® Corporation 61 Rain Bird® MI Series Mobile Controllers User Manual Areas/Stations When you select the sprinkler link what you see next depends on how you have configured Rain Bird MI Series Mobile Controllers through the User Preferences area. More detail will be provided later on these preferences and how to choose among them. Those details are omitted here to simplify the explanation for understanding. Rain Bird MI Series Mobile Controllers can do most of the things your central control can with a sprinkler including turning one or more sprinklers on and off, checking the status of the sprinkler to see if it is running and how long it has left to go, and even editing sprinkler data to customize irrigation system performance. The basic steps are listed below: a) Select the Station option from the home page – the next screen depends on your preference of QuickMethod or Tree List. b) Select a sprinkler by its station ID or satellite address. c) Indicate what you want to do with the sprinkler (Control it, check its status or edit the sprinkler properties) a. If you want to edit sprinkler properties, you will also have to indicate what type of property to edit (rotor data, runtime data or device data) d) Issue the appropriate sprinkler command from your remote device e) A message of success or failure will appear on the remote In step d) the sprinkler command is sent over the Internet to your central control computer where it is received by the Rain Bird MI Series Mobile Controllers server. The Rain Bird MI Series Mobile Controller tells your central control what to do and the central control takes the appropriate action. If everything is ok, the Rain Bird MI Series Mobile Controllers server will send an ―ok‖ message back to your remote. If there is some problem, Rain Bird MI Series Mobile Controllers respond with a message telling you what went wrong. These basic steps occur every time you work with a sprinkler station. There are two places where things can be confusing at firststeps b) and c) Step b) asks you to select the sprinkler station to work with by its station ID or controller address. In fact, this step encompasses a rather wide range of options depending on your user preferences for Tree List versus QuickMethod. The Tree List has you choose the station by selecting increasingly more precise groupings (Course-Hole-Area-Station) until you finally arrive at the station you wish to control. Once you choose the station, some simple menus will be used to perform the action. If the QuickMethod was selected, a single control panel will appear. All possible sprinkler operations can be performed from this single control panel using special command codes. Step c) asks you to choose which sprinkler process you want to use. With QuickMethod, all options are available from the QuickMethod control. If Tree List is used, the sprinkler control panel you see will depend on your Default Process preference. There are three default processes: Execute, Show Status and Edit Data. Execute means that when you select a station from the Tree List, you want the © 2013 Rain Bird® Corporation 62 Rain Bird® MI Series Mobile Controllers User Manual control panel for executing commands (turn on, turn off) to appear first. When Show Status is the default preference, selecting a station will result in the status screen being displayed. The edit data preference will produce a display for editing sprinkler data. You can always get to the other control panels, this feature is simply designed to place the controller in an ―Edit Data‖ mode so you can rapidly select stations, edit their data and move on with limited clicking. Station Layout Views Rain Bird MI Series Mobile Controllers offers several control options for stations. In addition to the Tree-List and QuickMethod, a viewing option is also available. The viewing option allows you to choose between Area View and Satellite View. Area view is the standard viewing method for all types of Rain Bird systems in which each sprinkler on the golf course is assigned a unique area-based ID. This simplifies the use of the central control by eliminating the need to memorize satellite (machine) addresses and instead use a simple area-based identification. On a golf course, Rain Bird identifies sprinklers by course number, Hole number, area ID (greed = G, tee = T, etc.) and finaly a station number within the areas. Consider for example, a site with two 18-Hole golf courses run from one Rain Bird central control. If you walked out to the green on Hole number 1 you might see five sprinklers. In a Rain Bird central these would be identified as Course 1, 1G1, 1G2, 1G3, 1G4 and 1G5. On Hole 2 you would find stations 2G1, 2G2, etc. These same sprinklers on Hole 1 might be physically wired to stations 10, 11, 12, 13 and 14 on satellite number 7 of wire group 2. The addresses would be 2/7/10, 2/7/11, 2/7/12. 2/7/14 and 2/7/15. Clearly, the area-based identification is much easier to learn and remember. There are times when knowing the satellite address is important. Some people even prefer it. For those times, Rain Bird MI Series Mobile Controllers offer the satellite view option. Satellite and Area view are available for both the Tree-List and QuickMethod. You choose these options though user preferences from the Home Page. Licensed Features It is important to note that functionality depends on the licensing level of the user. Basic users have a limited feature set. Advanced and Professional users have extended feature sets. The table here shows the available features by licensing level. Functions Area-View Course Hole Area Station Basic Advanced Professional Get Status Get Status Execute Get Status Execute Get Status Edit Data © 2013 Rain Bird® Corporation 63 Rain Bird® MI Series Mobile Controllers User Manual Satellite-View Satellite Station Execute Execute Get Status Edit Data Basic users have standard command functions to turn sprinklers on and off, but the sprinkler status and data management options are only available for Advanced and Professional users. Tree-List Operation Tree-list displays are covered in detail in the On-Screen Controls section of this User Operation Manual. Tree-List displays in area view are organized by Hole, Area and Station. The course number is set as a user preference under the link. This simplifies your interaction with the data because it means you do not have to include the course number with every command. To work with area-based tree-lists, begin at the Home Page, select the link. At the Preferences page, select the link then choose . Next, select the link and choose the option. Once your preferences are set, The Home Page will have a link indicating that you currently have your preference set to Area View. The symbol indicates that the link is set to Tree-List. Selecting the link will bring up a course selection page. This page will list any courses defined in your central. If there is only one course, you will only see a link for and all Holes on that course will be listed. Depending on your lines per page settings, the Hole selection page may include pagination buttons to move through the list. Instead of a link, the Hole selection page has a link to return you to the previous course selection page. What happens when you select a Hole, area or station from the list depends on your setting of the command and your user preference for Process. Clicking the command will cause it to toggle between and your user preference for Process. If your Process is set to the will default to which means selecting the Program name or a Schedule from this list will automatically retrieve the Execute Command control. If the command is set to a selection screen will be displayed and you can select the process you want to use next. The options for and the associated process are presented in the table below. © 2013 Rain Bird® Corporation 64 Rain Bird® MI Series Mobile Controllers User Manual Default Process Command From the Hole selection page, selecting the Course link only offers a status report. There are no course level executions or data. A course level status report looks similar to the figure to the right. The report tells you that there are currently stations running on Course-1, 52 are feeding back (red in your central) and no stations report no feedback (yellow in your central). The feedback stations (all 37) are demanding 997 gpm from the pump station. Because there are no stations failing to feedback, the no feedback flow is zero. If you select a Hole from the Hole selection page the Area selection page will appear. All areas defined in your central control for that Hole will be listed. The layout of this page is similar to the Hole selection page. The link will take you back to the previous page. The link has your preference for Process. If you select the link from this page you can get a Hole runtime status report. There are no Hole-level executions or data. A Hole-level status report looks similar to the figure to the right. The report tells you that there are currently stations running on Course-1:Hole-1. Three stations are feeding back (red in your central) and no stations report no feedback (yellow in your central). The feedback stations all together are demanding 55 gpm from the pump station. Because there are no stations failing to feedback, the no feedback flow is zero. If you select an area from the Area selection page, the Station selection page will appear. The Station selection page lists all stations defined in your central control for the selected area of the selected Hole on the selected course. If you select the Area link such as the one shown here called what happens next depends on your settings. If is displayed, the next screen will be a process selection screen. If is displayed, the next screen will be a command control panel. If is displayed, the next screen will be an area status report. If nothing happens because there is not editable data for a golf area. Examples of these pages are shown below. © 2013 Rain Bird® Corporation 65 Rain Bird® MI Series Mobile Controllers User Manual The version is a control panel used to perform area level commands. Area level commands include those shown to the right. and are commands that affect all stations in the area. For example, selecting in the drop down menu on the page for Hole 1 Green would turn on all stations on the Hole 1 Green for the minutes entered in the text box provided. To execute this command enter the desired runtime for all stations in the box provided and select the button. The command turns off any running stations in the selected area. The and commands will Pause or resume all the stations in the selected area. In Rain Bird centrals, Pause means suspend operation on those sprinklers until a resume command is issued. The text box is not used with the Pause command. The command is used to advance the group of running stations to the next group. In a Rain Bird system, turning on a large block of stations like and entire fairway will probably result in reaching flow capacity, electrical capacity or both. Rain Bird centrals will turn on a many stations as possible and stack the rest. As the first group of stations begins to time out, stacked stations will come on to take their place. The command forces the current group of stations to time out and the next group comes on immediately. This can be very useful if you just need to test all the sprinklers in an area. The screen for a golf area will provide and area status report. The status report shows the selected Course, Hole and Area and indicates if there are any stations running in that area. Feedback stations are those stations in the selected area which are running and also feeding back (red in your central) to the central control. No Feedback stations are those stations which have been commanded on, but are not feeding back (yellow in your central). Feedback flow is the combined flow demand of all stations in that area which are also feeding back. No feedback flow is the total demand coming from stations which are not feeding back. If, instead of select a Golf area you select an individual station such as , what happens next depends on your preference settings. Depending on your setting in combination with your Station Data preference, you may get an page, a page, an page or one of three possible pages. The page you get depends on your user preference for Station Data. Example screens are shown below: © 2013 Rain Bird® Corporation 66 Rain Bird® MI Series Mobile Controllers User Manual Use of these is very similar to the Area level. The page lets you select the process you want to use – ―Execute‖, ―Status‖ or ―Data‖. The Data drop down menu lets you select the type of station data to work with if the ―Data‖ button is selected. The page executes action type commands as shown in the picture to the right. Select the type of command you want to execute from the drop down. In the ―Minutes‖ box, enter the number of minutes that station should run. For convenience, leaving the Minutes box empty will default to a 5 minute runtime. and will turn sprinklers off or on. The ―More Stations‖ box is used to add additional stations. The first station is always assumed to be the one you selected to get to this page. If you selected station 1G1 and wanted to turn on stations 1, 3 and 4, you would key in with the appropriate delimiter. The command activates a range of stations by identifying the first and last station in the range. To turn or Hole 2 Fairway stations 5 through 9 you would work through the tree-list to 2F7. On the page you would choose and in the additional stations, enter a then select the button. and are used to Pause or resume stations. In a Rain Bird system, a station will remain in the Paused state until a resume command is sent. YOU DO NOT INCLUDE MINUTES WITH A PAUSE COMMAND. The page provides a status report of the selected station. The feedback condition is reported as well as the demand flow. The pages are used to review and/or edit certain sprinkler properties. Through the page you are able to select the data type you want to review or edit. You also set your preference for the type of Station Data you want to work with. This can be very helpful for example if you want to quickly audit the in-field sprinklers against your database. Set your preference for process to and set the preference to . Now every time you select a station in the tree-list, that rotor‘s sprinkler type will be shown. The data pages can also be edited. When edits are made with Rain Bird MI Series Mobile Controllers, the central control database is immediately updated and the new settings are in effect for the next irrigation cycle. The Run Time Data page includes © 2013 Rain Bird® Corporation 67 Rain Bird® MI Series Mobile Controllers User Manual fields for editing ET Adjust percentage, Station Adjust percentage, default runtime, cycle time and soak time. To use this page, key in any adjustments required, then select the button. This will automatically update you central control database with these new settings. The Device Data page contains special fields for of the central control. The fields include Attribute, Address, Type, Switch and Valves. These fields correspond to fields in the Station Detail table of your central control. These properties are only changed for special functions beyond the scope of this manual. The Rotor Data identifies the Head type, Nozzle configuration and pressure setting for the selected rotor. The flow per rotor, rotors per station and flow per station are all editable. Flow settings are edited indirectly by selecting a head type, nozzle and pressure combination. To change these values, select the appropriate link and a rotor database will be displayed. Select the correct values and submit the update back to the central control. Back To Top Uniqueness of ICM Addresses ICM stations are available only at Smart UI of Rain Bird MI Series Mobile Controllers. If your central control contains an ICI interface, the ICM station links will appear at MI station pages. Check Uniqueness ICM station addresses are required unique in entire system. When navigate to ―ICM-Address Data‖ page, you will see a new button of ―Check Uniqueness‖ (see screenshot on right). If you doubt uniqueness of a long address, input the address in address box and click ―Check Uniqueness‖ button. MI will search the central-control database to find out the address. The address searching results will be listed with associated station IDs. If an address is found in two or more stations, it is duplicated. Screenshot below is an example that shows long address 12C28 is only assigned to the current station. In other word, long address 12C28 is unique in the central-control database. © 2013 Rain Bird® Corporation 68 Rain Bird® MI Series Mobile Controllers User Manual Short Address ICM station short address is not displayed because it is automatically generated by the central-control application and usually you do not need to change the short address. If you need to verify or troubleshoot the short address for diagnostics, you can click ―Show Short Address‖ link to display the short address (see Channel# and Station# at screenshot on right). Change Connect If you want to change the station connect, click ―-Change Connect --‖ dropdown box to list connect choices (screenshot below). After select a choice, click ―Submit‖ button and the selected connect choice will be saved to the central-control database. © 2013 Rain Bird® Corporation 69 Rain Bird® MI Series Mobile Controllers User Manual Update If you changed the station short or/and long addresses, the changes will not be saved to the database until click ―Submit‖ button to update database. Before the changes to be saved to the central-control database, MI will search the database to make sure that your input/changed addresses will not be duplicated. If one of your input/changed addresses is found, MI will not save the addresses to the database. Screenshot below is an example trying to change long address to 31AE7 for current station. After clicked ―Submit‖ button, MI found long address 31AE7 is already assigned to station 1.1S3 (―1.‖ means course-1). So the changes were not saved to the database. Otherwise if your changed addresses are unique, MI will save them to the database and ask you if sending the changed addresses to ICM modules (screenshot below left). Clicking ―Connect Address‖ button will request the central-control application to send the addresses to ICM modules. If you want to change more ICM station addresses, you can send the addresses later until all changes are finished. You can go to another station data page (e.g., Runtime) or go back to select other stations. If you clicked ―Connect Address‖ button to request the central-control application to send the addresses to ICM modules, you will see a screen similar as screenshot above right. Sending addresses process is also called Fast Connect Programming. The process may take a few minutes depended on total numbers of ICM stations in entire system. Back To Top © 2013 Rain Bird® Corporation 70 Rain Bird® MI Series Mobile Controllers User Manual Temporary Station Adjustment At station runtime page, MI 4.0 adds Temporary Station Adjustment (Tmp.Stn.Adj%) feature. The feature functions as it does in the central-control. If you want to temporarily adjust a station for some reasons, for example, reduce precipitation to 75% for 3 days, put the numbers as screenshot. The centralcontrol will use the Tmp.Stn.Adj, instead of Base.Stn.Adj, for the station for 3 days. Three days later, the Tmp.Stn.Adj will be expired and the centralcontrol goes back to use Base.Stn.Adj for daily operation. Back To Top Appendices On-Screen Controls Navigating through the remote is similar to the Web pages you are familiar with. The paragraphs below describe the types of controls found on Rain Bird MI Series Mobile Controllers pages. Links: Links are clickable or selectable text used to navigate through the application. Typically, the link will tell you where it goes in words. You click the link using the mechanism provided by the browser on your cell phone. Rain Bird MI Series Mobile Controllers will responds by replacing the view you are looking at with a view appropriate to the link you just clicked. Links change color after they are ―visited‘ to remind you they were once clicked. The color, font and length of time the color remains changed after being clicked is determined by your browser – not Rain Bird MI Series Mobile Controllers. links are special links used on certain screens in Rain Bird MI Series Mobile Controllers. The links are similar to option buttons in that they are used to indicate your preference for a certain type screen behavior. links are used to save you key strokes. Certain activities in Rain Bird MI Series Mobile Controllers can have © 2013 Rain Bird® Corporation 71 Rain Bird® MI Series Mobile Controllers User Manual several possible results. For example, when you select a Station ID in Rain Bird MI Series Mobile Controllers you might want to execute a sprinkler command, you might want to view that sprinkler‘s current status, or you might want to edit the sprinkler data. links were designed to help. The links take several forms as shown in the table below. The subject of Manual. links is covered is detail in other parts of this User Operation Text Boxes: Text boxes are areas on the page provide for input from you. When you see a text box you will click in the space and use whatever method is provided by your cell phone or other browser to key in the appropriate information. In every case, a page with text boxes requesting information is associated with other controls on the same page. One of those controls will be a button used to apply or save the settings. Text boxes are displayed on cell phones in many different ways. On some cell phone you see the box, select it and begin typing. On other phones, selecting the box might bring up some sort of text entry form. You type on that form then select OK and whatever you typed will be placed in the text box. Command Buttons: Command buttons usually made to look like threedimensional buttons. They are used to cause an action or command to take place. Typically, they are associated with areas in which user input is required. You key in the proper information to the appropriate text box, the select or click the command button to apply settings, save data or command an action. The look of these buttons is entirely controlled by the Web browser you are using. In Internet Explorer, they look like the one shown above. In some micro-browsers like many version of Blackberry, these buttons may not even appear to be part of the Web page you are viewing. List Boxes: List boxes are used where a short list of choices exist. The lists are usually filled with information read from the central control. Information in the list may change. You use the list box by selecting one of the items in the list then using a command button return your choice back to the Rain Bird MI Series Mobile Controllers server. When you select something from a list in a list box, the background color of the item selected usually changes. List boxes may look very different from one micro-browser to another. Some micro-browsers indicate a selection by placing a checkmark next to the item. Others might change only the color of the text. However your browser was designed to display these objects, the same method will be used. Checkboxes: Checkboxes are used in two ways. In same cases they are used to get your attention and ensure your really intend to perform the next step. © 2013 Rain Bird® Corporation 72 Rain Bird® MI Series Mobile Controllers User Manual Checkboxes are a way to double-check before certain types of commands are issued. Checkboxes are also used when you must select one or more items from a list of options. To use a checkbox, select it on-screen using whatever controls are provided by your browser, then click item of the checkbox. The box itself will alternate between checked and unchecked each time it is clicked. A checkmark in the box indicated you acceptance of the setting or condition. Unchecked means you do not. Pagination Buttons: Pagination buttons are used when a length list of information needs to be displayed, but it will not fit on a single page. There are user preferences in Rain Bird MI Series Mobile Controllers that affect these buttons. There may also be settings in your cellular phone to control this sort of behavior. If you see button like the ones above on-screen, it means there is more information available to be displayed. The button moves to the first page of information. The button moves one page previous. The button moves to the next page of information. The button moves to the last page of information. Dropdown Menu: A dropdown menu is used to offer a list of possible choices. It is like a folded-up list box (described above). When you select a dropdown menu, a list of choices will appear. Upon selecting one of those choices the menu folds back up and your choice is shown in the box. Cell phone microbrowsers have many ways of showing a drop-down menu. The one shown here is the classic form. The smartphone completely redesigned this control and turned it into a large list which looks like it was written on a drum. You use your finger to spin the drum and tap an item to select it. However your micro-browser displays a drop down menu, it will be the same throughout the application. The two pictures below are equivalent. Tree View: A tree-view or tree-list is an indented list of items. Tree-list displays are convenient in that they group information in a list for easier access, but they have the drawback of requiring a lot of user interaction in the form of clicking and scrolling. More on this topic will be covered in the user preferences section. Option Buttons: Option buttons are used where a list of mutually exclusive choices exist. They are similar to the checkbox described earlier, but different because you may only select one of the options . For example, when choosing a viewing option, you can select either [view by areas] or [view by satellites]. You cannot choose to have both viewing method at one time. © 2013 Rain Bird® Corporation 73 Rain Bird® MI Series Mobile Controllers User Manual Troubleshooting Failures of Running MI Series Web If you could not run Rain Bird® MI Series Web app after finishing all setup steps, it may be caused by incomplete IIS configuration. You may fix it by reconfiguring IIS. Run the MI Series Configuration, click menu Tools and submenu “Internet Service (IIS) – Reconfigure”. If this could not fix the problem, you may need to call your distributor or Rain Bird for help. Log file C:\RainBird\MI\Log\RainBird.MI.Tools.log might record failures of configuring IIS. Please send the file to your distributor or Rain Bird when you call for help. Communication Service Problems Rain Bird Communication Service executable is located at ―C:\RainBird\MI\Bin\RainBird.ccCommSvc.exe‖. Check if it exists. If not, you have to reinstall the MI Series. Most possible cause is that Rain Bird Communication Service is listening on a port that may be used by other applications. In the MI Series Configuration, move your mouse over the Communication Service icon. The Service listening port number will be displayed as screenshot (listening on port 57243) below. Solutions o Restart Rain Bird Communication Service. The service will retry other 10 ports when it starts. In the MI Series Configuration, click menu Tools and submenu ―Communication Service - Restart‖. Then restart the MI Series Configuration to see the service communication status. o Manually assign a new port to Rain Bird Communication Service. © 2013 Rain Bird® Corporation 74 Rain Bird® MI Series Mobile Controllers User Manual First, decide what new port number will be used, for example, 57245, 57248, or 57291. Then must make sure the new port is not used by other apps. You can find what ports are currently being used in the computer. Run the MI Series Configuration, click menu ―Tools‖ and submenu ‗Active Connections and Ports‖ to list all listening ports in the computer. Second, use Notepad to open configuration file of Rain Bird Communication Service. The file is located at ―C:\RainBird\MI\Data\RainBird.ccCommSvc.config‖. In Notepad, change ChannelPort number (it may be 57243, see highlighted areas in screenshot below) to the new number. Then save the changes and restart the computer to let the Communication Service to read the new port. You must restart the computer. Then launch the MI Series Configuration to see if the problem is solved. Important Note: do not change anything else in the configuration file. Otherwise the Communication Service will not recognize the content format. License Key Problems Trial-Key Problems The trial license is bound ONLY to a central-control System-ID and not the computer. If there is a problem with the trial key, please check the SystemID indicated in the license file (see highlighted in screenshot below). © 2013 Rain Bird® Corporation 75 Rain Bird® MI Series Mobile Controllers User Manual The System-ID of the trial license should EXACTLY match the central-control System-ID shown in the License window of the MI Series Configuration. Activation-Key problems 5X5 key is bound to your computer‘s Registration-ID as well as the central control System-ID. This means that the System-ID should exactly match the one in the MI Series and the one in the Central-Control app. Also, the Registration-ID listed in the License file (screenshot below) should EXACTLY match the Registration-ID shown in the License window of the MI Series Configuration. 5X6 key is bound to your computer‘s Registration-ID only. This means that the Registration-ID listed in the License file (screenshot below) should EXACTLY match the Registration-ID shown in the License window of the MI Series Configuration. © 2013 Rain Bird® Corporation 76