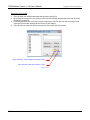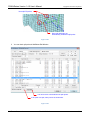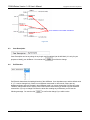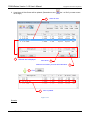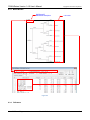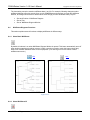
1
3DWhiffletree Version 1.4.0 User’s Manual Copyright © 2013-2014 Yoji Hosoe 3DWhiffletree Version 1.4.0 User’s Manual Rev 2015-08-13 i 3DWhiffletree Version 1.4.0 User’s Manual Copyright © 2013-2014 Yoji Hosoe CAUTION Any example data presented in this manual or available from website (these include but are not limited to FEM element property data, FEM element material data, weight and CG data, whiffletree diagrams, and whiffletree material data) are fictitious values intended to illustrative purpose use only or deliberately changed to unrealistic values due to proprietary reasons, and should not be used to perform any analysis and/or calculations in your job. Although every reasonable effort has been made to verify 3DWhiffletree application software, end-users are fully responsible for any results produced by the software including computed results and software errors. Rev 2015-08-13 ii 3DWhiffletree Version 1.4.0 User’s Manual Copyright © 2013-2014 Yoji Hosoe Table of Contents 1.0 General ..................................................................................................................................................... 1-1 1.1 Copyright and Liability .......................................................................................................................... 1-1 1.2 Support ................................................................................................................................................. 1-1 1.3 System Requirement ............................................................................................................................ 1-1 1.3.1 .Net Framework ................................................................................................................................ 1-1 1.3.2 CATIA V5, Word 2010, Excel 2010 .................................................................................................. 1-2 1.4 System File ........................................................................................................................................... 1-2 1.4.1 Product Key and Expiration Date ..................................................................................................... 1-2 1.4.2 Default Values in System File .......................................................................................................... 1-4 1.5 Files – How files work each other......................................................................................................... 1-5 1.5.1 *.d (*.dat) .......................................................................................................................................... 1-6 1.5.2 *.wtr .................................................................................................................................................. 1-7 1.5.3 *.mtl .................................................................................................................................................. 1-7 1.5.4 *.csv .................................................................................................................................................. 1-7 1.5.5 *.col ................................................................................................................................................. 1-10 2.0 Overview of User Interface ....................................................................................................................... 2-1 2.1 General ................................................................................................................................................. 2-2 2.1.1 Window Size ..................................................................................................................................... 2-2 2.1.2 Tooltips ............................................................................................................................................. 2-2 2.1.3 Click or Toggle Button ...................................................................................................................... 2-3 2.1.4 Locked or Unlocked Button .............................................................................................................. 2-3 2.1.5 Status Bar ......................................................................................................................................... 2-4 2.2 File Information ..................................................................................................................................... 2-4 2.3 File Menu .............................................................................................................................................. 2-5 2.4 FEM Pane............................................................................................................................................. 2-5 2.5 Whiffletree Pane ................................................................................................................................... 2-5 2.6 Navigation Pane ................................................................................................................................... 2-6 2.7 Model Window ...................................................................................................................................... 2-6 3.0 FEM File and Model View ........................................................................................................................ 3-1 3.1 General ................................................................................................................................................. 3-1 3.1.1 FEM Pane......................................................................................................................................... 3-1 3.1.2 File Menu .......................................................................................................................................... 3-2 3.2 Open FEM Model File .......................................................................................................................... 3-2 3.2.1 Supported File Format and Limitation .............................................................................................. 3-3 3.2.2 Reduce Mesh ................................................................................................................................... 3-3 3.2.3 Read 1D Line Element ..................................................................................................................... 3-8 3.2.4 Read Solid Tet-Mesh ...................................................................................................................... 3-10 3.3 Save File............................................................................................................................................. 3-11 3.4 Start in Blank Space ........................................................................................................................... 3-13 3.5 Wire Frame View ................................................................................................................................ 3-14 3.6 Perspective View ................................................................................................................................ 3-15 3.7 Change Element Color ....................................................................................................................... 3-16 3.8 Hide-Behind View ............................................................................................................................... 3-20 4.0 Naviation of Model .................................................................................................................................... 4-1 4.1 General ................................................................................................................................................. 4-1 4.1.1 Navigation Pane ............................................................................................................................... 4-1 4.1.2 File Menu .......................................................................................................................................... 4-2 4.2 Model View Operation .......................................................................................................................... 4-3 4.2.1 Rotate ............................................................................................................................................... 4-3 4.2.2 Pan Move ......................................................................................................................................... 4-4 4.2.3 Zoom In and Out............................................................................................................................... 4-5 Rev 2015-08-13 iii 3DWhiffletree Version 1.4.0 User’s Manual Copyright © 2013-2014 Yoji Hosoe 4.2.4 Preset View Angle ............................................................................................................................ 4-6 4.3 Coordination Axis ................................................................................................................................. 4-7 4.3.1 Turn On and Off the Axis .................................................................................................................. 4-8 4.3.2 Global Coordinate System ............................................................................................................... 4-8 4.3.3 Airplane Coordinate System............................................................................................................. 4-8 4.3.4 Custom Coordinate System ............................................................................................................. 4-9 4.4 Adjust Model Center ........................................................................................................................... 4-10 4.5 Copy Image ........................................................................................................................................ 4-11 5.0 Whiffletree Construction ........................................................................................................................... 5-1 5.1 General ................................................................................................................................................. 5-1 5.1.1 General Model View and Nomenclature .......................................................................................... 5-1 5.1.2 Whiffletree Pane ............................................................................................................................... 5-2 5.1.3 File Menu .......................................................................................................................................... 5-4 5.2 Open Whiffletree File (*.wtr) ................................................................................................................. 5-5 5.3 Save Whiffletree File (*.wtr) .................................................................................................................. 5-6 5.4 Read CG Data ...................................................................................................................................... 5-7 5.5 View and Edit Whiffletree Data............................................................................................................. 5-8 5.6 View and Edit Whiffletree Material Data ............................................................................................... 5-9 5.7 View Whiffletree Diagram ..................................................................................................................... 5-9 5.8 Export to CATIA.................................................................................................................................... 5-9 5.9 Build Whiffletree ................................................................................................................................. 5-10 5.9.1 Procedures ..................................................................................................................................... 5-10 5.9.2 Technical Background .................................................................................................................... 5-13 5.10 Delete All Whiffletree .......................................................................................................................... 5-15 5.11 Add a Point ......................................................................................................................................... 5-16 5.12 Delete a Point (Delete Whiffletree) ..................................................................................................... 5-19 5.12.1 Delete a Point ............................................................................................................................. 5-19 5.12.2 Delete Whiffletree ....................................................................................................................... 5-21 5.13 Show Point Info .................................................................................................................................. 5-24 5.14 Move and Edit Points ......................................................................................................................... 5-25 5.14.1 Summary of Moving Points ........................................................................................................ 5-25 5.14.2 Move a Point (Along Loading Direction) ..................................................................................... 5-26 5.14.3 Split a Point ................................................................................................................................ 5-28 5.14.4 Move Two Points Together ........................................................................................................ 5-32 5.14.5 Move a Point (In Plane) .............................................................................................................. 5-33 5.15 Change Point/Rod/Beam Sizes .......................................................................................................... 5-35 5.16 No Beam Length Warning .................................................................................................................. 5-38 6.0 View and Edit Whiffletree Data................................................................................................................. 6-1 6.1 Display General .................................................................................................................................... 6-1 6.2 ID .......................................................................................................................................................... 6-2 6.3 Case Description .................................................................................................................................. 6-3 6.4 Pull Direction ........................................................................................................................................ 6-3 6.5 G-Factor ............................................................................................................................................... 6-4 6.6 Other Factor ......................................................................................................................................... 6-4 6.7 Warning Length .................................................................................................................................... 6-5 6.8 Units and Decimals............................................................................................................................... 6-5 6.9 Data Screen.......................................................................................................................................... 6-8 6.10 Edit and Update Data ........................................................................................................................... 6-9 6.11 Split and Forget Split .......................................................................................................................... 6-11 6.12 Delete ................................................................................................................................................. 6-11 7.0 View and Edit Whiffletree Material ........................................................................................................... 7-1 7.1 What is Material for? ............................................................................................................................ 7-1 7.2 General View ........................................................................................................................................ 7-2 7.3 Icons ..................................................................................................................................................... 7-3 Rev 2015-08-13 iv 3DWhiffletree Version 1.4.0 User’s Manual Copyright © 2013-2014 Yoji Hosoe 7.3.1 Open Whiffletree Material File (*.mtl) ............................................................................................... 7-3 7.3.2 Save Whiffletree Material File (*.mtl) ................................................................................................ 7-4 7.3.3 Switch View between Rod and Beam .............................................................................................. 7-4 7.4 Decimals ............................................................................................................................................... 7-4 7.5 Data Screen.......................................................................................................................................... 7-5 7.5.1 Rod ................................................................................................................................................... 7-5 7.5.2 Beam ................................................................................................................................................ 7-6 7.6 Add New ............................................................................................................................................... 7-7 7.6.1 Rod ................................................................................................................................................... 7-8 7.6.2 Beam ................................................................................................................................................ 7-9 7.7 Update .................................................................................................................................................. 7-9 7.8 Delete ................................................................................................................................................. 7-11 8.0 View Whiffletree Diagram ......................................................................................................................... 8-1 8.1 General View ........................................................................................................................................ 8-1 8.2 Icons ..................................................................................................................................................... 8-3 8.3 View Operation ..................................................................................................................................... 8-3 8.3.1 Model Window .................................................................................................................................. 8-4 8.3.2 Fit Buttons ........................................................................................................................................ 8-4 8.3.3 Zoom In and Out Buttons ................................................................................................................. 8-7 8.3.4 Mouse Controls ................................................................................................................................ 8-7 8.3.5 Change Window Size ....................................................................................................................... 8-8 8.3.6 Change Font Size ............................................................................................................................. 8-9 8.3.7 Unit and Decimals ............................................................................................................................ 8-9 8.3.8 Additional Remarks about View Operation ...................................................................................... 8-9 8.4 Whiffletree Diagrams Functions ......................................................................................................... 8-10 8.4.1 Show Basic Whiffletree .................................................................................................................. 8-10 8.4.2 Show Whiffletree ID ........................................................................................................................ 8-10 8.4.3 Check Whiffletree Completeness ................................................................................................... 8-11 8.4.4 Show Whiffletree Materials............................................................................................................. 8-13 8.4.5 Shown Tension Load and Bending Moment .................................................................................. 8-13 8.5 Copy Image ........................................................................................................................................ 8-14 8.6 Export Diagram................................................................................................................................... 8-14 8.6.1 Export to Word................................................................................................................................ 8-15 8.6.2 Export to Excel ............................................................................................................................... 8-16 9.0 Export to CATIA........................................................................................................................................ 9-1 9.1 About CATIA Export ............................................................................................................................. 9-1 9.2 Export Window ..................................................................................................................................... 9-2 9.3 Whiffletree Data File ............................................................................................................................. 9-3 9.4 CATIA Origin and Location on Whiffletree ........................................................................................... 9-3 9.5 CATIA Coordinate and Whiffletree Coordinate .................................................................................... 9-5 9.6 Scale Factor ......................................................................................................................................... 9-6 9.7 Save Changes in .wtr File .................................................................................................................... 9-6 9.8 Export ................................................................................................................................................... 9-7 Rev 2015-08-13 v 3DWhiffletree Version 1.4.0 User’s Manual 1.0 GENERAL 1.1 Copyright and Liability Copyright © 2013-2014 Yoji Hosoe 3DWhiffletree Version 1.4.0 (released Rev 2015-08-13) ©2013-2014 Yoji Hosoe. All rights reserved. This is a freeware. Sharing, copies and redistributions of this product are accepted; however, selling or modifying this product is prohibited. Although every reasonable effort has been made to verify 3DWhiffletree application software, end-users are fully responsible for any results produced by the software including computed results and software errors. 1.2 Support The following website can be used to access all resources for 3DWhiffletree software. http://www.3dwhiffletree.com/ From the website, you can: • • • • • • 1.3 Download the latest version of 3DWhiffletree.exe Download the latest 3DWhiffletree User’s Manual Request Product Key (It’s free!) Download sample files View Demo/Tutorial Videos Comment on the software (suggestion for improvement is welcome!) System Requirement This program will only work on Windows platform. This program does not require an installation package or change in registry. However, it is assumed that .Net Framework 4.0 or higher is installed on the user’s PC. 1.3.1 .Net Framework If an appropriate version of Net Framework is not installed on your computer, you will see an error message saying something like “.Net Frame 4.0 is not installed” when you attempt to launch the program. If so, you will need to download and install the correct version of .Net Framework. There are different versions of .Net Framework depending on the Windows OS version. You can download it from the Microsoft website: http://www.microsoft.com/net For Windows XP or Windows 7 user, install .Net Framework 4.0. http://www.microsoft.com/net/download/version-4 For Windows 8 user, install .Net Framework 4.5. http://www.microsoft.com/visualstudio/eng/downloads#d-net-45 It may be possible to run this program with old version of .Net Framework in Windows XP machine. However, it is known that certain display problems will occur. General Rev 2015-08-13 1-1 3DWhiffletree Version 1.4.0 User’s Manual 1.3.2 Copyright © 2013-2014 Yoji Hosoe CATIA V5, Word 2010, Excel 2010 To have this program fully function, you will need the following applications installed on your computer. Without these applications, some functions are limited as listed in Table 1-1. All other functions can be still performed. Table 1-1 Application 1.4 Function CATIA V5 or later version Export whiffletree into CATIA model Word 2010 Export whiffletree diagram into Word Format Excel 2010 Export whiffletree diagram into Excel Format System File This program requires a system file placed in the same folder where 3Dwhiffletree.exe is placed. The system file will come with the application package, or you can download or request it at http://www.3dwhiffletree.com/. The system file should be named exactly as the following (case not sensitive): 3DWTSystem.ini If the system file is missing, you will get the following error message (Figure 1-1). If you see this message, check the system file if it is in the correct folder or has named correctly. Figure 1-1 1.4.1 Product Key and Expiration Date System file includes 40-digit alpha-numeric product key. Each product key is associated with an expiration date (called “License Expiration Date”). Once you start 3DWhiffletree program, you can check the product key and expiration date by the following File Menu. General Rev 2015-08-13 1-2 3DWhiffletree Version 1.4.0 User’s Manual Copyright © 2013-2014 Yoji Hosoe Figure 1-2 You will see a window like one below and there you can find the product key and expiration date. Figure 1-3 Once the product key (or “License”) has expired, you are no longer able to start the software. Then, you need to request a new product key (or new system file) at http://www.3dwhiffletree.com/.. If you get a new product key only, then open the file by text editor and replace the old product key in the system file and save the system file. In an event that the product key is expired, you will see a message (Figure 1-4) and program will not start. In an event that the product key is invalid, you will see a message (Figure 1-5) and program will not start. General Rev 2015-08-13 1-3 3DWhiffletree Version 1.4.0 User’s Manual Copyright © 2013-2014 Yoji Hosoe Figure 1-4 Figure 1-5 When you request a new product key only and replace the old one in the system file, you may get an error message (Figure 1-6). This means there is the later version of 3DWhiffletree.exe. In such a case, you cannot run the program anymore unless you obtain the latest version of 3DWhiffletree.exe associated with the product key. This ensures that you use the most reliable version. Figure 1-6 1.4.2 Default Values in System File The system file controls default values used in the program. Any lines start with a dollar mark (“$”) are considered as comments and will be ignored. General Rev 2015-08-13 1-4 3DWhiffletree Version 1.4.0 User’s Manual Copyright © 2013-2014 Yoji Hosoe Table 1-2 System File Description Launch Mode Only used for debugging purpose and user should not change this value. AirplaneCoordinate Defines default airplane coordinate system to be used when you display axis in FEM/Whiffletree view window. (See Section 4.3.3.) 4NodeQuadElement Specifies 4-node Nastran plane element type to be read. 3NodeTriangleElement Specifies 2-node Nastran plane element type to be read. 2NodeLineElement Specifies 2-node Nastran line element type to be read. SolidElemnt Specifies Nastran solid element type to be read. For version 1.0 only CTETRA can be read. WarningLength Specifies a default minimum moment arm length that the program provides a warning message. The warning can be turned off from Whiffletree menu. (See Section 6.7.) WTRUnits Defines default units used in the new whiffletree. WTRDisplayDecimals Defines default decimal places used in the new whiffletree. See Section 6.8 for formatting rules. MTLDisplayDecimals Defines default decimal places used in the new whiffletree material properties. See Section 7.4 for formatting rules. If any of values in the system file is missing, you will see an error message and program will not start. Below shows an error message when 3NodeTriangleElement is missing in the system file. Figure 1-7 1.5 Files – How files work each other There are 7 types of files associated with 3DWhiffletree program, including main program (executable file), as shown in Table 1-3. General Rev 2015-08-13 1-5 3DWhiffletree Version 1.4.0 User’s Manual Copyright © 2013-2014 Yoji Hosoe Table 1-3 File Name Description 3DWhiffletree.exe Main program runs 3DWhiffletree 3DWTSystem.ini System file that requires to run 3DWhiffletree.exe (See Section1.4.) *.d (*.dat) FEM files in Nastran format, used to display FEM model. (See Section 1.5.1) *.wtr Files that save information to construct whiffletree (See Section 1.5.2) *.mtl Files that save information of material used in building whiffletree. (See Section 1.5.3) *.csv Files that is used to read loading points = weight and CG data. (See Section 1.5.4) *.col Files that save color associated with element property ID (See Section 3.7) Further explanations on certain types of files are shown below. 1.5.1 *.d (*.dat) This file is used to show FEM model in Model Window. The file can be directly created by preprocessors (such as Femap or HyperMesh) or manually created. The format is same as Nastran and can be any of Small-Field Format (8 columns for one entry field), Large-Field Format (16 columns for one entry field), or Free-Format (comma delimited format). For Free-Field format, unlike Nastran’s Free-Field format only allows 8 characters per each entry field; this software can read any length. When using “Include” statement, the following limitations apply. Limitations using “Include” statement: 1. Use of “Include” statement is supported but referenced files must be relatively referenced from the folder where 3DWhiffletree.exe is located. “Include” statement can be nested, that is, use of “Include” inside “Include”-referenced file is accepted as deep folders as you want, and there is no character length limit. Example 1: 3DWhiffletree.exe is in C:\3DWhiffletree and you want to read a file of C:\3DWhiffletree\input.d Correct: Wrong: INCLUDE ‘input.d’ INCLUDE ‘C:\3DWhiffletree\input.d’ Example 2: 3DWhiffletree.exe is in C:\3DWhiffletree and you want to read a file of C:\3DWhiffletree\files\input.d Correct: Wrong: General INCLUDE ‘files\input.d’ INCLUDE ‘C:\3DWhiffletree\files\input.d’ Rev 2015-08-13 1-6 3DWhiffletree Version 1.4.0 User’s Manual Copyright © 2013-2014 Yoji Hosoe The FEM model in Model Window is only to display models and does not do anything with actual whiffletree constructions or does not interact with other files (*.wtr, *.mtl, or *.csv). You still can read *.csv file for weight and CG data, *.wtr for whiffletree, or *.mtl for materials without reading *.d file. Grid Real Number Format: Real number format for grid points (X, Y, Z) are generally same as Nastran format with one exception that it may not need to contain a decimal point. Therefore, the following values are all acceptable formats for real number seven (7). 7.0 7 .7E1 .7E+1 0.7+1 0.70+1 7.E+0 70.-1 700E-2 1.5.2 (Nastran does not allow this as a real number) (Nastran does not allow this as a real number) *.wtr When you are creating whiffletree, you can save your work. Your work will be saved as *.wtr file. This file contains all information associated with the whiffletree (with some exceptions, see Table 5-2). See Section 5.2 for more details about file operation of *.wtr file. 1.5.3 *.mtl You can save material properties for rod and beams used in whiffletree constructions. This will be saved as *.mtl file. See Section 7.0 for more details about material and its use. 1.5.4 *.csv Unlike *.wtr or *.mtl files, this file is what YOU will need to create so that Whiffletree.exe can read weight and CG data. The weight and CG are essentially become loading points of the whiffletree. The *.csv file is, as the name specifies, comma-separated values. You can create a *.csv file by using spreadsheet application or by using text editors. The first line in the file is reserved for a header and always required. Since the first line is ignored by Whiffletree.exe, values do not matter. It is recommended to use the same header name as shown in the Table 1-4. General Rev 2015-08-13 1-7 3DWhiffletree Version 1.4.0 User’s Manual Copyright © 2013-2014 Yoji Hosoe Table 1-4 Column No. Header Description Rule 1 Description Item Name Any Characters 2 Weight Item Weight Numeric values only (8-byte, double) 3 X Item Xcg location Numeric values only (8-byte, double) 4 Y Item Ycg location Numeric values only (8-byte, double) 5 Z Item Zcg location Numeric values only (8-byte, double) Using Microsoft Excel: This is the easiest way to create *.csv file. 1. Start MS Excel application and type values that look like Figure 1-8. In most cases users already have weight and CG data in hand. In such cases, simply copy and paste the weight and CG data. Don’t forget to add a header in the first row. Figure 1-8 2. Use “Save As” and choose “CSV (Comma delimited)” in “Save as Type” General Rev 2015-08-13 1-8 3DWhiffletree Version 1.4.0 User’s Manual Copyright © 2013-2014 Yoji Hosoe Figure 1-9 Using Text Editors: You can use any text editors to create *.csv files. The following basic rules apply (quoted from http://en.wikipedia.org/wiki/Comma-separated_values#Toward_standardization). • • • • Each record "should" contain the same number of comma-separated fields. Any field may be quoted (with double quotes). Fields containing a line-break, double-quote, and/or commas should be quoted. (If they are not, the file will likely be impossible to process correctly). A (double) quote character in a field must be represented by two (double) quote characters. Notes: Use of comma and double-quote in the column 1 is supported; however, the current version is not fully tested for irregular use (such as multi repeated use of comma and double-quote combined together). Figure 1-10 shows text-edited *.csv file that is the same file created in Excel file in the above example. General Rev 2015-08-13 1-9 3DWhiffletree Version 1.4.0 User’s Manual Copyright © 2013-2014 Yoji Hosoe Figure 1-10 1.5.5 *.col Colors assigned to property IDs can be saved into *.col file. The file only contains property IDs and associated Color IDs. One Color file can be shared with many FEM files, or many Color files can be used with one FEM file whichever meets user’s working environment. General Rev 2015-08-13 1-10 3DWhiffletree Version 1.4.0 User’s Manual 2.0 Copyright © 2013-2014 Yoji Hosoe OVERVIEW OF USER INTERFACE The below screenshot shows 3DWhiffletree main widow. File Information File Menu Navigation Pane FEM Pane Model Window Whiffletree Pane Figure 2-1 Overview of User Interface Rev 2015-08-13 2-1 3DWhiffletree Version 1.4.0 User’s Manual 2.1 General 2.1.1 Window Size Copyright © 2013-2014 Yoji Hosoe The default window size, which is also the minimum window size, is 885 (W) x 720 (H) pixels with Model Window size 598 (W) x 598 (H) pixels. You can maximize the window size, or adjust the window size by dragging the right-bottom corner of the window. You can enlarge the window size to any size and the Model Window size also changes at the same ratio. However, Model Window remains in square shape based on the height of the window. 885 (Min) 598 (Min) 720 (Min) 598 (Min) Units [pixel] Drag to change main window size Figure 2-2 2.1.2 Tooltips Tooltips are available for the most of icons by placing a mouse pointer over the icon and hold it for a second. Overview of User Interface Rev 2015-08-13 2-2 3DWhiffletree Version 1.4.0 User’s Manual Copyright © 2013-2014 Yoji Hosoe Tooltip example Figure 2-3 2.1.3 Click or Toggle Button Icon buttons have two types: regular click button and toggle button. The way to see if the toggle button is toggled or not is a color of the button as shown in the figure below. ** Toggle On Toggle Off Figure 2-4 **If your PC is set to “Classic Windows View” the toggle button actually “toggles”. 2.1.4 Locked or Unlocked Button Some buttons are locked (grayed out) when their functions are unavailable. They become enabled automatically when functions are available. Below figures show an example of enabled and locked button. Button Enabled Button Locked Figure 2-5 Overview of User Interface Rev 2015-08-13 2-3 3DWhiffletree Version 1.4.0 User’s Manual 2.1.5 Copyright © 2013-2014 Yoji Hosoe Status Bar Occasionally you will see messages in Status Bar at the left-bottom of the window. They are supportive message for you to perform certain tasks. Figure below shows an example. Message example Figure 2-6 2.2 File Information At the very top of the window, you can see the followings: • • • Software Version FEM File Name shown in the first square-bracket Whiffletree File Name shown in the second square-bracket Whiffletree File Name Displays [*.wtr] if no file is opened. Software Version FEM File Name Displays [Blank Space] if no file is opened. Figure 2-7 Overview of User Interface Rev 2015-08-13 2-4 3DWhiffletree Version 1.4.0 User’s Manual 2.3 Copyright © 2013-2014 Yoji Hosoe File Menu File Menu is available to perform tasks. Most tasks can be completed from Icons, but there are some functions only available from File Menu. See corresponding sections for detail explanations of each menu. Displays help menu. Menus related to editing whiffletrees. (Section 5.0) Menus related to changing model views. (Section 4.0) Menus related to FEM file operations. (Section 3.0) Figure 2-8 2.4 FEM Pane FEM Pane is to perform tasks related to FEM file operation and also to change FEM model views. See Section 3.0 for more details. Figure 2-9 2.5 Whiffletree Pane Whiffletree Pane is to perform tasks related to Whiffletree constructions. See Section 5.0 for more details. Overview of User Interface Rev 2015-08-13 2-5 3DWhiffletree Version 1.4.0 User’s Manual Copyright © 2013-2014 Yoji Hosoe Figure 2-10 2.6 Navigation Pane Navigation Pane is to move, rotate, zoom, and change center location of models in Model Window. See Section 4.0 for more details. Figure 2-11 2.7 Model Window Model Window shows the following information. • • • FEM Model Whiffletree Model Coordinate Axis FEM model and Whiffletree model in Model Window they are simply overlapped view and do not act each other. Overview of User Interface Rev 2015-08-13 2-6 3DWhiffletree Version 1.4.0 User’s Manual Copyright © 2013-2014 Yoji Hosoe In addition, there are information boxes to show the following information. • • • • Center X Center Y Center Z View Scale Center X, Y, and Z are model center. When you rotate the models, the models are rotated about the point. The default model center is set to the geometric center of FEM model. The model center can be changed. See Section 4.4 to adjust the model center. View Scale is a factor related to zoomed size of the model. The larger View Scale is, the smaller the models appear in the Model Window. The values depend on the model geometric size and view orientation and users have no control on it. Whiffletree Model FEM Model Coordination Axis Center of Model View Scale Figure 2-12 Overview of User Interface Rev 2015-08-13 2-7 3DWhiffletree Version 1.4.0 User’s Manual 3.0 Copyright © 2013-2014 Yoji Hosoe FEM FILE AND MODEL VIEW This section explains functions related to FEM file operations and FEM model views in 3DWhiffletree. 3.1 General Functions are available through icon buttons and File Menu. You have more options to certain functions only through File Menu. 3.1.1 FEM Pane FEM Pane has icon buttons to access most of basic functions related to FEM file operations and model views. Figure 3-1 Open FEM model file (Section 3.2) Start in blank space (Section 3.4) Save FEM model as a new file (Section 3.3) Switch model view between Solid Color and Wire Mesh (Section 3.5) Switch model view between Perpendicular View and Perspective View (Section 3.6) Change element colors by element properties (Section 3.7) Switch whiffletree views shown as Most-Front or With-FEM (Section 0) Number of Nodes is displayed in FEM Pane. These numbers are actual nodes used to show the FEM models and are NOT the number of nodes contained in the original FEM file. Similar to Nodes, actual number of elements used in 3DWhiffletree is displayed. FEM File and Model View Rev 2015-08-13 3-1 3DWhiffletree Version 1.4.0 User’s Manual 3.1.2 Copyright © 2013-2014 Yoji Hosoe File Menu File Menu associated with FEM file operations can be access from “File”. Menus associated with FEM model views can be access from “View”. Some functions are not available through icon buttons in FEM Pane. Menus for FEM File Operations Menus for Model View Operations Figure 3-2 3.2 Open FEM Model File The command to open FEM model file can be accessed from either icon in FEM Pane or File Menu as shown in the figure below. Default folder that you see in File Open Dialog is the same folder where 3DWhiffletree.exe is stored. or Figure 3-3 FEM File and Model View Rev 2015-08-13 3-2 3DWhiffletree Version 1.4.0 User’s Manual 3.2.1 Copyright © 2013-2014 Yoji Hosoe Supported File Format and Limitation 3DWhiffletree can read FEM data files in any Nastran formats. The default file extensions to open are: *.d, *.dat, *.blk, *bdf, *.nid, and *.nas. However, any file extensions can be used as long as the files are written in plain text format (ASCII) and texts follow Nastran format. Even though the file is written in Nastran format, certain restrictions will apply. See Section 1.5.1 for format limitation. Because 3DWhifletree does not rely on 3D engine or physical graphic board to display 3D model data, number of nodes/elements directly affects the CPU usage of your machine, and thus, it affects the performance of the software. You may feel slow responses if the FEM model has more than 5,000 elements (of course it should depend on your machine). If your FEM model has large number of elements, for example, nodes more than 10,000, it is recommended to coarse-mesh the model before open it in 3DWhiffletree, or use “Reduce Mesh” function explained in the following section. 3.2.2 Reduce Mesh 3DWhiffletree comes with a built-in function to reduce meshes (i.e., to reduce number of elements and nodes). This can be done in 2 different ways: Before you open the FEM file, or After you open the FEM file. Method A: 1. Before opening FEM file, select “Reduce Mesh on Opening” FEM in “File” Menu. You will see that the option is checked. (Figure 3-4) 2. Open FEM file as normal. Figure 3-4 Method B: 1. Open FEM file first as normal. 2. Select “Reopen Current Model with Mesh Reduction”. (Figure 3-5) FEM File and Model View Rev 2015-08-13 3-3 3DWhiffletree Version 1.4.0 User’s Manual Copyright © 2013-2014 Yoji Hosoe Figure 3-5 Once the mesh reduction is successfully completed, you will see a message showing how much the elements are reduced (Figure 3-6). Example Figure 3-6 Logics Behind: FEM File and Model View Rev 2015-08-13 3-4 3DWhiffletree Version 1.4.0 User’s Manual Copyright © 2013-2014 Yoji Hosoe Mesh reductions are performed by merging 4 of CQUAD4 elements into one CQUAD4 element. All midnotes will be removed. The mesh reduction takes place only if the mid-center node (a node shared among 4 elements) is connected with 4 of CQUAD4 elements. If there are more than 4 elements or there is CTETRA3 elements, then these elements will not be merged. 4 rectangular elements 1 element (mesh reduced) More than 4 elements or containing triangular elements No mesh reduction Figure 3-7 Warnings and Precautions: 1. Merged Joints When you are proceeding with mesh reductions by either Method A or Method B above, you will see the following warning message. Figure 3-8 This is because 3DWhiffletree cannot distinguish out-of-plane nodes. FEM File and Model View Rev 2015-08-13 3-5 3DWhiffletree Version 1.4.0 User’s Manual Copyright © 2013-2014 Yoji Hosoe This could result in such mesh reductions Shared nodes between two planes Figure 3-9 2. Re-Opening the Re-Opened File It is known that error will occur when you try to use “Reopen Current Model with Mesh Reduction” when the model is already open with mesh reduction. Therefore, the command becomes unavailable once you reopen the model. However, it is possible to further reduce elements. To do so, save the reopened model first, open the saved model, and then, use “Reopen Current Model with Mesh Reduction” again. Refer to Section 3.3 for how to save model. When you reach a point that no more reduction is possible, you will see the following message. Figure 3-10 3. Distorted Element It is also known that some of elements are distorted after mesh reduction. This is due to mesh-reduction algorithm. Example is shown in the figure below. As FEM model is just for a supportive view to construct whiffletrees, the mesh quality will not affect the actual whiffletree constructions. FEM File and Model View Rev 2015-08-13 3-6 3DWhiffletree Version 1.4.0 User’s Manual Original Mesh Copyright © 2013-2014 Yoji Hosoe Reduced Mesh Figure 3-11 Merged Element and Property: When 4 of CQUAD4 elements are merged into 1 of CQUAD4 element, original elements are deleted and a new element is created with an element property ID set to zero. If you open Element Property Color window (Section 3.7), you can see Property ID = 0, which ID means merged element. Figure 3-12 Using Element Property Color window, you can set a color for merged element (Element Property ID = 0). Figure below shows FEM model with merged element color set to gray. FEM File and Model View Rev 2015-08-13 3-7 3DWhiffletree Version 1.4.0 User’s Manual Copyright © 2013-2014 Yoji Hosoe Merged element color set to “Gray” Figure 3-13 3.2.3 Read 1D Line Element 1D line elements can be displayed if the following option is checked when opening the FEM model. By default, this option is turned off. Figure 3-14 FEM File and Model View Rev 2015-08-13 3-8 3DWhiffletree Version 1.4.0 User’s Manual Copyright © 2013-2014 Yoji Hosoe Model with Line Elements Figure 3-15 Types of 1D elements allowed to be used are defined in 3DWTSystem.ini file. Only the most common line elements (CBAR, CBEAM, CROD) are defined by default; however, it is possible for users to add more elements in the 3DWTSystem.ini file. Additional allowed element types are CBEND, CONROD, CTUBE, and CVISC. Add more line elements as necessary, separated by comma. Figure 3-16 Remarks for Displaying 1D line elements: 1. 1D line elements are always shown in black color when displayed. There is not option to change the line element colors. 2. Even though some elements look like line elements such as CELAS2 (scalar elements) or RBE2 (Rtype elements), they will NOT be displayed even though you add the element types in 3DWTSystem.ini file. This is because the Nastran Bulk data formats are different for these elements. 3. It is a known issue that FEM model may be crashed when reading 1D element at the same time the option of reducing meshes is turned on. If you attempt to read 1D element with reducing meshes, the FEM File and Model View Rev 2015-08-13 3-9 3DWhiffletree Version 1.4.0 User’s Manual Copyright © 2013-2014 Yoji Hosoe following warning message will be displayed. Click Cancel to just open the FEM model without reducing meshes (still reads 1D element). Figure 3-17 3.2.4 Read Solid Tet-Mesh Solid tetra mesh can be displayed if the following option is checked when opening the FEM model. By default, this option is turned on. When opening the model, tetra meshes are converted into CTETRA3 elements only for outer surfaces. Because of this conversion process, it will take longer time to open the file. Figure 3-18 FEM File and Model View Rev 2015-08-13 3-10 3DWhiffletree Version 1.4.0 User’s Manual Copyright © 2013-2014 Yoji Hosoe Figure 3-19 3.3 Save File The command to save FEM model file can be accessed from either icon in FEM Pane or File Menu as shown in the figure below. or Figure 3-20 When saving the file, the following messages will pop up. It is to confirm whether you want to include “E” in the scientific format. If you click Yes, “E” will be included in the scientific format, otherwise, “E” will be omitted. Example: Original values: Click Yes to use “E”: Click No not to use “E”: FEM File and Model View -1.234E-6 -1.23E-6 -1.234-6 Rev 2015-08-13 1.2345E+6 1.235E+6 1.2345+6 3-11 3DWhiffletree Version 1.4.0 User’s Manual Copyright © 2013-2014 Yoji Hosoe As explained in Section 1.5.1, 3DWhiffletre can read both format with or without a symbol “E” as regular Nastran does. Since the saved file can only be used in 3DWhiffletree.exe, it does not matter which format you take. However, if you want to use the values imported to other software, such as Microsoft Excel, then scientific format without a symbol “E” may not work. Figure 3-21 Followings are some remarks that you may want to know. a) Default folder that you see in File Save Dialog is the same folder where 3DWhiffletree.exe is stored. b) File extension of the saved file is “.d”. c) Default file name is “XXX-Copy.d” where XXX is the original file name, but you can change it when you saving. (So, technically you can consider it as “Save As” function.) d) The saved data created by 3DWhiffletree only contains model data that is displayed. All other data such as Nastran executive control data or any element data that are not displayed will not be saved. For example, if your model does not show 1D line element (See Section 3.2.3), the 1D element data will be removed from the saved file. Further, element and grid numberings may be different from the original Nastran data file. e) Even though 3DWhiffletree.exe can read Large-Field format and Free-Field format (See Sec 1.5.1), saving FEM data is currently available only in Small-Field format. Cautions: Saved file shall be used by 3DWhiffletree.exe only. It does not guarantee any use for commercial FEM pre/post processors or solvers. Example Use of the “Save” Function 1. You used mesh reduction (Section 3.2.2). If you want to further reduce the model, you need to save the reduced mesh model first, then open the file to reduce mesh again. FEM File and Model View Rev 2015-08-13 3-12 3DWhiffletree Version 1.4.0 User’s Manual Copyright © 2013-2014 Yoji Hosoe 2. You used mesh reduction (Section 3.2.2). You don’t want to reduce the mesh every time you open the same model so you want save the reduced mesh model. 3. You have a large model file but most of contents are non-relevant data for just FEM view purpose such as DMIG entries. You want to compact the file only to contain the necessary data to be used in 3DWhiffletree. 3.4 Start in Blank Space When launched, 3DWhiffletree starts with an initial blank screen with 3 main axes (X, Y, and Z) as shown in the Figure below. Figure 3-22 This initial screen can be brought at any time by either clicking an icon or from File Menu. If there are any unsaved whiffletree data, you’ll be asked if you want to save. Use of this function (Start in Blank Space) actually does the almost same thing that you close the application and start it again. FEM File and Model View Rev 2015-08-13 3-13 3DWhiffletree Version 1.4.0 User’s Manual Copyright © 2013-2014 Yoji Hosoe or Figure 3-23 3.5 Wire Frame View Wire Frame View can be turned on and off from the following icon or File Menu. or Figure 3-24 FEM File and Model View Rev 2015-08-13 3-14 3DWhiffletree Version 1.4.0 User’s Manual Wire Frame Off Copyright © 2013-2014 Yoji Hosoe Wire Frame On Figure 3-25 3.6 Perspective View Perspective View can be turned on and off from the following icon or File Menu. or Figure 3-26 FEM File and Model View Rev 2015-08-13 3-15 3DWhiffletree Version 1.4.0 User’s Manual Perspective View Off Copyright © 2013-2014 Yoji Hosoe Perspective View On Figure 3-27 3.7 Change Element Color Element colors can be changed from the following icon or File Menu. or Figure 3-28 Remarks: 1. Separate element property IDs are required for separate colors. 2. No colors can be assigned for 1D line element. 3. Assigned colors cannot be saved even though you use Save FEM function (Section 3.3). The initial default color is always Powder Blue when you load FEM model. 4. Customized color is available as shown in the figure below. FEM File and Model View Rev 2015-08-13 3-16 3DWhiffletree Version 1.4.0 User’s Manual 1 Copyright © 2013-2014 Yoji Hosoe Select Element Property ID 2 Click “Define Custom Colors” if you want to Customize colors. 4 Click “Define Color” or preview color 3 Click OK Figure 3-29 FEM File and Model View Rev 2015-08-13 3-17 3DWhiffletree Version 1.4.0 User’s Manual Copyright © 2013-2014 Yoji Hosoe Assign Random Colors If you want to assign colors all at once, use “Random All” button. Random colors will be assigned to each property. Figure 3-30 FEM File and Model View Rev 2015-08-13 3-18 3DWhiffletree Version 1.4.0 User’s Manual Copyright © 2013-2014 Yoji Hosoe Save/Open Color Setting 1. User can save color settings associated with element property IDs. 2. By opening saved color file (*.col), element colors are automatically assigned per previously set colors per element property ID. 3. If element property ID are not found in the previously saved color file, the color will not change in that property ID (but all other property ID found in the file will change). 4. User can save as many color files as user want to meet user’s work environment. Open color file (*.col) to assign user-preset colors Save user-set colors into color file (*.col). Figure 3-31 FEM File and Model View Rev 2015-08-13 3-19 3DWhiffletree Version 1.4.0 User’s Manual 3.8 Copyright © 2013-2014 Yoji Hosoe Hide-Behind View Hide-Behind View is to hide points, rods, and beams behind the FEM model if they are actually behind of it. The view can be turned on and off by the following icon or File Menu. or Figure 3-32 Remarks: 1. Turning on the Hide-Behind View makes it easier to visualize whiffletrees. 2. The view can only be turned on when there is at least one loading point. 3. By turning on the view, each rod and beam in the whiffletrees are divided into 20 elements. Therefore, turning on this view makes the model heavy and you may feel slower responses if there are many rods and beams in your whiffletrees. Hid-Behind View Off Hid-Behind View On Figure 3-33 FEM File and Model View Rev 2015-08-13 3-20 3DWhiffletree Version 1.4.0 User’s Manual 4.0 Copyright © 2013-2014 Yoji Hosoe NAVIATION OF MODEL This section explains functions related to FEM and whiffletree model navigation. 4.1 General Functions are available through icon buttons and File Menu. Most of view operations (move, zoom, or rotate model) have mouse shortcut. 4.1.1 Navigation Pane Navigation Pane has icon buttons to access most of basic functions related to FEM and whiffletree model navigations. Figure 4-1 Angle of rotation achieved by one click on related icons or mouse move. The initial value is set between 2 to 16 degrees depending on number of elements and CPU speed, but it can be changed by typing the desired values in the box. Percentage of zooming in/out of the model with respect to the current view size, achieved by one click on related icons or mouse scroll move. The default value is set to 12.5 percent but it can be changed by typing the desired values in the box. Rotate model down (Section 4.2.1) Shortcut: Middle Mouse Button + Drag Down [Inside Circle] Rotate model up (Section 4.2.1) Shortcut: Middle Mouse Button + Drag Up [Inside Circle] Rotate model right (Section 4.2.1) Shortcut: Middle Mouse Button + Drag Right [Inside Circle] Rotate model left (Section 4.2.1) Shortcut: Middle Mouse Button + Drag Left [Inside Circle] Rotate model clockwise (Section 4.2.1) Shortcut: Middle Mouse Button + Drag [Outside Circle] Naviation of Model Rev 2015-08-13 4-1 3DWhiffletree Version 1.4.0 User’s Manual Copyright © 2013-2014 Yoji Hosoe Rotate model counterclockwise (Section 4.2.1) Shortcut: Middle Mouse Button + Drag [Outside Circle] Pan move left model (Section 4.2.2) Shortcut: Left Mouse Button + Drag Pan move up model (Section 4.2.2) Shortcut: Left Mouse Button + Drag Pan move down model (Section 4.2.2) Shortcut: Left Mouse Button + Drag Pan move right model (Section 4.2.2) Shortcut: Left Mouse Button + Drag Zoom in model (Section 4.2.3) Shortcut: Mouse Scroll Back Zoom in model (Section 4.2.3) Shortcut: Mouse Scroll Forward Change model view into XY plane (Section 4.2.4) Change model view into YZ plane (Section 4.2.4) Change model view into XZ plane (Section 4.2.4) Change model view into Isometric (Section 4.2.4) Copy model image into clipboard (Section 4.5) Adjust model center (Section 4.4) 4.1.2 File Menu There is basically no File Menu associated with model view operations such as move, zoom, or rotate models. There are some functions available from File Menu. The Axis option is only available from File Menu. Naviation of Model Rev 2015-08-13 4-2 3DWhiffletree Version 1.4.0 User’s Manual Copyright © 2013-2014 Yoji Hosoe Figure 4-2 4.2 Model View Operation There are four types of model view operations. Following subsections describe detail of each operation. • • • • 4.2.1 Rotate Pan Move Zoom Preset View Rotate By Icon Angle of rotate by one click or mouse move (Can be edited) Rotate counter-clockwise Rotate clockwise Rotate Left Rotate Right Rotate Up Rotate Down Figure 4-3 By Mouse Naviation of Model Rev 2015-08-13 4-3 3DWhiffletree Version 1.4.0 User’s Manual Copyright © 2013-2014 Yoji Hosoe Dragging cursor by middle mouse button in the Model Window can rotate the model. When you try to rotate, a red-dotted circle will appear in the Model Window. Dragging inside the circle will rotate the model around vertical or horizontal axis. Dragging outside the circle will rotate the model around the axis perpendicular to the screen. Rotate Left – Right Rotate Up – Down Rotate Clock – Counterclockwise Figure 4-4 Remarks: 1. By default, the center of rotation is set to the geometric center of FEM. It is NOT the center of view window. The center of rotation can be changed by using Adjust Model Center function (Section 4.4). 2. If your model rotate too fast by mouse (usually happens when model size is small in terms of number of nodes/elements), lower the “Rotation (deg)” in the box. Adjust angle to change rotation speed by mouse Figure 4-5 4.2.2 Pan Move By Icon Naviation of Model Rev 2015-08-13 4-4 3DWhiffletree Version 1.4.0 User’s Manual Copyright © 2013-2014 Yoji Hosoe Pan-move Right Pan-move Down Pan-move Up Pan-move Left Figure 4-6 By Mouse Dragging left mouse button in the Model Window can pan-move the model. Remarks: Moving model does NOT shift the model center for zoom in/out. The model center can be changed by using Adjust Model Center function (Section 4.4). 4.2.3 Zoom In and Out By Icon Percentage of zoom by one click or one mouse scroll move with respect to the current zoom. (Can be edited) Zoom Out Zoom In Figure 4-7 By Mouse (Scroll) Naviation of Model Rev 2015-08-13 4-5 3DWhiffletree Version 1.4.0 User’s Manual Copyright © 2013-2014 Yoji Hosoe Zoom In (Scroll Back) Zoom Out (Scroll Forward) Figure 4-8 Remarks: By default, the center of zoom in/out is set to the geometric center of FEM. It is NOT the center of view window. The center of zoom in/out can be changed by using Adjust Model Center function (Section 4.4). 4.2.4 Preset View Angle There are four types of preset view: XY Plane, YZ Plane, XZ Plane, and Isometric View. All of them can be accessed only from icons. Whenever preset view is selected, the zoom level is automatically adjusted to fit in Model Window. The default is Isometric view when opening a new FEM model (not whiffletree model). Isometric View (Default when open new FEM ) XZ Plane YZ Plane XY Plane Figure 4-9 Naviation of Model Rev 2015-08-13 4-6 3DWhiffletree Version 1.4.0 User’s Manual Copyright © 2013-2014 Yoji Hosoe Isometric View XY Plane View YZ Plane View XZ Plane View Figure 4-10 4.3 Coordination Axis By default, global coordinate axis is shown at the lower left corner in the model view window. Axis properties can be changed only from File Menu, View >> Axis. Naviation of Model Rev 2015-08-13 4-7 3DWhiffletree Version 1.4.0 User’s Manual Copyright © 2013-2014 Yoji Hosoe Figure 4-11 4.3.1 Turn On and Off the Axis Axis can be turned on by selecting unchecked coordinate system from File Menu. Re-selecting checked coordinate system again will uncheck and turn off the axis view. Checked (Turned On) Unchecked (Turned Off) Figure 4-12 4.3.2 Global Coordinate System Global coordinate system is a default coordinate system. It shows X-Y-Z axis corresponding to FEM model axis. Figure 4-13 4.3.3 Airplane Coordinate System Naviation of Model Rev 2015-08-13 4-8 3DWhiffletree Version 1.4.0 User’s Manual Copyright © 2013-2014 Yoji Hosoe Airplane coordinate system can be shown as FWD, RHS, and UP. Figure 4-14 Remarks: The default airplane coordinate system is set as follows. FWD = -X RHS = +Y UP = +Z This default can be changed in 3DWhiffletree.ini file by changing the following line. Currently, FWD can be only changed to either “+X” or “-X”, RHS to “+Y” or “-Y”, and UP to “+Z” or “-Z”. Assigning other values will cause errors. Also note that only FWD, RHS, and UP can be used for airplane coordination. For example, AFT, LHS or DOWN cannot be used. Change signs to set default axis. Figure 4-15 4.3.4 Custom Coordinate System Custom Coordinate System can allow you to specify your own axis for airplane coordinate system. Currently following axis can be set to FWD, RHS, and UP. FWD = +X or -X RHS = +Y or -Y UP = +Z or -Z Naviation of Model Rev 2015-08-13 4-9 3DWhiffletree Version 1.4.0 User’s Manual Copyright © 2013-2014 Yoji Hosoe Figure 4-16 Remarks: This customized coordinate system is effective only for the current window and will not be saved. 4.4 Adjust Model Center Center of model is displayed just below the Model Window. The model center is a base point for zooming in/out the model as well as rotating the model. When FEM file is opened, the model center is calculated based on the FEM model geometry. Then, the geometric center is set to the model center. Figure 4-17 The model center can be adjusted from the following icon or File Menu. or Figure 4-18 There are four types of center you can select. Each property is explained in the table below. • • • • FEM Geometric Center Loading Points Overall CG Current Window Center Custom Naviation of Model Rev 2015-08-13 4-10 3DWhiffletree Version 1.4.0 User’s Manual Copyright © 2013-2014 Yoji Hosoe Figure 4-19 Table 4-1 Option Button Model Center FEM Geometric Center − X Min YMax − YMin Z Max − Z Min X (x, y, z) = Max , , 2 2 2 Loading Points Overall CG ∑ mi ⋅ x i ∑ mi ⋅ y i ∑ mi ⋅ z i , , (x, y, z) = ∑m ∑m ∑m To select this option, there must be at least one loading point in the current model. Current Window Center Current window center will be automatically extracted. Custom Any numbers can be typed in. Once new model center is selected, the model will be regenerated to be fit in Model Window with Isometric View. 4.5 Copy Image Copy Image function can be accessed from the following icon or File Menu. This will capture a bitmap image of Model Window. The copied image will be stored into clipboard so that it can be pasted to other application. Naviation of Model Rev 2015-08-13 4-11 3DWhiffletree Version 1.4.0 User’s Manual Copyright © 2013-2014 Yoji Hosoe or Figure 4-20 Warnings: 1. As of Version 1.0, this Copy Image function from File Menu is disabled. 2. This function is almost same as PC’s Print Screen function. Therefore, the Model Window must be cleared and entire window should be seen in your screen to capture correct images. Otherwise, loss of image will happen. Naviation of Model Rev 2015-08-13 4-12 3DWhiffletree Version 1.4.0 User’s Manual 5.0 Copyright © 2013-2014 Yoji Hosoe WHIFFLETREE CONSTRUCTION This section explains functions related to construction of whiffletree which is a core part of this software. 5.1 General Functions are available through icon buttons and File Menu. You have more options to certain functions only through File Menu. 5.1.1 General Model View and Nomenclature Below figures show an example view of building whiffletrees. Whiffletrees generally consist of CG points, Rods, Beams, and Connecting Points. Nomenclatures of these components are explained in the table below. Connecting Points CG Points (Loading Points) Beam Rod Figure 5-1 Whiffletree Construction Rev 2015-08-13 5-1 3DWhiffletree Version 1.4.0 User’s Manual Copyright © 2013-2014 Yoji Hosoe Table 5-1 CG Appearance in Model Red Dot Beam (*1) Green Line This is moment arm. It connects with two rods at both ends and with one rod at somewhere in between. Beam has the following properties: • Must contain 3 connecting points. • Must be perpendicular to the loading direction. Rod (*2) Blue Line This is axially loaded device. It connects between two connecting points (one end can be CG). Rod has the following properties: • Must contain 2 points at ends. • Must be parallel to the loading direction. Connecting Point Blue dot This is a connecting point between rod and beam. It has the following properties: • Must be connected with beam except for the top of whiffletree. • Can be moved in rod’s axial direction. • Can be deleted if it is at the top of whiffletrees. • All 3 points within the same beam will move together. (Numbers) Numbers Numbers are automatically assigned at CG (Loading Points) and Connecting Points. Numbers are not fixed and can be changed automatically at any time if construction changes but cannot be edited by users. Nomenclature Meanings It is also called “Loading Point”. The point represents weight components where loads are applied. CG points have the following properties: • Can be only connected by rod. • CG properties (weight, location, and name) can be edited at any time. • Can be split. • Can be moved together with another CG in the plane perpendicular to the loading direction while keeping the overall CG same. • Can be moved in the plane perpendicular to the loading direction (overall CG will change.) • Can be added at any time. • Can be deleted only when not connected to the other point. Notes: *1) Even though it is called “Beam”, the physical constructions do not need to be actually a beam. *2) Even though it is called “Rod”, the physical constructions do not need to be actually a rod. 5.1.2 Whiffletree Pane Whiffletree Pane has icon buttons to access most of basic functions related to whiffletree constructions. Whiffletree Construction Rev 2015-08-13 5-2 3DWhiffletree Version 1.4.0 User’s Manual Copyright © 2013-2014 Yoji Hosoe Figure 5-2 ID can be assigned to an individual whiffletree model. It can be assigned or changed in Whiffletree Edit Window. See Section 6.2 for more detail. Pull Direction shows a loading direction. It can be set or modified in Whiffletree Edit Window. See Section 6.4for more detail. G-Factor is a loading factor multiplied to the original weight at each CG Point. It can be set or modified in Whiffletree Edit Window. See Section 6.5 for more detail. This is a weight ratio to be used when splitting a CG into to. It can be directly modified. See Section 5.14.3 for more detail about splitting a CG point. Other Factor is any additional factors multiplied together with G-Factor. You can enter as many factors as you want. It can be edited in Whiffletree Edit Window. See Section 6.6 for more detail. This shows supplemental information about the location of point. It can be displayed when you are modifying a point. Open whiffletree (*.wtr) file (Section 5.2) Save whiffletree (*.wtr) file (Section 5.3) Open and read CG (*.csv) file (Section 5.4) View and edit whiffletree data (Section 5.5) Whiffletree Construction Rev 2015-08-13 5-3 3DWhiffletree Version 1.4.0 User’s Manual Copyright © 2013-2014 Yoji Hosoe View and edit whiffletree material data (Section 5.6) View whiffletree diagram (Section 5.7) Export whiffletree to CATIA (Section 5.8) Create a whiffletree between two points (Section 5.9) Delete all whiffletrees (Section 5.10) Add a CG point (Section 5.11) Delete a point (Section 5.12) Obtain information of a point (Section 5.13) Move a point along loading direction (Section 5.14) Shortcut: SHIFT KEY + Mouse Left Button Drag Split a CG point (Section 5.14.3) Move two CG points together (Section 5.14.4) Move a CG point in a plane perpendicular to loading direction (Section 5.14.5) 5.1.3 File Menu Most of File Menu is available in icons, but there are some functions only available from File Menu such as changing graphic size of rod/beam/point and turning on/off the warning for whiffletree beam length. Whiffletree Construction Rev 2015-08-13 5-4 3DWhiffletree Version 1.4.0 User’s Manual Copyright © 2013-2014 Yoji Hosoe Figure 5-3 5.2 Open Whiffletree File (*.wtr) Previously saved whiffletree data (*.wtr file) can be opened from the following icon or File Menu. or Figure 5-4 What is Whiffletree Data (*.wtr) File? Whiffletree Construction Rev 2015-08-13 5-5 3DWhiffletree Version 1.4.0 User’s Manual Copyright © 2013-2014 Yoji Hosoe Whiffletree data file is a text-formatted file containing whiffletree geometry data as well as other associated information to the whiffletree model. It is used to save your whiffletree created in 3DWhiffletree program to be used for later time. Even though the file is written in ASCII-format, it is not intended to be edited by text editors. The contents have to be written in specific format and order. The default file extension is (*.wtr); however, any file extensions can be opened as long as it is written in text format. Figure 5-5 Remarks: 1. Default file extension in File Open Dialog is (*.wtr). 2. Opening whiffletree models does not automatically readjust the center of model based on the whiffletree geometry or its overall CG. This is because FEM model is usually opened first and whiffletree model will be constructed based on the FEM model space. If you open whiffletree model only, you may need to adjust model center to view your whiffletree models (See Section 4.4). 5.3 Save Whiffletree File (*.wtr) You can save your whiffletree data for later use. Saving whiffletree data can be done from the following icon or File Menu. Table 5-2 summarizes what you can save and what you can NOT save in the *.wtr file. Whiffletree Construction Rev 2015-08-13 5-6 3DWhiffletree Version 1.4.0 User’s Manual Copyright © 2013-2014 Yoji Hosoe or Figure 5-6 Table 5-2 • • • • • • • • • • • • • What you can save Whiffletree ID Case Description Pull Direction Load Factor Other Factor(s) Whiffletree Constructions including CG, Loads, Rod, and Beam Origin for CATIA export Coordinate for CATIA export Scale Factor for CATIA export Scale Conversion for CATIA export Whiffletree Display Units (L, W, M) Display Format (L, W, M, Iyy, c, and Ftu for Whiffletree, but not for Material. You can save them in a separate *.mtl file – See Section 7.0) Warning Length • • • • • • What you can NOT save Relationship between FEM model. Remember FEM model is just an image to help whiffletree constructions and there is no interaction with whiffletree models. Whiffletree Model View Properties including Rotation Angle, View Angle, Location, and Zoom Level Point Size Rod Size Beam Size Whiffletree Material (You can save them in a separate *.mtl file – See Section 7.0) Remarks: 1. Default file extension in Save File Dialog is (*.wtr). 2. Icon and File Menu can become active only when changes are made in whiffletree data. 3. You can change/edit file name before you confirm to save. Therefore, this function is technically considered as “Save As” function. 5.4 Read CG Data CG data file (*.csv) can be read through the following icon or File Menu. Whiffletree Construction Rev 2015-08-13 5-7 3DWhiffletree Version 1.4.0 User’s Manual Copyright © 2013-2014 Yoji Hosoe or Figure 5-7 What is CG data? CG data is a set of point data where loads will be applied by whiffletree. The CG Points are located very bottom of the whiffletree, and therefore, it shows distribution of loads. The CG Points can be created in 3DWhiffletree by Add Point command (Section 5.11). However, it is more common and efficient to create CG points separately from 3DWhiffletree and let the program read the points. This is because users usually have a set of CG data already if the users already have FEM model. How the CG data file (.csv) can be created? There is no function to save points as CG data file in 3DWhiffletree program. You need to create CG data file by yourself. Since the file is in CSV format (comma-separated values), you can use any commercial software such as Microsoft Excel to edit and save the file in CSV format. Refer to Section 1.5.4 for how to create CSV file. Difference between CG data file (*.csv) and whiffletree data file (*.wtr) CG data (csv) file can only contain data for CG points while whiffletree data (wtr) file can contain both CG points and whiffletree models. (This is of course because CG point is a part of whiffletree model.) 5.5 View and Edit Whiffletree Data All whiffletree data can be viewed and managed in a separate window called Whiffletree Edit Window. The window can be launched from the following icon or File Menu. The detail to manage whiffletree data is explained in Section 6.0. or Figure 5-8 Whiffletree Construction Rev 2015-08-13 5-8 3DWhiffletree Version 1.4.0 User’s Manual 5.6 Copyright © 2013-2014 Yoji Hosoe View and Edit Whiffletree Material Data Whiffletree material data can be opened, viewed, edited, and saved in a separate window called Material Edit Window. The window can be launched from the following icon or File Menu. The detail to manage whiffletree material data is explained in Section 7.0. or Figure 5-9 5.7 View Whiffletree Diagram Whiffletree diagram can be reviewed in a separate window. The window can be launched from the following icon or File Menu. The detail about whiffletree diagram is explained in Section 8.0. or Figure 5-10 5.8 Export to CATIA Exporting whiffletree model into CATIA can be done in a separate window. The window can be launched from the following icon or File Menu. The detail about exporting model in to CATIA is explained in Section 9.0. Whiffletree Construction Rev 2015-08-13 5-9 3DWhiffletree Version 1.4.0 User’s Manual Copyright © 2013-2014 Yoji Hosoe or Figure 5-11 5.9 Build Whiffletree Building whiffletree can be done by the following icon or File Menu. Take the following procedures described in the following subsections. or Figure 5-12 5.9.1 Procedures 1. Click icon or start from File Menu. You will see a message “Select the first point” in Status Bar. 2. Pick the first point by clicking a point in Model Window by mouse. Zoom in/out or rotate the model as necessary. Once you click a point, the point turns to yellow and the message in Status Bar changes to “Select the second point.” 3. Pick the second point by clicking a point in Model Window by mouse. As soon as you select the second point, a message will appear to confirm the connection between the points you selected. Whiffletree Construction Rev 2015-08-13 5-10 3DWhiffletree Version 1.4.0 User’s Manual Copyright © 2013-2014 Yoji Hosoe 1) Message in Status Bar for the first point. 2) Point 1 is selected (color turns to yellow). 3) Message in Status Bar for the second point. 4) Point 13 is selected as the second point. 5) Message will appear to confirm the connection. Figure 5-13 Whiffletree Construction Rev 2015-08-13 5-11 3DWhiffletree Version 1.4.0 User’s Manual Copyright © 2013-2014 Yoji Hosoe 4. Whiffletree is built with rods and beam (new point 18, 19, and 20 are created in this example). Selected Points New Whiffletree Figure 5-14 Non-selectable points for whieeltree construction You can select points for whiffletree only if they are CG points that are not connected with rods or the point at the top of the tree. In summary belows are points that cannot be selected for whiffletree construction. 1. CG points that are alrady connected with a rod 2. Points that are already part of whiffletree (i.e., Beam) 3. Point for 2nd point that is already selected as the 1st point. When selecting any of these points, you will see an error message shown in the figure below. Whiffletree Construction Rev 2015-08-13 5-12 3DWhiffletree Version 1.4.0 User’s Manual Copyright © 2013-2014 Yoji Hosoe Examples of Non-Selectable Points Figure 5-15 5.9.2 Technical Background Calculation method for whiffletree construction is shown below. In the below example the pulling direction is assumed to be Z direction. Method is similar for the case of pulling direction in X or Y. 3DWhiffletree program only can take the pulling direction parallel to major global axes (X, Y, or Z). Whiffletree Construction Rev 2015-08-13 5-13 3DWhiffletree Version 1.4.0 User’s Manual Copyright © 2013-2014 Yoji Hosoe Loading Direction: Z L2 L1 Z P3 (X3, Y3, Z3, W3) Y P2 (X2, Y2, Z2, W2) X P1 (X1, Y1, Z1, W1) Figure 5-16 In the figure above, we want to find P 3 based on P 1 and P 2 properties. Therefore, Find: P 3 coordinate (X 3 , Y 3 , Z 3 ) and Load (W 3 ) Known: P 1 coordinate (X 1 , Y 1 , Z 1 ) and Load (W 1 ) P 2 coordinate (X 2 , Y 2 , Z 2 ) and Load (W 2 ) Direction to pull (+Z in this example) By taking a moment about P 3 , L 1 ⋅ W1 = L 2 ⋅ W 2 If L = L 1 + L 2 , then L1 W2 ⋅= L W1 + W 2 Therefore, X 3 = (X 2 − X 1 ) Y3 = (Y2 − Y1 ) W2 + X1 W1 + W 2 W2 + Y1 W1 + W 2 W 3 = W1 + W 2 Note that default Z 3 value is automatically calculated by program based on the distance between P 1 and P 3 . Whiffletree Construction Rev 2015-08-13 5-14 3DWhiffletree Version 1.4.0 User’s Manual 5.10 Copyright © 2013-2014 Yoji Hosoe Delete All Whiffletree This command will delete ALL whiffletrees. To delete a part of whiffletree, use Delete a Point (See Section 5.12). Delete All Whiffletree function is available through the following icon or File Menu. or Figure 5-17 Delete All Whiffletree will delete all rods, beams, and points except for CG points. You will see a confirmation message. Click Yes will delete all rods and beams. Figure 5-18 Whiffletree Construction Rev 2015-08-13 5-15 3DWhiffletree Version 1.4.0 User’s Manual Copyright © 2013-2014 Yoji Hosoe Figure 5-19 5.11 Add a Point The Add a Point function is available through the following icon or File Menu. or Figure 5-20 Procedures: 1. A separate window will open. 2. Fill out X, Y, and Z coordinate, Description, and Weight. Whiffletree Construction Rev 2015-08-13 5-16 3DWhiffletree Version 1.4.0 User’s Manual Copyright © 2013-2014 Yoji Hosoe Figure 5-21 3. Click Preview to check the point. The new point will show in yellow. New Point (Preview) Figure 5-22 4. Click OK to finalize the point. The yellow point will turn to red. Weight must be greater than 0. Description is optional. Whiffletree Construction Rev 2015-08-13 5-17 3DWhiffletree Version 1.4.0 User’s Manual Copyright © 2013-2014 Yoji Hosoe New Point (Finalized) Figure 5-23 5. You can check the new point from Whiffletree Edit Window. See 6.0 for detail about Whiffletree Edit Window. Whiffletree Construction Rev 2015-08-13 5-18 3DWhiffletree Version 1.4.0 User’s Manual Copyright © 2013-2014 Yoji Hosoe New Point Entry Figure 5-24 5.12 Delete a Point (Delete Whiffletree) The Delete a Point function is available through the following icon or File Menu. or Figure 5-25 There are two functions for this command: to delete a point, and to delete a whiffletree. 5.12.1 Delete a Point Only CG points that are not connected can be deleted. Whiffletree Construction Rev 2015-08-13 5-19 3DWhiffletree Version 1.4.0 User’s Manual Copyright © 2013-2014 Yoji Hosoe 1. Click icon or use File Menu to activate Delete a Point function. You’ll see a message in Status Bar. Figure 5-26 2. Select a CG point that you want to delete. Below figure shows an example of deleteable CG points. Deletable Points Figure 5-27 3. A confirmation dialog will pop up. Click OK to confirm the point deletion. Figure 5-28 Whiffletree Construction Rev 2015-08-13 5-20 3DWhiffletree Version 1.4.0 User’s Manual Copyright © 2013-2014 Yoji Hosoe 4. Point has been deleted. Note that point numbers have been updated automatically. Point has been deleted. Figure 5-29 Notes: If you select any non-deletable points, you’ll see the following warning message. Figure 5-30 5.12.2 Delete Whiffletree Points and whiffletree (Beam and Rod) can be deleted if they are located at the top of whiffletrees. You need to select the point located top of the whiffletree. Then, rod and beams only one level below of the points will be deleted together. Whiffletree Construction Rev 2015-08-13 5-21 3DWhiffletree Version 1.4.0 User’s Manual Copyright © 2013-2014 Yoji Hosoe Deleting this point will delete this whiffletree. Deleting this point will delete this whiffletree. Figure 5-31 Procedures are essentially the same as deleting CG points. 1. Click icon or use File Menu to activate Delete a Point function. 2. Select a point at top of whiffletrees. Whiffletree Construction Rev 2015-08-13 5-22 3DWhiffletree Version 1.4.0 User’s Manual Copyright © 2013-2014 Yoji Hosoe Figure 5-32 3. Confirm in a pop up dialog message. Figure 5-33 4. Point along with rods and beam are deleted. Note that point numbers will be automatically updated as necessary. Whiffletree Construction Rev 2015-08-13 5-23 3DWhiffletree Version 1.4.0 User’s Manual Copyright © 2013-2014 Yoji Hosoe Points, beam, and rods are deleted. Figure 5-34 5.13 Show Point Info The Show Point Info function is available through the following icon or File Menu. or Figure 5-35 1. Activate Show Point function by clicking icon or from File Menu. You’ll see a message in Status Bar. Figure 5-36 Whiffletree Construction Rev 2015-08-13 5-24 3DWhiffletree Version 1.4.0 User’s Manual Copyright © 2013-2014 Yoji Hosoe 2. Click a point that you are interested. You can click any point including points that are part of rods or beams. A message window will pop up. Figure 5-37 Remarks: 1. Weight is given only for CG points. 2. Load will be shown with units and decimal places set by users (See Section 6.8.) 3. X, Y, and Z values will be shown with units and decimal places set by users (See Section 6.8.) 5.14 Move and Edit Points There are four types of moving or editing points in addition to directly editing point in Whiffletree Edit Window. (See Section 6.0 for editing whiffletrees in Whiffletree Edit Window.) They are: • • • • Move a Point (Along Loading Direction) Split a Point Move Two Points Together Move a Point (In Plane) Move a Point (In Plane) Move Two Point Together Split a Point Move a Point (Along Loading Direction) Figure 5-38 5.14.1 Summary of Moving Points Whiffletree Construction Rev 2015-08-13 5-25 3DWhiffletree Version 1.4.0 User’s Manual Copyright © 2013-2014 Yoji Hosoe Table 5-3 summarizes different function of moving points. Table 5-3 Function Direction Points Final Loading Points Any No Change Move a Point (Along Loading Direction) Along loading direction Split a Point In plane perpendicular to loading direction CG Only No Change Move Two Point Together In plane perpendicular to loading direction CG Only No Change Move a Point (In Plane) In plane perpendicular to loading direction CG Only Will Change (*1) Notes: (*1) If the point you are moving is a split point (and have not been forgotten), then, the point will only move with other split point. This behavior is exactly same as Move Two Point Together, unless you forget the split between two points. See Section 6.11 for how to forget split. 5.14.2 Move a Point (Along Loading Direction) This command will move any points along loading direction. Any points (CG, rod, or beam) can be moved. The final loading point will not change. This command is useful when you want to: • • • move a CG Point to accurate location where actually loaded in the static test, clean overlapped beams and rods, or adjust rod lengths to be more accurately represent actual static test. The Move a Point is available through the following icon or File Menu. or Figure 5-39 1. Activate Move a Point function by clicking icon or from File Menu. You’ll see a message in Status Bar. Whiffletree Construction Rev 2015-08-13 5-26 3DWhiffletree Version 1.4.0 User’s Manual Copyright © 2013-2014 Yoji Hosoe Figure 5-40 Since this function is frequently used, a shortcut key is also available. Shortcut Key: Hold SHIFT Key and drag a point by mouse left button 2. Click and drag the point you want to move by mouse left button. Moving Point Figure 5-41 3. While dragging a point, the point turns to yellow. Moving Point Figure 5-42 4. If you pick a point that is part of beam, three points consist of the beam will move together. Whiffletree Construction Rev 2015-08-13 5-27 3DWhiffletree Version 1.4.0 User’s Manual Copyright © 2013-2014 Yoji Hosoe Moving Point Select one of points in a beam 3 points move together Moving Point Figure 5-43 5.14.3 Split a Point This command can split a CG Point into 2 new points. Final load point and overall CG will not change. This command is useful when you want to: • • Distribute a loading points, or Split a loading point to avoid interferences with test fixture. The Split a Point is available through the following icon or File Menu. or Figure 5-44 Whiffletree Construction Rev 2015-08-13 5-28 3DWhiffletree Version 1.4.0 User’s Manual Copyright © 2013-2014 Yoji Hosoe 1. Activate Split a Point function by clicking icon or from File Menu. You’ll see a message in Status Bar. Figure 5-45 2. Select a point by mouse left button and drag it. While dragging, two new yellow points will dynamically appear showing new split points. Click and drag a point While dragging, two new points will dynamically appear. Split will occur based on the Split Weight Ratio (default = 1.0) Location of one of new split point (base point) will be shown. Figure 5-46 Whiffletree Construction Rev 2015-08-13 5-29 3DWhiffletree Version 1.4.0 User’s Manual Copyright © 2013-2014 Yoji Hosoe 3. Once you drag the point at approximate desired locations, release the mouse left button. Then, below window will pop up. In the window you can fine-tune the location or split ratio. Ratio can only be edit at main window (Whiffletree Panel) Edit new point names Edit weight. Coordinate of both points (New Point 1 and New Point 2) will be automatically updated. This will overwrite weight ratio specified above. Edit exact location. Loading direction cannot be edited. Coordinate of other points (New Point 1) will be automatically updated. Temporary point IDs (not final ID) Figure 5-47 Remarks: a) Weight Ratio: “P1:P2 = 1.00” means weight are distributed equally. For example, “P1:P2 = 2.0” means P1 weight will be distributed twice of P2 weight. b) Default Name Following suffix will be added to the new points New Point 1: “Original Name” – Split 1/2 New Point 2: “Original Name” – Split 2/2 c) Weight: Weight distribution can be edited. The new weight distribution will overwrite the Weight Ratio. (i.e., no matter what the weight ratio is, the new weight can be distributed as entered in the weight box.) 4. Click OK to confirm. Then, whiffletrees will be updated with split points. Remarks: Once a point is split, the new split points cannot be recovered. There is no command to combine two points into one. Whiffletree Construction Rev 2015-08-13 5-30 3DWhiffletree Version 1.4.0 User’s Manual Copyright © 2013-2014 Yoji Hosoe New split CG points New rods and beam are automatically created for split points Figure 5-48 5. You can check split points in Whiffletree Edit Window. This will remove a link between two split points. If the point is a split, other point ID is shown here. Figure 5-49 Whiffletree Construction Rev 2015-08-13 5-31 3DWhiffletree Version 1.4.0 User’s Manual Copyright © 2013-2014 Yoji Hosoe Remarks: What is for? When a CG Point is split, the new points will be linked as split points. This is to ensure that the overall CG will not change when moving a point in plane (see Sec 5.14.5). Forget Split will delete this link and make these split points to an individual CG Point. By clicking Forget Split button, • • • Split information is permanently removed. Other split point will be automatically updated. Point name will not be changed automatically. (i.e., if the name contains “- Split 1/2", then it remains unchanged.) 5.14.4 Move Two Points Together This command can move two CG Points together in a plane perpendicular to the loading direction while keeping overall CG being unchanged. This command is useful when you want to: • Adjust whiffletree loading points but keep the same overall CG The Move Two Points is available through the following icon or File Menu. or Figure 5-50 1. Activate Move Two Points function by clicking icon or from File Menu. You’ll see a message in Status Bar. Figure 5-51 2. Once selecting the first point, the selected point turns to yellow. Then, you’ll see the next message in Status Bar. Whiffletree Construction Rev 2015-08-13 5-32 3DWhiffletree Version 1.4.0 User’s Manual Copyright © 2013-2014 Yoji Hosoe Figure 5-52 3. Once selecting the second point, both selected points now turn to yellow. Then, you’ll see the next message in Status Bar. Figure 5-53 4. Dragging either point in yellow will dynamically update the whiffletrees. Overall CG will not change. The distance that the other point moves depends on the weight ratio of the two selected points. Two points will move together Drag one point This point remains the same. Figure 5-54 5.14.5 Move a Point (In Plane) Whiffletree Construction Rev 2015-08-13 5-33 3DWhiffletree Version 1.4.0 User’s Manual Copyright © 2013-2014 Yoji Hosoe This command will move a CG Point in a plane perpendicular to loading direction. Depending on the moving point, there are two different results. • • Moving a Split Point will result in the same move as Move Two Points Together previously described in Section 5.14. Moving all other points will result in change in overall CG. The Move a Point (In Plane) is available through the following icon or File Menu. or Figure 5-55 1. Activate Move a Point (In Plane) function by clicking icon or from File Menu. Because this function will change the original overall CG, the following message will appear to ensure that the use is aware of this function. Figure 5-56 2. Then, you’ll see a message in Status Bar. Figure 5-57 3. Select a point and drag it to the desired location. There are two different results depending on the type of point you choose. Whiffletree Construction Rev 2015-08-13 5-34 3DWhiffletree Version 1.4.0 User’s Manual Copyright © 2013-2014 Yoji Hosoe 1) Split Points If the selected point is a Split Point, the selected point will move together with the other linked split point. The behavior is exactly same as Move Two Point Together as described in Section 5.14, except you select one point instead two points. Therefore, the overall CG will not change. 2) Other CG points The point will freely move independently on the other points. Therefore, overall CG will change. Move this point (not split point) Total CG will change. (Whiffletrees will be updated accordingly.) Figure 5-58 5.15 Change Point/Rod/Beam Sizes Point, Rod, and Beam size can be changed from the following menus. (There is no icon for these commands.) Note that the change of size is temporary and will not be saved. Whiffletree Construction Rev 2015-08-13 5-35 3DWhiffletree Version 1.4.0 User’s Manual Copyright © 2013-2014 Yoji Hosoe Figure 5-59 Figure 5-60 Whiffletree Construction Rev 2015-08-13 5-36 3DWhiffletree Version 1.4.0 User’s Manual Copyright © 2013-2014 Yoji Hosoe Figure 5-61 Default Sizes Largest Sizes Figure 5-62 Whiffletree Construction Rev 2015-08-13 5-37 3DWhiffletree Version 1.4.0 User’s Manual 5.16 Copyright © 2013-2014 Yoji Hosoe No Beam Length Warning By default, 3DWhiffletree provides warning message when beam length (one of the moment arms) become less than specified length (default is 2 inches). Figure 5-63 You can change the setting so that such warning message will not appear by checking “No Beam Length Warning” in the File Menu. Figure 5-64 This function is useful when you are moving the CG point and get this message. In such a case, unless you turn on this function, you will be stack and cannot move or change the whiffletree anymore as the warning message keep showing if you try to move the point. Whiffletree Construction Rev 2015-08-13 5-38 3DWhiffletree Version 1.4.0 User’s Manual 6.0 Copyright © 2013-2014 Yoji Hosoe VIEW AND EDIT WHIFFLETREE DATA This section explains how to view and edit whiffletree data through Whiffletree Edit Window. Whiffletree Edit Window can be accessed by the following icon or File Menu. (The name “View or Edit Point” in File Menu is not intuitive for this command. In fact, it can do more than just view or edit points.) or Figure 6-1 6.1 Display General Figure 6-3 on the next page shows a typical view of Whiffletree Edit Window. All data and information in the window will be saved in *.wtr file when saved. The *.wtr file name will appear on the top of window. *.wtr file name Figure 6-2 View and Edit Whiffletree Data Rev 2015-08-13 6-1 3DWhiffletree Version 1.4.0 User’s Manual Copyright © 2013-2014 Yoji Hosoe ID (Section 6.2) Units & Decimals (Section 6.8) Pull Direction (Section 6.4) Warning Length (Section 6.7) G Factor (Section 6.5) Description (Section 6.3) Other Factors (Section 6.6) Data Screen (Section 6.9) Edit Area (Section 6.10) Figure 6-3 6.2 ID ID can be any strings in any length, and it’s optional (can be left blank). ID can be used as a root number of whiffletree beam IDs when showing ID on whiffletree diagram (Section 8.4.2). You need to click confirm the change. View and Edit Whiffletree Data Rev 2015-08-13 to 6-2 3DWhiffletree Version 1.4.0 User’s Manual Copyright © 2013-2014 Yoji Hosoe ID is used as root number of beam ID Figure 6-4 6.3 Case Description Case Description can be any strings in any length, and it’s optional (can be left blank). It is only for your purpose to identify your whiffletree. You need to click 6.4 to confirm the change. Pull Direction Pull Direction determines the loading direction of the whiffletree. It’s a dropdown menu and the default value is “-X”. It can be changed only if there is no whiffletree constructed. In other words, if there are any whiffletrees (beam and rods) created in the whiffletree model, you cannot change the Pull Direction value. Therefore, always make sure to set the correct Pull Direction value before you create any new whiffletree connections. If you try to change Pull Direction value after creating any whiffletrees, you will see the following message. You need to click View and Edit Whiffletree Data to confirm the change if you edit the value. Rev 2015-08-13 6-3 3DWhiffletree Version 1.4.0 User’s Manual Copyright © 2013-2014 Yoji Hosoe Figure 6-5 Remarks: The Pull Direction value can be chosen only in parallel to global axis (X, Y, Z). If you need to load in arbitrary direction, adjust FEM model so that the desired loading direction can be in line with one of global axis. 6.5 G-Factor G-Factor is a multiplication factor applied to the weight to get a load. Together with Other Factors (Section 6.6), the final loading values are determined. You need to click the value. 6.6 to confirm the change if you edit Other Factor Other Factors are additional factors applied to the weight. You can enter as many factors as you want by separating each factor by comma. (Spaces after comma is optional and not required). You need to click to confirm the change if you edit the value. For example, by entering 1.15, 1.15 will result in the factor 1.15 x 1.15 (=1.3225) and will be multiplied to the weight together with G Factor. Below figure shows an example of how the load is calculated from Weight, G Factor, and Other Factors. View and Edit Whiffletree Data Rev 2015-08-13 6-4 3DWhiffletree Version 1.4.0 User’s Manual Copyright © 2013-2014 Yoji Hosoe 396 x 9.0 x 1.15 x 1.15 = 4713 Example: How the load is computed Figure 6-6 6.7 Warning Length Warning Length will set the value and provide warning message when moment arm of any whiffletree beams become less than the value (an example figure below). Default value is 2.0. You need to click to confirm the change if you edit the value. Figure 6-7 As explained in Section 5.16, there won’t be any warning message when “No Beam Length Warning” is turned on. 6.8 Units and Decimals View and Edit Whiffletree Data Rev 2015-08-13 6-5 3DWhiffletree Version 1.4.0 User’s Manual Copyright © 2013-2014 Yoji Hosoe Units and Decimals controls displaying units and decimals. The default values are as shown above. The units are mainly for the use in Whiffletree Diagram. The below figure shows an example of whiffletree diagram with default units and decimals. (Moment in beam is also set to shown in this example.) You need to click to confirm the change if you edit the value. Figure 6-8 Rules Decimal Format L: Length W: Weight (Load) M: Moment Figure 6-9 Decimal format is per visual basic format. For examples, this can be used to limit number of decimal places or add a thousand-separator in the figure. The default value will work for the most common cases when using US units (inches and pounds). This function is useful when using Metric units and need to control decimal places. Refer to the following table for the rules of formatting. Remarks: Changing decimal places only affects the format of displaying values, not actual values stored in database. No figures in decimal places will be lost by changing the format. View and Edit Whiffletree Data Rev 2015-08-13 6-6 3DWhiffletree Version 1.4.0 User’s Manual Copyright © 2013-2014 Yoji Hosoe Table 6-1 Character None Description Displays the number with no formatting. (0) Digit placeholder. Displays a digit or a zero. If the expression has a digit in the position where the zero appears in the format string, display it; otherwise, displays a zero in that position. If the number has fewer digits than there are zeros (on either side of the decimal) in the format expression, displays leading or trailing zeros. If the number has more digits to the right of the decimal separator than there are zeros to the right of the decimal separator in the format expression, rounds the number to as many decimal places as there are zeros. If the number has more digits to the left of the decimal separator than there are zeros to the left of the decimal separator in the format expression, displays the extra digits without modification. (#) Digit placeholder. Displays a digit or nothing. If the expression has a digit in the position where the # character appears in the format string, displays it; otherwise, displays nothing in that position. This symbol works like the 0 digit placeholder, except that leading and trailing zeros aren't displayed if the number has fewer digits than there are # characters on either side of the decimal separator in the format expression. (.) Decimal placeholder. The decimal placeholder determines how many digits are displayed to the left and right of the decimal separator. If the format expression contains only # characters to the left of this symbol; numbers smaller than 1 begin with a decimal separator. To display a leading zero displayed with fractional numbers, use zero as the first digit placeholder to the left of the decimal separator. In some locales, a comma is used as the decimal separator. The actual character used as a decimal placeholder in the formatted output depends on the number format recognized by your system. Thus, you should use the period as the decimal placeholder in your formats even if you are in a locale that uses a comma as a decimal placeholder. The formatted string will appear in the format correct for the locale. (,) Thousand separator. The thousand separator separates thousands from hundreds within a number that has four or more places to the left of the decimal separator. Standard use of the thousand separator is specified if the format contains a thousand separator surrounded by digit placeholders (0 or #). A thousand separator immediately to the left of the decimal separator (whether or not a decimal is specified) or as the rightmost character in the string means "scale the number by dividing it by 1,000, rounding as needed." Numbers smaller than 1,000 but greater or equal to 500 are displayed as 1, and numbers smaller than 500 are displayed as 0. Two adjacent thousand separators in this position scale by a factor of 1 million, and an additional factor of 1,000 for each additional separator. Multiple separators in any position other than immediately to the left of the decimal separator or the rightmost position in the string are treated simply as specifying the use of a thousand separator. In some locales, a period is used as a thousand separator. The actual character used as the thousand separator in the formatted output depends on the Number Format recognized by your system. Thus, you should use the comma as the thousand separator in your formats even if you are in a locale that uses a period as a thousand separator. The formatted string will appear in the format correct for the locale. Reference:http://msdn.microsoft.com/en-us/library/microsoft.visualbasic.strings.format.aspx The decimal formatting will also affect the displaying values in Data Screen. See the following figure as an example. View and Edit Whiffletree Data Rev 2015-08-13 6-7 3DWhiffletree Version 1.4.0 User’s Manual Copyright © 2013-2014 Yoji Hosoe Format: #,#### Format: #,#### Format: 0.00 Changing Decimal Formatting (Click Format: 0.00 .) Format: 0.0 Format: 0.0 Format: 0.000 Format: 0.000 Figure 6-10 6.9 Data Screen Data Screen shows detail information of each point that constructs full whiffletree. Table 6-2 explains some important facts in Data Screen. View and Edit Whiffletree Data Rev 2015-08-13 6-8 3DWhiffletree Version 1.4.0 User’s Manual Copyright © 2013-2014 Yoji Hosoe Figure 6-11 Table 6-2 Items No Description The number corresponds to the point ID of the model in Model Window. The number is not a fixed number and can be changed as you edit whiffletree, but always shown in order of small to large number. There is a limit in number of characters to be displayed in Data Screen. However, any length can be stored in database. Weight Non-zero weight value is displayed for CG points. Other points that do not have weight will be displayed either blank or zero depending on your decimal format setting. By default setting, weight is only displayed for CG Points. X, Y, Z Values will be displayed for all points. Load Length 6.10 Explanations Values will be displayed for all points. This is the load acting on the point. This is moment arm length in beam and only shown for Rod (each end of beam). CG points and Beam (middle point of the beam) do not have length; therefore, it is displayed as zero. Edit and Update Data Whiffletree data can be edited and updated through Data Screen. 1. Select time that you want to edit. 2. The selected item is displayed in the bottom pane. 3. Edit values. Note that only editable items can be accessed. Other items are locked (grayed out). See table below for edit permit of each item. View and Edit Whiffletree Data Rev 2015-08-13 6-9 3DWhiffletree Version 1.4.0 User’s Manual 4. Once you have done editing, click will be automatically updated too. 1 Copyright © 2013-2014 Yoji Hosoe to confirm change. Whiffletree models in Model Window Click item that you want to edit. 2 Selected item will be displayed for edit. 3 Only editable items can be unlocked. Other items are grayed out. Figure 6-12 Table 6-3 Items Edit Permit Remarks None Automatically assigned by the program Description CG Points only - Weight CG Points only - X, Y, Z CG Points: Fully editable Other points: Only loading component - Load None Automatically computed by the program Length None Automatically computed by the program Yes For Split Points only No Forget Split View and Edit Whiffletree Data Rev 2015-08-13 6-10 3DWhiffletree Version 1.4.0 User’s Manual 6.11 Copyright © 2013-2014 Yoji Hosoe Split and Forget Split You can remove the link between two Split Points. Refer to Section 5.14.3 for details of this function. 6.12 Delete As explained in Section 5.12.1, whiffletree data point can only be deletable if the point is located at the top of the whiffletrees. Delete button is locked if you select items which is not deletable. Click to delete the point. Rest of whiffletrees (including IDs) will be automatically updated. Delete button becomes enabled when selected item is deletable. Figure 6-13 View and Edit Whiffletree Data Rev 2015-08-13 6-11 3DWhiffletree Version 1.4.0 User’s Manual 7.0 Copyright © 2013-2014 Yoji Hosoe VIEW AND EDIT WHIFFLETREE MATERIAL This section explains how to view and edit whiffletree material through Edit Material. Window for Edit Material can be accessed by the following icon or File Menu. or Figure 7-1 7.1 What is Material for? 3DWhiffletree program can automatically select the best material for beam and rod and display them on whiffletree diagrams. For the program to be able to select, users need to specify material of beam and rod. If you create multiple materials in the list, the program will choose from the weakest material that meets the strength requirement. Beam Material Rod Material Figure 7-2 View and Edit Whiffletree Material Rev 2015-08-13 7-1 3DWhiffletree Version 1.4.0 User’s Manual 7.2 Copyright © 2013-2014 Yoji Hosoe General View There are two views: Rod and Beam. The view can be switched by selection Rod/Beam icons. Rod View Beam View Figure 7-3 The below figure shows a typical view of Material Edit Window (this example shows Beam view). View and Edit Whiffletree Material Rev 2015-08-13 7-2 3DWhiffletree Version 1.4.0 User’s Manual Icons (Section 7.3) Copyright © 2013-2014 Yoji Hosoe *.mtl file name Data Screen (Section 7.5) Decimals (Section 7.4) Edit Area (Section 7.6, 7.7 & 7.8) Figure 7-4 7.3 Icons Open material (*.mtl) file (Section 7.3.1) Save material (*.mtl) file (Section 7.3.2) Switch to rod material view (Section 7.3.3) Switch to beam material view (Section 7.3.3) 7.3.1 Open Whiffletree Material File (*.mtl) Click icon to open material (*.mtl) file that you have previously created. Default folder is the same folder where 3DWhiffletree.exe is located. If you already have material data edited, then you will see the following message. View and Edit Whiffletree Material Rev 2015-08-13 7-3 3DWhiffletree Version 1.4.0 User’s Manual Copyright © 2013-2014 Yoji Hosoe Figure 7-5 7.3.2 Save Whiffletree Material File (*.mtl) Click icon to save material (*.mtl) file. Default folder is the same folder where 3DWhiffletree.exe is located. When saving the file, the program always ask you to name the file. Therefore, the save function works also as “Save As” command. Both Rod and Beam data are saved in one file. When closing Material Edit Window without saving material data, you will see the following warning message. You can come back to Material Edit Window later to save the data. Until then, you won’t lose any data unless you exit 3DWhifletree program. (There won’t be any warning message when you exit 3DWhiffletree data without saving material data, unlike the program does for the other files such as *.wtr data.) Figure 7-6 7.3.3 Switch View between Rod and Beam Click and to switch view between Rod and Beam. Information is slightly different between Rod and Beam. See Data Screen (Section 7.5) for more details. 7.4 Decimals View and Edit Whiffletree Material Rev 2015-08-13 7-4 3DWhiffletree Version 1.4.0 User’s Manual Copyright © 2013-2014 Yoji Hosoe This is very similar to “Units and Decimals” explained for Whiffletree Edit Window (Section 6.8) except there is no “Units” to show for materials. The decimal is used only for a display purpose in Data Screen. See Table 6-1 for detail explanation of formatting rules/ To complete editing decimals, click 7.5 Data Screen 7.5.1 Rod to confirm changes. Figure below shows a typical Data Screen for rod. Table 7-1 provides explanation of each item in Data Screen. Figure 7-7 Table 7-1 Items ID Description Explanations ID is only for listing purpose. Not relevant to any computation. Description is used to identify the rod. It will also appear in whiffletree diagram when showing materials. Dia Diameter of rod. This is for information only and not a parameter of selecting rod at the time showing materials in whiffletree diagram. F tu Ultimate tensile stress of the rod material. This is for information only and not a parameter of selecting rod at the time showing materials in whiffletree diagram. P allow Allowable tensile load of the rod (maximum load that rod can take). This is only the parameter of selecting rod at the time showing materials in whiffletree diagram. Used The value is either “YES” or “NO” and it determines if the particular rod can be selected at the time showing materials in whiffletree diagram. For example, if you have a rod that is out of stock but want to keep the information in the list for future purpose, then set the value to “NO” so that it won’t be selected as a valid material. View and Edit Whiffletree Material Rev 2015-08-13 7-5 3DWhiffletree Version 1.4.0 User’s Manual 7.5.2 Copyright © 2013-2014 Yoji Hosoe Beam Figure below shows a typical Data Screen for beam. Table 7-2 provides explanation of each item in Data Screen. Figure 7-8 Table 7-2 Items Explanations ID is only for listing purpose. Not relevant to any computation. ID Description Description is used to identify the beam. It will also appear in whiffletree diagram when showing materials. Iyy The second moment of inertia of the cross-sectional area computed about the neutral axis of the beam (see figure below). This is for information only and not a parameter of selecting rod at the time showing materials in whiffletree diagram. c The perpendicular distance from the neutral axis to a point farthest away from the neutral. This is for information only and not a parameter of selecting rod at the time showing materials in whiffletree diagram. F tu Ultimate tensile stress of the beam material. This is for information only and not a parameter of selecting rod at the time showing materials in whiffletree diagram. M allow Allowable bending moment of the beam (maximum bending moment that the beam can take). This is only the parameter of selecting beam at the time showing materials in whiffletree diagram. Used The value is either “YES” or “NO” and it determines if the particular rod can be selected at the time showing materials in whiffletree diagram. For example, if you have a beam that is out of stock but want to keep the information in the list for future purpose, then set the value to “NO” so that it won’t be selected as a valid material. Form the figure below, Iyy can be calculated as I yy = ∫∫ z 2 dxdz (The second moment of inertia) View and Edit Whiffletree Material Rev 2015-08-13 7-6 3DWhiffletree Version 1.4.0 User’s Manual Copyright © 2013-2014 Yoji Hosoe X Z c Bending Moment N.A. Y Area (A) Figure 7-9 7.6 Add New Take the following procedure to add new material. 1. Click or to switch view to desired material (rod or beam). 2. Enter information. (See sub sections for detail of each item). As minimum, only description is required to create a new material. If you don’t enter description, you will see the following message. Figure 7-10 3. Click to confirm new the new item. The new item will appear in Data Screen. View and Edit Whiffletree Material Rev 2015-08-13 7-7 3DWhiffletree Version 1.4.0 User’s Manual Copyright © 2013-2014 Yoji Hosoe 1 Enter information 2 Click Button to confirm Figure 7-11 7.6.1 Rod To add a new rod material, fill out the information per the notes given in the following table. Table 7-3 Items Value Explanations Description Required Enter description of the rod material. Any character lengths are accepted but simple expression is recommended as it will appear on whiffletree diagram. Dia Optional Enter a diameter of rod. F tu Optional Enter ultimate tensile stress of the rod material. P allow Optional Enter ultimate tensile strength in terms of load (i.g., lb or N). If it is left blank, the value is automatically calculated as 1 Pallow = Ftu ⋅ πD 2 4 If values are entered and the value does not match calculated value, user will see a message to select which values the user wants to use. Used Optional Choose “YES” or “NO” from dropdown menu. If left blank, “YES” is assigned automatically. View and Edit Whiffletree Material Rev 2015-08-13 7-8 3DWhiffletree Version 1.4.0 User’s Manual 7.6.2 Copyright © 2013-2014 Yoji Hosoe Beam To add a new beam material, fill out the information per the notes given in the following table. Table 7-4 Items Value Description Required Enter description of the rod material. Any character lengths are accepted but simple expression is recommended as it will appear on whiffletree diagram. Iyy Optional Enter the second moment of inertia of the beam cross section. c Optional Enter distance from neutral axis to the furthest point of the beam in the cross section. F tu Optional Enter ultimate tensile stress of the beam material. M allow Optional Enter ultimate tensile strength in terms of bending moment (i.g.,in- lb or Nmm). If it is left blank, the value is automatically calculated as Ftu ⋅ I yy M allow = c If values are entered and the value does not match calculated value, user will see a message to select which values the user wants to use. Used Optional Choose “YES” or “NO” from dropdown menu. If left blank, “YES” is assigned automatically. 7.7 Explanations Update The material in the list can be updated. 1. Select material in the list by clicking the item on Data Screen. 2. Items will appear in Edit Area. 3. Edit items you want to update. 4. If you want allowable values (P allow, M allow) being calculated automatically, leave the item block blank. 5. Click to confirm the change. View and Edit Whiffletree Material Rev 2015-08-13 7-9 3DWhiffletree Version 1.4.0 User’s Manual Copyright © 2013-2014 Yoji Hosoe 6. Listed items in Data Screen will be updated. (Remember to save the change.) 1 2 the *.mtl file if you want to save Select an item Selected item is displayed. Edit values. 3 Make the box blank if you want auto-calculation. 5 4 Click 5 Item is updated. Figure 7-12 Remarks View and Edit Whiffletree Material Rev 2015-08-13 7-10 3DWhiffletree Version 1.4.0 User’s Manual Copyright © 2013-2014 Yoji Hosoe If “P allow” or “M allow” that user entered (except for blank entry) does not match the calculated value, the following message will appear asking user to select which values users want to use. This situation most commonly happens in the following situation 1. When user wants to update values but forget to update/enter allowable value 2. When user wants to enter his own allowable value. Figure 7-13 7.8 Delete Items in the list can be also deleted. 1. Select item that you want to delete. 2. Items will appear in Edit Area. 3. Click to delete. IDs are automatically updated in the list. 4. Listed items in Data Screen will be updated. (Remember to save the change.) View and Edit Whiffletree Material Rev 2015-08-13 the *.mtl file if you want to save 7-11 3DWhiffletree Version 1.4.0 User’s Manual Copyright © 2013-2014 Yoji Hosoe 1 2 Selected item is displayed. 4 Select an item 3 Click button to delete. Item are updated. Figure 7-14 View and Edit Whiffletree Material Rev 2015-08-13 7-12 3DWhiffletree Version 1.4.0 User’s Manual 8.0 Copyright © 2013-2014 Yoji Hosoe VIEW WHIFFLETREE DIAGRAM This section explains how to review whiffletree diagram in Whiffletree Diagram Window. Whiffletree Diagram Window can be accessed by the following icon or File Menu. or Figure 8-1 8.1 General View The figure below shows a general view of Whiffletree Diagram Window. View Whiffletree Diagram Rev 2015-08-13 8-1 3DWhiffletree Version 1.4.0 User’s Manual Copyright © 2013-2014 Yoji Hosoe Font Size (Section 8.3.6) Icons (Section 8.2) Model Window (Section Error! Units and Decimals (Section 8.3.7) Window Size Adjust (Section 8.3.5) Figure 8-2 View Whiffletree Diagram Rev 2015-08-13 8-2 3DWhiffletree Version 1.4.0 User’s Manual 8.2 Copyright © 2013-2014 Yoji Hosoe Icons Auto fit whiffletree diagram to the current window size (Section 8.3.2) Enlarge whiffletree diagram in vertical direction (Section 8.3.2) Contract whiffletree diagram in vertical direction (Section 8.3.2) Enlarge whiffletree diagram in horizontal direction (Section 8.3.2) Contract whiffletree diagram in horizontal direction (Section 8.3.2) Zoom in whiffletree diagram (Section 8.3.3) Shortcut Key: Scroll down the mouse wheel Zoom out whiffletree diagram (Section 8.3.3) Shortcut Key: Scroll up the mouse wheel Show whiffletree labels (Section 8.4.1) Show whiffletree IDs (Section 8.4.2) Check whiffletree completeness (Section 8.4.3) Show whiffletree materials (Section 8.4.4) Show rod tensile load and beam bending moment (Section 8.4.5) Copy image (Section 8.5) Export whiffletree diagram into Microsoft Word 2010 (Section 8.6.1) Export whiffletree diagram into Microsoft Excel 2010 (Section 8.6.2) 8.3 View Operation This section explains operation related to whiffletree diagram view. View Whiffletree Diagram Rev 2015-08-13 8-3 3DWhiffletree Version 1.4.0 User’s Manual 8.3.1 Copyright © 2013-2014 Yoji Hosoe Model Window Whiffletree ID Whiffletree Description CG Points Figure 8-3 8.3.2 Fit Buttons View Whiffletree Diagram Rev 2015-08-13 8-4 3DWhiffletree Version 1.4.0 User’s Manual Copyright © 2013-2014 Yoji Hosoe Auto fit and center This button will center the whiffletree diagram and auto-fit the diagram to the current window size. This is the default setting when opening Whiffletree Diagram Window. Figure 8-4 Adjust vertical size This button will adjust whiffletree diagram in vertical direction. View Whiffletree Diagram Rev 2015-08-13 8-5 3DWhiffletree Version 1.4.0 User’s Manual Copyright © 2013-2014 Yoji Hosoe Figure 8-5 Adjust horizontal size This button will adjust whiffletree diagram in horizontal direction. Figure 8-6 View Whiffletree Diagram Rev 2015-08-13 8-6 3DWhiffletree Version 1.4.0 User’s Manual 8.3.3 Copyright © 2013-2014 Yoji Hosoe Zoom In and Out Buttons Zoom in and out This button will zoon in and out the whiffletree diagram. It does not change font size. See Section 8.3.6 for how to change font size in whiffletree diagram. 8.3.4 Mouse Controls Left Mouse Drag Pan-move the whiffletree diagram. The pan-move is only available by mouse. Middle Button Wheel Zoom in and out the whiffletree diagram. Drag diagram by mouse left button Figure 8-7 Zoom In (Scroll Back) Zoom Out (Scroll Forward) Figure 8-8 View Whiffletree Diagram Rev 2015-08-13 8-7 3DWhiffletree Version 1.4.0 User’s Manual 8.3.5 Copyright © 2013-2014 Yoji Hosoe Change Window Size Sometime figures overlap due to the size of window if you build big whiffletree constructions. In such cases you can adjust window size by dragging a corner of window (or right vertical edge or bottom horizontal edge) to adjust window size until overlapping figures are gone. Overlapping figures Drag this corner to adjust window size Figure 8-9 View Whiffletree Diagram Rev 2015-08-13 8-8 3DWhiffletree Version 1.4.0 User’s Manual 8.3.6 Copyright © 2013-2014 Yoji Hosoe Change Font Size Font size in the whiffletree diagram can be changed to any size between 1 and 10. The default size is set to 8. Largest Font Size = 10 Default Font Size = 8 Figure 8-10 8.3.7 Unit and Decimals The current format of units and decimal display are shown. As they are shown in gray, they cannot be changed from Whiffletree Diagram Window. To change the units and decimal format, go to Whiffletree Edit Window to update values (Section 6.8) and come back to Whiffletree Diagram Window. Figure 8-11 8.3.8 Additional Remarks about View Operation You can NOT save view setting. View Whiffletree Diagram Rev 2015-08-13 8-9 3DWhiffletree Version 1.4.0 User’s Manual Copyright © 2013-2014 Yoji Hosoe The view setting cannot be saved to whiffletree data (*.wtr) file. For example, following changes made to whiffletree diagram will not be saved. Once you exit 3DWhiffletree and next time you open the whiffletree data file, all changes will be back to default values even though you save whiffletree data (*.wtr) file. • • • 8.4 Size and Position of Whiffletree Diagram Size of Font Size of Whiffletree Diagram Window Whiffletree Diagrams Functions This section explains several functions to display whiffletrees in different ways. 8.4.1 Show Basic Whiffletree By default, this button is on when Whiffletree Diagram Window is opened. This button automatically turns off when showing materials or bending moment. Usually, users do not need to touch this button unless they want to turn off basic whiffletree items for some purposes. (You cannot get rid of item names or basic whiffletree structures.) ON OFF Figure 8-12 8.4.2 Show Whiffletree ID View Whiffletree Diagram Rev 2015-08-13 8-10 3DWhiffletree Version 1.4.0 User’s Manual Copyright © 2013-2014 Yoji Hosoe Whiffletree beam IDs can be turned on to identify each beam to help manufacturing and inspection. OFF ON Figure 8-13 Remarks 1. ID can be set in Whiffletree Edit Window (Section 6.2). 2. Dash numbers after ID shown on the whiffletree diagram are automatically assigned and cannot be edited. 8.4.3 Check Whiffletree Completeness It is always good to check whiffletree completeness when having its diagram. Clicking the button brings a new window with summary of whiffletree. It will show a summary of 4 check items: View Whiffletree Diagram Rev 2015-08-13 8-11 3DWhiffletree Version 1.4.0 User’s Manual Copyright © 2013-2014 Yoji Hosoe Table 8-1 Items Explanations Connection This checks if all CG Points are connected. If “Non Connected CG” is zero, then, whiffletree is considered completed. Overall Load This compares the final load on the whiffletree against calculated overall load from weight times factors. Overall CG Beam Moment Arm This compares the final loading point against the calculated overall cg location of the all CG Points. The overall cg will not match in the loading component, but other component should match. If the connection check shows that whiffletree is not completed, then, it does not provide comparison results. This shows the current Warning Length for moment arm and number of arms that are shorter than the defined warning length. Figure 8-14 View Whiffletree Diagram Rev 2015-08-13 8-12 3DWhiffletree Version 1.4.0 User’s Manual 8.4.4 Copyright © 2013-2014 Yoji Hosoe Show Whiffletree Materials This button will show whiffletree materials in the diagram. Following rules apply 1. Rod and beam materials need to be defined prior to show whiffletree diagram. See Section 7.0 for how to define rod and beam materials. 2. Rod and beam are selected based on the tensile load in the rod or bending moment in the beam. Rod or beam with the lowest allowable above the required load or bending moment will be chosen. 3. No materials will be selected if “Used” value is set to “NO” in material data (Table 7-4) 4. If there is no rod or beam available to meet required load or bending moment, then “No Rod” or “No Beam” in red color will be displayed. Figure 8-15 8.4.5 Shown Tension Load and Bending Moment View Whiffletree Diagram Rev 2015-08-13 8-13 3DWhiffletree Version 1.4.0 User’s Manual Copyright © 2013-2014 Yoji Hosoe To verify that the correct materials are chosen, you can see load in each rod and bending moment in each beam. OFF ON Figure 8-16 8.5 Copy Image Clicking this button will copy the whiffletree diagram image (screenshot) into your computer’s clipboard. 8.6 Export Diagram Whiffletree diagram along with detail data table can be exported into Microsoft Word or Microsoft Excel. The difference in the output between Word and Excel is shown in the table below. Table 8-2 Export to Word Excel View Whiffletree Diagram Differences • Data table is given in Word table format (editable). • Whiffletree Diagram is given as a screenshot (non-editable). • Data table is given in Excel cells (editable). • Whiffletree diagrams are drawn by using cell boarders. • Values in the whiffletree are given in text as cell values (editable) • Excel format has more control and freedom to edit or touchup values in the whiffletree diagram. Rev 2015-08-13 8-14 3DWhiffletree Version 1.4.0 User’s Manual 8.6.1 Copyright © 2013-2014 Yoji Hosoe Export to Word Clicking the button will start exporting diagram into Word file. You’ll see progress in the Whiffletree Model Window. It should only take several seconds depending on the size of whiffletree and should not be long. Output Word file includes: • • • Whiffletree Summary Whiffletree Data Table Whiffletree Diagram Figure 8-17 View Whiffletree Diagram Rev 2015-08-13 8-15 3DWhiffletree Version 1.4.0 User’s Manual Copyright © 2013-2014 Yoji Hosoe Figure 8-18 8.6.2 Export to Excel Clicking the button will start exporting diagram into Excel file. You’ll see progress in the Whiffletree Model Window but generally output will be complete in a second. Output Word file includes: • • • Whiffletree Summary Whiffletree Data Table Whiffletree Diagram Because the exported whiffletree diagram and its values are not screenshot, you can edit or touchup the values when desired. View Whiffletree Diagram Rev 2015-08-13 8-16 3DWhiffletree Version 1.4.0 User’s Manual Copyright © 2013-2014 Yoji Hosoe Figure 8-19 View Whiffletree Diagram Rev 2015-08-13 8-17 3DWhiffletree Version 1.4.0 User’s Manual Copyright © 2013-2014 Yoji Hosoe Figure 8-20 View Whiffletree Diagram Rev 2015-08-13 8-18 3DWhiffletree Version 1.4.0 User’s Manual 9.0 Copyright © 2013-2014 Yoji Hosoe EXPORT TO CATIA This section explains how to export whiffletrees in CATIA. CATIA Export function can be accessed by the following icon or File Menu. or Figure 9-1 9.1 About CATIA Export Figure 9-2 Export to CATIA Rev 2015-08-13 9-1 3DWhiffletree Version 1.4.0 User’s Manual Copyright © 2013-2014 Yoji Hosoe 3DWhiffletree can export whiffletree geometric data into CATIA as CATIA Part with points and lines as shown in the figure above. You need: 1. CATIA installed on your computer (tested with V5 R21), 2. CATIA launched, and 3. CATIA Part Design is opened and window is activated. Once you create a CATIA Part Design for your whiffletree models, you can bring it into your CATIA Product model to check physical properties such as interferences. Figure 9-3 9.2 Export Window The figure below shows a typical window for exporting whiffletree into CATIA. Export to CATIA Rev 2015-08-13 9-2 3DWhiffletree Version 1.4.0 User’s Manual Copyright © 2013-2014 Yoji Hosoe Whiffletree File Name (Section 9.3) CATIA and Whiffletree Origin (Section 9.4) CATIA and Whiffletree Coordinate (Section 9.5) Save Whiffletree File (Section 9.7) Scale Factor (Section 9.5) Figure 9-4 9.3 Whiffletree Data File This shows current whiffletree file (*.wtr). If no file is opened or saved, the file name is shown as “NA”. 9.4 CATIA Origin and Location on Whiffletree CATIA assembly origin is often different from FEM (or whiffletree) origin. To locate whiffletree diagram at correct location in CATIA assembly, specify where CATIA origin is located in in whiffletree coordinate Export to CATIA Rev 2015-08-13 9-3 3DWhiffletree Version 1.4.0 User’s Manual Copyright © 2013-2014 Yoji Hosoe system. In other words, specify location of whiffletree diagram where the location is same as CATIA coordinate (0, 0, 0). Note that CATIA origin is always (0,0,0) and cannot be changed. + Specify where CATIA origin is located in whiffletree coordinate system. In this example: CATIA(0,0,0) = WT(589,-100,200) Figure 9-5 Export to CATIA Rev 2015-08-13 9-4 3DWhiffletree Version 1.4.0 User’s Manual 9.5 Copyright © 2013-2014 Yoji Hosoe CATIA Coordinate and Whiffletree Coordinate Sometimes CATIA coordinate is different from whiffletree coordinate. For example, x-axis of the whiffletree may be y-axis in CATIA coordinate. In such a case, you can specify whiffletree coordinate system to match that of CATIA coordinate system. The below example shows different exported whiffletree when whiffletree x-axis is flipped. CATIA X-coordinate is same as Whiffletree X-coordinate. CATIA X-coordinate is opposite of Whiffletree X-coordinate. Whiffletree flipped in X-coordinate. Figure 9-6 Export to CATIA Rev 2015-08-13 9-5 3DWhiffletree Version 1.4.0 User’s Manual 9.6 Copyright © 2013-2014 Yoji Hosoe Scale Factor The scale factor will convert units between 3DWhiffletree and CATIA. There are predefined scale factors as well as user-entered value. Following table summarizes the different scale factors. Table 9-1 Items No Scale Scale Factor = 1.0 There won’t be any scales performed. Inch to MM Scale Factor = 25.4 1 unit in Whiffletree becomes 25.4 units in CATIA. MM to Inch Scale Factor = 0.03937 1 unit in Whiffletree becomes 0.03937 unit in CATIA. Custom 9.7 Explanations User can enter any scale factors. Save Changes in .wtr File This button will save information defined in CATIA Export Window such as location of whiffletree and coordinate system. Remarks: 1. Information in CATIA Export Window can be only saved through this window. Saving the file from (main window) will not save information in CATIA Export Window. 2. The save button is only available if any exiting file is opened or whiffletree file has been saved. When file name is shown as “NA”, the button is not enabled. without saving changes, you will see the following warning message. Clicking 3. If you click No will let you stay in the window. Clicking Yes will close the window without saving changes you made. Figure 9-7 Export to CATIA Rev 2015-08-13 9-6 3DWhiffletree Version 1.4.0 User’s Manual 9.8 Copyright © 2013-2014 Yoji Hosoe Export This button will create whiffletree diagram in CATIA Part Design. Remarks: 1. Make sure that you have CATIA Part Design open and activated as follows Figure 9-8 , you may see the following message if proper CATIA Part Design is not 2. After clicking activated. If so, check CATIA window. Figure 9-9 3. If there is no error, CATIA will start importing whiffletree data and create points and lines in CATIA Part Design. The following message will appear if whiffletree data are successfully exported into CATIA. Export to CATIA Rev 2015-08-13 9-7 3DWhiffletree Version 1.4.0 User’s Manual Copyright © 2013-2014 Yoji Hosoe Figure 9-10 Export to CATIA Rev 2015-08-13 9-8