1
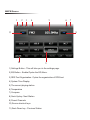
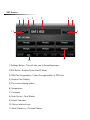
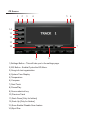
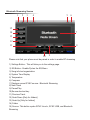
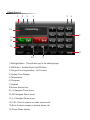
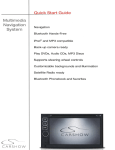
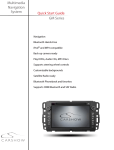
Multimedia
Navigation
System
Owner’s Manual
Ford Mustang
*FOR MODELS WITH FORD SYNC® ONLY
Navigation
Bluetooth Hands-Free (For use with Sync)
iPod® and MP3 compatible (For use with Sync)
Back-up camera included Play Audio CDs and MP3 Discs
Play Audio CDs and MP3 Discs (For use with Sync)
Supports steering wheel controls
Customizable backgrounds
Satellite Radio (For use with Sync)
Operational Panel
1
2
Button Functions
1) DISP Button:
• Press this button to dim backlight.
• Press this button to turn display off.
2) NAV Button:
• Press this button to enter naviation mode; press again to
return to current source.
3) MENU Button:
• Press this button to access the MENU option of the
particular source.
4) Micro SD Card Slot:
• Holds Micro SD card that contains Navigation software.
3
4
AM/FM Source
1
2
3
4
5
11
6
7
8
10
9
1) Settings Button - This will take you to the settings page.
2) EQ Button - Enable/Cycles the EQ Menu.
3) RDS Text Organization- Cycles the organization of RDS text.
4) System Time Display
5) The current playing station
6) Temperature
7) Compass
8) Seek Up key- Next Station
9) Preset Channels
10) Source shortcut keys
11) Seek Down key - Previous Station
Scanning
Touch the current station to activate/deactivate scanning mode.
Step Tuning
1. Touch the [AM/FM] key to select radio band (FM1>FM2>AM1)
2. Long touch the [<<] / [>>] key to search to the next strong signal station.
3. Short touch the [<<] / [>>] key to tune backward or forward one step.
Preset List
Touch a preset key for 3 seconds to store a new channel.
SAT Source
1
2
3
4
6 7
5
11
8
10
9
1) Settings Button - This will take you to the settings page.
2) EQ Button - Enable/Cycles the EQ Menu.
3) RDS Text Organization- Cycles the organization of RDS text.
4) System Time Display
5) The current playing station
6) Temperature
7) Compass
8) Seek Up key - Next Station
9) Preset Channels
10) Source shortcut keys
11) Seek Down key - Previous Station
Scanning
Touch the current station to activate/deactivate scanning mode.
Step Tuning
1. Touch the [SAT] key to select radio band (SAT1>SAT2>SAT3)
2. Short touch the [<<] / [>>] keys to tune backward or forward one station
Preset List
Touch a preset key for 3 seconds to store a new channel.
CD Source
1
2
3
4
5
6
14
13
12
11
7
10
9
8
1) Settings Button - This will take you to the settings page.
2) EQ Button - Enable/Cycles the EQ Menu.
3) Song info text organization
4) System Time Display
5) Temperature
6) Compass
7) Next Track
8) Pause/Play
9) Source shortcut key
10) Previous Track
11) Seek Down [Only for folders]
12) Seek Up [Only for folders]
13) Scan Enable/ Disable Scan feature
14) Eject Disc
SYNC Line In Source
1
2
3
4
5
6
15
14
7
13
12
11
8
10
9
1) Settings Button - This will take you to the settings page.
2) EQ Button - Enable/Cycles the EQ Menu
3) Song info text organization- Not Used
4) System Time Display
5) Temperature
6) Compass
7) Displays current SYNC source - SYNC Line In
8) Next Track - Not Used
9) Pause/Play - Not Used
10)Source shortcut key
11) Previous Track - Not Used
12) Seek Down - Not Used
13) Seek Up - Not Used
14) Folder - Not Used
15) Source- This button cycles SYNC Line In, SYNC USB, and Bluetooth
Streaming
SYNC USB Source
1
2
3
4
5
6
15
14
7
13
12
11
8
10
9
1) Settings Button - This will take you to the settings page.
2) EQ Button - Enable/Cycles the EQ Menu
3) Song info text organization
4) System Time Display
5) Temperature
6) Compass
7) Displays current SYNC source - SYNC USB
8) Next Track
9) Pause/Play
10)Source shortcut key
11) Previous Track
12) Seek Down [Only for folders]
13) Seek Up [Only for folders]
14) Folder
15) Source- This button cycles SYNC Line In, SYNC USB, and Bluetooth
Streaming
Bluetooth Streaming Source
1
2
3
4
5
6
15
14
7
13
12
11
8
10
9
Please note that your phone must be paired in order to enable BT streaming
1) Settings Button - This will take you to the settings page.
2) EQ Button - Enable/Cycles the EQ Menu
3) Song info text organization
4) System Time Display
5) Temperature
6) Compass
7) Displays current SYNC source - Bluetooth Streaming
8) Next Track
9) Pause/Play
10)Source shortcut key
11) Previous Track
12) Seek Down [Only for folders]
13) Seek Up [Only for folders]
14) Folder
15) Source- This button cycles SYNC Line In, SYNC USB, and Bluetooth
Streaming
AV IN Source
1
2
3
5
The AV IN source allows for display of external video/audio. This source
will automatically go to full screen. To exit, just tap anywhere on the touch
screen and then select the desired source.
1) Settings Button - This will take you to the settings page.
2) System Time Display
3) Temperature
4) Compass
5)Source shortcut key
4
Cam Source
9
The Cam source will display the Backup camera.
Caution- Objects may be closer then they appear
The Cam source will automatically go to full screen. To exit, just tap anywhere
on the touch screen and then press the back arrow on the top left corner.
Phone Source
1
2
3
4
5
6
14
7
13
12
11
8
10
9
1) Settings Button - This will take you to the settings page.
2) EQ Button - Enable/Cycles the EQ Menu
3) Song info text organization - No Function
4) System Time Display
5) Temperature
6) Compass
7) Keypad
8)Source shortcut key
9) >>| Navigate Phone menu
10) OK Navigate Phone menu
11) |<< Navigate Phone menu
12) Call - Press to answer or make a phone call
13) End- Press to answer or reject a phone call
14) Phone Menu display
Pairing Your Phone
Using the arrow keys, Navigate the Menu and select “Add Bluetooth Device”.
A Pin number will then be generated and displayed on screen.On your device,
search for SYNC and input the pin provided.When successfully connected the
bottom right “Phone” tab will be highlighted blue. For more information please
refer to your Vehicle User’s Manual.
Settings Page
Press to return to source
Set: Press set to go into Clock settings page
Beep: Enable/Disable Beep
Reverse: Enable/Disable auto Reverse feature
Illumination: Enable/Disable the auto illumination feature
Turn Info: Enable/Disable the Turn Info feature.
FW Version: Displays the FW Version.
CS1015 Rev A
All rights reserved. Copyright 2012 CarShow Electronics