1
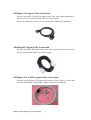
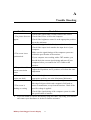
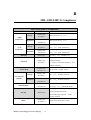
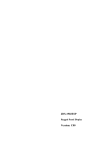
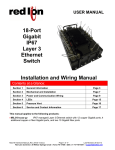
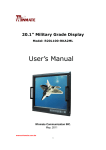
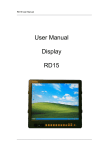
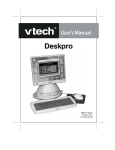
Military Grade Rugged Console
Display User Manual
Version: 1.0
2013
i-Tech Company LLC
TOLL FREE: (888) 483-2418 • EMAIL: [email protected] • WEB: www.iTechLCD.com
Copyright Notice
ALL RIGHTS RESERVED. No part of this document may be reproduced, copied,
translated, or transmitted in any form or by any means, electronic or mechanical, for
any purpose, without the prior written permission of the original manufacturer.
Trademark Acknowledgement
Brand and product names are trademarks or registered trademarks of their respective
owners.
Disclaimer
We reserve the right to make changes, without notice, to any product, including
circuits and/or software described or contained in this manual in order to improve
design and/or performance. We assume no responsibility or liability for the use of the
described product(s), conveys no license or title under any patent, copyright, or masks
work rights to these products, and makes no representations or warranties that these
products are free from patent, copyright, or mask work right infringement, unless
otherwise specified. Applications that are described in this manual are for illustration
purposes only. We make no representation or warranty that such application will be
suitable for the specified use without further testing or modification.
Warranty
We warrant that each of its products will be free from material and workmanship
defects for a period of one year from the invoice date. If the customer discovers a
defect, We will, at its option, repair or replace the defective product at no charge to
the customer, provided it is returned during the warranty period of one year, with
transportation charges prepaid. The returned product must be properly packaged in its
original packaging to obtain warranty service.
If the serial number and the product shipping data differ by over 30 days, the inwarranty service will be made according to the shipping date. In the serial numbers
the third and fourth two digits give the year of manufacture, and the fifth digit means
the month (e. g., with A for October, B for November and C for December).
Military Grade Rugged Console Display
II
Packing List
Before using this product, please make sure that all the items listed below are present
in your package:
Ø Display Unit
x1
Ø User’s Manual
x1
Ø Military Grade Power Cable / 2.0m
x1
Ø DVI Cable / 2.0m
x1
Ø VGA Cable / 2.0m
x1
Ø VGA to BNCs Cable / 2.0m
x1
Ø Touch RS232 Cable / 2.0m (Optional) x 1
Ø Touch Driver CD (Optional)
x1
If any of these items are missing or damaged, contact your distributor or sales
representative immediately.
Customer Service
We provide service guide for any problem as follow steps:First, visit the website at to
find the update information about the product. Second, contact with your distributor,
sales representative, or our customer service center for technical support if you need
additional assistance. You may have the following information ready before you
call:
Ø Product serial number
Ø Peripheral attachments
Ø Software (OS, version, application software, etc.)
Ø Description of complete problem
Ø The exact wording of any error messages
In addition, free technical support is available from our engineers every business day.
We are always ready to give advice on application requirements or specific
information on the installation and operation of any of our products. Please do not
hesitate to call or e-mail us.
Military Grade Rugged Console Display
III
Safety and Warranty
1.
2.
3.
4.
5.
6.
7.
8.
9.
10.
11.
12.
13.
Please read these instructions carefully before using the product and save for
later reference.
Follow all warnings and instructions marked on the product.
Unplug this product from the wall outlet before cleaning. Clean the product with
a damp soft cloth. Do not use liquid or aerosol cleaners as it may cause
permanent damage to the screen.
Do not use this product near water.
Do not place this product on an unstable cart, stand, or table. The product may
fall, causing serious damage to the product.
Slots and openings in the cabinet and the back or bottom are provided for
ventilation; to ensure reliable operation of the product and to protect it from
overheating, these openings must not be blocked or covered. The openings
should never be placed near or over a radiator or heat register, or in a built-in
installation unless proper ventilation is provided.
This product should be operated from the type of power indicated on the
marking label. If you are not sure of the type of power available, consult your
dealer or local power company.
This product is equipped with a 3-wire grounding type plug, a plug having a
third (grounding) pin. This plug will only fit into a grounding-type power outlet.
This is a safety feature. If you are unable to insert the plug into the outlet,
contact your electrician to replace your obsolete outlet. Do not defeat the
purpose of the grounding-type plug.
Do not allow anything to rest on the power cord. Do not locate this product
where persons will walk on the cord.
If an extension cord is used with this product, make sure that the total of the
ampere ratings on the products plugged into the extension cord does not exceed
the extension cord ampere rating. Also make sure that the total of all products
plugged into the wall outlet does not exceed 15 amps.
Never push objects of any kind into this product through cabinet slots as they
may touch dangerous voltage points or short out parts that could result in a risk
of fire or electric shock. Never spill liquid of any kind on the product.
Do not attempt to service this product yourself, as opening or removing covers
may expose you to dangerous voltage points or other risks and will void the
warranty. Refer all servicing to qualified service personnel.
Unplug this product from the wall outlet and refer servicing to qualified service
personnel under the following conditions:
- When the power cord or plug is damaged or frayed.
- If liquid has been spilled into the product.
- If the product has been exposed to rain or water.
- If the product does not operate normally when the operating instructions are
followed. Adjust only those controls that are covered by the operating
instructions since improper adjustment of other controls may result in damage
Military Grade Rugged Console Display
IV
and will often require extensive work by a qualified technician to restore the
product to normal operation.
- If the product has been dropped or the cabinet has been damaged.
- If the product exhibits a distinct change in performance, indicating a need for
service.
CAUTION
Read manual prior to installing the product. The operation of products depends on you reading and
following the information in this manual. Re-check your work prior to operating the product.
EVENT
EFFECT
PREVENTION
Sunlight shines directly will
You should avoid placing the
cause the panel damage.
product under direct sunlight.
If the product is close to the
You should avoid placing the
wet ground such as grassplot,
product in wet environment.
the moisture between panel and
glass will make the product
malfunction.
Military Grade Rugged Console Display
V
Revision History
Version
V1.0
Date
2013.03.08 ü
Military Grade Rugged Console Display
VI
Note
Initial Draft
Content
CONTENT……………………………………………………………….1
1. GENERAL
INTRODUCTION…………………………………..................……..2
SPECIFICATION (17” WMRM717)…………………………..2
SPECIFICATION (19” WMRM919)…………………………..3
SPECIFICATION
(20.1”
WMRM920)…………………….3
PACKING LISTS……………………………………………………4
I/O VIEW…………………………………………………………….4
INSTALLATION……………………………………………….……4
2. ON-SCREEN
3. DISPLAY CONFIGURATION………………………………..……..6
4. DEFINITION OF CONTROL KEY………………………………...6
NAVIGATING OSD MENU………………………………………..7
OSD MENU ON VGA MODE……………………………………...7
OSD MENU ON DVI MODE……………………………………….9
A TROUBLE SHOOTING……………………………………………..11
B MIL-STD-810F/G COMPLIANCE…………………………………..12
C MIL-STD-461E/F COMPLIANCE…………………………….……..13
1. General Introduction
Military Grade Rugged Console Display Series
ITech’s Military Grade Rugged Console Display provides the anti-corrosion housing,
fanless design and military grade power connector. In addition, the rugged design
display enhances the front cover with ITO coating glass or touch screen for less
interference of electromagnetic, and it also supports 5-wire resistive touch for easy
control. The Military Grade Console Rugged Display which covers the sizes from
17-inch to 20.1-inch is the better choice for use in various harsh environment
applications, including logistics, heavy vehicle, and Military management.
Specification (17” WMRM717) Display
Size: 17-inch
Pixels: 1280 x 1024
Brightness: 350 (cd/m2)
Contrast Ratio: 1000:1
Viewing Angle: -85~85(H); -80~80(V) degree
Physical Characteristics
Housing: Aluminum sheet metal Dimensions:
482.6 x 399.3 x 75.1 mm (9U) Mounting:
Flush rack mounting
Glass / Touch
I/O (Standard)
Glass:
Anti-Reflective Glass (Default)
ITO Shielding Glass (Optional)
Touch: (Optional)
5-Wire Resistive Touch
5-Wire Resistive Touch with Mesh Filter
1 x VGA
1 x DVI
1 x Video BNCs (R, G, B, H, V)
1 x RS232 or USB for Touch
1 x Power Input
Standards / Certifications
Power Requirements
Safety: Compliant with MIL-STD-810F/G
EMC: Compliant with MIL-STD-416E/F
Input Voltage:
100 to 240 VAC, 47 to 63 Hz (Default)
24 VDC, 4.16 A (Optional)
Military Grade Rugged Console Display
2
Specification (19” WMRM919) Display
Size: 19-inch
Pixels: 1280 x 1024
Brightness: 350 (cd/m2)
Contrast Ratio: 1000:1
Viewing Angle: -85~85(H); -80~80(V) degree
Physical Characteristics
Housing: Aluminum sheet metal Dimensions:
482.6 x 399.3 x 76.9 mm (9U) Mounting:
Flush rack mounting
Glass / Touch
I/O (Standard)
Glass:
Anti-Reflective Glass (Default)
ITO Shielding Glass (Optional)
Touch: (Optional)
5-Wire Resistive Touch
5-Wire Resistive Touch with Mesh Filter
1 x VGA
1 x DVI
1 x Video BNCs (R, G, B, H, V)
1 x RS232 or USB for Touch
1 x Power Input
Standards / Certifications
Power Requirements
Safety: Compliant with MIL-STD-810F/G
EMC: Compliant with MIL-STD-416E/F
Input Voltage:
100 to 240 VAC, 47 to 63 Hz (Default)
24 VDC, 4.16 A (Optional)
Specification (20.1” WMRM920) Display
Size: 20.1-inch
Pixels: 1600 x 1200
Brightness: 300 (cd/m2)
Contrast Ratio: 800:1
Viewing Angle: -89~89(H); -89~89(V) degree
Physical Characteristics
Housing: Aluminum sheet metal Dimensions:
482.6 x 399.3 x 85 mm (9U) Mounting: Flush
rack mounting
Glass / Touch
I/O (Standard)
Glass:
Anti-Reflective Glass (Default)
1 x VGA
1 x DVI
1 x Video BNCs (R, G, B, H, V)
1 x RS232 or USB for Touch
1 x Power Input
ITO Shielding Glass (Optional)
Touch: (Optional)
5-Wire Resistive Touch
5-Wire Resistive Touch with Mesh Filter
Standards / Certifications
Power Requirements
Safety: Compliant with MIL-STD-810F/G
EMC: Compliant with MIL-STD-416E/F
Military Grade Rugged Console Display
Input Voltage:
100 to 240 VAC, 47 to 63 Hz (Default)
24 VDC, 4.16 A (Optional)
3
Packing Lists
n
n
n
n
n
n
n
n
Display Unit
User’s Manual
Military Grade Power Cable / 2.0m
DVI Cable / 2.0m
VGA Cable / 2.0m
VGA to BNCs Cable / 2.0m
Touch RS232 Cable / 2.0m (Optional)
Touch Driver CD (Optional)
x1
x1
x1
x1
x1
x1
x1
x1
I/O View
Installation
Following the procedures below to set up the display.
Power
Switch off the power on both your display and your computer.
The Power Switch is located in the front side of the display.
Power Cable Connection
Connect one end of Military Grade power connector to the display, and the other
end of connector to the power source.
100 to 240 VAC, 47 to 63 Hz (Default)
Military Grade Rugged Console Display
24 VDC (Optional)
4
Shielding VGA Signal Cable Connection
Plug one end of the 15-pin D-Sub signal cable to the video signal connector at
the rear of the PC system and the other end to the display.
Secure the connectors with the screws on the cable connector at both ends.
Shielding DVI Signal Cable Connection
Plug one end of the DVI signal cable to the video signal connector at the rear of
the PC system and the other end to the Display.
Shielding VGA to BNCs Signal Cable Connection
Plug one end of D-Sub VGA signal cable to the rear side of the PC system and
the other end of BNCs (R,G,B,H,V) signal connector to the display.
Military Grade Rugged Console Display
5
2. On-Screen Display Configuration
On-Screen Display (OSD) is a user-friendly interface to remote the display function
and to adjust the display’s image properties. It also supports special Hot Keys for easy
control, such as auto-adjustment and brightness control for backlight.
Definition of Control Key
LED Indicators
The following table describes the LED Indicators located on the front of the display.
Name
PWR
LOCK
Color
Function
Green
Power is on and functioning normally
Orange
Display is suspended
Red
The functions of OSD buttons are locked
Off
Lock function is disabled
Buttons
Power: Turn on or turn off the display
Brightness Down: Decrease the brightness of the panel, or allow users to navigate the
items of a single OSD menu
Brightness Up: Increase the brightness of the panel, or allow users to navigate the
items of a single OSD menu
Auto-adjustment: Auto-adjust the display image to correct for off-centered images,
improper aspect ratio, phase or frequency. (VGA channel only)
Main Menu: Open the OSD configuration, or allow users to navigate to sub-menu
from a specific menu item
Day/Night Mode: Convenient and fast control for the brightness of the panel which is
suitable used in specific environments.
Key Pad Control: Lock or unlock the functions of OSD buttons
Military Grade Rugged Console Display
6
Navigating OSD Menu
1. Open the OSD configuration
Press the Main Menu button to show the OSD menu on the display.
2. Select the specific menu you want
Press the “+/-” buttons to navigate the items of a single OSD menu, and press
the “OK” button to enter to sub-menu from a specific menu item.
3. Modify the value of setting
Press the “+/-” buttons to modify the value of settings, and the value will be
stored automatically.
4. Exit the OSD configuration
Press the Exit button to return to the regular screen viewing, and the OSD menu
will be closed automatically if there is no command respond for 30 seconds.
OSD Menu on VGA Mode
BRICONTRAST
l
BRIGHTNESS
Electronically increase or decrease the overall
brightness of the panel, and it applies to the
main source signal.
l
CONTRAST
Increase or decrease the overall contrast of
the panel electronically, and it applies to the
main source signal.
l
l
l
POSITION
H-POSITION
Adjust the horizontal (left/right) position of
the real-time window overlay.
V-POSITION
Adjust the horizontal (left/right) position of
the real-time window overlay.
IMAGE
AUTO
Make the best settings for the current input
signal.
l
CLOCK
Adjust the value of horizontal image.
l
PHASE
Remove pixellation defects in black areas
Military Grade Rugged Console Display
7
that manifest as a vertical line from top to
bottom by fine tuning signal data sampling.
l
l
WHITE BALANCE
Recalibrate the gain on the R(red), G(green),
and B(blue) signals (color intensity) to a
neutral, normalized level automatically.
COLOR
USER
The user can adjust the R(red), G(green), and
B(blue) levels of color temperature manually.
l
9300K
Set value of display for the CIE coordinate
9300 color temperature.
l
6500K
Set value of display for the CIE coordinate
6500 color temperature.
l
ADC BRIGHTNESS
Set value of display for ADC brightness.
l
l
AUDIO (Optional)
VOLUME ADJUST
Adjust the volume of speaker.
SPEAK ON / OFF
Turn on or turn off the speaker.
RECALL
The user can recall the factory default
setting by selecting “YES”, or return to
the main menu by selecting “NO”.
OSD EXIT
The user can exit the OSD menu by
selecting “YES”, or return to the main
menu by selecting “NO”.
Military Grade Rugged Console Display
8
OSD Menu on DVI Mode
BRICONTRAST
l
BRIGHTNESS
Electronically increase or decrease the overall
brightness of the panel, and it applies to the
main source signal.
l
CONTRAST
Increase or decrease the overall contrast of
the panel electronically, and it applies to the
main source signal.
POSITION
It is not available on DVI Mode.
IMAGE
It is not available on DVI Mode.
l
COLOR
USER
The user can adjust the R(red), G(green), and
B(blue) levels of color temperature manually.
l
9300K
It is not available on DVI Mode.
l
6500K
It is not available on DVI Mode.
l
ADC BRIGHTNESS
It is not available on DVI Mode.
l
l
AUDIO (Optional)
VOLUME ADJUST
Adjust the volume of speaker.
SPEAK ON / OFF
Turn on or turn off the speaker.
Military Grade Rugged Console Display
9
RECALL
The user can recall the factory default
setting by selecting “YES”, or return to
the main menu by selecting “NO”.
OSD EXIT
The user can exit the OSD menu by
selecting “YES”, or return to the main
menu by selecting “NO”.
Military Grade Rugged Console Display
10
A
Trouble Shooting
Condition
Check Point
1. The picture does not
appear
Check if the signal cable is firmly seated in the socket.
Check if the Power is ON at the computer
Check if the brightness control is at the appropriate position,
not at the minimum.
2. The screen is not
synchronized
Check if the signal cable is firmly seated in the socket.
Check if the output level matches the input level of your
computer.
Make sure the signal timings of the computer system are
within the specification of the monitor.
If your computer was working with a CRT monitor, you
should check the current signal timing and turn off your
computer before you connect the VGA Cable to this
monitor.
3. The position of the
screen is not in the
center
Adjust the H-position, and V-position, or Perform the Auto
adjustment.
4. The screen is too
bright (too dark)
Check if the brightness or contrast control is at the
appropriate position, not at the Maximum (Minimum).
5. The screen is
shaking or waving
Press (the Auto - adjustment control) to adjust.
Moving all objects which emit a magnetic field such as
motor or transformer, away from the monitor. Check if the
specific voltage is applied.
Check if the signal timing of the computer system is within
the specification of monitor.
Ø
If you are unable to correct the fault by using this chart, stop using your monitor
and contact your distributor or dealer for further assistance.
Military Grade Rugged Console Display
11
B
MIL-STD-810F/G Compliance
MIL-STD-810F/G Compliance
Test
Reference
Method 501,
Storage
* High
Temperature
Storage
* Low
Temperature
Operation
* Humidity
Basic Hot 30 to 63℃ ± 2℃
Procedure I
Method 501,
Operation
Condition
Basic Hot 30 to 63℃ ± 2℃
Procedure II
Method 502,
-21℃ ± 2℃ (MIL-STD-810F)
Procedure I
-33℃ ± 2℃ (MIL-STD-810G)
Method 502,
-21℃ ± 2℃ (MIL-STD-810F)
Procedure II
-33℃ ± 2℃ (MIL-STD-810G)
Method 507
20 to 60℃ ± 2℃, 95%RH ± 3%
5 ~ 500 Hz, 1.62/2.05/2.20 Grms, 3-Axis
* Vibration
Method 514,
(MIL-STD-810F)
Procedure I
5 ~ 500 Hz, 1.48/1.90/2.24 Grms, 3-Axis
(MIL-STD-810G)
Method 516,
* Transit Drop
Method 500,
Storage
Low Pressure
(Altitude)
Thermal Shock
30℃ ± 2℃, 15,000 ft (4,572 m)
Procedure I
Method 500,
Operation
4ft, 8 Corner, 12 edges, 6 faces
Procedure IV
30℃ ± 2℃, 15,000 ft (4,572 m)
Procedure II
Method 503,
-21 to 63℃ ± 2℃ (MIL-STD-810F)
Procedure II
-33 to 63℃ ± 2℃ (MIL-STD-810G)
Salt Spray test, exposing for 24 Hrs
Drying condition for 24 Hrs
Salt Fog
Method 509
24 Hrs Salt Spray exposure + 24 Hrs
Drying condition
Method 516,
Shock
Procedure I
* Default Tests
Military Grade Rugged Console Display
12
Impact acceleration 40 G, 6 faces
C
MIL-STD-461E/F Compliance
MIL-STD-461E/F Compliance
Test
Description
Type
Frequency Range
CE101
Power Leads
Conducted Emission
30 Hz ~ 10 kHz
* CE102
Power Leads
Conducted Emission
10 kHz ~ 10 MHz
CS101
Power Leads
Conducted Susceptibility
30 Hz ~ 150 kHz
CS109
Structure Current
Conducted Susceptibility
60 Hz ~ 100 kHz
CS114
Bulk Cable Injection
Conducted Susceptibility
10 kHz ~ 200 MHz
Conducted Susceptibility
10 kHz ~ 100 MHz
Magnetic Field
Radiated Emission
30 Hz ~ 100 kHz
Electric Field
Radiated Emission
10 kHz ~ 18 GHz
Damped Sinusoidal Transients,
CS116
RE101
* RE102
Cables and Power Leads
RS101
Magnetic Field
Radiated Susceptibility
30 Hz ~ 100 kHz
RS103
Electric Field
Radiated Susceptibility
2 MHz ~ 18 GHz
* Default Tests
Military Grade Rugged Console Display
13