1
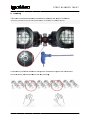
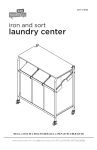
USER MANUAL
Strip Blinder Twist
STRIP BLINDER TWIST
Table of contents
1.
Safety instructions ................................................................
................................................................................................
................................................................
...........................................................
........................... 3
1.1.
2.
FOR SAFE AND EFFICIENT OPERATION ................................................................
............................................................................
............ 3
General Instructions……………………………………………………………………………………….4
Instructions……………………………………………………………………………………….4
2.1.
Warnings................................................................
................................................................................................
................................................................................................
..................................
................................ 4
2.2.
Cautions................................................................
................................................................................................
................................................................................................
...................................
................................ 4
3.
Main Features ................................................................
................................................................................................
................................................................................................
..................................
................................ 4
4.
Operation Guide ................................................................
................................................................................................
................................................................
..............................................................
.............................. 5
4.1.
Operation
ion Modes: ................................................................
................................................................................................
................................
....................................................
.................... 5
4.1.1.
4.2.
DMX Mode: ................................................................
................................................................................................
................................
......................................................
...................... 5
Chase Mode: ................................................................
................................................................................................
................................................................
...........................................................
........................... 5
5.
Technical Specifications:…………………………………………………………………………………..6
Specifications:…………………………………………………………………………………..6
6.
Handling……………………………………………………………………………………………………...7
2/8
STRIP BLINDER TWIST
1. Safety instructions
•
This device is suitable for indoor use only.
•
All modifications to the device will void the warranty.
•
Repairs are to carry out by skilled personnel only.
•
Use only fuses of the same type and original parts as spare parts.
•
Protect the unit from rain and humidity to avoid fire and electric shocks.
•
Make sure to unplug the power supply before opening the housing.
1.1. FOR SAFE AND EFFICIENT OPERATION
Be careful with heat and extreme temperature
Avoid exposing it to direct rays of the sun or near a heating appliance.
Not put
ut it in a temperature bellow 32°
32 F / 0°C, or exceeding 1 31°
1°F / 5 5°C.
Keep away from humidity, water and dust.
dust Do not place the set in a location with high humidity or lots of dust.
Containers with water should not be placed on the set.
Keep away from sources of hum and noise
Such as transformer motor, tuner, TV set and amplifier.
To avoid placing on un-stable
un stable location
Select a level and stable location to avoid vibration.
Do not use chemicals or volatile liquids for cleaning
Use a clean dry cloth to wipe off the dust, or a wet soft cloth for stubborn dirt.
If out of work, contact sales agency immediately
Any troubles arose, remove the power plug soon, and contact with an engineer for repairing, do not open the
cabinet by yourself, it might result a danger of electric shock.
Take care with the power cable
Never pull the power cable to remove the plug from the receptacle, be sure to hold the plug. When not using the
device for an extended period of time, be sure to disconnect the plug from the receptacle.
Important:
Damages caused by the disregard of this user manual are not subject to warranty. The
dealer will not accept liability for any resulting defects
defects or problems. Make sure the electrical connection is
carried out by qualified personnel.
personnel. All electrical and mechanical connections have to be carried out
according to the European safety standards.
3/8
STRIP BLINDER TWIST
2. General Instructions
For the optimum operation and best performance, read the instruction in this manual carefully an
andthoroughly.
thoroughly. As
they give important information regarding safety during use and maintenance. Keep this manual with the unit for
further reference. If the unit is
is sold or given to another operator, make certain that is always has its manual for
new owner reading about its operation and relative instruction again.
again
Every unit has been thoroughly tested and carefully packed before shipment. Unpack the shipping carto
carton
n and
inspect thoroughly saving the carton and all packing materials for possible use later. Check carefully and make
sure your product is not damaged and included accessories are not missing. If damaged or missing something
happens, please contact the nearest
nearest dealer or our customer support staff directly.
2.1. Warnings
-
The unit is not a toy, must only be operated by adults. Do NOT allow any children to temper or play with
it. Packaging materials are not toys. To avoid danger of suffocation must be keep away from children.
-
Do not use in cribs, beds, carriages or playpens.
-
To protect against high electric shock and injury to person, DO NOT open or dismantle the unit.
-
Never try to repair the unit yourself. Repair by unqualified people could cause
cause damage or mis
mis-operation.
operation.
-
Don t touch it while the fixture is running operation to avoid any hurts happening occurred.
Don’t
-
After use, please wait at least 15 min for absolute cool before touching it. Otherwise, it causes the result
of burning.
2.2. Cautions
The voltage mush be matched the specified on this unit. Using the product with a higher voltage than that which is
specified is dangerous and may result in a fire or other type of accident causing damage. We will not be held
responsible for any damage resulting
resulting from using the unit with improper voltage.
Do not make any inflammable liquids, water or metal objects enter the unit.
This unit contains no user serviceable parts inside. Never open the unit unless qualified person to do so, as this
way result in electric
electric shock. This unit contains dangerous voltages, always remove the AC power plug from the
wall socket before any service operation and when not in use for a long time.
Earth connection is so essential.
After having remove the packaging check that the unit is not damage in any way. If in doubt, DO NOT use it and
contact authorized dealer.
Stop using the unit immediately in the event of serious operation problems and either contact your local dealer for
a check or contact us directly.
3. Main Features
o
01,02,05,10
,02,05,10 DMX Channels selection
o
Standard DMX 3-pin
3 pin In/Out
o
16 built-in
built in programs except for Auto&Full subject to Speed and Dimmer
o
0-100%
100% dimming level
o
Standard DMX-512
DMX 512 protocol
o
01 Thru 99 Chase speed adjustment
o
Power failure memory
o
LED display window-4
window 4 digits Segment Display shows current activity and function state
4/8
STRIP BLINDER TWIST
4. Operation Guide
4.1. Operation Modes:
The Strip Blinder Twist has two different operation modes. It can be used a 10 channel chaser or as a
01,02,05,10 channel DMX dimmer. Please follow illustrations below to operate the unit in your desired mode.
4.1.1.
DMX Mode:
Use this operation mode only when you are about to use the unit as a DMX dimmer. This function can allow you
set your unit dimmer function as a 01,02,05,10 channel DMX dimmer
dimmer and DMX address.
1.
Selecting DMX Mode:
DMX mode is indicated by an “A” followed by three digits in the LED. “A” stands for DMX Address and
means the DMX Mode has been activated at present. If “P” appears in the LED display, means you are
in the Chase Mode. Of course, the mode switch can immediately realize on your fingertips by tapping the
“
“MODE”
button.
2.
Selecting the Channel Mode:
Channel Mode is indicated by “CH” followed by two digits 01,02,05,10.
01,02,05,10. You cannot use the “MENU
MENU”
button to select the Channel Mode unless you have called up the DMX Operation Mode as in step 1.
NOTE:
When CH: 01 is displayed, overall channels will be controlled by one DMX channel.
When
hen CH: 02 is displayed, channel 1 and 2 will be controlled by one DMX channel, channel 3 and 4 will be
controlled by one DMX channel, and so forth, channel 9 and 10 will be controlled by another.
When
hen CH: 05 is displayed, channel 1-5
1 5 will be controlled by one DMX channel and channel 6
6-10 will be
e controlled
by another.
When CH: 10 is displayed, each channel will be controlled by one DMX channel.
This is the factory default setting.
3.
Selecting DMX Address Mode:
DMX Address Mode is indicated by “A” followed by three digits 001-512.
001 512. You can not use the “MENU
MENU”
button to select the DMX Address Mode unless you have activated the DMX Mode as step 1. This mode
is the factory default setting.
4.
Setting the DMX Address:
Once you have activated the DMX Mode as step 1, you can use the “UP” and “DOWN
DOWN” arrow buttons to
select your desired DMX address from 001-512.
001
4.2. Chase Mode:
Use
se the operation mode only when you are about to use your unit as a channel chaser among of the 01, 02, 05,
10 channel chasers. The unit has 16 built-in
built in programs except for Auto and Full.
Full. Of course, you can select any of
these programs to chase for a more dramatic lighting show, and you can also control the speed at which the set
programs will be chased.
5/8
STRIP BLINDER TWIST
1.
Selecting the Chase Mode:
Chase Mode is indicated by “P” followed by two digits. “P” stands for Chase
C ase program and means the
Chase Mode has been activated at present, and you have also activated the Chase Program Mode. After
activating the Chase Mode, the Chase Program Mode starts initially and is the default se
setting.
tting. If “A”
appears in the LED display, means you are in the DMX mode. “A” stands for DMX address. Of course,
the mode switch can immediately
immediately realize on your fingertips by tapping the “MODE
MODE” button.
2.
Setting your desired Chase Program:
Once you have activated
activated the Chase Mode as in step1, you can use the “UP” and ““DOWN” arrow button
to change your selected chase program. The
T e chase pattern is displayed in the LED by ““P” followed by
two digits 01-16
01 16 or only “AUTO
AUTO” & “FULL”” appears. You can select any of them to run at a single time.
3.
Selecting the Chase Speed Mode:
To adjust the Chase Speed, you must activate the Chase Speed Mode. Of course, only while in the
Chase Mode as step1, press and hold the “MENU” button until “SP” followed by two digits appears in the
LED. “SP” stands for the chase speed.
4.
Setting your desired Chase Speed:
In this mode, you can adjust the program chase speed. Use the “UP
In
UP” and “DOWN
DOWN” arrow buttons to
adjust the chase speed from 01 thru 99. A value of 99 will give you the fastest chased speed
(approx.1/10th of a second). While a set value of 01 will give you the slowest chase speed (once
once every
30 second).
sec
5.
Selecting the Intensity (Dimming) Mode:
To adjust the output intensity, you must activate the Chase Dimmer Mode. Of course, only when in the
Chase Mode as in step 1, press and hold the “MENU” button until “d
d” followed by three digits appears in
the LED. “d” stands for the chase dimmer.
6.
Setting your
your desired Intensity:
Use the “UP” and “DOWN” arrow buttons to adjust the light output intensity from 000
000-100.
100. A set value of
000 will give you the weakest output intensity and a set value of 100 will give you the full intensity.
5. Technical Specifications:
Specifications
POWER REQUIREMENT
AC230V,50Hz
POWER CONSUMPTION
750W
LAMP
10*Gu10 230V/75W
HOUSING
Metal shell with power finishing
INGRESS
RESS PROTECTION RATING
IP20
CONTROL
DMX--512 (1990)
OPERATING
ATING TEMPERATURE
0 degC to +55
+ degC
STORAGE
TORAGE TEMPEARTURE
-20degC TO +70 degC
-20degC
DIMENSIONS
1256(L) x60(W) x135(H)mm
WEIGHT
6kgs
Please note: Specifications and improvements in the design of this product and this manual are subject to
change without any prior notice.
6/8
STRIP BLINDER TWIST
6. Handling
Take care to open the adjustment screw before adjusting the angle of inclination.
Avoid an excessive load on the material that
that could lead to material failure.
Furthermore you should make sure that you do not stress the joints and connections
too much during the transportation and the mounting.
7/8
STRIP BLINDER TWIST
Importer:
B&K
K Braun GmbH
Industriestraße 1
D-76307
76307 Karlsbad-Ittersbach
Karlsbad Ittersbach
www.bkbraun.com
[email protected]
8/8