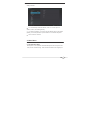
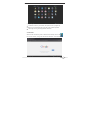
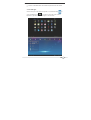
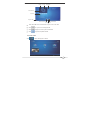
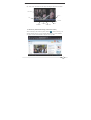
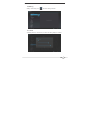
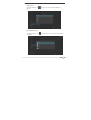
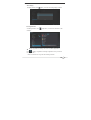
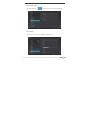
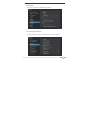
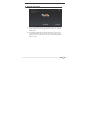
1
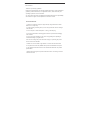
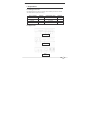
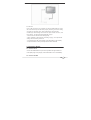
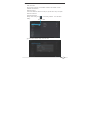
Dear customer,
Thanks for purchasing CyberBox.
Please do look through this user manual carefully before using. There are functional
guidance, product introduction, and application means, which will make your
operating experience more convenient.
Any loss caused by misuse of software and hardware will not be our responsibility.
We reserve the rights on final explanation of this user manual.
Announcements:
1. Place the product far away from high-intensity magnetic field and water.
Make sure to keep it dry.
2. Avoid dropping or striking when you are using which will cause to damage
and lost data .
3. Do not expose in moist atmosphere,raining, and damping.
4. Do not use chemicals or cleaning agent to clean it to prevent from damaging
and corrosion.
5. Do not cut power suddenly in the course of upgrading and uploading to
avoid data missing or program error.
6.Do not over charge the power and bend strongly or squeezing the power
line to avoid the fire hazards.
7.Please do not use it within a gas station or near the fuel and chemicals.
8. Only the service man and qualified iView personnel is authorized to repair it.
9. Use original accessories and do not use accessories that match our product
specification.
10.Read manual and get the specific instructions when connecting it to other
electronic devices.
Content
1.Preparation..................................................................................... .2
2.Power...............................................................................................3
3.Operating Detail...............................................................................4
4.Main Menu.......................................................................................6
4.1 System Main Menu.......................................................................6
4.2 Browser.........................................................................................8
4.3 File Manager.................................................................................9
4.4 Picture Browser.........................................................................10
4.5 Music.........................................................................................12
4.6 Local Video.................................................................................13
4.7 Browser (Internet Browsing and Online Video)...........................14
4.8 Setting.........................................................................................15
4.9 Apk Installer................................................................................21
5 Calculator.......................................................................................22
6 Calendar........................................................................................23
7 Email..............................................................................................23
8 Google Play Store..........................................................................24
9 Specification..................................................................................25
10 2.4G wireless remote..................................................................26
1
Preparation
1. Preparation
1.1 Package Inner List
It includes the items in the box. Please check carefully and at once contact
with local dealers if parts are missing.
Inner Contents
Quantity
Components name
Quantity
CyberBox
1
HDMI Cable
Wireless Keyboard
1
Y/Pb/Pr Cable
1
Manual
1
AV Cable
1
Adapter
1
1
1.2 Appearance
Front Panel
Back Panel
Side
2
1
Card Reader
5
Power on/off
9
Y/ Pb/ Pr
2
IR
6
DC power
10
AV Out
3
Reset
7
Optical
11
Lan
4
Indicator
8
HDMI ports
12
USB
2. Power
2.1 Plug the miniport of AC charger to the DC port of CyberBox, and
another end into power outlet. When the power indicator of Box changes to
red, it means the power input is working properly.
Notice: In order to make sure TV Box operates under best condition, make
sure to take notice of below:
Do not power on in high temperature surroundings, such as in the sun
or under direct light.
Please unplug the power cord when the CyberBox does not work for a
long time.
2.2 Connect the AV cable to the CyberBox and the display monitor, and
output the video signals.
2.3 Connect the HDMI output of the CyberBox to the HDMI input of the TV
if you use an HDMI Cable. Or, you can use RCA AV out of the CyberBox
to connect the input of the TV.
3
2.2 SD Card
here is SD card slot on the CyberBox to read the Multimedia files in the
SD card. Please input the SD card properly according to the slot setting
and push the card till it clicks, which indicates the card has been
inserted right. When taking out the SD card, push the SD card once, and
then release. The SD card will automatically pop up.
* Please insert the SD card to the Slot properly.
* When operating on SD card such as reading, copying, do not pull out the
storage card to avoid any data error.
* Avoid applying the SD card at places of high temperature, and humidity.
* Keep the SD card far away from liquid and corrosive materials.
3. Operating Detail
3.1 Connect to TV
Connect the HDMI cable to the ports of the CyberBox and high resolution TV.
If the display image is not properly, set the contrast ratio of TV to “Automatically”.
3.2 Connect to Web
4
WIFI connection:
Set the WIFI connection at “SETTING”-“Wireless and Network” in WIFI
available circumstances.
Ethernet Connect:
Connect the Ethernet cable to the web port, just the same way to computer
Ethernet connection.
Wireless & Networks:
, enter setting interface,and Click WIFI
Setting: Click setting icons
setting.
Power on WIFI
Click needed network singal, write the code.
5
Setting Ethernet:
For Automatically default IP address, there is no need to input IP
address, subnet, and default gateway.
For Static IP address, you need to input IP address subnet, and default
gateway. Use soft keyboard to input IP address or use wireless keyboard.
Click connect to confirm it.
4. Main Menu
4.1 System Main Menu
When power on, the CyberBox will automatically load into the system main
menu, shown as below image. There are some functional icons to guide you.
6
1 ) Detail explanation of the functional icons on the menu:
MAIN
FUNCTIONS
Video
Play Video
Music
Play Music
Gallery
Picture Browser
Play Store
Go to Play Store
Browser
Surf Internet
Settings
Settings
MARKS
2 ) OS Interface
Click
to enter into the OS application interface
7
3 ) Operating on Main Menu
Control the cursor by Touch Pad, and open the icon or program by
clicking the icon with tapping the touch pad of the wireless keyboard.
Click Apps icon to get into application interfaces.
4.2 Browser
After the web connection by WIFI or Ethernet successfully, click on the
Icon of main surface, and get into the Browser interface. as shown below.
8
Press the “RETURN” button of the Wireless Keyboard to close the surface.
4.3 File Manager
Use the touch pad of the wireless keyboard or use directional keys
to
go the File Manager icon
and tap the touch pad of the wireless
keyboard to get into the the file manager as shown below.
9
Tap
to return to main surface.
Tap
to return to upper surface.
Tap
to choose multiple files and you are able to choose the file name.
Tap
to add new file holder, input file name, and tap “confirm” to add.
Click
may insert the internet shared function.
Click return button of the wireless keyboard to get into the directory.
4.4 Picture Browser
Tap
via touch pad of the wireless keyboard to enter the icon
interface and the screen will show as below:
10
Click on one of the image file and folder and click the picture and it will
display as below:
Click ”Menu” to choose the movie, editor, spins to the right or left, clip,
and make the photos.
Click "Share" to use bluetooth and skype to send the pictures
Click “Dustbin" to delete or cancel.
11
4.5 Music
Click
icon to enter music player, as follow.
Choose one singer and the display shows as below:
12
List file
In turn
Play back
Music Picture
Equalizer
Progress Bar
Scroll left and right
Fast Reverse/Next
Play/Suspen
Click "Scroll Bar" and "Fast Reverse" keys to move to the video
Click
to cycle in the music played file.
Click
to play the music by the broadcast list.
Click
to open the Equalizer file list
4.6 Local Video
Click
to enter video player as follow:
13
Click on the video files into video player and begin to play video as follows:
Video Zone
VOL +
VOL -
Next/FW
Play/Halt
PREV/REV
Return
NEXT /FWD
4.7 Browser (Internet Browsing and Online Video)
After connecting to the internet by WIFI, click the
Browser icon to go to
website interface where you input website addresses to go to the website
you want or Online video website to play the video you like.
14
4.8 Setting
Setting: Click setting icons
, and enter setting interface.
4.8-1 Sound
At Setting interface, click Sound, and enter into setting display as follows:
15
4.8-2 Screen
At Setting interface, click
follows:
Screen, and enter into setting display as
4.8-3Accounts & sync
At Setting interface, click
as follows:
Accounts & sync, and enter into setting display
16
4.8-4 Display
At Setting interface, click
display, and enter into setting display as follows:
4.8-5 Applications
At Setting interface, click
following:
application, to enter into its interface as the
Manage Applications: Manage and remove installed applications
“Setting”>”Application”>”Manage Application” and you will see
Enter
the program list
1. Click to uninstall icons to get into the following interface
17
2. Click uninstall, then you can delete the application
4.8-6 Security
At Setting interface, click
follows:
Security, and enter into setting display as
Unknown Sources: For accessing and installing applications from Google
Play Store go to "Unknown Resources" first and click once to make a "check"
on the empty box on the top of right corner. Then you can download
application from the market.
18
4.8-7 Backup & input
At Setting interface, click
backup & input and it will show as following.
4.8-8 Storage
Remove TF card, view of the available storage space
19
4.8-9 Storage
Remove TF card and view available storage space.
4.8-10 Language & keyboard
Language Setting, text input, and automatic error correction options;
20
Select Language: 54 kind of national languages are available
Remark: Android system can support 54 kind of language but menu
interface supports 14 language.
Android keyboard: Android keyboard setting
Sound on Key-press
Auto-capitalisation
Show suggestions: Display suggested words while typing
Auto-Complete: Spacebar and punctuation automatically insert
highlighted words
4.9 Apk Installer
Use mouse to click this icon to insert the main interface
click
to go to Apk Installer and you will see the below options. You can
install and manage the files from the mobile storage such as flash drive and
SD Card etc.
21
5. Calculator
Click
icon to use the calculator function as follow.
22
6.Calendar
You must first log in the Gmail Account first to view the Calendar
7. Email
Go to the website icon and get into the interface, a website page will pop
up. Then enter the email website address you want to search such as
Hotmail. You can input your account name and password to log in your
email account.
23
8. Google Play Store
To download applications from the Google Play Store you must first
register a Gmail Account. After logging into the account you can access
the Play Store.
For installing applications from Google Play Store you need to go to
"Unknown Resources" first and click once to make a "check" on the
empty box on the top right corner. Then you can download application
from the market.
24
9. Specification
Key Features
Product
Processor Main
Frequency
CyberBox
RAM
Memory
Memory
O/S
Main Function
Interface
DDR3-1GB
NAND 8GB
Copy to SD memory or removable hard disk
Brower
Internet Browser
GOOGLE TV
Play local HD videos
Video
Connect to internet and watch video online
Audio
Music
MP3/WMA
Connect internet , listen music on line
1.2GHz
Android 4.0
Android style interface
Photos
View photos
External memory SD memory or removable hard disk
Connectors and Ports
USB
4 * USB HOST
SD
1 * SD card port
RJ45
Can connect to network by plugging network cable into RJ45 network port
HDMI
Remote
Support
Connect HD TV , put out audio
Support IR remote and 2.4G wireless remote
1080P HD output
Support CVBS
Optical
Power voltage
Others
Audio, Video
Audio output
5V 2A DC adaptor
Resolution
1920*1080
Screen
Size
No Screen, support HDMI output to TV
125*125*28mm
25
26
27