1
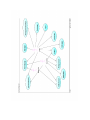
GROUP 9 Requirements Document Create-A-Page Matthew Currier, John Campbell, and Dan Martin 5/1/2009 This document is an outline of what was originally desired in the application in the Project Abstract, Create-A-Page, the desired functionality of each piece of the application, as well as the actors involved in its use found in the Use Case Report. Finally, it is concluded with the actual use of the functionality within the entire program, in a user’s manual. Project Abstract The purpose of this project is to create a user-friendly, web-based tool for creating HTML pages for use by professors who may not be well versed with HTML or even how to use it. This tool will have similar functionality to Google Sites, except we will be using an open source project which handles a lot of the functionality needed for this project. However, there are some enhancements we are hoping to add to the project to make managing and creating websites much more useful than the current project allows. The current functionality from the open source project is similar to that of a text editor. This functionality includes font size, type, and decorations such as bolding and italicizing, empty table declaration, content alignment(left, center, right, justify, etc), hyper linking, creating ordered and unordered lists, view toggling( Text to HTML and vice-versa), adding images, creating superscripts and subscripts, and undo/redo functionality. We are proposing to add the following enhancements: saving the current HTML to file on the server, adding applets to the webpage, embedding video (e.g. YouTube), creating templates of pages so all subsequent page, adding a Flash program to the webpage, framing, adding a spell checker for the text, and being able to dynamically change the number of rows/columns in an existing table(or at least making a note to the end user to be certain of the table size when first creating it). Hopefully, we will be able to add all of this functionality as well as get the program to run on the web in the allotted time. We will prioritize these enhancements when scheduling the project to maximize our ability to complete as many of the enhancements as possible. We will be utilizing HTML, JavaScript, CSS, PHP (for saving source to file), and possibly even MySQL if we need to create any data basing for the project. Since the purpose of the projects is to allow multiple professors to use the program, there may be a need to use a database to keep track of their information as well as keep it secure from other users being able to see or manipulate any files/pages that the professor(s) may want to keep secure. Ideally, it will be compatible with many different browsers, such as Firefox and Internet Explorer to name a couple of examples. Use Case Report User – An outsider who views pages within sites ONLY, but has the option to become an admin by signing up for an account. View pages 1. To view a website created through Create-A-Page you must supply the URL with the username a. http://babyhuey.cis.temple.edu/createapage?username=matt 2. If the supplied username is a valid user, you can begin to navigate their “published” website 3. If the username is not a valid user, you will be redirected to the login page Create account 1. If a user is visiting Create-A-Page for the first time they are given the option to create an account by clicking the “Signup for an account” on the login page (login.php) 2. To create the account they must fill out the required information on the account setup page (setup.php) a. Username b. Password c. Confirm Password d. Firstname e. Lastname f. Email g. Confirm email h. Security question 1 i. Security question 2 j. Security question 3 3. Until all the information is entered and entered correctly they will not be able to proceed in creating the account successfully 4. The user will click submit to create their account or cancel to go back to the login page 5. On successful account creation, the page will display a notice that the account was created and that they will be redirected to the login page NOTE: Anyone who creates an account becomes the administrator for his/her account, but can only view others as a regular user. User-Admin – Owns personal site in application for creating/editing pages, managing the account, etc. Login 1. On the login a page, if a user forgets their password, they may use the password retrieval tool (admin_manage_password.php) a. To begin the process you must supply a valid username otherwise you will be notified the account does not exist b. If successful, you will now be required to answer the security questions that you supplied when you created the account c. If successful, you will not be allowed to change your password by supplying the new password in the new password field, and the confirm password field d. You will be notified that the password was changed successfully and that you will be redirected to the login page 2. By supplying a valid username and password a user may log into their website and begin editing View Page Once logged in you are now able to edit your pages as the administrator. Edit Page 1. When in admin mode, an admin can create new pages for editing a. To create a new page, simply click the “Create” option on the navigation bar and the admin will be directed to a new page where the admin will have to supply the desired name for the new page, and, if so desired, may begin adding content to that page. b. When finished, simply save the changes by using the save feature in the editor. 2. An admin can also edit existing pages in his/her account. a. To edit an existing page, simply choose the page from the dropdown menu on the navigation bar. b. The admin will then be directed to the page with the WYSIWYG editor, and automatically uploads all pre-existing content into the editor. c. The admin will now be able to edit and save changes to the site. Delete Page 1. If an admin has a page that he/she no longer wants to keep, the admin can remove it permanently. a. Simply move the mouse over to the delete button in the admin bar. b. A dropdown menu with all the web pages in the admin’s account will appear. The admin simply chooses the page he/she wishes to delete. c. The admin will be prompted to confirm the deletion of the page. 1) Cancelling at this stage will bring the admin back to the index page. 2) Confirming at this stage will permanently delete the file. d. The admin will be directed back to the index.php page relative to his/her account. 1) Notice that the page is now gone from the admin’s navigation bar! Publish Site 1. The admin may have several reasons why he/she may not want the outside world to view his/her pages. They may all be under construction, or may contain info that shouldn’t be made public yet to a prospective group of individuals who have in the past had access to the site. This option provides the admin the ability to hide all his/her pages from the outside world until he/she chooses to make them available at a later date. a. The admin clicks the button in the admin bar called “publish site”. b. Now all the sites in the admin’s navigation bar will not be visible to the outside world. However, each page in the navigation bar will retain its individual visible status. Settings Manage Account 1. The admin may wish to change certain info about himself/herself, such as password, security questions, name, and email address. This menu option will allow the admin to do just that. Clicking on the option in the admin bar will direct the admin to this page a. To change the password, click the hyperlink named “Change password”. 1) The admin will be taken to the page to change his/her password. 2) Enter a password and then confirm it in the subsequent text field to ensure accuracy of data entry. NOTE: You may not change the password to its current value. It must be a new password. 3) Click “submit” to commit the changed password, or “cancel” to void any changes. After clicking either option, the admin is redirected to the manage account page. b. Security questions can be selected from the dropdown menus, and the answers can be edited simply by editing the textbox as normal. c. Changing the admin’s first and lastname are just like changing the security answers. d. Changing the email address is like changing the password without being redirected to a new page. 2. When finished making any and all changes, click the submit button at the bottom of the manage account page to commit the changes, or click cancel to void any changes. Either option will result in the admin being redirected back to his/her main page. Sign Out 1. When the admin is ready to leave the system, he/she clicks the “Sign Out” button in the admin control bar. 2. Upon exit, the admin will be directed back to the login page. Super-Admin – Manages the regular admins via password resetting, removing admins, and creating new accounts Login 1. Same as for regular admin, except directed to the Super Admin’s main page. 2. Once on Super Admin’s page, every user in system is laid out in a grid format, and clicking an area in the grid will allow the Super Admin to change an individual cell relating to a user’s account in the following fields. a. Userid b. Username c. Password d. First Name e. Last Name f. Email address g. Publish (0 for yes/1 for hide - default) Create User 1. Same functionality as for user, except format is in a popup list, and not a separate page. Reset Password 1. The Super Admin can automatically reset the password of an account holder so he/she can log into his/her account. This should be reserved for the case when the admin user forgets the answers to his/her security questions, but it is not required. Delete User 1. The Super Admin can remove users from the system for several reasons, including but not limited to a violation of the terms to use the system, legal violations, or discontinued use of his/her account. a. Click the “Delete User” option above the grid. b. The Super Admin will be prompted which user to remove. c. After selecting a user, click the submit button to continue or cancel to return to the main page. d. A dialog box will appear to confirm the decision. Choose “OK” to commit the user account deletion, or “Cancel” to void the transaction. 1) Confirming at this stage will result in the permanent removal of the selected user! e. After selecting either option, the Super Admin will return to the main page. Sign Out 1. Same as regular admin. Extra Sources for info/help Please refer to http://babyhuey.cis.temple.edu/createapage/popups/admin_manual.html for details about “Administration Control Bar” Please refer to http://babyhuey.cis.temple.edu/createapage/popups/about_manual.html?wysiwyg=textarea1 for details about using the “WYSIWYG” editor Use Case Diagram See enclosed diagram User Manual Admin Control Bar - Please note that these options are only available to site owners when logged in to Create-A-Page. Create - Create a new web page to be added to the user's account. Click this button when you're ready to add a new webpage to your account. After you click this button, you will be taken to edit mode, where you will find a text field labeled "Page Name" that appears above the editor. Simply enter the name you wish to call the new web page, and hit enter to submit your page to the system. Before hitting enter, you can even begin to edit the page immediately, or come back to it later using the edit option. When you first create a page, it is not visible to the public. View - Allows user to see the selected web pages as it would appear in browser. When you wish to use the view option, simply move your mouse over the word "View", and you will see a drop down menu appear as long as you keep the mouse cursor over the View button. The drop down menu will consist of all the names in your navigation bar. Simply click on one of them and you will be taken to the view of that particular page. Edit - Allows user to see the selected web pages as HTML code, for the purposes of editing it. This option works exactly like the view option, except when you pick a webpage, you will be taken into the edit mode for that page. The editor menu will appear, and the HTML code of your page will appear underneath it. For help using the editor, please see the tab marked "Manual" in the help menu. Delete - Allows user to remove a web page from his/her account. This option works exactly like view and edit, except when you pick a webpage, that webpage will be deleted. Make sure you truly intend to delete the page you select, as once it is deleted, it is GONE! Settings - Allows user to change personal aesthetics of page. Clicking this option will gray out the rest of the page and a popup will appear. It has three tabs: Page, Header, and Navigation. This popup lets the user change color schemes or box sizes for these three attributes. The page option affects the whole page, the header affects only the top, and the navigation affects the left side where all a user's pages are listed. Publish/Unpublish Site - Allows user to show/hide ALL pages in user's collection. This option will default upon user creation to keep sites unpublished. This means you will see "Publish Site" in the admin control bar. To change this so the outside world can see your pages, just click it. Click again to hide it. Manage Account - Allows user to change personal info on Create-A-Page. When this option is chosen, you will be taken to the account management page. Here, you can change personal info about yourself, such as your password, your email, and your name. When you are finished making changes, hit submit to make your changes official, or hit cancel and all your changes will be undone. After choosing submit or cancel, you will be taken back to the last page you were working on. Export - Extracts all user files and packages them into a ZIP. This option allows for easy portability of the site. Help - Brings up the same help page in editor, for access to help files for editor and admin bar. Click this option in order to bring up the help menu. But in order for you to see this note in the help menu, chances are you already figured this out on your own!!! Sign Out - Allows user to sign out of their account. Simply click this option and you will exit Create-A-Page. Make sure you save all your work before leaving, as it is NOT saved automatically upon exiting. You should be immediately directed back to the login page after exiting. Navigation Bar Option - Please note that these options are only available to site owners when logged in to CreateA-Page. - Allows this website to be visible on the Web. When you want to make it invisible, just click on the check mark and it will turn into an "X", indicating that it is no longer visible to web users. - Makes this website to be invisible on the Web. When you want to make it visible, just click on the "X" and it will turn into a check mark, indicating that it is now visible to web users. - Moves this web page's listing in the Navigation bar up one space. This option is used to reorder the webpages in the navigation bar. Simply click the up arrow to the left of a particular webpage's name, and that webpage will be moved up one space in the navigation bar. - Moves this web page's listing in the Navigation bar down one space. This option is used to reorder the webpages in the navigation bar. Simply click the up arrow to the left of a particular webpage's name, and that webpage will be moved up one space in the navigation bar. WYSIWYG Editor - Please note that these options are only available to site owners when logged in to Create-APage. To enable the editor, go to the Admin Control Bar, hover over Edit and select the page to modify. Backcolor - Changes the backcolor of the text to the selected option. To change the current backcolor, click the Backcolor button and choose from the list of colors. To change the backcolor of a region, highlight the region of text by click-and-dragging your cursor over the text. Then click the Backcolor button and choose from the list of colors. Bold - Changes the weight of the font to bold. To change the current font weight to bold, click the Bold button. Press it again to change the weight back to regular. To change the a region of text to bold, highlight the region of text by click-and-dragging your cursor over the text. Then click the Bold button. Press it again to change the font weight back to regular. Copy - Copies the highlighted items onto the clipboard. To copy items onto the clipboard, highlight the region that you wish to copy by click-anddragging your cursor over the region. Then click the Copy button. NOTE: Cut, Copy, and Paste is not available in Mozilla and Firefox browsers. Cut - Copies and removes the highlighted items onto the clipboard. To cut items onto the clipboard, highlight the region that you wish to cut by click-anddragging your cursor over the region. Then click the Cut button. NOTE: Cut, Copy, and Paste is not available in Mozilla and Firefox browsers. Forecolor - Changes the forecolor to the selected option. To change the current forecolor, click the Forecolor button and choose from the list of colors. To change the font color of a text region, highlight the region of text by click-and-dragging your cursor over the text. Then click the Forecolor button and choose from the list of colors. Font Size - Changes the font size to the selected option. To change the current font size, click the Font Size button and choose from the selection. To change the font size of a text region, highlight the region of text by click-and-dragging your cursor over the text. Then click the Font Size button and choose from the selection. Font Type - Changes the font type to the selected option. To change the current font type, click the Font Type button and choose from the selection. To change the font type of a text region, highlight the region of text by click-and-dragging your cursor over the text. Then click the Font Type button and choose from the selection. Header Type - Changes the font to a predefined size and in most cases the font is bold. To create a heading, click the Header Type button and choose from the selection. To create a heading from existing text, highlight the region of text by click-and-dragging your cursor over the text. Then click the Header Type button and choose from the selection. Help Menu - Opens the help menu. To open the help menu, click the Help Menu button. HTML View - Changes the view of the editor to raw HTML. To change the editor's view to HTML, click the HTML button. Indent - Indents the current line to the right. To indent the current line, select the line you wish to indent and click the Indent button. Insert Image - Inserts an image onto the page. To insert an image onto page, place and click your cursor where you wish to insert the image and click the Insert Image button. To replace a region of the page with an image, highlight the region of text by click-anddragging your cursor over the area. Insert Image options: o o o Upload - Upload an image from a directory. After upload completes, you can select the image to add. The Image is saved for later use as well. Image URL - Add an image by providing its URL (Uniform Resource Locator). Alernate Text - In the event that the image cannot be displayed, the provided text will show in its place. Layout options: o o o o o o Width - Sets the width of the image. If left blank, the it will be set by the width of the image's property. Height - Sets the height of the image. If left blank, the it will be set by the height of the image's property. Border - Sets border width of the image. If value is 0, the image will have no border. Alignment Horizontal Space Vertical Space - Select Image - From the list of uploaded images, you can select an image to add clicking on its name. Insert Link - Adds a hyperlink to the page. To add a hyperlink to the page, highlight the region of text by click-and-dragging your cursor over the area and click on the Insert Link button. Insert Hyperlink options: o o o o o URL - The address of the resource you wish to link to. Target - Specifies the name of a frame where a document is to be opened. Style - Specifies style information for the current element Class - Assigns a class name or set of class names to an element. Any number of elements may be assigned the same class name or names. Multiple class names must be separated by white space characters. Name - Names the current link so that it may be the destination of another link. The value of this attribute must be a unique link name. Insert Table - Adds a table to the page. To add a table to the page, place your cursor where you wish to add a table and click on the Insert Table button. Table Properties options: o o o o o o o o o o Rows - The number of rows to add to the table. Columns - The number of columns to add to the table. Padding - Specifies the amount of space between the border of the cell and its contents. Border-Size - Specifies the width of the frame around a table. Border-Type - Specifies the style of the border (solid, double, dotted, dashed, groove, ridge, inset, outset). Width - Specifies the width of the table in pixels or percentage. Alignment - Specifies the table alignment (left, center, right). Background-Color - Specifies the table's background color by choosing from the list of colors. Border-Color - Specifies the table's border color by choosing from the list of colors. Border-Colapse - Insert YouTube Video - Embeds a YouTube video in the page. To embed a YouTube video, place your cursor where you wish to add the video and click on the Insert YouTube button. Source - The copied source code from the Embed field of a YouTube video page. Italic - Changes the style of the font to italic. To change the current font style to italic, click the Italics button. Press it again to change the style back to non-italic. To change a region of text to italic, highlight the region of text by click-and-dragging your cursor over the text. Then click the Italics button. Press it again to change the font style back to non-italic. Justify Center - Justifies the selected line to the center of the page. To set the justification to the center, selected the line you wish to justify and click the Justify Center button. Justify Full - Justifies the selected line to the center of the page. To set the justification to full, selected the line you wish to justify and click the Justify Full button. Justify Left - Justifies the selected line to the left of the page. To set the justification to the left, selected the line you wish to justify and click the Justify Left button. Justify Right - Justifies the selected line to the right of the page. To set the justification to the right, selected the line you wish to justify and click the Justify Right button. Maximize The Editor - Maximized the editor to a full view. To maximize the editor, click the Maximize Editor button. Ordered List - Adds an ordered list, with the first bullet highlighted, to the page. To add an ordered list to the page, click the Ordered List button. Outdent - Indents the current line to the left. To outdent the current line, select the line you wish to outdent and click the Outdent button. Paste - Pastes the contents of the clipboard into the page. To paste items from the clipboard and onto the page, place and click the cursor where you wish to perform the paste. Then click the Paste button. NOTE: Cut, Copy, and Paste is not available in Mozilla and Firefox browsers. Preview - A preview of content from the editor. To preview the content of the editor, click the Preview button. Print - Sends a copy of the content in the editor to a printer for printing. To print the content of the editor, click the Print button. Redo page. - Places the content of what was last removed from the Undo back into the To perform the redo, click the Redo button. Save - Saves the editor content. To save your page content, simply click the save button. Strke-through - Add a strike-through line to the text. To add a strike-through to the text at the current cursor position, click the Strike-through button. Press it again to turn off the strike-through. To add a strike-through to a region of text, highlight the region of text by click-and- dragging your cursor over the text. Then click the Strike-through button. Press it again to remove the strike-through. Strip MS Word HTML MS Word. - Removes formating from HTML that was inserted from To to remove MS Word formatting, highlight the content that was inserted MS Workd and click the Strip MS Word HTML button. Subscript - Add subscript text to the page. To add subscript text to the current position of the cursor, click the Subscript button. Press it again to turn off subscripting. To add subscript to a region of text, highlight the region of text by click-and-dragging your cursor over the text. Then click the Subscript button. Press it again to remove the subscript formatting. Superscript - Add superscript text to the page. To add superscript text to the current position of the cursor, click the Subscript button. Press it again to turn off superscripting. To add superscript to a region of text, highlight the region of text by click-and-dragging your cursor over the text. Then click the Superscript button. Press it again to remove the superscript formatting. Text View - Changes the view of the editor to text. To change the editor's view to text, click the TEXT button. Underline - Add underlining to text. To add underlining text underlining a the current position of the cursor, click the Underline button. Press it again to turn it off. To add underlining to a region of text, highlight the region of text by click-and-dragging your cursor over the text. Then click the Underline button. Press it again to remove the underline formatting. Undo - Removes the content of what was last added to the page. To perform the undo, click the Undo button. Unordered List page. - Adds an unordered list, with the first bullet highlighted, to the To add an unordered list to the page, click the Unrdered List button. Admin Console - Please note that these options are only available to the Create-A-Page administrator. Create Account: To create an account, click on the Create Account link. Fill in the the fields in the dialog prompt. Once all fields are filled, click Submit. Reset Password: To reset existing account's password, click on the table's row selector. Once the row is highlighted, click anywhere in the table. At the dialog prompt, click the Reset Password button. Delete Account: To delete an existing account, click on the table's row selector. Once the row is highlighted, click anywhere in the table. At the dialog prompt, click the Delete button.