1
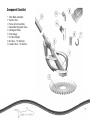
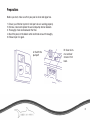
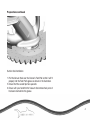
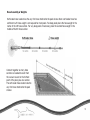
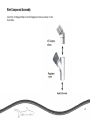
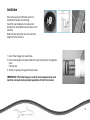
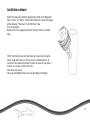
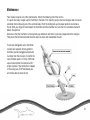
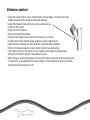
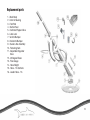
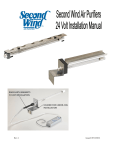
1
Introduction
SAFETY INFORMATION
WARNINGS - Please read the following before installing your new automatic pool cleaner!
• Hazardous suction can cause injury and drowning. Do not play with cleaner or hose or apply to
body. Do not let children use or play with pool cleaner. Turn off pump before attempting to clean unit.
• Suction entrapment, injury and drowning hazard. If your pool has a dedicated suction port (vacuum
port) for vacuuming or for an automatic pool cleaner, it must be covered when not in use. If your
dedicated suction port does not have a spring loaded cover (vacuum lock fitting) purchase one from
your local pool store and install it before connecting pool cleaner to dedicated suction port.
• If your pool is exposed to large quantities of leaves, we suggest purchasing and installing an in-line
leaf trap. A leaf trap will provide more debris-loading capacity and also provides a water by-pass when
the basket is full. It is very important that the pump will get sufficient water flow!
BEFORE INSTALLATION
IMPORTANT FOR VINYL LINER POOL OWNERS:
Before installing the pool cleaner, examine the interior of your pool carefully. If your vinyl liner is brittle or has stones,
wrinkles or metal corrosion in contact with the bottom side of the liner, or has damage to the base or supporting
walls, do not install the pool cleaner before having a qualified professional perform the necessary repairs.
IMPORTANT FOR GUNITE POOL OWNERS:
Before installing the pool cleaner in a gunite (concrete) pool or pool that is partially or completely tiled, check closely
for loose tiles and loose light fittings. Do not install the pool cleaner before having a qualified professional perform
the necessary repairs.
1
Component Checklist
1
2
3
4
5
6
7
8
9
Main Body assembly
Suction Seal
Swivel & Nut Assembly
Adjustable Regulator Valve
45 Degree Elbow
Flow Gauge
2x Hose Weight
9x Hose - 1m Sections
Leader Hose - 1m Section
2
Preparations
Before you start, make sure that your pool is clean and algae free.
1. Ensure your filtration system’s multi port valve is working properly.
2. Remove, clean and replace the weir and pump strainer baskets.
3. Thoroughly clean and backwash the filter.
4. Brush the pool, let the debris settle and hand vacuum thoroughly.
5. Follow steps 2-4 again.
A: Switch the
pump off
B: Clean skimmer and leaf
strainer. Put it
back.
3
Preparations continued
Suction Seal Installation
1. P
ull the Vacuum Seal over the Cleaner’s Foot Pad so that it will fit
properly into the Foot Pad’s groove as shown in the illustration.
2. Ensure that the curved tips face upwards
3. E
nsure with your hand that the Vacuum Seal rotates freely once it
has been inserted into the groove.
4
Hose Assembly & Weights
Soft leader hose needs to be the very first hose attached to the pool cleaner. Note: soft leader hose has
a different cuff. Hose weight is not required for most pools. For deep pools place the hose weight in the
center of the 4th hose section. For very deep pools if necessary place the second hose weight in the
middle of the 5th hose section.
Connect together as many hose
sections as needed to reach from
the vacuum source to the farthest
point of the pool, plus one section.
The soft leader hose needs to be the
very first hose attached to the pool
cleaner.
5
Weir Component Assembly
Insert the 45 Degree Elbow into the Regulator Valve as shown in the
illustration.
6
Return Line Adjustments
Important:
The cleaner must move randomly
throughout the pool. Water circulating
at the surface will influence the hose
thus limiting Cleaner’s coverage.
Adjust Return Line Flow as described
in diagrams below.
To adjust the Eyeball Diverters; loosen
the lock ring and redirect the Eyeball
Diverters slightly downwards and also
try different directions to see what
works best in your pool. Allow time
for the body of water to settle into
new pattern.
7
Installation
Ensure the pump and filtration system is
switched off before commencing.
Insert the weir adaptors into vacuum lid.
Connect the assembled hose sections to the
machine.
Slide the hose protector over the last hose
length from the machine.
1. Insert Flow Gauge into leader hose.
2. P
lace hose lengths into pool (filled with water) and connect to regulator
valve
fitted to weir.
3. Switch on pump and regulate flow of water
IMPORTANT: The Flow Gauge is used for test purposes only and
must be removed during normal operation of the Pool cleaner
8
Installation continued
Switch the pump on and start adjusting the Knob of the Regulator
Valve “Faster” or “Slower” until the disc indicator in the Flow Gauge
settles between “Maximum” and “Minimum” flow.
Turn the pump off.
Remove the Flow Gauge and connect the pool cleaner to leader
hose.
NOTE: Optimizing the water flow does not mean maximizing the
flow through the Cleaner. In fact, to insure a random pattern of
travel that will enable the Cleaner to reach all areas of your pool, it
is better to use less suction, not more.
Switch on your pump.
Your fully assembled cleaner will start pulsating immediately.
9
Maintenance
Your Cleaner requires very little maintenance. Check the following from time to time.
It is quick and easy to open up the Oscillator’s chamber. First stop the pump. Unscrew the pipe and nut swivel
and slide internal housing out of the external body. Push the sliding lock up into open position and remove
the lid. With your finger lift and inspect the Oscillator and the chamber to insure that it is not obstructed with
debris. See picture:
Also insure that the Oscillator is moving freely up and down and that it is securely clipped onto the steel pin.
Then place the lid back and slide the lock down to close and reassemble the unit.
To remove damaged or worn Oscillator;
no tools are required. Simply grab the
Oscillator, pull and waggle outward until
it unclips from the steel pin. To install the
new Oscillator push it in firmly (TOP side
up as marked) onto the steel pin until it
snaps in place. If the Oscillator is clipped
in the wrong way (TOP side down) you
will not be able to close the lid.
10
Maintenance continued
• Check the Suction Seal for wear. If it becomes thin and too floppy, it will impair the correct
random movement of the Cleaner and should be replaced.
• Inspect the Regulator Valve and flush away any debris build up.
• Clean your filter system.
• Empty the Skimmer Basket.
• Empty the Pump Strainer Basket.
• Use your Flow Gauge to ensure correct water flow for your Cleaner.
• For best results and to maintain proper operation, use only original hoses.
• Note: Remove the Cleaner from the pool before a chemical shock treatment!!
• When not in the pool, keep the Cleaner’s Suction Seal flat to avoid warping.
• Your Cleaner can stay in the pool at all times, however, when people are using the pool,
disconnect the Cleaner and pull it to one side of the pool.
• When storing or winterizing the Cleaner, do not coil the hoses. Disconnect each hose section and
lay them flat in an area protected from direct sunlight. It is also important to remove the Suction
Seal from the Cleaner and store it flat.
11
Troubleshooting 1 of 2
Problem: Cleaner is sluggish or has stopped operating.
Solution:
• Check Cleaner for blockage inside the Oscillator chamber. Refer to Maintenance on page 10.
• Clean your filter system, empty pump basket and empty skimmer basket.
• Inspect the Regulator Valve and flush away any debris buildup.
• Check hose sections for blockages.
• Check hose sections for leaks by lifting each section above water.
• Using your Flow Gauge, verify proper water flow to your Cleaner. Refer to
Problem: Cleaner gets stuck on the steps.
Solution:
• Adjust the Eyeball Diverter of the return flow towards the problem area to guide the
Cleaner away from the steps.
• Verify proper hose length and correct position of the Hose Weight(s).
• Remove or add one hose section.
• Using your Flow Gauge, verify proper water flow to your Cleaner.
• Using your Flow Gauge, Increase or decrease the flow to your cleaner within the
Maximum/Minimum range.
12
Troubleshooting 2 of 2
Problem: Cleaner travels in repetitive pattern.
Solution:
• Adjust Eyeball Diverters as described in diagrams.
• Verify proper hose length and correct position of the Hose Weight(s).
• Remove or add one hose section.
• Check that the hose sections are straight. Straighten up any bent or coiled hose sections
by laying them in the warm sun for a day or two.
Problem: Cleaner does not transit onto the wall.
Solution:
• Using your Flow Gauge, verify proper water flow to your Cleaner.
• Increase the water flow slightly by turning the knob on the adjustable regulator valve.
• Verify proper hose length and correct position of the Hose Weights.
Problem: Cleaner stays in one side of the pool.
Solution:
• Adjust Eyeball Diverters as described in diagrams.
• Adjust Eyeball Diverters as necessary to guide the Cleaner to the other side of the pool.
• Verify proper hose length and correct position of the Hose Weight(s).
• Remove or add one hose section.
13
Replacement parts
1 - Main Body
2 - Internal Housing
3 - Foot Pad
4 - Suction Seal
5 - Oscillator/Flapper Valve
6 - Lid & Lock
7 - Vertical Bumper
8 - Horizontal Bumper
9 - Swivel & Nut Assembly
10 - Fastening Nuts
11 - Adjustable Regulator
Valve
12 - 45 Degree Elbow
13 - Flow Gauge
14 - Hose Weight
15 - Hose - 1m Sections
16 - Leader Hose - 1m
14
Warranty
We warrant your new pool cleaner machine unit to be free from defects in material and workmanship for 5 YEARS
from date of purchase, subject to our standard conditions of sale. Please return the attached reply card to ensure
your warranty is recorded.
Standard Conditions of Sale
The WARRANTY excludes:
• Defects in the hose. (Genuine pool cleaner hoses are warranteed for three years against the
manufactured defects.)
• Pool cleaner warranty terms and conditions apply.
• Normal wear and tear of the Footpad and Suction Seal. These must be checked monthly and
replaced when worn.
• Damage due to abnormal use, lack of care, negligence, undue exposure to sun, heat, and all
such acts or omissions beyond our control.
• Damage caused by an incorrect chemical balance in the swimming pool.
• Any obligation other than the obligation to repair or replace defective parts.
• Discolouration of parts. (Your pool cleaner may become discoloured as a result of being
subjected to use in your swimming pool. Such discolouration, however, shall in no way affect the
cleaner’s operating ability.) The pool cleaner Warranty is given in place of all warranties,
guarantees, express or implied, of merchantability, fitness for particular purpose, or otherwise.
• The warranty is not transferable.
15