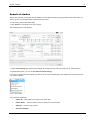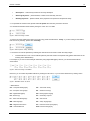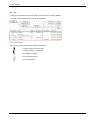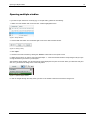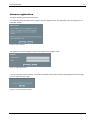
1
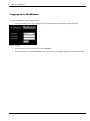
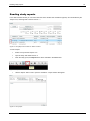
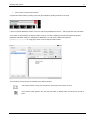
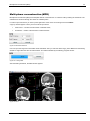
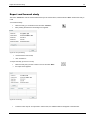
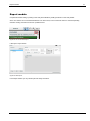
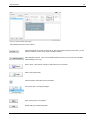
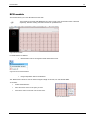
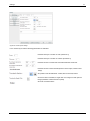
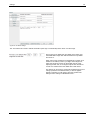
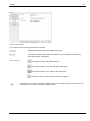
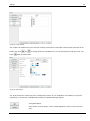
MedDream WEB DICOM Viewer USER’S MANUAL (version 4.03) © 2014, Softneta UAB, Kaunas All rights reserved in the event of granting of patents or registration as a utility patent. All names of companies and products mentioned in this user`s manual may be trademarks or registered trademarks. References to products of other manufacturers are for information purposes only. Such references are intended neither as an approval nor a recommendation of these products. Softneta UAB accepts no liability for the performance or use of such products. Other brand names, software and hardware names used in this user`s manual are subject to trademark or patent protection. The quoting of products is for informational purposes only and does not represent a trademark misuse. This user`s manual is protected by copyright. Unless expressly authorized in writing, dissemination, duplication or other commercial exploitation of this documentation set or communication of its contents or parts of it is not permitted. In case of infringement, the violator may be liable to pay compensation for damages. Specifications due to technical developments are subject to change. This user`s manual is not subject to the revision service. Please contact the manufacturer or authorized dealer to request the latest edition of the manual. Table of Contents 3 Table of Contents Table of Contents ..................................................................................................................................................................... 3 Notes on the user`s manual ...................................................................................................................................................... 4 Purpose and availability of documentation .....................................................................................................................4 Questions and comments ..............................................................................................................................................4 Explanation of symbols used .........................................................................................................................................5 Introduction ............................................................................................................................................................................... 6 Minimal hardware requirements................................................................................................................................................ 7 Minimal software requirements ................................................................................................................................................. 7 Installing MedDream for MedDream PACS Quick Install (Windows and Linux)........................................................................ 8 Windows install ..............................................................................................................................................................8 Linux install ....................................................................................................................................................................9 Logging on to MedDream ....................................................................................................................................................... 11 Search of studies .................................................................................................................................................................... 12 Opening multiple studies ........................................................................................................................................................ 15 Reading study reports............................................................................................................................................................. 16 Viewing and analyzing images................................................................................................................................................ 18 Viewing one or multiple studies ....................................................................................................................................18 Comparing multiple studies ..........................................................................................................................................19 Image localization ........................................................................................................................................................20 Manipulating images ....................................................................................................................................................21 Measuring Images........................................................................................................................................................23 Printing images and series ..................................................................................................................................................... 29 Context menu functions .......................................................................................................................................................... 30 Saving images..............................................................................................................................................................30 Cine mode ....................................................................................................................................................................31 Multi-planar reconstruction (MPR) .......................................................................................................................................... 32 Export and forward study ........................................................................................................................................................ 35 Report module ........................................................................................................................................................................ 37 ECG module ........................................................................................................................................................................... 40 SR view .................................................................................................................................................................................. 43 PDF view ................................................................................................................................................................................ 44 Video view .............................................................................................................................................................................. 45 Settings ................................................................................................................................................................................... 46 License registration................................................................................................................................................................. 52 Information window ................................................................................................................................................................. 53 Table of Figures ...................................................................................................................................................................... 54 Index ....................................................................................................................................................................................... 57 MedDream WEB DICOM Viewer v4.03 User`s Manual Notes on the user`s manual 4 Notes on the user`s manual Purpose and availability of documentation This user`s manual describes the operation with MedDream WEB DICOM Viewer (hereinafter – MedDream). Correct operation of the system is imperative for its safe and successful functioning. You should therefore ensure that you are thoroughly familiar with the user manual before setting up and using MedDream for the first time. The user manuals and other documentation enclosed with MedDream should be kept accessible to users at all times to ensure that the information required for the use of MedDream is readily available. MedDream WEB DICOM Viewer is not intended to replace skilled and qualified medical professional. The software should only be used by people who have been trained and is acquainted with its functions, capabilities and limitations. Users must be aware that the quality, accuracy and correctness of the output data displayed on the screen, printed or exported from MedDream depends on the quality, accuracy and correctness of the input data, the user`s interface with the data, the quality, calibration and other parameters of printer or monitoring device. MedDream has been tested extensively, however, it is possible that errors may remain/emerge in the software. Users must be aware of the potential for errors and in case of an error or for other assistance, please contact Softneta, UAB Customer support: write an e-mail [email protected] MedDream saves images and studies together with patient, organization and other information while saving to the local database and exporting from the Viewer. Users must ensure that the data will not be accessed by unauthorized people. MedDream measuring functions are approximate and cannot be used for diagnostic purposes. Questions and comments If you have any questions or comments regarding this user`s manual, please contact Softneta UAB Customer support. MedDream WEB DICOM Viewer v4.03 User`s Manual 5 Explanation of symbols used The symbols used in this daily workflow refer to important safety information which warn against possible health risks or fatal injuries and contain useful notes. Whenever you see these symbols, read the accompanying information carefully and observe all safety notes and information in the user manual, daily workflow and on the device labels. WARNING Indicates a hazardous situation which may result in a fatal or serious bodily injury if the appropriate safety precautions are not heeded. CAUTION Indicates a hazardous situation which may result in a minor injury if the appropriate safety precautions are not heeded. CAUTION – PROPERTY DAMAGE Indicates possible device damage if the appropriate safety precautions are not heeded. Information, hints and advice for a better understanding of the instructions to be observed in the operation of the instrument. MedDream WEB DICOM Viewer v4.03 User`s Manual Introduction 6 Introduction MedDream WEB DICOM Viewer is a Flash based package for PACS server which is designed to aid professionals in everyday’s decision making process, connecting all the medical data into a unified and fast performing network. MedDream ensures a fast and reliable way to search, present and analyze the medical data (images and video files) on various devices: computers, smart phones, tablets (near future) and so forth. MedDream covers: radiology, cardiology, oncology, gastroenterology and many other fields of medical application. It seamlessly integrates with various medical imaging devices, such as: ultrasound (US), magnetic resonance (MRI), positron emission tomography (PET), computed tomography (CT), endoscopy (ES), mammograms (MG), digital radiography (DR), computed radiography (CR) ophthalmology, and so forth. Core MedDream WEB DICOM Viewer uses are: Replacement of hard copies, e.g. film archives, paper documents, etc. Remote access. MDS provides a possibility to be mobile and work from any place in the world where the Internet is accessible. More than one person can access and view medical records at one time. Such functionality speeds up the collaboration among the professionals. So that a doctor in the hospital and a doctor that is in the different location may view the medical data and discuss about it simultaneously. The patient’s medical history, various studies and images are found much faster comparing to the conventional paper-based methods. MedDream can be used as a standalone WEB Viewer or integrated into PacsOne PACS, dcm4chee Archive, Conquest PACS, ClearCanvas PACS systems. Moreover, MedDream can be adapted to client's PACS system and easily integrated into RIS/HIS workflow. MedDream has multiple functions such as search of studies, viewing, analyzing, saving, exporting, forwarding images and videos, etc. MedDream cannot guarantee the accuracy of calibration data received from the modality. Moreover, Softneta cannot guarantee that the manual calibration which is performed by users is done accurately. Measuring function is approximate and cannot be used for diagnostic purposes. MedDream WEB DICOM Viewer v4.03 User`s Manual Minimal hardware requirements 7 Minimal hardware requirements Parameter Processor Memory Hard drive Network Interface Requirement 2.33GHz or higher x86-compatible 2 GB 10 GB (RAID 1, RAID 5, RAID 10) 100 Mbit/s Minimal software requirements Microsoft® Windows® XP SP3 (32 bit and 64 bit), Windows Server 2008 (32 bit and 64 bit), Windows 7 (32 bit and 64 bit), Windows 8 (32 bit and 64 bit), or Windows Server 2012 (32 bit and 64 bit) Internet Explorer 8.0 or later, Mozilla Firefox 17 or later, Google Chrome, or Opera MedDream WEB DICOM Viewer v4.03 User`s Manual Installing MedDream for MedDream PACS Quick Install (Windows and Linux) 8 Installing MedDream for MedDream PACS Quick Install (Windows and Linux) Under Windows, a thread-safe (TS) 32-bit PHP build is required. The DLLs included won't work with a 64-bit PHP, like in 64bit builds of WampServer. Under Linux, a non-TS PHP build is required. This is related to a more common build of Apache, the "prefork". The "worker" build is incompatible. PHP 5.3 is built for Windows either with VC6 or VC9 runtime. Take note which version you have and use a corresponding .dll during installation as explained below. Otherwise you'll get an error message like this one: Module compiled with build ID=API20090626,TS,VC6 PHP compiled with build ID=API20090626,TS,VC9 These options need to match Under Linux, the .so file requires glibc 2.5 or later. Under Linux, MedDream PACS's custom libjpeg conflicts with standard libjpeg needed by the GD2 extension on which MedDream depends heavily at the moment. You will need to disable the antispam image in order to log in to MedDream PACS web interface (to do that, place an empty file "no.antispam.code" near MedDream PACS.exe). You also won't be able to view DICOM images in MedDream PACS; on the other hand, MedDream adds a Show button to the web interface and thus can be used instead of the built-in viewer. During an upgrade it's recommended to use the included config.sample-MedDream PACS.php as a template and then update the resulting config.php according to the old one. This will prevent misunderstandings like variable names which were suddenly changed. Since 3.06.1103.3003, a DICOMDIR viewer in the subdirectory "DICOMDIR" is automatically included on export. However, an alternative way is to use MedDream PACS's "Include external viewer" functionality. If you use the latter and still keep the viewer in the subdirectory "DICOMDIR", MedDream Export function might fail due to same files included twice. The solution is to rename the subdirectory, or move it somewhere outside the MedDream directory tree. MySQL from XAMPP 1.8 for Windows: if MedDream or MedDream PACS web interface connects to the database very slowly (each attempt takes about 1 second), then try adding "bind-address = ::" to my.ini. While still in demo mode, you *must* remove the existing meddream.lic after changing computer's host name (any OS), reinstalling the OS (Windows) or changing the MAC of any network card (Linux). A correct file will be created automatically. Otherwise a commercial license generated from your meddream.lic will not work. Windows install 1. Copy meddream folder to C:\Program Files\MedDream PACS\php (the result: C:\Program Files\MedDream PACS\php\meddream) If you are updating older version of MedDream: a) Please back up the old version (so you can go back any time). b) Please do not replace files you changed in last version. You must carefully synchronize the new version 2. From C:\Program Files\MedDream PACS\php\meddream Copy and Replace applet.php to C:\Program Files\MedDream PACS\php 3. From C:\Program Files\MedDream PACS\php\meddream copy php5.2_meddream.dll to PHP_INSTALL_DIR\ext (if you are using PHP 5.2.x) copy php5.3_meddream-VC6.dll to PHP_INSTALL_DIR\ext (if you are using PHP 5.3.x, VC6 build) copy php5.3_meddream-VC9.dll to PHP_INSTALL_DIR\ext (if you are using PHP 5.3.x, VC9 build) MedDream WEB DICOM Viewer v4.03 User`s Manual Installing MedDream for MedDream PACS Quick Install (Windows and Linux) 9 copy php5.4_meddream.dll to PHP_INSTALL_DIR\ext (if you are using PHP 5.4.x) 4. Add to php.ini file "extension=php5.2_meddream.dll" (if you are using PHP 5.2.x) "extension=php5.3_meddream-VC6.dll" (if you are using PHP 5.3.x, VC6 build) "extension=php5.3_meddream-VC9.dll" (if you are using PHP 5.3.x, VC9 build) "extension=php5.4_meddream.dll" (if you are using PHP 5.4.x) 5. Specify date.timezone in php.ini: [Date] ; Defines the default timezone used by the date functions date.timezone = "America/Chicago" (the list of possible values is at http://www.php.net/manual/en/timezones.php) 6. Edit APACHE_HTDOCS_DIR/meddream/config.php file. Follow instructions inside the file. 7. Restart Apache 8. Navigate to http://127.0.0.1/MedDream PACS/meddream/home.php (use MedDream PACS users to log in) or use "Show" button in MedDream PACS web interface. Linux install 1. Copy the "meddream" directory to MEDDREAM PACS_INSTALL_DIR/php (so that the result is MEDDREAM PACS_INSTALL_DIR/php/meddream; e.g. in our machines it usually is /home/MedDream PACS/php/meddream.) Adjust permissions: no less than 0777 for MEDDREAM PACS_INSTALL_DIR/php/meddream 0777 for MEDDREAM PACS_INSTALL_DIR/php/meddream/log 0777 for MEDDREAM PACS_INSTALL_DIR/php/meddream/temp If you are updating an older version of MedDream: a) Please back up the old version (so you can go back any time). b) Please do not replace the files you changed in the last version. You must carefully synchronize the new version 2. From MEDDREAM PACS_INSTALL_DIR/php/meddream Copy and Replace applet.php to MEDDREAM PACS_INSTALL_DIR/php 3. From MEDDREAM PACS_INSTALL_DIR/php/meddream copy php5.2_meddream.so to /usr/lib/php/modules (if you are using PHP 5.2.x) copy php5.3_meddream.so to /usr/lib/php/modules (if you are using PHP 5.3.x) copy php5.4_meddream.so to /usr/lib/php/modules (if you are using PHP 5.4.x) copy php5.2_meddream-x86_64.so to /usr/lib64/php/modules (if you are using PHP 5.2.x under a 64-bit OS) copy php5.3_meddream-x86_64.so to /usr/lib64/php/modules (if you are using PHP 5.3.x under a 64-bit OS) copy php5.4_meddream-x86_64.so to /usr/lib64/php/modules (if you are using PHP 5.4.x under a 64-bit OS) 4. Add to /etc/php.ini file MedDream WEB DICOM Viewer v4.03 User`s Manual Installing MedDream for MedDream PACS Quick Install (Windows and Linux) 10 "extension=php5.2_meddream.so" (if you are using PHP 5.2.x) "extension=php5.3_meddream.so" (if you are using PHP 5.3.x) "extension=php5.4_meddream.so" (if you are using PHP 5.4.x) "extension=php5.2_meddream-x86_64.so" (if you are using PHP 5.2.x under a 64-bit OS) "extension=php5.3_meddream-x86_64.so" (if you are using PHP 5.3.x under a 64-bit OS) "extension=php5.4_meddream-x86_64.so" (if you are using PHP 5.4.x under a 64-bit OS) 5. Specify date.timezone in php.ini: [Date] ; Defines the default timezone used by the date functions date.timezone = "America/Chicago" (the list of possible values is at http://www.php.net/manual/en/timezones.php) 6. MedDream PACS and Apache must run as the same user because newer versions of MedDream PACS create subdirectories with permissions too strict for different users. 7. Edit APACHE_HTDOCS_DIR/meddream/config.php file. Follow instructions inside the file. 8. Restart Apache 9. Navigate to http://127.0.0.1/MedDream PACS/meddream/home.php (use MedDream PACS users to log in) or use the "Show" button in the MedDream PACS web system. 10. ffmpeg is required in order to display thumbnails of MPEG2 DICOM files. It is expected at /usr/bin/ffmpeg. Not every distribution has it. Sometimes it is possible to download separate dependencies from sites like rpmfind.net and install these manually. 11. mkisofs is required for the Export command. MedDream WEB DICOM Viewer v4.03 User`s Manual Logging on to MedDream 11 Logging on to MedDream To log on to MedDream, please do the following: Enter the address given by your administrator in your Internet Browser. The following screen will appear: Figure 1. Logging in. Enter the username you were given in the field “Username” Enter the password in the field “Password”. If you forgot your password, please contact your system administrator. MedDream WEB DICOM Viewer v4.03 User`s Manual Search of studies 12 Search of studies Search menu will help you to quickly find the studies you need. We recommend using all possible search menu options in order to get the most accurate search results and save your time. To find a study, please follow these steps: 1. Click “Search” in the top left corner of the window. The following search screen appears: Figure 2. "Search" window 2. Select search settings (the default search settings are usually set to the search by “Patient ID” or “Patient Name”). To specialize the search, you can use two different search settings. If you wish to change the search settings, just click the arrow to the immediate right of the header and choose the criterion you need from the list: Figure 3. Search filters. The criteria are as following: “Patient ID” - enter patient's ID number in the search field “Patient Name” - enter the patient's name or surname in the search field “Study ID” - enter the study number “Accession Number” MedDream WEB DICOM Viewer v4.03 User`s Manual Search of studies 13 “Description” - enter few keywords from the study description “Referring Physician” - please indicate, to which doctor the study was sent “Reading Physician” - please indicate, which physician has opened and analyzed the study. 3. To specialize the search further, please select the period when the study could have be done. You will activate the date search fields by ticking the “From” and “To” fields: Figure 4. Search according to dates. To see the list of the studies done during the current day, please click the button “Today”. If you are looking for the studies that were done yesterday, please click “Yesterday”: Figure 5. Search options" Today, Yesterday. 4. The search can also be specified by selecting the method which was used to obtain the study images: Tick the field next to one or more methods (devices) that were used in the required study (please look below for the meaning of the abbreviations) For example, if you want to find all images obtained by using Digital radiography devices, you should tick the fields as shown below: Figure 6. Search according to modalities. Moreover, you can select all possible methods by clicking the “All” button, or you can clear all the ticks by clicking “None”: Figure 7. Modalities search: All, None. * Abbreviations: CR – Computed Radiography PX – Panoramic X-Ray CT – Computed Tomography RF – Radio Fluoroscopy DX – Digital Radiography RG – Radiographic Imaging ES – Endoscopy SC – Secondary Capture IO – Ultra-Oral Radiography US – Ultra Sound MG – Mammography XA – X-Ray Angiography MR – Magnetic Resonance XC – External camera photography NM – Nuclear Medicine ECG - Electrocardiography MedDream WEB DICOM Viewer v4.03 User`s Manual Search of studies 14 OT – Other 5. After you have selected your search settings, start the search by clicking “Search”: 6. You will see the following window with the search results: Figure 8. Search results. Also you can use the following search window action buttons: To display window on the right side; To display window on the left side; To maximize the Window; To minimize the Window; To close the Window. MedDream WEB DICOM Viewer v4.03 User`s Manual Opening multiple studies 15 Opening multiple studies If you need to open more than one study (e.g. to compare them), please do the following: 1. Select one of the studies with one mouse click. It will be highlighted in blue: Figure 9. Study selection. 2. Tick the field “Add” which is in the bottom right corner of the search results window: Figure 10. Adding a study. 3. Click “Open” 4. Go back to the search results by clicking the “Search” button that is in the top left corner. 5. Select the next study you want to open and repeat steps 1 – 3 that were mentioned above. Keep doing this till you open enough studies that you need for your analyses. After selecting all the studies, you will see all study series displayed in the pane on the left. When you select the study and click on it, you will see the image icons of the study series: Figure 11. Opened multiple studies. In order to navigate through the study series, just click on the header to activate it and see the image icons. MedDream WEB DICOM Viewer v4.03 User`s Manual Reading study reports 16 Reading study reports In the search results window you can notice that some of the studies have annotations (reports). This is indicated by the “Report” icon, which appears in the first column “ * ”: Figure 12. Study Report icon location in “Search” window. To read a report: Select a study with the “Report” icon open the study with double-click on it when the study opens, the Report button will be activated in the Tools menu: Figure 13. Report icon in the toolbar. click the “Report” button once to open the annotation. A report window will appear: Figure 14. Study report. MedDream WEB DICOM Viewer v4.03 User`s Manual Reading study reports 17 Press “Close” to exit the report window. Complete annotation editing or printing of the study are available by clicking the button in the study. Figure 15. Report icon in the study header. It opens a separate MedReport window, which can fully employ MedReport functions — edit and print the study annotation. This function is superseded by the Report module. However, even after installing the license that enables this module, MedReport will still be called if it is integrated into MedDream. You will need to disable the integration ($medreport_root_link in config.php) in order to use the Report module instead. Figure 16. MedReport. The annotation of the study may be indicated by two different buttons: If the “Report” button is empty, the annotation is also empty and the doctor can fill it. If the “Report” button appears "full", the study annotation is already written and the doctor can edit or print it. MedDream WEB DICOM Viewer v4.03 User`s Manual Viewing and analyzing images 18 Viewing and analyzing images Viewing one or multiple studies After opening one of the study series, you can rearrange the preview window as you prefer. First of all, you can choose on which side of the screen - left or bottom - you want to see the icons of the images. Just click button in the menu bar and change the preview window, as you prefer: Also, you can choose how many panes with study images there will be in the window. You can choose from one to nine panes with different images. If you want to open more panes do the following: click “Screen layout” on the menu bar: choose from the list how many panes you want. For example, if you need to see 4 screens with different images, select „2x2 Screen layout”: Figure 17. Layout: 2x2. After selecting how many screens you want to see in the window, move the images into them. There are two methods to do this: First method: select the image icon from the study series that are displayed on the left (or on the bottom, depending on how you have rearranged the display) drag-and-drop the image with one mouse click into the pane where you want the image to be: MedDream WEB DICOM Viewer v4.03 User`s Manual Viewing and analyzing images 19 Figure 18. Drag-and-drop the image into the pane. Second method: Select the pane where you want to move the image with one mouse click. The active pane will be outlined in red. Select the image icon from the study series that are displayed on the left (or in the bottom, depending on how you have rearranged the display) Double click on the image that you want to move into the pane. The image will appear in the selected pane. These are the ways how you can move the images from the series into the main window. You can select and compare images not only from one study, but from multiple studies as well. Comparing multiple studies To compare multiple studies you can use the “Lock Scroll” button. It allows you to either move through images one at a time or easily scroll though the images of a series: Select the studies that you want to compare. From each study select and move the first images into the viewing panes Click „Lock Scroll“. When this button is active (is outlined in blue), you will change all images simultaneously (scroll though the images of a series) by scrolling the mouse wheel. If the button is inactive, you will move through images one at a time by scrolling the mouse wheel. NOTE: when the “Lock scroll” button is active, you can move through images with the help of keyboard arrow keys, not only by scrolling the mouse wheel. MedDream WEB DICOM Viewer v4.03 User`s Manual Viewing and analyzing images 20 Image localization Overlaying reference lines allow you to indicate the location of an image slice on another image of an intersecting pane. Select the images that you want to compare and move them into the panes: Select one of the image you want to know the location of in regard to other images. Click the button „Reference Lines“: yellow lines appear in the images, indicating the location of the selected image: Figure 19. Reference lines option. MedDream WEB DICOM Viewer v4.03 User`s Manual Viewing and analyzing images 21 Manipulating images You can manage and analyze the study images according to the criteria you need. The following buttons are used for this: Figure 20. Image manipulation tools. All manipulation buttons are disabled for video view. More about each of them: Button is used to adjust the Level/Window (contrast and brightness) of the image. A pop-up menu appears: You can select one of the standard contrast settings: Default – a preset setting. Auto – the system analyses the image and adjusts the brightness and contrast automatically. Abdomen – a preset setting for abdomen studies. Bone – a preset setting for bone studies. Cerebrum – a preset setting for cerebrum studies. Liver - a preset setting for the liver studies. Lung – a preset setting used for studying the images of the lungs. Mediastinum - a preset setting for mediastinum studies. Pelvis – a preset setting for pelvis studies. Posterior Fossa - a preset setting for Posterior Fossa studies. Inverse – the user can inverse the image. Figure 21. Level/Window button options. “Hand” button allows you to position images within the pane. This feature is especially useful when the image is larger than the pane, as it usually is after zooming. To move an image within the pane: On the Tools menu, click “Hand” Position the cursor over the image you want to move and click-and-drag the cursor around the pane to move the image. Release the mouse button to leave the image in its new position. Button is used to increase and decrease the selected image. There are two ways to zoom in and zoom out of an image: Press on the Keyboard + to Zoom In and – to Zoom Out; press the left button on your mouse and drag it upwards to zoom in and downwards to zoom out. “Fit to Screen” button. When you press this button, the size of the image is automatically adjusted so that the image would fill the entire screen. For example, if only part of the image is visible on the screen, choose this button to see the whole image displayed on the entire screen. MedDream WEB DICOM Viewer v4.03 User`s Manual Viewing and analyzing images 22 „1:1 Resolution” button allows you to restore the original image size. “Transform” button allows you to rotate the image. Click the arrow to the immediate right of the “Transform” and select one of the options from the pop-up menu: Rotate Right – to rotate the image 90° clockwise; Rotate Left – to rotate the image 90° counterclockwise; Figure 22. Transformation possibilities. Flip Horizontal – to flip an image 180° about the horizontal axis; Flip Vertical – to flip an image 180° about the vertical axis. “Inverse”. This button is used to invert the image. To invert the image, press the button once. If you press the button second time, the image returns to the previous state: Figure 23. Inverted image. “Channels” Highlight a color component or a combination of them in the image by showing selected color in white shades and other colors in black. This tool is enabled for image view. “Set scroll” enables to scroll images by draging mouse on image from one side to other. Enables or disables the image smoothing. MedDream WEB DICOM Viewer v4.03 User`s Manual Viewing and analyzing images 23 Measuring Images Measuring function is approximate and cannot be used for diagnostic purposes. Allows you to measure the images in number of ways. The main measurement button is “Measure”: Figure 24. Measurement tools. The “Intensity” button is used to measure the density of a CT image. To measure the density: Select “Intensity” once. Move the mouse cursor over the point you want. The density of the point and its coordinates should be visible next to the cursor (expressed in Hounsfield units, HU): Figure 25. Density measurement. MedDream WEB DICOM Viewer v4.03 User`s Manual Viewing and analyzing images 24 To measure the distance: click on the „Measure“ button and choose „Line“ from the list Place the mouse cursor on the starting point from which you want to measure the distance. Press and hold the left mouse button. Move the cursor to the end point and release the button. The distance (in millimeters, or pixels in some images) will be displayed in yellow: Figure 26. Line measurement. Angle measurements allow you to display the angles between intersecting lines. To display the angle measurements: Draw intersecting lines on the image. On the Tools menu, click „Measure“ button Tick “Show Angles”: Figure 28. Angle measurement option. Figure 29. Angle measurement. The “Angle” button is also used to measure an angle between any intersecting lines. To measure an angle: Position the mouse pointer on the point from which you want to measure the angle. Then press the left mouse button. Move the pointer to the second point (the intersection point) and press the left mouse button again. Then move the pointer to the end point and press the left mouse button once more. MedDream WEB DICOM Viewer v4.03 User`s Manual Viewing and analyzing images 25 The “Polyline” button is used to measure the perimeter of more than one line. To measure the perimeter: Position the mouse pointer on the point from which you want to measure the perimeter. Then press the left mouse button. Move the cursor to the second point (the intersection point) and press the left mouse button again. Then move the cursor to the third, fourth, etc. points and each time press the left mouse button again. When you reach the last point, click the left mouse button twice. The perimeter (in millimeters) will be displayed in yellow. Figure 30. Perimeter measurement. The “Area“ button is used to measure the perimeter and the area of a region of interest. To measure the area: Place the mouse cursor on the point from which you want to select the region of interest. Then press the left mouse button. Move the cursor to the second point (the intersection point) and press the left mouse button again. Then move the cursor to the third, fourth, etc. points and each time press the left mouse button again. When you reach the last point, click the left mouse button twice. Figure 31. Area measurement. The area (in square millimeters) and the perimeter (in millimeters) will be displayed in yellow: The “Volume“ button is used to measure the volume of the object. Place the mouse cursor on the point from which you want to measure the volume. Then press the left mouse button (do not hold it) and move the cursor to the second point and press the left mouse button again. Then move the cursor to the third, fourth, etc. points and each time press the left mouse button again. When you reach the last point, click the left mouse button twice in order to show the height of the object. Figure 32. Volume measurement. MedDream WEB DICOM Viewer v4.03 User`s Manual Viewing and analyzing images 26 The “VTI“ (Velocity Time Integral) button is used to measure the distance which the blood was ejected over a period of time. Place the mouse cursor on the point from which you want to measure the velocity time integral. Then press the left mouse button (do not hold it) and press the cursor to the second point and press the left mouse button again. Then move the cursor to the third, fourth, etc. points and each time press the left mouse button again. When you reach the last point, click the left mouse button twice in order to end the measurement. Figure 33.VTI measurement. The velocity time integral is measured in centimeters. NOTE: this button is active only for the images of "US" modality. The “STD” (standard deviation) button is used to measure average deviation of pixels in a square area 10 by 10 mm. Place the mouse cursor on the place that you would like to measure STD. MedDream WEB DICOM Viewer v4.03 User`s Manual Viewing and analyzing images 27 Figure 34. STD measurement. The “Calibration” button is used to change the scale of measurement. Press the Calibration button and pop-up window will appear: Figure 35. Calibration function. In this case 10mm corresponds to 100 pixels, if 0 will be left in the empty space the initial settings will be shown. The “Cobb angle” button is used to measure angle between lines. To measure angle: select “Cobb angle” measurement, select the image, click on image and lines will appear in the middle of image, You can drag lines, line points and move all lines simultaneously by moving the white–dotted line. Figure 36. Cobb angle measurement. The “Delete All” button is used to remove all measurements at once. To remove the measurements: select the image from which you want to remove all measurements MedDream WEB DICOM Viewer v4.03 User`s Manual Viewing and analyzing images click “Measure” select “Delete All” 28 MedDream WEB DICOM Viewer v4.03 User`s Manual Printing images and series 29 Printing images and series To print images/series, press “Print” button, which is in the middle of the Menu bar two options of printing: (enabled for images). There are Figure 37. Printing options. Press “Print” option to print the selected image area view. Press “Print Series” to print whole series (images only). Then choose the number of images per page: one, two or four. Figure 38. Selection of number of images on a page. MedDream WEB DICOM Viewer v4.03 User`s Manual Context menu functions 30 Context menu functions You can open a context menu with functions “Save Images”, “Cine mode”, “MPR”, by clicking the right button on the diagnostic image. Figure 39. Context menu. Saving images Select “Save Images...” in the context menu and also select a preferred format in the pop-up menu: JPG or DICOM. Then select to save an image or a series of images. Figure 40. Saving images. Press “Save” and choose a folder where you prefer to save the images in your computer. Press “Save” again. Figure 41. Saving location selection. MedDream WEB DICOM Viewer v4.03 User`s Manual Context menu functions 31 Cine mode Using “Cine mode” you may put all images into one movie. Figure 42. Opening Cine mode function. This function allows you to play images as one movie (one image – one frame). Figure 43. Playing images as one movie. To turn the Cine mode off, just open one of the images again. MedDream WEB DICOM Viewer v4.03 User`s Manual Multi-planar reconstruction (MPR) 32 Multi-planar reconstruction (MPR) Multi-planar reconstruction (MPR) is the simplest method of reconstruction. A volume is built by stacking the axial slices. The software then cuts slices through the volume in a different plane. In order to open this function you have to press right button of the mouse on the image and choose MPR.... A pop-up window appears. There you have to fill two input boxes: Start Frame: – number of the first frame of selected series; End Frame – number of the last frame of selected series. Figure 44. MPR frame selection. User can input the range from which MPR will be calculated. After you enter the frame range, press “Show” and the loading will start. It might take some time to load all frames. This will be indicated by the following progress window: Figure 45. Loading MPR. After the loading is finished, the MPR window appears: Figure 46. MPR. MedDream WEB DICOM Viewer v4.03 User`s Manual Multi-planar reconstruction (MPR) 33 The top picture on the left is the main one. You can see three arrows which can be moved in order to see different planes and the optimal plane can be chosen to display an anatomical structure. This may be particularly useful for visualizing the structure of the selected organ. The other pictures correspond to different cross-sections: MPR1 – horizontal cross-section; MPR2 – vertical cross-section; MPR3 – diagonal cross-section; You can manage and analyze the study images according to the criteria you need. The following buttons are used for this: Figure 47. MPR toolbar. „Default“ button is used to adjust the Level/Window (contrast and brightness) of the image. Hand button allows you to position images within the pane. The button is used to increase and decrease the selected image: press on the Keyboard + to Zoom In and – to Zoom Out; press left button on your mouse and drag it upwards to zoom in and downwards to zoom out. Measurement button allows you to measure the images in number of ways. Slice button allows you to make a cross-section. There are two possible options: Line – three arrows will automatically appear that make a vertical, horizontal and diagonal cross-section; Curve - MPR calculation from the curve drawn on the original slice: Figure 48. Curve measurement. The curve is always shown in MPR1. Delete curve – by pushing this option you will delete the curve. Fit to Screen button. When you press this button, the size of the image is automatically adjusted so that the image would fill the entire screen. For example, if only part of the image is visible on the screen, MedDream WEB DICOM Viewer v4.03 User`s Manual Multi-planar reconstruction (MPR) choose this button to see the whole image displayed in the entire screen. 1:1 Resolution button allows you to restore the original image size. “Transform” button allows you to rotate the image. Options: Rotate Right – to rotate the image 90° clockwise; Rotate Left – to rotate the image 90° counter-clockwise; Flip Horizontal – to flip an image 180° over the horizontal axis; Flip Vertical – to flip an image 180° over the vertical axis. This button closes MPR and the main screen opens again. MedDream WEB DICOM Viewer v4.03 User`s Manual 34 Export and forward study 35 Export and forward study The button “Forward” is used to send the selected study to the remote device, while the button “Burn” will save the study to a CD. To forward the study: select the study you would like to send and click “Forward”; after pressing the button the forwarding menu appears: Figure 49. Study forwarding. choose a device from the list; click “Forward To”. To export the study (to save it on a CD): select the study that you want to write on the CD and click “Burn”: the Export menu appears. Figure 50. CD burning. Press the button “Export” in Export Menu. After a while, two additional buttons will appear in the list below: MedDream WEB DICOM Viewer v4.03 User`s Manual Export and forward study 36 Figure 51. Export menu. You can choose one of two options in this window: 1. „Download ISO“ - this option is used to download a CD image which can be burned to the disc later; 2. „Burn Now“ - this option is used to write the file to a CD automatically. (You will need to install additional software, MedDreamBurn and Active ISO Burner, on each workplace.) CAUTION – PROPERTY DAMAGE MedDream is incompatible with the CD Viewer from Softneta ("DICOMDIR Viewer"). Both Viewer and MedDream may encounter licensing errors if CD Viewer runs on the same computer where MedDream is hosted. Use a different machine to test the Viewer on a burned CD or temporally shut down the webserver that hosts MedDream. MedDream WEB DICOM Viewer v4.03 User`s Manual Report module 37 Report module Complete annotation editing or printing of the study are available by clicking the button on the study header. Note: This module can be used while MedDream is in demo mode; in the commercial mode it is licensed separately, therefore existing customers will need an updated license. Figure 52. An icon of a filled report. It will open a report window: Figure 53. Filled report. In the Report window you may edit and print the study annotation. MedDream WEB DICOM Viewer v4.03 User`s Manual Report module 38 Figure 54. Report template replacement. The following buttons are used in order to: Insert the template. The button is active only in “Edit” mode. After pressing “Insert” button, you are asked to confirm the action as the entire text will be replaced. Add a template to the list. Once you are satisfied with the content, you can save it as a template (either existing or new one). Save a report. “Save” button changes to “Edit” button once it is clicked. Write a report (edit mode). Insert the nearby information into the annotation. Print just the text or including all images. Open an empty form of a template. Enable editing of a selected template. MedDream WEB DICOM Viewer v4.03 User`s Manual Report module 39 Delete the selected template. Figure 55. Template. Also you can use the following Report window action buttons: To display window on the right side; To display window on the left side; To maximize the Window; To minimize the Window; To close the Window. MedDream WEB DICOM Viewer v4.03 User`s Manual ECG module 40 ECG module This module allows you to view DICOM ECG wave data. This module can be used while MedDream is in demo mode; in the commercial mode it is licensed separately, therefore existing customers will need an updated license. Figure 56. ECG view. For ECG behavior is different: Measurement tools are changed into ECG measurement tools. Figure 57. ECG measurements. Image manipulation buttons are disabled. The “Measurement” button is used to measure fragment length in seconds, mV and calculate BPM. To measure: Select “Measurements”. Move the mouse cursor on the point you want. Press down and move mouse over an ECG wave. Figure 58. Measurements MedDream WEB DICOM Viewer v4.03 User`s Manual ECG module 41 The „QT points“ button is used to measure wave QT points: RR, QT and QTc. To measure: Select “QT points”. Move the mouse cursor on the point you want to set Q point and click. Move the mouse cursor on the point you want to set T point and click. Move the mouse cursor on the point you want to set last Q point and click (double click also works). Figure 59. QT points. Change horizontal scale (mm per second). Change vertical scale (mm per mV). Display ECG annotation data. Figure 60. ECG annotation. You can use the following window action buttons as well: To display window on the right side; To display window on the left side; To maximize the Window; To minimize the Window; MedDream WEB DICOM Viewer v4.03 User`s Manual ECG module 42 Button to adjust ECG data position. Button to adjust ECG data zoom. Scrollbar Is used to display remaining data. By default first 5 seconds of ECG wave data is visible. MedDream WEB DICOM Viewer v4.03 User`s Manual SR view 43 SR view SR view enables to view structured reports. Figure 61. SR window. SR window displays standard structured DICOM reports. SR window uses the following window action buttons: To display window on the right side; To display window on the left side; To maximize the Window; To minimize the Window; MedDream WEB DICOM Viewer v4.03 User`s Manual PDF view 44 PDF view PDF view enables to view PDF files encapsulated in DICOM format. Figure 62. PDF window. PDF window displays a standard PDF reader. Some Web browsers have built-in readers, in other cases the workplace needs additional software like Adobe Acrobat Reader. PDF window uses the following window action buttons: To display window on the right side; To display window on the left side; To maximize the Window; To minimize the Window; MedDream WEB DICOM Viewer v4.03 User`s Manual Video view 45 Video view Software enables to view video files, MPEG2 and MPEG4 (H.264), encapsulated in DICOM format. Figure 63. Video player. Video is played with the standard video player available in Flash. MedDream WEB DICOM Viewer v4.03 User`s Manual Settings 46 Settings To change settings of MedDream, click “Settings” button in the toolbar. This button is displayed for the database administrator only. In MySQL it's "root", in Microsoft SQL Server — "sa", with DCM4CHEE it's also possible to use the internal user account "admin". In some configurations like "SQLite3", "DICOM", "WADO" and "FileSystem", where any login or password is accepted, you will need to use "root", too. The Settings window will open. Figure 64. DICOM View settings. In the “DICOM View” tab the following parameters are indicated: The image does not open automatically when the study is opened. Is opened only if the study consists of one image. The first image is always opened automatically. Automatically start playing multi-frame images. Allow to scroll multi-frame images with mouse wheel. Cache all images in advance. After an image is cached, scrolling through adjacent images takes very little time. But, the entire study must fit into browser's memory. MedDream WEB DICOM Viewer v4.03 User`s Manual Settings 47 Figure 65. Screen layout settings. In the “Screen layout” tab the following parameters are indicated: Indicates the layout`s number of rows (maximum 3); Indicates the layout`s number of columns (maximum 3); Indicates the size of vertical and horizontal thumbnails` series bar Indicates the size of the thumbnail (minimum size is 50px, maximum size 150px). Set position of the thumbnail bar: vertical, left or horizontal, bottom. Once the button is activated, a single click on an image icon will open the image (otherwise a double click is required). Set scale of toolbar buttons. MedDream WEB DICOM Viewer v4.03 User`s Manual Settings 48 Figure 66. Info labels settings. The “Info Labels” tab is used to indicate information (from tags of a DICOM file) that is shown over the image. Set font size of info labels and other labels in the image view when this view is larger than defined dimensions. By default the size is 13. When using a high–resolution (5 megapixels etc) monitor as an addition to an ordinary monitor, you might need a larger font, which also might be too large for the smaller monitor. After adjusting the text size, do not forget to adjust view dimensions so that on a smaller monitor the default size is still chosen. This setting can be saved on a particular workplace among local settings (a feature of the Web browser). It can't be applied globally. Therefore you will need to press the “Update local settings” button and log into MedDream anew. MedDream WEB DICOM Viewer v4.03 User`s Manual Settings 49 Figure 67. Reports setting. In the “Reports” tab the following parameters are indicated: Write the Company`s legal name (department, etc.); The values indicated in this field will be shown once the images are printed (e.g., 20XX-XX-XX 0001 John Smith). - the report is shown over the main layout. - the report is shown on the left side of the main layout. - the report is shown on the center of the main layout. - the report is shown on the right side of the main layout. if MedReport is used instead of the built–in Reports module, then the fields "Company" and "Text line" are not visible here and must be configured in MedReport itself. MedDream WEB DICOM Viewer v4.03 User`s Manual Settings 50 Figure 68. Toolbar settings. The “Toolbar” tab enables user to show the most commonly used buttons on the toolbar, while the rarely used tools can be hidden. Use arrows button and to manage the shown and hidden tools; you can also drag buttons with the mouse. The hides the whole toolbar. Figure 69. Style settings. The „Style“ tab serves to set the style (color of backgrounds, buttons, etc.) for visualization on the desktop or for printout, respectively. It contains a list of variables that correspond to individual data input regimes. Save global settings. Close window. On style change – need to restart application in order to return to previous style. MedDream WEB DICOM Viewer v4.03 User`s Manual Settings 51 Update/save local settings. This option enables a particular workplace to have its own settings. The browser must support local storage. Clear all local settings on the browser. After MedDream is reloaded (for example, by logging in anew), global settings will take place. MedDream WEB DICOM Viewer v4.03 User`s Manual License registration 52 License registration This allows activating the software for legal use. As a notification about the DEMO version appears, click the “Register” button. The registration button also appears in the Information window. Figure 70. Demo notification. The registration window will appear. Fill in the form and press the “Register” button. Figure 71. Registration window. If you have entered correct information, you will see a notification window that the license will be applied from the next login. You must log off and log in again. Figure 72. License application notification. MedDream WEB DICOM Viewer v4.03 User`s Manual Information window 53 Information window In the main window, press the “Information window” button. Information window will display: 1. Full product name; 2. Licensed to; 3. Current connections; 4. Modules – Report, ECG, Video; 5. Valid to – empty if there is no termination in time; 6. Update to – date till the technical support and updates are provided; 7. Version; 8. Medical device class; 9. Contacs – Softneta UAB contacts. Figure 73. MedDream Information window. MedDream WEB DICOM Viewer v4.03 User`s Manual Table of Figures 54 Table of Figures Figure 1. Logging in. ............................................................................................................................................................... 11 Figure 2. "Search" window ...................................................................................................................................................... 12 Figure 3. Search filters. ........................................................................................................................................................... 12 Figure 4. Search according to dates. ...................................................................................................................................... 13 Figure 5. Search options" Today, Yesterday. ......................................................................................................................... 13 Figure 6. Search according to modalities. ............................................................................................................................... 13 Figure 7. Modalities search: All, None. ................................................................................................................................... 13 Figure 8. Search results. ......................................................................................................................................................... 14 Figure 9. Study selection. ....................................................................................................................................................... 15 Figure 10. Adding a study. ...................................................................................................................................................... 15 Figure 11. Opened multiple studies. ....................................................................................................................................... 15 Figure 12. Study Report icon location in “Search” window. .................................................................................................... 16 Figure 13. Report icon in the toolbar. ...................................................................................................................................... 16 Figure 14. Study report. .......................................................................................................................................................... 16 Figure 15. Report icon in the study header. ............................................................................................................................ 17 Figure 16. MedReport. ............................................................................................................................................................ 17 Figure 17. Layout: 2x2. ........................................................................................................................................................... 18 Figure 18. Drag-and-drop the image into the pane. ................................................................................................................ 19 Figure 19. Lock Scroll function.................................................................................................. Error! Bookmark not defined. Figure 20. Reference lines option. .......................................................................................................................................... 20 Figure 21. Image manipulation tools. ...................................................................................................................................... 21 Figure 22. Level/Window button options. ................................................................................................................................ 21 Figure 23. Transformation possibilities. .................................................................................................................................. 22 Figure 24. Inverted image. ...................................................................................................................................................... 22 Figure 25. Measurement tools. ............................................................................................................................................... 23 Figure 26. Density measurement. ........................................................................................................................................... 23 Figure 27. Line measurement. ................................................................................................................................................ 24 Figure 28. Line measurement. ................................................................................................................................................ 24 Figure 29. Angle measurement option. Figure 30. Angle measurement. .................................... 24 Figure 31. Perimeter measurement. ....................................................................................................................................... 25 Figure 32. Area measurement. ............................................................................................................................................... 25 Figure 33. Volume measurement............................................................................................................................................ 25 Figure 34.VTI measurement. .................................................................................................................................................. 26 Figure 35. STD measurement................................................................................................................................................. 27 MedDream WEB DICOM Viewer v4.03 User`s Manual Table of Figures 55 Figure 36. Calibration function. ............................................................................................................................................... 27 Figure 37. Cobb angle measurement. .................................................................................................................................... 27 Figure 38. Printing options. ..................................................................................................................................................... 29 Figure 39. Selection of number of images on a page. ............................................................................................................ 29 Figure 40. Context menu. ....................................................................................................................................................... 30 Figure 41. Saving images. ...................................................................................................................................................... 30 Figure 42. Saving location selection. ...................................................................................................................................... 30 Figure 43. Opening Cine mode function. ................................................................................................................................ 31 Figure 44. Playing images as one movie. ............................................................................................................................... 31 Figure 45. MPR frame selection. ............................................................................................................................................ 32 Figure 46. Loading MPR. ........................................................................................................................................................ 32 Figure 47. MPR....................................................................................................................................................................... 32 Figure 48. MPR toolbar. .......................................................................................................................................................... 33 Figure 49. Curve measurement. ............................................................................................................................................. 33 Figure 50. Study forwarding. ................................................................................................................................................... 35 Figure 51. CD burning. ........................................................................................................................................................... 35 Figure 52. Export menu. ......................................................................................................................................................... 36 Figure 53. An icon of a filled report. ........................................................................................................................................ 37 Figure 54. Filled report. ........................................................................................................................................................... 37 Figure 55. Report template replacement. ............................................................................................................................... 38 Figure 56. Template................................................................................................................................................................ 39 Figure 57. ECG view............................................................................................................................................................... 40 Figure 58. ECG measurements. ............................................................................................................................................. 40 Figure 59. Measurements ....................................................................................................................................................... 40 Figure 60. QT points. .............................................................................................................................................................. 41 Figure 61. ECG annotation. .................................................................................................................................................... 41 Figure 62. SR window............................................................................................................................................................. 43 Figure 63. PDF window. ......................................................................................................................................................... 44 Figure 64. Video player. .......................................................................................................................................................... 45 Figure 65. DICOM View settings............................................................................................................................................. 46 Figure 66. Screen layout settings. .......................................................................................................................................... 47 Figure 67. Info labels settings. ................................................................................................................................................ 48 Figure 68. Reports setting. ..................................................................................................................................................... 49 Figure 69. Toolbar settings. .................................................................................................................................................... 50 Figure 70. Style settings. ........................................................................................................................................................ 50 Figure 71. Demo notification. .................................................................................................................................................. 52 MedDream WEB DICOM Viewer v4.03 User`s Manual Table of Figures 56 Figure 72. Registration window............................................................................................................................................... 52 Figure 73. License application notification. ............................................................................................................................. 52 Figure 74. MedDream Information window. ............................................................................................................................ 53 MedDream WEB DICOM Viewer v4.03 User`s Manual Index 57 Index C Cine mode .............................................................................................................................................................................. 31 Context menu functions .......................................................................................................................................................... 30 E ECG module ........................................................................................................................................................................... 40 Explanation of symbols used .................................................................................................................................................... 5 Export and forward study ........................................................................................................................................................ 35 I Image localization ................................................................................................................................................................... 20 Information window ................................................................................................................................................................. 53 Installing MedDream for MedDream PACS Quick Install (Windows and Linux)........................................................................ 8 Introduction ............................................................................................................................................................................... 6 L License registration................................................................................................................................................................. 52 Linux install ............................................................................................................................................................................... 9 Logging on to MedDream ....................................................................................................................................................... 11 M Manipulating images ............................................................................................................................................................... 21 Measuring Images .................................................................................................................................................................. 23 Minimal hardware requirements................................................................................................................................................ 7 Minimal software requirements ................................................................................................................................................. 7 Multi-planar reconstruction (MPR) .......................................................................................................................................... 32 N Notes on the user`s manual ...................................................................................................................................................... 4 O Opening multiple studies ........................................................................................................................................................ 15 P PDF view ................................................................................................................................................................................ 44 Printing images and series ..................................................................................................................................................... 29 Purpose and availability of documentation ............................................................................................................................... 4 Q Questions and comments ......................................................................................................................................................... 4 R Reading study reports............................................................................................................................................................. 16 Report module ........................................................................................................................................................................ 37 S Saving images ........................................................................................................................................................................ 30 Search of studies .................................................................................................................................................................... 12 Settings ................................................................................................................................................................................... 46 SR view .................................................................................................................................................................................. 43 MedDream WEB DICOM Viewer v4.03 User`s Manual Index 58 T Table of Contents ..................................................................................................................................................................... 3 Table of Figures ...................................................................................................................................................................... 54 V Video view .............................................................................................................................................................................. 45 Viewing and analyzing images................................................................................................................................................ 18 Viewing one or multiple studies .............................................................................................................................................. 18 W Windows install ......................................................................................................................................................................... 8 MedDream WEB DICOM Viewer v4.03 User`s Manual MedDream WEB DICOM Viewer ir manufactured by Softneta UAB. Softneta UAB Varniu str. 1 LT-48310 Kaunas, Lithuania MedDream WEB DICOM Viewer v4.03 User`s Manual