1
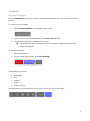
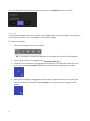
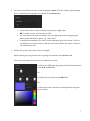
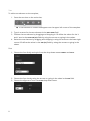
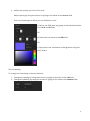
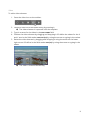
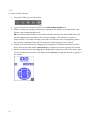
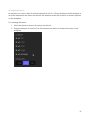
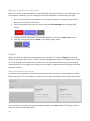
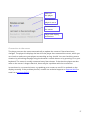
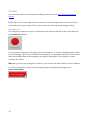
User Guide for Template Creators iDiD Content Management System User Guide for Template Creators Table of Contents Getting Started ..................................................................................................................................... 1 Logging in .............................................................................................................................................. 1 Forgot your password?.................................................................................................................... 2 Overview............................................................................................................................................ 3 Logging out ....................................................................................................................................... 4 Templates ............................................................................................................................................. 5 Creating Templates .......................................................................................................................... 5 Saving templates ............................................................................................................................ 15 Saving as a template ...................................................................................................................... 15 Moving a template to another level ............................................................................................ 16 Players ................................................................................................................................................. 16 Basic information and search ...................................................................................................... 16 Connection to the server .............................................................................................................. 17 Content ................................................................................................................................................ 18 Emergencies.................................................................................................................................... 18 Touch screen .................................................................................................................................. 19 Clock ................................................................................................................................................. 20 Troubleshooting and technical support ......................................................................................... 21 Glossary ............................................................................................................................................... 22 Getting Started As a Template Creator you can create templates by adding and composing different elements on them. You can also create content on the templates you have created and upload media through the web. This guide is for creating templates. For more information on editing content or uploading files, see the User Guide for Content Editors. For best user experience we recommend using the iDiD Management Site with Google Chrome. You can also use Mozilla Firefox, Opera and Safari to access the site, and only with Internet Explorer (v. 10) you may encounter some minor issues with compatibility. Logging in To enable you to manage your info screens anytime and from anywhere, the iDiD content management is done through a web browser on a content management site you can log into with any device that is connected to the internet. Log in to the management site on v4.idid.fi. Log in using the email address the account is created for, e.g. [email protected]. 1 Forgot your password? If you forget your password, you can request a link that leads you to set a new one. 1. Press the link under the login fields. 2. Press Send instructions. You will get an email with a link you can use to set a new password. 3. Type in a new password and press Change password. You are redirected to the login page and you can log in normally using the new password. 2 Overview When you log in to iDiD, you will first see the level your account was created at. You are shown the view you were last working in before logging out, either Players, Content or Files. If you want to view or edit contents at other levels, choose the Level from the drop-down menu on the top left corner. Content from higher levels is inherited at the lower ones, so you may see content you are not authorized to edit. The inherited content is marked with the name of the level it is inherited from. Along with content, templates are also inherited, and this is marked under the name of the template. An inherited content An inherited template Content that is not scheduled to be displayed yet is shown on grey in the Content view. 3 Under the Level menu on the left you can see another menu with Templates, Players, Content and Files. To create templates, press Templates. You can monitor the connections of your Player PCs by pressing Players. Choosing Content enables you to view, create and edit content, while choosing Files allows you to view the media library – images, videos and documents – and upload more files to use in the content. Logging out Your login information is saved on the server so your session will not be terminated even if you accidentally close the management tab or browser window. For privacy reasons, remember to end the session by logging out when you have made all the changes you wish in the management. Log out of the management by pressing the logout icon on the top right corner. 4 Templates Creating Templates On the Templates view you can see the existing templates for both horizontal and vertical screens. To create a new template 1. Press Create template on the upper right corner. 2. Type in a name for the template in the CREATE TEMPLATE field. 3. Choose the resolution to match your screens. The template you choose appears on the Templates page with previously created templates. To edit the template 1. Press the template. 2. On the upper right corner, press Edit settings. A template may contain • rectangles • text • images • videos • HTML content Add elements by pressing them on the action bar at the top of the page. 5 You can edit the elements by pressing their name in the ELEMENTS menu on the left. Rectangle You can use rectangles and other shapes as the background on your template. Note that you can round the corners of the rectangle to create other shapes. To create a rectangle 1. Press the rectangle icon on the toolbar. A rectangle is created and appears on the upper left corner of the template. 2. Type in a name for the rectangle in the RECTANGLE NAME field. 3. Position the text element by dragging and dropping it OR define the values for the X and Y axes in the POSITION (PX) fields by using the arrows or typing in the values. 4. Resize the rectangle by dragging and dropping it using the arrow on the lower right corner OR define in the fields under SIZE (PX) by using the arrows or typing in the values. 6 5. You can round off the corners of the rectangle in EDGES. Give the radius in percentage (%) or in pixels (px) by typing in the values in the RADIUS field. • If you want all the corners equally round, give a single value. NB To make a circle, set the value at 50%. • You can define the same roundness for two opposing corners by giving two values separated with a space, e.g. ”20px 50px”. • To define the roundness for each corner separately, give four values. The first one defines the top left corner, and the next values define the other corners in a clockwise direction. 6. Define the opacity and colour of the rectangle: Adjust opacity by using the arrows or typing in the value in the OPACITY field. There are three ways in which you can define the colour: a) Define the RGB value by typing in the individual values in the R, G and B fields. OR b) Define the hex value in the HEX field. OR c) Choose the hue, saturation and brightness using the colour sliders. 7 Text To add a text element on the template, 1. Press the text icon on the action bar. A text element is created and appears on the upper left corner of the template. 2. Type in a name for the text element in the TEXT NAME field. 3. Position the text element by dragging and dropping it OR define the values for the X and Y axes in the POSITION (PX) fields by using the arrows or typing in the values. 4. Resize the text element by dragging and dropping it using the arrow on the lower right corner OR define the values in the SIZE (PX) fields by using the arrows or typing in the values. Font 1. Choose the font family and style from the drop-down menus FAMILY and STYLE. 2. Choose the font size by using the arrows or typing in the value in the SIZE field. 3. Choose the alignment from the ALIGN drop-down menu. 8 4. Define the opacity and color of the text: Adjust opacity by using the arrows or typing in the value in the OPACITY field. There are three ways in which you can define the color: a) Define the RGB value by typing in the individual values in the R, G and B fields. OR b) Define the hex value in the HEX field. OR c) Choose the hue, saturation and brightness using the color sliders. Text formatting To change the formatting in the text element, 1. Change the spacing by using the arrows or typing in the value in the LINE field. 2. Change the padding by using the arrows or typing in the value in the PADDING field. 9 Image To add an image element 1. Press the image icon on the toolbar. 2. Choose an image from the media library by pressing the image. The image element is imported onto the template. 3. Type in a name for the image in the IMAGE NAME field. 4. Choose the IMAGE FORMAT from the drop-down menu. 5. Position the image element by dragging and dropping it OR define the values for the X and Y axes in the fields under POSITION (PX) by using the arrows or typing in the values. 6. Resize the image element by dragging and dropping it using the arrow on the lower right corner OR define in the fields under SIZE (PX) by using the arrows or typing in the values. The image is automatically scaled. 10 Video To add a video element 1. Press the video icon on the toolbar. 2. Choose a video from the media library by pressing it. The video element is imported onto the template. 3. Type in a name for the video in the VIDEO NAME field. 4. Position the video element by dragging and dropping it OR define the values for the X and Y axes in the fields under POSITION (PX) by using the arrows or typing in the values. 5. Resize the video element by dragging and dropping it using the arrow on the lower right corner OR define in the fields under SIZE (PX) by using the arrows or typing in the values. The video is scaled automatically. 11 HTML To add an HTML element 1. Press the HTML icon on the toolbar. 2. Type in a name for the html content in the HTML WINDOW NAME field. 3. Import content by copying and pasting or typing in the address in the URL field in the format “http://www.example.com”. NB You cannot embed videos in the HTML element because the embedded video will not start playing automatically as the content changes. If the element contains a looped video, it is shown normally, but it will not be shown from the beginning when the content is displayed because the loop runs independently of the content. 4. Position the html element by dragging and dropping it OR define the values for the X and Y axes in the fields under POSITION (PX) by using the arrows or typing in the values. 5. Resize the html element by dragging and dropping it using the arrow on the lower right corner OR define the values in the fields under SIZE (PX) by using the arrows or typing in the values. 12 Arranging Elements An element can cover a part of another element or all of it. They are shown on the template in an order indicated in the menu on the left, the element at the top of the list is shown topmost on the template. To rearrange elements 1. Press the element name in the menu on the left. 2. Drag the element on the list. The first element on the list is shown at the top on the template. 13 Locking Elements You can move and edit elements freely on the template unless they are locked. To ease working you can lock the elements in place by using the lock in front of the element’s name. 1. Press the lock icon in front the element name in the menu on the left. The element is locked and can no longer be moved or edited freely. NB If you want to make changes to the element, you have to activate it by pressing the element name on the list. Unlock the element by pressing the lock icon again. Hiding elements You can change the visibility of each element. To hide an element 1. Press the eye icon in front of the element name in the menu on the left. A cross appears over the icon and the hidden element is no longer visible on the template. If you want to make the element visible, press the icon again. 14 Saving templates After you have made all the changes you want and the template is ready to be used for content, press Save on the upper right corner. The template appears on the template page. You can discontinue creating the template without saving it by pressing Cancel on the top right. NB Changes you make on a template are not automatically applied to the content created earlier using that template. Saving as a template As a template creator in addition to creating templates you can edit content, but unlike a regular content editor, you can also add, remove and reposition the elements in the content. You can save time by saving the changes you make in content as a template. Then it will also become available for the content creators. 1. Create or edit content. 2. Save the content as a template by pressing Save as template on the upper right corner. 15 Moving a template to another level When you create a new template, it is automatically saved at the level you are working on at the moment. However, you can change the level the template is at whenever you wish. 1. Go to the level where the template is currently located by choosing the level on the level menu on the top left corner. 2. Press the template you want to move and press Edit settings on the upper right corner. 3. Choose the level you want to move the template to from the CHOOSE LEVEL menu. 4. Save the change by pressing Save on the upper right corner. Players When you want to review the connections of your player PCs, choose Players in the view menu on the upper left corner. The iDiD Content Management System is installed on a Player PC in the display and retrieves the content from the server and shows them on the display. Generally there is one player per display, but one player can guide several displays that show identical content. Basic information and search You will see all the players of the level your account was created at, and the players at levels lower than yours. For each player you will see its tile with the player’s name and other details. You can search for players by typing the player name in the SEARCH field. The player name is often the same as the level name. 16 Name of the player The level the player is set at Connection to the server Player and display resolutions Connection to the server The player contacts the server automatically to update the content if there have been changes. The player tile displays the last time the player has contacted the server, which you can check to make sure your players are working as they should. You can check the current situation by refreshing the page using the browser’s refresh button or by pressing F5 on your keyboard. The server is usually contacted every few minutes. If the time the player was last seen on the server is longer than this, there may be a problem with the connection. In case there is a connection issue, try updating your content to see if it is updated on the display normally. If the problem persists, contact our technical support on support.idid.fi or email us at [email protected]. 17 Content For more information on creating and editing contents, see the User Guide for Content Editors. At the top of the content view, there can be one or several widgets you can use to control some features on the screens. This section covers the most important widgets briefly. Emergencies For emergency situations, there is a red button with a bell at the top of the screen with the text EMERGENCY! below it. To compose an emergency message, press the red button. A screen is displayed with a field for the message. Type in your preferred message and it is updated on all your screens with a few second delay. When the emergency message is displayed on the screens, no other contents are shown. NB When you have the emergency screen on, you cannot use other features in the software. To exit the emergency screen and stop displaying the emergency message, press Cancel emergency. 18 Touch screen If you are using touch screens, you can combine informing and interacting on a single screen. When the screen is not touched, your content is shown according to the schedule and when the user touches the screen, a website you choose is opened which the user can browse to review your products or view schedules. The screen will go back to displaying your content when it has been untouched for a predefined amount of time. The touch screen button is at the top of the Content page between the EMERGENCY! button and the CLOCK button. You can see if the touch screen functionality is on by looking at the button: When the button is grey, the functionality is off and when it has been activated, the button is green. When the touch screen functionality is off, touching the screen will not disrupt displaying the slides. To activate the touch screen functionality 1. Press the touch screen button at the top of the page. 2. Set the STATE On. 3. In the TIME menu, choose how long after the last touch the screen goes back to displaying content. 4. Type in or paste in the URL field the address of the webpage you want to display on the screen when it is touched. Type in the address in the format http://www.example.com. 5. Finally activate the functionality by pressing Save. 19 Clock You can display the time on your screens in digital format. The time is defined according to the Player PC. The clock button is at the top of the Content page on the right side of the TOUCH SCREEN button. When the clock is disabled, the button is shown on grey in the management, and when the clock is on, the button is green. To display the clock 1. Press the Clock button at the top of the page. 2. In the CLOCK menu, choose On. 3. In the SIZE menu, type in the preferred font. 4. Finally save the changes and enable the clock by pressing Save. To stop displaying the clock 1. Press the Clock button at the top of the page. 2. In the CLOCK menu, choose Off. 3. Finally save the changes and disable the clock by pressing Save. NB The change is not visible in the management until you refresh the page. To refresh, use the refresh icon on your browser or press F5 on your keyboard. 20 Troubleshooting and technical support Problem I cannot log in / I forgot my password. The template / piece of content I created is not previewed properly. An image I added on content is pixelated. An element I’ve added on the template is not visible or it’s only partially visible. The scrollbar is missing when I’m trying to change the level. A video I uploaded is not previewed properly in the media library. The player tile shows that the player has not been on the server for several minutes. The software becomes slow or unresponsive. Solution Check that you typed your email and password correctly. If this does not help, press Forgot your password? under the fields and follow the instructions to get a new password. Refresh the page by pressing the F5 key or the refresh icon on the browser, or log out and then log back in. The image may contain transparency which is not supported in the JPG format. Change the image format from JPG to PNG. The elements are organised on the template in the order they are listed in the elements menu. An element whose name is listed above another may cover the lower one completely or partially. You can bring the covered element towards the top by dragging its name up in the elements menu. Resize your browser window to make the scrollbar reappear. When uploaded, videos are automatically converted, which may take a few minutes. When the video is successfully uploaded, you can see a still shot and the duration. If this takes more than a few minutes, refresh the view by pressing the F5 key on your keyboard. Refresh your player view by pressing the F5 key or pressing the refresh icon on the browser. Refresh the page by pressing the F5 key or pressing the refresh icon on the browser. For technical support, visit support.idid.fi or email us at [email protected]. You can also reach your contact person by phone. 21 Glossary Content A single compilation of backgrounds, images and videos made by the user and shown on the display. There are usually several contents shown on the display in turns according to the settings. Content Editor A user group whose members can create, edit and schedule content using existing templates. Element A frame for material such as an image or video that is used in content. Template Creators can position and size the elements on templates, Content Editors can change the material in them. iDiD Management Site A web-based service whose users design, schedule and publish material. Level Each user account is created at a specific level. The level determines where a user’s contents are displayed, e.g. on all the displays in the organisation, in specific locations or offices. Contents created at higher levels are automatically inherited to the lower levels and a user at a higher level can also edit contents at lower levels. Media Files that you can upload to the server and use in contents: images, videos and documents. Player Pc A computer on which the Player Software is installed and which retrieves the content from the server. You can use any computer with Windows, Mac Os, Android or Linux as the Player PC. Template A pre-developed layout used to create content. A template can contain different elements, i.e. predefined positions for images or videos in which the material can be changed as needed. Template Creator A user group whose members can create templates. User Group On the Management Site, there are two different user groups that can perform different kinds of tasks. Cf. Content Editor and Template Creator. 22


![[デンマークフォン] ID-140 説明書[PDF:220Kb]](http://vs1.manualzilla.com/store/data/006577252_2-27a68f2a6e6f4176dabdc547974bb4cf-150x150.png)