1
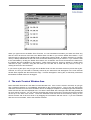
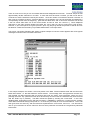
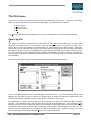
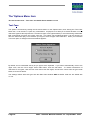
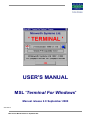
USER'S MANUAL MSL 'Terminal For Windows' Manual release 2.0 September 2000 223.6020.0 223.6020.2 MSL Terminal Manual Release 2.0 September 2000 These instructions describe the installation, operation and maintenance of the subject equipment. Failure to strictly follow these instructions can lead to an equipment rupture that may cause significant property damage, severe personal injury and even death. If you do not understand these instructions, please call Severn Trent Water Purification for clarification before commencing any work at 215-997-4000 and ask for a Field Service Manager. Severn Trent Water Purification, Inc. reserves the rights to make engineering refinements that may not be described herein. It is the responsibility of the installer to contact Severn Trent Water Purification, Inc. for information that cannot be answered specifically by these instructions. Any customer request to alter or reduce the design safeguards incorporated into Severn Trent Water Purification equipment is conditioned on the customer absolving Severn Trent Water Purification from any consequences of such a decision. Severn Trent Water Purification has developed the recommended installation, operating and maintenance procedures with careful attention to safety. In addition to instruction/operating manuals, all instructions given on labels or attached tags should be followed. Regardless of these efforts, it is not possible to eliminate all hazards from the equipment or foresee every possible hazard that may occur. It is the responsibility of the installer to ensure that the recommended installation instructions are followed. It is the responsibility of the user to ensure that the recommended operating and maintenance instructions are followed. Severn Trent Water Purification, Inc. cannot be responsible deviations from the recommended instructions that may result in a hazardous or unsafe condition. Severn Trent Water Purification, Inc. cannot be responsible for the overall system design of which our equipment may be an integral part of or any unauthorized modifications to the equipment made by any party other that Severn Trent Water Purification, Inc. Severn Trent Water Purification, Inc. takes all reasonable precautions in packaging the equipment to prevent shipping damage. Carefully inspect each item and report damages immediately to the shipping agent involved for equipment shipped “F.O.B.Colmar” or to Severn Trent Water Purification for equipment shipped “F.O.B Jobsite”. Do not install damaged equipment. SEVERN TRENT SERVICES, COLMAR OPERATIONS COLMAR, PENNSYLVANIA, USA IS ISO 9001: 2000 CERTIFIED Copyright Capital Controls Group - MSL 8, Hawksworth South Mead Industrial Park Didcot, Oxon 0X11 7HR! !UK TEL: +44 (0)1235 512000 FAX: +44 (0)1235 512020 e-mail: [email protected] Web site: http://www.capitalcontrols.net Page ii MSL Terminal Manual Release 2.0 September 2000 CONTENTS ABOUT THE MSL TERMINAL PROGRAM. ................................................................................................................1 MSL 'TERMINAL' - INSTALLATION............................................................................................................................2 TO RUN THE MSL TERMINAL PROGRAM ................................................................................................................4 USING MSL 'TERMINAL'................................................................................................................................................5 BAUD RATE ....................................................................................................................................................................6 FLOW CONTROL ............................................................................................................................................................6 XON/RTS ..........................................................................................................................................................................7 DATA BITS ......................................................................................................................................................................7 ECHO ................................................................................................................................................................................7 STOP BITS AND PARITY.................................................................................................................................................7 THE MAIN TERMINAL WINDOW.................................................................................................................................9 1. THE TOP HORIZONTAL BAR - THE 'CAPTION BAR' .........................................................................................................10 2. THE 'MENU' BAR ..........................................................................................................................................................10 Quick Keys ...................................................................................................................................................................11 3. THE 'STATUS' BAR ........................................................................................................................................................11 4. THE BUFFER SEND AREA.............................................................................................................................................11 5. THE MAIN TERMINAL WINDOW AREA. ........................................................................................................................12 THE FILE MENU .............................................................................................................................................................15 OPEN LOG FILE ................................................................................................................................................................15 CLOSE LOG FILE ...............................................................................................................................................................16 TRANSMIT A TEXT FILE ....................................................................................................................................................17 'Command files' ...........................................................................................................................................................18 THE FILE - EXIT MENU ITEM .............................................................................................................................................20 THE 'COMMPORT' MENU............................................................................................................................................21 PORT OPEN .......................................................................................................................................................................21 SETTINGS ..........................................................................................................................................................................21 'DIAL A PHONE' NUMBER AND 'HANG UP PHONE'...............................................................................................................22 THE 'WINDOW' MAIN MENU ITEM ..........................................................................................................................23 CLEAR WINDOW ...............................................................................................................................................................23 Background colour ......................................................................................................................................................23 Text Colour ..................................................................................................................................................................23 Font..............................................................................................................................................................................23 THE 'OPTIONS MENU ITEM ........................................................................................................................................24 TEXT CASE .......................................................................................................................................................................24 BUFFER SEND ...................................................................................................................................................................25 THE 'CLIPBOARD' MENU ITEM .................................................................................................................................25 THE 'TIMESTAMP' MENU ITEM ................................................................................................................................26 THE 'ABOUT MENU ITEM............................................................................................................................................27 INDEX ..................................................................................................................................................................................2 MSL Terminal Manual Release 2.0 September 2000 Page iv MSL Terminal Manual Release 2.0 September 2000 Minworth Systems Ltd. (MSL) 'Terminal' Program. About the MSL Terminal Program. The MSL terminal program has been designed as a simple communications program to allow the user of an IBM ® - compatible personal computer (PC) running Microsoft ® Windows Version 3.x, '95 or '98 to communicate with Minworth Systems Ltd. Intelligent Instruments via the PC's serial communications port. It allows the user to interrogate the instrument to find out its status and to send commands to the instrument to modify its configuration or mode of operation. The program allows you to open a log file - into which all commands sent to the instrument and all replies from it are recorded in simple ASCII text format that can be read and edited by any standard word-processor. It also allows you to put commands and time delay instructions into a command file and send this file to the instrument. This allows you to save configuration information and restore it later if the configuration is changed erroneously. It can save typing and help avoid mistakes in reconfiguring. The prime purpose of the program is to allow communications with MSL equipment, but it is not limited to this. If you have a Hayes ® - compatible modem that supports the 'ATDT' command you may use the program to dial a number via a tone-dialling telephone line. You can then transmit messages you type on the keyboard, or transmit an ASCII text file, and you can receive ASCII text into the log file via a remote modem. Menus let you alter the communications port used and the communications settings - baud rate, parity, and data length and so on, so the program can be used as a general communications program. However it is not designed to be a terminal emulator - it works only with simple ASCII text and it does not support file transfer protocols such as 'Kermit', 'X/Y/Z-Modem' and so on. As supplied, the communications settings default to those suitable for communications with MSL instruments, so the inexperienced user does not normally have to make any adjustments to communications settings before he/she can interrogate and send commands to MSL equipment. MSL Terminal Manual Release 2.0 September 2000 Page 1 MSL 'Terminal' - Installation To install the program you need to be running Microsoft ® Windows v3.x, instructions assume you are familiar with Microsoft Windows. If you are Windows manuals before proceeding, and if you are running Windows v3.1x run the inbuilt tutorial or help file accessed through the 'Help' menu item in start button menu respectively. '95 or '98 on your PC. These not, you will need to read the or Windows 95 or 98 you could the Program Manager menu or Start up Microsoft ® Windows in the normal way if it is not already running. Then insert the supplied MSL 'Terminal' floppy disc into your floppy disk drive. In Windows 3.x, from the windows desktop select the program manager and maximise its window. Click on the 'File' menu item and then double-click on 'Run' in the drop-down menu. A similar process is required for Windows 95/98, except use the Start button / Run Menu item. A window something like the one below will pop up on the screen. Position the mouse cursor in the box below the label 'Command Line' in Windows 3.x ('Open' in Windows 95), and click the left mouse button. The cursor will change to an "I-beam" shape, indicating Windows is waiting for you to enter text into the box. If you inserted the MSL supplied disk into drive A: enter into the box: A:\SETUP If the supplied disk was placed into drive B: enter B:\SETUP When you have entered the appropriate text, click on the OK Button. You should then see a small popup window with the message 'Initialising Set-up'. this should be replaced by a large window like that overleaf after a while. It may take up to 40 seconds for slower PCs. Page 2 MSL Terminal Manual Release 2.0 September 2000 By default, the MSL Terminal program will be installed onto the hard disk drive C: into the sub-directory (called a 'folder' in Windows 95/98) named ' \MSL '. The sub-directory will be automatically created if it does not already exist. If this is acceptable, click the 'OK' button. If not, edit the highlighted text to reflect the drive and directory to which you wish to install the program, then click the Continue button. The files on the supplied disk are in a compressed format to save space. The set-up program will now automatically decompress the necessary files and install them onto your hard disk. The following files will be copied onto your hard disk - Into the selected working sub-directory (by default, C:\MSL): MSL_TERM.EXE and into the SYSTEM subdirectory under that into which you originally installed Windows (normally into \WINDOWS\SYSTEM) the following files: VBRUN300.DLL CMDIALOG.VBX MSCOMM.VBX THREED.VBX These files are all necessary to run the MSL Terminal program, so you should not delete any of them. each file is copied across, the Set-up program reports the fact in a window that you will see on the screen. MSL Terminal Manual Release 2.0 September 2000 Page 3 As At the end of the process you should see a window like that below... ... click on the 'OK' button when you see this window. If you look at the Program Manager desktop in Windows 3.x, or the Start Menus in Windows 95, you will see that a new folder called 'MSL Applications' has been created if it did not exist already. If you open this folder, you will see that it has an icon in it called 'MSL Terminal'. In the unlikely event that the installation fails for any reason, a window will appear stating that installation of the MSL Terminal program was incomplete. In this event, do not try to run the program - refer to MSL for help if needed to solve the problem. To run the MSL Terminal Program To run 'MSL Terminal', run Microsoft ® Windows, open the 'MSL Applications' folder in the Desktop in Program Manager, or through the Start Menus if running Windows 95, and double-click on the 'MSL Terminal' icon. The program will now start. Refer to the next section of this manual to see how to use the program. Please note that some of the screen shots in this manual were taken off a PC running 'MSL Terminal' under Windows For Workgroups v3.11; Others were taken from a PC running Windows '95 or Windows '98. Some were converted from colour to monochrome. Others were kept in full colour. The differences are fairly minor, but your PC may show screens slightly different to those shown in the manual. Page 4 MSL Terminal Manual Release 2.0 September 2000 Using MSL 'Terminal' Start up MSL Terminal as detailed previously. When it starts, the program puts two windows on the screen. The one at the back is the actual Terminal screen where text entered and replied will be displayed. When first started, this is overlaid automatically with the Communications setting windows as shown below: This window contains a series of sets of circular 'radio buttons', each set grouped within a frame. Within each set, only one button will be highlighted to show it is active. To change a setting, simply click on the new setting you want. For example, if you wished to use the COM2: serial port for communications (perhaps because you have a serial mouse plugged into the COM1: port), just move the mouse pointer into the area within the frame which is labelled 'Communications Port' to the circle to the left of 'COM2', then click the left mouse button. The circle will now turn black and the one by COM1 will clear. It is a characteristic of radio buttons that only one within a group may be selected at any time - i.e. they are mutually exclusive. The rectangular button labelled 'Make Default' will be greyed out - i.e. not available - unless you alter one or more of the displayed settings. If you do this and then click the 'Make Default' button, those settings will be saved and next time you run 'MSL Terminal' they will become the new default settings. MSL Terminal Manual Release 2.0 September 2000 Page 5 A glance at the screen will show you, by those buttons that have a black circle by them, what the current communications settings are. Any of them may be altered by a similar procedure to that described above. The meaning of each set of radio buttons is described below. If you are familiar with communications settings, and the settings displayed are the ones you want, you may click the OK button, skip the section below and proceed to Page 10. BAUD RATE Baud rate governs the speed of communications - the rate at which data is sent from and received by the PC. It approximates to the number of bits transmitted per second. The effective transmission rate of characters is approximately one tenth of the baud rate (because each character has up to 8 bits, plus a start and stop bit, and maybe a parity bit). MSL instruments normally communicate at 1200 baud. Occasionally 2400 or even 9600 baud is supported if the instruments are not multi-dropped and if the communications cable is only short. 'MSL Terminal' supports standard baud rates from 300 to 19200 baud. FLOW CONTROL It is common in computer communications to have some form of protocol whereby the PC and the device with which it is communicating can ensure that the PC does not try to send messages to the remote device, or vice versa, when the other device is busy carrying out other tasks and is not ready to communicate. To ensure the one device will not 'talk' while the other is not ready to 'listen' a technique called 'handshaking' or 'Flow control' is used. At slow baud rates, it is possible no form of flow control (handshaking) is needed. This is the setting 'None' in the communications Flow Control options. Some equipment uses 'XOn/XOff' handshaking. Some MSL instruments in a multi-dropped configuration may need this type of flow control. With this system, the communicating devices make use of two special nonprinting ASCII characters, which the user normally never sees. The computer may send the instrument an 'XOFF' character (to tell it to stop transmitting for the moment because it is busy), then later send an 'XON' character (to tell it to resume transmitting). Many devices can communicate through their serial communications ports by using only three wires - one for data transmitted, one for data received, and a common ground (earth) wire. However more complex devices such as modems use extra signal wires to connect the two devices. Some of these wires may be used to implement a form of hardware handshaking. One of these is RTS/CTS handshaking. If you click the radio button labelled 'RTS' in the 'Terminal' program, this form of handshaking will be implemented. With this system, the master device (say the computer - sometimes called DCE, for Data Communications Equipment) puts a digital high voltage signal on the RTS wire ('raises RTS') to ask the other device (the slave - sometimes called DTE - Data Terminal Equipment) for permission to send it data. RTS stands for 'Request To Send'. If the other device is ready, it in turn raises another signal line named CTS which stands for 'Clear To Send'. If the sending device raises RTS and the other device raises CTS, the two devices will communicate. If the receiving device is not ready, it will not raise CTS, and the sending device will wait until it does before sending a message to it. Page 6 MSL Terminal Manual Release 2.0 September 2000 XON/RTS Some devices may use a combination of hardware (RTS/CTS) and software (XON/XOFF) handshaking. The XON/RTS radio button in MSL 'Terminal' allows that flow control mechanism to be selected if appropriate. DATA BITS In Serial communications, data may be transmitted with each character represented by either 7 or 8 data bits according to the needs of the application. 7-bit data can represent 128 different 'characters', and this is more than enough to represent all the standard text characters on a keyboard, plus special characters such as 'XON' and 'XOFF' and 'Esc'. Thus for transmitting textual information each character may be sent as a 7 bit word. A word is a pattern of bits (Binary digITS). There is no point in sending all 8 bits if the last bit is unnecessary. MSL instruments communicate with words 7 bits long since they only 'talk' with alphanumeric characters. 8-bit data can represent 256 different 'characters'. PCs typically use the extra 128 'characters' the additional bit provides to supply things like international characters and graphical line drawing characters. PC programs however use all available 256 possible bit patterns. MSL Terminal is not designed to permit programs (COM, EXE) and non-textual data files to be transmitted, although it will not prevent you trying! MSL terminal takes each character to be transmitted, as you type it on the keyboard or it is read from a file, and sends it bit pattern representation out through the serial port. Anything received back in the serial port is displayed in the Terminal main window. If the data received is not a text character, it will show on the screen as a small square box. You are advised to restrict your use of MSL 'Terminal' to transmitting standard ASCII text files and communications via the keyboard. ECHO In MSL 'Terminal', the Echo setting governs whether a character typed at the keyboard is echoed to the Terminal Window and out of the communications port (Echo ON) or is sent only out of the Communications port (Echo OFF). MSL Instruments automatically echo characters they receive back to the device that sent them. For MSL instruments, the default Echo-off setting should be used. If you turn echo on, each character you type will appear TWICE on the screen. For example, if you enter 'Hello' at the keyboard, you will see 'HHeelllloo' on the screen. If this happens, make sure the echo setting is set to off. MSL Terminal allows you to set echo on if you are using it with some non-MSL device which does not echo back characters it is sent. STOP BITS and PARITY In serial communications steps are taken to make communications as reliable as possible. One mechanism explained already is handshaking. Two further devices are commonly used to try to ensure the bit pattern transmitted from one device is interpreted properly when received by another device. Commonly one or two 'Stop bits' - extra bits over and above the 7 or 8 data bits - are transmitted for each 'character' sent to the receiving device. The extra one or two bits are used to help the receiving device make sure it distinguishes properly between the end of one 'character' and the start of the next. In addition a 'Parity bit' may be added to ensure reliable communications. With parity: none, this feature is not used. With even and odd parity an extra bit (digital 0 or 1) is added to make the total number of digital high bits in an individual word either Even (parity: even) or odd (parity: odd). MSL instruments implement even parity checking. MSL Terminal Manual Release 2.0 September 2000 Page 7 It may well be that you will not need to alter any of the default communications settings to be able to communicate satisfactorily with an MSL instrument. When MSL Terminal starts, it makes the most common settings for communications with MSL instruments the default settings. If you are using the program to communicate with some other product, or need to alter the settings for any other reason, click on the appropriate radio buttons until the highlighted radio buttons describe the settings you want. Once the settings selected are the correct ones, click on the OK button. The 'Cancel' button is used only when you have actually started a communications session and need to change the settings, perhaps to communicate with a different device on another communications port. Once you have clicked the OK button in the communications settings window, that window will disappear, and you will be left with the main 'MSL Terminal' window visible on screen. The next section describes that window and its associated menus. Page 8 MSL Terminal Manual Release 2.0 September 2000 The Main Terminal Window. When you have selected suitable communications settings, the Communications Settings window will disappear and you will be left with the Main Terminal window similar to that shown below. MAIN TERMINAL WINDOW The larger main rectangular area within this application window labelled 'Main Terminal Window Area' above, is where all characters received by the PC are shown. When this window is active (i.e. the cursor has been placed in this window and the left mouse button clicked), anything you type at the keyboard is transmitted character-by-character as you type it. Each character is usually automatically echoed back to this window from the receiving device. MSL Instruments automatically echo back all characters sent to them, but not all equipment does. If you type something on the keyboard with the cursor active in this area of the screen and you do not see anything on the screen, it may be the device with which you are communicating does not echo back characters it receives. If this is the case, you should click on the CommPort menu item and change the Echo setting to ON in the screen that will be displayed, then click the 'OK' button. If Echo is already on, you will have to check that the device with which you are communicating, the communications cable and the communications set-up (baud, parity etc.) are all functioning correctly. MSL Terminal Manual Release 2.0 September 2000 Page 9 The main Terminal window consists of 5 main parts: 1. The top horizontal bar - the 'Caption Bar' This window has the standard 'control button' on its left hand side, the standard 're-sizing' buttons on the right, and the caption 'MSL Terminal'. This caption bar and the outline frame around the window allow you to move, re-size and close the window. See the Windows manuals and tutorial if you do not know how to perform any of these operations. Note the program has been written so that you cannot accidentally resize the window so small that you can no longer see any of the main terminal window area. 2. The 'Menu' Bar Below the caption bar is the 'Menu Bar'. The Menu bar in MSL Terminal Version 1.0 has menu items entitled File; CommPort; Options, Window; TimeStamp and About. Clicking the left mouse button with the cursor over a menu item will cause a drop-down menu to appear with various sub-menu options. For example, if you click on the 'File option, the window will change to... Similarly other menus will drop down if you click on the other entries in the menu bar. Page 10 MSL Terminal Manual Release 2.0 September 2000 Quick Keys In any menu some items may have 'quick keys'. If a letter is underlined in the menu, the corresponding menu item may be accessed quickly by pressing and holding down the 'Alt' key, then pressing the key whose letter is underlined, then releasing both keys. Alternatively you can select items by clicking the left mouse button on the menu or sub-menu item you want to use. In the 'Terminal' Menu Bar you can see that the following quick keys will apply : Alt - F Alt - C Alt - W Alt - O Alt - C Alt - T Alt - H Opens the File Menu Opens the Communications Port Menu Opens the Window Menu Opens the Options Menu Opens the Clipboard Menu Opens the Timestamp Menu Opens the Help Menu . Similarly for example with the File drop-down sub-menu selected, Alt-O opens a log file, Alt-X exits the program, and so on. 3. The 'Status' bar Below the Menu bar is the 'Status bar'. MSL 'Terminal' uses this to report the state of last change in communications status - for example such things as changes in the state of communications signal lines and so on. 4. The Buffer Send Area Below the Status bar is the Buffer Send Area. This feature was added in version 1.11d of the program ( August 1995) to: 1. Provide a facility to send the same commands to an instrument repeatedly without having to retype them each time. and 2. To provide a facility to transmit a series of characters in a continuous stream, rather than one-by-one as each one is typed (which is what happens with data typed when the cursor is in the main client window area). The Buffer Send Area consists of a single button labelled 'Buffer Send', and a text box to the right of it which we describe as call the 'Buffer Send Text Box'. A very simple example of the buffer send facility is illustrated in the Windows 95 screen copy on the following page. The text 'TIM' - which asks an MSL instrument to report the time currently recorded in its internal clock was typed into the text box. Then each time the 'Buffer Send' button was clicked, the command 'TIM' was sent, this command and its echoed reply was displayed in the main terminal window area. MSL Terminal Manual Release 2.0 September 2000 Page 11 When you type text into the Buffer Send Text Box, it is not transmitted until either you strike the 'Enter' key with the cursor at the end of the text in the Buffer Send Text Box or you click the 'Buffer Send' button. If you send the text by typing it into the Buffer Send Text Box then pressing 'Enter', an ASCII character 13 (carriage return) is always transmitted as the end of line terminator following the text you entered. If you cause the text to be transmitted by clicking the 'Buffer Send' button, the characters sent as line terminators are taken from the settings that are modifiable via the Options - Buffer Send sub-menu, which by default is a single ASCII character 13 (CR). However, using this sub-menu you can alter this to send CR only, CR/LF, LF only, or nothing as the end of line terminator. If you have a log file open, text you type into the Buffer Send Text box and send will not be put into the log file. However, the text you send will be normally echoed by the instrument and will appear in the main terminal window area, together with the instrument's reply. This text will appear in the log file, so effectively commands transmitted via Buffer Send can be logged. 5. The main Terminal Window Area. Below the Buffer Send area is the Main Terminal Window area. If the cursor is active in this area, as you type each individual character it is immediately transmitted to the receiving device. This is also the area where characters received from the communications device are displayed. Replies to messages typed into the Buffer Send Area text box are also displayed here. This area is associated with a storage buffer that will gradually fill as more data is received. You can use the horizontal and vertical scroll bars to access text that has scrolled off the top or the side of the screen. These are standard scroll bars and are accessed by clicking on the arrows at either end of each scroll bar or by dragging the scroll button with the mouse. If you are unfamiliar with how to use scroll bars, refer to the windows manuals. Page 12 MSL Terminal Manual Release 2.0 September 2000 There is a limit to how far you can scroll back data that has disappeared off-screen. 'Terminal' keeps the last approximately 32,000 characters in a buffer. If more than that have been received, you will not be able to scroll back to those characters back beyond 32,000. Once this number of characters has been received, as each new set of data is received, 'Terminal' adds the new characters to the end of the buffer and displaces a corresponding number from the beginning. [Note that this takes time, and on slow PCs characters can be lost if the PC cannot take them out of the receive buffer as fast as each one comes in.] These displaced characters in the main transmit window text buffer are 'lost' in that you cannot scroll back to look at them. However, if you have opened a Log file (see File: Open Log File) they will still be present in that file and can be edited or examined in that file by any suitable ASCII editor or word-processor. The screen copy below (Windows 95) shows a typical example of how the screen appears after a few typical messages have been sent to an MSL instrument. In this simple example, the I-beam cursor was placed in the Main Terminal Window area and the left mouse button was clicked - i.e. that was made the 'active window'. The message 'DAT' was typed then the enter key was pressed. An MSL instrument will not send its reply until you send it a line terminator, which you do by pressing the 'Enter' key. (Note that some other devices may not echo back the characters they have received until the 'Enter' key is pressed.) The MSL instrument replied by sending the current date - in this case 03/08/95 (MSL instruments use the UK date convention - DD/MM/YY), followed by a new line and a question mark. MSL instruments always prompt with a '?' to show they are ready for more communications. Then 'TIM' was typed, then the enter key, and the instrument replied with the current time, and so on. You will need to refer to your instrument or device manual to find out which particular commands are recognised by individual instruments. MSL Terminal Manual Release 2.0 September 2000 Page 13 With an MSL instrument, if you send a command that is not recognised, the instrument will reply with an error message. MSL instrument's commands are always in UPPER CASE. Replies may be upper, lower or mixed case. If you send 'TIM' the instrument will reply with its current time setting but if you send 'tim' it will reply 'error'. Because of this, the program allows you to ensure ALL messages you type at the keyboard are transmitted as upper case - see the description of the Options-'Text Case' sub-menu item). In normal use you will simply make the Main Terminal Window active by clicking the mouse with the cursor in it, type commands on the keyboard, see them echoed to the main terminal window and see the replies from the remote device in the same window. When you have finished a communications session you should close the program via the File menu Exit item. This is the proper way to close the program since it ensures the communications port is closed properly and any open logging file is closed - in case you forget to do it yourself. A new feature with v1.11d and later of the 'MSL Terminal' program was added so that you can clear the window without needing to use the 'Window - Clear Window' sub-menu. The Ctrl-L key (ASCII code 12) achieves the same thing. If you want to clear the window, with the cursor within the window, hold down the Ctrl key, Press and release the 'L' key, and release the Ctrl key - the window will then clear. If you require Ctrl-L not to be captured in this way, contact MSL and we will provide a version of Terminal with this feature disabled. It has been found that some old, slow PCs - especially portables with slow CPU clock speeds and slow video cards, and older PCs with the slower unbuffered, pre-type 16550, UARTS, can lose characters when the visible part of the receive window is filled and the windows operating system has to scroll the window. This loss of received characters with some PCs has been found to happen because the PC is so busy scrolling the window it is not fast enough to simultaneously pull characters out of the receive buffer before the next one arrives. Older UARTS only had a 1-character 'buffer' i.e. if a character was not pulled out before the next arrived, it would be lost. If this problem occurs it can be partially alleviated by shutting down all programs except the Terminal program; clearing the screen after looking at the reply for each command you send; and asking for data in small blocks rather than one huge block - for example asking for respirometric time stamps 50 at a time rather than asking for one block of 500 all in one go. However, it would be better to upgrade or replace such PCs. Page 14 MSL Terminal Manual Release 2.0 September 2000 The FILE menu The FILE main menu is accessed by clicking 'File' in the menu bar or by the 'Alt - F' quick key combination. When you do this, the File drop-down sub-menu will appear. This sub-menu has 4 options: 1. Open Log File 2. Close Log File 3. Transmit Text File 4. Exit The 'Close Log File' option will be 'greyed out' to show it is not available if no Log File has been opened. Open Log File This option is accessed by clicking the left mouse button on the 'Open Log File' Menu item, or via the Alt-O quick key combination (after Alt-F if necessary to open the File main menu). Its purpose is to allow you to open a file into which all characters received through the communications port will be written. Since MSL instruments echo all characters sent to them, this means that all commands sent and all replies received will be written to this file. A log file is a standard ASCII text file that can be edited by any standard word processor. You can use the Microsoft ® 'Notepad' program supplied with 'Windows' to look at or edit this file provided it has not grown to more than about 60,000 characters (this is the limit of the size of files which 'Notepad' can accommodate). When you invoke 'Open Log File', an input window something like that below will appear... This is a standard Windows (v3.11 in this example) 'File Dialogue box'. If you are not familiar with the File Dialogue box and want to open the log file on a different drive or directory to that shown, please refer to the Windows manuals for information on how to alter the drive, directory and File Type. By default MSL 'Terminal' will show the drive and directory from which you started the MSL 'Terminal' program. The rectangular area in the left centre of the window is the Filename box. If the 'List files of Type box does not show *.LOG, ( it starts by showing 'command files' of type CMD) use the scroll arrow on its right to select the LOG file type. If there are any files with the LOG extension, they will appear in this box. You can select to open an existing log file by clicking on its name in the Filename box, or type the name of a new LOG file in the text entry box under the label 'File Name'. Then click the OK button. MSL Terminal Manual Release 2.0 September 2000 Page 15 If you have selected a new LOG file name, you will be returned to the Main Terminal screen. If you have chosen the name of a log file that already exists, a box like that overleaf (Windows 3.11) will appear. You should click one of the three buttons. If you click the 'Yes' button, the existing LOG file will be emptied and only new data from the current session will be written into it. Only click this if you want to get rid of all old information in the LOG File. If you click the 'No' button the existing data in the LOG file will be kept, and all new information will be added to the end of the existing information. If you click the 'Cancel' button the box will disappear and you will be returned to the previous window from which you can choose a different log file name or cancel opening of a log file. Close Log File This option is accessed by clicking the left mouse button on the 'Close Log File' menu item, or via the Alt-C quick key combination (after Alt-F if necessary to open the File sub-menu). Its purpose is to allow you to close a log file (i.e. stop recording information into it), which you will have opened via the 'Open Log File' menu item. If you have not opened a log file, this option will be inactive ('greyed out'). Page 16 MSL Terminal Manual Release 2.0 September 2000 Transmit a text File This option is accessed by clicking the left mouse button on the 'Transmit a Text File' menu item, or via the 'Alt-T' quick key combination (after Alt-F if necessary to open the File sub-menu). Its purpose is to allow you to transmit a text file through the open communications port. For example, if two PCs were connected together, each one running MSL Terminal and each one with the same communications settings, you could open a log file on the first PC, transmit a text file from the second PC, and then close the log file on the first PC. This provides a simple method of transferring text files from one PC to another, but remember that although it will do it, MSL 'Terminal' was not designed for the transfer binary files (programs). These contain non-printable characters and may contain control codes that adversely affect modems or whatever. The results will be unpredictable and a full uncorrupted transfer is unlikely to be successful and will certainly fail if your communications are set to 7 data bits. A text file can also be very useful with some devices where you could put a whole series of commands, one on each line, into a text file and transmit it to the device - perhaps for example to re-program it. However with MSL instruments with an ordinary text file this would not work. The text file is simply transmitted straight out of the serial port. The program does not send one line, wait for a reply; send the next line; wait for a reply, and so on. If you were to send a series of commands one after the other without giving the instrument time to process them and send a reply, you would simply 'swamp' the instrument. However it would be very useful to be able to send a complex series of commands to an instrument to reprogram it. Version 1.10 and later versions of 'MSL Terminal' have a special feature - Command files - to accommodate this. MSL Terminal Manual Release 2.0 September 2000 Page 17 'Command files' Built into versions 1.0 (Jan 1995) and later of 'MSL Terminal' is the facility to treat text files with filenames ending in ".cmd" in a special way. We call such files 'command files'. Command files are simple text files which are in a format where a few simple rules apply: • The file is a pure ASCII text file containing only printable ASCII characters. • The filename extension is '.CMD' • The filename conforms to DOS format i.e. [Up to 8 characters].CMD • Each command to be sent to an instrument is put on a separate line. • The program strips out any leading or trailing spaces in a line. • If the first character on a line is '*', but the line does not begin '*R'; '*U' or '*L', it signifies a command to wait a specific number of seconds before proceeding: e.g. '*5' means wait 5 seconds; *60 means wait 1 minute, etc. • • • The number following the '*' must be an integer. If the number following the '*' is more than 32767, it is clipped to 32767 - the maximum delay achievable with a '*(number) command is 32767 seconds. If the text immediately following the * cannot be evaluated to a number, no delay ensues. However three special cases exist: 1. If the line starts '*R' this means retain the case of the text irrespective of the settings in the Options 'Text Case' menu. This will be in force until a line starting with '*U' or '*L' is read. 2. If it starts '*U', transmit the text as UPPER CASE irrespective of the settings in the Options - 'Text Case' menu. This will be in force until a line starting with '*R' or '*L' is read. 3. If it starts '*L' ,transmit the text as lower case irrespective of the settings in the Options - 'Text Case' menu. This will be in force until a line starting with '*R' or '*L' is read. Page 18 MSL Terminal Manual Release 2.0 September 2000 A 'command file' can be easily created using Windows 'Notepad' applet, or any program capable of saving its data as pure ASCII text. Here is an example 'command file': *U dir *10 (Wait 5 seconds) PIN *5 DAT *1 TIM VAL 6 7 *10 TIM *5 *R SIT=Test Rig *U val 6 7 *5 VAL 1 10 If this file were called 'TEST.CMD', and using the 'File - Transmit Text file menu' this file were selected and transmitted, it would: 1. Start to convert the case of the text transmitted to upper case, irrespective of whether you had set 'Force upper case' in the 'Text Case' menu. If the *U had not been present and in the 'Text Case' menu 'Force Upper Case' was not selected, all following commands would be transmitted as is. MSL instruments 'talk' upper case. If you sent 'dir' it will respond with an error message. If you send 'DIR' a directory of the commands it understands. In the example command file, by putting *U as the first line you ensure 'DIR' is next transmitted, not 'dir'. 2. When the third line is read , a 10 second delay will occur. The line reads '*10 (wait 10 seconds)'. Note that when this line is analysed, because the file has the extension '.CMD', the program sees the * as the first character as having special implications. If the line does not start '*R'; '*L' or '*U' It looks at the remainder of the line, and tries to convert it to a number. It would see '10 (wait 10 seconds)' which it evaluates to 10 - because as soon as it sees the space between the '10' and the '(' it stops looking - it is satisfied that it has found a number. 3. The program would now send 'PIN' to the instrument; wait 5 seconds; send 'DAT'; wait 1 second, and so on. 4. When it reads the line '*R' it will retain the case of the command, irrespective of what is set in the Text Case menu, so it will next transmit 'SIT=Test Rig'. If the 'R' were not there it would transmit 'SIT=TEST RIG' - because the '*U' command on the first line would still be in force. 5. The '*U' on the next line forces translation to upper case to begin again, so on the 16th line that reads 'VAL 6 7' would be sent, not 'val 6 7' - which would result in an error reply. If the same file had the name 'TEST.TXT', or the extension was anything other than '.CMD', the text would be sent exactly as seen - for example *10 would be sent literally - it would not be interpreted as 'wait 10 seconds, then transmit the next line. While a command file is being transmitted, a small window will be visible on screen showing what command was last transmitted, how long the program is waiting, and which line of which file it is transmitting. It contains a button labelled 'Cancel'. Click this to abort the transmission of the text file it part way through if you wish. Note that you must put in individual time delays long enough to ensure the instrument has time to reply to each command sent - the program does not look for the '?' sent at the end of each successful reply to a command. MSL Terminal Manual Release 2.0 September 2000 Page 19 The File - Exit menu item The File - Exit menu option is accessed by clicking the left mouse button on the 'Exit' sub-menu item of the file menu, or via the 'Alt-F X' quick key combination. Its purpose is to allow you to close down the MSL Terminal program at the end of a session. You should always use MSL Terminal's 'Exit' sub-menu item to end a program session. Do not use the programs control box, or the Windows quick key combination or the Program Manager's Task Manager to close down MSL Terminal. By using the correct 'Exit' procedure the program is able to make sure that any log file you opened and forgot to close is closed properly - if it were not, its contents would not be saved properly. It also ensures that the opened communications port is closed down properly, and made available to other programs, and that any characters that might be waiting to be transmitted are transmitted before the program stops. Page 20 MSL Terminal Manual Release 2.0 September 2000 The 'CommPort' menu The ComPort Menu is accessed through the Alt-C quick-key combination from the MSL Terminal Main Window, or by clicking the left mouse button on the 'ComPort' main menu item. When you invoke this item, a drop-down menu will appear with 4 items in it: 1. Port Open 2. Settings 3. Dial Phone number 4. Hang up phone Port Open This option is accessed by clicking the left mouse button on the 'Port Open' Menu item, or via the Alt-O quick key combination (after Alt-C if necessary to open the CommPort sub-menu). Its purpose is to allow you to open or close a communications port. Normally when you invoke the 'CommPort' drop-down menu, or have just started the MSL Terminal program and clicked 'OK' on the communications settings form, this item has a tick to its left. This shows that the port, which was set up in the 'Communications setting' dialogue, is open for communications. If the Port Open item is ticked and you click this item, the tick will disappear and the port will be closed. If you click it again, the port will be reopened. Normally this item should be ticked. However, if you wish to close the communications port temporarily, perhaps so that you can change to another port via the Settings sub-menu item, this option permits such an action. To re-open the port, you simply click the menu item again - if it has a tick, the port is open for communications; if not, the port is closed for communications. If the port is closed, anything you type may be echoed to the screen, but it will not be transmitted to the remote device, nor will it be written into any open log file. Settings This option is accessed by clicking the left mouse button on the Settings Menu item, or via the Alt-S quick key combination (after Alt-C if necessary to open the CommPort sub-menu). Its purpose is to allow you to change the settings (baud rate, parity etc.) of a communications port or to change the communications port in use say from COM1: to COM2:. When you invoke this item, the communications settings window will appear. The use of this window has already been described on pages 5 to 9. If you change the communications settings you may wish to use the port open menu item to close the port before altering settings, and then open it again after invoking this option. This is not strictly necessary, but in any case you should make sure that the Port Open sub-menu item has a tick by it or no communications will take place. MSL Terminal Manual Release 2.0 September 2000 Page 21 'Dial a phone' number and 'Hang up phone' These items are only relevant to those people who have a Hayes®-compatible modem connected to a tonedialling telephone system, and may be ignored by most users. They are accessed by clicking the left mouse button on the relevant Menu item, or via the Alt-D or Alt-H quick key combinations respectively (after Alt-C if necessary to open the CommPort sub-menu). You should ensure you have set the communications settings appropriate to the modem before invoking these options. 'Dial a phone number' simply pops up a box asking you to enter the phone number to dial. When you click its 'OK' button, the MSL Terminal simply sends out a Hayes 'ATDT' command followed by the phone number. The purpose of 'Hang up phone' is to disconnect the modem from the phone line. You should always doublecheck that the phone has really disconnected. Failure to do so can run up large telephone bills! MSL accept no responsibility for misuse of these features. Page 22 MSL Terminal Manual Release 2.0 September 2000 The 'WINDOW' main menu item In versions prior to 1.10, this menu only had one entry in its drop-down sub-menu, namely 'Clear Window' Clear Window This option is accessed by clicking the left mouse button on the 'Clear Window' Menu item, or via the Alt-C quick key combination (after Alt-W if necessary to open the Windows sub-menu). Its purpose is to allow you to clear any existing received text from the main Terminal window area. It clears the received text buffer, so you cannot access old received data after clearing the window. If you have opened a log file, the old data is left intact in the log - it is not deleted. Version 1.10 added a further three sub-menus to the Window menu: Background colour Clicking this pops up a dialogue box that allows you to select the background colour of the of the main terminal window. This is a standard windows dialogue box, and its usage is obvious, so will not be described further. Version 1.11d and later start up with a black background with white text. Earlier versions used white text on a black background. Text Colour Clicking this pops up a dialogue box that allows you to select the text colour of the main terminal window. This is a standard windows dialogue box, and its usage is obvious, so will not be described further. Version 1.11d and later start up with a black background with white text. Earlier versions used white text on a black background. Font Clicking this pops up a dialogue box that allows you to select the name of the font and the size of the font for the text of the main terminal window. This is a standard windows dialogue box, and its usage is obvious, so will not be described further. Version 1.11d and later start up with a black background with white text using terminal font, 9 point. Earlier versions used 10-point arial white text on a black background. If you change the text colour in this box the change will be ignored. Use the Text Colour menu to change text colour rather than the font menu. Note that whether or not dithered colours (those other than the basic 16 windows colours) show correctly depend on you PCs video card, monitor and Windows set-up. MSL Terminal Manual Release 2.0 September 2000 Page 23 The 'Options Menu item This has 2 sub menus - 'Text Case' and 'Buffer Send' added at v1.11d Text Case This option is accessed by clicking the left mouse button on the Options Menu, then clicking the 'Text Case' Menu item, or via the Alt-O S quick key combinations. Its purpose is to allow you to decide whether or not all characters typed at the keyboard are converted to upper case (capital letters) or not before being transmitted. MSL Instruments recognise only upper case text. This option was provided because it can be annoying to have the instrument reply 'error' because you forgot to send it upper case characters. When you invoke the Text case option, a dialogue box like that below appears: By default, text is transmitted exactly as you type it at the keyboard. If you wish to automatically convert it to upper case, click the 'Force Upper Case' radio button, then the OK button. To restore transmission of characters to 'as typed', click the Text case main menu item again, and click the 'Leave case as typed' radio button, then the OK button. This settings affects both text typed into the Main Client window AND the Buffer send text box added with v1.11d. Page 24 MSL Terminal Manual Release 2.0 September 2000 Buffer Send Clicking the left mouse button on the 'Text Case' Menu item, or via the Alt-O B quick key combination accesses this option. Its purpose is to allow you to dictate what end of line characters are added to the text you type in the Buffer Send Text Box when you click the Buffer Send Button. The window that pops up looks like the screen copy below: This facility was provided because most devices need CR only (the default); some CR/LF, some LF only, and some nothing at all - all these options are supported. To modify the setting, simply click the appropriate radio button then click the OK button. The 'Clipboard' Menu item This option is accessed by clicking the left mouse button on the Clipboard Menu, or via the Alt-C S quick key combinations. Its purpose is to allow you to copy all or just selected text from the main client window area into the clipboard, from whence you can paste it into other applications. To copy all the contents into the clipboard, simply use the Clipboard - Copy all sub-menu (or Alt-C A quick keys) To copy selected contents into the clipboard , simply select them as usual by clicking the mouse at the start of text to be selected and dragging it to the end of the required text, then use the Clipboard - Copy all sub-menu (or Alt-C S quick keys). MSL Terminal Manual Release 2.0 September 2000 Page 25 The 'Timestamp' Menu item Clicking the left mouse button on the Timestamp Menu, or via the Alt-T quick key combination accesses this option. Its purpose is to allow you to encode or decode the time stamps reported by many of the replies received from MSL instruments. Note that the Timestamps do not encode the YEAR, so it does not feature in this window. When you select this menu you will see a window like this... Its use is fairly obvious: MSL Instruments using the old platform could only work to 1-minute timestamp resolution. The newer platform can work to 1-second resolution, although not all do, because not all need do so. The two radio buttons allow you to change between the two types of timestamp resolution. There are 4 options for copying information to and from the clipboard. One of the most common uses is to copy a timestamp from the terminal window by highlighting it and using the Clipboard - Copy Selected Text menu. Then if you click 'Copy Timestamp to clipboard', it will be placed in the timestamp window and automatically converted to show the decoded Day, Month, Hours, Minutes (secs if to 1-second resolution) in the appropriate screen boxes. Copy Date/Time To Clipboard takes the information from the Day, Month, Hours, Minutes (secs if to 1-second resolution) screen boxes, converts it to text of the form DD/MM HH:MM:SS, and places it in the clipboard - to be pasted elsewhere if you wish. There is a button that lets you view the text in the clipboard. The 'Now' button reads the date and time from the PC and displays it coded and as the Day, Month, Hours Minutes (secs if to 1-second resolution) in the appropriate screen boxes. The button 'Close this form' shuts the Timestamp window. Page 26 MSL Terminal Manual Release 2.0 September 2000 The 'About Menu item Clicking the About menu item, or using the Alt-A quick key combination causes a window to pop up giving details of the version of MSL Terminal, together with MSL's telephone and fax numbers. If you have any problems with, or suggestions about 'MSL Terminal', please do not hesitate to contact MSL. Some versions after Version 1.10 and later have another sub-menu item - 'Software key'. Clicking this will cause the program to look for the software protection key and report what type of key it is and which MSL programs it permits you to use. Later versions abandoned the requirement for a software key to run MSL Terminal. *** End of manual - index follows *** MSL Terminal Manual Release 2.0 September 2000 Page 27 MSL Terminal Manual Release 2.0 September 2000 INDEX * E *L 18 *R.................................................................................18 *U.................................................................................18 echo ..............................................................................9 Echo..............................................................................7 Exit ..............................................................................20 . F .CMD ...........................................................................18 File - Exit menu .........................................................20 FILE main menu........................................................15 File Menu ...................................................................11 File menu Exit item ...................................................14 Flow control .................................................................6 folder .............................................................................3 font ..............................................................................23 Force Upper Case ....................................................24 A About menu................................................................27 ASCII.....................................................1, 12, 13, 15, 18 B background colour ....................................................23 baud rate ....................................................................21 Baud rate......................................................................6 bits .................................................................................7 buffer...........................................................................13 Buffer Send ..........................................................11, 25 Buffer send text box..................................................24 Buffer Send Text Box ...............................................12 H handshaking ................................................................6 Hang up phone..........................................................22 Help Menu..................................................................11 I install.............................................................................2 C caption bar .................................................................10 carriage return ...........................................................12 Clear Window ............................................................23 Clipboard Menu ...................................................11, 25 Close Log File............................................................16 Command files...........................................................17 CommPort menu .........................................................9 Communications Port Menu ....................................11 Communications setting.............................................5 communications settings window .............................8 communications set-up ..............................................9 ComPort Menu ..........................................................21 CR ...............................................................................25 CR/LF..........................................................................25 CTS ...............................................................................6 L LF ................................................................................25 line terminators..........................................................12 log file ...................................................................12, 15 M Main Terminal window ...............................................9 Make Default ...............................................................5 Menu bar ....................................................................10 modem....................................................................1, 22 multi-dropped configuration.......................................6 O Open Log File ............................................................15 Options Menu ............................................................11 D data bits ........................................................................7 date convention .........................................................13 DCE...............................................................................6 Dial a phone number ................................................22 directory........................................................................3 DOS format ................................................................18 drive ..............................................................................3 drop-down menu .......................................................10 DTE ...............................................................................6 P parity ...........................................................................21 Parity bit .......................................................................7 Port Open...................................................................21 Program Manager .......................................................4 purpose of the program..............................................1 Q quick keys ..................................................................11 MSL Terminal Manual Release 2.0 September 2000 R radio buttons ................................................................5 RT..................................................................................6 run 'MSL Terminal' ......................................................4 S screen shots.................................................................4 scroll bars ...................................................................12 serial port......................................................................5 Settings Menu............................................................21 set-up ............................................................................3 Software key ..............................................................27 Start Menu....................................................................4 Status bar ...................................................................11 Stop bits........................................................................7 sub-directory ................................................................3 T terminal emulator ........................................................1 Terminal screen ..........................................................5 Text Case' Menu .......................................................24 text colour...................................................................23 Timestamp Menu ......................................................11 Timestamps ...............................................................26 Transmit a Text File..................................................17 U UART ..........................................................................14 UPPER CASE ...........................................................14 W Window Menu............................................................11 Windows.......................................................................2 X XON/RTS .....................................................................7 XOn/XOff......................................................................6 MSL Terminal Manual Release 2.0 September 2000 Design improvements may be made without notice. Represented by: CAPITAL CONTROLS Severn Trent Services 3000 Advance Lane Colmar, PA 18915 Tel: 215-997-4000 • Fax: 215-997-4062 Web: www.severntrentservices.com E-mail: [email protected] UNITED KINGDOM • UNITED STATES • HONG KONG ITALY • MALAYSIA 08/06 223.6020.2 Copyright 2005 Severn Trent Services - 36 -